Craving that crispy, sweet, and savory bite from Pei Wei’s Sesame Chicken? You’re not alone! I’ve created a simple copycat recipe that brings those amazing flavors right to your kitchen. With easy steps and pantry-friendly ingredients, you'll impress friends and family in no time. Ready to dive into this tasty dish? Let’s get cooking!
Why I Love This Recipe
- Delicious Flavor: This sesame chicken is packed with a savory-sweet flavor that perfectly balances the richness of the fried chicken and the tanginess of the sauce.
- Crispy Texture: The combination of cornstarch and flour creates a wonderfully crispy coating that adds a satisfying crunch to each bite.
- Easy to Make: This recipe is straightforward and quick, making it perfect for a weeknight dinner without sacrificing taste.
- Customizable: You can easily adjust the ingredients and add your favorite vegetables or spices to make this dish your own.
Ingredients
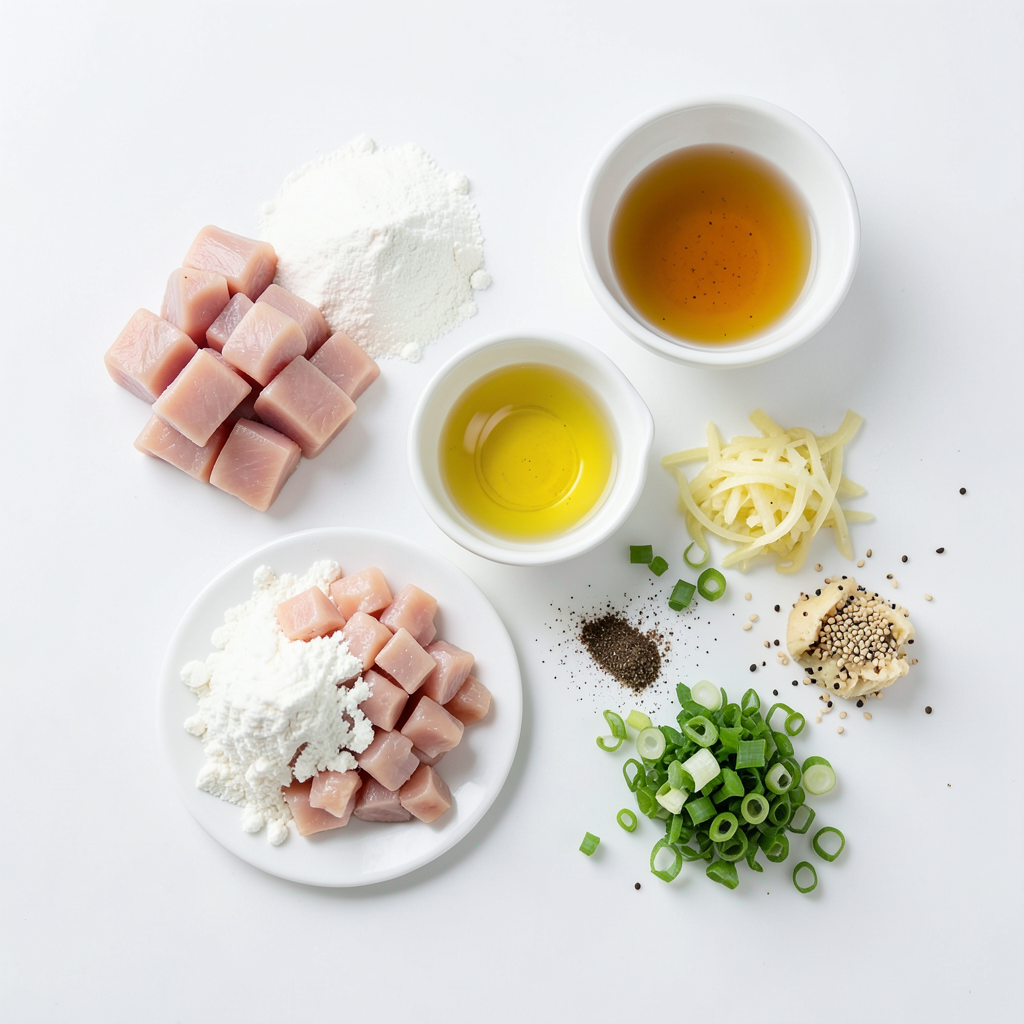
List of Ingredients
- 1 lb chicken breast, cut into bite-sized pieces
- 1/2 cup cornstarch
- 1/2 cup all-purpose flour
- 2 large eggs, beaten
- 1 cup vegetable oil (for frying)
- 1/4 cup sesame oil
- 1/4 cup low-sodium soy sauce
- 1/4 cup honey
- 1 tablespoon rice vinegar
- 1 tablespoon ginger, grated
- 2 cloves garlic, minced
- 1 tablespoon sesame seeds
- 3 green onions, chopped (for garnish)
- Salt and pepper to taste
Key Flavor Enhancers
The magic of this dish lies in its flavor. First, sesame oil gives a rich, nutty taste. Low-sodium soy sauce adds a savory depth without being too salty. Honey brings sweetness, balancing the strong flavors. Ginger and garlic add brightness and warmth, making each bite exciting. Don’t skip the sesame seeds; they add texture and a slight crunch. Green onions make a fresh and colorful garnish, enhancing the overall look and flavor.
Substitute Options for Ingredients
If you lack an ingredient, don’t worry! You can swap chicken breast for chicken thighs for more flavor. Cornstarch can be replaced with potato starch if needed. If you want a gluten-free version, use gluten-free soy sauce. For honey, maple syrup works well as a sweetener. If you don’t have rice vinegar, regular vinegar can substitute, but use less, as it is stronger. Adjust seasonings based on your taste.
Step-by-Step Instructions
Preparation of Chicken
Start by getting your chicken ready. Take 1 pound of chicken breast and cut it into bite-sized pieces. In a large bowl, mix 1/2 cup of cornstarch and 1/2 cup of all-purpose flour. Add a pinch of salt and pepper for taste. Dip each chicken piece into 2 beaten eggs, making sure to shake off the extra egg. Now, coat each piece with the flour-cornstarch mix. This will give your chicken a nice crunch.
Cooking the Chicken
Next, heat 1 cup of vegetable oil in a large skillet over medium-high heat. When the oil is hot, add the chicken pieces in batches. Fry them for about 4-5 minutes until they turn golden brown and crispy. It’s key to fry in batches so they cook evenly. Once done, take them out and let them drain on paper towels. This helps keep them crispy.
Making the Sesame Sauce
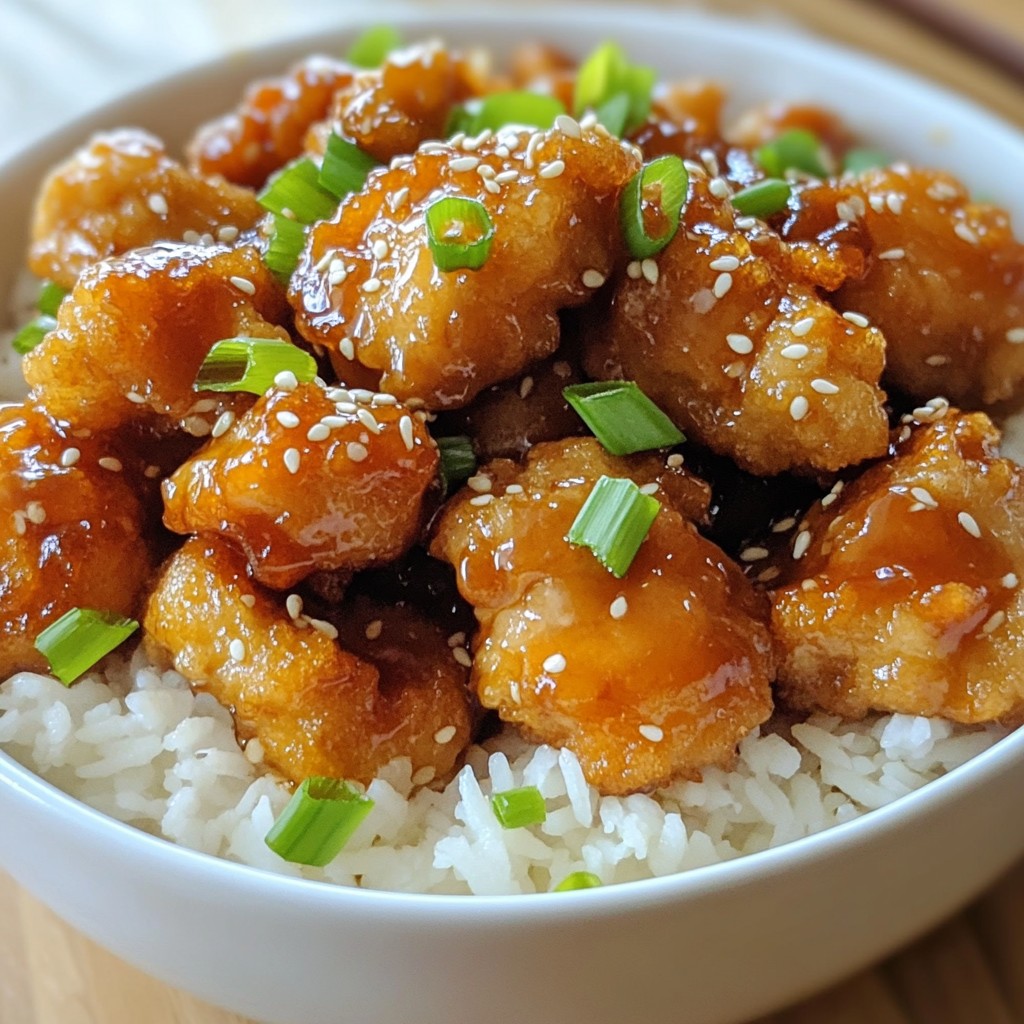
Now, let’s make the sauce! In a separate saucepan, mix together 1/4 cup of sesame oil, 1/4 cup of low-sodium soy sauce, 1/4 cup of honey, 1 tablespoon of rice vinegar, 1 tablespoon of grated ginger, and 2 minced garlic cloves. Heat this mix over medium heat. Stir occasionally until it starts to simmer, about 3-4 minutes. Once simmering, add your crispy chicken to the pan. Toss gently to coat every piece with the sauce. Finally, sprinkle 1 tablespoon of sesame seeds on top and give it another gentle toss.
Tips & Tricks
Achieving Perfect Crispiness
To get that nice crunch, use cornstarch and flour. Mix them well with salt and pepper. After coating the chicken, let it sit for a few minutes. This helps the batter stick better. Fry in hot oil, about 350°F, to ensure it crisps up fast. Fry in small batches to avoid steaming the chicken. This keeps it crispy and delicious.
Balancing Flavors for Authenticity
For true flavor, use low-sodium soy sauce. Honey adds sweetness, while rice vinegar gives a nice tang. Fresh ginger and garlic bring warmth and depth. Adjust these ingredients to match your taste. If you want more heat, add a dash of chili sauce. This will give your dish a kick and make it even more tasty.
Timing for Best Results
Timing is key for perfect sesame chicken. Fry each batch for 4-5 minutes until golden brown. Don’t rush the frying; this is what makes it crispy. When mixing the chicken with the sauce, do it gently. This helps keep the crispiness intact. Serve right away for the best flavor and texture. Enjoy it hot with steamed rice or veggies!
Pro Tips
- Golden Brown Perfection: Ensure your oil is hot enough before adding the chicken; this will help achieve that perfect crispy texture.
- Coating Secrets: For extra crunch, let the coated chicken pieces rest for a few minutes before frying to allow the coating to adhere better.
- Flavor Boost: Marinate the chicken in soy sauce and ginger for 30 minutes before coating for an added depth of flavor.
- Serving Style: Drizzle extra sauce over the chicken just before serving for an appealing glossy finish and enhanced flavor.
Variations
Different Proteins to Use
You can swap chicken for other proteins. Try shrimp, beef, or pork. Each gives a unique taste. For shrimp, cook until pink. For beef, use thin strips. Pork works well, too. Just adjust cooking times to keep everything tender and juicy.
Vegetarian or Vegan Alternatives
For a vegetarian option, use tofu or tempeh. Press and cube tofu for better texture. Coat it like the chicken and fry until crispy. Tempeh can also be sliced and cooked in the same way. For a vegan dish, replace honey with maple syrup or agave nectar. This keeps the sweet flavor while staying plant-based.
Flavor Modifications
You can easily tweak the sauce for different tastes. Add more ginger for a spicy kick. Want a tangy flavor? Increase the rice vinegar. You can also mix in chili paste for heat. If you love nuts, toss in some chopped cashews or peanuts for crunch. Experimenting lets you find your perfect flavor.
Storage Info
How to Store Leftovers
To keep your sesame chicken fresh, place leftovers in an airtight container. Make sure to store it in the fridge. It stays good for up to three days. If you want to keep it longer, consider freezing it.
Reheating Tips for Best Taste
When you reheat sesame chicken, use a skillet for the best flavor. Heat it on medium-low heat. Add a splash of water to keep it moist. Stir often until it’s warmed through. This method helps maintain that crispy texture.
Freezing Guidelines
If you freeze sesame chicken, let it cool completely first. Place it in a freezer-safe bag or container. It can last up to three months in the freezer. When you’re ready to eat, thaw it in the fridge overnight before reheating. This keeps the taste and texture just right.
FAQs
What is the origin of Sesame Chicken?
Sesame chicken comes from Chinese cuisine. It is popular in American Chinese restaurants. This dish blends crispy chicken with sweet and savory sauce. It features sesame seeds, adding a nice crunch. Many believe it has roots in Hunan or Cantonese cooking. Over time, it became a favorite in the U.S. People love its taste and easy preparation.
How can I make this dish gluten-free?
To make gluten-free sesame chicken, swap regular soy sauce for gluten-free soy sauce. You can also use tamari, which is a gluten-free option. Replace all-purpose flour with a gluten-free flour blend. Cornstarch works great in this mix, so keep that. Follow the rest of the recipe as is. You will enjoy all the flavor without gluten.
What sides pair well with Sesame Chicken?
Many sides go well with sesame chicken. Here are some great options:
- Steamed rice
- Fried rice
- Stir-fried vegetables
- Broccoli
- Snap peas
- Egg rolls
- Spring rolls
These sides add color and taste to your meal. They also enhance the dining experience.
This guide covered all you need for a great Sesame Chicken. We explored key ingredients and great substitutes. You learned how to prepare, cook, and make a tasty sesame sauce. Tips helped with crispiness and flavor balance. We also discussed fun variations and storage tricks.
In the end, you can enjoy this dish however you want. With these steps, you'll impress anyone at your table. Enjoy your cooking!