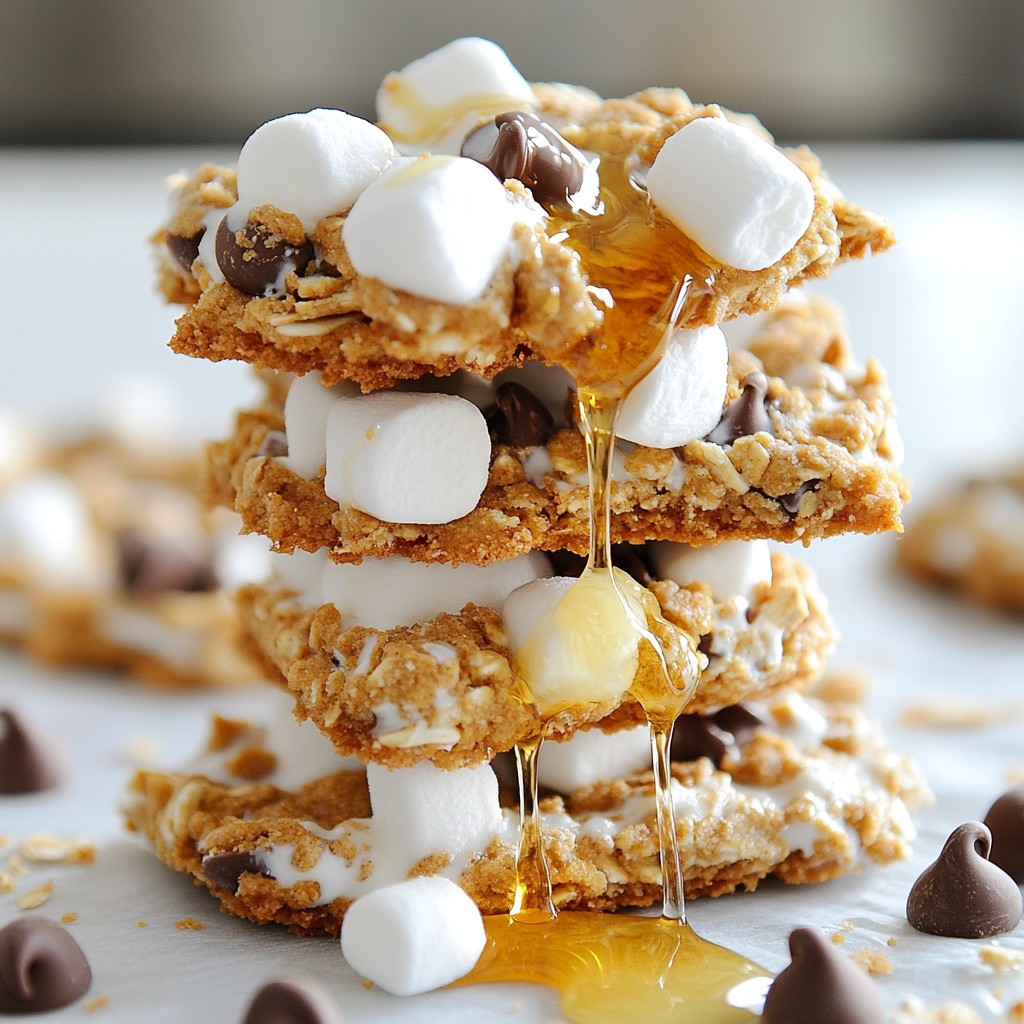
Get ready to satisfy your sweet tooth with these S’mores No-Bake Cookies! You can whip up this easy and delicious treat without turning on the oven. Made with simple ingredients, they capture that classic campfire flavor in every bite. Whether you’re a beginner or a baking pro, my step-by-step guide will help you create the perfect cookies. Let’s dive right in and make some tasty memories!
Why I Love This Recipe
- Quick and Easy: This recipe requires no baking, making it a hassle-free treat that can be whipped up in just 15 minutes.
- Perfect for Any Occasion: Whether it's a family gathering, a sleepover, or just a sweet craving, these cookies are a hit with everyone.
- Customizable: Feel free to swap out ingredients, such as different nut butters or add-ins like dried fruit, to make these cookies your own.
- Delicious S'mores Flavor: These cookies capture the classic s'mores taste without the need for a campfire, bringing nostalgia in every bite!
Ingredients
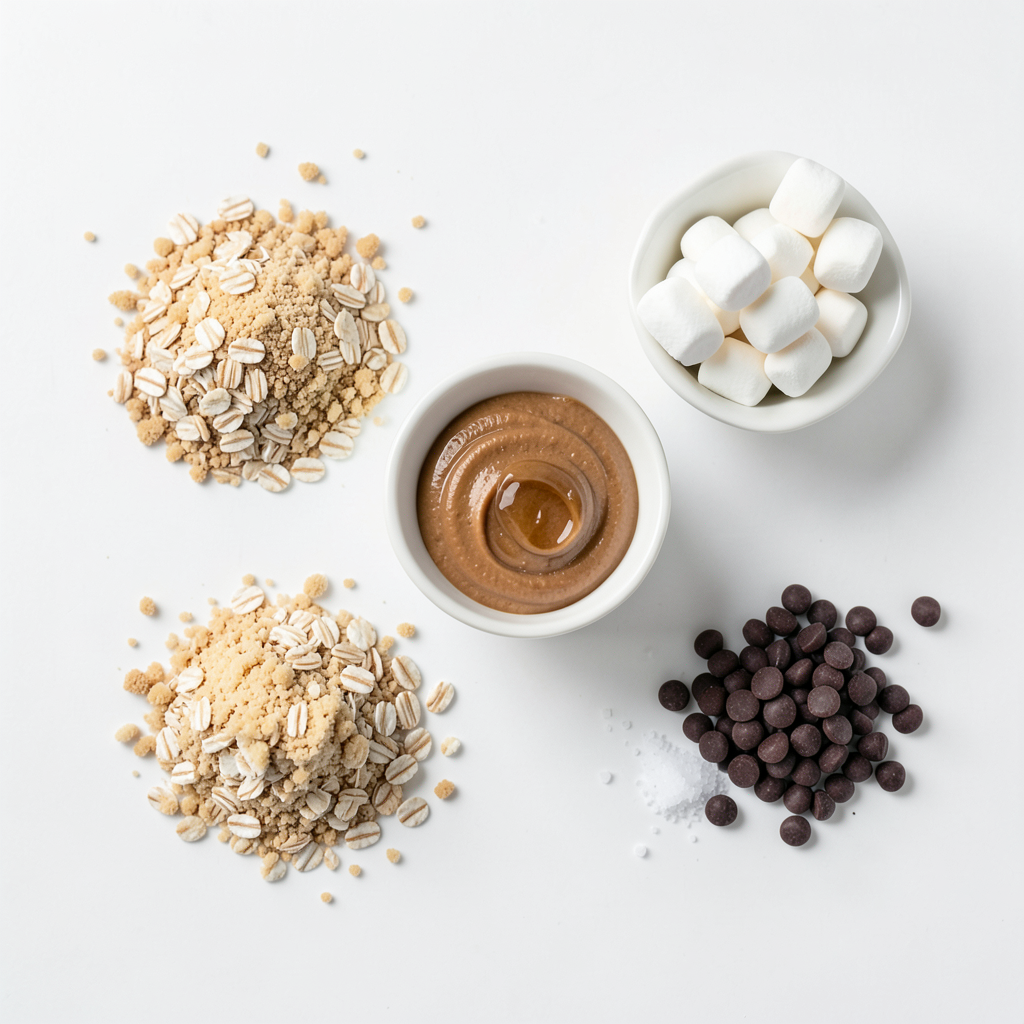
List of Ingredients
- 1 cup graham cracker crumbs
- 1/2 cup rolled oats
- 1/2 cup smooth peanut butter
- 1/4 cup honey or maple syrup
- 1 teaspoon vanilla extract
- 1 cup mini marshmallows
- 1/2 cup semi-sweet chocolate chips
- Pinch of salt
For S’mores No-Bake Cookies, using the right ingredients matters. Each one plays a key role in flavor and texture. I use graham cracker crumbs for that classic S’mores taste. Rolled oats add a nice chewiness. Smooth peanut butter gives the cookies richness. Honey or maple syrup binds everything together while adding sweetness.
If you need alternatives, you can swap honey for agave syrup. For nut allergies, try sun butter instead of peanut butter. Your choices can change the flavor and texture, so pick what you love.
Quality is key. Use fresh ingredients for the best taste. Old chocolate chips or stale oats can ruin your cookies. Always check dates on packages. For mini marshmallows, I prefer soft, fluffy ones. They melt in your mouth and add sweetness.
Choosing high-quality ingredients ensures that your S’mores No-Bake Cookies will be a hit every time!
Step-by-Step Instructions
Preparation Steps
First, gather your ingredients. This step makes cooking easier. Take a medium bowl. Add 1 cup of graham cracker crumbs. Then, add 1/2 cup of rolled oats and a pinch of salt. Mix these dry ingredients well. In another bowl, whisk together 1/2 cup of smooth peanut butter, 1/4 cup of honey (or maple syrup), and 1 teaspoon of vanilla extract. Mix until smooth and creamy.
Forming the Cookie Mixture
Now, pour the wet mixture into the bowl with the dry ingredients. Stir the two mixtures. Keep mixing until they blend into a thick, manageable dough. Next, gently fold in 1 cup of mini marshmallows and 1/2 cup of semi-sweet chocolate chips. Make sure they spread evenly throughout the dough.
Setting the Cookies
Line an 8x8 inch pan with parchment paper. Using your hands or a spatula, press the mixture into the bottom of the pan. Make sure it’s a flat layer. Then, refrigerate the pan for at least 1 hour. This step helps the cookies firm up. Once set, take them out and cut into squares or bars. Enjoy your delicious treat!
Tips & Tricks
Recipe Success Tips
- To stop sticking, use parchment paper in the pan. This helps lift the cookies out easily.
- If the mixture feels too dry, add a bit more peanut butter or honey. Mix well.
- For the best flavor, use high-quality chocolate chips. They make a big difference.
Presentation Suggestions
- Stack the cookies on a nice dessert platter. This makes them look inviting.
- Top the cookies with extra mini marshmallows and chocolate chips. This adds color and fun.
- Serve with a glass of cold milk. It completes the S’mores experience perfectly.
Pro Tips
- Use Fresh Ingredients: Always ensure your marshmallows and chocolate chips are fresh for the best taste and texture.
- Chill Time Matters: Allow the cookies to chill for a full hour to ensure they firm up properly and hold their shape.
- Customize Your Mix-ins: Feel free to add nuts, dried fruits, or even different types of chocolate to enhance the flavor profile.
- Perfect Portioning: Use a sharp knife to cut the bars after they've set; this will give you clean edges and a more appealing look.
Variations
Flavor and Ingredient Variations
You can have fun with S’mores No-Bake Cookies by changing the flavors and ingredients. Here are some ideas:
- Using different nut butters: Try almond butter, cashew butter, or sun butter instead of peanut butter. Each nut butter adds its own taste. Almond butter gives a nutty flavor, while sun butter is a great choice for nut-free diets.
- Replacing chocolate chips with other mix-ins: Get creative! Use white chocolate chips, butterscotch chips, or even dried fruits. Each option will change the taste and make your cookies unique.
- Adjusting sweetness with different syrups: While honey or maple syrup works well, you can also try agave syrup or brown rice syrup. Each syrup will add a different sweetness level, so choose what you like best.
Dietary Modifications
If you have dietary needs, you can still enjoy these cookies. Here are some easy swaps:
- Gluten-free options: Use gluten-free graham crackers or gluten-free rolled oats. This way, you can keep all the tasty flavors without gluten.
- Vegan alternatives: Replace honey with maple syrup or agave syrup. For the chocolate chips, choose dairy-free options. This makes the recipe vegan-friendly while still being delicious.
These variations and modifications let you tailor the S’mores No-Bake Cookies to your taste. Enjoy your treats!
Storage Info
Best Storage Practices
To keep your S’mores No-Bake Cookies fresh, store them in an airtight container. This method prevents moisture loss and keeps them from drying out. Place a sheet of parchment paper between layers if you stack the cookies. This tip avoids sticking and helps keep their shape.
The ideal room temperature for storage is cool, around 68°F to 72°F. Avoid leaving them in direct sunlight or near heat sources. If you want to enjoy them later, refrigeration can also help maintain their texture. Just remember, the cookies will firm up in the fridge, so let them sit at room temperature for a few minutes before enjoying.
Freezing Instructions
Freezing S’mores No-Bake Cookies is simple and effective. First, cut the cookies into squares or bars. Wrap each piece tightly in plastic wrap or foil. This step prevents freezer burn and keeps them tasty.
Next, place the wrapped cookies in a freezer-safe bag or container. Label the container with the date for easy tracking. You can freeze them for up to three months. When you're ready to eat, take out the cookies and let them thaw in the fridge overnight. For a quick treat, leave them out at room temperature for about an hour. Enjoy your delicious cookies anytime!
FAQs
Common Questions
Can I make these cookies ahead of time? Yes, you can make these cookies ahead of time. They taste great after chilling. Just keep them in the fridge for up to a week. If you plan to serve them later, cut them into squares and store them in an airtight container.
What can I use instead of graham cracker crumbs? If you don’t have graham cracker crumbs, use vanilla wafer crumbs or crushed digestive biscuits. Both options will still give you that sweet, crunchy base. You can even try crushed pretzels for a salty twist!
How long do these cookies last? These cookies last about one week in the fridge. You can also freeze them for longer storage. Just make sure they are in an airtight container to keep them fresh.
Troubleshooting
What to do if the mixture is too dry or too wet? If the mixture is too dry, add a bit more honey or peanut butter. Mix it well until the texture feels right. If it’s too wet, add more graham cracker crumbs or oats to absorb excess moisture.
How to keep the cookies from becoming too hard? To prevent the cookies from getting hard, don’t over-refrigerate them. One hour is enough to set them. Store them in an airtight container at room temperature to keep them soft and chewy.
You now have all the steps to make S’mores No-Bake Cookies. We covered the key ingredients, preparation, and tips for success. Remember to choose good-quality ingredients for the best taste. Don’t hesitate to try different flavors or dietary options. These cookies are easy to store and can last a while if done right. I hope you enjoy making and sharing these fun treats! Happy baking!