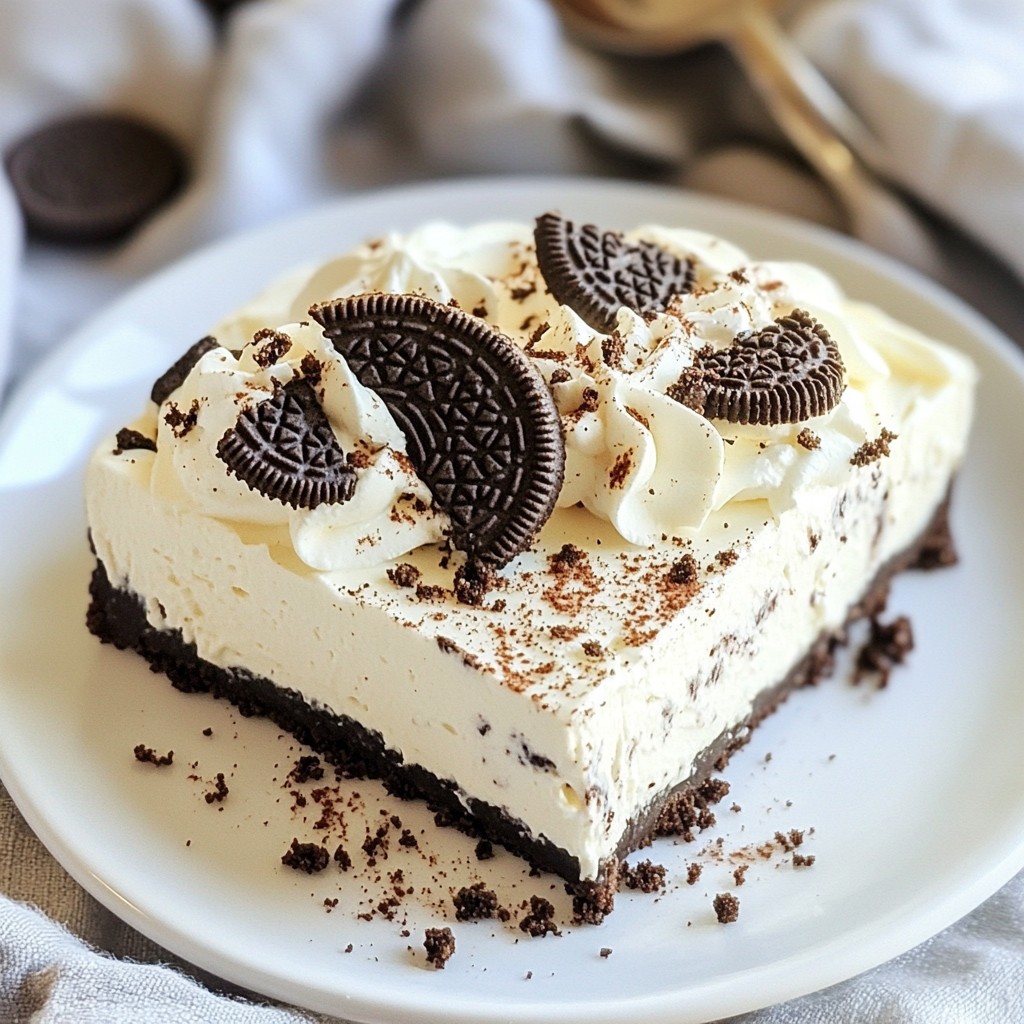
Looking for a simple and tasty dessert? This No Bake Oreo Cheesecake is just what you need! With just a few ingredients, you can whip up a creamy, dreamy treat in no time. I’ll guide you through each step, share tips for the best texture, and even suggest fun variations. Whether you want to impress guests or satisfy a sweet tooth, keep reading to learn how to make this easy dessert!
Why I Love This Recipe
- Indulgent Flavor: This cheesecake is a chocolate lover's dream with rich Oreo flavor in every bite.
- No Baking Required: Perfect for warm days or quick desserts, this cheesecake sets in the fridge without the need for an oven.
- Easy to Make: The simple steps make it accessible for bakers of all skill levels, ensuring success every time.
- Customizable: Add your own twist with different toppings or mix-ins for a unique dessert experience.
Ingredients
List of Ingredients
To make the No Bake Oreo Cheesecake, you will need:
- 24 Oreo cookies (crushed, plus extra for topping)
- 1/2 cup unsalted butter (melted)
- 2 cups cream cheese (softened)
- 1 cup powdered sugar
- 1 teaspoon vanilla extract
- 1 cup heavy whipping cream
- 1 cup sour cream
- A sprinkle of cocoa powder (for garnish)
These ingredients come together to create a rich and creamy dessert. The crushed Oreos form a tasty crust that pairs well with the smooth cheesecake filling.
Optional Toppings
You can add some fun toppings to your cheesecake to make it even better! Consider using:
- Extra crushed Oreo cookies
- Whipped cream on top
- Chocolate shavings
- Fresh berries for a fruity touch
These toppings add flavor and make your dessert look fancy and inviting.
Ingredient Substitutions
If you want to switch things up, here are some easy swaps:
- Use gluten-free cookies for a gluten-free version.
- Swap heavy cream with coconut cream for a dairy-free option.
- Replace sour cream with Greek yogurt for a tangy twist.
These substitutions keep the essence of the cheesecake while catering to different diets or preferences.

Step-by-Step Instructions
Preparing the Crust
To start, gather your 24 Oreo cookies and crush them into fine crumbs. You can use a food processor or place them in a zip-top bag and crush with a rolling pin. Next, melt 1/2 cup of unsalted butter. In a medium bowl, mix the crushed cookies with the melted butter. Stir until the crumbs are well coated. This will help form a solid crust.
Now, take a 9-inch springform pan. Press the Oreo mixture firmly into the bottom. Use the back of a measuring cup to pack it down tightly. This step is key for a sturdy base.
Making the Cheesecake Filling
In a large mixing bowl, add 2 cups of softened cream cheese. Beat it with an electric mixer until it is smooth and creamy. This should take about 2 minutes. Now, gradually add 1 cup of powdered sugar and 1 teaspoon of vanilla extract. Mix until everything is well combined.
In a separate bowl, pour in 1 cup of heavy whipping cream. Whip it until stiff peaks form. This means it should hold its shape when you lift the beaters. Gently fold the whipped cream into the cream cheese mixture. Be careful not to deflate the cream.
Next, add 1 cup of sour cream to the mix. Fold until the mixture is completely smooth. Check for lumps, as you want a nice, creamy filling.
Assembling the Cheesecake
Pour the cheesecake filling over the prepared crust in the springform pan. Use a spatula to spread it evenly. This will ensure every slice looks great.
For the finishing touch, crush some extra Oreo cookies and sprinkle them on top. This adds a nice crunch and look. Now, cover the cheesecake with plastic wrap. Place it in the fridge for at least 4 hours or overnight. This helps it set properly.
When ready to serve, carefully remove the sides of the springform pan. Slice the cheesecake and enjoy! Add whipped cream on top for an extra treat.
Tips & Tricks
Achieving the Perfect Texture
To get a smooth and creamy cheesecake, make sure your cream cheese is soft. I let it sit out for about 30 minutes before mixing. Mix it well until there are no lumps. When you add the whipped cream, fold it gently. This keeps the mix light and fluffy.
How to Prevent Cracking
Cracking can ruin the look of your cheesecake. To avoid this, chill it slowly. After mixing, cover it tightly and place it in the fridge. Avoid opening the fridge door too often. Also, try not to overbeat the cream cheese. Overmixing can add too much air, leading to cracks.
Serving Suggestions
When it's time to serve, think about presentation. I love adding a dollop of whipped cream on each slice. A sprinkle of cocoa powder or chocolate shavings adds a nice touch. For a fun twist, you could add fresh berries on the side. They provide a pop of color and taste great with the cheesecake.
Pro Tips
- Crust Consistency: Make sure to pack the Oreo crust tightly in the springform pan to prevent it from crumbling when you slice the cheesecake.
- Room Temperature Ingredients: Allow the cream cheese and sour cream to come to room temperature before mixing for a smoother texture and easier blending.
- Chill Time: For the best flavor and texture, refrigerate the cheesecake overnight. This will enhance the creamy consistency and help the flavors meld.
- Garnishing Tips: Use a microplane to create fine chocolate shavings or curls for an elegant touch on top of each slice when serving.
Variations
Adding Flavor Additions
You can easily change the taste of your no bake Oreo cheesecake. Try mixing in different flavors. For a chocolate boost, add melted chocolate to the cream cheese mix. You can also use peanut butter for a nutty twist. Another idea is to add a splash of coffee for a mocha flavor. These flavors blend well and make the cheesecake even more fun!
Different Cookie Options
While Oreos are great, you can swap them for other cookies. Try using chocolate sandwich cookies or even graham crackers for a different base. You can also use flavored cookies like mint or lemon for a unique taste. Each cookie choice can change the whole vibe of the cheesecake. Experiment and find your favorite!
Healthier Substitutes
You can make this cheesecake a bit healthier with some easy swaps. Use low-fat cream cheese instead of regular cream cheese. Greek yogurt can replace sour cream for added protein. If you want to cut sugar, use a sugar substitute in the cream cheese mix. These small changes can make your dessert lighter without losing flavor.
Storage Info
How to Store Leftovers
To store leftovers, wrap the cheesecake tightly with plastic wrap. You can also use a lid if your springform pan has one. Keep it in the fridge. This way, it stays fresh for later. Make sure to eat it within a few days for the best taste.
Freezing Instructions
You can freeze this cheesecake if you want to keep it longer. First, let it cool completely. Then, slice it into pieces. Wrap each slice in plastic wrap. Place the slices in an airtight container or freezer bag. This helps prevent freezer burn. You can freeze it for up to three months.
Shelf Life
The cheesecake stays good in the fridge for about 5 days. If frozen, it lasts about three months. Just remember to let it thaw in the fridge overnight before you eat it. This helps keep the texture smooth and creamy.
FAQs
Can I make this cheesecake in advance?
Yes, you can make this cheesecake ahead of time. It tastes even better after chilling. I suggest making it the night before. This way, it will have enough time to set. Just cover it well with plastic wrap or foil. When you are ready to serve, remove it from the fridge.
What can I use instead of cream cheese?
If you need a cream cheese substitute, try mascarpone cheese. It has a similar texture and taste. You can also use Greek yogurt for a lighter option. Just remember that this may change the flavor a bit.
How do I know when the cheesecake is set?
You can tell the cheesecake is set when it has a firm texture. Gently shake the pan to check. If the center jiggles slightly, it needs more time. Refrigerate it for a bit longer if needed. Once it feels firm, it’s ready to slice and serve!
You now know how to make a great cheesecake. We covered the key ingredients and how to swap them. You learned the step-by-step process for making the crust, filling, and assembly. Tips on texture and serving will help you impress anyone. We also explored variations for fun new flavors and healthier options. Lastly, you know how to store leftovers for later. With this knowledge, you can create your perfect cheesecake any time. Happy baking!