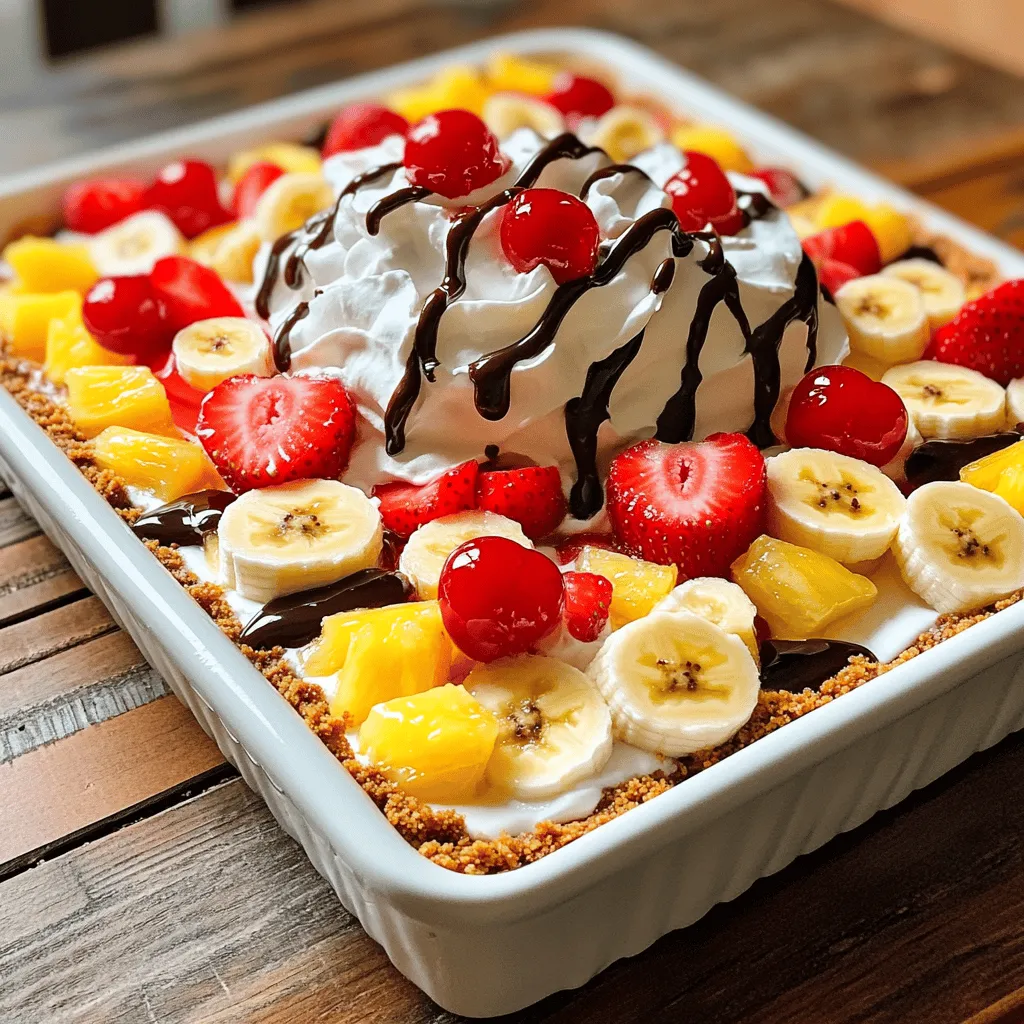
Craving something sweet and easy to whip up? This No-Bake Banana Split Cake is your answer! With creamy layers and fresh fruit, it’s a hit for any gathering. You won’t need an oven, just a few simple steps to create this delightful treat. Whether you’re serving friends or family, it’s sure to impress. Let’s dive into the ingredients and get you started on this scrumptious cake!
Ingredients
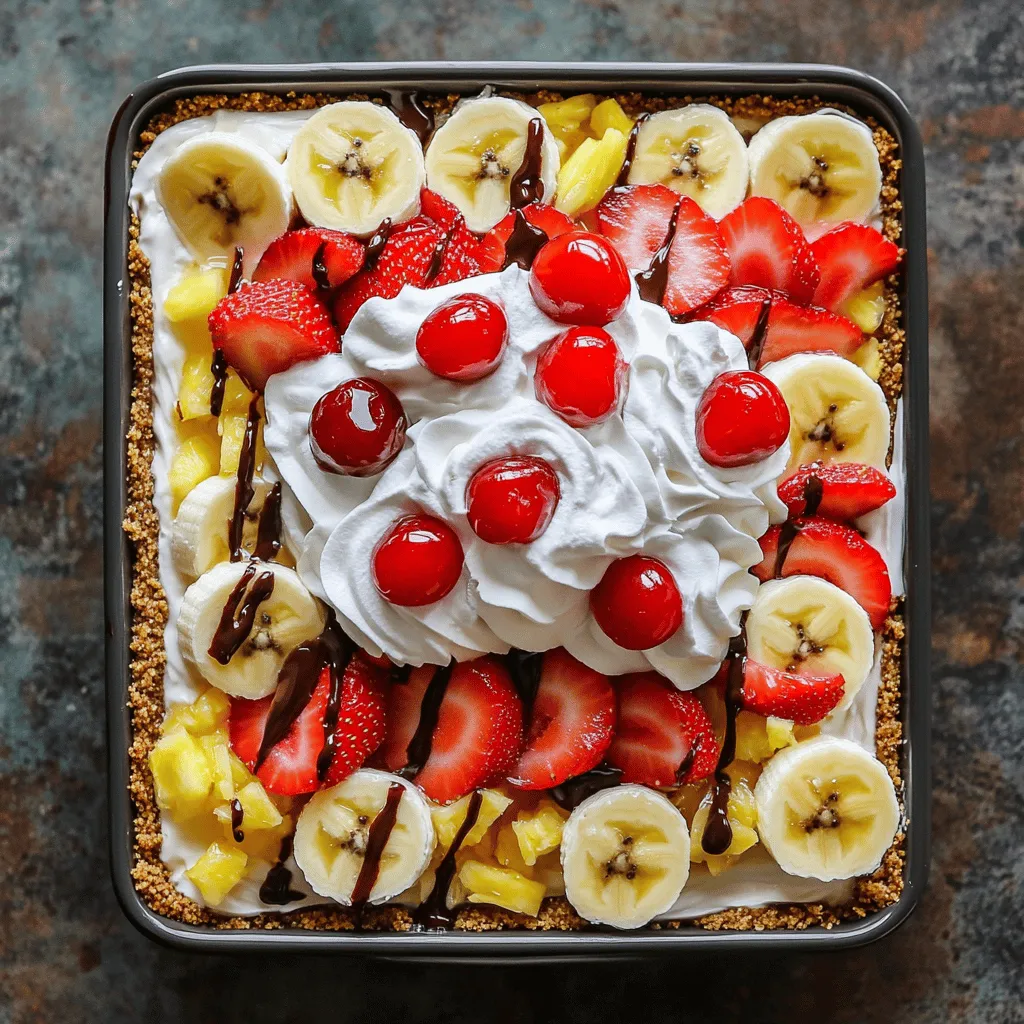
Complete list of ingredients
To make this No-Bake Banana Split Cake, gather these ingredients:
– 1 ½ cups graham cracker crumbs
– ½ cup unsalted butter, melted
– 1 cup powdered sugar
– 8 oz cream cheese, softened
– 1 cup heavy whipping cream
– 2 ripe bananas, sliced
– 1 cup sliced strawberries
– 1 cup crushed pineapple, drained
– ½ cup chocolate syrup
– ½ cup chopped walnuts (optional)
– Whipped cream for topping
– Maraschino cherries for garnish
Measurements and notes
For best results, measure each ingredient carefully. Use a clear measuring cup for liquids. Softened cream cheese blends well with powdered sugar. The butter needs to be melted to mix well with the graham cracker crumbs. Chill the cake for at least four hours for it to set. This allows the flavors to blend perfectly.
Substitutions for dietary needs
If you have dietary concerns, here are some easy swaps:
– Use gluten-free graham crackers for a gluten-free option.
– Replace cream cheese with a dairy-free cream cheese for vegan needs.
– If you can’t have walnuts, try using chopped pecans or leave them out.
– For a lower sugar option, use a sugar substitute in place of powdered sugar.
These substitutions keep the yummy flavors while meeting your needs.
Step-by-Step Instructions
Preparation of the crust
To start, gather your graham cracker crumbs and melted butter. In a mixing bowl, mix the crumbs and butter together. Use a fork or your hands to blend until it looks like wet sand. Next, press this mixture firmly into the bottom of a 9×13 inch baking dish. This will form your tasty crust. Make sure it is even and compact. This step is key for a strong base.
Making the cream cheese filling
Now, take another bowl and add your softened cream cheese and powdered sugar. Beat these together until the mix is smooth and creamy. You want to avoid lumps for a nice texture. In a separate bowl, whip the heavy cream until it forms stiff peaks. This means when you pull the beaters out, the cream holds its shape. Gently fold this whipped cream into the cream cheese mixture. Do this carefully to keep the fluffiness.
Assembling the layers
Once your cream cheese filling is ready, it’s time to layer! Start by spreading half of the cream cheese mix over your crust. Then, add half of your banana slices, strawberries, and crushed pineapple on top. Drizzle half of the chocolate syrup over the fruit. If you like nuts, sprinkle some chopped walnuts now. Repeat this process with the remaining cream cheese mix, fruits, and syrup. Finally, top it all off with a thick layer of whipped cream. Garnish with maraschino cherries for a fun touch. Refrigerate your cake for at least four hours, or overnight for the best results. Enjoy the sweet treat!
Tips & Tricks
How to perfect the whipped cream
To get great whipped cream, start with cold tools. Use a chilled bowl and beaters. Pour in the heavy cream and whip until you see stiff peaks. This means it holds its shape. Be gentle when folding it into the cream cheese mixture. This keeps the whipped cream fluffy and light.
Presentation ideas for serving
For a lovely display, cut the cake into neat squares. Place each piece on a plate. Drizzle extra chocolate syrup on top for flair. Add a slice of banana on the side for color. You can also sprinkle walnuts on top for crunch. Finish with a maraschino cherry for that classic look.
Common mistakes to avoid
One mistake you might make is overmixing the whipped cream. This can make it grainy. Another issue is not chilling the cake long enough. This makes it hard to cut and serve. Use a sharp knife to slice through the layers cleanly. Lastly, don’t skip the fruit! It adds flavor and fun to every bite.
Variations
Alternate fruit options
You can change up the fruit in this cake. Use your favorite fruits. Try ripe peaches or sweet blueberries. Cherries also work well. You can even mix in some kiwi slices for a fun twist. Just make sure the fruit is fresh and ripe. This will keep your cake tasting great.
Different toppings and mix-ins
Toppings can add more flavor and fun. Use nuts like pecans or almonds. You can also swap the chocolate syrup for caramel sauce. Drizzle some peanut butter on top for a tasty change. A sprinkle of coconut can add nice texture. Be creative and make it your own!
Gluten-free or vegan adaptations
You can easily make this cake gluten-free. Use gluten-free graham crackers for the crust. For a vegan option, swap out the cream cheese for a nut-based cream. Use coconut cream to replace the heavy whipping cream. These changes keep the flavors while meeting dietary needs. Enjoy your delicious versions without worry!
Storage Info
Best practices for refrigerating
To keep your No-Bake Banana Split Cake fresh, store it in the fridge. Use an airtight container or wrap it tightly with plastic wrap. This will help keep moisture in and prevent the cake from drying out. It also helps to avoid any fridge odors from affecting the taste.
How long it lasts in the fridge
When stored properly, this cake lasts about 3 to 5 days in the fridge. The flavors blend and get richer over time. However, the bananas may brown after a day or two. If you want to keep it looking fresh, add the bananas just before serving.
Freezing options and tips
You can freeze slices of the cake for later enjoyment. Wrap each slice in plastic wrap and then place them in a freezer bag. This way, they stay safe from freezer burn. The cake can last up to 2 months in the freezer. To enjoy, let it thaw in the fridge overnight before serving.
FAQs
How do you make No-Bake Banana Split Cake?
To make No-Bake Banana Split Cake, start with the crust. Mix 1 ½ cups graham cracker crumbs and ½ cup melted unsalted butter. Press this into a 9×13 inch dish. Next, beat 8 oz softened cream cheese with 1 cup powdered sugar until smooth. In another bowl, whip 1 cup heavy cream until stiff peaks form. Gently fold this into the cream cheese mix. Spread half over the crust, then layer half of 2 sliced bananas, 1 cup sliced strawberries, and 1 cup drained crushed pineapple. Drizzle with ½ cup chocolate syrup and add ½ cup chopped walnuts if you like. Repeat the layers with the rest. Top with whipped cream and maraschino cherries. Chill for at least 4 hours or overnight.
Can I prepare it a day in advance?
Yes, you can prepare No-Bake Banana Split Cake a day ahead. Make sure to cover it well. This helps the flavors blend together. The cake will set nicely overnight in the fridge. It also makes serving easier. Just slice and serve it the next day.
What can I substitute for cream cheese?
If you need a substitute for cream cheese, try Greek yogurt. It adds a nice tang. You can also use mascarpone cheese for a rich taste. Silken tofu is another option for a dairy-free choice. Blend it until smooth for best results. Each option will give a different flavor but will still work well in the recipe.
No-Bake Banana Split Cake is simple and fun to make. We covered the essential ingredients, noted some easy substitutions, and shared step-by-step instructions. I provided tips to avoid common mistakes and ideas for beautiful presentations. You can even try different fruit and topping options!
Remember to store leftovers properly for the best taste. With this guide, you can enjoy a tasty treat anytime. I hope you feel confident to make your own delicious No-Bake Banana Split Cake!