Craving a cool, zesty treat this summer? Look no further than my Key Lime Pie Icebox Bars! These bars offer all the bright, tangy flavor of classic key lime pie without the fuss. With easy steps and fresh ingredients, you’ll whip up a dessert that’s sure to impress. Grab your lime juice and let’s dive into this delightful recipe that’s perfect for hot days and casual gatherings!
Why I Love This Recipe
- Refreshing Flavor: The combination of key lime juice and zest creates a refreshing tartness that is perfect for warm days.
- Easy Preparation: With no baking required, these bars come together quickly, making them a hassle-free dessert option.
- Coconut Twist: The addition of shredded coconut in the crust adds a delightful texture and tropical flavor to each bite.
- Perfect for Sharing: These bars are easy to cut into portions, making them ideal for parties, potlucks, or family gatherings.
Ingredients
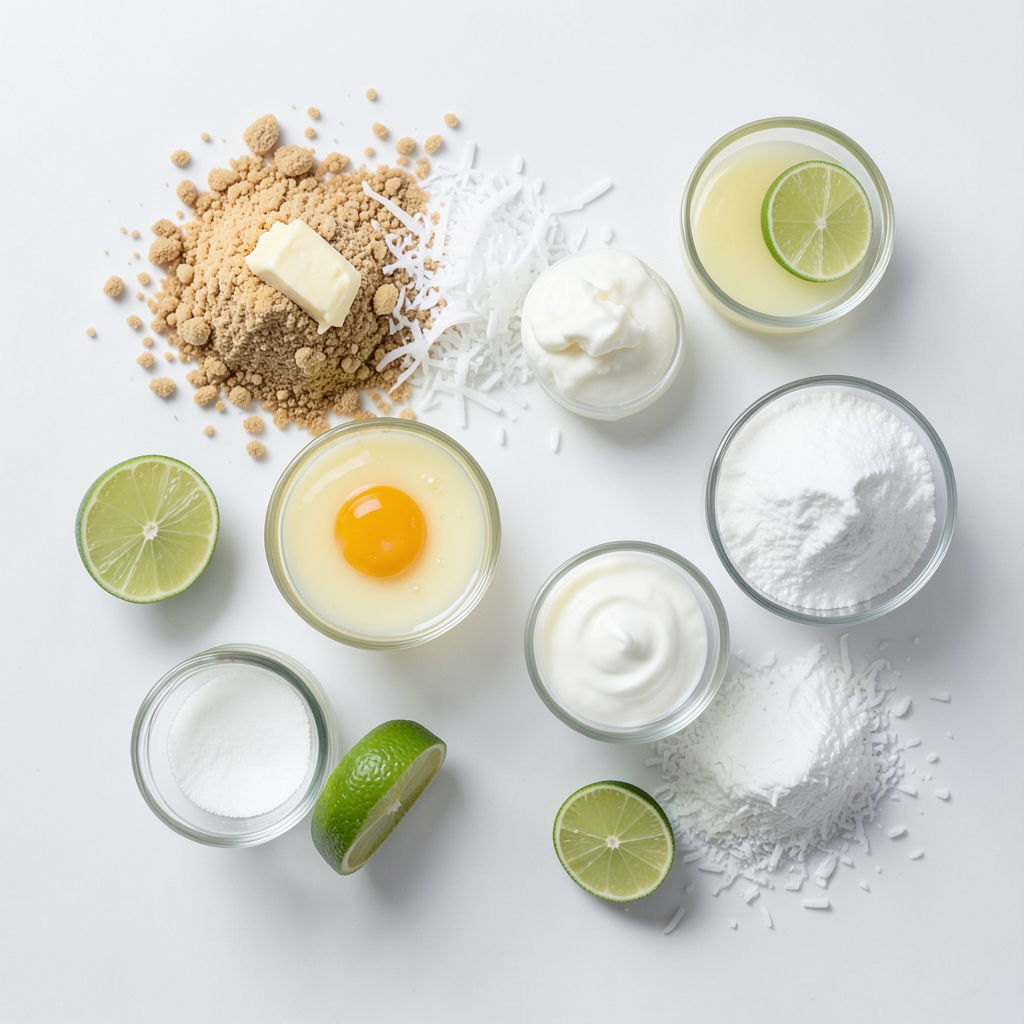
Complete Ingredients List
To make Key Lime Pie Icebox Bars, gather these simple ingredients:
- 1 ½ cups graham cracker crumbs
- ½ cup unsweetened shredded coconut
- ½ cup unsalted butter, melted
- 1 cup sweetened condensed milk
- ½ cup freshly squeezed lime juice (about 4-5 limes)
- 2 large egg yolks
- Zest of 2 limes
- 1 teaspoon pure vanilla extract
- 1 cup heavy whipping cream
- 2 tablespoons powdered sugar
- Lime wedges and additional coconut for garnish
Importance of Fresh Ingredients
Using fresh ingredients makes a big difference. Fresh lime juice adds a bright flavor. It wakes up the taste of the bars. Fresh zest gives the filling a strong aroma. These details keep your dessert vibrant and tasty. You want your bars to taste their best, right? So, choose fresh limes every time.
Substitutions and Modifications
If you need to make changes, you have options. For the crust, you can swap graham cracker crumbs with crushed cookies. Try vanilla wafers or digestive biscuits. If you want a dairy-free version, use coconut cream instead of heavy whipping cream. You can also use a dairy-free sweetened condensed milk. This keeps the dessert creamy without the dairy. Remember, feel free to play with flavors!
Step-by-Step Instructions
Preparation of the Crust
To start, grab a medium bowl. Combine 1 ½ cups of graham cracker crumbs and ½ cup of shredded coconut. Pour in ½ cup of melted unsalted butter. Mix until it feels moist. Press this mix evenly into the bottom of an 8x8-inch baking pan. Line the pan with parchment paper for easy removal. Now, refrigerate it for 30 minutes. This helps your crust set firm.
Making the Filling
In a large mixing bowl, whisk together 1 cup of sweetened condensed milk, ½ cup of freshly squeezed lime juice, and 2 large egg yolks. Add the zest from 2 limes and 1 teaspoon of vanilla extract. Mix until smooth. Once your crust is set, pour this mixture over it. Spread it evenly to cover the crust.
Chilling and Setting the Bars
Cover the baking pan with plastic wrap or aluminum foil. Place it in the fridge. Chill for at least 4 hours. This step is key to making sure the filling is firm. You want each bite to hold together nicely when served.
Whipping the Cream
In a separate bowl, pour in 1 cup of heavy whipping cream. Use an electric mixer on medium speed to beat it until soft peaks form. Then, add 2 tablespoons of powdered sugar. Keep beating until you see stiff peaks. This whipped cream will add a light and fluffy touch to your bars.
Final Assembly and Serving
After the filling sets, take the pan out of the fridge. Spread the whipped cream evenly over the top. This adds a nice finish. Carefully lift the bars out using the parchment paper. Cut them into squares or bars. For a fun touch, garnish each piece with a lime wedge and a bit of shredded coconut. Enjoy your cool treat!
Tips & Tricks
Achieving the Perfect Crust
To make a great crust, use fresh graham cracker crumbs. I like to blend them myself for better taste. Mixing in shredded coconut adds a fun twist. Make sure to melt the butter fully. This helps the crumbs stick together well. Press the mixture firmly into the pan. A solid base keeps everything from falling apart later. Chill the crust for 30 minutes. This sets it and makes it easier to spread the filling.
Ensuring a Smooth Filling
For a smooth filling, whisk the sweetened condensed milk well. Add the lime juice slowly for an even mix. It is best to use fresh lime juice. The flavor is brighter and more vibrant. Mix in the egg yolks and lime zest until smooth. This step adds a nice zing. Pour the filling over the crust gently. Spreading it evenly gives you uniform bars. Chill the mixture for at least four hours. This helps the filling firm up nicely.
Whipping Cream Techniques
Whipping cream can be tricky, but it’s worth it. Start with cold heavy cream for best results. Use a clean bowl and beaters to avoid any clumps. Beat on medium speed until soft peaks form. This means the cream holds its shape but is still smooth. Gradually add powdered sugar while mixing. Keep beating until stiff peaks form. This creates a fluffy topping that contrasts well with the filling. Spread the whipped cream evenly for a beautiful finish.
Pro Tips
- Use Fresh Limes: For the best flavor, always use freshly squeezed lime juice instead of bottled juice. Fresh limes give a vibrant taste that enhances the pie.
- Chill Thoroughly: Make sure to chill the filling for at least 4 hours. This helps it set properly, ensuring that your bars hold their shape when cut.
- Whip Cream to Stiff Peaks: When whipping the cream, ensure you achieve stiff peaks. This will provide a sturdy topping that won’t collapse on your bars.
- Garnish Creatively: Feel free to get creative with your garnishes! In addition to lime wedges and coconut, consider adding fresh mint for a pop of color and flavor.
Variations
Adding Fruit Flavors
You can mix in other fruits for a fun twist. Try adding pureed strawberries or mangoes. Just reduce the amount of lime juice slightly. This keeps the bars from being too tart. You can also use zest from other fruits, like oranges or lemons, for a new flavor. These additions can make your bars colorful and tasty.
Gluten-Free Alternatives
To make these bars gluten-free, swap out the graham cracker crumbs. Use gluten-free cookie crumbs instead. You can also use crushed nuts or oats as a base. Make sure all other ingredients are gluten-free too. Checking labels is key. This way, everyone can enjoy this delicious treat without worry.
Different Toppings and Garnishes
Toppings can change the whole look and taste of your bars. Try adding fresh berries like blueberries or raspberries on top. You can also use lime zest for a bright pop. For a creamy touch, add a dollop of whipped cream. If you want added crunch, sprinkle some toasted coconut or crushed nuts. Get creative with your garnishes to make each serving unique!
Storage Info
Best Storage Practices
To keep your Key Lime Pie Icebox Bars fresh, store them in the fridge. Place them in an airtight container. If you use the original baking pan, cover it tightly with plastic wrap or aluminum foil. This helps prevent drying out and keeps the bars tasting great. Remember to keep them chilled until you're ready to serve.
Freezing Techniques
You can freeze these bars for later enjoyment. First, cut them into squares or bars. Wrap each piece in plastic wrap. Then, place the wrapped bars in a freezer-safe bag or container. Be sure to label them with the date. They freeze well for up to three months. When you're ready to eat, let them thaw in the fridge overnight.
Shelf Life of Key Lime Pie Icebox Bars
When stored correctly in the fridge, these bars last about 5 to 7 days. If you freeze them, they can last for up to three months. Keep an eye on their look and smell. If they change in color or scent, it’s best not to eat them. Enjoy these cool treats while they are fresh and tasty!
FAQs
Can I use bottled lime juice instead of fresh?
Yes, you can use bottled lime juice. However, fresh lime juice gives a better flavor. Fresh limes taste bright and tangy. Bottled juice may lack that zing. If you choose bottled, look for one with no added sugar. It helps keep the taste closer to fresh juice.
How long do Key Lime Pie Icebox Bars last in the fridge?
These bars last about 5 days in the fridge. Keep them covered to stay fresh. Use plastic wrap or a tight lid. If you want them to last longer, consider freezing them. They can stay good in the freezer for up to 3 months.
Can I make these bars dairy-free?
Yes, you can make these bars dairy-free. Use coconut milk instead of sweetened condensed milk. This swap gives a nice flavor. For the whipping cream, opt for a non-dairy cream. There are many brands available. This way, you can enjoy the treat without dairy.
This article covered the key steps for making delicious Key Lime Pie Icebox Bars. Fresh ingredients are crucial for great taste, and we explored both substitutions and modifications. You learned how to prepare the crust, make the filling, and assemble the bars. My tips will help you achieve the perfect texture. Remember, you can also try variations and use proper storage methods to keep your bars fresh. Enjoy experimenting with flavors and sharing these treats with others!