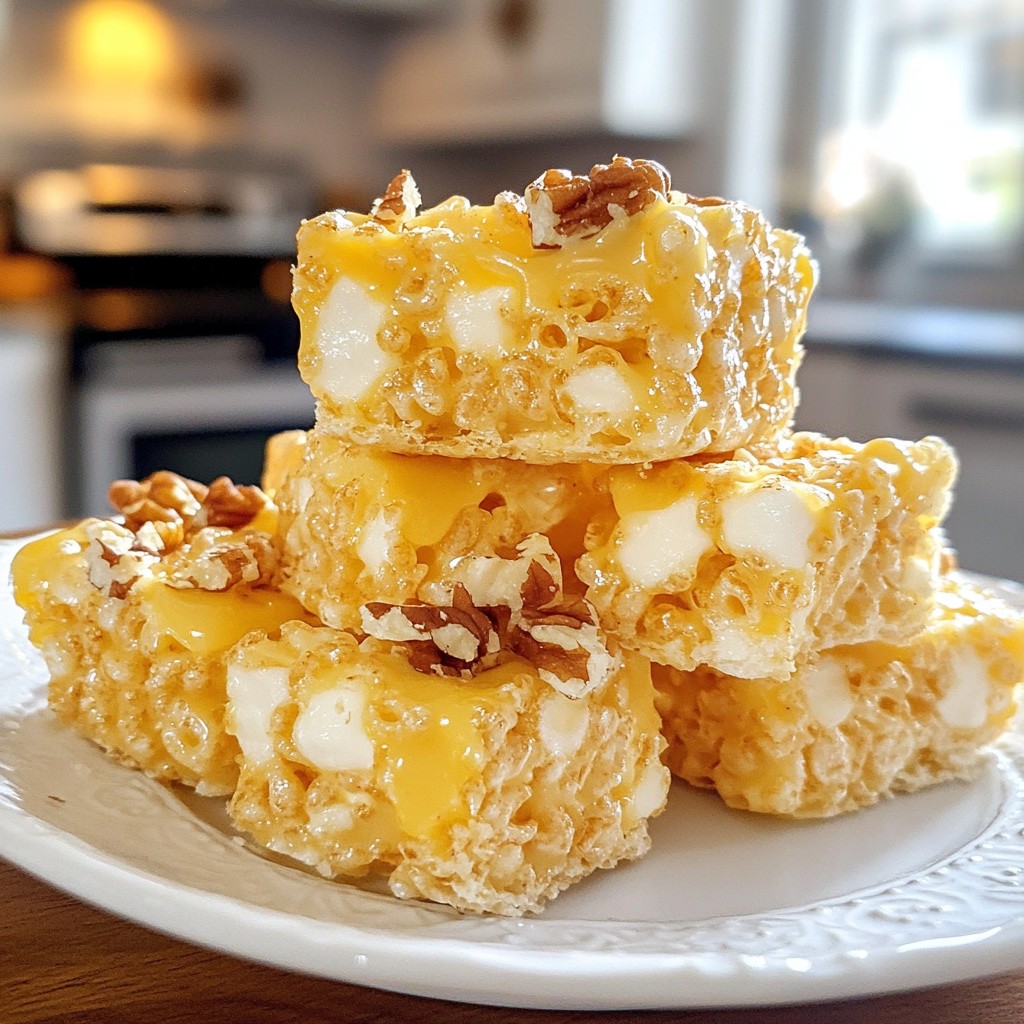
Are you ready to take your classic Rice Krispie treats to new heights? This irresistible brown butter Rice Krispie treats recipe adds a rich, nutty flavor that will have you coming back for more. With just a few simple ingredients and easy steps, you can create a delicious, chewy treat that everyone will love. Let's dive into making these perfect snacks together!
Why I Love This Recipe
- Unique Flavor: The rich, nutty taste of brown butter elevates these classic treats to a new level of deliciousness.
- Easy to Make: This recipe is quick and simple, making it perfect for last-minute gatherings or a sweet craving.
- Customizable: You can easily add your favorite mix-ins like nuts or spices to make them your own.
- Nostalgic Treat: These Rice Krispie treats bring back childhood memories, making them a delightful treat for all ages.
Ingredients
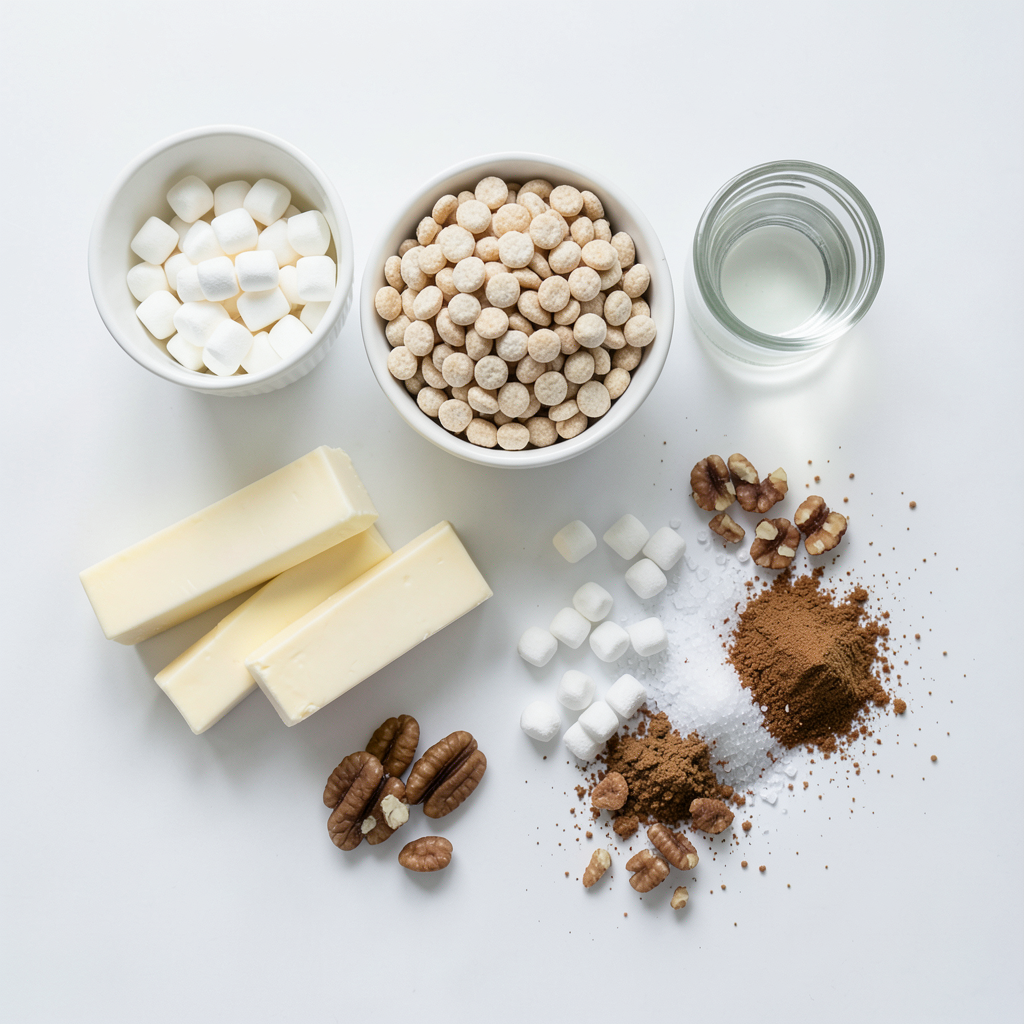
To make irresistible brown butter Rice Krispie treats, gather these key ingredients:
- 6 cups Rice Krispies cereal
- 1 cup unsalted butter (2 sticks)
- 1 package (10 oz) mini marshmallows
- 1 teaspoon vanilla extract
- 1/4 teaspoon sea salt
- Optional Add-ins: chopped pecans, cinnamon
These ingredients come together to create a delightful twist on the classic treat. The brown butter adds a rich, nutty flavor that elevates the taste. The mini marshmallows provide sweetness and a gooey texture. The Rice Krispies give that perfect crunch. If you want to get creative, consider adding chopped pecans for a nice crunch or a sprinkle of cinnamon for warm spice notes.
Make sure to use fresh ingredients for the best flavor. Quality butter and marshmallows make a big difference in taste. Have fun mixing and matching with these ingredients to suit your taste!
Step-by-Step Instructions
Step 1: Brown the Butter
To start, take a large saucepan. Place it on medium heat and add the unsalted butter. As the butter melts, you will see it foam. Keep whisking and cooking it. Watch closely as it turns a golden brown color and gives off a nutty smell. This takes about 5 to 7 minutes. Be careful not to let it burn; burnt butter will ruin the taste.
Step 2: Add Marshmallows
Once your butter is browned, reduce the heat to medium-low. Now, add the mini marshmallows to the pan. Stir constantly until they melt into the brown butter. This mixture should be smooth and creamy.
Step 3: Incorporate Flavorings
Next, mix in the vanilla extract and sea salt. If you like, add the cinnamon. Stir well until everything is fully combined. The smell will be amazing!
Step 4: Mix in the Cereal
Now, take the saucepan off the heat. Add in the Rice Krispies cereal. Gently fold the cereal into the marshmallow mixture. Make sure every piece of cereal is coated. If you want to add chopped pecans, do it at this stage.
Step 5: Transfer to Pan
Prepare your 9x13-inch baking dish by lightly greasing it with butter or non-stick spray. Pour the Rice Krispie mixture into the dish. Use a spatula or your hands to press it down evenly. Wet your hands slightly to prevent sticking.
Step 6: Cool and Slice
Let the treats cool at room temperature for about 30 minutes. After they cool, slice them into squares or rectangles. Enjoy your delicious Brown Butter Rice Krispie Treats!
Tips & Tricks
Achieving the Perfect Brown Butter
To get the best brown butter, heat unsalted butter over medium heat. Stir it often. Watch for a golden color and a nutty smell. This takes about 5 to 7 minutes. If you see dark bits forming, pull it off heat. You want the flavor without burning it.
Avoiding Sticking When Pressing Mixture
Pressing the mixture can be tricky. Use damp hands or a spatula. This keeps the mixture from sticking. If it sticks, the treats won't hold their shape. Lightly greasing your hands with butter helps too.
Best Practices for Cutting Treats
Cutting the treats can be messy. Use a sharp knife for clean edges. You can also lightly grease the knife. This avoids sticking. Let the treats cool for about 30 minutes before cutting. This helps them firm up.
Pro Tips
- Brown Butter Watch: Keep a close eye on the butter as it browns; it can quickly go from perfect to burnt.
- Marshmallow Melt: Stir the marshmallows gently but continuously to ensure even melting and to prevent sticking.
- Pressing Technique: When pressing the mixture into the pan, use a damp spatula or your hands to prevent sticking.
- Flavor Variations: Experiment with different mix-ins like chocolate chips or dried fruit for a unique twist on this classic treat.
Variations
Nut-Free Version
You can easily make these treats nut-free. Just skip the pecans. The brown butter and marshmallows create enough flavor on their own. You still get that rich taste without nuts. Kids and adults will love them just the same.
Adding Chocolate or Peanut Butter
If you love chocolate, add mini chocolate chips. Stir them in right before pressing the mixture into the pan. This makes the treats extra special. For peanut butter lovers, mix in 1/2 cup of creamy peanut butter with the marshmallows. The flavor pairs well with the brown butter.
Seasonal Variations: Fall Spices, Holiday Flavors
For fall, add 1/2 teaspoon of cinnamon or nutmeg to the marshmallow mix. This gives a warm, cozy taste. During the holidays, try adding crushed candy canes or dried cranberries. These add a festive twist and a pop of color. Each season, you can change the flavors to keep things fun!
Storage Info
Best Storage Practices for Freshness
To keep your Brown Butter Rice Krispie Treats fresh, store them in an airtight container. Place parchment paper between layers to prevent sticking. Make sure to keep them at room temperature. Avoid direct sunlight or heat sources. This helps maintain their chewy texture.
How Long They Last
These treats stay fresh for about 3 to 5 days. After that, they may lose their crispness. If they become hard, you can microwave them for a few seconds to soften. Check regularly to enjoy them at their best.
Freezing for Later Use
You can freeze these treats for longer storage. Cut them into squares first and wrap each piece in plastic wrap. Then, place them in a freezer-safe bag or container. They will last up to 3 months in the freezer. When you want to enjoy them, just thaw at room temperature.
FAQs
Can I use regular butter instead of unsalted?
Yes, you can use regular butter. However, unsalted butter lets you control the salt. This way, the treats won’t be too salty. If you use salted butter, skip the added sea salt in the recipe. The flavor will still be great!
What can I substitute for Rice Krispies?
You can use any crisp rice cereal. Brands like Crispix or even homemade puffed rice work well. Just make sure they are crunchy and light. You could also try cornflakes for a different texture. The key is to keep the volume close to six cups.
How do I make these treats gluten-free?
To make gluten-free Rice Krispie treats, choose certified gluten-free Rice Krispies. Many brands offer this option. Also, double-check the marshmallows. Most are gluten-free, but it’s always good to check the label. This way, everyone can enjoy these treats.
Can I use homemade marshmallows for this recipe?
Yes, homemade marshmallows can be used! Just make sure they are soft and gooey. They may melt differently than store-bought ones. You might need to adjust the cooking time slightly. The flavor will be even more special with your homemade touch!
This article covered the ingredients, steps, tips, variations, storage, and FAQs for making Rice Krispies treats. You now know how to brown butter, mix in flavor, and store these treats. Remember, you can switch things up by adding nuts or spices. Making these treats can be fun and rewarding. Enjoy your tasty creations!