Crispy Chickpeas with Fall Spices Air Fryer Delight

WANT TO SAVE THIS RECIPE?

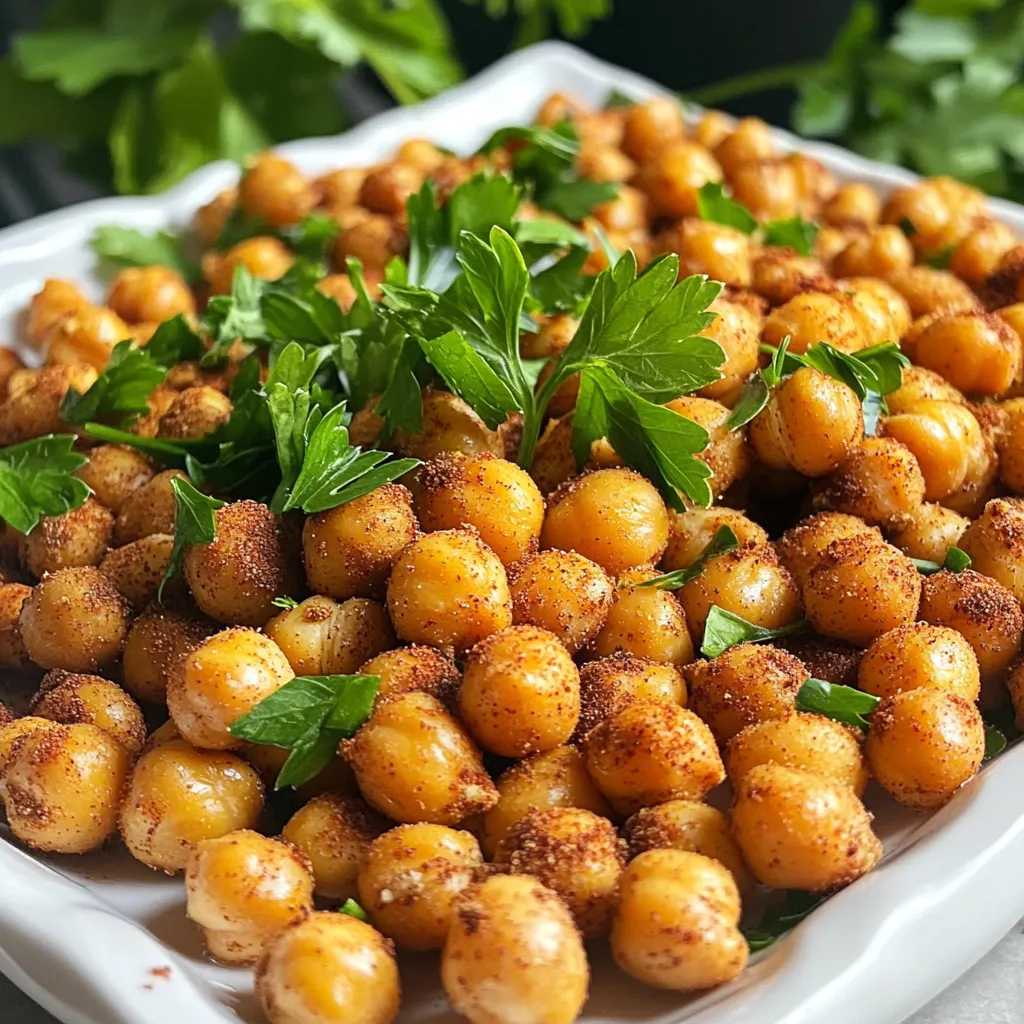
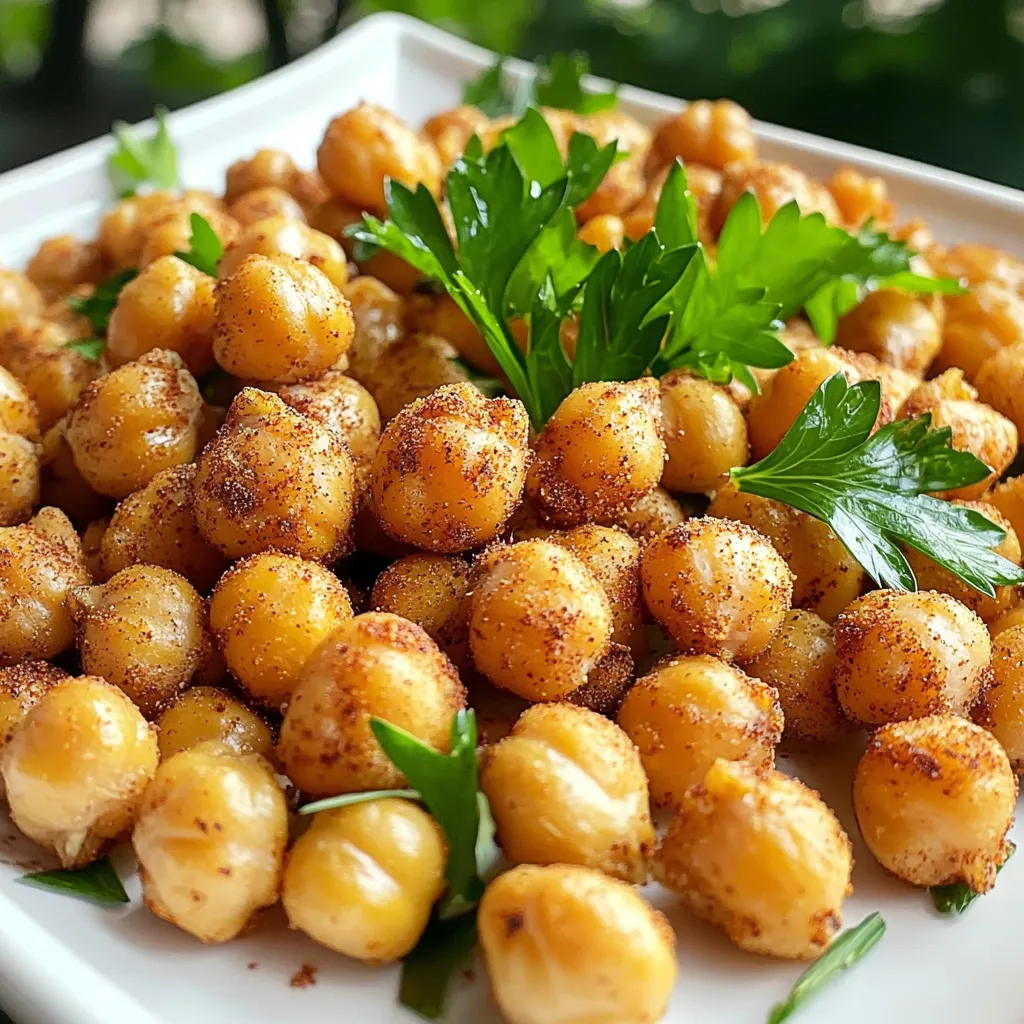
Looking for a tasty snack that packs a crunch? My Crispy Chickpeas with Fall Spices Air Fryer Delight recipe is just what you need! With simple ingredients and a few easy steps, you can whip up a savory treat that’s perfect for any gathering. Ready to elevate your snacking game? Let’s dive into how to make these crispy bites bursting with autumn flavors!

Ingredients

List of Ingredients

To make Crispy Chickpeas with Fall Spices, gather these items:

– 1 can (15 oz) chickpeas, drained and rinsed

– 2 tablespoons olive oil

– 1 teaspoon ground cinnamon

– 1 teaspoon ground cumin

– 1 teaspoon smoked paprika

– 1/2 teaspoon ground ginger

– 1/4 teaspoon cayenne pepper (adjust for heat preference)

– Salt, to taste

– Fresh parsley or cilantro, chopped (for garnish)

These ingredients create a warm, spiced flavor that pairs well with the chickpeas.

Optional Add-ins

You can add more flavors to your chickpeas. Here are some suggestions:

– Garlic powder for extra flavor

– Onion powder for a savory touch

– Nutritional yeast for a cheesy flavor

– Lemon zest for a fresh kick

Feel free to mix and match these add-ins to suit your taste.

Ingredient Substitutions

If you need alternatives for the ingredients, consider these options:

– Replace olive oil with avocado oil for a different flavor.

– Use coconut oil for a hint of sweetness.

– Swap smoked paprika for regular paprika if you prefer a milder taste.

– For a gluten-free option, all spices on this list are gluten-free.

These substitutions help you adapt the recipe to your needs while keeping the taste vibrant.

Step-by-Step Instructions

Prepping the Air Fryer

To start, you need to preheat your air fryer. Set it to 400°F (200°C). Preheating helps the chickpeas cook evenly. It only takes a few minutes, so don’t skip this step. A hot fryer is key for that crispy finish.

Preparing the Chickpeas

First, open the can of chickpeas. Drain them well, then rinse under cold water. This helps remove any canning liquid. Next, you must dry the chickpeas. Use a paper towel to pat them completely dry. This step is very important. If they are wet, they won’t crisp up. Now, in a bowl, mix together the olive oil, ground cinnamon, cumin, smoked paprika, ground ginger, cayenne pepper, and salt. Stir until combined. Then, add the dried chickpeas to the bowl. Toss them well to coat with the spice mix. Make sure every chickpea gets covered.

Air Frying Process

Now it’s time to cook! Place the chickpeas in the air fryer basket. Spread them out in a single layer. Do not overcrowd the basket; this helps them cook evenly. Set your timer for 15-20 minutes. Halfway through, shake the basket gently. This ensures even crisping on all sides. Keep an eye on them. You want them golden brown and crispy but not burnt. Once they’re done, carefully take them out. Let them cool slightly. They will get even crunchier as they cool. Enjoy them warm, garnished with fresh parsley or cilantro if you like.

Tips & Tricks

Achieving Maximum Crispiness

To make chickpeas crispy, start with dry ones. After rinsing, use a paper towel to pat them dry. This step is key. If they are wet, they won’t crisp up well. Toss them in olive oil and spices, but don’t overdo the oil. A light coat is enough. Air fry them in a single layer. If you crowd the basket, they will steam instead of crisp. Shake the basket halfway through cooking to ensure even browning.

Flavor Enhancements

You can customize the spices to match your taste. For a sweeter touch, add a bit of brown sugar or nutmeg. If you like heat, increase the cayenne or add crushed red pepper flakes. Try mixing in garlic powder or onion powder for depth. Explore different spice combinations like curry powder or taco seasoning. The options are endless and fun.

Serving Suggestions

Serve the crispy chickpeas warm for the best crunch. They make a great snack on their own. For a twist, add them to salads or grain bowls for extra texture. You can also use them as a topping for soups. To present, use a nice bowl and sprinkle fresh parsley or cilantro on top. This adds color and freshness to the dish. Enjoy your delicious creation!

Variations

Spice Blend Variations

You can change the spice blend to fit your taste. Here are some fun ideas:

Curry Chickpeas: Use 1 teaspoon curry powder and 1/2 teaspoon turmeric.

Italian Flair: Mix 1 teaspoon dried oregano and 1 teaspoon garlic powder.

Sweet and Spicy: Add 1 tablespoon brown sugar with the original spices.

These options let you play with flavors. Try different blends to find your favorite!

Temperature and Time Adjustments

Air fryers can vary in heat. If your model runs hot, lower the temperature to 375°F (190°C). Cook for 12-15 minutes instead. If it runs cooler, you may need to increase to 425°F (220°C) and cook for 18-20 minutes. Always shake the basket halfway through to avoid uneven cooking.

Dietary Variations

These crispy chickpeas can fit many diets. Here are some ideas:

Gluten-Free: The recipe is already gluten-free. Enjoy it as is!

Vegan: This recipe is vegan-friendly, so dig in without worry.

Low-Sodium: Use less salt or switch to a salt-free spice blend.

Feel free to adapt the recipe to meet your dietary needs while keeping it delicious!

Storage Info

Storing Leftovers

To keep your crispy chickpeas fresh, store them in an airtight container. This helps maintain that crunch you love. Make sure they cool completely before sealing. If you don’t, moisture can build up and make them soggy. For added freshness, use a paper towel inside the container. This will soak up any extra moisture.

Reheating Instructions

When it’s time to reheat, use your air fryer again. Set it to 350°F (175°C) and cook for about 5 minutes. This method helps restore their crispiness. If you don’t have an air fryer, you can use an oven. Spread the chickpeas on a baking sheet and heat for 10-15 minutes. Keep an eye on them to avoid burning.

Shelf Life

Crispy chickpeas can last up to 5 days at room temperature. However, for the best taste and texture, eat them within 2-3 days. If you want to store them longer, consider freezing them. Place them in a freezer bag, and they can last for up to 3 months. Just remember, they may lose some crunch when thawed. Enjoy your tasty snacks!

FAQs

Can I use dried chickpeas instead of canned?

Yes, you can use dried chickpeas. However, they need more time to prepare. Soak them overnight in water. After soaking, drain and rinse them. Then, cook them until tender. This usually takes about 1 to 2 hours. Once cooked, you can follow the same steps as with canned chickpeas.

What are the best spices for chickpeas?

The best spices depend on your taste. For a warm flavor, use cinnamon and cumin. If you like smoky notes, add smoked paprika. For heat, cayenne pepper works well. You can also try garlic powder or turmeric for extra flavor. Mix and match to find your favorite combination.

How do I know when the chickpeas are done?

Look for a golden brown color and a crunchy texture. They should be crispy on the outside. If they feel soft or chewy, they need more time. Shake the basket halfway through cooking to ensure even crispiness. Let them cool slightly after cooking; they will crisp up more as they cool.

This post covered how to make tasty air-fried chickpeas. We talked about ingredients, from chickpeas to spices. You learned step-by-step prepping and cooking tips. I shared ways to make them extra crispy and some fun serving ideas. Remember, you can tweak the flavors and store leftovers easily. Crispy chickpeas can be a yummy snack or a side dish. I hope this helps you enjoy a healthy treat!

To make Crispy Chickpeas with Fall Spices, gather these items: - 1 can (15 oz) chickpeas, drained and rinsed - 2 tablespoons olive oil - 1 teaspoon ground cinnamon - 1 teaspoon ground cumin - 1 teaspoon smoked paprika - 1/2 teaspoon ground ginger - 1/4 teaspoon cayenne pepper (adjust for heat preference) - Salt, to taste - Fresh parsley or cilantro, chopped (for garnish) These ingredients create a warm, spiced flavor that pairs well with the chickpeas. You can add more flavors to your chickpeas. Here are some suggestions: - Garlic powder for extra flavor - Onion powder for a savory touch - Nutritional yeast for a cheesy flavor - Lemon zest for a fresh kick Feel free to mix and match these add-ins to suit your taste. If you need alternatives for the ingredients, consider these options: - Replace olive oil with avocado oil for a different flavor. - Use coconut oil for a hint of sweetness. - Swap smoked paprika for regular paprika if you prefer a milder taste. - For a gluten-free option, all spices on this list are gluten-free. These substitutions help you adapt the recipe to your needs while keeping the taste vibrant. To start, you need to preheat your air fryer. Set it to 400°F (200°C). Preheating helps the chickpeas cook evenly. It only takes a few minutes, so don’t skip this step. A hot fryer is key for that crispy finish. First, open the can of chickpeas. Drain them well, then rinse under cold water. This helps remove any canning liquid. Next, you must dry the chickpeas. Use a paper towel to pat them completely dry. This step is very important. If they are wet, they won't crisp up. Now, in a bowl, mix together the olive oil, ground cinnamon, cumin, smoked paprika, ground ginger, cayenne pepper, and salt. Stir until combined. Then, add the dried chickpeas to the bowl. Toss them well to coat with the spice mix. Make sure every chickpea gets covered. Now it's time to cook! Place the chickpeas in the air fryer basket. Spread them out in a single layer. Do not overcrowd the basket; this helps them cook evenly. Set your timer for 15-20 minutes. Halfway through, shake the basket gently. This ensures even crisping on all sides. Keep an eye on them. You want them golden brown and crispy but not burnt. Once they're done, carefully take them out. Let them cool slightly. They will get even crunchier as they cool. Enjoy them warm, garnished with fresh parsley or cilantro if you like. To make chickpeas crispy, start with dry ones. After rinsing, use a paper towel to pat them dry. This step is key. If they are wet, they won’t crisp up well. Toss them in olive oil and spices, but don’t overdo the oil. A light coat is enough. Air fry them in a single layer. If you crowd the basket, they will steam instead of crisp. Shake the basket halfway through cooking to ensure even browning. You can customize the spices to match your taste. For a sweeter touch, add a bit of brown sugar or nutmeg. If you like heat, increase the cayenne or add crushed red pepper flakes. Try mixing in garlic powder or onion powder for depth. Explore different spice combinations like curry powder or taco seasoning. The options are endless and fun. Serve the crispy chickpeas warm for the best crunch. They make a great snack on their own. For a twist, add them to salads or grain bowls for extra texture. You can also use them as a topping for soups. To present, use a nice bowl and sprinkle fresh parsley or cilantro on top. This adds color and freshness to the dish. Enjoy your delicious creation! {{image_2}} You can change the spice blend to fit your taste. Here are some fun ideas: - Curry Chickpeas: Use 1 teaspoon curry powder and 1/2 teaspoon turmeric. - Italian Flair: Mix 1 teaspoon dried oregano and 1 teaspoon garlic powder. - Sweet and Spicy: Add 1 tablespoon brown sugar with the original spices. These options let you play with flavors. Try different blends to find your favorite! Air fryers can vary in heat. If your model runs hot, lower the temperature to 375°F (190°C). Cook for 12-15 minutes instead. If it runs cooler, you may need to increase to 425°F (220°C) and cook for 18-20 minutes. Always shake the basket halfway through to avoid uneven cooking. These crispy chickpeas can fit many diets. Here are some ideas: - Gluten-Free: The recipe is already gluten-free. Enjoy it as is! - Vegan: This recipe is vegan-friendly, so dig in without worry. - Low-Sodium: Use less salt or switch to a salt-free spice blend. Feel free to adapt the recipe to meet your dietary needs while keeping it delicious! To keep your crispy chickpeas fresh, store them in an airtight container. This helps maintain that crunch you love. Make sure they cool completely before sealing. If you don’t, moisture can build up and make them soggy. For added freshness, use a paper towel inside the container. This will soak up any extra moisture. When it's time to reheat, use your air fryer again. Set it to 350°F (175°C) and cook for about 5 minutes. This method helps restore their crispiness. If you don't have an air fryer, you can use an oven. Spread the chickpeas on a baking sheet and heat for 10-15 minutes. Keep an eye on them to avoid burning. Crispy chickpeas can last up to 5 days at room temperature. However, for the best taste and texture, eat them within 2-3 days. If you want to store them longer, consider freezing them. Place them in a freezer bag, and they can last for up to 3 months. Just remember, they may lose some crunch when thawed. Enjoy your tasty snacks! Yes, you can use dried chickpeas. However, they need more time to prepare. Soak them overnight in water. After soaking, drain and rinse them. Then, cook them until tender. This usually takes about 1 to 2 hours. Once cooked, you can follow the same steps as with canned chickpeas. The best spices depend on your taste. For a warm flavor, use cinnamon and cumin. If you like smoky notes, add smoked paprika. For heat, cayenne pepper works well. You can also try garlic powder or turmeric for extra flavor. Mix and match to find your favorite combination. Look for a golden brown color and a crunchy texture. They should be crispy on the outside. If they feel soft or chewy, they need more time. Shake the basket halfway through cooking to ensure even crispiness. Let them cool slightly after cooking; they will crisp up more as they cool. This post covered how to make tasty air-fried chickpeas. We talked about ingredients, from chickpeas to spices. You learned step-by-step prepping and cooking tips. I shared ways to make them extra crispy and some fun serving ideas. Remember, you can tweak the flavors and store leftovers easily. Crispy chickpeas can be a yummy snack or a side dish. I hope this helps you enjoy a healthy treat!

Crispy Chickpeas with Fall Spices Air Fryer

Discover the perfect fall snack with these Crispy Chickpeas featuring warm spices that will delight your taste buds! This easy air fryer recipe combines chickpeas with cinnamon, cumin, and paprika for a deliciously crunchy treat. Ready in just 30 minutes, they make a great appetizer or healthy snack. Click through for the full recipe and enjoy this flavorful dish today! #CrispyChickpeas #FallRecipes #HealthySnacks #AirFryerRecipes

Ingredients
  

1 can (15 oz) chickpeas, drained and rinsed

2 tablespoons olive oil

1 teaspoon ground cinnamon

1 teaspoon ground cumin

1 teaspoon smoked paprika

1/2 teaspoon ground ginger

1/4 teaspoon cayenne pepper (adjust for heat preference)

Salt, to taste

Fresh parsley or cilantro, chopped (for garnish)

Instructions
 

Preheat your air fryer to 400°F (200°C).

    After rinsing the chickpeas, pat them dry thoroughly with a paper towel. This step is crucial for achieving crispiness.

      In a mixing bowl, combine the olive oil, ground cinnamon, cumin, smoked paprika, ginger, cayenne pepper, and salt. Mix well to create a spice blend.

        Add the dried chickpeas to the bowl and toss them in the spice mixture until they are fully coated.

          Place the seasoned chickpeas in the air fryer basket in a single layer. Avoid overcrowding for even cooking.

            Air fry the chickpeas at 400°F (200°C) for 15-20 minutes, shaking the basket halfway through for even crisping. Cook until they are golden brown and crispy, keeping an eye to ensure they don't burn.

              Once done, remove the chickpeas from the air fryer and let them cool slightly. They will continue to crisp up as they cool.

                Serve the crispy chickpeas warm, garnished with fresh parsley or cilantro if desired.

                  Prep Time: 10 minutes | Total Time: 30 minutes | Servings: 4

                    WANT TO SAVE THIS RECIPE?

                    Leave a Comment

                    Recipe Rating