Indulge in the rich world of Chocolate Hazelnut Lava Cakes, your new dessert obsession! These little delights burst with warm chocolate and hazelnut flavors, making them the perfect treat for any special occasion—or just because. I’ll guide you through simple steps to create these decadent cakes that are sure to impress. So grab your ingredients, and let's get baking! Your taste buds will thank you.
Why I Love This Recipe
- Indulgent Flavor: This recipe combines rich chocolate with the nutty flavor of hazelnuts, creating a decadent dessert that’s hard to resist.
- Easy to Make:
- Impressive Presentation: The molten center creates a stunning effect when you cut into the cake, making it perfect for special occasions.
- Customizable: You can easily adapt this recipe by adding different nuts, flavored spreads, or even a hint of coffee for extra depth.
Ingredients
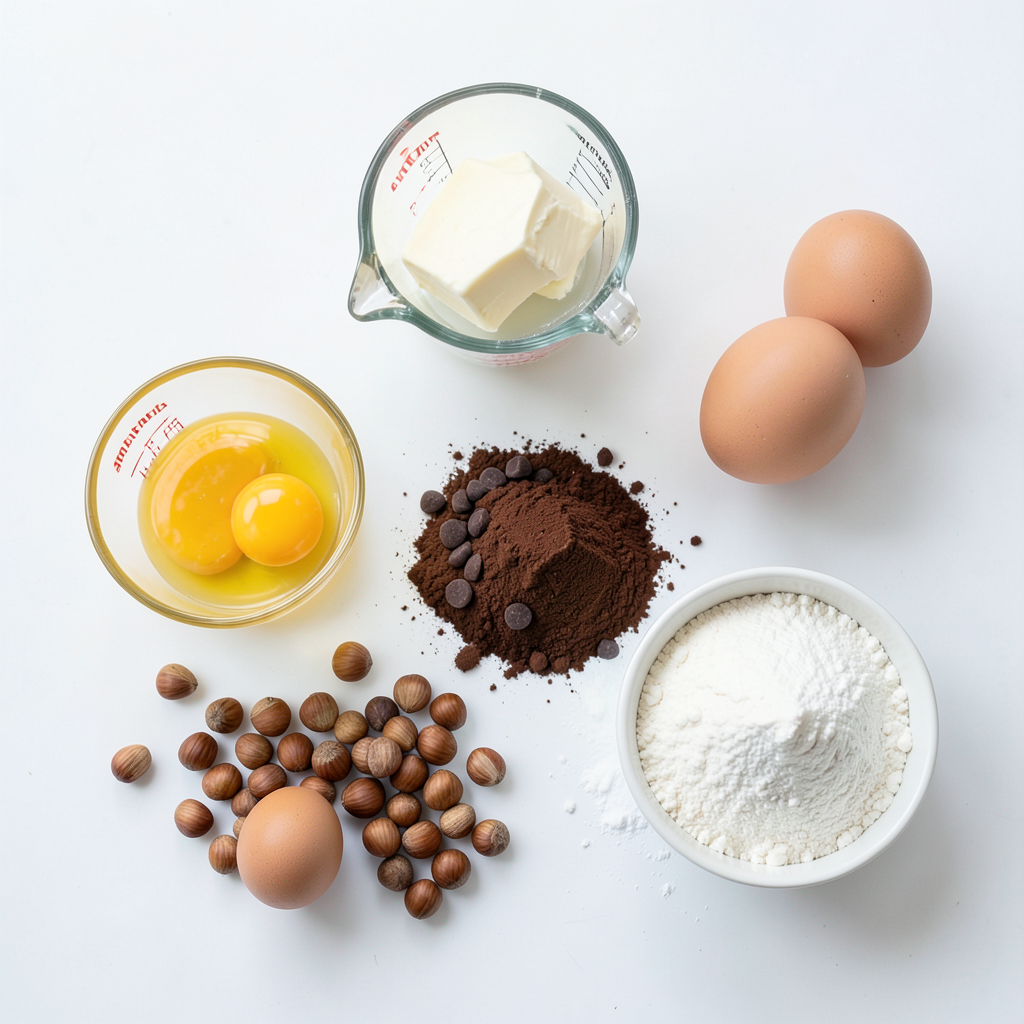
List of Ingredients
- ½ cup unsalted butter
- 1 cup semi-sweet chocolate chips
- 2 large eggs
- 2 large egg yolks
- ⅓ cup powdered sugar
- ¼ cup all-purpose flour
- 1 tablespoon unsweetened cocoa powder
- ¼ teaspoon salt
- ¼ cup chopped hazelnuts
- 2 tablespoons hazelnut spread (such as Nutella)
To make these chocolate hazelnut lava cakes, I gather all my ingredients first. This step keeps me organized and focused.
I use unsalted butter for richness. The semi-sweet chocolate chips give the right balance of sweet and bitter. The eggs and yolks add lift and creaminess.
Powdered sugar sweetens the batter. All-purpose flour and cocoa powder create the cake structure. A little salt enhances all the flavors.
Chopped hazelnuts add a nice crunch. The hazelnut spread, like Nutella, creates the gooey center.
As I prepare, I imagine how each ingredient will come together. The magic happens when they blend and bake into a warm, rich dessert.
Step-by-Step Instructions
Preheat the Oven and Prepare Ramekins
First, set your oven to 425°F (220°C). This is key for baking. While the oven heats, take four ramekins. Grease each one with butter or cooking spray. I like to dust the insides with cocoa powder. This step helps the cakes slide out easily after baking.
Melt the Chocolate Mixture
Next, grab a microwave-safe bowl. Combine ½ cup of unsalted butter and 1 cup of semi-sweet chocolate chips in it. Heat this mixture in the microwave. Do this in 30-second bursts. Stir in between until it’s fully melted and smooth. This chocolate mixture is the heart of your lava cake.
Combine Egg Mixture and Fold Ingredients
In a large mixing bowl, whisk together 2 large eggs, 2 egg yolks, and ⅓ cup of powdered sugar. Whisk until the mix is pale and a bit thick. Gradually add the melted chocolate mixture to the egg mix. Stir well to combine.
Now, sift ¼ cup of all-purpose flour, 1 tablespoon of unsweetened cocoa powder, and ¼ teaspoon of salt over the batter. Fold gently until no dry bits remain. This keeps your cake light and airy. Finally, fold in ¼ cup of chopped hazelnuts. This adds a nice crunch and flavor.
Now you're ready to fill the ramekins and create the magic inside!
Tips & Tricks
Perfecting the Lava Center
To get the perfect lava center, you need precise timing. Bake your cakes for 12-14 minutes. The edges should be firm, but the center should remain soft. If you bake too long, you’ll lose the gooey part. I often check at 12 minutes. If the center jiggles gently when moved, it’s ready.
How to Avoid Overbaking
Overbaking can ruin your lava cakes. Use a timer to stay on track. If you’re unsure, take one out at 12 minutes. Let it cool for a minute, then check the center. If it’s too firm, adjust your baking time next time. Remember, practice makes perfect!
Serving Suggestions for Chocolate Hazelnut Lava Cakes
Serve your lava cakes warm for the best experience. Dust with powdered sugar for a lovely touch. You can add extra chopped hazelnuts for crunch. A scoop of vanilla ice cream balances the rich chocolate. Pair with fresh berries for a pop of color and flavor!
Pro Tips
- Use Quality Chocolate: For the best flavor, opt for high-quality semi-sweet chocolate. The taste of the chocolate will significantly influence the overall richness of your lava cakes.
- Chill the Ramekins: If you have time, chill the greased ramekins in the fridge for about 10 minutes before adding the batter. This helps the cakes maintain their structure better while baking.
- Check for Doneness: The key to a perfect lava cake is timing. Keep an eye on the cakes towards the end of the baking time; they should have set edges with a soft, jiggly center.
- Experiment with Fillings: While hazelnut spread is delicious, feel free to experiment with other fillings like peanut butter, caramel, or even a piece of chocolate for added indulgence.
Variations
Nut-Free Alternative Options
If you want to make nut-free lava cakes, it's easy. Just skip the hazelnuts. Use a different chocolate spread, like almond or sunflower seed spread. You can also try using smooth peanut butter. This way, you still get a delicious filling without nuts.
Different Flavor Additions
Want to add more fun to your lava cakes? You can mix in espresso or orange zest. Espresso gives a rich coffee flavor. Just add one teaspoon of espresso powder to the melted chocolate. For orange zest, use about one teaspoon of fresh zest. This adds a bright and fresh taste. Both options make your cakes stand out!
Making Lava Cakes Ahead of Time
You can prepare these lava cakes in advance. Just follow the recipe, but stop before baking. Cover the ramekins and place them in the fridge. When you're ready to bake, take them out and let them sit for 10 minutes. Then, bake as directed. This way, you can enjoy warm lava cakes anytime.
Storage Info
How to Store Leftover Lava Cakes
To keep your leftover lava cakes fresh, allow them to cool fully. Place them in an airtight container. Store them in the fridge for up to three days. Make sure they are not stacked, as they can stick together. If you want to keep them longer, freezing is a great option.
Freezing Instructions
To freeze lava cakes, wrap each one tightly in plastic wrap. Then, place them in a freezer bag. They can stay frozen for up to three months. When you want to enjoy one, simply remove it from the freezer. Let it thaw in the fridge overnight before reheating.
Reheating Tips for Best Texture
To reheat your lava cakes, preheat your oven to 350°F (175°C). Place the cakes on a baking sheet. Heat for about 10 minutes or until warmed through. This method keeps the centers gooey and the outside soft. Avoid using the microwave, as it can make them rubbery.
FAQs
Can I use dark chocolate instead of semi-sweet?
Yes, you can use dark chocolate. It will give a richer taste. Dark chocolate has less sugar, so it may make the cakes less sweet. Adjust the sugar to your liking for a balanced flavor. I recommend using a dark chocolate that you enjoy eating.
How can I tell when the lava cakes are done baking?
The cakes are done when the edges look set, but the center remains soft. A slight jiggle in the middle shows they are not overcooked. Set a timer for 12 to 14 minutes. Keep an eye on them to ensure you catch the perfect moment to take them out.
What can I substitute for hazelnut spread?
You can use almond butter or peanut butter as a substitute. These will change the flavor a bit but still taste great. If you want a chocolate flavor, choose chocolate spread. Just make sure the spread is thick enough to hold its shape in the center of the cake.
This blog post covered all you need to make chocolate hazelnut lava cakes. We discussed the ingredients, easy steps for baking, and tips for perfecting your cakes. Variations and storage options help you make these treats your own. Finally, I answered common questions to boost your confidence in baking. Enjoy creating your delicious lava cakes! They are sure to impress your friends and family.