
Latest & Greatest
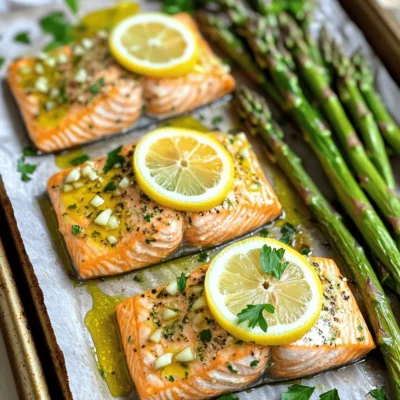
Sheet Pan Lemon Salmon Flavorful and Easy Dinner
Looking for a quick and tasty dinner? You’ve found it! Sheet Pan Lemon Salmon is flavorful, easy to make, and
Read more…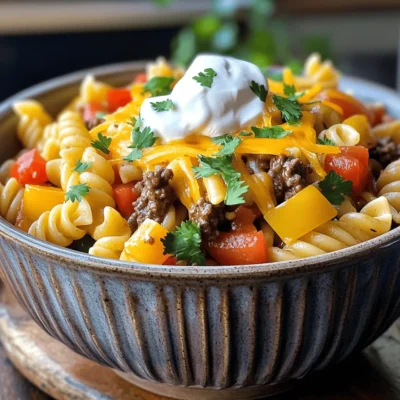
One Pot Taco Pasta Quick and Flavorful Recipe
Get ready to spice up your weeknight dinners with my One Pot Taco Pasta recipe! This dish is quick, tasty,
Read more…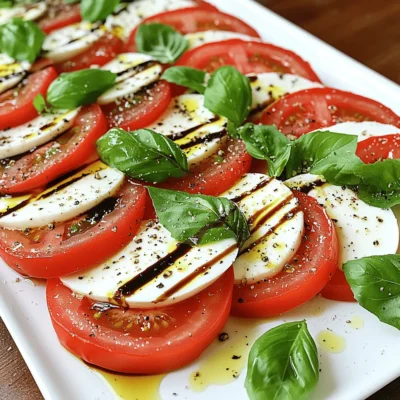
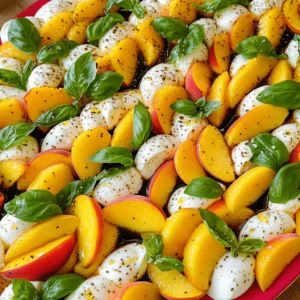
Easy Caprese Salad Fresh and Flavorful Dish
Looking for a dish that’s fresh, simple, and bursting with flavor? You’ve come to the right place! This Easy Caprese
Read more…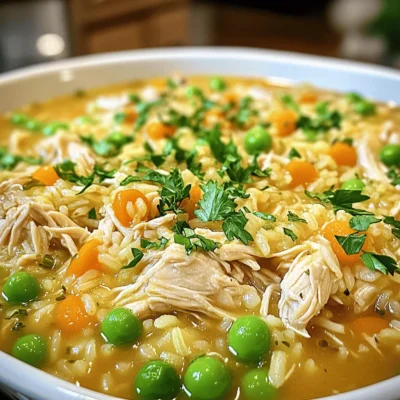
Crockpot Chicken and Rice Simple Comfort Food Recipe
Are you ready for a warm, cozy meal that practically cooks itself? Today, I’m excited to share my simple recipe
Read more…
Creamy Garlic Tuscan Chicken Flavorful Dinner Delight
Are you ready to elevate your dinner game with a dish that’s bursting with flavor? Creamy Garlic Tuscan Chicken is
Read more…
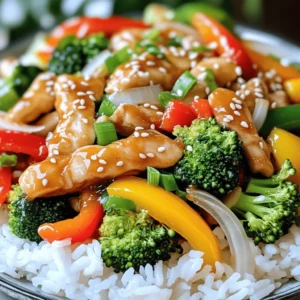
Pineapple Teriyaki Chicken Flavorful Easy Recipe
Looking for a tasty dish that’s both simple and flavorful? You’re in the right place! This Pineapple Teriyaki Chicken recipe
Read more…
Fluffy Japanese Pancakes Soft and Delicious Delight
If you love pancakes, you need to try Fluffy Japanese Pancakes. Their soft, cloud-like texture is a game changer! In
Read more…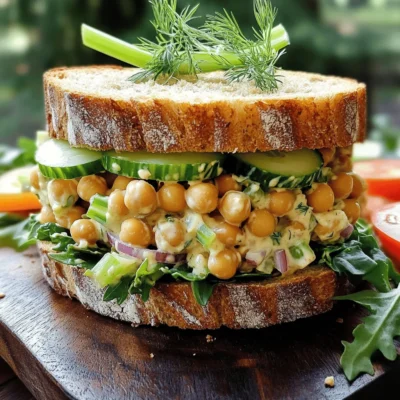
Vegan Chickpea Salad Sandwich Nutritious and Easy Meal
Are you looking for a quick, tasty, and healthy meal? The Vegan Chickpea Salad Sandwich is just the solution! Packed
Read more…browse recipes

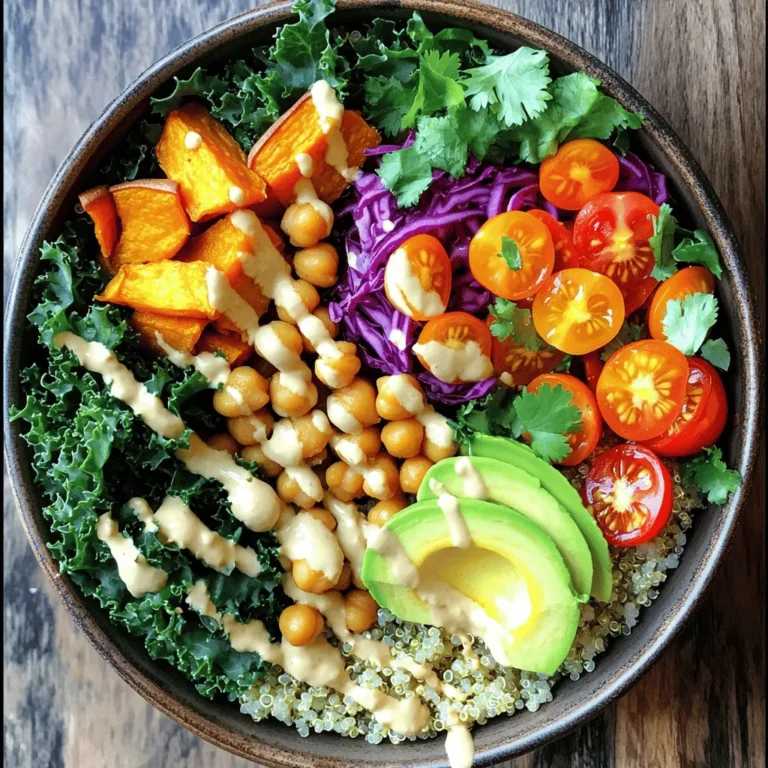
![To make Lemon Garlic Roasted Asparagus, you need fresh and bright ingredients. Here’s what you'll need: - 1 pound fresh asparagus, trimmed - 3 tablespoons olive oil - 4 cloves garlic, minced - Zest of 1 lemon - Juice of 1 lemon These fresh ingredients bring a crisp taste to the dish. Make sure your asparagus is bright green and firm. This ensures you get the best flavor and texture. Seasonings add depth to your dish. For this recipe, you need: - 1 teaspoon sea salt - 1/2 teaspoon black pepper - 1/4 teaspoon red pepper flakes (optional) Sea salt enhances the natural taste of the asparagus. Black pepper gives it a nice kick, while red pepper flakes add a spicy touch. You can adjust the spice level based on your taste. Sometimes, a little extra flavor is just what you need. Consider these optional add-ins: - 2 tablespoons grated Parmesan cheese (optional) Parmesan cheese adds a creamy, savory layer to the dish. You can sprinkle it on during the last few minutes of roasting for a delightful finish. These add-ins can elevate your Lemon Garlic Roasted Asparagus to a whole new level. For the full recipe, check out the details above. Start with fresh asparagus. Choose firm, bright green stalks. Trim the tough ends. Aim for about an inch off the bottom. Rinse the asparagus under cold water. Pat it dry with a clean towel. This step helps the oil and flavors stick better. Grab a large mixing bowl. Add three tablespoons of olive oil. Next, mix in four minced garlic cloves. Zest one lemon and add that too. Squeeze in the juice of the same lemon. Then, toss in a teaspoon of sea salt, half a teaspoon of black pepper, and red pepper flakes if you want some heat. Stir everything well. Now, add the trimmed asparagus. Toss gently to coat all pieces evenly with the lemon garlic mixture. Preheat your oven to 425°F (220°C). Line a baking sheet with parchment paper. Spread the marinated asparagus in a single layer. Make sure none of the stalks overlap. This helps them roast evenly. Roast in the oven for 12-15 minutes. Turn them halfway through for a nice, even cook. The asparagus should be tender and slightly crispy. If you want, sprinkle grated Parmesan cheese over the top in the last two minutes. Remove from the oven and let it cool for a minute before serving. For the full recipe, check out the earlier section. Enjoy your tasty lemon garlic roasted asparagus! To get that perfect crunch, you need to roast your asparagus at a high heat. Set your oven to 425°F (220°C). This temperature helps to cook the asparagus fast while keeping it crisp. Spread the asparagus out evenly on the baking sheet. Avoid overcrowding; this lets the hot air circulate. Turn the asparagus halfway through cooking for even crispiness. One mistake is using old asparagus. Fresh asparagus should be firm and bright green. If it bends easily, it is past its prime. Another common error is not cutting the ends. Always trim the tough ends off before cooking. Lastly, don’t skip the lemon zest. It adds a bright flavor that makes a big difference. Adding fresh herbs can take your asparagus to the next level. Try adding thyme or rosemary for an earthy taste. You can sprinkle herbs on just before serving. This way, they stay fresh and flavorful. For a twist, consider fresh basil or parsley for a lighter touch. Mixing herbs can create unique flavor combinations. {{image_2}} You can switch up the asparagus with other veggies. Try broccoli, Brussels sprouts, or green beans. These veggies roast well and soak up the lemon garlic flavor. If you're feeling bold, add some cherry tomatoes. They burst with flavor when roasted. Boost your meal by adding protein. Grilled chicken or shrimp works great with this dish. For a vegetarian option, add chickpeas or white beans. You can also serve the asparagus over grains like quinoa or brown rice. This makes the dish heartier. Asparagus shines in spring, but you can enjoy this recipe all year. In summer, swap lemon for lime to give it a fresh twist. In fall, add some roasted squash for a warm flavor. In winter, pair it with roasted root vegetables for a cozy meal. For the full recipe, check out the Lemon Garlic Roasted Asparagus instructions above. After making Lemon Garlic Roasted Asparagus, let it cool to room temperature. Place it in an airtight container. Store it in the fridge. It stays fresh for up to 3 days. This way, you can enjoy it later without losing flavor. Always check for any signs of spoilage before eating. To reheat your leftovers, use an oven or a skillet. Preheat the oven to 350°F (175°C). Spread the asparagus on a baking sheet. Heat for about 10 minutes or until warm. If using a skillet, add a splash of oil. Cook over medium heat for 5 minutes. This keeps the asparagus crispy and tasty. You can freeze asparagus, but it's best to blanch it first. Boil water in a pot. Add the asparagus for 2-3 minutes. Then, plunge it into ice water. This stops the cooking. Drain and dry the asparagus, then place it in a freezer bag. Remove as much air as possible. Frozen asparagus keeps well for up to 6 months. When you're ready to use it, just thaw and roast it for a quick side dish! For the full recipe, check the section above. When choosing fresh asparagus, look for firm, bright green stalks. The tips should be tightly closed and not mushy. Avoid any yellow or wilted stalks. Hold the bunch and feel the weight; it should feel heavy and fresh. If you can, smell the asparagus. It should have a clean, earthy scent. Fresh asparagus tastes best and gives the best texture in your dish. Yes, you can use frozen asparagus, but it may change the texture. Frozen asparagus tends to be softer after cooking. This dish works best with fresh asparagus for a crisp bite. If using frozen, thaw it first and pat it dry to remove excess moisture. Adjust the cooking time, as frozen asparagus may need less time in the oven. Asparagus is fully cooked when it is tender yet still slightly crisp. You can check by piercing it with a fork. It should go in easily but not fall apart. The color will change to a bright green. If you prefer it softer, roast for a few extra minutes. For the best results, keep an eye on it while roasting. This ensures you get that perfect texture for your Lemon Garlic Roasted Asparagus. For the complete recipe, check out the [Full Recipe]. This blog post covered how to make delicious lemon garlic roasted asparagus. We explored fresh ingredients, seasonings, and optional add-ins. I shared step-by-step instructions for preparation, marinating, and roasting. You learned tips for crispiness and common mistakes to avoid. We also looked at flavor variations and how to store leftovers. With these insights, you can create a tasty side dish. Enjoy the flavor and health benefits of asparagus year-round. You can impress friends with your new skills in the kitchen.](https://southerndishes.com/wp-content/uploads/2025/05/6ab6965d-d0d9-469d-83a0-078784c602c6.webp)
Lemon Garlic Roasted Asparagus Flavorful Side Dish
Looking to add a burst of flavor to your meals? Lemon Garlic Roasted Asparagus is the perfect side dish! With vibrant ingredients and simple…
My Latest Desserts
-

No-Bake Banana Split Cake Simple Sweet Delight
Craving something sweet and easy to whip up? This No-Bake Banana Split Cake is your answer! With creamy layers and Read Full Recipe -

Pumpkin Streusel Muffins Irresistible Fall Treat
Fall is here, and it’s time to embrace the flavors of the season! These Pumpkin Streusel Muffins are easy to Read Full Recipe -

Mini Apple Hand Pies Tasty and Simple Dessert Recipe
If you’re craving a warm, sweet treat that’s easy to make, you’ll love these Mini Apple Hand Pies! This recipe Read Full Recipe -

Cinnamon Swirl Bundt Cake Irresistible and Delicious
Get ready to delight your taste buds with my delicious Cinnamon Swirl Bundt Cake! This cake is not just a Read Full Recipe -

Delicious Double Chocolate Muffins Easy Recipe Guide
Craving a rich, chocolatey treat? You’re in the right place! In this guide, I’ll show you how to make delicious Read Full Recipe -

Thanksgiving Brioche Donuts Rich and Festive Delight
Are you ready to impress your guests this Thanksgiving? These Thanksgiving Brioche Donuts are perfect for holiday gatherings. Soft, rich, Read Full Recipe -

Make Ahead Pumpkin Cinnamon Rolls Savory Fall Delight
Autumn is here, and what better way to celebrate than with Make Ahead Pumpkin Cinnamon Rolls? These gooey, sweet rolls Read Full Recipe -

Pumpkin Patch Dirt Cups Tasty Treat for Fall Fun
Fall is here, and it’s time to whip up a fun treat! Pumpkin Patch Dirt Cups are easy to make Read Full Recipe -

Salted Caramel Apple Pie Cheesecake Delight
Craving a dessert that’s both comforting and indulgent? Let me introduce you to my Salted Caramel Apple Pie Cheesecake Delight! Read Full Recipe -

Minute Reese’s Snack Mix Tasty Treat for Everyone
Craving a sweet and crunchy snack? I’ve got just the treat for you! The Minute Reese’s Snack Mix is quick, Read Full Recipe
My Latest Recipes

hey,
i’m !
I’m so happy you’re here!
My kitchen is filled with stories, flavors, and love and I’m so happy to share them with you. Here’s to dishes that feel like home.
![- 1 lb beef sirloin, thinly sliced - 4 cups green cabbage, shredded - 1 bell pepper, thinly sliced - 1 medium onion, thinly sliced - 3 cloves garlic, minced - 1 teaspoon ginger, grated - 3 tablespoons soy sauce - 1 tablespoon sesame oil - 1 teaspoon chili paste (optional) - Salt and pepper to taste - 2 tablespoons vegetable oil for frying - 2 green onions, chopped for garnish - Sesame seeds for garnish For this dish, you want fresh and high-quality ingredients. The beef sirloin is key to a tender bite. Use green cabbage for its crunch and sweetness. A colorful bell pepper adds both flavor and visual appeal. Fresh garlic and ginger bring a fragrant aroma and warmth to the dish. The soy sauce gives a savory umami taste. Sesame oil adds a nutty depth. If you like heat, chili paste can spice things up. Don’t forget to season with salt and pepper as you cook. For garnishes, green onions add brightness, while sesame seeds add a nice crunch. You can find the full recipe for this delicious stir fry in the link provided. Enjoy the fresh flavors and quick prep of this meal! To start, you need to marinate the beef. In a bowl, mix soy sauce, sesame oil, minced garlic, and grated ginger. Add the thinly sliced beef and let it sit for 10 to 15 minutes. This step helps the beef soak in all the great flavors. While the beef marinates, chop your veggies. You will need green cabbage, bell pepper, onion, and green onions. Make sure to slice them thin for quick cooking. Next, heat a large skillet over medium-high heat. Add one tablespoon of vegetable oil to the pan. Once the oil is hot, toss in the marinated beef. Cook it for about 3 to 4 minutes. Stir it often until the beef is browned. Once done, remove the beef from the pan and set it aside. In the same skillet, add the remaining tablespoon of vegetable oil. Now, add the sliced onion and bell pepper. Sauté these for about 2 to 3 minutes until they start to soften. After that, add the shredded cabbage to the pan. Stir often and cook for another 5 to 7 minutes. You want the cabbage to wilt but still have a little crunch. Finally, return the cooked beef to the skillet with the veggies. Mix everything well. Season with salt and pepper to taste. Cook for an additional 2 minutes to heat it all through. Now, you can enjoy a flavorful Minute Beef & Cabbage Stir Fry. For the full recipe, check the details provided above. To get a great stir fry, use high heat. This helps the food cook fast and keeps it crisp. If you cook on low heat, your beef and veggies may steam instead of fry. Also, do not overcrowd the pan. If you add too much food at once, the temperature drops. This can cause soggy stir fry. Instead, cook in batches if needed. To boost flavor, consider adding spices like black pepper or red pepper flakes. You can also try a splash of rice vinegar or a dash of oyster sauce for extra depth. For the best taste, marinate your beef for at least 10-15 minutes. This lets the flavors soak in well. You can even marinate it longer if you have time. To serve your stir fry attractively, use a large bowl. This shows off the colorful veggies and beef. You can also serve it over steamed rice for a nice base. For ideal sides, think about pairing it with a light salad or spring rolls. These add freshness and crunch to your meal. Enjoy your flavorful creation! {{image_2}} You can switch beef for chicken or tofu in this stir fry. If you choose chicken, use boneless, skinless thighs or breasts. Slice them thinly for even cooking. For tofu, press it to remove extra water before cutting it into cubes. Cook chicken for about 5-7 minutes until it's no longer pink. Tofu needs about 4-5 minutes to get crispy and golden. If you want a low-carb meal, replace cabbage with green beans or zucchini. Cut zucchini into thin strips or half-moons. Cook them for about 3-4 minutes until they are tender but still crisp. Green beans take about 5 minutes. This swap keeps your dish light and fresh. Feel free to add more veggies for extra nutrition. Carrots, sliced thinly, add a sweet crunch. Broccoli florets cook well too; just steam them for a few minutes before adding. You can mix and match to suit your taste. Adding more colors makes your stir fry look great and taste even better. For the full recipe, check the [Full Recipe]. To store leftover Minute Beef & Cabbage Stir Fry, cool it quickly. Spread it out on a plate to release heat. Use airtight containers for storage. This helps to keep the meal fresh. Make sure to seal the lid tightly. You can store it in the fridge for up to 3 days. If you want to save the stir fry for later, freezing is a great option. First, let it cool completely before packing it. Use freezer-safe containers or bags. Remove as much air as possible to prevent freezer burn. For best results, eat frozen stir fry within three months. To reheat, thaw it in the fridge overnight. Heat it on the stove over low heat until warmed through. Leftovers last up to 3 days in the fridge. If frozen, they stay good for about 3 months. After this time, the quality may drop. Always check for signs of spoilage before eating. Keeping track of how long your food lasts ensures you enjoy every bite! It takes about 30 minutes to make this dish. The prep time is around 20 minutes. You can slice the beef and chop the veggies during this time. The cooking time is quick, only about 10 minutes. This makes it a great choice for busy nights. Yes, you can make this recipe ahead of time. Prepare the beef and veggies and store them in the fridge. When you are ready to cook, just stir-fry them quickly. For reheating, you can use a skillet over medium heat. Add a splash of soy sauce to keep it moist. To cut beef for stir fry, choose a good cut like sirloin. Freeze the beef for about 30 minutes. This makes slicing easier. Cut it thinly against the grain. This helps keep it tender. Aim for strips about 1/4 inch thick. This way, the beef will cook fast and stay juicy. For the detailed ingredient list and instructions for Quick & Zesty Beef & Cabbage Stir Fry 🥬, check the [Full Recipe](#). In this blog post, we explored making a tasty Minute Beef & Cabbage Stir Fry. We discussed the key ingredients, cooking steps, and tips for great flavor. You learned how to use different proteins and vegetables, and how to store leftovers properly. Remember, cooking is fun, and this stir fry is quick and versatile. With just a few ingredients, you can create a dish that pleases everyone. Enjoy making this meal and get creative with it!](https://southerndishes.com/wp-content/uploads/2025/07/67de7ac3-b69f-4d39-9aae-99b9b7cd2adf-300x300.webp)
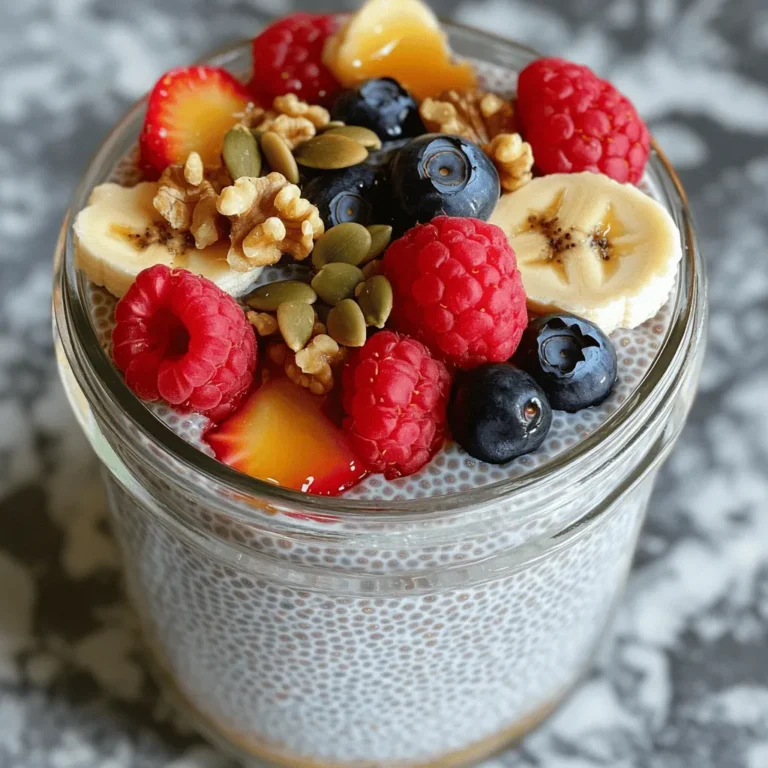
![- 1 cup quinoa, rinsed - 2 cups vegetable broth - 1 cup cherry tomatoes, halved - 1 cucumber, diced - 1/2 red bell pepper, chopped - 1/2 red onion, finely chopped - 1/3 cup Kalamata olives, pitted and sliced - 1/2 cup feta cheese, crumbled - 1/4 cup fresh parsley, chopped - 3 tablespoons olive oil - 2 tablespoons lemon juice - 1 teaspoon dried oregano - Salt and black pepper to taste To make this savory quinoa salad, you need some key ingredients. First, quinoa is the star of the show. It is nutritious and gluten-free. You will also want fresh vegetables like cherry tomatoes, cucumber, and bell pepper. These add color and crunch. Feta cheese brings a creamy, salty flavor that ties it all together. Lastly, the dressing, made from olive oil and lemon juice, brightens up the dish. - Nuts and seeds - Additional herbs You can customize your salad with optional add-ins. Nuts and seeds add crunch and healthy fats. Sunflower seeds or walnuts work well. Fresh herbs like basil or mint can give extra flavor. Experiment with what you love! - Measuring cups and spoons - Mixing bowls - Cooking pot To prepare this salad, you will need some basic kitchen tools. Measuring cups and spoons help with accurate portions. Mixing bowls are essential for combining your ingredients. A cooking pot is needed to cook the quinoa. Having the right tools makes cooking easier and more fun. For the full recipe, be sure to check out the complete instructions. Boiling the Vegetable Broth Start by pouring 2 cups of vegetable broth into a medium saucepan. Heat it on high until it boils. Watch closely to avoid spills. Simmering the Quinoa Once the broth is boiling, add 1 cup of rinsed quinoa. Cover the pot and turn the heat down to low. Let it simmer for about 15 minutes. The liquid should absorb, and the quinoa will get fluffy. When done, remove it from heat and let it cool for a few minutes. Fluff the quinoa with a fork, then set it aside. Chopping and Dicing While your quinoa cooks, grab your fresh veggies. Chop 1 cucumber, halve 1 cup of cherry tomatoes, and chop 1/2 red bell pepper. Finely chop 1/2 red onion. Slice 1/3 cup of Kalamata olives. Combining Ingredients In a large bowl, mix all your chopped veggies. This bowl will soon hold all the vibrant flavors of your salad. Creating the Dressing In a small bowl, whisk together 3 tablespoons of olive oil, 2 tablespoons of lemon juice, and 1 teaspoon of dried oregano. Add salt and black pepper to taste. This dressing brings all the flavors together. Tossing Ingredients Pour your dressing over the quinoa and vegetable mixture. Gently toss everything until well combined. Add 1/2 cup of crumbled feta cheese and 1/4 cup of chopped parsley. Toss lightly again to mix them in. Enjoy the bright colors and fresh scents! For the complete steps, check the [Full Recipe]. Rinsing quinoa is key. It removes a bitter coating called saponin. To rinse, place the quinoa in a fine-mesh strainer. Run cold water over it for about a minute. This simple step makes a big difference in flavor. Fluffing quinoa is equally important. After cooking, let it sit for a few minutes. Then, use a fork to gently fluff it. This helps separate the grains and keeps the texture light. For the best pairings, consider adding grilled chicken or shrimp. Both add protein and flavor. You can also serve the salad alongside a warm pita. This adds a nice touch to your meal. Plating is vital for visual appeal. Serve the salad in a large, colorful bowl. You can also use individual plates. Garnish with extra parsley and a drizzle of olive oil. This makes the dish pop. You can play with sweet or savory additions. Try adding diced apples or dried cranberries for sweetness. For a savory touch, consider adding capers or extra olives. Explore different dressing alternatives. Instead of lemon juice, try balsamic vinegar. You can also mix in yogurt for a creamy texture. These changes can give your salad a new life. For the full recipe, check out the complete steps to make your Savory Quinoa Salad with Feta! {{image_2}} You can brighten up your salad with a Mediterranean twist. Adding roasted vegetables gives a fun texture. Just toss in some zucchini, bell peppers, or eggplant. Roast them until they are golden. This adds a warm, rich flavor to your dish. You can also include artichokes or sun-dried tomatoes. Both options boost taste and bring a tangy kick. Artichokes add a unique texture and flavor. Sun-dried tomatoes add sweetness and depth. These small changes can make your salad feel fresh and exciting. For a protein boost, consider adding grilled chicken. Just slice it and mix it in. This makes the salad more filling and hearty. Chickpeas or black beans are great plant-based options too. They provide protein and fiber. Simply rinse and add them to the salad. Either choice keeps the dish healthy and satisfying. If you want to keep it vegan, simply omit the feta cheese. The salad will still be delicious and full of flavor. You can substitute feta with plant-based alternatives. Look for vegan feta made from nuts or tofu. These swaps keep your meal tasty while meeting dietary needs. You can enjoy a vibrant salad without losing any flavor! To keep your savory quinoa salad fresh, store it in the fridge. Place the salad in an airtight container. This helps lock in moisture and flavor. I like using glass containers because they don’t stain and are easy to clean. If you want to save the salad for later, freezing is a great option. Scoop the salad into freezer-safe bags. Make sure to squeeze out as much air as you can before sealing. When you are ready to eat, thaw it in the fridge overnight. Reheat it in a pan on low heat, or enjoy it cold! How long will it last? In the fridge, your salad should be good for 3 to 5 days. If you freeze it, it can last up to 3 months. Signs of spoilage include a sour smell or change in color. If you see any mold, throw it away! Enjoy your salad fresh for the best taste. For the full recipe, check out the section above. You can try several cheeses in this salad. Here are some great options: - Goat cheese for a creamy texture. - Ricotta cheese for a mild flavor. - Cotija cheese for a crumbly bite. - Parmesan for a sharper taste. Each cheese adds its own twist to the salad, making it fun to experiment! Yes, you can prepare this salad ahead of time! It stays fresh in the fridge for up to three days. Just keep the dressing separate until you're ready to eat. This way, the salad stays crisp and tasty. Yes, quinoa is gluten-free. It comes from a seed, not a grain. Many people who have gluten sensitivities or celiac disease can enjoy quinoa safely. It’s also packed with protein and fiber, making it a healthy choice for everyone. In this blog post, we explored how to make a fresh quinoa salad. We covered main ingredients, optional add-ins, and the right tools. You learned how to cook quinoa and prepare vegetables. I shared tips for perfecting the dish and suggested variations for more flavors. Remember to store your salad properly for the best taste. With these steps and tips, you can enjoy a delicious, healthy meal. Try it out and customize it to fit your taste.](https://southerndishes.com/wp-content/uploads/2025/05/50cbb912-12ba-450c-a10a-a8bc66d6029e-300x300.webp)


Stuffed Bell Peppers with Quinoa Simple and Tasty Dish
Are you ready to savor a dish that’s both healthy and bursting with flavor? Stuffed bell peppers with quinoa are your answer! This simple…
![- 4 large bell peppers (red, yellow, or green) - 1 cup quinoa (rinsed) - 2 cups vegetable broth (or water) - 1 can black beans (15 oz, drained and rinsed) - 1 cup corn (frozen or canned) - 1 medium onion (diced) - 2 cloves garlic (minced) - 1 teaspoon cumin - 1 teaspoon smoked paprika - 1 teaspoon chili powder - Salt and pepper to taste - 1 cup diced tomatoes (fresh or canned) - 1 cup shredded cheese (cheddar or pepper jack, optional) - Fresh cilantro or parsley for garnish For this dish, I love using fresh bell peppers. They add color and crunch. You can choose red, yellow, or green peppers based on your taste. Quinoa is a great base for stuffing. It’s full of nutrients and easy to cook. You should rinse it to remove any bitter taste. Black beans and corn bring a nice texture and flavor. They also add protein and fiber. Diced onion and garlic make the dish aromatic and tasty. You can adjust the spices to your liking. Cumin, smoked paprika, and chili powder give it warmth and depth. For a twist, add diced tomatoes and cheese if you like. These ingredients enhance the flavor. Top with fresh herbs for a bright finish. This recipe is simple yet full of flavor. You can find the Full Recipe to guide you through each step. Enjoy your cooking adventure! - Preheat your oven to 375°F (190°C). - Cut the tops off the bell peppers and remove the seeds. Preparing the bell peppers is easy. Just slice off the tops and scoop out the insides. This step helps make room for the tasty filling. I like to lightly brush the outside with olive oil for extra flavor and crispness. - In a medium saucepan, combine quinoa and vegetable broth. - Bring to a boil, then reduce heat to low, cover, and simmer for about 15 minutes. Cooking quinoa is simple. Just mix it with vegetable broth in a pot. Bring it to a boil, then lower the heat. Cover it and let it simmer. After about 15 minutes, you’ll have fluffy quinoa. It’s a great base for the filling. - Heat olive oil in a large skillet over medium heat. - Add diced onion and sauté until translucent, then add minced garlic. Now, let’s sauté some veggies. Heat a bit of olive oil in a skillet. Add diced onion and cook until it turns soft and clear. This usually takes about 3-4 minutes. Then, add minced garlic and stir for another minute. The aroma will fill your kitchen! - Add black beans, corn, diced tomatoes, and spices to the skillet. - Stir until heated through, then mix in the cooked quinoa. Next, it’s time to bring everything together. Add black beans, corn, and diced tomatoes to your skillet. Sprinkle in your spices like cumin and chili powder for flavor. Mix it all well and heat for about 5 minutes. Finally, add the cooked quinoa and stir until combined. - Spoon the quinoa mixture into each prepared bell pepper. - Reserve some cheese for topping, if using. Now comes the fun part: stuffing! Use a spoon to fill each bell pepper with the quinoa mix. Don’t be shy; pack it in! If you like cheese, save some to sprinkle on top later. - Cover with aluminum foil and bake for 30 minutes. - Remove foil and bake an additional 10-15 minutes until tender. Place the stuffed peppers in a baking dish. Cover them with aluminum foil to keep them moist. Bake for 30 minutes. Then, remove the foil and bake for another 10-15 minutes. This will make them tender and delicious. You can find the Full Recipe at the start of this section. Enjoy your cooking! - To avoid soggy bell peppers, pre-bake them for 10 minutes. This helps them stay firm. - Rinse quinoa well before cooking. Use two cups of broth for one cup of quinoa. This keeps it fluffy. - Add cumin and smoked paprika for a warm taste. Fresh herbs like cilantro boost the flavor, too. - For cheese, add it only in the last 10 minutes of baking. This ensures it melts nicely and doesn’t burn. - Serve the stuffed peppers with a side salad for a complete meal. A light vinaigrette works great. - Garnish with fresh cilantro or parsley for color. A sprinkle of lime juice adds a zesty touch. For the full recipe, check out the vibrant quinoa-stuffed bell peppers! {{image_2}} You can make stuffed bell peppers vegan or vegetarian with simple swaps. For cheese, use vegan cheese or nutritional yeast. Instead of meat, add more beans or lentils. This option gives you plant-based protein and keeps the dish hearty. Quinoa is great, but try rice or couscous for a twist. Both options work well and change the texture. You can also mix in different vegetables like zucchini, spinach, or mushrooms. These additions boost flavor and nutrition. Want more heat? Add jalapeños or a dash of hot sauce. For milder flavors, skip the chili powder. You can also play with spices from other cuisines, like Italian herbs or curry powder. This lets you customize the dish to fit your taste. For the full recipe and more details, check out the [Full Recipe]. To keep your stuffed peppers fresh, let them cool first. Place them in a tight container. You can store them in the fridge for up to three days. If you want to keep them longer, freezing is a good option. To freeze your stuffed bell peppers, wrap each one tightly in plastic wrap. Then, place them in a freezer bag or container. They last for up to three months in the freezer. When ready to eat, take them out and thaw in the fridge overnight. For reheating, use the oven for the best taste. Set it to 350°F (175°C). Place the peppers in a baking dish with a little water. Cover with foil and bake for 20-25 minutes. You can also use a microwave. Just heat them for about 2-3 minutes. Make sure they are hot all the way through. Adding a splash of water can help keep them moist. Enjoy your tasty meal! Bake the stuffed peppers for 30 minutes covered with foil. Then, uncover and bake for another 10 to 15 minutes. This helps the peppers become tender and the cheese to melt nicely. Yes, you can prepare the stuffed peppers a day in advance. Just stuff the peppers and place them in the fridge. When you’re ready, bake them straight from the fridge. This saves time and keeps your meal fresh. Stuffed peppers pair well with many sides. Consider serving them with a simple green salad. You can also add some crusty bread or a side of rice. These options will round out your meal nicely. Stuffed peppers are quite healthy! They are packed with nutrients. Quinoa is a great source of protein and fiber. The peppers add vitamins A and C. Beans and corn also boost the nutrition, making this dish a great choice. Absolutely! You can use any bell pepper color: red, yellow, or green. Each adds a unique flavor. If you want to try something different, use poblano or jalapeño peppers for a bit of heat. Stuffed bell peppers are a tasty, healthy meal you can make easily. We covered the main ingredients like quinoa, black beans, and spices. I shared simple steps to prepare, cook, and bake the peppers. You learned tips to avoid soggy peppers and how to store leftovers too. Try different fillings and adjust spices to suit your taste. Cooking is fun, so experiment and enjoy your stuffed peppers.](https://southerndishes.com/wp-content/uploads/2025/06/85208949-c0e2-426a-afab-03706c6a0034.webp)
