

Latest & Greatest

Coconut Curry Ramen Bold and Flavorful Delight
If you’re craving a meal that’s both bold and comforting, look no further than Coconut Curry Ramen. This soup is
Read more…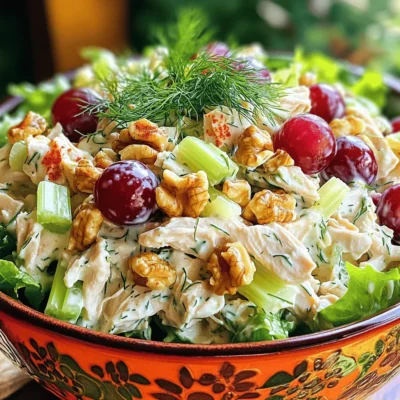
Greek Yogurt Chicken Salad Tasty and Healthy Dish
If you want a dish that is both tasty and healthy, you’re in the right place! Greek Yogurt Chicken Salad
Read more…
Cast Iron Skillet Pizza Perfect Crust Every Time
Cast Iron Skillet Pizza is a game changer for pizza lovers! With the right ingredients and simple steps, you can
Read more…
Buffalo Cauliflower Bites Crispy and Flavorful Snack
Are you craving a snack that’s both crispy and packed with flavor? Look no further than my Buffalo Cauliflower Bites!
Read more…
Blender Banana Oat Pancakes Easy and Delicious Recipe
Love pancakes but want a healthy twist? Try my easy and delicious Blender Banana Oat Pancakes! They’re simple to whip
Read more…
Creamy Spinach Artichoke Dip Flavorful and Easy Recipe
Dive into the rich, creamy world of Spinach Artichoke Dip! This flavorful and easy recipe makes a perfect snack for
Read more…
Mango Black Bean Quinoa Salad Fresh and Flavorful Dish
Are you looking for a fresh and tasty meal? Look no further! This Mango Black Bean Quinoa Salad is packed
Read more…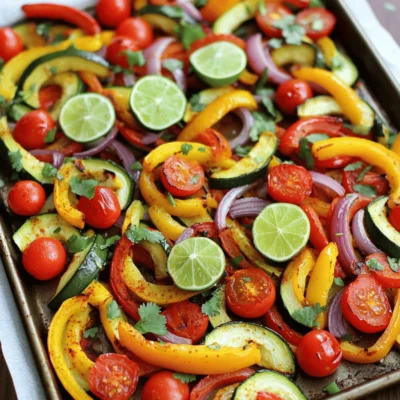
Sheet Pan Fajita Veggies Flavorful and Easy Recipe
Are you ready to spice up your dinner routine? My Sheet Pan Fajita Veggies recipe is both flavorful and simple!
Read more…browse recipes


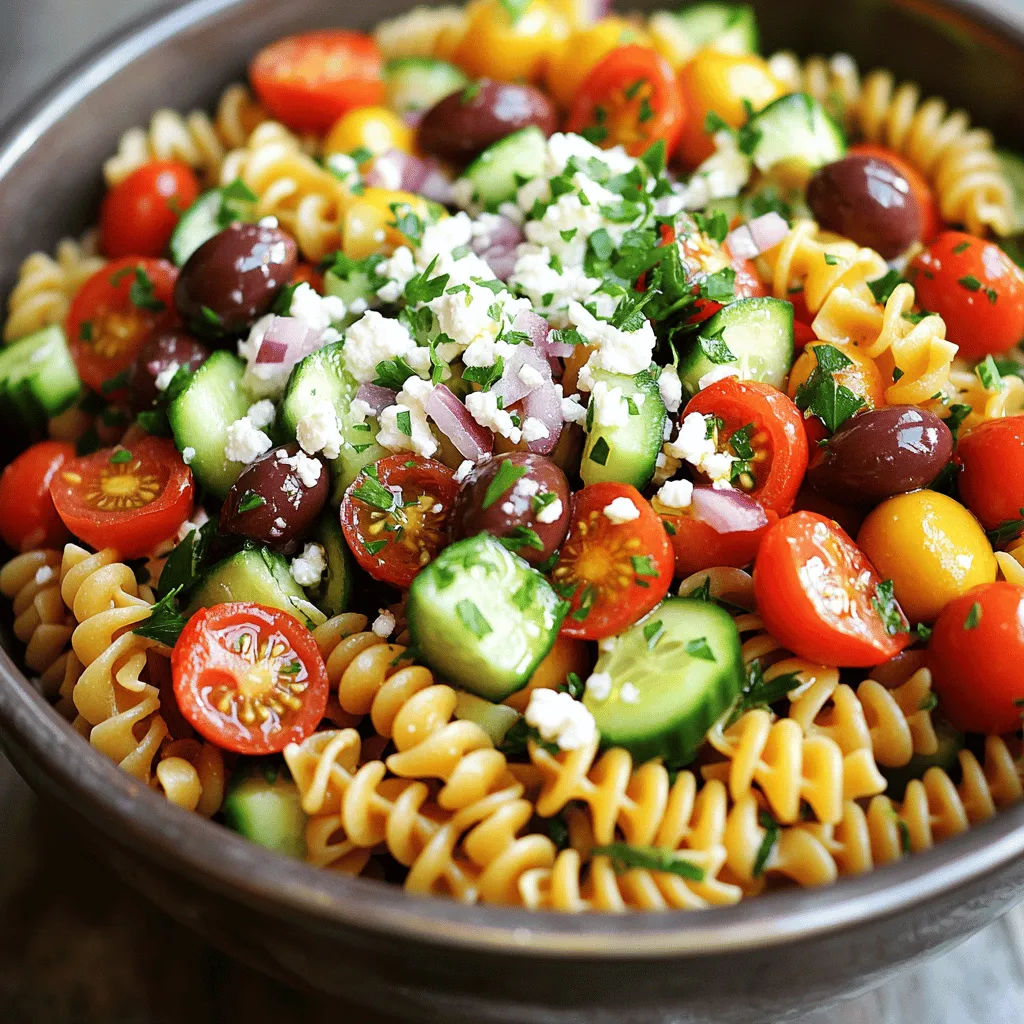
Greek Pasta Salad Fresh and Flavorful Recipe Delight
Greek Pasta Salad is a burst of color and flavor. You’ll learn how to mix fresh veggies, olives, and feta for a healthy meal.…
My Latest Desserts
My Latest Recipes

hey,
i’m !
I’m so happy you’re here!
My kitchen is filled with stories, flavors, and love and I’m so happy to share them with you. Here’s to dishes that feel like home.
![To make a No-Bake Nutella Cheesecake, you need the following: - 1 ¾ cups graham cracker crumbs - ½ cup unsweetened cocoa powder - ½ cup unsalted butter, melted - 1 cup Nutella - 16 oz cream cheese, softened - ½ cup powdered sugar - 1 teaspoon vanilla extract - 1 cup heavy whipping cream - Chocolate shavings or hazelnuts for garnish (optional) Each ingredient plays a big role in the taste and texture. The graham cracker crumbs form a sweet and crunchy crust. The cocoa powder adds a rich chocolate flavor. Nutella is the star of this dessert, bringing creamy chocolate-hazelnut goodness. Cream cheese gives the cheesecake its smooth and rich texture. The heavy whipping cream makes it light and fluffy. Lastly, powdered sugar sweetens it just right. When you shop for ingredients, look for fresh products. Choose high-quality cream cheese for a smooth finish. Check the Nutella for the best flavor; it should be creamy and rich. Fresh heavy whipping cream whips up better and adds more volume. For the crust, get graham crackers without artificial flavors. Quality ingredients make a big difference in your cheesecake's taste! Start by mixing 1 ¾ cups of graham cracker crumbs and ½ cup of cocoa powder in a medium bowl. This mix gives the crust a rich chocolate flavor. Next, add ½ cup of melted unsalted butter. Stir until the mixture looks like wet sand. Pack this mix tightly into a 9-inch springform pan. Use your fingers or a measuring cup to press it down firmly. This step is key to a sturdy crust. Once pressed, place the pan in the fridge to set while you make the filling. In a large bowl, beat 16 oz of softened cream cheese until it is smooth. Then, add 1 cup of Nutella, ½ cup of powdered sugar, and 1 teaspoon of vanilla extract. Mix these together until the filling is creamy and well combined. In another bowl, whip 1 cup of heavy whipping cream until you see soft peaks. Now, gently fold the whipped cream into the Nutella mix. Be careful not to deflate the cream, as the airy texture is important. Pour the Nutella cheesecake filling over your prepared crust. Use a spatula to smooth the top evenly. Cover the springform pan with plastic wrap and place it in the fridge. Let it chill for at least 4 hours, or overnight for the best texture. Once it is set, carefully remove the sides of the springform pan. If you want, you can garnish with chocolate shavings or chopped hazelnuts. Now you are ready to serve this delicious No-Bake Nutella Cheesecake! For a complete recipe, check out the Full Recipe section. To get a smooth and creamy cheesecake, start with softened cream cheese. Cold cream cheese will create lumps. Beat it well until it's fluffy. When you add whipped cream, fold gently. This keeps the air in the cream. The mixture should be light and airy. One big mistake is not pressing the crust firmly. If it's loose, the crust will fall apart. Another mistake is over-mixing the filling. This can make the cheesecake dense. Lastly, don’t skip the chilling time. It needs time to set. Four hours is the minimum, but overnight is best. For a richer taste, try adding a pinch of sea salt. It balances the sweetness. You can also mix in some hazelnuts for crunch. They add a nice texture. Feel free to drizzle extra Nutella on top before serving. Chocolate shavings also make it look fancy. For the full recipe, check out the details above. {{image_2}} You can change up the flavor of the cheesecake easily. Try using peanut butter instead of Nutella for a nutty twist. You can also mix in some caramel sauce for a sweet touch. For a fruity option, consider adding pureed strawberries or mango. Each of these flavors brings a unique taste to your cheesecake. You can also add spices like cinnamon or nutmeg for warmth. If you want a gluten-free cheesecake, use gluten-free graham crackers. Many brands offer these today. For a dairy-free option, substitute cream cheese with a non-dairy cream cheese. Use coconut cream in place of heavy whipping cream. This will still give you a rich texture without dairy. Always check the labels to ensure all your ingredients fit your dietary needs. Serve your cheesecake with a dollop of whipped cream on top. Fresh berries make a colorful and tasty addition too. You can also drizzle extra Nutella or chocolate sauce over the slices. Pair the cheesecake with coffee or tea for a delightful dessert experience. For a crunch, sprinkle some crushed hazelnuts or chocolate shavings on top. These small touches make a big difference. For the full recipe, check out [Full Recipe]. Store your no-bake Nutella cheesecake in the fridge. Keep it in the springform pan. Cover it with plastic wrap to prevent drying. You can also use a cake box. This keeps it fresh and ready to serve. Your cheesecake lasts about 5 days in the fridge. It tastes best within the first couple of days. Check for any signs of spoilage, like off smells or a change in texture. If it looks good and smells fine, it’s still safe to eat. For the best taste, serve it chilled. You can freeze leftovers if you need to. First, let it set completely in the fridge. Then, remove it from the springform pan. Wrap each slice tightly in plastic wrap. Place the slices in a freezer-safe bag. They can last up to 2 months in the freezer. To serve, let it thaw in the fridge overnight. Enjoy your no-bake Nutella cheesecake later with the same creamy taste! You can tell the cheesecake is set when it is firm to the touch. The edges should feel solid, and the center should have a slight jiggle. The best way to check is to give the pan a gentle shake. If it wobbles but does not appear liquid, it’s ready. It’s crucial to refrigerate the cheesecake for at least four hours. Overnight is even better for a perfect texture. Yes, you can make this cheesecake ahead of time. It actually tastes better after sitting in the fridge. Preparing it the day before allows the flavors to blend well. Just cover it with plastic wrap to avoid any fridge odors. When you are ready to serve, simply remove it from the fridge and garnish as you like. If you want to swap Nutella, try using chocolate hazelnut spread or a plain chocolate spread. You can also blend peanut butter with melted chocolate for a different flavor. For a lighter touch, consider using a fruit spread, like raspberry or strawberry, for a fruity twist. Adjust the sugar in the recipe as needed, depending on the sweetness of your substitute. This blog post covered key ingredients for your cheesecake, from the crust to the filling. I shared tips on selecting quality ingredients and avoiding common mistakes. We also explored variations to suit different diets. Remember proper storage to keep your cheesecake fresh. Always chill your dessert thoroughly for the best texture. Feel free to experiment with flavors or try substitutes. Enjoy making your cheesecake, and have fun with it!](https://southerndishes.com/wp-content/uploads/2025/05/b4f68974-3cf1-415d-8190-4c36e660e1bf-300x300.webp)

![For the perfect sweet and spicy chicken wings, you need: - 2 lbs chicken wings - 1/4 cup honey - 1/4 cup sriracha sauce - 2 tablespoons soy sauce - 1 tablespoon rice vinegar - 2 cloves garlic, minced - 1 teaspoon ginger, grated - 1 teaspoon smoked paprika - Salt and pepper to taste These ingredients create a delicious marinade that makes the wings flavorful and juicy. The honey adds sweetness while the sriracha brings the heat. To take your wings to the next level, consider these toppings: - 2 tablespoons sesame seeds - 2 green onions, sliced Sesame seeds give a nice crunch, and green onions add freshness. You can also mix and match toppings based on what you like. For full details on how to make these wings, check the Full Recipe. Preheating the Oven First, preheat your oven to 400°F (200°C). This temperature helps the wings cook evenly. Line a baking sheet with foil. This makes cleanup easier. Place a wire rack on top of the baking sheet. This allows hot air to circulate around the wings, making them crispy. Mixing the Marinade Next, grab a large bowl. Combine the following ingredients: - 1/4 cup honey - 1/4 cup sriracha sauce - 2 tablespoons soy sauce - 1 tablespoon rice vinegar - 2 cloves garlic, minced - 1 teaspoon ginger, grated - 1 teaspoon smoked paprika - Salt and pepper to taste Mix well until smooth. This marinade gives the wings their sweet and spicy flavor. Add the chicken wings to the bowl. Make sure they are coated evenly. Let them marinate for at least 30 minutes. For best flavor, marinate for up to 2 hours in the fridge. Basting and Baking Place the marinated wings on the wire rack. Space them out evenly for proper cooking. Reserve any leftover marinade for basting. Bake the wings in the preheated oven for 25 minutes. After 25 minutes, take them out and baste with the reserved marinade. This adds more flavor and moisture. Crispiness Adjustment Return the wings to the oven for an extra 10-15 minutes. Watch them closely. You want them golden brown and crispy. For added crispiness, switch the oven to broil. Broil the wings for 2-3 minutes. Keep an eye on them to prevent burning. Once done, your sweet and spicy chicken wings are ready! You can sprinkle sesame seeds and sliced green onions on top before serving from the [Full Recipe]. - Marination Time Recommendations I recommend marinating the wings for at least 30 minutes. If time allows, marinate them for up to 2 hours. This helps the flavors soak in deeply. The longer they marinate, the better they taste. - Adjusting Sweetness and Spice Levels You can easily tweak the sweetness and spice. Add more honey for extra sweetness. To make it spicier, increase the sriracha sauce. Taste your marinade before using it to find your perfect balance. - Baking vs. Deep Frying Baking chicken wings is a healthier option than deep frying. It uses less oil and allows for more even cooking. Baking at 400°F gives you crispy skin without the mess of frying. - Broiling for Extra Crisp For those extra crispy wings, broil them for a few minutes at the end. Keep a close eye on them to avoid burning. Broiling can take your wings from good to great with just a bit of time. Enjoy these tips as you prepare your sweet and spicy chicken wings! For the full recipe, check out the recipe section above. {{image_2}} Alternative Sauces You can switch up the sauces in this recipe. Instead of sriracha, try barbecue sauce or buffalo sauce. Both add their own unique flavors. For a sweet touch, use teriyaki sauce. It pairs well with honey. You can also mix sauces to create your own blend. Experiment with different flavors to find your favorite. Heat Level Adjustments If you want less heat, reduce the sriracha. You can add more honey to balance it out. If you like it hotter, add more sriracha or some cayenne pepper. Just a pinch goes a long way. Always taste as you go to get it just right. Pairings with Sides Sweet and spicy chicken wings go well with many sides. Try serving them with celery and carrot sticks for crunch. A fresh salad can also balance the flavors. For a heartier option, pair them with rice or potato wedges. Consider adding coleslaw for a refreshing crunch. Dipping Sauce Ideas Dipping sauces can enhance the wings even more. Ranch or blue cheese dressing are popular choices. You can also use a creamy garlic sauce for a twist. For extra spice, serve with a hot sauce on the side. Having different dips lets everyone customize their meal. This recipe is versatile, making it fun to switch things up. You can find the full recipe to get started. To keep your sweet and spicy chicken wings fresh, use proper storage methods. First, let the wings cool down after cooking. Then, place them in an airtight container. This keeps moisture out and flavors in. You can also wrap them tightly in plastic wrap. This option works well if you don’t have a container. Aim to eat the wings within three to four days. This timeframe ensures they stay tasty and safe to eat. If you want to store them longer, consider freezing. When it’s time to enjoy leftovers, reheating is key. The best way to reheat wings is in the oven. Preheat your oven to 350°F (175°C). Place the wings on a baking sheet lined with foil for easy cleanup. Heat them for about 10 to 15 minutes. This keeps them warm and helps regain some crispiness. To maintain that crispy texture, avoid microwaving the wings. Microwaving makes them soggy. For extra crunch, finish them under the broiler for a few minutes. Watch them closely to avoid burning. Enjoy your wings just like the first time with these simple reheating tips. For the full recipe, check the earlier section. Can I use frozen chicken wings? Yes, you can use frozen wings. Just thaw them first. This helps them cook evenly. Pat them dry before marinating. This step makes the wings crispier. How to make wings crispy in the oven? To make wings crispy, place them on a wire rack. This allows air to flow around them. Bake at 400°F for 25 minutes, then baste. Broil for 2-3 minutes for extra crispiness. What is the best sauce for chicken wings? The best sauce is one that balances sweet and spicy flavors. The honey and sriracha mix in the Sweet and Spicy Chicken Wings is a great choice. It creates a rich, tasty glaze. How long to bake chicken wings at 400°F? Bake chicken wings for about 25 minutes. After that, baste with your sauce. Then bake for an additional 10-15 minutes. This ensures they are cooked through and golden brown. Are sweet and spicy chicken wings healthy? Sweet and spicy chicken wings can be part of a balanced diet. They have protein from chicken. However, watch the sauce for sugar and sodium levels. How many calories are in a serving of chicken wings? A serving of chicken wings has about 400-500 calories. This depends on the size and amount of sauce. You can check the Full Recipe for more details on nutritional info. You now have a clear guide to making delicious chicken wings. We covered essential ingredients, steps, and variations. Topping them with sesame seeds or green onions can enhance flavor. Adjust marination time for the best taste. Remember to store properly and use the right reheating techniques for crispiness. Whether you bake or fry, enjoy experimenting with flavors and techniques. Your perfect chicken wings await!](https://southerndishes.com/wp-content/uploads/2025/05/4dbb56e4-adae-4fc6-86da-57baae3d95f5-300x300.webp)
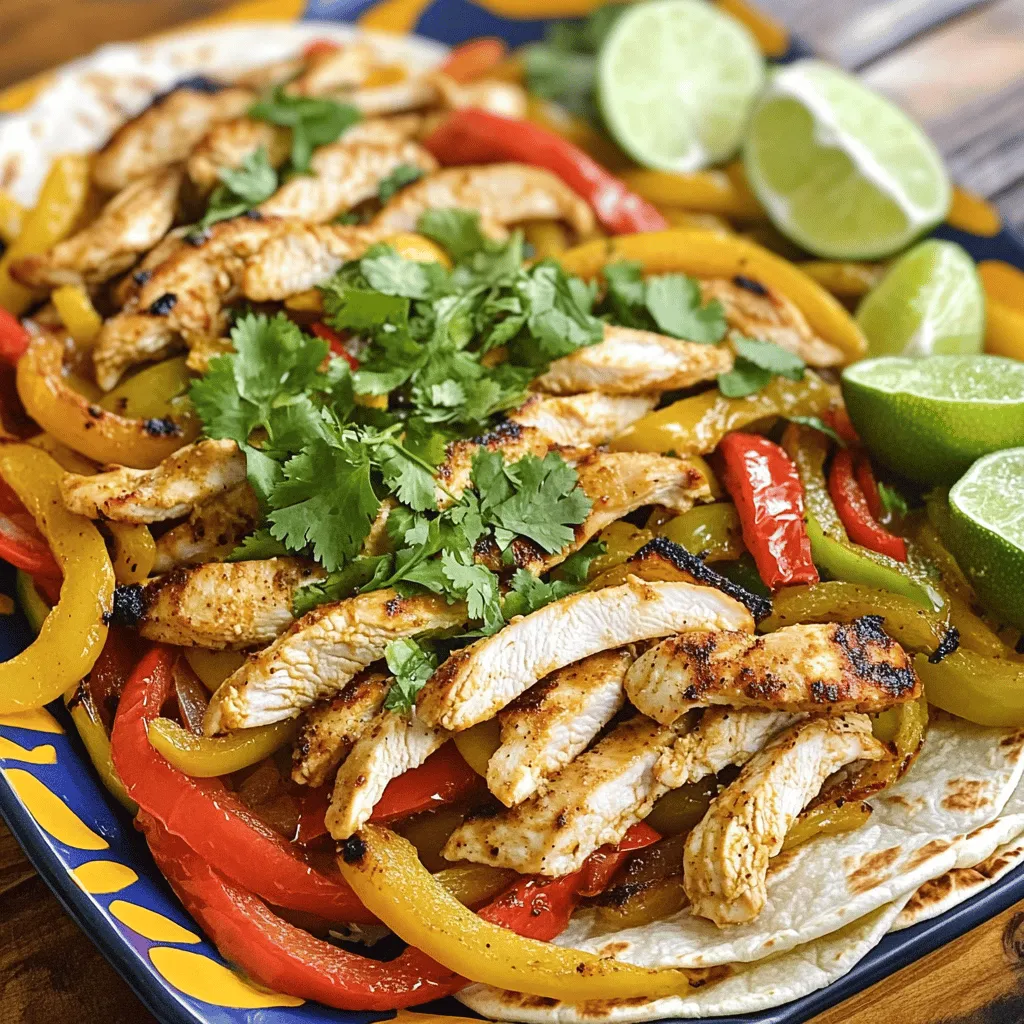
Easy Chicken Fajitas Flavorful and Quick Meal Recipe
Looking for a fast and tasty dinner? Try my Easy Chicken Fajitas! This simple recipe is packed with flavor and takes just minutes to…