Skip to content
DisclaimerTerms Of UseGDPR PolicyCookie Policy

Southern Dishes

  • Home
  • Drinks
  • Appetizers
  • Dinner
  • Dessert
  • About
  • Contact
  • Privacy Policy
DisclaimerTerms Of UseGDPR PolicyCookie Policy

Isabella

To make a delicious Cinnamon Roll Casserole, you'll need a few key items: - 2 cans refrigerated cinnamon roll dough (with icing) - 4 large eggs - 1 cup milk - 1 teaspoon vanilla extract - 1 teaspoon ground cinnamon These ingredients form the base of your casserole. The cinnamon roll dough provides a sweet, fluffy texture. The eggs and milk create a rich custard that soaks into the rolls. You can enhance your casserole with some fun additions. Here are a few ideas: - ½ cup maple syrup - ½ cup chopped pecans - 1 cup fresh blueberries Maple syrup adds extra sweetness and flavor. Chopped pecans give a nice crunch, while blueberries add a burst of freshness. You can mix and match or try them all! For the full recipe, check the details above. Enjoy making this easy and delightful dish! 1. Preheat your oven to 375°F (190°C). This ensures the casserole bakes evenly. 2. Grease a 9x13 inch baking dish with cooking spray or butter. This helps prevent sticking. 3. Open the cans of cinnamon roll dough. Cut each roll into quarters. Make sure to keep the pieces uniform for even cooking. 1. In a large mixing bowl, whisk together 4 large eggs, 1 cup of milk, 1 teaspoon of vanilla extract, and 1 teaspoon of ground cinnamon. Mix until everything is well blended. 2. Pour the egg mixture evenly over the cinnamon roll pieces in the baking dish. Use a spatula to gently press down. This helps all pieces soak up the mixture. 1. Drizzle ½ cup of maple syrup over the top of the casserole. You can also sprinkle chopped pecans and blueberries if you like these flavors. 2. Bake in the preheated oven for about 25-30 minutes. Check for doneness by inserting a toothpick into the center. It should come out clean when done. 3. Remove the casserole from the oven and let it cool for a few minutes. Drizzle the included icing over the top while it is still warm for that extra sweetness. For the full recipe, refer back to the ingredients and instructions provided. To ensure even soaking of cinnamon roll pieces, cut them into quarters. Spread the pieces evenly in your greased baking dish. Then, pour the egg mixture over them. Press down gently with a spatula. This helps each piece soak up the mix. To achieve a golden brown top, bake at 375°F for 25-30 minutes. Keep an eye on the casserole. The top should look golden, and the center should be set. If it browns too fast, cover it loosely with foil. For presentation, serve the casserole warm and cut it into squares. You can add fresh blueberries on top for a pop of color. A sprinkle of powdered sugar gives it a nice touch. Pair this dish with drinks like coffee or hot chocolate. It also goes well with sides like crispy bacon or fresh fruit. These options make your meal feel special and complete. {{image_2}} You can change the taste of your cinnamon roll casserole in fun ways. Try using different flavored syrups, like caramel or chocolate. This small change can make a big difference. You can also add fruits or nuts. Fresh apples or ripe bananas mix well with the sweet rolls. Chopped pecans or walnuts can add crunch and flavor. Mix and match to find your favorite combo! If you need gluten-free options, look for gluten-free cinnamon roll dough. Many brands offer this choice. You can also make dairy-free substitutions. Use almond milk or coconut milk instead of regular milk. For eggs, try a flaxseed meal or a commercial egg replacer. These changes make this dish fit for everyone. Enjoy your delicious cinnamon roll casserole with ease! To store your cinnamon roll casserole, cool it first. This step helps to keep the texture. Place any leftovers in an airtight container. You can keep it in the fridge for up to three days. Make sure to cover it well to prevent drying out. If you want to freeze the casserole, follow these steps: 1. Cool Completely: Let the casserole cool down to room temperature. 2. Wrap It Up: Use plastic wrap or aluminum foil to wrap it tightly. This keeps the air out. 3. Label and Freeze: Write the date on the wrap. You can freeze it for up to three months. When you’re ready to eat, thaw it in the fridge overnight. To reheat, place it in the oven at 350°F (175°C) for about 20 minutes. You can also use a microwave, but the oven gives a better texture. Enjoy your delicious cinnamon roll casserole! For the full recipe, check the section above. Can I prepare Cinnamon Roll Casserole in advance? Yes, you can prepare it ahead of time. Just follow the steps up to pouring the egg mixture over the rolls. Cover it and place it in the fridge overnight. This lets the flavors meld. In the morning, simply bake it as usual. What is the best way to reheat leftovers? To reheat, place slices in the microwave for about 30 seconds. You can also use the oven. Preheat it to 350°F (175°C) and warm the casserole for about 10 minutes. This keeps it soft and tasty. What to do if the casserole is too soggy? If your casserole turns out soggy, it may be due to too much liquid. Next time, reduce the milk or eggs slightly. You can also bake it a bit longer to firm it up. Just watch for burning. How to know when it is fully cooked? You’ll know it’s done when the top is golden brown. Insert a toothpick in the center. If it comes out clean, it’s ready. If it has wet batter, bake for a few more minutes. Can I use homemade cinnamon rolls instead of refrigerated? Absolutely! Homemade rolls work great in this recipe. Just cut them into quarters like the store-bought ones. They can add a fresh taste and unique texture. What can I substitute for eggs? You can use flaxseed meal as an egg replacement. Mix 1 tablespoon of flaxseed meal with 2.5 tablespoons of water. Let it sit for a few minutes until it thickens. This works well in many baked goods. This blog post outlined how to make a delicious Cinnamon Roll Casserole. You learned about the main ingredients and optional add-ins that make it unique. I shared step-by-step instructions for preparation, mixing, and baking. Cooking tips help ensure your casserole turns out perfectly. Plus, you found ideas for variations and how to store leftovers. Cinnamon Roll Casserole is fun and easy to customize. Enjoy making and sharing this sweet dish with others!

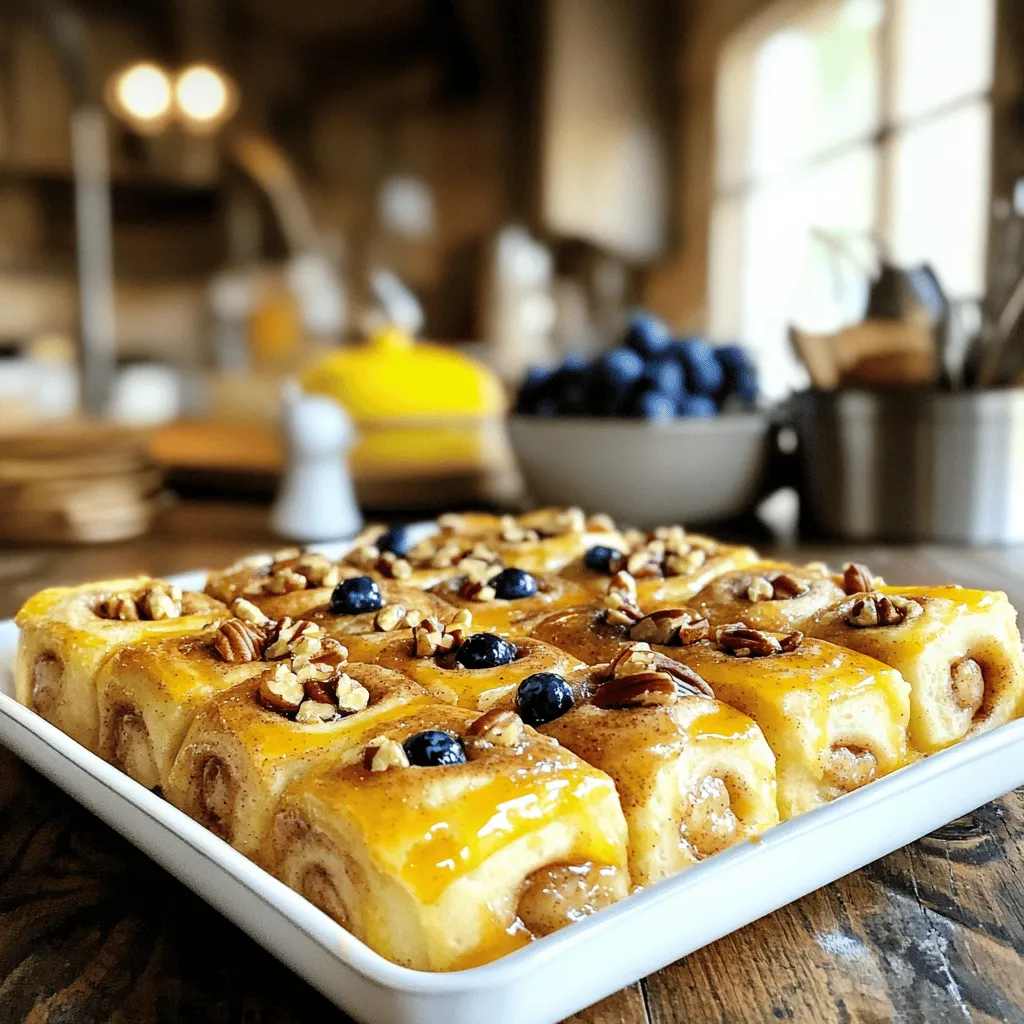
Cinnamon Roll Casserole Delightful and Easy Recipe

Looking for a delightful breakfast that’s easy to make? This Cinnamon Roll Casserole is your answer! In just a few

For a delightful Caprese Pasta Salad, you need fresh and simple ingredients. Here’s what you need: - 8 oz fusilli or rotini pasta - 1 cup cherry tomatoes, halved - 1 cup fresh mozzarella balls (bocconcini), halved - 1/2 cup fresh basil leaves, torn - 1/4 cup extra virgin olive oil - 2 tablespoons balsamic glaze - Salt and pepper to taste - Optional: 1/4 teaspoon red pepper flakes for a kick Each ingredient plays a key role in making this dish fresh and vibrant. The pasta serves as a hearty base, while cherry tomatoes add sweetness. Fresh mozzarella brings creaminess, and basil contributes a fragrant touch. The olive oil and balsamic glaze tie it all together with richness and tang. You can also add red pepper flakes if you like a bit of heat. Using high-quality ingredients matters. Fresh mozzarella and ripe tomatoes make a big difference in taste. When you get these ingredients right, your salad will shine. For the full recipe, check the details above. Enjoy your cooking adventure! 1. Start by boiling a large pot of water. Make sure to add salt. This helps flavor the pasta. 2. Add your fusilli or rotini pasta to the boiling water. Cook it until it is al dente. This means it should be firm but not hard. Check the package for the right cooking time. 3. Once done, drain the pasta. Rinse it under cold water. This stops the cooking process and cools it down quickly. 1. In a large mixing bowl, combine the cooled pasta, halved cherry tomatoes, mozzarella balls, and torn basil leaves. Toss gently to mix them well. 2. To make the dressing, take a small bowl. Whisk together the extra virgin olive oil, balsamic glaze, salt, and pepper. If you want a spicy kick, add red pepper flakes. 1. Pour the dressing over the pasta mixture. Toss everything gently. Make sure all the ingredients are coated with the dressing. 2. Taste the salad and adjust the seasoning if needed. You may want a bit more salt or pepper. 3. Let the salad rest for about 15 to 20 minutes. This helps the flavors blend together. Serve it in a large bowl or in individual portions. Enjoy this Caprese Pasta Salad Delight! For the full recipe, check out the details above. To make your Caprese pasta salad shine, use fresh ingredients. Fresh basil, ripe tomatoes, and good mozzarella are key. I recommend adding a pinch of salt and pepper to taste. For a bit of heat, try red pepper flakes. Letting the salad sit for 15-20 minutes is crucial. This time allows the flavors to blend well. You’ll notice a big difference in taste. Presentation makes your dish inviting. Use a large, colorful bowl to serve. Scatter extra basil leaves on top for a fresh look. Drizzle balsamic glaze over the salad before serving. This adds a nice touch and enhances the flavor. Serve chilled or at room temperature for the best experience. You want your guests to enjoy every bite. {{image_2}} You can easily change the pasta in this dish. Try penne or farfalle for a fun twist. Each shape holds the dressing differently, adding to your meal's taste. You can also switch up the cheese. Instead of mozzarella, use feta or goat cheese for a tangy flavor. For a heartier dish, add grilled chicken or chickpeas. This change boosts protein and makes the salad more filling. Feel free to add more veggies too. Bell peppers, cucumbers, or spinach can brighten the dish and add crunch. To give your Caprese pasta salad a kick, add spices or herbs. Fresh oregano or thyme can add depth. A pinch of garlic powder can also enhance the taste. You might want to try different dressings too. Swap balsamic glaze with a lemon vinaigrette for a zesty twist. A splash of pesto can also add richness and flavor. Experimenting with these swaps and enhancements will make your dish truly yours. For the full recipe, check out the details above. To keep your Caprese Pasta Salad fresh, use airtight containers. Glass or plastic containers work well. Make sure to seal them tightly. This salad can last in the fridge for about three days. Check for freshness before serving it again. For best results, serve the salad cold. If you prefer it warm, gently heat it in a pan. Use low heat to avoid overcooking the pasta. Stir it often, and watch closely. You can also enjoy it at room temperature. Just let it sit for a bit before serving. Caprese pasta salad is a bright and fresh dish. It combines pasta, tomatoes, mozzarella, and basil. This dish comes from Italy, inspired by the classic Caprese salad. It captures the flavors of summer with its simple ingredients. The salad is colorful and perfect for gatherings or picnics. You can tweak this recipe to fit your diet. Try using gluten-free pasta for a gluten-free option. Swap fresh mozzarella for feta cheese for a tangy twist. You can also add more veggies like bell peppers or cucumbers. For protein, grill chicken or shrimp to include in the salad. Yes, you can prepare this salad a few hours ahead. Just make the salad and store it in the fridge. The flavors will blend nicely as it sits. However, add the dressing just before serving. This keeps the pasta and veggies fresh and crisp. This Caprese pasta salad is fresh, tasty, and easy to make. We covered the ingredients and steps to create this dish. You learned how to mix the pasta, tomatoes, and cheese with a simple dressing. I shared tips for better flavors and how to present your salad. You can also swap ingredients and store leftovers effectively. Try this recipe today. Enjoy its fresh taste and vibrant flavors at your next meal!

Caprese Pasta Salad Fresh and Flavorful Delight

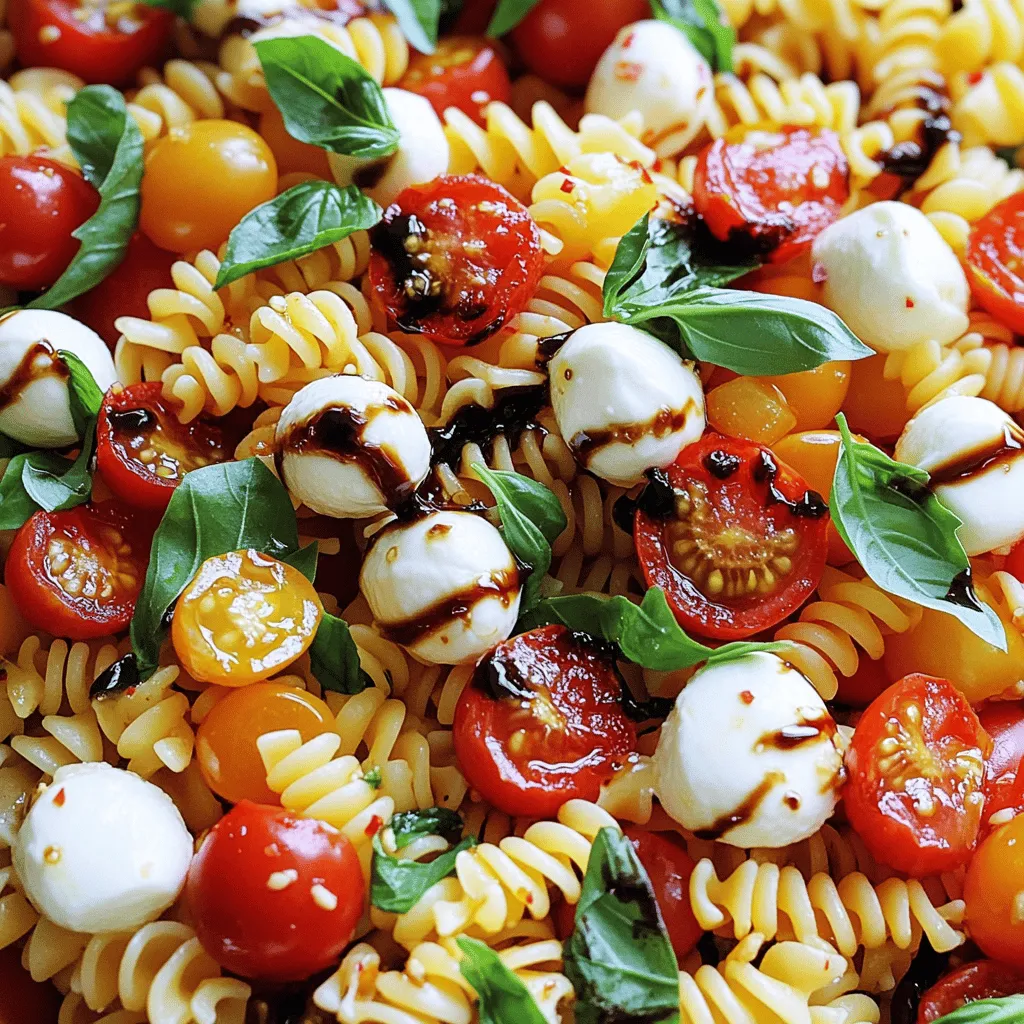
Looking for a dish that’s fresh, easy, and packed with flavor? You’re in the right place! Caprese Pasta Salad combines

To make stuffed bell peppers, gather these ingredients: - 4 large bell peppers (any color) - 1 cup quinoa, rinsed - 2 cups vegetable broth - 1 can (15 oz) black beans, drained and rinsed - 1 cup corn kernels (fresh or frozen) - 1 cup diced tomatoes (canned or fresh) - 1 teaspoon cumin - 1 teaspoon smoked paprika - 1 teaspoon garlic powder - Salt and pepper to taste - 1 cup shredded cheese (cheddar or mozzarella) - Fresh cilantro or parsley for garnish You can change some ingredients for your tastes. Here are some ideas: - Use brown rice or couscous instead of quinoa. - Swap black beans for kidney beans or lentils. - Try different vegetables like zucchini or spinach. - Use chicken or beef broth for added flavor. - Change the cheese to feta or goat cheese for a tangy taste. Stuffed bell peppers are healthy and filling. Here's a quick look at the nutrition: - Calories: About 400 per serving - Protein: 18 grams - Carbohydrates: 60 grams - Fiber: 12 grams - Fat: 12 grams - Vitamins and Minerals: Rich in vitamin C and potassium These values can vary based on your ingredient choices. For the full recipe, check out the complete guide. First, preheat your oven to 375°F (190°C). This helps the peppers cook just right. Next, take your bell peppers and slice off the tops. Be careful while cutting. Remove the seeds and membranes inside. Now, place the peppers upright in a baking dish. This keeps them steady while baking. In a medium saucepan, add 1 cup of rinsed quinoa and 2 cups of vegetable broth. Bring this to a boil. Once it boils, turn down the heat. Cover the pot and let it simmer for about 15 minutes. The quinoa will be fluffy when done. Make sure all the liquid is absorbed. In a large mixing bowl, combine the cooked quinoa, black beans, corn, and diced tomatoes. Add cumin, smoked paprika, garlic powder, salt, and pepper to taste. Mix everything well to blend the flavors. Now, it's time to stuff the peppers. Take each bell pepper and fill it with the quinoa mixture. Press down gently to pack it in. Top each pepper with shredded cheese. Cover the dish with aluminum foil and bake for 25 minutes. After that, remove the foil and bake for another 10 to 15 minutes. Look for bubbly, golden cheese on top. Once done, let them cool a bit before serving. Add fresh cilantro or parsley for a nice touch. For the full recipe, check out the details above. When you pick bell peppers, look for ones that feel firm. The skin should be smooth and shiny. Avoid peppers that have soft spots or wrinkles. These signs mean they are not fresh. Color also matters. Bright colors show that the pepper is ripe and full of flavor. Green, red, yellow, or orange peppers all bring different tastes. Choose the color you like best for your stuffed bell peppers. To cook quinoa well, rinse it first. Rinsing removes a bitter coating called saponin. Use two cups of vegetable broth for each cup of quinoa. This adds great flavor. Bring the broth to a boil. Then, lower the heat and cover the pot. Let it simmer for about 15 minutes. After that, fluff the quinoa with a fork. This makes it light and fluffy, perfect for stuffing. Serve your stuffed bell peppers warm. They look great on a plate and taste even better. You can pair them with a fresh salad or some crusty bread. A dollop of yogurt or sour cream on top adds creaminess. If you want a kick, try adding hot sauce or salsa. These sides enhance the meal and make it more filling. For more ideas, check out the Full Recipe! {{image_2}} For a tasty vegetarian option, you can load your peppers with veggies and grains. Try using cooked rice, lentils, or even couscous. You can mix in chopped spinach, zucchini, or mushrooms for added nutrition. Add your favorite spices like oregano or chili powder for extra flavor. I love using black beans and corn, as they provide great texture and taste. Don't forget to top with cheese for a nice melt! If you prefer meat, ground beef, turkey, or chicken work well. Begin by browning the meat in a pan before mixing it with other ingredients. You can add onions and garlic for a savory base. For a kick, include diced jalapeños or hot sauce. Meat adds richness and makes the dish more filling. Use the same cooking method as with the vegetarian version. To keep your stuffed peppers gluten-free, use quinoa or rice as your base. Both are great options that keep the dish hearty. Always check labels on canned products, as some may contain gluten. You can also explore using gluten-free grains like millet or farro. They offer unique flavors and textures. This way, everyone can enjoy stuffed peppers without worry! To store leftover stuffed bell peppers, wait until they cool down. Place them in an airtight container. You can keep them in the fridge for up to four days. If you want to enjoy them later, consider freezing them. To freeze stuffed bell peppers, wrap each pepper tightly in plastic wrap. Then, place them in a freezer-safe bag or container. Label the bag with the date. They can stay good in the freezer for up to three months. When you are ready to eat, just thaw them in the fridge overnight. To reheat, you can use the oven or microwave. For the oven, preheat it to 375°F (190°C). Place the peppers in a baking dish and cover with foil. Bake for about 20 minutes until heated through. If using a microwave, place one pepper on a microwave-safe plate. Heat for about 2-3 minutes, checking to see if it is hot. Enjoy your meal! For the full recipe, check back to the beginning. You can tell when the peppers are done by checking their texture. They should be soft but still hold their shape. The cheese on top should be melted and golden. If you poke a fork into a pepper, it should go in easily. This usually takes about 35 to 40 minutes in the oven. Yes, you can use other grains. Brown rice, couscous, or farro work well too. Each grain adds a unique taste and texture. Just make sure to cook the grain before stuffing the peppers. Follow package instructions for cooking times and water amounts. Reheating stuffed bell peppers is easy. You can use a microwave or an oven. For the microwave, place them on a plate and heat for about 2-3 minutes. If you prefer the oven, set it to 350°F (175°C) and bake for about 10-15 minutes. Cover with foil to keep them moist. For more details, check out the Full Recipe. This blog post offered a simple guide to making stuffed bell peppers. We discussed key ingredients, prep steps, and cooking methods. I shared tips for selecting fresh peppers and cooking quinoa perfectly. You learned about variations, storage, and how to reheat leftovers. Stuffed bell peppers are versatile and easy to customize. Enjoy this nutritious dish in your way!

Stuffed Bell Peppers Flavorful and Easy Recipe Guide

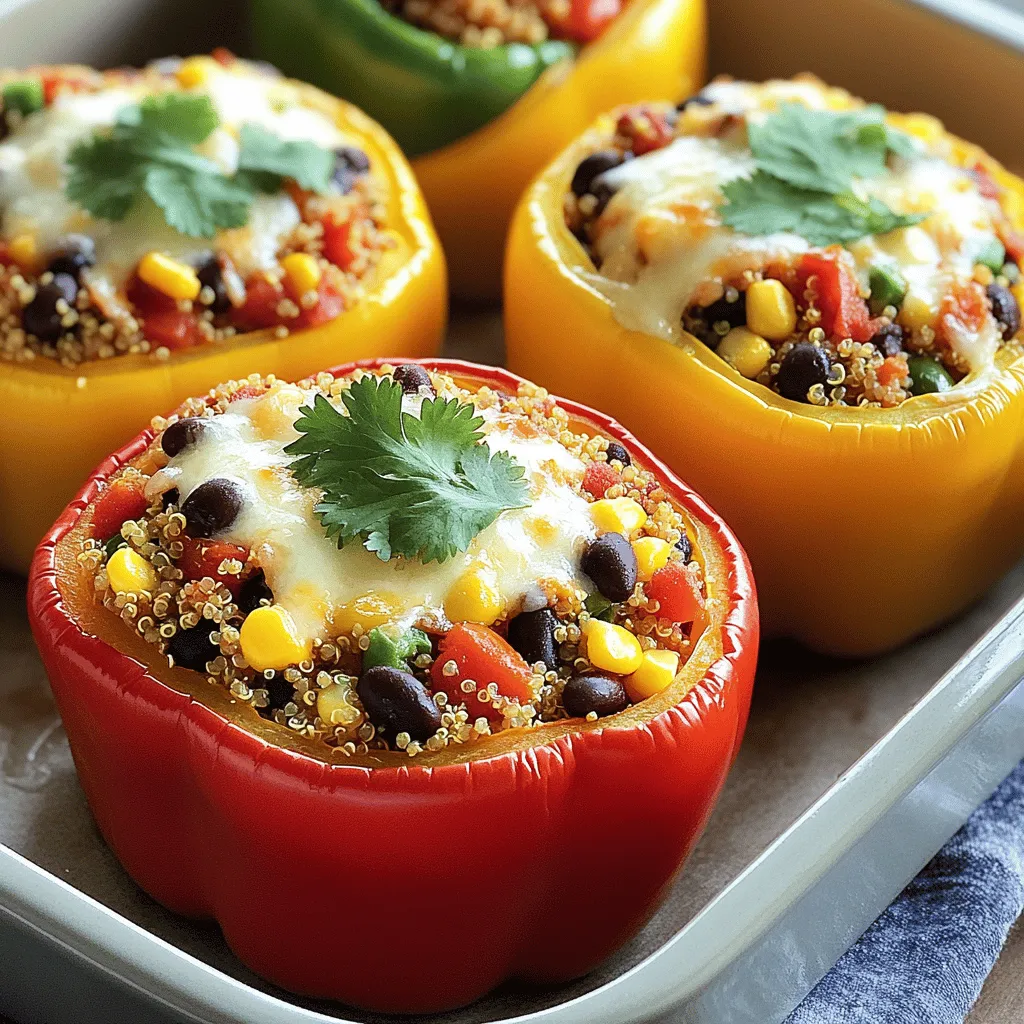
Are you ready to enjoy a delicious meal that’s easy to make? Stuffed bell peppers are a tasty option that

- Ripe peaches: 3, peeled and diced - Ripe mangoes: 2, peeled and diced - Coconut water or juice: 1 cup - Honey or agave syrup: 1/2 cup (adjust to taste) - Fresh lime juice: 2 tablespoons - Sea salt: A pinch For this peach mango sorbet, choose ripe fruits. Look for soft peaches and mangoes. They should smell sweet and fragrant. The coconut water adds hydration and a hint of flavor. You can swap honey with agave syrup for a vegan treat. The lime juice brightens up the taste and balances sweetness. Just a pinch of sea salt enhances all the flavors. Each ingredient works together to create a refreshing dessert. If you want to check the full recipe, you can find it above. - Blend the diced peaches and mangoes until smooth. - Combine with coconut water, honey, lime juice, and sea salt. First, gather your ripe peaches and mangoes. Peel and dice them. Use a blender to mix the fruits until smooth. This step is quick and easy. You want to make sure no chunks remain. Next, add coconut water to the blender. It gives the sorbet a nice, light flavor. Then, add the honey or agave syrup for sweetness. Adjust the amount to your taste. After that, squeeze in the fresh lime juice. This adds a zesty note. Finally, sprinkle in a pinch of sea salt. This enhances the flavors. Blend everything until it is well combined. - Pour the mixture into a shallow dish and freeze for 2 hours. - Scrape the mixture to break ice crystals, repeat freezing and scraping. Now it's time to freeze the mixture. Pour it into a shallow dish. This helps it freeze faster. Place it in the freezer for about 2 hours. Check it after 2 hours. When the edges start to freeze, use a fork to scrape the mixture. This breaks up ice crystals. Stir it well and return it to the freezer for another hour. Repeat this scraping and stirring. This will help you achieve a smooth texture. - Allow to freeze until firm for 2-3 hours. - Let sit at room temperature for easier scooping. Once you have scraped and stirred, let the sorbet freeze for 2-3 more hours. This will give it a firm consistency. Before you scoop it, let it sit at room temperature for about 5-10 minutes. This makes it easier to serve. Now, you're ready to enjoy your homemade peach mango sorbet! For the full recipe, check the ingredients and instructions above. To get the best texture for your peach mango sorbet, you need to scrape the mixture while freezing. This helps break up ice crystals. Every hour, take a fork and stir the mixture. This makes it creamy and smooth. If your sorbet is too sweet, add a bit more lime juice. The tartness balances the sweetness. Taste it as you go to find your perfect blend. For a stunning presentation, serve your sorbet in chilled bowls. This keeps it cold longer. You can also scoop it into cups for easy serving. Garnish with fresh mint leaves for a pop of color. A slice of lime on the side adds a nice touch, too. These small details make your sorbet look fancy and fun. Peach and mango are not just tasty; they are good for you! Peaches are low in calories and high in vitamins A and C. They help keep your skin healthy. Mangoes are rich in fiber and vitamin C, which supports your immune system. Together, they make a sweet treat that is also nutritious. Enjoying this sorbet is a great way to treat yourself without the guilt. {{image_2}} You can boost the flavor of your peach mango sorbet by adding other fruits. Strawberries and pineapple work great. Just chop them up and blend them in. You can also play with different juices. Try orange juice or apple juice instead of coconut water. Sweeteners can change the taste too. Maple syrup or a sugar substitute might be fun to use. If you want a vegan option, switch honey for agave syrup or maple syrup. Both options keep it sweet without using animal products. For a low-sugar sorbet, use less sweetener. You can even skip it if you use very ripe fruit. The natural sweetness of the fruit often shines through. Seasonal fruits can make your sorbet even better. In summer, use fresh, juicy peaches and mangoes. They taste sweeter and fuller. As seasons change, try other fruits. In the fall, you could swap peaches for ripe pears. Each season offers new flavors to explore. Keep it refreshing all summer long! For the full recipe, check out the details above. To keep your peach mango sorbet fresh, store it in the freezer. Use an airtight container to avoid freezer burn. A shallow container helps the sorbet freeze evenly. Make sure to leave some space at the top. The sorbet will expand as it freezes. Your sorbet can last up to two weeks in the freezer. After that, it may lose flavor and texture. Signs that the sorbet is bad include ice crystals forming on top. If it smells odd or has changed color, it's best to toss it. Yes, you can refreeze sorbet. However, this may change the texture. To restore the texture after refreezing, let it soften slightly. Give it a good stir with a fork to break up ice crystals. This will help bring back its creamy feel. For the best results, try to freeze it only once. For the full recipe, refer back to the earlier section. You can easily make peach mango sorbet without an ice cream maker. Start by blending ripe peaches and mangoes until smooth. Then, mix in coconut water, honey, lime juice, and a pinch of sea salt. Pour the mix into a shallow dish and freeze it for about 2 hours. Scrape it with a fork to break the ice crystals. Repeat this process every hour until it's firm. This method gives you a lovely texture without extra tools. To prevent ice crystals in your sorbet, the key is to scrape the mixture while it freezes. This helps break up any ice that forms. You should scrape it every hour after the first two hours. Also, using ripe fruits with natural sugars can help. They create a smoother mix and reduce crystal formation. Keeping the mixture well blended and adding a little lime juice also aids in achieving that silky texture. Yes, you can use frozen fruits for this sorbet recipe. Using frozen peaches and mangoes can make your sorbet even easier to prepare. Just blend the frozen fruits directly without thawing them first. You may need to adjust the liquid content a bit since frozen fruits release some moisture as they blend. This can still yield a delicious and refreshing sorbet. Yes, you can make this peach mango sorbet sugar-free. Instead of honey or agave syrup, use a sugar-free sweetener like stevia or erythritol. Adjust the amount to taste, as these sweeteners can vary in sweetness. Be sure to check the sweetener's flavor to ensure it blends well with the fruit. You will still enjoy a creamy and tasty sorbet without added sugar. You learned how to make delicious peach mango sorbet step by step. We covered the best ingredients, easy methods, and tips for great taste. Remember to scrape the mixture while freezing for perfect texture. Try different fruits or sweeteners for fun variations. Storing your sorbet properly will keep it fresh and tasty. This treat is not only fun to make but also healthy. Enjoy serving it to friends or family—it’s sure to impress!

Peach Mango Sorbet Refreshing and Simple Recipe

Craving a cool treat that’s both delicious and easy to make? Dive into my Peach Mango Sorbet recipe! Made with

- Fresh mozzarella balls - Cherry tomatoes - Fresh basil leaves The main stars of this dish are fresh mozzarella, cherry tomatoes, and basil. Fresh mozzarella balls, also called bocconcini, provide a soft, creamy texture. Cherry tomatoes add a burst of sweetness. Fresh basil leaves bring a fragrant aroma and a hint of peppery flavor. Together, these ingredients create a bright and tasty treat. - Balsamic glaze - Extra virgin olive oil - Salt and pepper Next, we enhance our skewers with a few extras. Balsamic glaze adds a rich, tangy sweetness. Extra virgin olive oil gives a smooth finish and extra flavor. A sprinkle of salt and pepper rounds out the taste, making every bite delightful. - Types of skewers to use - Recommended sizes When it comes to skewers, you have options. Wood or bamboo skewers work well. You can also use metal skewers for a more eco-friendly choice. I recommend a length of 4-6 inches. This size is perfect for holding a few ingredients without being too long to handle. For the full recipe, refer to the section above. Start by washing the cherry tomatoes and fresh basil leaves under cold water. This removes dirt and makes them clean. Next, pat them dry with a paper towel. This step is key for keeping things fresh. If your mozzarella balls are packed in water, drain them. After draining, pat them dry as well. This helps avoid sogginess in your skewers. Now, it’s time to assemble the skewers. Take a skewer and thread one cherry tomato onto it. Next, add a basil leaf on top of the tomato. Following that, add a mozzarella ball. Continue this layering by adding another basil leaf and finish with another cherry tomato. Repeat this process for the remaining skewers. You can place 2-3 of each ingredient on each skewer. This creates a colorful and tasty treat. After assembling, it’s time for the final touches. Drizzle the skewers lightly with extra virgin olive oil and balsamic glaze. This adds a rich flavor. Finally, season them with a pinch of salt and pepper. This step enhances the taste of the fresh ingredients. Serve them right away or refrigerate for up to an hour before serving. This allows the flavors to blend nicely. For the Full Recipe, check the earlier section. To make the best Caprese Salad Skewers, you need ripe tomatoes. Look for tomatoes that feel firm yet slightly soft when you press them. Their color should be bright and vibrant. Ripe tomatoes give your skewers a sweet and juicy taste that really shines. Next, you should select high-quality mozzarella. Fresh mozzarella balls, or bocconcini, are ideal. They should feel soft and moist. When you bite into them, they should have a creamy texture. Good mozzarella makes a big difference in flavor. For the best accompaniments, serve your skewers with crusty bread or a light salad. A simple arugula salad pairs nicely. It adds a peppery kick that balances the flavors. You can also serve them with olives or marinated artichokes for extra flavor. When it comes to presentation, arrange the skewers on a nice platter. You can add a drizzle of balsamic glaze over the top. Place a few fresh basil leaves around the skewers for color. This makes your dish look as good as it tastes. Serve your skewers right after you make them for the best taste. The flavors meld beautifully when they are fresh. If you need to prepare them ahead of time, you can store them in the fridge for up to an hour. This lets the flavors combine without losing freshness. Just remember to take them out about 10 minutes before serving to let them come to room temperature. For the full recipe, check the section above. {{image_2}} You can swap fresh mozzarella for other cheeses. Try using burrata for a creamier texture. Feta adds a salty kick, too. If you're feeling adventurous, goat cheese brings a tangy twist. You can also play with herbs and veggies. Add arugula for a peppery taste. You could use mint for a refreshing hint. Cherry tomatoes can be replaced with roasted red peppers for a smoky flavor. Dipping sauces can take your skewers to the next level. A simple pesto pairs well with the fresh flavors. Try a sun-dried tomato dip for a rich taste. You can enhance flavor profiles by adding herbs to your dips. Blend fresh basil into yogurt for a creamy sauce. A dash of lemon juice can brighten up any dip. In summer, use fresh peaches or nectarines. Their sweetness contrasts nicely with the savory cheese. You can also add cucumber slices for a cool crunch. For winter holidays, consider using roasted cherry tomatoes. They add warmth and depth. You might also try cranberries for a festive pop of color and flavor. To store your prepared skewers, place them in the fridge. Use a covered container to keep them fresh. This helps seal in the flavors and keep the skewers crisp. If you need to, you can also wrap the skewers in plastic wrap. Make sure they stay cool until you're ready to serve. For long-term storage, you can freeze the ingredients. However, I recommend freezing only the mozzarella and tomatoes. The basil does not freeze well. To freeze, place mozzarella balls and tomatoes in a freezer bag. When you’re ready to use them, thaw them in the fridge. After thawing, reassemble the skewers with fresh basil. This keeps everything tasting great. To ensure flavor retention, always season just before serving. This keeps the flavors bright and fresh. Avoid sogginess by not drizzling the balsamic glaze until you're ready to eat. If you follow these tips, your Caprese salad skewers will stay delicious and vibrant! Caprese Salad Skewers are already gluten-free. The main ingredients are cherry tomatoes, mozzarella, and basil. Just ensure any sauces, like balsamic glaze, do not contain gluten. You can check the label for safety. Yes, you can prepare the skewers in advance. However, they taste best when fresh. You can make them up to an hour before serving. Just keep them covered in the fridge. This keeps them cool and fresh. For a party, arrange the skewers on a large platter. You can drizzle extra balsamic glaze over them for a nice touch. Add fresh basil leaves around the skewers for color. This makes the dish eye-catching and tasty. Caprese Salad Skewers can sit out for about two hours. After that, they should be refrigerated. If it’s very warm, keep them out for less time. This helps prevent spoilage and keeps your guests safe. Yes, mozzarella pearls work great! They are smaller and easy to handle. Just thread them onto the skewers like the balls. They add a fun twist to the dish. You can find them in most grocery stores. For more details, check the Full Recipe for Caprese Salad Skewers! Caprese salad skewers are simple yet tasty. We explored key ingredients like fresh mozzarella, tomatoes, and basil. You learned the steps for easy assembly and ways to improve flavors. We also discussed variations, serving tips, and storage advice. These skewers are fun to make and share. Enjoy experimenting with new ideas for your next gathering!

Caprese Salad Skewers Fresh and Flavorful Treats

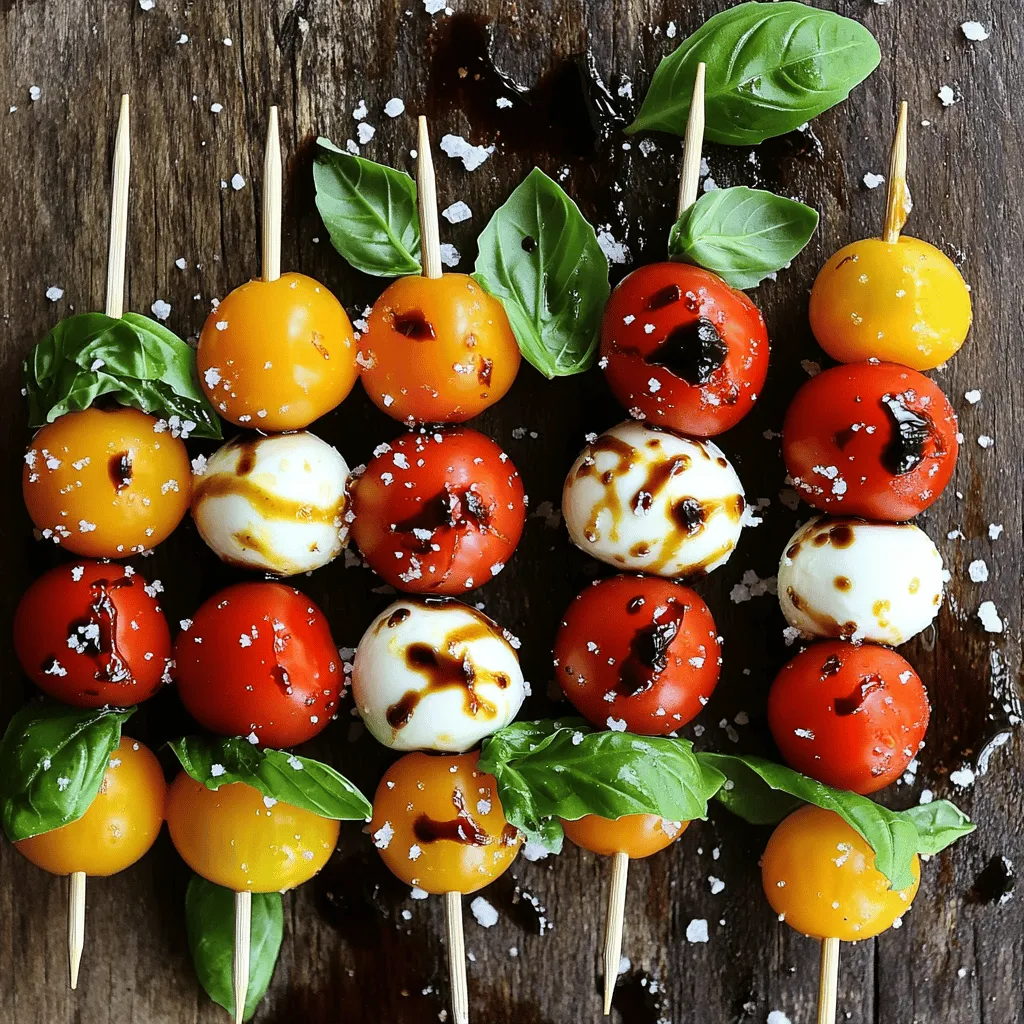
If you’re looking for a fresh and tasty bite, try Caprese Salad Skewers! These easy-to-make treats combine juicy tomatoes, creamy

- Rolled Oats - Cranberries (Fresh or Dried) - Orange (Zest and Juice) The heart of this recipe is the rolled oats. They provide a great base and a chewy texture. I recommend using whole rolled oats for the best flavor. Next, cranberries add a tangy twist. You can use fresh or dried cranberries, depending on what you have. Fresh cranberries give a burst of flavor, while dried ones add sweetness. Finally, the orange zest and juice brighten the dish. The zest brings a punch, while the juice adds sweetness. - Sweeteners (Maple Syrup or Honey) - Nuts (Walnuts or Almonds) - Toppings (Banana, Yogurt) You can also add sweeteners like maple syrup or honey. They enhance the dish's taste. If you want more crunch, add nuts like walnuts or almonds. They provide healthy fats and protein. For toppings, consider sliced banana or a dollop of yogurt. These extra touches make your oatmeal even better. - Caloric Breakdown - Key Nutrients Cranberry orange oatmeal is not only tasty but also healthy. A serving has about 300-350 calories. It’s packed with fiber, vitamins, and minerals. Oats are rich in fiber, which helps digestion. Cranberries add antioxidants, and oranges provide vitamin C. Together, they make a balanced meal. For the full recipe, check out the details above. First, we need to boil water or almond milk. I prefer almond milk for a creamier texture. In a medium saucepan, add 2 cups of water or almond milk. Bring it to a boil over medium heat. Once the liquid is boiling, stir in 1 cup of rolled oats and 1/4 teaspoon of salt. Reduce the heat to low. Let the oats simmer for about 5 minutes. Stir occasionally to prevent sticking. Now it’s time to add some flavor. I like using fresh or dried cranberries. Add 1 cup of cranberries to the oats. Then, add the zest and juice of 1 orange. This will give a bright, fresh taste to your oatmeal. Next, drizzle in 2 tablespoons of maple syrup or honey. This adds some sweetness. Don’t forget to sprinkle in 1 teaspoon of ground cinnamon. Stir everything together and cook for another 2-3 minutes. The cranberries will soften, and the mixture will thicken nicely. After cooking, remove the saucepan from heat. Let it sit for a minute to cool slightly. Now, stir in 1/4 cup of chopped nuts like walnuts or almonds. This adds a nice crunch to the dish. Serve your oatmeal warm. You can top it with sliced banana, extra cranberries, or a dollop of yogurt for an extra treat. Enjoy this delightful meal! For the complete recipe, check out the Full Recipe section. Achieving Perfect Texture To get the best texture, use rolled oats. They cook well and remain chewy. Bring your water or almond milk to a boil first. Stir in the oats and salt. Cook on low heat. This keeps the oats tender and creamy. Avoiding Clumps To avoid clumps, stir the oats often while cooking. Use a whisk if needed. This helps separate the oats and keeps them smooth. If you see any clumps, break them apart with a spoon as you stir. Alternative Spices You can add more flavor with spices. Try nutmeg or ginger for a warm taste. A pinch of vanilla extract also brightens the dish. These spices work well with cranberries and orange. Sweetness Adjustments Adjust the sweetness to your liking. If you prefer it sweeter, add more maple syrup or honey. For less sweetness, cut back on these. You can also use mashed banana for natural sweetness. Eye-Catching Presentation Techniques Make your oatmeal look great. Serve it in a bowl with layers. Add cranberries on top for a burst of color. A sprinkle of nuts adds a nice crunch and contrast. Garnishing Tips Garnish with fresh orange slices or zest. This adds a pop of color and fresh aroma. A dollop of yogurt on top gives a creamy finish. These small touches make your dish more inviting. {{image_2}} You can change the fruits in your oatmeal based on the season. Try adding diced apples in the fall, or fresh berries in summer. Mixing different fruits gives your oatmeal a fun twist. For example, combine cranberries with chopped pears for a sweet and tart blend. If you need gluten-free options, use certified gluten-free oats. This makes the recipe safe for those with gluten intolerance. For vegan substitutions, replace honey with maple syrup. You can also swap almond milk for regular milk to keep it dairy-free. Scaling the recipe is easy. If you want to serve more people, just double or triple the ingredients. For meal prep, make a big batch and store it in the fridge. You can reheat individual portions during the week. This way, you enjoy a healthy breakfast without the fuss each morning. Check out the [Full Recipe] to get started! Store any leftover cranberry orange oatmeal in an airtight container. This keeps it fresh and prevents odors. Always let it cool before sealing. It lasts up to three days in the fridge. Reheat oatmeal in the microwave or on the stove. For the microwave, use a bowl and heat for 30 seconds. Stir and check the warmth. On the stove, add a splash of water or milk. Heat over low heat, stirring often. This helps keep its creamy texture and flavor. You can freeze oatmeal for later. Portion it into single servings in freezer-safe containers. Be sure to leave space at the top for expansion. It stays good for about three months in the freezer. When ready to eat, thaw overnight in the fridge. Reheat it on the stove or microwave as mentioned before. Adjust with a little liquid if needed. Enjoy your warm, flavorful meal! How to make Cranberry Orange Oatmeal vegan? To make this oatmeal vegan, simply use almond milk instead of cow’s milk. Swap out the honey for maple syrup. This keeps the recipe plant-based while still offering great taste. Can I use instant oats instead of rolled oats? Yes, you can use instant oats. They cook faster but will change the texture. Instant oats will create a creamier oatmeal. Just reduce the cooking time to avoid mushiness. What can I substitute for maple syrup? You can use agave nectar or honey as a sweetener. Both will add sweetness without changing the flavor much. If you want a lower-calorie option, use stevia or a sugar substitute. Can I use dried orange zest? Yes, dried orange zest is a fine substitute for fresh zest. Just use a smaller amount, as dried zest has a stronger flavor. About half a teaspoon should work well. What are the health benefits of oats? Oats are full of fiber, which helps digestion. They can lower cholesterol and keep you full longer. They also provide energy, making them a great breakfast choice. Are cranberries good for digestion? Yes, cranberries are good for digestion. They have fiber that helps keep your gut healthy. Plus, they are rich in antioxidants, which can support overall health. This article showed how to make delicious cranberry orange oatmeal. You learned about essential and optional ingredients, as well as tips for the best taste. We covered variations to fit your diet and storage ideas to keep leftovers fresh. Incorporating oats into your meals can bring health benefits. You can make this dish your own by mixing flavors or adjusting sweetness. Enjoy creating a warm bowl of oatmeal that makes breakfast exciting and nutritious.

Cranberry Orange Oatmeal Healthy and Flavorful Recipe

Kickstart your morning with a warm bowl of Cranberry Orange Oatmeal! This healthy recipe bursts with flavor and brightens your

- 2 pounds baby potatoes, halved - 3 tablespoons olive oil - 4 cloves garlic, minced - 1 teaspoon dried rosemary - 1 teaspoon dried thyme - ½ cup grated Parmesan cheese - Salt and pepper to taste - Fresh parsley, chopped (for garnish) When I make Garlic Parmesan Roasted Potatoes, I love the simple, fresh ingredients. First, baby potatoes are perfect. Their small size lets them cook quickly and get crispy. Halving them helps with even cooking. Next, I use olive oil for richness. It helps the potatoes brown well. The garlic adds a strong flavor that makes this dish special. I always use fresh garlic, minced finely. It gives a punch that pairs well with the cheese. I add dried rosemary and thyme for a cozy taste. These herbs mix nicely and add depth. Salt and pepper are key to bring all the flavors together. Finally, the Parmesan cheese makes it all better. It melts and gets golden, adding a nice crunch. I like to garnish with fresh parsley. It adds color and a fresh taste. For the full recipe, check out the details above. Enjoy your cooking! - Preheat oven to 400°F (200°C). - In a large bowl, mix halved potatoes with olive oil, garlic, rosemary, thyme, salt, and pepper. Toss until the potatoes are coated well. This step is key. The olive oil helps the potatoes crisp up in the oven. The garlic and herbs add great flavor. Make sure every piece is covered. - Spread the potatoes evenly on a baking sheet lined with parchment paper. - Roast for 25 minutes, turning halfway through. Even heat is important. Spreading the potatoes out helps them cook evenly. Turning them halfway ensures they get crispy on all sides. You want that golden brown look! - After 25 minutes, take the baking sheet out. Sprinkle the grated Parmesan cheese evenly over the potatoes. - Roast for an additional 5-10 minutes until the cheese melts and turns slightly golden. The cheese adds a rich flavor and a nice crunch. Keep an eye on them so they don’t burn. When they come out, let them cool for a few minutes. Then, garnish with fresh parsley before serving. This process makes Garlic Parmesan Roasted Potatoes a crispy and tasty dish you’ll love. For the full recipe, check out the source. To get those golden, crispy potatoes, spread them out in a single layer on your baking sheet. When they touch, they steam instead of roast. This steaming keeps them soft, but we want crunch! Set your oven to 400°F (200°C). This heat works best to brown the potatoes. If you cook them at too low a temperature, they will not crisp up well. Want to kick up the flavor? Try adding herbs like oregano or basil. They work well with garlic and Parmesan. A pinch of smoked paprika adds a nice touch too. To really boost the garlic flavor, use fresh garlic instead of powdered. You can also roast the garlic beforehand. This will sweeten it and give it a deep flavor. You can prep the potatoes the night before. Just cut them and toss them in olive oil and seasoning. Keep them in the fridge until you are ready to roast. If you have leftovers, store them in an airtight container. When you reheat, use the oven for best results. Just place them on a baking sheet and heat at 350°F (175°C) until hot. {{image_2}} You can change the cheese to fit your taste. Instead of Parmesan, try Gruyère or cheddar. Both add a rich flavor. For potatoes, baby potatoes work great, but you can use Yukon Gold or red potatoes too. Each type gives a different texture. Yukon Golds are creamy, while reds are firmer. Want to spice things up? Make Mediterranean-style roasted potatoes. Add olives and feta cheese. The salty olives and creamy feta mix well with garlic and herbs. Or try a Southwest version. Add spices like cumin and chili powder. Toss in some jalapeños for heat. This twist gives the dish a fun kick. These Garlic Parmesan Roasted Potatoes pair well with many main dishes. Serve them with grilled chicken or steak. They also go great with fish. For dips, try ranch or a spicy aioli. A tangy yogurt sauce is another good choice. These dips add extra flavor and fun to your meal. For the full recipe, check out the details on how to make these amazing potatoes. To keep your Garlic Parmesan Roasted Potatoes fresh, place them in an airtight container. This helps prevent them from drying out. Store them in the fridge for up to four days. Make sure they are fully cooled before sealing. You can freeze your roasted potatoes if you want to save some for later. Let them cool completely first. Then, place them in a freezer-safe bag or container. They can stay frozen for up to three months. When you're ready to eat, reheat them in the oven at 400°F (200°C) for about 15-20 minutes. This keeps them crispy and tasty. Transforming your leftovers into new meals is easy! Try adding them to a salad for extra texture and flavor. You can also use them in casseroles or frittatas. Mixing them with eggs creates a hearty breakfast dish. The options are endless! For more ways to enjoy your Garlic Parmesan Roasted Potatoes, check out the Full Recipe. To make your roasted potatoes crispy, follow these tips: - Use small, even-sized baby potatoes. This helps them cook evenly. - Dry the potatoes well before seasoning. Moisture can make them soggy. - Toss them in olive oil and seasonings. This adds flavor and crunch. - Spread the potatoes out on the baking sheet. Give them space to brown. - Turn them halfway through cooking. This ensures all sides get crispy. - Add the Parmesan cheese at the end. This keeps it from burning. These steps will give you the best texture and flavor. Yes, you can prepare Garlic Parmesan Roasted Potatoes ahead of time. - Cut and season the potatoes, then store them in the fridge for a day. - You can also roast them fully and store leftovers. Just cool them first. - To reheat, place them in a hot oven for about 10-15 minutes. This helps them regain their crispiness. Plan ahead for easy meal prep or gatherings! Garlic Parmesan Roasted Potatoes pair well with many dishes. - Serve them with grilled chicken or steak for a hearty meal. - They complement fresh salads, like a Caesar or mixed greens. - Try them with roasted vegetables for a colorful plate. - They also go great with a dipping sauce, like ranch or aioli. These ideas will make your meals more enjoyable and balanced. For the complete recipe, check out the Full Recipe section. To sum up, we explored the tasty Garlic Parmesan Roasted Potatoes. You learned the key ingredients, like baby potatoes and garlic, along with cooking steps. I shared tips for crispiness and flavor boosts, plus fun variations. Remember to store leftovers well or turn them into new meals. These potatoes can pair with many dishes to please every palate. Enjoy making them and sharing the joy of cooking with others.

Garlic Parmesan Roasted Potatoes Crispy and Tasty Dish

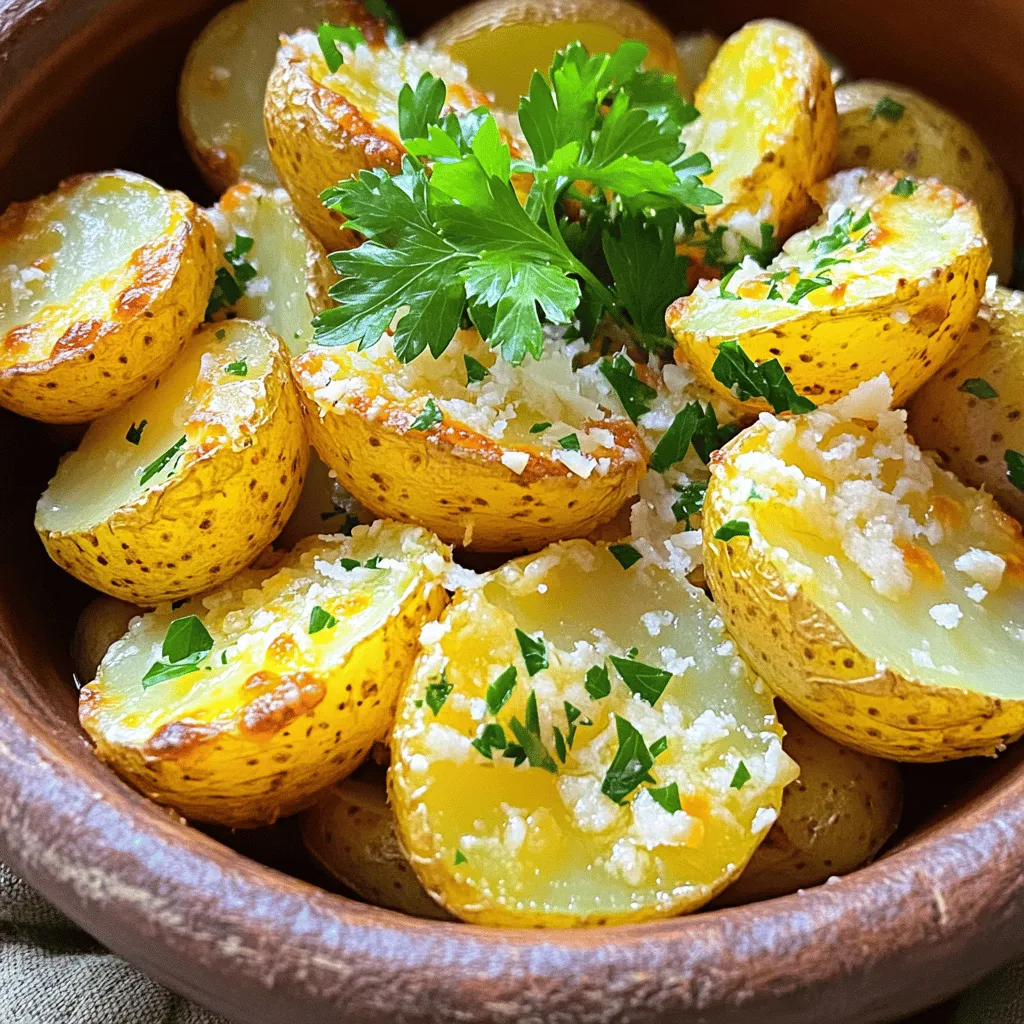
Are you ready to elevate your potato game? Garlic Parmesan Roasted Potatoes are crispy, tasty, and super easy to make.

- 2 lbs chicken wings, split and tips removed - 1 tablespoon baking powder - 1 teaspoon garlic powder - 1 teaspoon onion powder - 1 teaspoon smoked paprika - 1/2 teaspoon cayenne pepper (optional, for heat) - Salt and pepper to taste - 2 tablespoons olive oil Chicken wings are the star of this dish. You can use fresh or frozen wings. If using frozen wings, make sure to thaw them first. The spices bring flavor and the baking powder helps make the wings crispy. I love using smoked paprika for a hint of smokiness. - Fresh parsley, chopped (for garnish) - Dipping sauces Garnishing with fresh parsley looks nice and adds a fresh taste. You can also serve your wings with different dipping sauces. Some good choices are ranch, blue cheese, or honey mustard. These add extra flavor and make eating wings even more fun. For the Full Recipe, check the instructions section. First, you need to preheat your oven to 425°F (220°C). This high heat helps the wings get crispy. Next, line a large baking sheet with aluminum foil for easy cleanup. Place a wire rack on top of the baking sheet. The rack lets air flow around the wings, making them crispier. Now, let’s prepare the spice mix. In a big bowl, combine the following ingredients: - 1 tablespoon baking powder - 1 teaspoon garlic powder - 1 teaspoon onion powder - 1 teaspoon smoked paprika - 1/2 teaspoon cayenne pepper (optional) - Salt and pepper to taste Mix these well. The baking powder helps the wings crisp up nicely. Take your chicken wings and place them in the bowl with the spice mix. Drizzle 2 tablespoons of olive oil over the wings. Toss the wings until they are fully coated with the spices. Make sure every wing gets some flavor! Once coated, arrange the wings in a single layer on the wire rack. Leave space between each wing. This space helps them cook evenly and stay crispy. Now for the fun part: baking! Place the baking sheet in the oven and bake the wings for 40-45 minutes. Halfway through, flip the wings over. This helps both sides get golden brown and crispy. To achieve maximum crispiness, keep a close eye on them. If they look a bit soft, give them a few extra minutes in the oven. For more detailed steps, check the Full Recipe. Enjoy your crispy wings! Baking powder is the secret to crispy wings. It helps absorb moisture, which makes the skin crispier. You should use aluminum-free baking powder. It works best for this recipe. Air circulation is also key. By placing wings on a wire rack, hot air flows all around them. This helps them cook evenly and stay crispy. Do not overcrowd the baking sheet. If the wings touch, they will steam instead of crisp. Make sure they sit in a single layer. Check your oven temperature. If it's too low, the wings will not get crispy. A hot oven makes a big difference in the final result. Serve your wings with classic sides like celery and carrot sticks. They pair well with a cold beer or soda. For dipping sauces, try ranch or blue cheese. You can also use a spicy buffalo sauce for extra kick. These options enhance the flavor and make your meal more enjoyable. {{image_2}} When it comes to oven-baked crispy chicken wings, you can have fun with flavors. Each variation adds its own twist to the classic recipe. Here are some tasty ideas to try: - Buffalo-style wings: For a zesty kick, toss your wings in hot sauce after baking. You can mix the sauce with melted butter for richness. Adjust the heat level to your liking! - Honey garlic wings: Combine honey and minced garlic for a sweet and savory glaze. Drizzle this mixture over the wings after baking. The sticky texture is sure to please! - Asian-inspired wings: Use soy sauce, sesame oil, and ginger for an Asian twist. Toss the wings in this mix before baking. A sprinkle of sesame seeds adds a nice crunch. - Baked vs. fried wings: Baked wings are a great choice for a healthier meal. They have less fat than fried wings and still taste amazing. The oven keeps them crispy with less oil. - Low-sodium and gluten-free options: You can easily make low-sodium and gluten-free wings. Use low-sodium soy sauce or homemade spice mixes. This way, you can enjoy wings without the extra salt or gluten. Feel free to explore these variations and healthier options in your cooking. The oven-baked crispy chicken wings are a blank canvas for your culinary creativity. Check out the Full Recipe for more details! To keep your leftover wings tasty, let them cool first. Place them in a shallow container. Cover it tightly with a lid or plastic wrap. You can store them in the fridge for up to three days. If you want to keep them longer, freeze the wings. Use freezer bags or airtight containers for freezing. Remove as much air as possible to avoid freezer burn. When you're ready to eat again, the oven is your best friend for reheating. Preheat your oven to 375°F (190°C). Place the wings on a baking sheet lined with foil. Bake them for about 10-15 minutes. This method keeps them crispy. Flip the wings halfway for even heating. If you're in a hurry, you can use the microwave. Place the wings on a microwave-safe plate. Cover them with a damp paper towel. Heat them for 1-2 minutes. This method works, but the wings may lose some crispiness. For the best taste, I recommend the oven method. Enjoy your tasty wings! To make chicken wings crispy, use a few key techniques. First, coat the wings with baking powder. This helps to dry out the skin and makes it crispier. Next, use a wire rack on your baking sheet. This allows hot air to circulate around the wings. Lastly, bake them at a high temperature, around 425°F (220°C). This method ensures the wings cook evenly and become golden brown. Yes, you can use frozen chicken wings in this recipe. Just make sure to thaw them first. You can leave them in the fridge overnight or run them under cold water for quicker thawing. Once thawed, pat them dry with paper towels. This helps remove moisture, which is key for crispiness. Then, follow the recipe as usual. A few sauces go great with oven-baked wings. Here are some of my top picks: - Buffalo Sauce: This classic adds heat and flavor. - Honey Garlic Sauce: A sweet and savory choice that pleases all. - BBQ Sauce: Smoky and tangy, perfect for a summer vibe. - Ranch Dressing: Creamy and cool, it balances spicy wings well. These sauces enhance the flavor of the wings and make your meal even more enjoyable. For more ideas, check out the Full Recipe for different options! This blog post covered all the key steps to make delicious oven-baked chicken wings. We explored essential ingredients, from the chicken to spices and dips. You learned how to prep your wings and create that perfect crispiness. We also shared tips for better flavor and healthier options. In the end, follow these steps, avoid common mistakes, and enjoy mouthwatering wings. Try different flavors and find your favorite dipping sauce. You’ll impress family and friends with your tasty results. Happy cooking!

Oven-Baked Crispy Chicken Wings Simple and Tasty Recipe

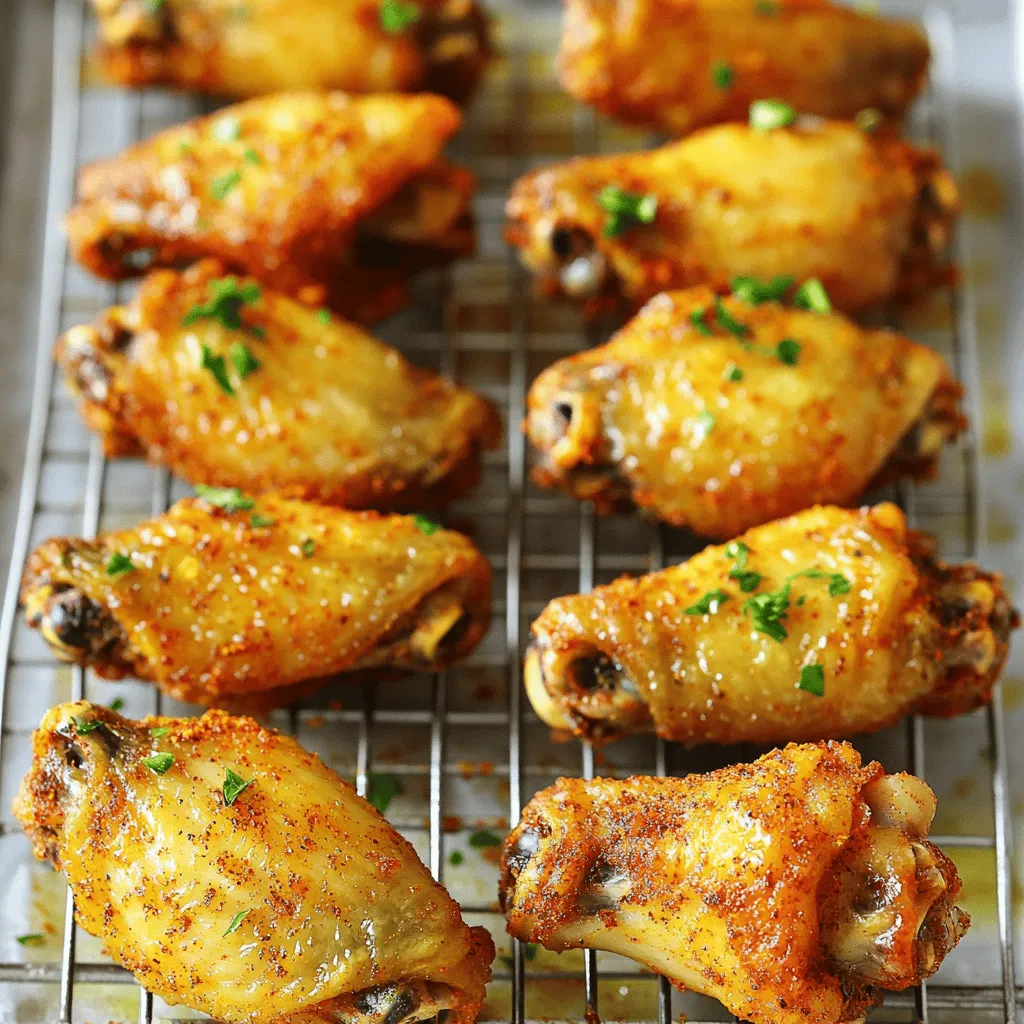
Are you craving crispy, flavorful chicken wings but want an easy oven-baked recipe? Look no further! In this guide, I’ll

For a vibrant vegetable stir fry, use these fresh veggies: - 1 cup broccoli florets - 1 bell pepper (any color), sliced - 1 carrot, julienned - 1 cup snap peas - 1 zucchini, sliced - 1 cup baby corn, chopped These vegetables add color and crunch to the dish. You can mix and match based on your taste or what you have at home. Fresh veggies ensure the best flavor and texture. Aromatics enhance the dish's flavor. Use these: - 3 cloves garlic, minced - 1 tablespoon fresh ginger, grated Garlic gives a savory depth, while ginger adds a nice zing. These two are key for a fragrant stir fry. Seasoning balances flavors. For this stir fry, gather: - 3 tablespoons soy sauce (or tamari for gluten-free) - 1 tablespoon sesame oil - Salt and pepper to taste - 1 tablespoon sesame seeds (for garnish) - Fresh cilantro, for garnish Soy sauce brings umami, while sesame oil adds richness. Adjust salt and pepper to your liking. Don't forget the sesame seeds and cilantro for a fresh finish. This blend ensures a delicious result every time. For the full recipe, check out the complete guide. Start by washing all your vegetables. Cut them into bite-sized pieces. For even cooking, make sure they are similar in size. Use a sharp knife to julienne the carrot and slice the zucchini. This makes them easy to eat. Keep your cutting board clean to avoid cross-contamination. Heat a large skillet or wok over medium-high heat. Add vegetable oil and let it warm up. Once hot, toss in minced garlic and grated ginger. Stir them for about a minute. This brings out their flavor. Add the tougher vegetables first, like broccoli and bell pepper. Stir-fry these for about 3 to 4 minutes. Then, add snap peas and baby corn. Keep stirring for another 2 minutes. Finally, add the zucchini and cook for 2 minutes more. Drizzle soy sauce and sesame oil over your stir-fried veggies. Stir well to mix everything. Let it cook for one more minute. This helps the flavors blend. Season with salt and pepper to taste. Remove from heat and sprinkle sesame seeds and fresh cilantro on top. This gives your dish a bright look and taste. You can find the full recipe for this vibrant stir-fry online! To get the best texture in your stir fry, cut your veggies into uniform pieces. This helps them cook evenly. Cook them over high heat for a short time. Aim for a tender-crisp bite. Broccoli and carrots need a bit more time, while snap peas and zucchini cook faster. Stir often to keep them from burning. Boost the flavor of your stir fry with fresh herbs and spices. Garlic and ginger add a nice kick. Consider adding a splash of lime juice for brightness. You can also try chili flakes for heat. For a hint of sweetness, toss in a bit of honey or maple syrup. Just a small amount can make a big difference. One common mistake is overcrowding the pan. If you add too many veggies at once, they will steam instead of fry. This changes their texture. Another mistake is not prepping ingredients ahead of time. Having everything ready allows you to focus on cooking. Lastly, don’t skip the seasoning. Proper seasoning at the end is key to a great taste. For the full recipe, check out the instructions above. {{image_2}} You can use many types of veggies in your stir fry. Feel free to mix and match based on your taste. Here are some great choices: - Cauliflower florets - Green beans - Bell peppers in different colors - Mushrooms, sliced - Bok choy - Spinach or kale Each option adds a unique taste and texture. Adding more colors makes your dish look even better and more fun. Adding protein boosts flavor and makes your meal heartier. Here are some easy options: - Tofu, cubed and sautéed until golden - Cooked chicken, thinly sliced - Shrimp, peeled and deveined - Beef strips, marinated and cooked Just make sure to cook the protein first before adding the vegetables. This keeps everything fresh and tasty. The sauce can change the whole dish. If you want to switch it up, try these options: - Teriyaki sauce for a sweet twist - Hoisin sauce for a rich flavor - Peanut sauce for a creamy touch - Coconut aminos for a soy-free option Feel free to mix sauces too! A bit of soy and a splash of sesame oil can create a delightful blend. For the full recipe, check out the details above. After making your savory vegetable stir fry, let it cool first. Transfer the leftovers to an airtight container. Store them in the fridge. This keeps your stir fry fresh for up to three days. If you want, you can also keep it in a bowl covered with plastic wrap. To reheat your stir fry, use a skillet or a microwave. If you use a skillet, add a splash of water or oil. Heat it on medium until it's warm. Stir it often to heat evenly. In the microwave, place your stir fry in a safe bowl. Heat it for one to two minutes. Check it and stir halfway through. If you want to save your stir fry for later, freezing is a great option. Pack cooled stir fry into freezer-safe bags or containers. Remove as much air as possible before sealing. Label the bags with the date. Your stir fry will stay good for about two months. When you're ready to eat it, thaw it in the fridge overnight. Then, reheat as usual. Enjoy the full recipe for a colorful and tasty meal! Vegetable stir fry lasts about 3 to 5 days in the fridge. Make sure you store it in an airtight container. This keeps it fresh and prevents odors from mixing with other foods. To enjoy it fully, eat it within this time frame. Reheat only what you need to keep leftovers tasty. Yes, you can use frozen vegetables for stir fry! They are quick and convenient. Just add them directly to your hot pan. Cook them a bit longer than fresh veggies. This ensures they heat through. Frozen vegetables can save you prep time while still being healthy and tasty. Some great side dishes for vegetable stir fry include: - Steamed rice - Quinoa - Noodles - Crispy tofu - Spring rolls - Asian-style salads These sides complement the flavors of the stir fry well. They help create a balanced meal. For more ideas, check out the Full Recipe for more inspirations! In this blog post, we explored how to make a great vegetable stir fry. We covered fresh veggies, essential aromatics, and the right seasonings to use. You learned step-by-step instructions for prepping, stir-frying, and combining your ingredients. We shared tips for perfect texture and flavor, plus common mistakes to avoid. You can try different veggies, add proteins, and switch sauces for variety. Remember how to store leftovers and reheat them properly. Enjoy your stir fry adventures, and let your creativity shine in the kitchen!

Savory Vegetable Stir Fry Quick and Easy Recipe

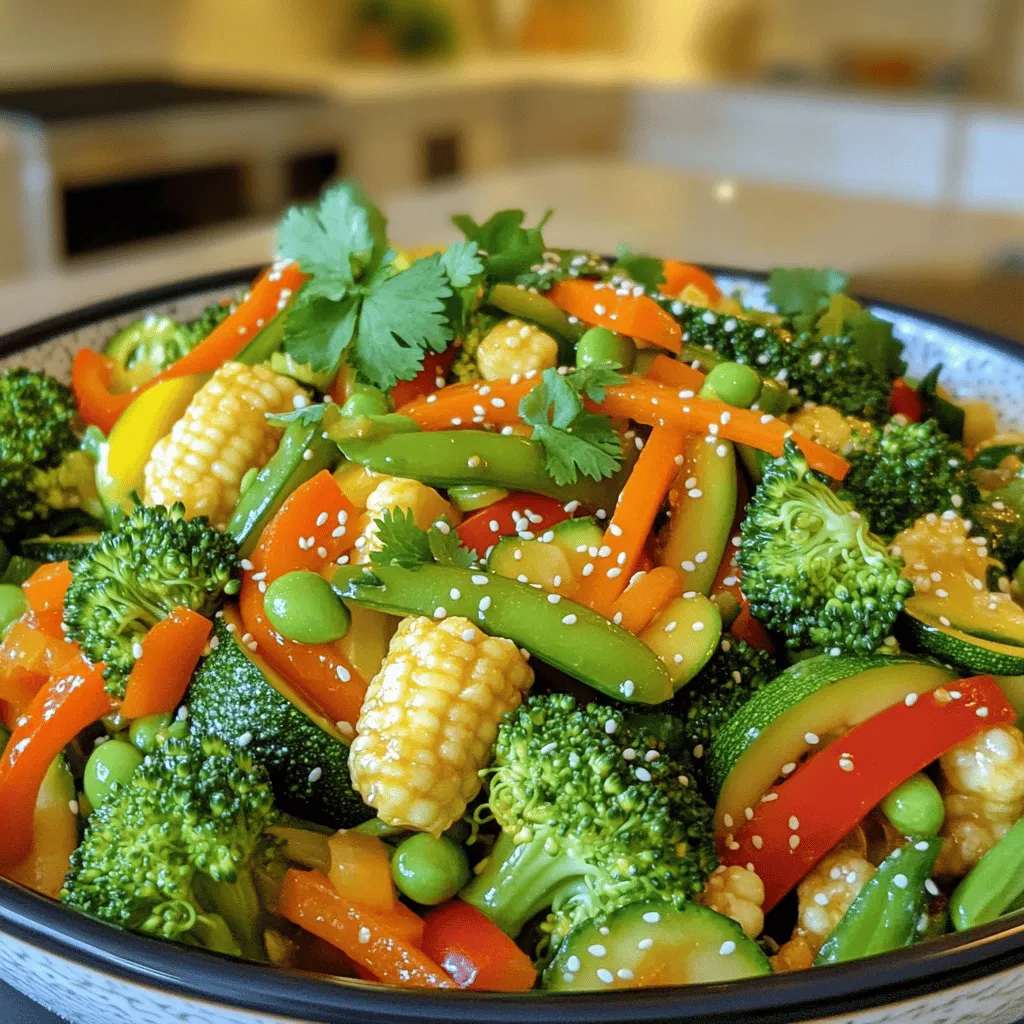
Looking to create a quick and tasty meal? My savory vegetable stir fry recipe is just for you! With fresh

- 3 medium zucchinis, spiralized into noodles - 1 ripe avocado - 1 cup fresh basil leaves - 2 tablespoons lemon juice - 2 tablespoons pine nuts (lightly toasted) - 2 tablespoons nutritional yeast (optional for cheesy flavor) - 2 cloves garlic, minced - 3 tablespoons olive oil - Salt and pepper to taste - Cherry tomatoes, halved (for garnish) - Extra pine nuts for garnish When I make Zucchini Noodles with Pesto, I love to keep it fresh and simple. The main ingredients are key for a great dish. I use three medium zucchinis, which I spiralize into fun noodle shapes. This step adds a playful touch to the meal. Next, I grab a ripe avocado. It brings creaminess to the pesto, making it rich and smooth. I also add a cup of fresh basil leaves. The basil gives a bright flavor that complements the dish perfectly. For the additional ingredients, I squeeze in two tablespoons of lemon juice. This adds a zesty kick that balances the dish. I also use two tablespoons of lightly toasted pine nuts. They add a nice crunch and depth to the pesto. If you want a cheesy flavor, try adding two tablespoons of nutritional yeast. When it comes to seasoning and garnishing, I use two cloves of minced garlic. Garlic gives the pesto a bold taste. I mix in three tablespoons of olive oil for smoothness. I always season with salt and pepper to taste. Finally, for garnish, I like to add halved cherry tomatoes and extra pine nuts. They bring color and freshness to the plate. For the full recipe, check out the link above. Start by spiralizing the zucchinis to create noodle-like strands. I use a spiralizer, which makes this easy and fun. Once you have your zoodles, set them aside on paper towels. This helps absorb excess moisture and keeps the noodles from getting soggy. Next, we’ll make the creamy avocado pesto. In a food processor, combine the ripe avocado, fresh basil leaves, lemon juice, toasted pine nuts, nutritional yeast, minced garlic, and olive oil. Blend these ingredients until they turn smooth and creamy. The vibrant green color will catch your eye! Now it’s time to bring it all together. Season the avocado pesto with salt and pepper to taste. If you want a bit more zing, feel free to adjust the lemon juice. In a large mixing bowl, toss the zucchini noodles with the avocado pesto. Make sure all the noodles are well coated in that delicious sauce. Let the zoodles sit for about five minutes. This allows them to soften slightly and soak up all those amazing flavors. For the full cooking experience, check out the Full Recipe. Adjusting your lemon juice is key. A little more will add a nice zing. If you want more crunch, add extra pine nuts. They bring a lovely texture to the dish. To store leftover zucchini noodles, place them in an airtight container. Keep them in the fridge for up to two days. To keep pesto fresh, store it in a jar with a layer of olive oil on top. This helps seal in the flavor and color. For a tasty twist, consider adding grilled chicken or shrimp. These proteins pair well with the creamy pesto. For a beautiful presentation, arrange the zoodles in a nest shape on the plate. Drizzle leftover pesto around the edges for a colorful touch. Garnish with fresh basil leaves or halved cherry tomatoes for added flair. {{image_2}} For a fully plant-based dish, keep the recipe vegan by using the ingredients listed. The avocado and basil create a rich, creamy sauce. You can skip the nutritional yeast if you want. It adds a cheesy flavor but is not needed. Use fresh, organic ingredients for the best taste. This will ensure your dish is healthy and vibrant. Want to make your zucchini noodles heartier? Add protein! Grilled chicken, shrimp, or tofu are great choices. Grill the chicken or shrimp until cooked through. For tofu, press it to remove excess liquid, then sauté until golden. Mix your protein into the noodles and pesto for a filling meal. Looking to spice things up? Try adding a pinch of red pepper flakes for heat. Fresh herbs like parsley or mint can also enhance the flavor. A squeeze of lime juice adds brightness, too. Experiment with these options to find your perfect blend. Each will give your dish a unique twist. To store leftover zucchini noodles and pesto, keep them in separate airtight containers. This helps maintain their textures and flavors. Zucchini noodles can last in the fridge for about 2 days. The pesto stays fresh for up to a week. If you notice any browning on the pesto, simply stir it before using. You can freeze zucchini noodles and pesto separately for long-term storage. For zucchini noodles, place them in a freezer-safe bag. Remove as much air as possible, then seal. They can last for about 2 months in the freezer. For pesto, store it in ice cube trays for easy use later. Once frozen, transfer cubes to a bag. This method keeps the pesto good for 3-6 months. Understanding the shelf life of each component is key. Zucchini noodles are best when fresh but can last up to 2 days in the fridge. Pesto can last about a week in the fridge. When frozen, zucchini noodles last about 2 months, while pesto can be stored for 3-6 months. Always check for signs of spoilage before using. To keep zucchini noodles firm, start by spiralizing them. After spiralizing, place the zoodles on paper towels. This step helps absorb extra moisture. Let them rest for about 20 minutes. You can also sprinkle salt on them. Salt draws out water, making the noodles less soggy. Finally, avoid cooking them for too long. Quick sautéing or serving them raw works best. Yes, you can make avocado pesto ahead of time. Just blend all the ingredients and store it in a jar. To keep it fresh, press plastic wrap against the surface. This step prevents oxidation, which causes browning. You can keep it in the fridge for up to three days. Stir it well before using to restore its creamy texture. If you don’t have pine nuts, try using walnuts or almonds. Both nuts add a nice crunch and flavor. Sunflower seeds are another great option for a nut-free pesto. They blend smoothly and keep the recipe creamy. If you want a different taste, try using cashews. They offer a rich, buttery flavor that works well in pesto. Serve zucchini noodles in a bowl or on a plate. Place the zoodles in a nest shape for a fun look. Drizzle any leftover pesto around the edge for color. Top with halved cherry tomatoes for freshness. You can also sprinkle extra pine nuts on top for crunch. Fresh basil leaves make a great garnish too. Zucchini noodles are low in calories and carbs, making them a healthy choice. They provide vitamins A and C, which support your immune system. Zucchini is high in fiber, aiding digestion. This veggie is also hydrating, as it contains a lot of water. In contrast to traditional pasta, zucchini noodles offer more nutrients and fewer empty calories. This blog post shared how to make delicious zucchini noodles with avocado pesto. You learned about the key ingredients, steps to prepare them, and helpful tips for storage and variations. Whether you want a vegan meal or to add protein, this dish offers options. Enjoy crafting this fresh and healthy meal! It’s simple and tasty for any day. Try it out, and you might find a new favorite!

Zucchini Noodles with Pesto Flavorful and Fresh Dish

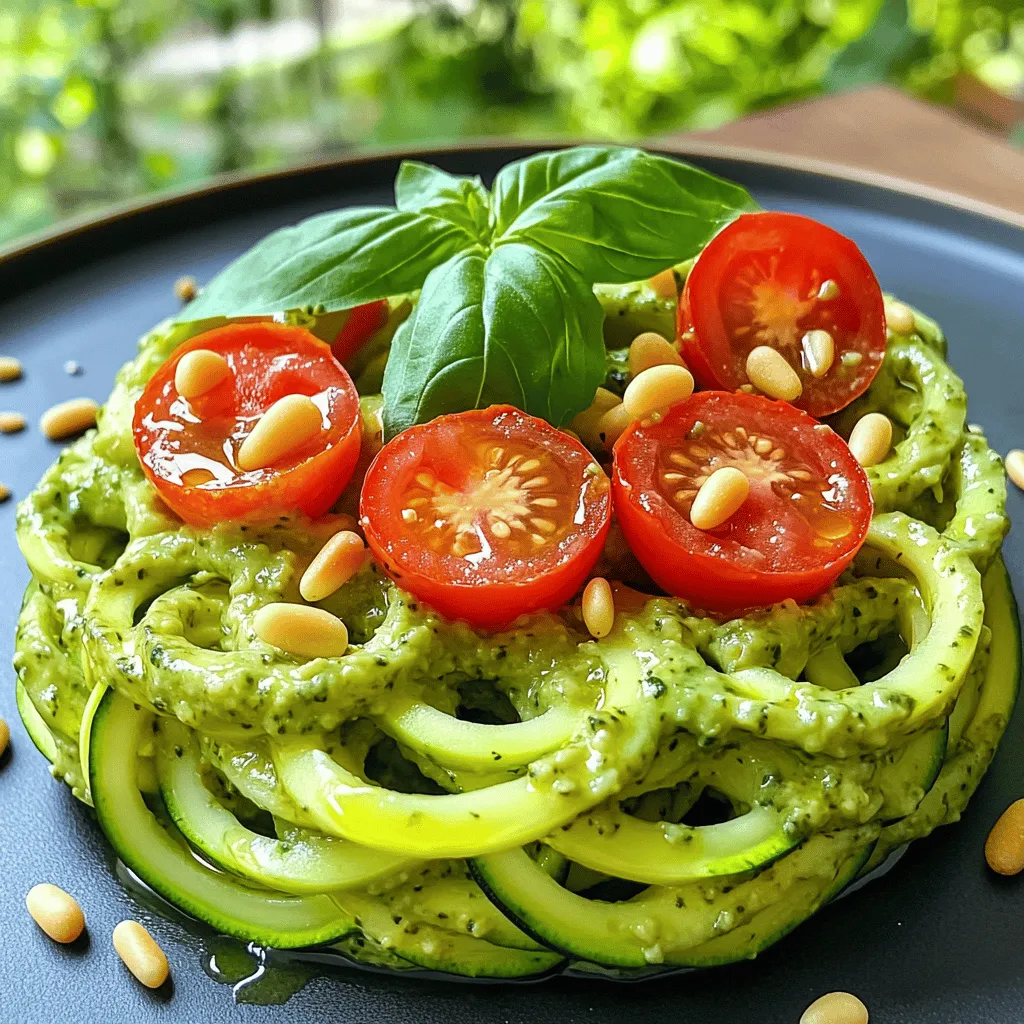
Are you ready to transform your meals with a fresh and healthy twist? Zucchini noodles with pesto are not just

Older posts
Newer posts
← Previous Page1 … Page83 Page84 Page85 … Page123 Next →

dsad

© 2025 Southern Dishes • Built with GeneratePress

Our Policies

  • Copyright Policy
  • Cookie Policy
  • GDPR Policy
  • Privacy Policy
  • Disclaimer
  • Terms Of Use

More Information

  • Home
  • About
  • Contact
  • Appetizers
  • Dessert
  • Dinner
  • Drinks
©2025, Southern Dishes About Back To Top