Skip to content
DisclaimerTerms Of UseGDPR PolicyCookie Policy

Southern Dishes

  • Home
  • Drinks
  • Appetizers
  • Dinner
  • Dessert
  • About
  • Contact
  • Privacy Policy
DisclaimerTerms Of UseGDPR PolicyCookie Policy

Isabella

To make a great taco soup, you need simple and tasty ingredients. Here’s what you’ll need: - 1 lb ground turkey or beef - 1 medium onion, diced - 2 cloves garlic, minced - 1 red bell pepper, diced - 1 can (15 oz) black beans, drained and rinsed - 1 can (15 oz) corn, drained - 1 can (15 oz) diced tomatoes with green chilies - 2 cups chicken or vegetable broth These ingredients create a strong base for your soup. The ground meat gives it protein. The beans add fiber, and the veggies bring color and flavor. The right seasonings make your taco soup pop with flavor. Here’s what to add: - 2 tablespoons taco seasoning - 1 teaspoon cumin - Salt and pepper to taste - 1 cup shredded cheese (cheddar or Mexican blend) - Fresh cilantro for garnish - Sour cream for topping Taco seasoning and cumin give your soup that classic taco taste. The salt and pepper help balance everything. Adding shredded cheese and sour cream makes it creamy and rich. Cilantro adds a fresh touch on top. For the full recipe, check out the complete guide to taco soup. Start by heating a large pot over medium-high heat. Add 1 pound of ground turkey or beef. Cook it until it turns brown. This should take about 5 to 7 minutes. If you see excess fat, drain it. This step adds a rich flavor to your soup. Next, add 1 diced onion, 2 minced garlic cloves, and 1 diced red bell pepper to the pot. Stir them well. Cook for about 5 minutes until the veggies are soft. This step makes your soup fragrant and tasty. Now, it’s time to mix in the canned items. Add 1 can of black beans (drained and rinsed), 1 can of corn (drained), and 1 can of diced tomatoes with green chilies. Pour in 2 cups of chicken or vegetable broth. Stir everything together. This gives your soup its hearty base. Sprinkle in 2 tablespoons of taco seasoning, 1 teaspoon of cumin, salt, and pepper to taste. Stir well to mix the spices. Bring the soup to a simmer. Lower the heat and let it cook for about 15 minutes. This allows all the flavors to blend perfectly. After simmering, taste the soup. Adjust any seasonings if needed. Serve the soup hot in bowls. Top it with 1 cup of shredded cheese, a dollop of sour cream, and some fresh cilantro. For the full recipe, check the details provided earlier. Enjoy your easy taco soup! Preparing your taco soup can be quick and easy. Here are some tips to speed up the process: - Chop your onion, garlic, and red bell pepper in advance. - You can also rinse the black beans and corn early. - Measure out your spices and broth before you start cooking. - Keep your ingredients close at hand to save time. To make your taco soup even better, try these flavor boosters: - Add more taco seasoning for extra zest. - Experiment with spices like paprika or chili powder. - Top the soup with avocado slices for creaminess. - A squeeze of lime juice adds a nice tang. - Fresh herbs like cilantro brighten the dish. Pair your taco soup with these tasty sides: - Serve with crispy tortilla chips for crunch. - A side of fluffy cornbread complements the flavors. - Fresh salad adds a nice contrast. - You can also serve it with rice for a filling meal. For the full recipe, check out the complete cooking guide. {{image_2}} For a vegetarian or vegan taco soup, you can swap meat for plant-based protein. Use lentils, black beans, or textured vegetable protein (TVP). These ingredients add protein and texture. You can also add more veggies like zucchini or carrots for extra flavor. Keep the rest of the recipe the same to enjoy a hearty meal. To make taco soup gluten-free, choose gluten-free broth and seasoning. Many taco seasonings contain gluten, so check labels carefully. Canned vegetables are usually gluten-free, but always verify. This way, everyone can enjoy the soup without worry. Adjust the heat in your taco soup based on your taste. For mild soup, use less taco seasoning. If you like it spicy, add chopped jalapeños or hot sauce. You can also mix in crushed red pepper flakes. This lets you customize your soup for every meal. For the complete recipe, check out the Full Recipe section. Store your taco soup in the fridge. Use an airtight container for best results. It stays fresh for about three to four days. Allow the soup to cool before sealing it. This helps prevent condensation. You can freeze the soup for longer storage. Let it cool completely before freezing. Use freezer-safe containers or bags. Make sure to leave some space for expansion. Taco soup can last up to three months in the freezer. To thaw, place it in the fridge overnight or use the microwave. Reheat the soup on the stove for best flavor. Use low to medium heat and stir often. You can also microwave it in a bowl. Heat in short bursts, stirring in between. Ensure it’s warmed through before serving. Add a splash of broth if it seems too thick. Enjoy your quick and flavorful weeknight meal! For the full recipe, check out the details above. You can make this taco soup spicier by adding more chili or hot sauce. Start with a small amount. Taste the soup after each addition. You can use jalapeños or crushed red pepper for extra heat. Yes, you can substitute with pinto or kidney beans. Both will add great flavor and texture. Just rinse them before adding to the soup. This makes it easy to adjust your recipe based on what you have. You can serve this soup with tortilla chips, avocado slices, or a fresh salad. You can also add toppings like shredded cheese, sour cream, or fresh cilantro. These will enhance the flavors and make it fun to eat. Taco soup can last for about 3 to 4 days in the fridge. If you freeze it, it can last up to 3 months. Just make sure to store it in airtight containers. This keeps it fresh and tasty for later. Yes, this taco soup is kid-friendly. To adjust flavors for younger palates, reduce spicy ingredients. You can also add more cheese or sour cream to make it creamier and milder. This makes it easier for kids to enjoy. This taco soup is made with simple ingredients like meat, veggies, and spices. We covered steps to cook the meat, sauté the vegetables, and combine everything into a tasty dish. I shared tips on faster prep, flavor boosts, and serving ideas. You can even customize it for dietary needs or spice levels. In conclusion, this soup is easy, versatile, and sure to please everyone. Enjoy your cooking!

Easy Taco Soup Quick and Flavorful Weeknight Meal

If you’re searching for a tasty, quick meal, Easy Taco Soup is your answer. This dish is full of flavor

To make cheesy garlic breadsticks, you need simple ingredients that pack a lot of flavor. Here’s what you’ll need: - 2 cups all-purpose flour - 1 packet (2 ¼ teaspoons) instant yeast - 1 teaspoon sugar - 1 teaspoon salt - ¾ cup warm water (110°F) - 2 tablespoons olive oil - 3 cloves garlic, minced - 1 teaspoon dried oregano - 1 teaspoon dried parsley - 1 cup shredded mozzarella cheese - ¼ cup grated Parmesan cheese - Extra olive oil for brushing - Marinara sauce for dipping These ingredients come together to create soft, warm sticks that are cheesy and garlicky. Each bite is a treat! Using fresh garlic and good cheese makes a big difference. The warm water helps the yeast activate, making the dough rise nicely. Olive oil adds richness and flavor. When you mix the flour, yeast, sugar, and salt, you set the stage for great breadsticks. The herbs add a lovely aroma and taste. I love using mozzarella for its stretch and Parmesan for its sharpness. Don’t forget the marinara sauce! It’s the perfect dip to enjoy with your cheesy garlic breadsticks. For the full recipe, check out the instructions later. Enjoy gathering these ingredients. They are the first step to a delicious snack! - In a large mixing bowl, combine the flour, instant yeast, sugar, and salt. - Slowly add the warm water and olive oil to create the dough. Stir until it comes together. - Knead the dough on a floured surface for about 5-7 minutes, until smooth and elastic. - Place the kneaded dough in a lightly greased bowl. Cover it and let it rise until it doubles in size, about 30 minutes. - Preheat your oven to 425°F (220°C). - Once risen, punch down the dough and roll it out on a floured surface into a rectangle about ½ inch thick. - Brush olive oil over the dough. Sprinkle minced garlic, oregano, and parsley evenly on top. Add mozzarella and Parmesan cheese. - Cut the dough into 1-inch strips using a sharp knife or pizza cutter. - Transfer the breadsticks to a baking sheet lined with parchment paper, leaving space between them. - Bake for 12-15 minutes or until golden brown and bubbly. - Remove from the oven, let cool slightly, and brush with more olive oil if desired. Enjoy with marinara sauce for dipping! For the full recipe, check the earlier section. To get the best dough, you need the right feel. The dough should be soft but not sticky. If it feels too wet, add a little more flour. When you knead, work it for about five to seven minutes. This makes it smooth and elastic. For even baking, preheat your oven to 425°F (220°C). This step is key for a golden finish. When you place your breadsticks in the oven, make sure they are spaced out. This gives them room to puff up and bake evenly. You can make these breadsticks even better with extra flavors. Try adding crushed red pepper for spice or mixing in Italian herbs. Some people love adding a bit of garlic powder for an extra kick. For toppings, think outside the box! Sliced olives, sun-dried tomatoes, or even chopped fresh basil can add a tasty twist. If you want a cheesy bite, consider using different cheeses like cheddar or gouda. Don’t forget, the full recipe is right here for you to explore more tips and tricks! {{image_2}} You can switch up the cheese in your breadsticks for fun flavors. Try using cheddar for a sharp bite or gouda for a creamy touch. Mixing cheeses can create a unique taste. For stuffed cheesy garlic breadsticks, roll out your dough and place cheese in the center. Fold the dough over and seal it well. This gives you a gooey, cheesy surprise in every bite. If you need a gluten-free option, you can use gluten-free flour. Look for a blend that has a good rise. This flour can change the texture a bit, so be ready for a softer bite. You might need to add more liquid to keep the dough from being too dry. This way, you can still enjoy cheesy garlic breadsticks without gluten. To keep your cheesy garlic breadsticks fresh, let them cool completely. Place them in an airtight container. You can also wrap them tightly in plastic wrap. This will help keep them from drying out. Store the container in the fridge. The breadsticks stay good for about 3 to 4 days. For longer storage, consider freezing them. Use a freezer-safe bag and remove as much air as possible. When you're ready to enjoy leftover breadsticks, reheating is key. For the best texture, use the oven. Preheat it to 350°F (175°C). Place the breadsticks on a baking sheet. Heat them for about 10 minutes. This will make them crispy again. If you choose the microwave, wrap the breadsticks in a damp paper towel. Heat them in short bursts of 15-20 seconds. This helps avoid sogginess. Enjoy your cheesy garlic breadsticks just like fresh! You can find the full recipe in the earlier sections. How long do homemade cheesy garlic breadsticks last? Homemade cheesy garlic breadsticks last about 2-3 days in the fridge. Store them in an airtight container. They taste best fresh, but you can still enjoy them later. Can I freeze cheesy garlic breadsticks? Yes, you can freeze cheesy garlic breadsticks. Wrap them tightly in plastic wrap and then in foil. They stay good for up to 3 months. Just thaw and reheat when you're ready to enjoy. What is the best way to serve cheesy garlic breadsticks? Serve cheesy garlic breadsticks warm for the best taste. Pair them with marinara sauce for dipping. You can also sprinkle extra herbs on top for added flavor. Where can I find the full recipe for cheesy garlic breadsticks? You can find the full recipe for cheesy garlic breadsticks in the earlier section of this article. It guides you through the process step by step. What dipping sauces pair well with cheesy garlic breadsticks? Marinara sauce is a classic choice. You can also try ranch or garlic butter. For a twist, use a spicy salsa or a creamy Alfredo sauce. Each adds a fun flavor to your breadsticks. You now know how to make delicious cheesy garlic breadsticks. We covered the ingredients, step-by-step instructions, and helpful tips. You can enhance the flavor and try different cheese options. There are easy ways to store leftovers, so you enjoy them later. This recipe is fun and perfect for gatherings or snacks. Enjoy making your breadsticks and impressing friends and family. Simple, tasty, and a treat sure to please!

Cheesy Garlic Breadsticks Irresistible and Flavorful Treat

Are you ready to elevate your snack game? These Cheesy Garlic Breadsticks are simple to make and packed with flavor.

- 4 large russet potatoes - 1 cup shredded sharp cheddar cheese - 1/2 cup crispy cooked chicken, chopped - 1/2 cup sour cream - 1/4 cup cooked and crumbled turkey bacon - 1/4 cup green onions, finely sliced - 1 teaspoon garlic powder - 1 teaspoon smoked paprika - Salt and pepper to taste - Olive oil for brushing When I make loaded potato skins, I focus on fresh, quality ingredients. The large russet potatoes serve as the perfect base. They bake up fluffy inside while the skins turn crisp. Using sharp cheddar cheese gives a strong flavor. I love the melted cheese that stretches as you pull a piece off. Crispy cooked chicken adds protein and texture. For a creamy finish, I top each skin with sour cream. Optional ingredients can elevate the dish. Turkey bacon adds a smoky crunch and pairs well with the potato. Green onions bring a fresh bite. I also add garlic powder and smoked paprika for depth. These spices enhance the overall flavor. Seasoning is key. Salt and pepper bring out the taste of each ingredient. I brush the potatoes with olive oil to help them crisp up in the oven. This simple step makes a big difference. For the full recipe, follow the steps carefully. You’ll create a dish that impresses everyone! First, preheat your oven to 400°F (200°C). Scrub the potatoes under running water to remove dirt. Pat them dry with a kitchen towel. This step is key for a crisp skin. Next, prick each potato several times with a fork. This allows steam to escape while baking. Rub the potatoes with olive oil and sprinkle salt on top. This will help flavor the skin. Now, place the potatoes directly on the oven rack. Bake them for 45 to 60 minutes. You want them to be fork-tender. Test by inserting a fork; it should go in easily. Once baked, remove the potatoes from the oven. Let them cool for a few minutes until safe to handle. This cooling time is important for easy scooping. Cut each potato in half lengthwise. Carefully scoop out some of the flesh. Leave about 1/4 inch of potato on the skin. This helps keep the skin sturdy. In a bowl, mash the scooped potato flesh. Add garlic powder, smoked paprika, salt, and pepper. Mix until creamy and smooth. Spoon this mixture back into the skins. Top each filled potato with shredded cheddar cheese, crispy chicken, and turkey bacon if you like. Place the loaded potato skins back onto a baking sheet. Return them to the oven. Bake for 10 to 15 minutes, or until the cheese melts and bubbles. Once they look golden, remove them from the oven. Let them cool slightly before serving. Drizzle each potato skin with sour cream and sprinkle green onions on top. Enjoy your loaded potato skins as a savory treat! To get the best potato skin texture, choose large russet potatoes. They have thick skins that hold up well. Bake them until they are soft inside. This gives you a nice, fluffy filling. After baking, let them cool slightly before you scoop. This makes it easier to handle them. For a creamy mashed filling, scoop out the flesh gently. Leave about 1/4 inch of potato on the skin. Mash the scooped potato with garlic powder, smoked paprika, salt, and pepper. Mix until smooth and creamy. This adds a rich taste to your skins. Adding spices and herbs boosts the flavor of your loaded potato skins. Try garlic powder and smoked paprika for a savory kick. You can also add chili powder or cumin for a different twist. Fresh herbs like chives or parsley brighten up the dish. When it comes to toppings, think about the texture. Crispy toppings like bacon or fried onions add crunch. Soft toppings like sour cream or cheese provide a creamy contrast. Balance the textures for a delightful bite. Serving your loaded potato skins can be fun! Use a rustic wooden board or a stylish platter. This gives a warm feel to your meal. Arrange the skins neatly and add garnishes like green onions on top. A drizzle of sour cream enhances visual appeal and taste. You can even serve extra sour cream on the side for dipping. This makes it more interactive for guests. For a pop of color, add some fresh herbs or colorful vegetables around the skins. For the full recipe, check out the complete guide to making these delicious treats! {{image_2}} You can switch up the cheese in your loaded potato skins. Try using mozzarella for a gooey texture. It melts well and has a mild taste. Pepper jack adds a kick, perfect for spice lovers. Blend cheeses for a unique flavor. Mixing sharp cheddar with a creamy cheese can make every bite special. Want to change the protein? Use pulled pork for a smoky flavor. It pairs well with cheese and toppings. Ground beef is another great choice. It adds heartiness to each bite. For vegetarians, try black beans or lentils. They add protein and texture without meat. You can even use sautéed mushrooms for a savory twist. Get creative with toppings for your potato skins. Adding jalapeños gives a spicy bite. Diced avocado adds creaminess and freshness. For vegan options, try cashew sour cream. It’s a great substitute that still tastes amazing. Gluten-free eaters can enjoy these too! Just be sure to check all your ingredients. You can have fun while making these tasty treats! To keep your loaded potato skins fresh, place them in an airtight container. This will help prevent drying or absorbing odors from the fridge. Store them in the refrigerator for up to three days. For the best taste, reheat them in the oven. Preheat your oven to 350°F (175°C) and bake for about 10-15 minutes. This makes the skins crispy again, and the cheese melts nicely. You can freeze loaded potato skins for later enjoyment. First, let them cool completely. Then, wrap each skin in plastic wrap or aluminum foil. Place them in a freezer-safe bag or container. They can last in the freezer for up to three months. When ready to eat, remove the skins from the freezer and thaw them in the fridge overnight. To reheat, pop them in the oven at 350°F (175°C) for 15-20 minutes. This keeps them tasty and warm, just like when they were fresh. You can prepare Loaded Potato Skins in advance. First, bake the potatoes as normal. After they cool, scoop out the insides and store the skins in an airtight container. Keep them in the fridge for up to two days. You can also prepare the filling ahead of time. Mix the scooped potato with seasonings and store it in another container. When you are ready to cook, fill the skins and bake them. This way, you save time and enjoy a quick treat! Yes, you can make Loaded Potato Skins healthier. Start by using sweet potatoes instead of russet potatoes. They add more nutrients and fiber. You can also reduce cheese or use low-fat cheese. Replace sour cream with Greek yogurt for protein and creaminess. Add more veggies like bell peppers or spinach to the filling. These changes help cut calories while keeping flavor. Loaded Potato Skins pair well with many sides. A fresh green salad adds crunch and color. You can also serve a bowl of chili for warmth. If you want something lighter, try a vegetable platter with dip. For a classic touch, serve some chicken wings or a hearty soup. All these options make for a great meal together! Loaded potato skins are a tasty treat you can easily make at home. We covered the key ingredients and shared step-by-step instructions to achieve perfect results. You learned how to boost flavor and try fun toppings. Remember, leftovers can be stored or frozen for later. Be creative with your toppings, and enjoy experimenting with flavors. This recipe is not just a meal; it's a fun way to gather and share joy with family and friends. Take a chance and create your own loaded potato skins today!

Loaded Potato Skins Savory and Flavorful Treat

Loaded potato skins are the perfect mix of comfort and taste. Imagine a crispy shell filled with creamy potato, savory

- 2 pounds chicken wings - 1/2 cup honey - 1/4 cup soy sauce - 4 cloves garlic, minced - 1 tablespoon sriracha (adjust to taste) - 1 teaspoon ginger, grated - 1 teaspoon sesame oil - 1 teaspoon black pepper - 1/2 teaspoon salt - 1 tablespoon sesame seeds (for garnish) - 2 green onions, chopped (for garnish) A serving of these wings has about 300 calories. You get 20 grams of protein, 15 grams of fat, and 10 grams of carbs. These wings are a tasty snack fit for any occasion. You will need a few tools to make this dish. Grab a baking sheet, a wire rack, a mixing bowl, and some measuring cups and spoons. These will help you prepare and cook the wings to perfection. In this recipe, the wings get a sweet and spicy kick. The honey adds a nice glaze, while the garlic and sriracha bring in bold flavors. You can find the full recipe [here]. To make the marinade, combine all the ingredients in a mixing bowl. You will need: - 1/2 cup honey - 1/4 cup soy sauce - 4 cloves garlic, minced - 1 tablespoon sriracha - 1 teaspoon ginger, grated - 1 teaspoon sesame oil - 1 teaspoon black pepper - 1/2 teaspoon salt Mix these well until they blend into a smooth sauce. If you like it spicier, add more sriracha. Just a bit can make a big difference! To get the best flavor, marinate the wings for at least 30 minutes. If you have more time, an hour or overnight works even better. This allows the wings to soak up all the great flavors. When you add the wings to the marinade, make sure each wing is coated well. Use your hands for this; it is the best way! First, preheat your oven to 400°F (200°C). While the oven warms up, line a baking sheet with aluminum foil for easy cleanup. Place a wire rack on top of the sheet. This setup helps the wings cook evenly and get crispy. Arrange the wings in a single layer on the wire rack. Avoid crowding the wings; they need space to crisp up. Bake them for about 35-40 minutes. Flip them halfway through for even cooking. When they are golden brown, they are ready! Once done, take them out and let them cool for a bit. Toss the wings in the remaining marinade for extra flavor before serving. This step makes them even tastier! You can find the complete details in the Full Recipe. To get crispy wings, air circulation is key. A wire rack helps keep air moving around the wings as they cook. This way, they won’t steam and will turn golden brown. Also, do not overcrowd the wings on the rack. Give them space so they can crisp up nicely. You can add more depth to your wings with extra ingredients. For instance, try adding a splash of lime juice or some chili flakes for heat. Fresh ingredients often taste better than dried ones. Fresh garlic gives a strong kick, while fresh ginger adds a unique zing. Pair your spicy honey garlic wings with cool sauces like ranch or blue cheese. They also go well with celery sticks to balance the heat. For drinks, an ice-cold beer or a sweet tea works great. You can find the full recipe at the end of the article. {{image_2}} To switch things up, try Spicy Garlic Parmesan Wings. You simply swap the honey for butter and add grated Parmesan cheese. Use the same garlic and spices from the original recipe. This change gives you a rich, savory flavor. You can also mix in some crushed red pepper for more heat. The buttery wings will still stay crispy if you bake them as directed. For a sweeter option, make Honey BBQ Wings. Instead of the soy sauce and sriracha, mix together honey and your favorite BBQ sauce. This gives a nice, smoky flavor. You can add a bit of vinegar to balance the sweetness. Marinate the wings as usual, then bake them. This version is great for those who love a sweeter style of wing. Asian Glazed Wings bring a fresh twist. You can use hoisin sauce in place of honey. Add rice vinegar for a tangy kick. This variation is perfect for those who enjoy a mix of sweet and sour. You can also toss in sesame seeds and chopped scallions for added flavor. Follow the same baking steps for crispy, flavorful wings. For the full recipe, check out Spicy Honey Garlic Wings above! Store your leftover spicy honey garlic wings in an airtight container. This helps keep them fresh. They will stay good for about 3 to 4 days in the fridge. Make sure to let them cool down to room temperature first. This prevents moisture build-up that can make them soggy. If you want to keep wings longer, freezing is a great option. Place the wings in a single layer on a baking sheet. Freeze them for about 1 to 2 hours. Once frozen, transfer them to a freezer-safe bag. This prevents them from sticking together. Spicy honey garlic wings can last up to 3 months in the freezer. To reheat, the oven is best. Preheat your oven to 350°F (175°C). Place the wings on a baking sheet and cover them with foil. Bake for about 15 to 20 minutes. This keeps them crispy. You can also use the stovetop. Heat a pan over medium heat, add the wings, and cover. Stir occasionally until warmed through. If you’re short on time, the microwave works too. Just place the wings on a microwave-safe plate and heat for 1 to 2 minutes. They may not be as crispy, but they will still taste great! Spicy Honey Garlic Wings take about one hour in total. Here’s the breakdown: - Prep Time: 15 minutes to mix your marinade and coat the wings. - Marinating Time: At least 30 minutes, but one hour is best. You can even let them sit overnight for more flavor. - Cooking Time: Bake for 35-40 minutes at 400°F (200°C), flipping halfway to get them crispy. Yes, you can use frozen chicken wings. Just follow these steps: - Thawing: For best results, thaw them in the fridge overnight. - Cooking from Frozen: If you cook them frozen, add 10-15 minutes to the baking time. Check that they reach 165°F (75°C) for safe eating. - Coating: You may need to dry them first for the marinade to stick. If you need a substitute for honey, try these options: - Maple Syrup: It provides a similar sweetness and works well. - Agave Nectar: This is another great option that is sweeter than honey. - Brown Sugar: Mix brown sugar with a bit of water to create a syrupy texture. Feel free to explore the [Full Recipe] for more details! You now have a complete guide for making tasty chicken wings. We covered ingredients, preparation, and cooking tips. You learned how to marinate for flavor and achieve the perfect crisp. Don't forget about variations like Spicy Garlic Parmesan. Proper storage and reheating are key for leftovers. Enjoy your wings with the best sides and drinks. This recipe makes serving friends and family easy and fun. Get cooking and delight in your delicious work!

Spicy Honey Garlic Wings Satisfying Flavorful Snack

Are you ready to dive into a world of flavor? Spicy Honey Garlic Wings are the perfect snack to spice

- 1 lb boneless, skinless chicken breasts - 1 cup cauliflower florets - 1 cup panko breadcrumbs - 1/2 cup all-purpose flour - 2 large eggs - Seasonings: garlic powder, onion powder, paprika, salt, and pepper - Cooking oil spray To make these homemade chicken nuggets, start with fresh, high-quality chicken. I prefer boneless, skinless chicken breasts, as they cook up tender and juicy. The cauliflower adds nutrition and a subtle flavor that blends well. Next, gather panko breadcrumbs for that delightful crunch. They create a crispy coating that makes every bite satisfying. You can use regular breadcrumbs, but panko gives a better texture. Don't forget the flour and eggs. The flour helps the coating stick, while the eggs create a nice seal. For seasoning, I use garlic powder, onion powder, and paprika. These spices add depth and flavor to the nuggets. Adjust the salt and pepper to your taste. Finally, have some cooking oil spray on hand. This will help the nuggets crisp up beautifully in the oven. For the full recipe, check out the detailed instructions. Enjoy the deliciousness of homemade chicken nuggets! 1. Preheat Oven and Prepare Baking Sheet Start by preheating your oven to 425°F (220°C). This step helps the nuggets cook evenly. Line a baking sheet with parchment paper. This keeps the nuggets from sticking and makes cleanup easy. 2. Prepare Chicken and Cauliflower Mixture In a large bowl, take your steamed and finely chopped cauliflower. Add garlic powder, onion powder, paprika, and a pinch of salt and pepper. Mix well until the cauliflower is coated with the spices. This mixture adds flavor and crunch. 1. Dipping Process: Flour, Egg, Breadcrumbs Set up three bowls. In the first bowl, place the flour. In the second bowl, whisk the eggs until smooth. In the third bowl, add the breadcrumbs. Take each piece of chicken. First, dip it in the flour to coat. Next, dip it in the egg wash. Finally, coat it well with the breadcrumbs. 2. Mixing in Cauliflower for Extra Crunch After you coat the chicken, add the chopped cauliflower to the breadcrumb bowl. Mix it well. This adds extra crunch to your nuggets. For better adhesion, press the chicken pieces into the cauliflower breadcrumb mixture. 1. Arrange Nuggets on Baking Sheet Place the coated chicken nuggets on the prepared baking sheet. Make sure to leave space between each nugget. This helps them cook evenly and get crispy. 2. Cooking Time and Guidelines Bake your nuggets for 15-20 minutes. Flip them halfway through to ensure even browning. The nuggets should be golden brown and fully cooked when done. For a perfect finish, you can serve them with a homemade dipping sauce. Check out the Full Recipe for more ideas! To make homemade chicken nuggets crispy, use panko breadcrumbs. Panko is light and airy. It gives a great crunch that regular breadcrumbs can't match. You can find panko in most grocery stores. Just look for the Japanese-style breadcrumbs. Another great trick is to use cooking spray. Lightly spray the coated nuggets before baking them. This will help them crisp up nicely in the oven. It adds a golden color and crunch without extra fat. Avoid overcrowding your baking sheet. If you place too many nuggets close together, they won’t cook evenly. They need space to crisp up. Arrange them in a single layer for best results. Also, don’t skimp on baking time. Make sure to bake them for 15 to 20 minutes. Check that they turn golden brown and are cooked through. Flipping them halfway helps with even cooking. Follow these tips for perfect homemade chicken nuggets. For the full recipe, refer to the section above. {{image_2}} You can make chicken nuggets healthier with a few easy swaps. - Using Whole Wheat Flour or Almond Flour: Whole wheat flour adds fiber. It gives a nutty taste. Almond flour is gluten-free. Both options work great for coating. - Adding Hidden Veggies to the Mixture: You can sneak in some veggies. Finely chopped carrots or spinach blend well. They add nutrition without changing the taste. Your kids will never know! You can change the flavor of your chicken nuggets to keep things fun. - Spicy Chicken Nuggets: Adding Cayenne Pepper: If you like heat, add cayenne pepper. Just a pinch can make a big difference. It gives a nice kick without being too hot. - Herbs and Seasonings: Italian or Cajun Flavors: Want a twist? Try Italian herbs like oregano and basil. For a bold taste, use Cajun spices. Both options make your nuggets stand out. For a complete guide on making these tasty treats, check out the Full Recipe. To keep your homemade chicken nuggets fresh, store leftovers properly. Place them in an airtight container. Make sure they cool completely before sealing. This helps prevent moisture buildup. - Refrigeration Guidelines: You can store chicken nuggets in the fridge for up to 4 days. Always check for any off smells or changes in texture before eating. - Freezing Instructions for Long-Term Storage: If you want to keep them longer, freeze the nuggets. Lay them flat on a baking sheet first and freeze until solid. Then you can transfer them to a freezer-safe bag. They will last for up to 3 months in the freezer. When it's time to enjoy your nuggets again, reheating them right is key. - Oven vs. Microwave for Best Results: The oven is the best choice for reheating. Preheat it to 375°F (190°C). Place the nuggets on a baking sheet and heat for about 10-15 minutes. This method keeps them crispy. The microwave is quicker but might make them soggy. If you use the microwave, heat them for 30 seconds at a time until warm. However, the oven always wins for texture. To make homemade chicken nuggets crispy, focus on the breading and frying techniques. Use panko breadcrumbs for a crunchier texture. Here are some tips: - Coat well: Dip chicken pieces in flour, then egg, and finally panko. This creates a strong layer. - Let them rest: Allow coated nuggets to sit for 10 minutes before cooking. This helps the breading stick better. - Fry in batches: Don’t overcrowd the pan. This keeps the oil hot and helps achieve that golden brown color. - Use hot oil: Heat your oil to about 350°F (175°C) for frying. This cooks the nuggets quickly and crisps the coating. Yes, you can use thighs instead of breasts. Thighs have a different texture and flavor. They tend to be juicier and more tender. Here are some things to consider: - Flavor: Chicken thighs have a richer taste than breasts. This can add extra depth to your nuggets. - Cooking time: Thighs may require a few more minutes to cook through. Ensure they reach an internal temperature of 165°F (75°C). Homemade chicken nuggets pair well with many sauces. Here are some popular choices: - Honey mustard: A sweet and tangy option that complements the nuggets. - BBQ sauce: A classic choice that adds a smoky flavor. - Ranch dressing: Creamy and herby, it’s a favorite for many. - Buffalo sauce: For those who like some heat, this sauce adds a kick. Air fryers make cooking chicken nuggets easy and healthy. For crispy nuggets in an air fryer: - Temperature: Set your air fryer to 400°F (200°C). - Cooking time: Cook the nuggets for about 10-12 minutes, flipping halfway through. This ensures an even crispness. For a detailed guide on making these delicious homemade chicken nuggets, check the Full Recipe. You learned how to make tasty chicken nuggets using simple ingredients and easy steps. We covered each part, from prepping to baking and even storing leftovers. Remember, using panko crumbs is key for crunch. Don't forget to experiment with spices and flours for new flavors. Enjoy your cooking time, and share your creations with others. Homemade nuggets can be fun and healthy—everyone will love them!

Homemade Chicken Nuggets Crunchy and Flavorful Treat

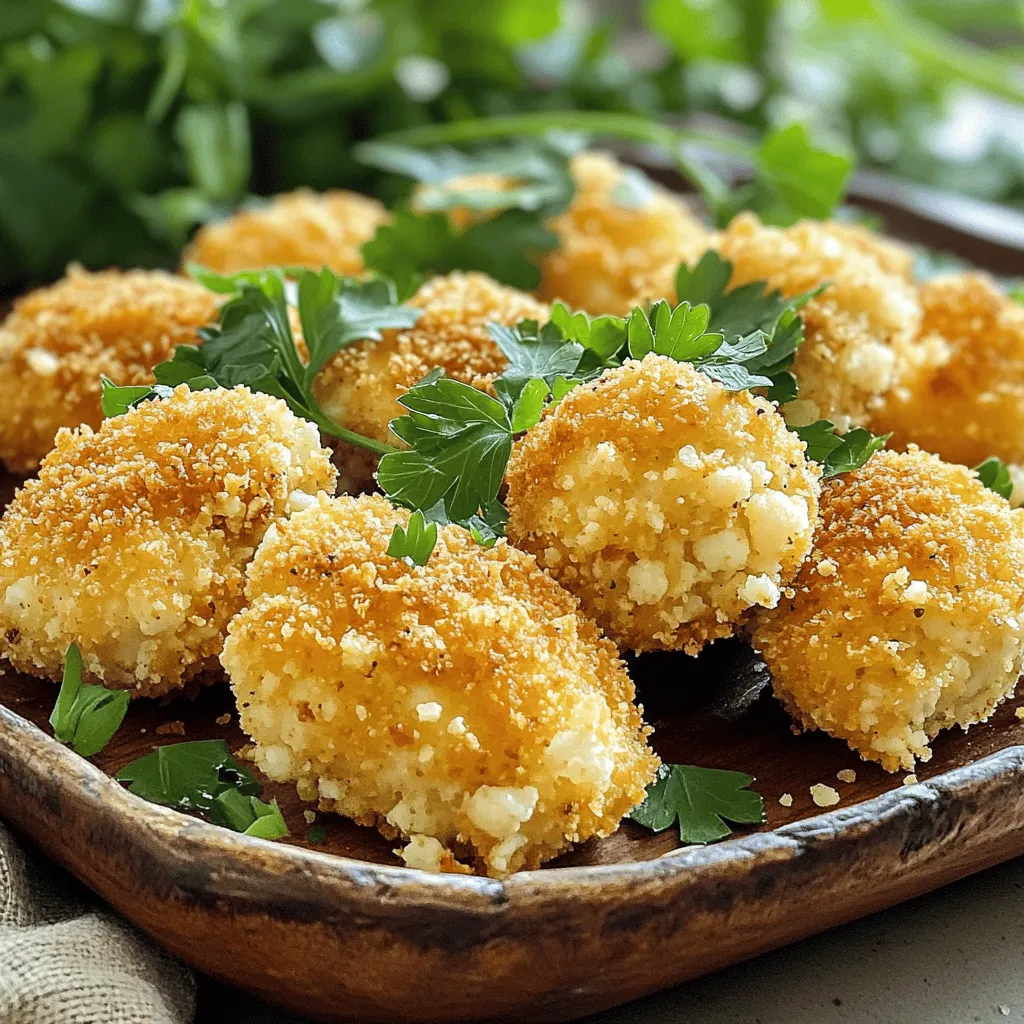
Craving a crunchy, flavorful treat? You’re in the right spot! Homemade chicken nuggets are fun to make, healthy, and packed

- 2 cups all-purpose flour - 1/2 cup granulated sugar - 2 1/2 teaspoons baking powder - 1/2 teaspoon baking soda - 1/4 teaspoon salt - 1/2 cup unsalted butter, cold and cubed - 1/2 cup buttermilk, cold - 1 large egg - Zest of 1 lemon - 1 cup fresh blueberries - 1 teaspoon vanilla extract - 1 tablespoon lemon juice - Optional: 1 egg for egg wash To make Lemon Blueberry Scones, you need simple ingredients. These scones are bright and tasty. The main ingredients create the base. Flour gives structure, while sugar adds sweetness. Baking powder and baking soda help the scones rise. Salt balances the flavors. Next, we have additional ingredients that enhance the flavor. Cold butter is key for a flaky texture. Buttermilk adds moisture and tang. The egg binds everything together. Lemon zest brings a fresh, citrusy taste. Fresh blueberries burst with sweetness in every bite. Vanilla extract adds warmth, and lemon juice brightens the scones. For a golden finish, you can use an egg wash. This step is optional but makes the scones look nice. With these ingredients, you can create a delightful treat. You can find the complete preparation steps in the Full Recipe. - Preheat oven to 400°F (200°C). - Line a baking sheet with parchment paper. - Combine flour, sugar, baking powder, baking soda, and salt in a bowl. - Stir well to ensure even mixing. - Whisk together buttermilk, egg, lemon zest, vanilla extract, and lemon juice. - Mix until smooth and well combined. - Mix dry and wet ingredients until just combined. - Gently fold in blueberries, being careful not to break them. - Transfer dough to a floured surface. - Pat it into a rectangle about one inch thick. - Cut into triangles or use a round cutter for shapes you like. - Place the scones on the prepared baking sheet. - Brush with egg wash if you want a shiny top. - Bake for 15-20 minutes until golden brown. The Full Recipe will guide you through these steps with exact measurements and tips for success. Enjoy the process, and soon you will have warm, zesty, and fluffy scones to share! To make your scones light and fluffy, do not overmix the dough. Mixing too much makes them tough. Use cold butter for flakiness. This helps create those lovely layers that everyone loves in a scone. When using frozen blueberries, do not thaw them before adding to the dough. This keeps them from getting mushy. Toss the blueberries in a bit of flour to prevent sinking. This simple step helps distribute them evenly in your scones. Serve your scones warm. A drizzle of lemon glaze adds a sweet touch. Pair them with clotted cream for a rich flavor. These simple ideas can elevate your scone experience. For the full recipe, check out the recipe section. {{image_2}} You can add chopped walnuts or almonds for a crunch. Nuts enhance the flavor and texture. Just fold them into the dough with the blueberries. This extra step creates a delightful surprise in each bite. Swap blueberries for cranberries or strawberries for a different taste. This simple change makes the scones feel fresh and new. You can even mix and match fruits for a unique twist. Consider using seasonal fruits for the best flavor. To make these scones gluten-free, use a gluten-free flour blend instead of all-purpose flour. This adjustment keeps the scones light and fluffy. Just ensure your blend works well for baking. Always check the package for proper ratios and guidelines. Store leftover scones in an airtight container. Keep them at room temperature. This helps maintain their softness and flavor. They should stay fresh for about three days. If you have more, consider freezing them. You can freeze scones either before baking or after cooling. To freeze before baking, shape the scones and place them on a baking sheet. Freeze until firm, then transfer to a freezer bag. To freeze baked scones, let them cool completely. Then, wrap them tightly in plastic wrap or foil. They can last up to a month in the freezer. To enjoy your scones again, reheat them properly. The oven works best. Preheat it to 350°F (175°C). Place the scones on a baking sheet and warm for about 10 minutes. You can also use a microwave. Heat them for about 15-20 seconds. However, the oven gives a better texture. Enjoy them warm for the best taste! Lemon blueberry scones typically last up to 3 days at room temperature. You can also freeze them for up to a month. To keep them fresh, store them in an airtight container. If you freeze them, wrap each scone well to prevent freezer burn. Yes, you can substitute buttermilk easily. Just mix regular milk with a splash of vinegar or lemon juice. Let it sit for about five minutes. This will give you a similar tangy flavor. If your scones turn out too crumbly, check your butter. Make sure it's well mixed into the flour. Also, avoid overmixing the dough. Mixing too much can lead to tough scones. Always handle the dough gently. For the best texture, keep the dough moist and fluffy. You can make delicious lemon blueberry scones by following the easy steps outlined. First, mix dry and wet ingredients carefully, then fold in fresh blueberries. Achieving a light texture is key, so remember not to overmix. For unique flavors, feel free to add nuts or swap berries. Store leftovers properly or freeze them for later. With a little practice, you’ll create delightful treats that impress everyone. Enjoy every bite of your homemade scones!

Lemon Blueberry Scones Fresh and Easy Baking Recipe

Are you ready to bake something delicious? Lemon blueberry scones are a perfect treat! They are easy to make and

- 4 boneless, skinless chicken breasts - 1 packet (1 oz) ranch seasoning mix - 1 can (10.5 oz) cream of chicken soup - 1 cup chicken broth The main ingredients in this dish create a creamy and rich flavor. The chicken breasts serve as the base, soaking up all the ranch goodness. The ranch seasoning mix gives it that classic taste you love. Cream of chicken soup adds a silky texture, while chicken broth keeps everything moist. - 1/2 cup sour cream - 1 cup shredded cheddar cheese - 1 cup frozen corn - 1 cup diced bell peppers (any color) The additional ingredients enhance the dish further. Sour cream adds a tangy depth. Shredded cheddar cheese melts beautifully, making the sauce even richer. Frozen corn brings a sweet pop, and diced bell peppers add color and crunch. You can choose different colors of bell peppers for added visual appeal. - Salt and pepper to taste - Fresh parsley for garnish Seasoning is key for a tasty dish. Add salt and pepper to bring out the flavors. Fresh parsley adds a nice touch. It not only looks great but also gives a fresh taste. When you serve this meal, the garnish makes it look fancy and inviting. If you're excited to make this dish, check out the Full Recipe. Enjoy cooking and sharing this easy meal! - Place chicken in the crockpot. - Mix ranch seasoning, cream of chicken soup, and chicken broth. Start by taking four boneless, skinless chicken breasts and laying them at the bottom of your crockpot. This is the base of your creamy ranch meal. Next, grab a bowl and combine the ranch seasoning mix, the cream of chicken soup, and the chicken broth. Stir it well until it blends smoothly. This mixture adds a rich flavor to the chicken. - Pour mixture over chicken and add corn and bell peppers. - Cover and cook on low or high. Now, pour your tasty mixture over the chicken in the crockpot. Make sure to cover the chicken evenly. Next, add one cup of frozen corn and one cup of diced bell peppers right on top. You don’t need to stir it yet; just let it sit. Cover the crockpot with its lid. Cook on low for 6-7 hours or on high for 3-4 hours. You want the chicken to be fully cooked and tender. - Shred chicken and stir well. - Add sour cream and cheddar cheese, then season. Once the cooking time is up, take two forks and shred the chicken right in the crockpot. Mix it all together so the flavors blend. Next, add half a cup of sour cream and one cup of shredded cheddar cheese. Stir until the cheese melts and the sauce is creamy. Don’t forget to season with salt and pepper to taste. This step will really enhance the flavors of your dish. For the complete recipe, check out the Full Recipe. To ensure your chicken stays tender, cook it on low heat. Low heat for 6-7 hours works best. If you use high heat, aim for 3-4 hours. Each crockpot can differ, so check your chicken with a meat thermometer. It should reach 165°F for safe eating. If your chicken is thicker, you might need more time. Adjust based on your crockpot's power. Thin chicken cooks faster, while thicker pieces need longer. Before you serve, taste the dish to check the seasoning. You can add more salt or pepper if needed. If you want extra flavor, consider adding garlic powder or onion powder. You can also mix in some hot sauce for a kick! For serving, I recommend a bed of rice or noodles. This helps soak up the creamy sauce. Garnish with fresh parsley for a nice touch. You can also add sliced green onions or a sprinkle of paprika for color. Consider a side of steamed vegetables for a balanced meal. For the full recipe, check out the detailed instructions above. {{image_2}} You can switch chicken breasts for thighs or even turkey. Chicken thighs add more flavor and stay juicy. For a creamy base, you can use alternatives to cream of chicken soup. Try cream of mushroom soup or a homemade dairy-free version using cashews. Want to spice things up? You can add garlic powder or onion powder to the mix. These add depth to the flavor. You can also throw in other veggies like zucchini or spinach. These vegetables not only boost nutrition but also bring fun textures to the meal. If you're watching fat intake, try using low-fat sour cream. You can also use a dairy-free sour cream for a vegan option. For gluten-free folks, make sure to check the ranch seasoning and soup labels. Many brands offer gluten-free options, making this dish safe for everyone. For the full recipe, check out the link above. To store leftover Crockpot Creamy Ranch Chicken, cool it to room temperature. Use airtight containers to keep it fresh. In the fridge, it stays good for about 3 to 4 days. Always check for any signs of spoilage before eating. You can freeze leftovers to extend their life. Let the chicken cool completely before putting it in freezer-safe bags or containers. Label them with the date for easy tracking. When you want to eat it, thaw it in the fridge overnight. Reheat it in the microwave or on the stove until hot. This keeps the flavors intact and ensures a tasty meal. Meal prepping this dish is easy and fun. Make a big batch and portion it out for the week. Use small, sealed containers for single servings. This makes lunch or dinner quick and simple. When prepping, consider adding veggies to each portion for balance. Keep the servings in the fridge or freezer based on when you plan to eat them. Yes, you can use frozen chicken breasts. Just keep in mind the cooking time. If you use frozen chicken, cook on low for about 8 hours. This extra time ensures the chicken is safe to eat. You can skip the sour cream. Greek yogurt is a great substitute. It keeps the dish creamy but adds a tangy taste. You might also try cream cheese, but it will change the flavor slightly. This dish pairs well with many sides. Here are some ideas: - Rice - Noodles - Mashed potatoes - Steamed vegetables These sides add balance and make your meal more filling. Larger chicken breasts need more time to cook. If they weigh over a pound, add an extra hour. Always check the internal temperature. It should reach 165°F for safety. Adjust the time based on thickness to ensure it cooks through. This recipe for Crockpot Creamy Ranch Chicken is simple and delicious. We covered key ingredients like chicken, ranch seasoning, and cream of chicken soup. Following easy steps, you create a tasty dish. I shared tips to ensure perfect cooking, variations for different diets, and storage advice to make meals last. Remember, you can customize flavors to fit your taste. I hope you enjoy making this comforting meal for yourself and your family!

Crockpot Creamy Ranch Chicken Flavorful Easy Meal

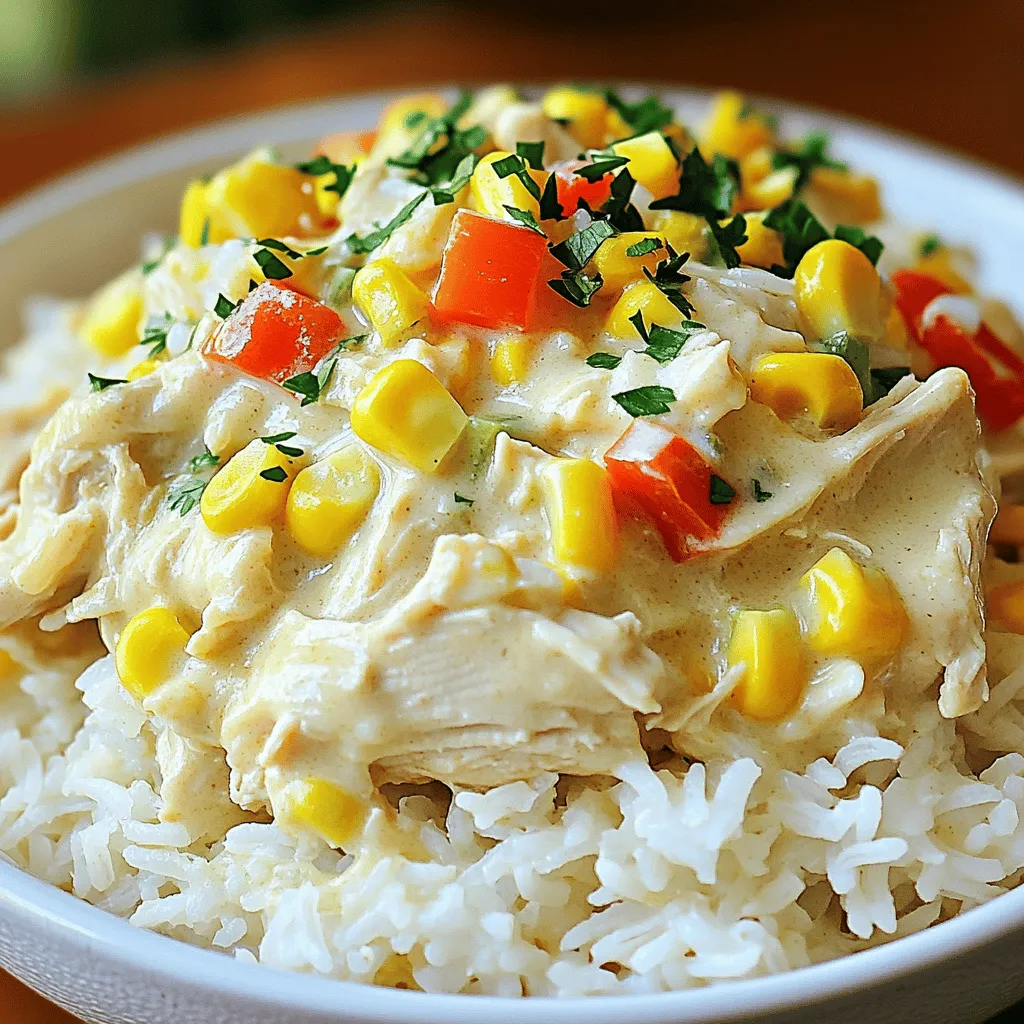
Looking for an easy, tasty meal? You’ll love this Crockpot Creamy Ranch Chicken! Packed with juicy chicken, rich flavors, and

To make Chicken Parmesan Sliders, you will need: - 1 lb ground chicken - 1 cup breadcrumbs - 1/2 cup grated Parmesan cheese - 1/2 teaspoon garlic powder - 1/2 teaspoon dried oregano - 1/2 teaspoon salt - 1/4 teaspoon black pepper - 1/4 cup fresh parsley, chopped - 1/2 cup marinara sauce - 1 cup shredded mozzarella cheese - 12 slider buns - 2 tablespoons olive oil - Fresh basil leaves for garnish (optional) Ground chicken is the star of this dish. It is lean and cooks quickly. You can find it in most grocery stores. Breadcrumbs add texture and help bind the chicken patties. I prefer using plain breadcrumbs, but seasoned ones work too. Parmesan cheese gives a salty, nutty flavor. Fresh parsley adds brightness and color to the sliders. Marinara sauce offers a rich, tomato flavor that complements the chicken well. Finally, mozzarella cheese melts beautifully, creating that gooey, cheesy aspect we all love. You can easily swap some ingredients if needed: - Ground turkey can replace ground chicken. - If you don’t have breadcrumbs, crushed crackers work well. - Use Pecorino Romano cheese instead of Parmesan for a sharper taste. - If you need a gluten-free option, try gluten-free bread or almond flour. - For a dairy-free version, use vegan cheese and skip the Parmesan. Using these substitutions can help you make the recipe fit your needs while still being delicious. For the full recipe, you can check the provided details above. Start by preheating your oven to 375°F (190°C). This makes sure your sliders bake perfectly. While the oven heats, gather all your ingredients. You need ground chicken, breadcrumbs, Parmesan cheese, garlic powder, dried oregano, salt, black pepper, parsley, marinara sauce, mozzarella cheese, slider buns, and olive oil. Having everything ready saves time and makes cooking fun. In a large bowl, mix the ground chicken with breadcrumbs, Parmesan cheese, garlic powder, oregano, salt, black pepper, and chopped parsley. Use your hands to combine everything well. This lets all the flavors mix together. After mixing, form the chicken mixture into 12 small patties. Make them slightly smaller than the slider buns. This ensures they fit nicely. Heat 1 tablespoon of olive oil in a large skillet over medium heat. Once hot, place the patties in the skillet. Cook them for about 5-7 minutes on each side. You want a nice golden brown color, indicating they're cooked through. If your skillet is small, cook in batches. This keeps them from crowding and ensures even cooking. After cooking, set the patties on a baking sheet lined with parchment paper. Add a tablespoon of marinara sauce on each patty. Then, sprinkle mozzarella cheese on top. Now, place the baking sheet in the preheated oven. Bake for 5-7 minutes until the cheese is melted and bubbly. Slice the slider buns in half and place a patty on the bottom half of each bun. Add more marinara sauce if you like, and top with a basil leaf for a touch of fresh flavor. Finally, place the top half of the bun over the chicken. Brush the tops with remaining olive oil for extra shine and flavor. Serve warm and enjoy! Check out the Full Recipe for detailed steps. To keep your sliders juicy, use ground chicken with some fat. Fat adds flavor and moisture. Mix your chicken with breadcrumbs and cheese well. This helps bind the ingredients and keeps the patties moist. When shaping the patties, make them a bit smaller than the buns. This way, they will not spill out when you bite into them. Cook the patties until they are golden brown. This adds a nice crunch and flavor. These chicken parmesan sliders shine on their own, but you can enhance your meal. Serve them with a side of marinara sauce for dipping. A fresh green salad adds a nice crunch and balances the meal. You can also pair the sliders with crispy sweet potato fries. They add a fun twist to your meal. For drinks, try serving sparkling water with lemon or iced tea. For a stunning display, arrange your sliders on a large platter. Stack them neatly and add fresh basil leaves on top. You can also drizzle extra marinara sauce over the sliders for color. Use small flags or toothpicks to hold each slider together. This makes them easy to grab. Consider using a wooden board for a rustic look. It adds charm to your table setting. For the full recipe, check out the complete guide! {{image_2}} Want to add some heat? You can make spicy chicken Parmesan sliders easily. Just mix in some crushed red pepper flakes or chopped jalapeños into the chicken mixture. This will give your sliders a nice kick. You can also use spicy marinara sauce for extra flavor. The heat balances well with the melted cheese and soft buns. Not everyone eats meat, but you can still enjoy sliders! Use a mix of black beans and quinoa as a base. Add breadcrumbs, cheese, and seasonings to create a tasty patty. You can also try using eggplant or zucchini slices instead of meat. Bake or grill them to get a nice texture. Top with marinara sauce and cheese just like the chicken sliders. Cheese can change the whole flavor of your sliders. While mozzarella is classic, try using provolone or fontina for a twist. Each cheese brings its own taste and meltability. For the sauce, you don't have to stick with marinara. Pesto is a great choice, or even a creamy Alfredo sauce for a richer flavor. Mix and match to find your favorite combinations. For more ideas, check out the Full Recipe for delicious chicken Parmesan sliders! After you enjoy your Chicken Parmesan Sliders, store any leftovers in an airtight container. Keep the sliders in the fridge. They will stay fresh for up to three days. If you want to keep them longer, consider freezing them. To reheat the sliders, preheat your oven to 350°F (175°C). Place the sliders on a baking sheet. Cover them with foil to keep them moist. Heat for about 10-15 minutes or until warmed through. You can also use a microwave for a quick option. Heat each slider for about 30-45 seconds. If you want to freeze your sliders, it’s easy! Wrap each slider tightly in plastic wrap. Then, place them in a freezer bag. They can last up to three months in the freezer. When you're ready to enjoy them, thaw them in the fridge overnight before reheating. This helps keep the flavors intact. For a quick meal, just grab what you need from the freezer. This recipe makes it all simple and fun! For the full recipe, check the section above. Yes, you can prepare Chicken Parmesan Sliders ahead of time. You can mix the chicken and shape the patties. Store them in the fridge until you are ready to cook. This makes it easy for a busy day or a party. If you want, you can also bake them and then reheat when needed. Just remember to cover them to keep them moist. You can tell when the patties are done by checking their color. They should be golden brown on the outside. Use a meat thermometer to check the inside. The chicken should reach 165°F (74°C) for safety. If you cut one open, the meat should be white, not pink. This way, you are sure they are cooked fully. You can serve Chicken Parmesan Sliders with several sides. A fresh salad pairs well, adding crunch and color. Sweet potato fries also make a great match for their flavor. You can even serve them with extra marinara sauce for dipping. For a fun twist, try a side of garlic bread. This will keep your meal both tasty and filling. Check out the Full Recipe for more ideas! In this post, I covered ingredients, step-by-step cooking, and tips for perfect sliders. You learned how to choose ingredients and their substitutes. We also explored tasty variations and ways to store leftovers. Remember to have fun with your sliders. Experiment with flavors and pairings. The joy of cooking lies in trying new things. Keep this guide handy, and enjoy each delicious bite!

Chicken Parmesan Sliders Tasty and Easy Recipe

Looking for a simple and delicious meal? Try my Chicken Parmesan Sliders! This easy recipe combines tender chicken patties, melted

- 2 cups cooked chicken breast, shredded - 4 cups mixed salad greens (lettuce, spinach, arugula) - 1 cup cherry tomatoes, halved - 1 cup corn (fresh, canned, or frozen) - 1/2 cup black beans, drained and rinsed - 1/2 red onion, thinly sliced - 1/2 cup shredded cheddar cheese - 1/4 cup crispy tortilla strips (for garnish) - 1/2 cup BBQ sauce - 1/4 cup ranch dressing - Salt and pepper to taste The beauty of BBQ Ranch Chicken Salad lies in its fresh ingredients. Each one adds a unique flavor and texture. For instance, the shredded chicken gives you protein. The mixed greens add crunch and freshness. Cherry tomatoes bring sweetness, while corn adds a delightful pop. Black beans provide heartiness, and red onions give a sharp bite. When you prepare this salad, you want to focus on quality. Use freshly cooked chicken for the best taste. Opt for organic salad greens whenever possible. They not only taste better but also offer more nutrients. Don't forget the BBQ sauce and ranch dressing! They tie all the flavors together. Now, let's talk numbers. This dish is not just tasty; it is balanced, too! Each serving has about 400 calories. You get around 30 grams of protein, 15 grams of fat, and 35 grams of carbohydrates. This balance keeps you full and satisfied. For more detailed insights, check out the Full Recipe. It shows you how to put all these ingredients together for a colorful and healthy meal. It's easy, quick, and full of flavor. Enjoy experimenting with this salad! 1. Start by taking your cooked chicken breast and shredding it. Place it in a large mixing bowl. 2. Pour the BBQ sauce over the shredded chicken. Mix well until all the chicken is coated. This adds a sweet and smoky flavor that makes the salad pop. 3. In another large bowl, add your mixed salad greens. This will be the base of your dish. Use a mix of lettuce, spinach, and arugula for a nice crunch and fresh taste. 4. Next, layer the halved cherry tomatoes, corn, black beans, and red onion on top of the greens. This adds color and nutrition to your salad. 5. Once the layers are set, add the BBQ chicken on top. The warm chicken will mix well with the cool veggies. 1. Drizzle ranch dressing over the entire salad. Use as much or as little as you like for the perfect finish. 2. Then, sprinkle shredded cheddar cheese over the salad. This adds a creamy texture and rich flavor. 3. Gently toss the salad to mix everything together. Or, if you like, keep it layered for a beautiful presentation. 4. Season with salt and pepper to taste. This step enhances all the flavors in your salad. 5. Before serving, top with crispy tortilla strips for extra crunch. This adds a fun texture to your fresh and flavorful meal. These steps should guide you through making the perfect BBQ Ranch Chicken Salad. For a detailed list of ingredients, check the Full Recipe. For the BBQ Ranch Chicken Salad, cooking your chicken well is key. I recommend two great methods: grilling and poaching. Grilling gives a nice smoky flavor. Poaching keeps the chicken juicy. No matter the method, cook the chicken until it reaches 165°F. What if you have leftover chicken? Use it! Shred it and mix it with BBQ sauce. This adds great flavor and saves time. Leftover chicken makes meal prep easy and quick. What are some tasty alternatives for BBQ sauce? You can use homemade sauce or sweet chili sauce. Each option brings a unique taste. Ranch dressing can also be swapped. Try yogurt dressing or blue cheese dressing for a twist. To elevate the flavor, add spices or herbs. A sprinkle of smoked paprika or garlic powder can do wonders. Fresh herbs like cilantro or parsley add brightness too. Experiment with flavors to find what you love. How you serve the salad matters. Use a large, colorful bowl to showcase the vibrant ingredients. A clear glass bowl can highlight the layers. It looks appealing and invites everyone to dig in. Beyond crispy tortilla strips, try other toppings. Roasted nuts add crunch. Avocado slices bring creaminess. You can even use crispy bacon for extra flavor. Get creative with your toppings; make it your own! {{image_2}} You can switch up the proteins in this salad. If you want a lighter option, try tofu. For seafood lovers, shrimp adds a nice touch. If you crave something heartier, use pork instead of chicken. Each option brings a unique flavor. You can also change the greens. Kale is sturdy and adds a nice crunch. Romaine gives a classic salad feel. Feel free to mix and match greens for a fun twist. Making this salad gluten-free is simple. Just ensure your BBQ sauce and ranch dressing are gluten-free. Most brands offer gluten-free options that taste great. For vegetarian or vegan options, replace chicken with chickpeas or grilled veggies. Use a vegan BBQ sauce and ranch dressing to keep it plant-based. This way, everyone can enjoy the salad! Pair your BBQ Ranch Chicken Salad with side dishes for a full meal. Some warm bread or crunchy chips complement it well. You can also serve it with a light soup for a cozy dinner. To make it a meal prep option, store the salad in separate containers. Keep the dressing separate to prevent sogginess. This way, you can grab a healthy meal anytime! For the full recipe, check out the detailed instructions provided earlier. To keep your BBQ Ranch Chicken Salad fresh, place it in an airtight container. This helps prevent moisture loss and keeps flavors intact. If you separate the components, the salad will last longer. Store the chicken, veggies, and dressing separately if possible. This way, the greens stay crisp and the chicken remains juicy. In the fridge, your salad lasts about 3 to 4 days. Check for signs of spoilage before eating. If you see any discoloration or off-smells, it's best to throw it out. The chicken should stay tender, and the veggies should look vibrant and fresh. To reheat the chicken, use a microwave or skillet. Heat until the chicken reaches 165°F for safety. Avoid reheating the salad greens or dressing. They lose their texture and flavor with heat. If you stored components separately, you can simply add the warm chicken to the salad right before serving. This keeps everything fresh and delicious. You can try using teriyaki sauce or honey mustard. Both add a nice flavor. If you'd like a homemade option, mix ketchup, vinegar, and spices for a quick BBQ sauce. You can find a great homemade BBQ sauce recipe [here](#). Yes, you can prepare parts of the salad in advance. Cook and shred the chicken, then mix it with BBQ sauce. Store the chicken in the fridge. Keep the salad greens and other veggies separate. This way, they stay fresh. Assemble the salad just before serving. If you want a change, try blue cheese or Caesar dressing. Both pair well with the BBQ chicken. You could also go with a light vinaigrette for a fresh twist. To add heat, mix in jalapeños or red pepper flakes. You can also use spicy BBQ sauce or hot sauce. For a fun kick, sprinkle some chili powder on top. These options will surely spice up your dish! This blog post explored the ingredients, preparation, and variations for BBQ Ranch Chicken Salad. You learned how to combine flavors, layer fresh ingredients, and enjoy a healthy meal. Remember to experiment with swaps and styles, tailoring the salad to your taste or dietary needs. Whether serving it fresh or storing leftovers, the possibilities are endless. Enjoy the flavors while making it your own, and share it with loved ones for fun gatherings or everyday meals. This salad is simple, nutritious, and perfect for any occasion.

BBQ Ranch Chicken Salad Fresh and Flavorful Meal

Looking for a fresh and tasty meal? This BBQ Ranch Chicken Salad has it all—crispy greens, tender chicken, and zesty

- 200g (7 oz) feta cheese block - 400g (14 oz) cherry tomatoes, halved - 3 cloves garlic, minced - 1 teaspoon red chili flakes (adjust for spice preference) - 300g (10.5 oz) pasta (penne or rigatoni) - 4 tablespoons olive oil - Salt and pepper to taste The star of this dish is the feta cheese block. It melts into a creamy sauce. The cherry tomatoes burst with flavor as they roast. Garlic adds a strong taste, while red chili flakes bring heat. The pasta serves as the base, soaking up all those delicious flavors. - 1 cup spinach (optional) - Zest of 1 lemon - Fresh basil leaves for garnish You can add spinach for a nutritious boost. Lemon zest brightens the dish with a fresh taste. Fresh basil leaves make a lovely garnish, adding color and flavor. - Baking dish - Pot for cooking pasta - Fork for mashing ingredients Having the right tools makes cooking easier. A baking dish holds all your ingredients while they roast. A pot cooks the pasta just right. A fork helps mash the feta and tomatoes into a creamy sauce. For the full recipe, check out the Creamy Baked Feta Pasta with a Twist . 1. Preheat the oven to 400°F (200°C). This helps cook the feta and tomatoes evenly. 2. Prepare the baking dish by placing a block of feta cheese in the center. Surround it with halved cherry tomatoes. 1. Assemble the feta and tomatoes in the dish. Make sure the tomatoes are snug around the feta. 2. Add spices and oil by sprinkling minced garlic and red chili flakes on top. Drizzle 2 tablespoons of olive oil over the dish. Season with salt and pepper. 1. Mash the feta and tomatoes after baking for 25-30 minutes. Use a fork to create a creamy sauce. 2. Mix with cooked pasta. Add the cooked pasta to the baking dish and toss everything together. If you want, add spinach for a pop of color and nutrition. Your dish is a vibrant mix of flavors and textures! For the full recipe, check the details in the article above. Enjoy your cooking! To enhance your feta pasta, you can adjust the spice levels. I love using red chili flakes. Start with one teaspoon, then taste. If you want more heat, add more. This gives your dish a nice kick. Lemon zest can really brighten the flavors. Just use a grater to add the zest of one lemon. Mix it in right before serving. It adds a fresh taste that balances the creaminess of the feta. For the perfect pasta texture, cook your pasta until it is al dente. This means it should still have a slight bite. Follow the package instructions, but start checking a minute or two early. Drain it, but save a bit of the pasta water. This can help thin your sauce later if needed. After baking, make sure your feta is creamy. It should be soft when you take it out of the oven. Use a fork to mash the feta into the tomatoes. This creates a smooth, creamy sauce that coats the pasta beautifully. Feta pasta pairs well with side dishes like a simple salad. A fresh green salad with a light vinaigrette works great. You can also serve garlic bread on the side for some crunch. When it comes to wine, a crisp white like Sauvignon Blanc is ideal. It complements the flavors of the dish. If you prefer red, try a light Pinot Noir. It won’t overpower the meal. For the full recipe, check out the complete guide. {{image_2}} You can make this dish your own by changing the flavors. Adding veggies like zucchini or bell peppers brightens the meal. These veggies cook well with the feta and tomatoes. They add color and crunch. You can also add protein sources. Chicken or shrimp works great. This will make the dish more filling. Just cook the protein separately, then mix it in. If you're plant-based, there’s a way for you to enjoy this dish too. You can use vegan feta instead of regular feta. It melts nicely and gives a creamy texture. For those who need gluten-free meals, swap regular pasta for gluten-free options. Look for rice or chickpea pasta. They taste great and keep the dish gluten-free. Feeling adventurous? You can swap out feta for other cheeses. Goat cheese adds a tangy flavor. Ricotta brings a creamy touch. You can even mix different cheeses for a unique taste. Try a blend of feta and mozzarella. Each cheese will give its own spin to the dish. Don't be afraid to experiment! For the full recipe, check out the details again. After enjoying your feta pasta, let it cool down. This step is key for safe storage. Place your leftovers in a clean container. Use airtight containers to keep your dish fresh. Glass or plastic containers work well for this. If you want to save space, use smaller containers for easy storage. To freeze baked feta pasta, first let it cool completely. Then, scoop portions into freezer-safe bags. Remove as much air as you can before sealing. This helps prevent freezer burn. When ready to eat, take it out of the freezer. Thaw it in the fridge overnight for best results. Reheat in the oven or microwave until hot. Stir well to mix up the creamy sauce. In the fridge, your feta pasta stays fresh for about 3 to 5 days. Keep an eye out for signs of spoilage. If you see mold, or if it smells off, it’s time to toss it. Always trust your senses when it comes to food safety. For more details on making this dish, check out the Full Recipe. Viral TikTok Feta Pasta is a simple and tasty dish that took social media by storm. It started as a trending recipe on TikTok in early 2021. The dish features a block of feta cheese baked with cherry tomatoes, garlic, and spices. The heat from baking makes the cheese creamy and rich. People love it for its ease and flavor. Plus, it looks great on camera! Yes, you can try different cheeses! Goat cheese gives a tangy flavor, while ricotta is creamy and mild. If you want a sharp taste, use aged cheddar. Each cheese changes the dish’s taste and texture. Just remember to adjust the cooking time as needed. The key is to find a cheese you enjoy, so feel free to get creative! To make this dish healthier, consider these tips: - Use whole-grain pasta for added fiber. - Add more veggies like spinach or bell peppers. - Reduce the amount of olive oil or use a light version. - Swap regular feta for a reduced-fat option. These changes keep the taste while making it a bit lighter. Enjoy your meal guilt-free! This blog post showed how to make viral TikTok feta pasta. You learned about the main and optional ingredients, plus essential kitchen tools. The step-by-step guide helped you prepare, bake, and combine flavors. You also got tips for perfecting your dish and ideas for variations. Finally, I shared how to store leftovers and answered common questions. With these simple steps and fun twists, you can enjoy creamy, flavorful pasta any time. Remember, cooking should be fun, so don’t be afraid to experiment!

Viral TikTok Feta Pasta Trendy and Easy Recipe

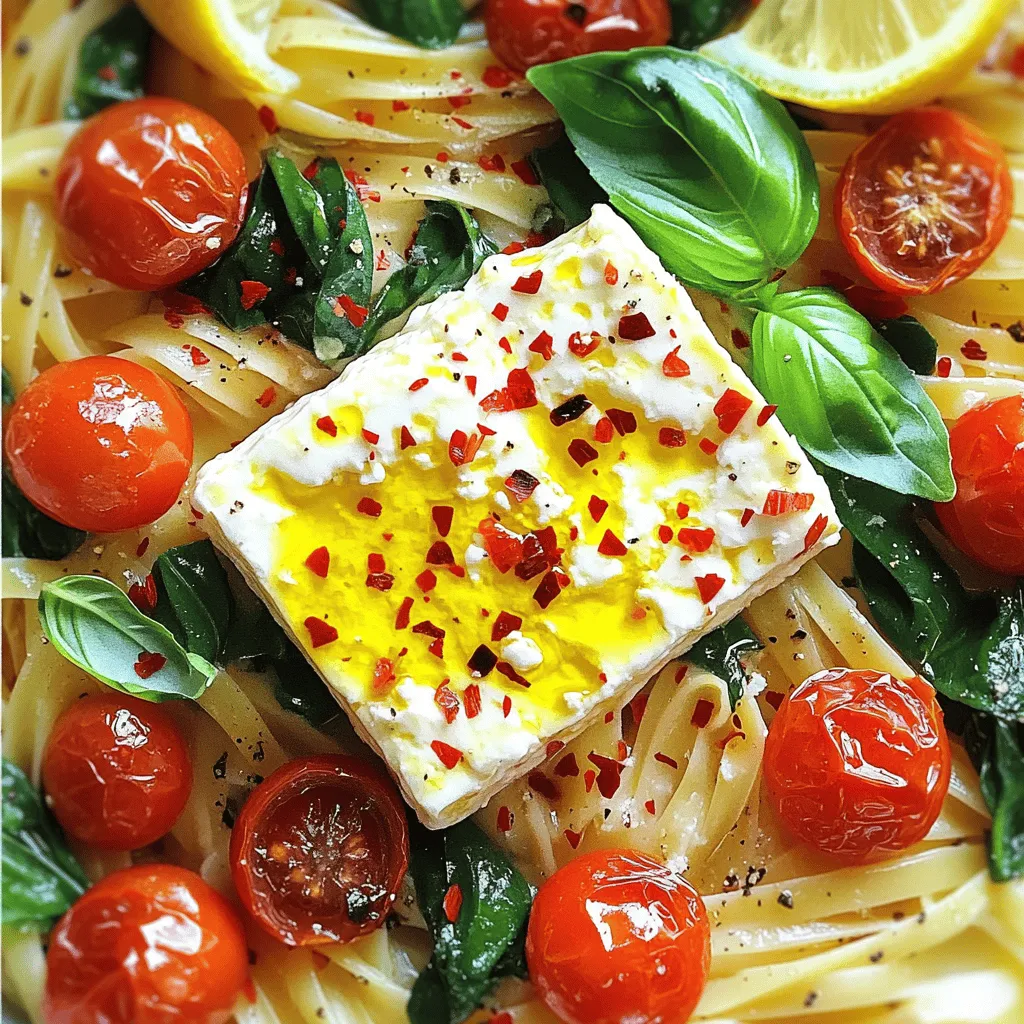
Have you heard about the viral TikTok Feta Pasta? This trendy dish is taking social media by storm, and for

Older posts
Newer posts
← Previous Page1 … Page77 Page78 Page79 … Page125 Next →

dsad

© 2025 Southern Dishes • Built with GeneratePress

Our Policies

  • Copyright Policy
  • Cookie Policy
  • GDPR Policy
  • Privacy Policy
  • Disclaimer
  • Terms Of Use

More Information

  • Home
  • About
  • Contact
  • Appetizers
  • Dessert
  • Dinner
  • Drinks
©2025, Southern Dishes About Back To Top