Go Back
- 1 package (15 Oreos), crushed - 4 tablespoons unsalted butter, melted - 8 ounces cream cheese, softened - ½ cup powdered sugar - 1 teaspoon vanilla extract - 1 cup heavy whipping cream - 1 cup mini chocolate chips (optional for topping) - Extra crushed Oreos for garnish You can swap Oreos with any chocolate cookie. Use margarine instead of butter if needed. For a lighter option, try low-fat cream cheese. If you want a dairy-free treat, use a plant-based cream cheese. You could also use a whipped topping instead of heavy cream, but the texture may change. Start by crushing the Oreos. Place them in a zip-top bag and crush with a rolling pin. For precise measuring, use a kitchen scale for the cream cheese and powdered sugar. Soften cream cheese by leaving it out for 30 minutes. Melt the butter in the microwave in short bursts to avoid burning. Whip the heavy cream until you see stiff peaks. This helps create a light, airy cheesecake. First, take a medium bowl. Add the crushed Oreos and melted butter. Mix them well. You want this to look like wet sand. This is your crust. Now, divide this mixture into your serving cups. Press it down firmly. This helps form a solid base. Set the cups aside while you prepare the filling. Grab a large bowl. Beat the softened cream cheese with the powdered sugar and vanilla extract. Mix until it is smooth and creamy. In another bowl, whip the heavy cream. Whip it until stiff peaks form. This step is key for a light filling. Gently fold the whipped cream into the cream cheese mixture. Do this carefully to keep the air in. Now, spoon the cream cheese filling over the Oreo crust. Fill each cup about three-quarters full. This gives you room for toppings later. If you like, add mini chocolate chips on top. You can also sprinkle extra crushed Oreos for some crunch. Once your cups are assembled, it’s chilling time! Place them in the fridge. Leave them to set for at least 2 hours. This helps the flavors mix and the filling to firm up. After chilling, they are ready to serve. Enjoy your delicious Oreo Bliss Cheesecake Cups! To get a smooth cheesecake, start with soft cream cheese. Cold cream cheese can make lumps. Beat it well with sugar and vanilla until creamy. This helps mix air into the batter. When you add whipped cream, be gentle while folding. This keeps the mix light and fluffy. Chilling the cups is key. It helps the cheesecake firm up nicely. Chill your mixing bowl and beaters before whipping cream. Cold tools help the cream whip better. Start mixing on low speed, then increase to high. Stop once you see stiff peaks. Over-mixing can turn cream into butter, so watch closely. Add it slowly to the cream cheese mix to keep it light. One mistake is skipping the chill time. If you don’t let them set, they won’t hold shape. Another mistake is not pressing the crust firmly. A loose crust can crumble when you serve it. Also, don’t rush the mixing. Take your time to combine each step well. These tips will help you make perfect Oreo cheesecake cups every time! {{image_2}} You can change the flavor of your cheesecake cups easily. For a mint twist, add 1 teaspoon of mint extract to the cream cheese mix. This gives a fresh and cool taste. If you love peanut butter, mix in 1/2 cup of smooth peanut butter with the cream cheese. This adds a nutty richness to each bite. You can also try other flavors like chocolate or caramel. Just swap out some cream cheese for your favorite spread. Toppings can make your cheesecake cups extra special. Try adding fresh fruit like strawberries or raspberries on top. They add color and a touch of sweetness. Mini chocolate chips give a nice crunch too. You can sprinkle more crushed Oreos on top for extra texture. Whipped cream is another great choice. It makes your cups look fancy and adds a light feel. Serve the cheesecake cups cold for the best taste. They are perfect for parties or family gatherings. You can place them on a nice tray to show them off. For a fun twist, give each guest their own cup. This makes it easy to enjoy and share. You can also pair them with a hot drink, like coffee or tea. The flavors work well together and will impress everyone. Store your Oreo cheesecake cups in an airtight container. This keeps them fresh and tasty. If you made several cups, layer them with parchment paper. This helps prevent sticking. Keep them in the fridge for the best taste. Avoid leaving them out at room temperature for long. Oreo cheesecake cups stay good in the fridge for about five days. After that, they may lose their flavor and texture. If you notice any changes in smell or appearance, it's best to throw them away. Always check before you enjoy your treat! You can freeze these cheesecake cups too! Just cover each cup with plastic wrap. Then, place them in a freezer-safe container. They will last for up to three months in the freezer. When you want to eat them, thaw them in the fridge overnight. Enjoy your sweet treat any time! Yes, you can use whipped topping instead of heavy cream. However, keep in mind that the texture will change. Whipped topping adds a lighter feel but may lack the rich taste of heavy cream. If you choose this option, use about 2 cups of whipped topping to replace the heavy cream. To make this recipe gluten-free, use gluten-free Oreos. Check labels to ensure they meet your needs. You can also use a gluten-free cookie for the crust. Most gluten-free cookies work well in this recipe. Yes, you can prepare these cups in advance. They stay fresh in the fridge for up to three days. Just make sure to cover them well. This makes them a great choice for parties or gatherings. If you need a substitute for cream cheese, try mascarpone cheese. It has a similar texture and flavor. You can also use Greek yogurt for a lighter option. Just remember, the taste will change a bit. To check if the cheesecake has set, gently shake the cup. If the center is firm and does not jiggle, it’s ready. Refrigerate for at least two hours to ensure proper setting. The cheesecake should feel cool and firm when you touch it. We explored the key ingredients and their roles in making Oreo cheesecake cups. I shared steps for preparing the crust, filling, and putting it all together. You learned tips for perfect texture and common mistakes to avoid. We discussed variations like flavors and toppings, along with storage methods. These cheesecake cups are fun and simple. With practice, you can impress friends and family. Enjoy creating your own delicious versions!

No Bake Oreo Cheesecake Cups

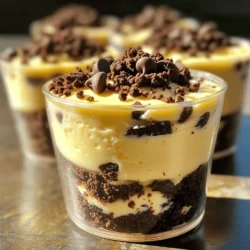
Indulge in the ultimate dessert with these Oreo Bliss Cheesecake Cups! This easy recipe combines crushed Oreos, creamy cheesecake, and a luscious topping for a treat everyone will love. Perfect for gatherings or just a sweet snack, these cups are as fun to make as they are to eat. Click through for step-by-step instructions and whip up this delightful dessert today! You won’t want to miss out on these delicious treats!

Ingredients
  

1 package (15 oreos) crushed

4 tablespoons unsalted butter, melted

8 ounces cream cheese, softened

½ cup powdered sugar

1 teaspoon vanilla extract

1 cup heavy whipping cream

1 cup mini chocolate chips (optional for topping)

Extra crushed oreos for garnish

Instructions
 

In a medium bowl, combine the crushed Oreos and melted butter. Mix well until the mixture resembles wet sand.

    Divide the Oreo mixture evenly among the serving cups, pressing it down firmly to create a crust layer at the bottom. Set aside.

      In a large bowl, beat the softened cream cheese with powdered sugar and vanilla extract until smooth and creamy.

        In a separate bowl, whip the heavy cream until stiff peaks form.

          Gently fold the whipped cream into the cream cheese mixture until well combined.

            Spoon the cheesecake filling over the Oreo crust in each cup, filling them about three-quarters full.

              Top each cup with mini chocolate chips (if using) and a sprinkle of extra crushed Oreos for added texture.

                Refrigerate for at least 2 hours to allow the cheesecake to set properly.

                  Serve chilled and enjoy your delicious Oreo Bliss Cheesecake Cups!

                    Prep Time: 15 mins | Total Time: 2 hrs 15 mins | Servings: 8