
Latest & Greatest
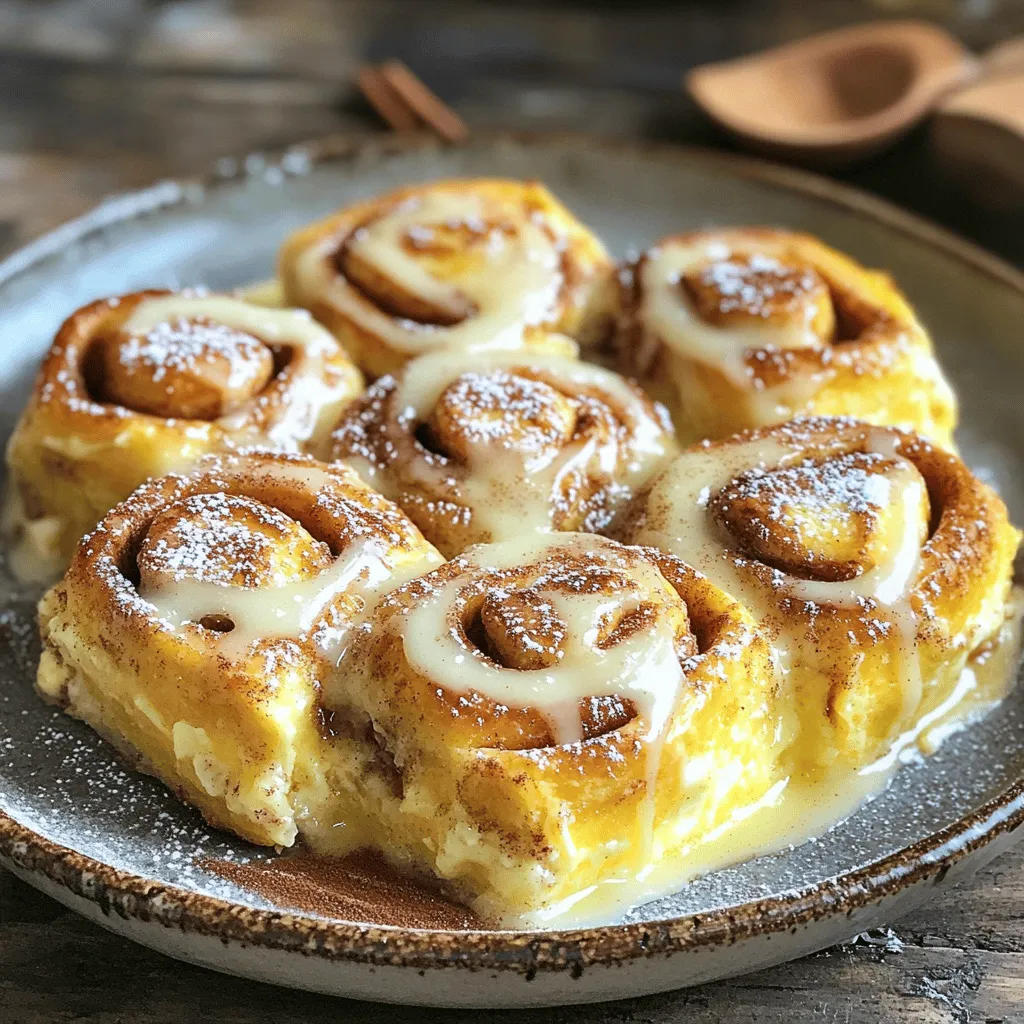
Cinnamon Roll Casserole Delightful and Easy Recipe
Are you ready for a warm and sweet treat? My Cinnamon Roll Casserole is an easy way to enjoy breakfast
Read more…
Sheet Pan Lemon Garlic Herb Chicken Flavorful Delight
Are you ready to impress your family with a simple yet delicious meal? The Sheet Pan Lemon Garlic Herb Chicken
Read more…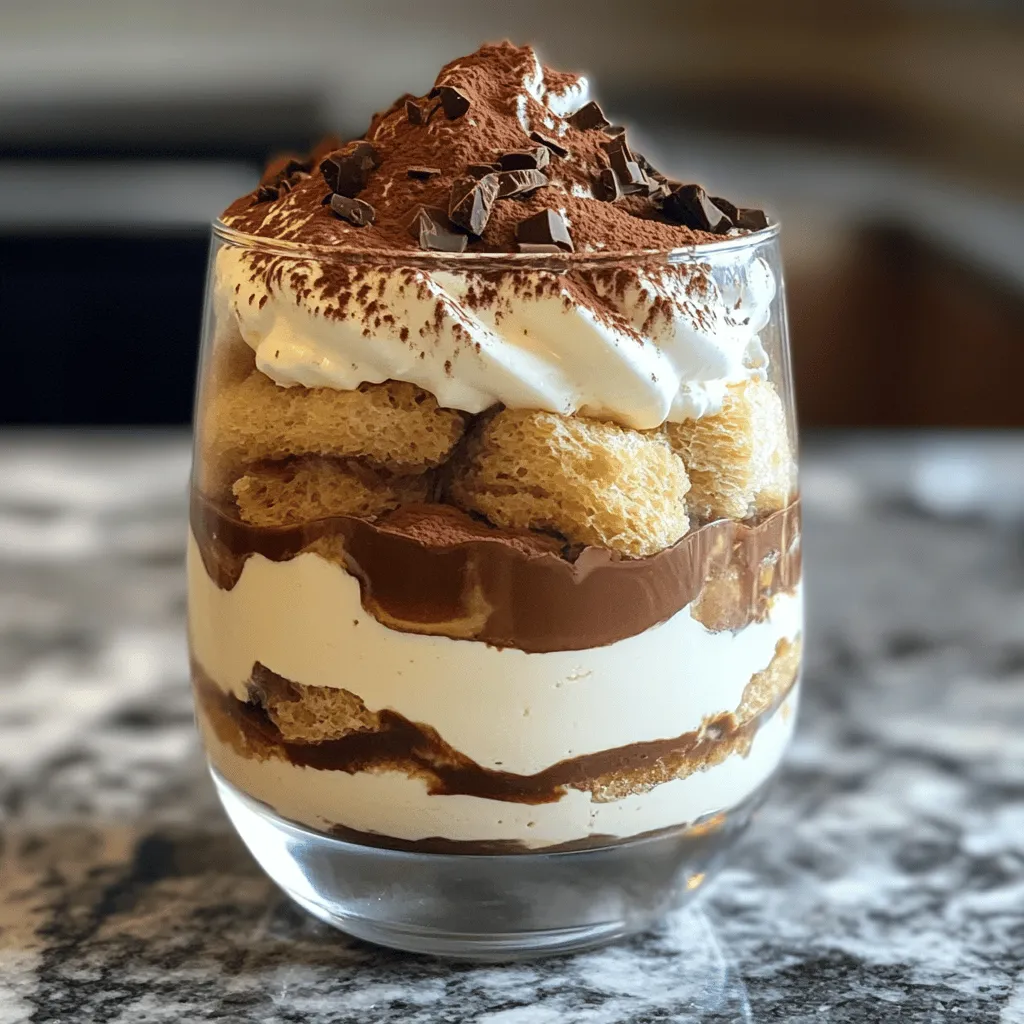
Easy No-Bake Tiramisu Delightful and Simple Recipe
If you crave a dessert that is both delicious and easy to make, you’re in the right place! This Easy
Read more…
Mango Sorbet Delightful and Easy Summer Treat
Summer is here, and nothing beats a cool, fruity treat! Mango sorbet is easy to make and perfect for warm
Read more…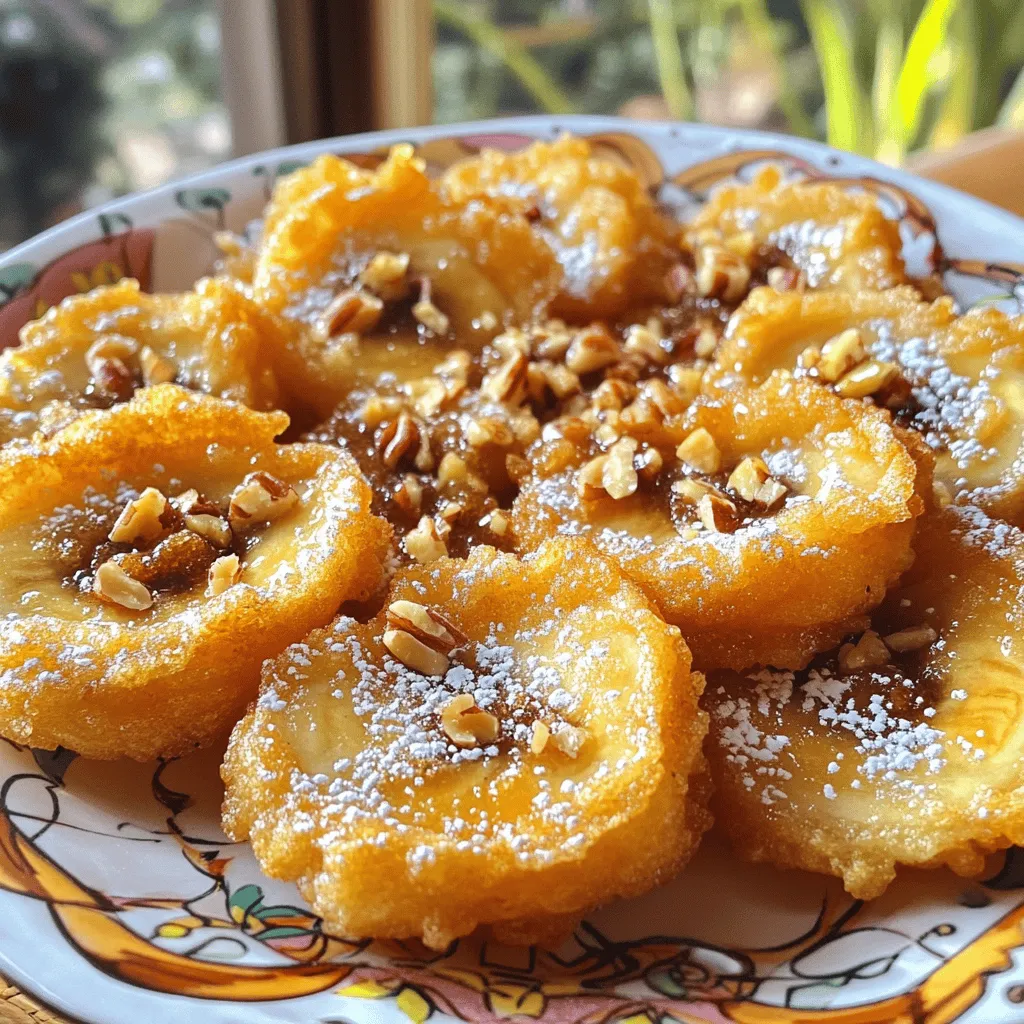
Fried Banana With Brown Sugar Sweet and Simple Delight
If you’re looking for a simple yet sweet treat, you’ve come to the right place. Fried banana with brown sugar
Read more…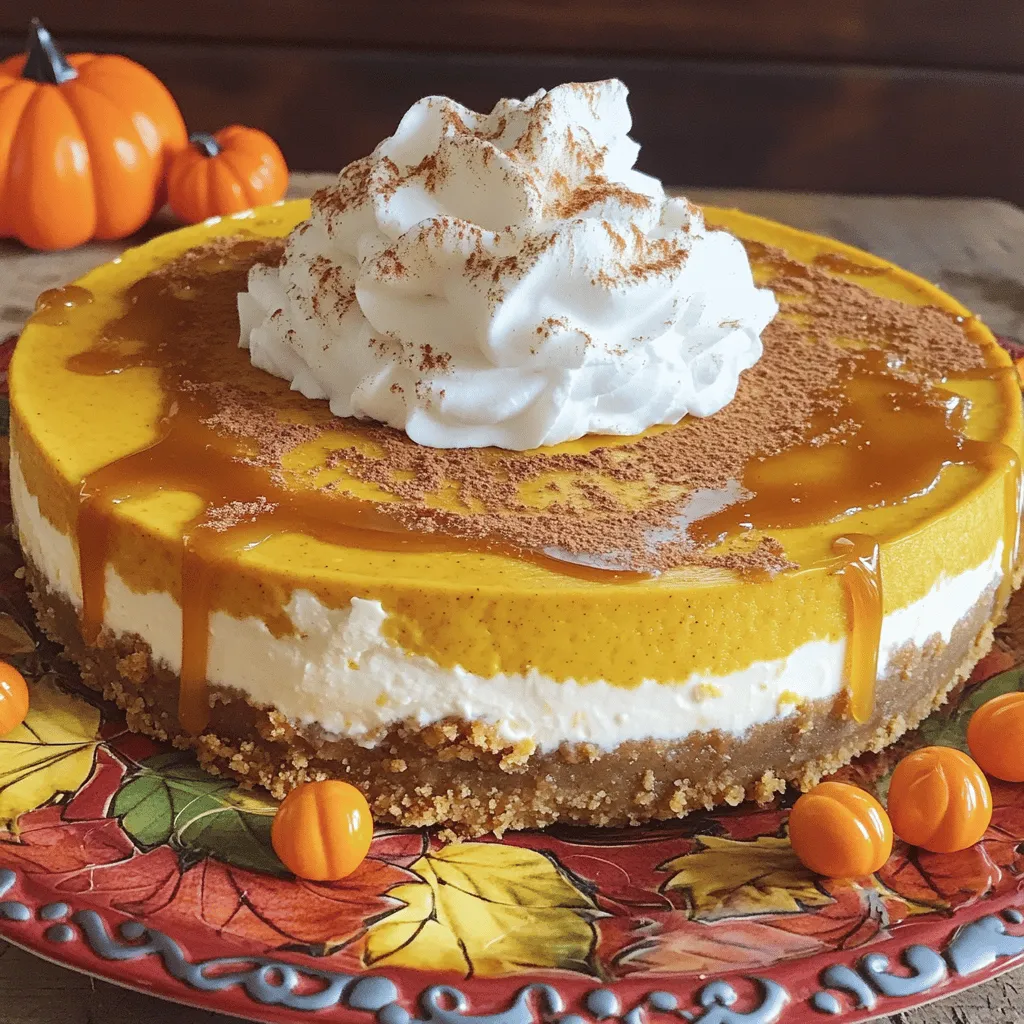
Best Pumpkin Cheesecake Rich and Creamy Delight Recipe
If you love the cozy flavors of fall, this Best Pumpkin Cheesecake recipe is for you! With rich cream cheese
Read more…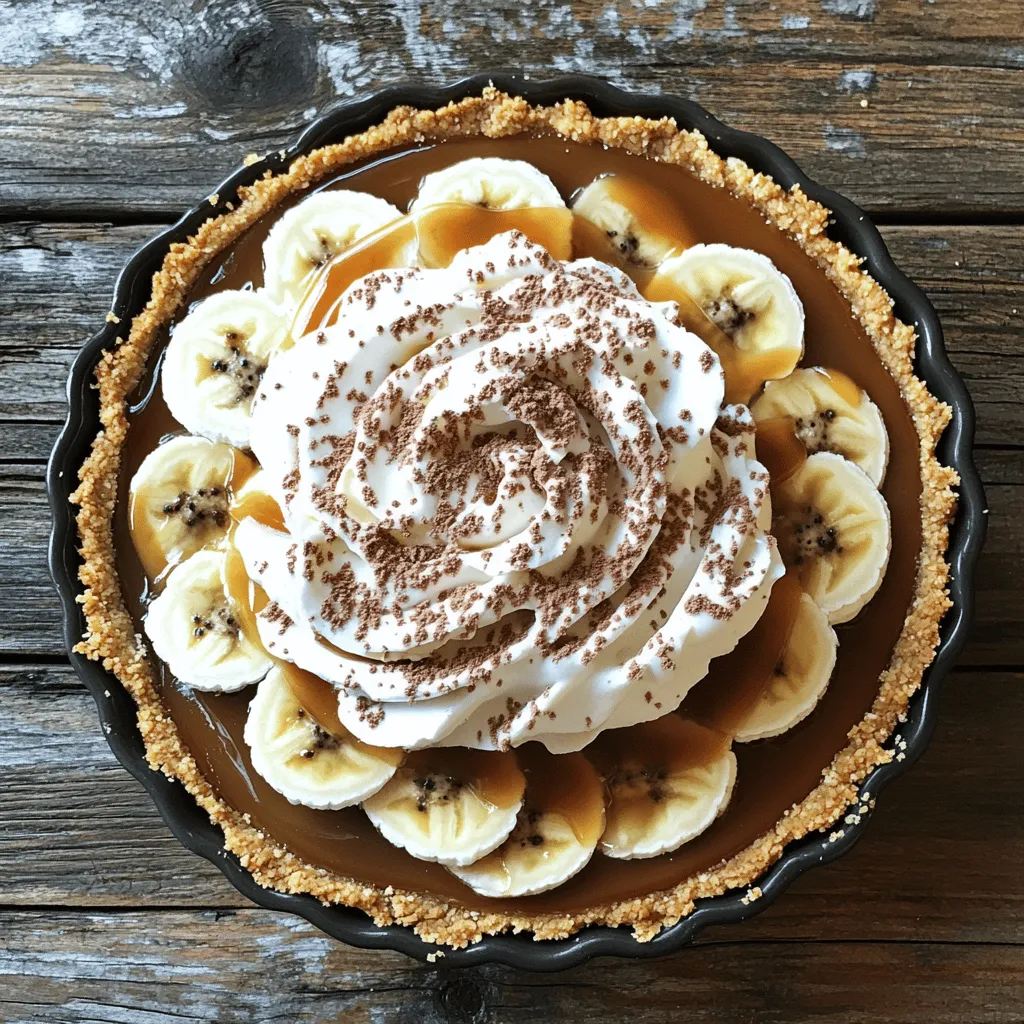
Easy Banoffee Pie with Caramel and Cream Delight
Are you craving a sweet treat that’s simple and decadent? Look no further! This Easy Banoffee Pie with Caramel and
Read more…
Red Velvet Cake Delight Simple and Tasty Recipe
Red Velvet Cake is a timeless favorite that never fails to impress. This deep red treat is not just beautiful;
Read more…browse recipes


Easy Chicken Enchiladas Quick and Tasty Recipe
Welcome to your new go-to recipe for Easy Chicken Enchiladas! If you love quick, tasty meals that everyone can enjoy, you’re in the right…
My Latest Desserts
-

Strawberry Cheesecake Icebox Cake Delightful Dessert
Craving a cool, creamy dessert that’s as easy to make as it is delicious? Look no further than this Strawberry Read Full Recipe -
No Bake Peanut Butter Bars Quick and Easy Treat
Looking for a sweet treat that’s quick, easy, and requires no baking? I’ve got you covered with my No Bake Read Full Recipe -

Air Fryer Apple Fries Delicious Crispy Snack Recipe
Craving a tasty snack that’s both fun and simple? Dive into my Air Fryer Apple Fries recipe! With a perfect Read Full Recipe -
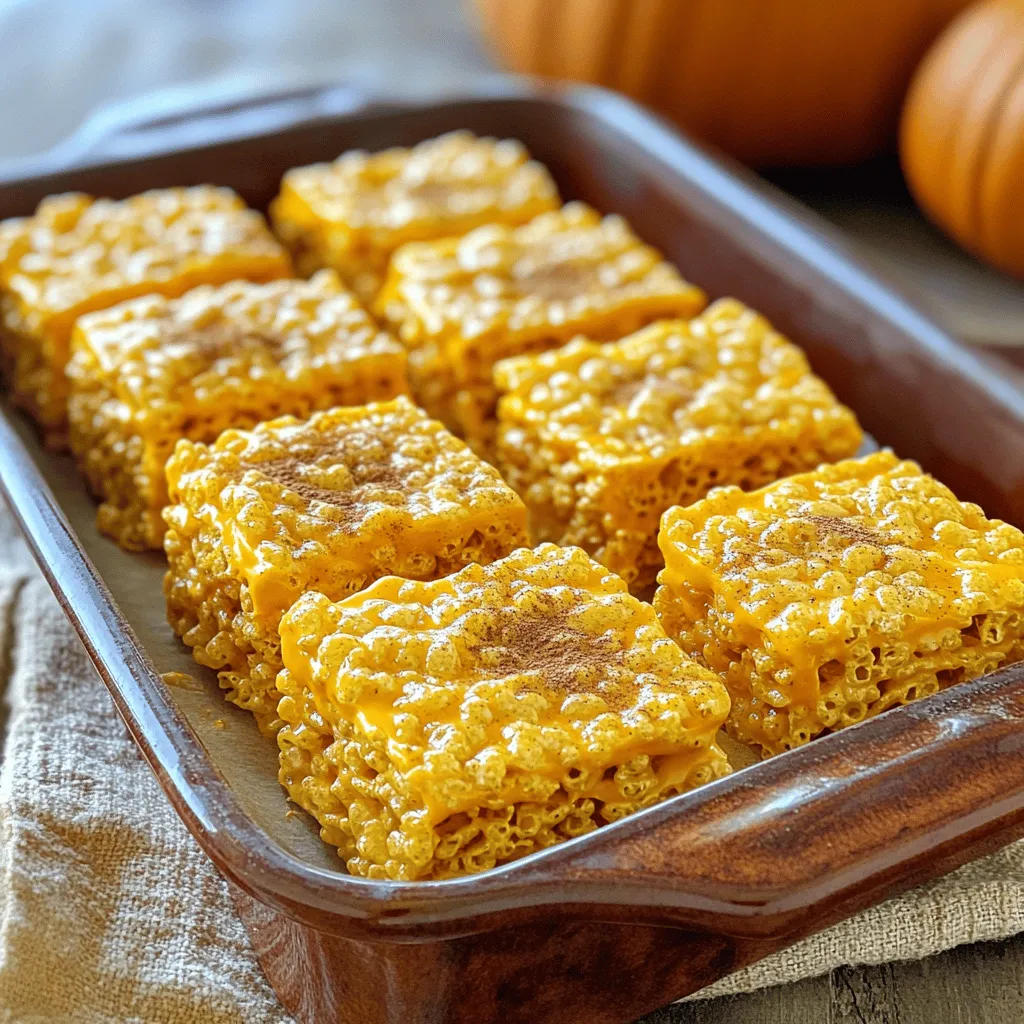
Pumpkin Spice Rice Krispie Treats Cozy Fall Delight
Fall is here, and what better way to celebrate than with Pumpkin Spice Rice Krispie Treats? These sweet, chewy delights Read Full Recipe -
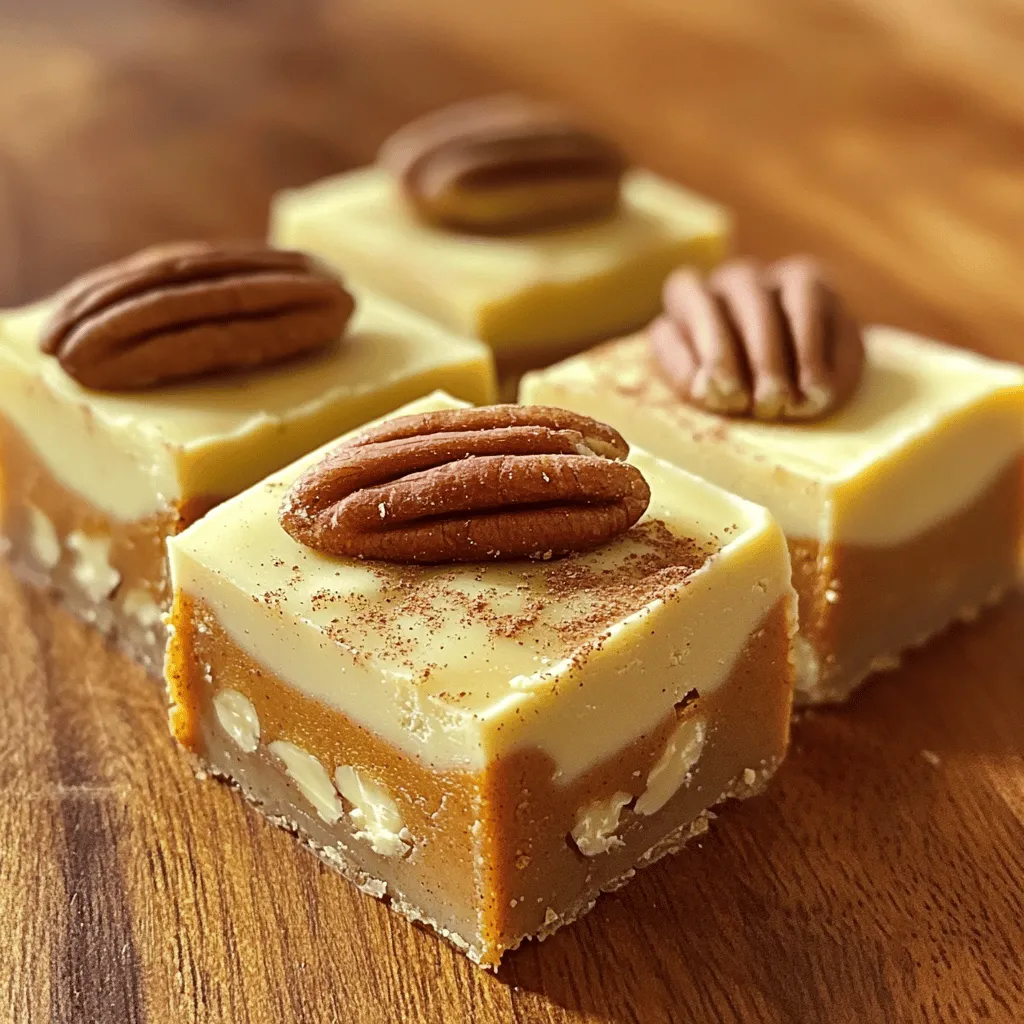
Pumpkin Spice Fudge Irresistible Fall Treat Recipe
Fall is here, and so is your new favorite treat: Pumpkin Spice Fudge! This sweet, creamy delight captures all the Read Full Recipe -

Pumpkin Spice Ice Cream Delightful Fall Treat Recipe
Get ready to savor fall with a creamy delight: Pumpkin Spice Ice Cream! This treat blends rich flavors of pumpkin, Read Full Recipe -
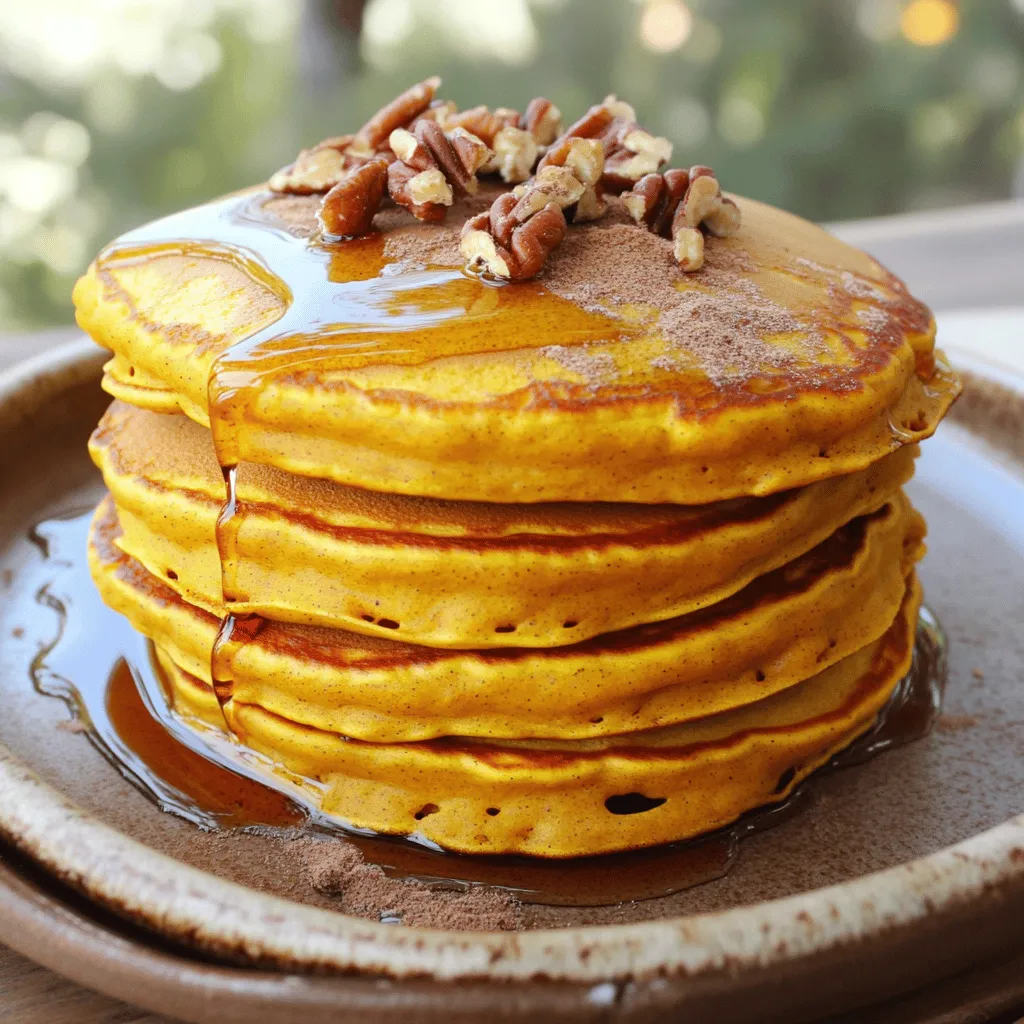
Pumpkin Spice Pancakes Delightful Fall Breakfast Recipe
Looking for a cozy breakfast that screams fall? Let’s make pumpkin spice pancakes! This simple recipe combines soft, fluffy pancakes Read Full Recipe -
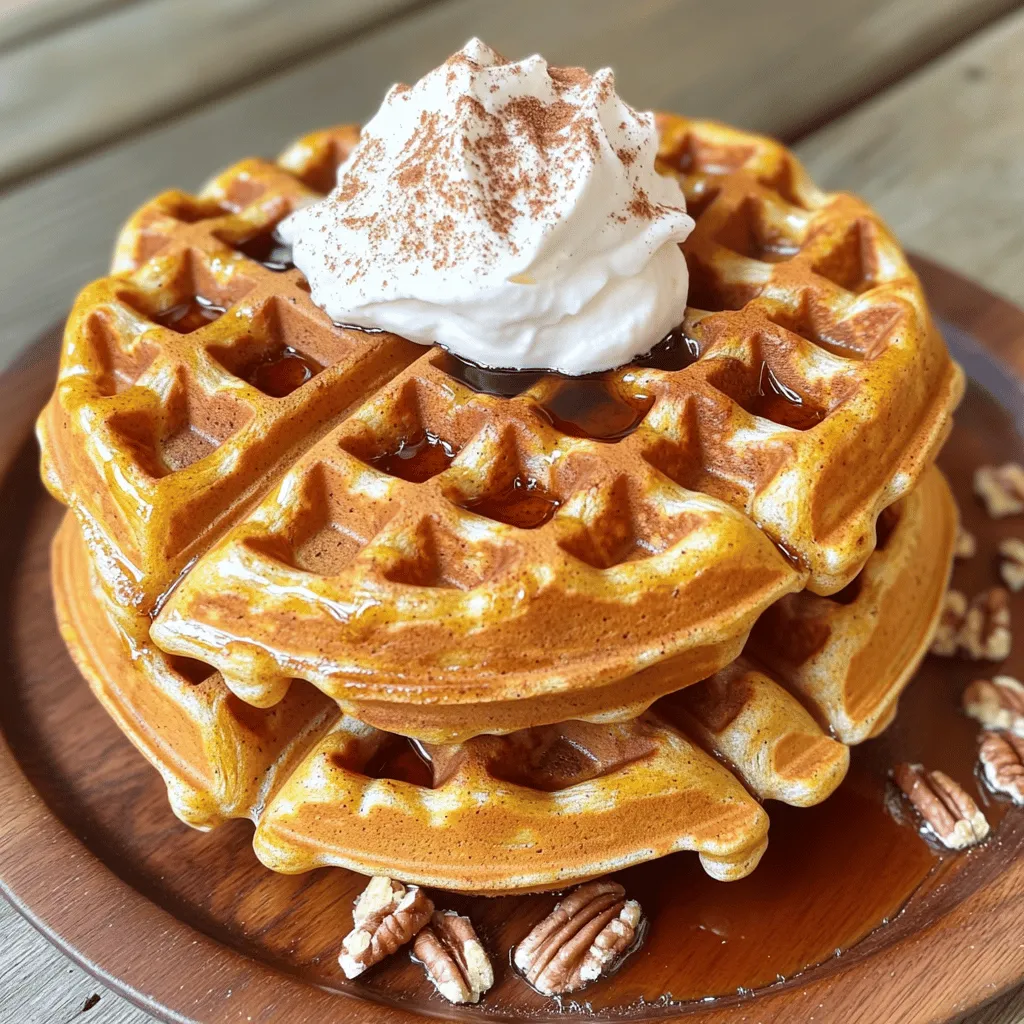
Pumpkin Spice Waffles Cozy Fall Breakfast Treat
Cozy up this fall with my delicious Pumpkin Spice Waffles! These warm, fluffy treats are packed with pumpkin goodness and Read Full Recipe -
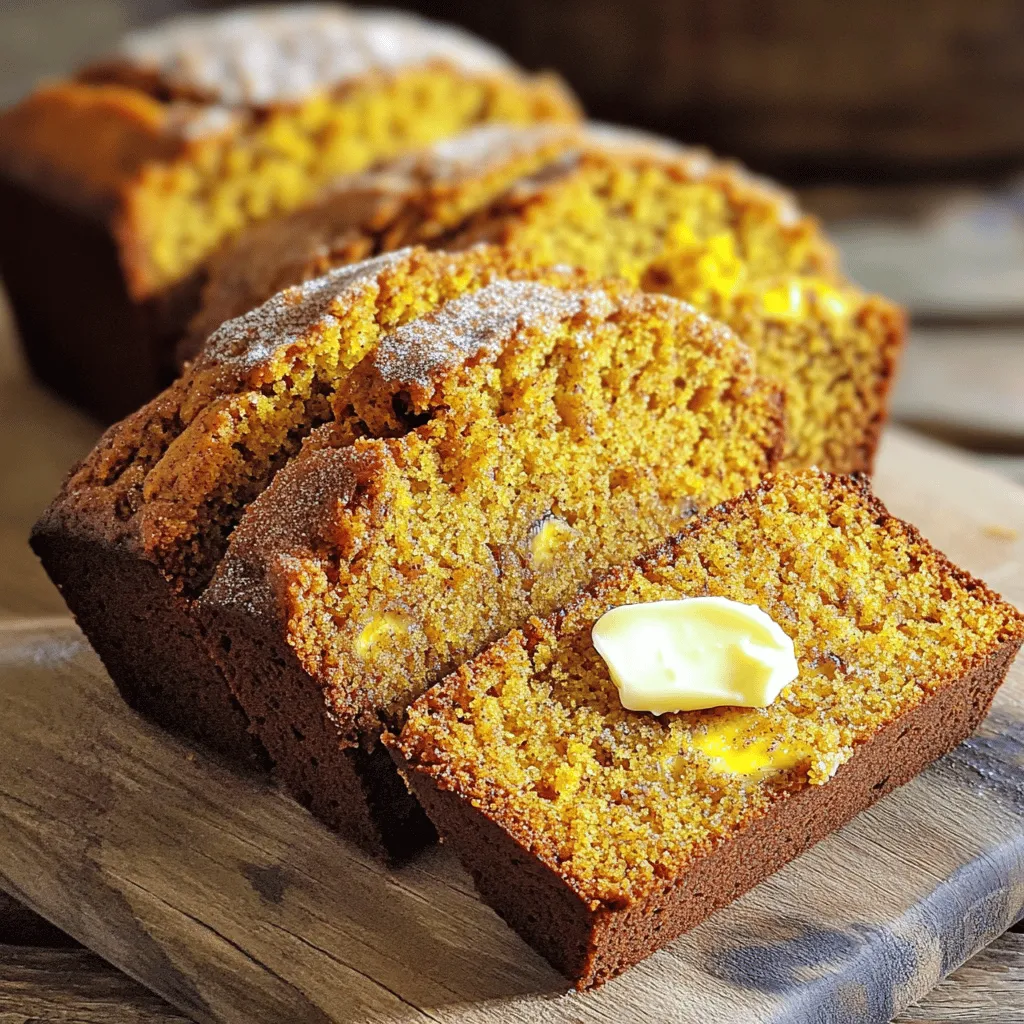
Pumpkin Spice Banana Bread Cozy and Comforting Treat
Warm, spicy, and oh-so-cozy, Pumpkin Spice Banana Bread is the ultimate fall treat! With ripe bananas and pumpkin puree, this Read Full Recipe -
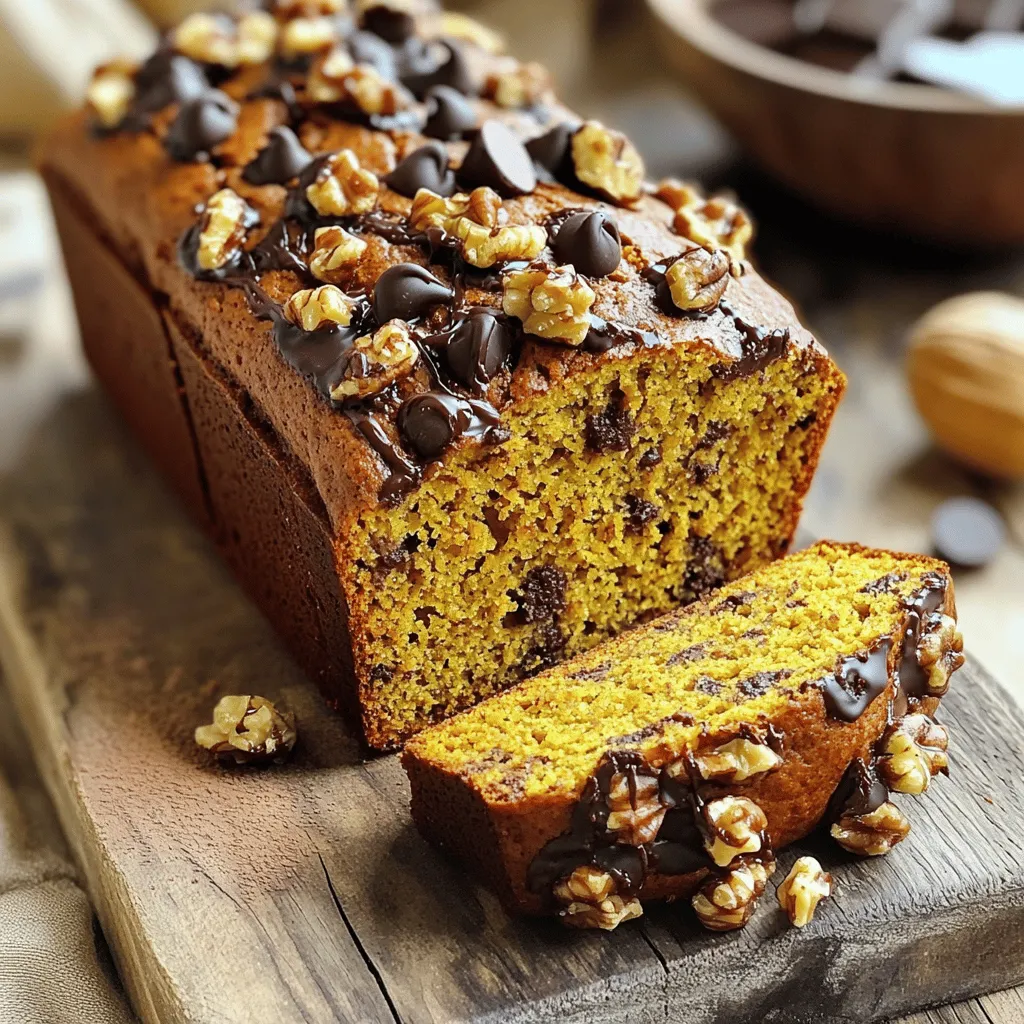
Chocolate Chip Pumpkin Bread Simple and Tasty Recipe
Fall is the perfect time for baking, and nothing says cozy like Chocolate Chip Pumpkin Bread. In this simple and Read Full Recipe
My Latest Recipes

hey,
i’m !
I’m so happy you’re here!
My kitchen is filled with stories, flavors, and love and I’m so happy to share them with you. Here’s to dishes that feel like home.
![- 2 cups all-purpose flour - 1/2 cup unsalted butter, cold and cubed - 1/4 cup granulated sugar - 1/2 teaspoon salt - 1/2 cup milk, warmed - 1 packet (2 1/4 teaspoons) active dry yeast - 1 large egg, for egg wash When making croissants, the dough needs the right balance of ingredients. The flour gives structure, while cold butter adds flakiness. Sugar adds a touch of sweetness. Salt enhances all the flavors. Warm milk helps activate the yeast, which is vital for rising. Finally, the egg wash gives a lovely golden color when baked. - 1 cup shelled roasted pistachios - 1/4 cup powdered sugar - 1 tablespoon honey - 1/2 teaspoon vanilla extract - 1/4 cup cream cheese, softened The filling is where the magic happens. Pistachios provide a rich, nutty flavor. Powdered sugar adds sweetness, while honey gives it a sticky texture. Vanilla extract enhances the taste, and cream cheese makes it creamy. This filling is smooth and delightful. - Chocolate chips - Almond extract - Orange zest Feel free to get creative! Chocolate chips add richness, while almond extract boosts flavor. A hint of orange zest gives a fresh twist. These options let you customize your croissants to your taste. Remember to check the [Full Recipe] for all the details! - Combine warm milk and yeast in a bowl. - Wait for 5-10 minutes until bubbly. To start, you need to activate the yeast. Warm milk helps wake up the yeast. When it gets bubbly, it means it's ready. This step is vital for fluffy croissants. - Combine flour, sugar, and salt in a mixing bowl. - Cut in butter until coarse crumbs form. - Mix in the activated yeast mixture. Next, mix flour, sugar, and salt in a big bowl. Then, add cold butter. Use your fingers or a pastry cutter to make crumbs. After that, add the bubbly yeast mixture. This forms your dough. Knead it gently on a floured surface for 2-3 minutes. - Blend pistachios, powdered sugar, honey, vanilla extract, and cream cheese. - Pulse until smooth and set aside. Now it’s time for the filling. In a food processor, blend shelled pistachios, powdered sugar, honey, vanilla extract, and cream cheese. Pulse until you get a smooth mix. This will be the tasty surprise inside your croissants. - Roll out dough and cut it into triangles. - Add filling and roll into a crescent shape. After making the dough and filling, roll out the dough into a large rectangle. Cut it into triangles, about 4 inches wide. Place a spoonful of filling at the wide end of each triangle. Roll it tightly to form a crescent shape. - Let croissants rise for 1 hour. - Brush with egg wash and bake. Place the croissants on a baking sheet lined with parchment paper. Cover them with a towel and let them rise in a warm spot for 1 hour. Preheat your oven to 375°F (190°C). Brush the croissants with beaten egg for a golden finish. Bake for 15-20 minutes until puffed and golden brown. Enjoy these delicious pistachio-filled croissants! For more details, refer to the Full Recipe. To make great croissants, start with cold ingredients. Cold butter helps create flaky layers. If the butter warms up, your dough will not rise well. Remember to chill the dough for at least one hour. This step is key to a light and airy croissant. When adding the pistachio filling, control the amount. Too much filling can make your croissants overflow. Just a spoonful at the wide end works best. Always use fresh pistachios for the best taste. The flavor of fresh nuts is bright and rich. An egg wash gives your croissants a nice shine. Beat the egg well and brush it on before baking. This helps create a golden crust. To ensure perfect baking, use an oven thermometer. It helps you know if your oven is at the right temperature. {{image_2}} You can make your pistachio filled croissants even sweeter. Try adding chocolate or fruit fillings. A few chocolate chips can melt inside for a rich taste. Or mix in some fruit preserves for a fruity twist. You can also experiment with spices like cinnamon. A touch of cinnamon adds warmth and depth to the pistachio filling. These simple changes can turn your croissants into a delightful treat. Savory options can surprise your taste buds. Incorporate cheese or herbs into the pistachio mixture. Cream cheese and herbs can give a lovely flavor. You could also try different nut fillings. Almonds or hazelnuts can complement pistachios well. Each nut brings its own unique flavor. This way, you can create a mix of sweet and savory bites. You can adjust this recipe to fit dietary needs. Use gluten-free flour instead of all-purpose flour. This makes it friendly for those with gluten issues. For a vegan option, swap out butter and cream cheese with plant-based alternatives. Look for vegan butters and cream cheeses at your store. These swaps help everyone enjoy pistachio filled croissants. You can store your croissants at room temperature for about 2 days. This keeps them fresh and tasty. If you want them to last longer, place them in the fridge. This will help maintain their quality for a few more days. To freeze croissants, wrap them tightly. Use plastic wrap or foil to ensure they stay fresh. Then, place them in freezer-safe bags. You can keep them in the freezer for up to a month. This way, you can enjoy your pistachio filled croissants later! When you want to eat your croissants, you can reheat them in the oven. This will make them crispy again. Place them in a preheated oven at 350°F (175°C) for about 10 minutes. If you prefer a softer texture, use the microwave instead. Heat them for about 15-20 seconds, but be careful not to overdo it! Enjoy your warm, delicious croissants! Use a warm environment or oven for proofing. A warm spot helps yeast grow. You can turn on your oven to 200°F for a few minutes, then turn it off. Place the dough inside to rise. It works well! Yes, if in a pinch; however, homemade is recommended. Store-bought saves time but lacks fresh flavor. Making your own dough lets you control the taste and texture. Plus, it feels special! Options include almond paste, chocolate, or fruit preserves. Almond paste gives a nutty taste. Chocolate adds sweetness, while fruit preserves bring a fruity flavor. Feel free to mix and match! Check local bakeries or specialty shops. Some grocery stores may also sell them. If you want the freshest taste, try making them at home with the Full Recipe. Yes, with clear instructions and tips provided! I made sure to break down each step. You can follow along easily. Cooking can be fun and rewarding. Serve warm with coffee or tea for the best experience. The warm croissants pair nicely with a hot drink. Enjoy them fresh out of the oven! Making croissants at home is a fun adventure. You learned about the main ingredients and steps to create light, flaky pastry. The pistachio filling adds a delightful twist, while various tips help achieve perfect results. Remember to experiment with different fillings and storage methods. Enjoy this tasty treat fresh, and share your creations with friends. Baking can be simple and rewarding, so go ahead and try it for yourself!](https://southerndishes.com/wp-content/uploads/2025/05/3b970036-ce60-4ee9-a026-3509be871873-300x300.webp)

![To make skillet creamed spinach, you need fresh, simple ingredients that create a creamy, flavorful dish. Here’s what you will need: - 1 lb fresh spinach, rinsed and roughly chopped - 2 tablespoons olive oil - 3 cloves garlic, minced - 1 small onion, finely chopped - 1 cup heavy cream - ½ cup cream cheese, softened - ½ cup grated Parmesan cheese - ¼ teaspoon nutmeg - Salt and pepper to taste - ¼ cup toasted pine nuts (for garnish) Each ingredient plays a key role in making this dish delicious. The fresh spinach brings a green, vibrant flavor. Olive oil adds richness and helps cook the garlic and onion. Garlic and onion provide a savory base that enhances the overall taste. Heavy cream and cream cheese create a smooth, creamy texture. Parmesan cheese adds a salty, umami kick. Nutmeg brings warmth and depth. Finally, toasted pine nuts give a delightful crunch when you serve it. For the full recipe, refer to the section above. First, heat the olive oil in a large skillet over medium heat. This will create a nice base for your dish. Next, add the minced garlic and finely chopped onion. Sauté them for about 3-4 minutes. You want the onion to turn translucent and fragrant. Now it’s time to cook the spinach. Gradually add the chopped spinach to the skillet. Stir often as the spinach wilts down. This step takes about 5 minutes. You’ll notice the volume decreases as it cooks. Once the spinach is wilted, reduce the heat to low. Stir in the heavy cream and cream cheese. Allow the cream cheese to melt fully. This creates a smooth, creamy texture that enriches the spinach. Next, mix in the grated Parmesan cheese and nutmeg. Stir until everything is well combined and creamy. Taste your dish and season with salt and pepper as needed. Adjust it to your liking. Let the mixture simmer gently for an additional 3-4 minutes. This allows all the flavors to meld together. Once done, remove from the heat. Top it off with toasted pine nuts for a crunchy finish before serving. For the full recipe, refer to the list above. Enjoy your creamy and flavorful delight! - Optimal heat settings: Start with medium heat. This helps the garlic and onion cook evenly. Too high a heat can burn the garlic. - Timing tips for aromatics: Sauté the garlic and onion for 3-4 minutes. Wait until the onion turns translucent. This brings out their best flavors. - Tricks to prevent curdling: Always lower the heat before adding cream. This helps keep it smooth. Stir slowly to ensure even mixing. - Choosing the right cream: Use heavy cream for the best results. It adds richness and helps the sauce stay creamy. - Adding herbs or spices: Nutmeg adds warmth and depth. You can also try adding thyme or basil for fresh flavor. - Adjusting for dietary preferences: For a lighter option, use half-and-half instead of heavy cream. This keeps it tasty while cutting calories. {{image_2}} You can switch up the greens in this dish. Instead of spinach, try kale or Swiss chard. These greens offer a similar texture and flavor. You can even use a mix of greens for a fun twist. For a dairy-free version, replace cream and cheese with nut-based alternatives. Coconut cream works great and adds a unique flavor. Adding bacon or ham can give your creamed spinach a savory kick. Cook the meat first, then mix it in. You could also use different cheeses for added depth. Try gouda or feta instead of Parmesan. Each cheese brings its own flavor, making the dish exciting. Skillet creamed spinach pairs well with many proteins. Serve it alongside grilled chicken or steak for a complete meal. You can also enjoy it as a side dish with roasted fish. For a more casual meal, serve it with crusty bread for dipping. This creamy delight fits any occasion! Don’t forget to check out the Full Recipe for more details! To keep your skillet creamed spinach fresh, store it in an airtight container. Place it in the fridge right after it cools down. It should stay good for about three to five days. If you want to keep it longer, consider freezing it. Use a freezer-safe bag or container. It can last up to three months in the freezer. When you reheat creamed spinach, the goal is to keep it creamy. For stovetop reheating, use a medium-low heat. Stir often to prevent sticking. Add a splash of cream if it seems thick. If you use a microwave, heat it in short bursts of 30 seconds. Stir in between to ensure even heating. The shelf life of creamed spinach varies by storage method. In the fridge, expect it to last about three to five days. In the freezer, it can last up to three months. Always check for signs of spoilage. If it smells off or has an unusual texture, it’s best to toss it. Creamed spinach is a rich side dish made with cooked spinach, cream, and cheese. People often serve it with steak or chicken. It has a creamy texture and a savory flavor. This dish is classic in American cuisine, especially during holidays and family dinners. Many enjoy its smoothness paired with meats or as part of a larger spread. Yes, you can use frozen spinach! Frozen spinach is convenient and saves time. It is often pre-washed and chopped. However, it has some downsides. Frozen spinach can be a bit watery when thawed. This extra moisture may change the dish's texture. You must squeeze out the water after thawing. Fresh spinach has a brighter taste and better texture, but frozen can work well in a pinch. To make creamed spinach gluten-free, you need to check your ingredients. Most of the main ingredients are gluten-free, which is great! Just ensure any added seasonings or cheeses are gluten-free. You can use cornstarch or rice flour to thicken the dish, if needed. This way, you can enjoy the creamy goodness without worry! For the full recipe, check out the [Full Recipe]. This blog post covered how to make a tasty creamed spinach dish. We started with the key ingredients and detailed steps for cooking. I shared tips to ensure creaminess and flavor, along with creative variations for more fun. Proper storage and reheating techniques help maintain quality. Remember, cooking should be enjoyable. Experiment with flavors and find what you love. A dish simple in nature can easily wow your guests! Enjoy making your own creamed spinach and feel free to customize it to your tastes.](https://southerndishes.com/wp-content/uploads/2025/05/764a9977-9c3a-4591-ab48-c900021f0b11-300x300.webp)
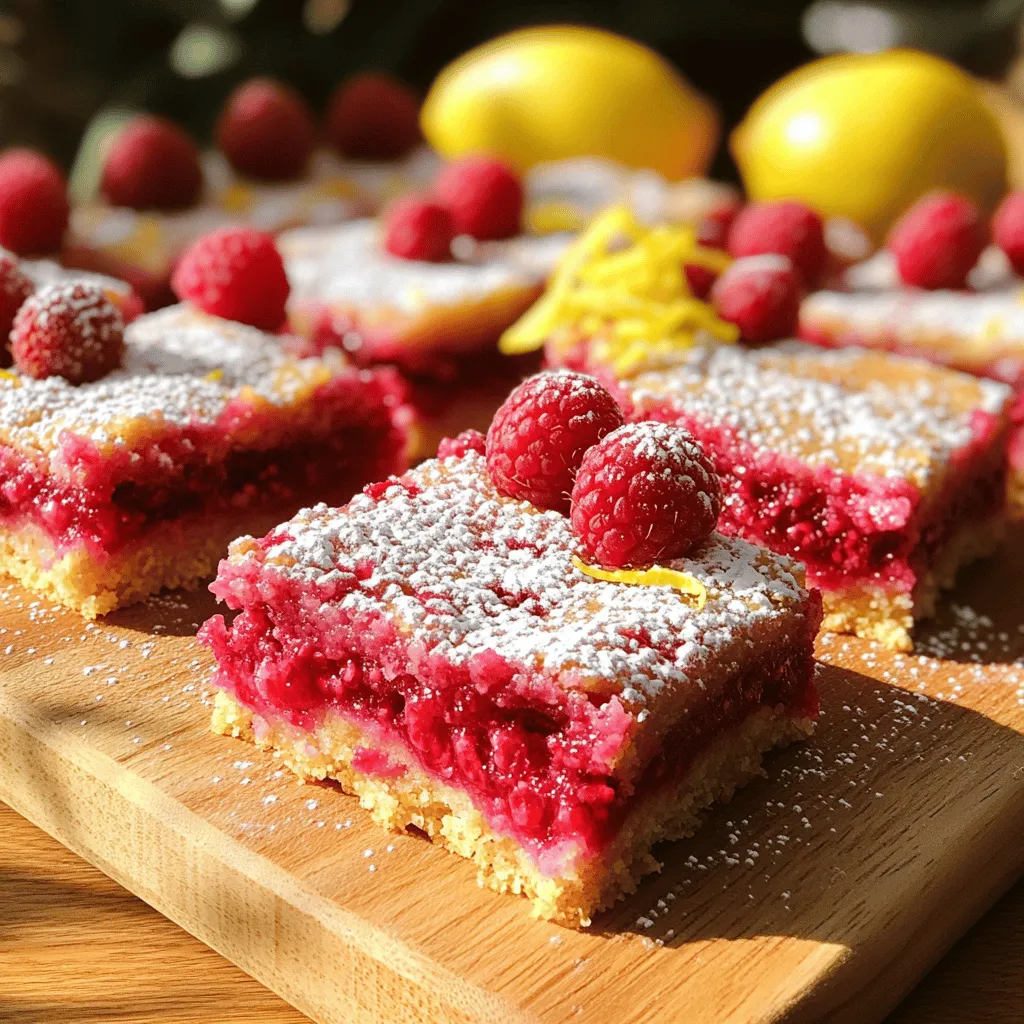
Raspberry Lemon Bars Tasty and Fresh Dessert Delight
Looking for a dessert that’s both sweet and tangy? Raspberry lemon bars are the answer! This treat blends juicy raspberries with zesty lemon, creating…