
Latest & Greatest
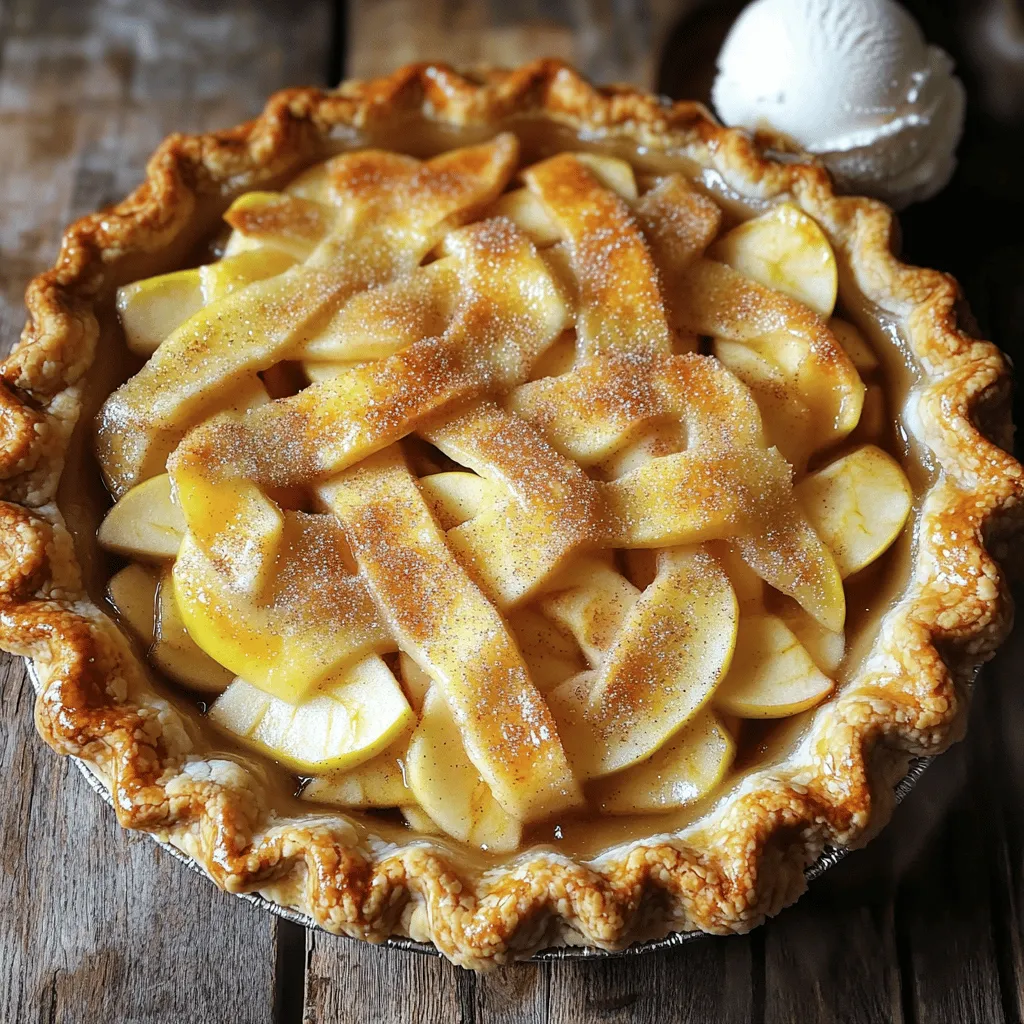
Apple Pie Delight Simple Steps for Perfect Recipe
Are you ready to bake the perfect apple pie? In “Apple Pie Delight: Simple Steps for Perfect Recipe,” I will
Read more…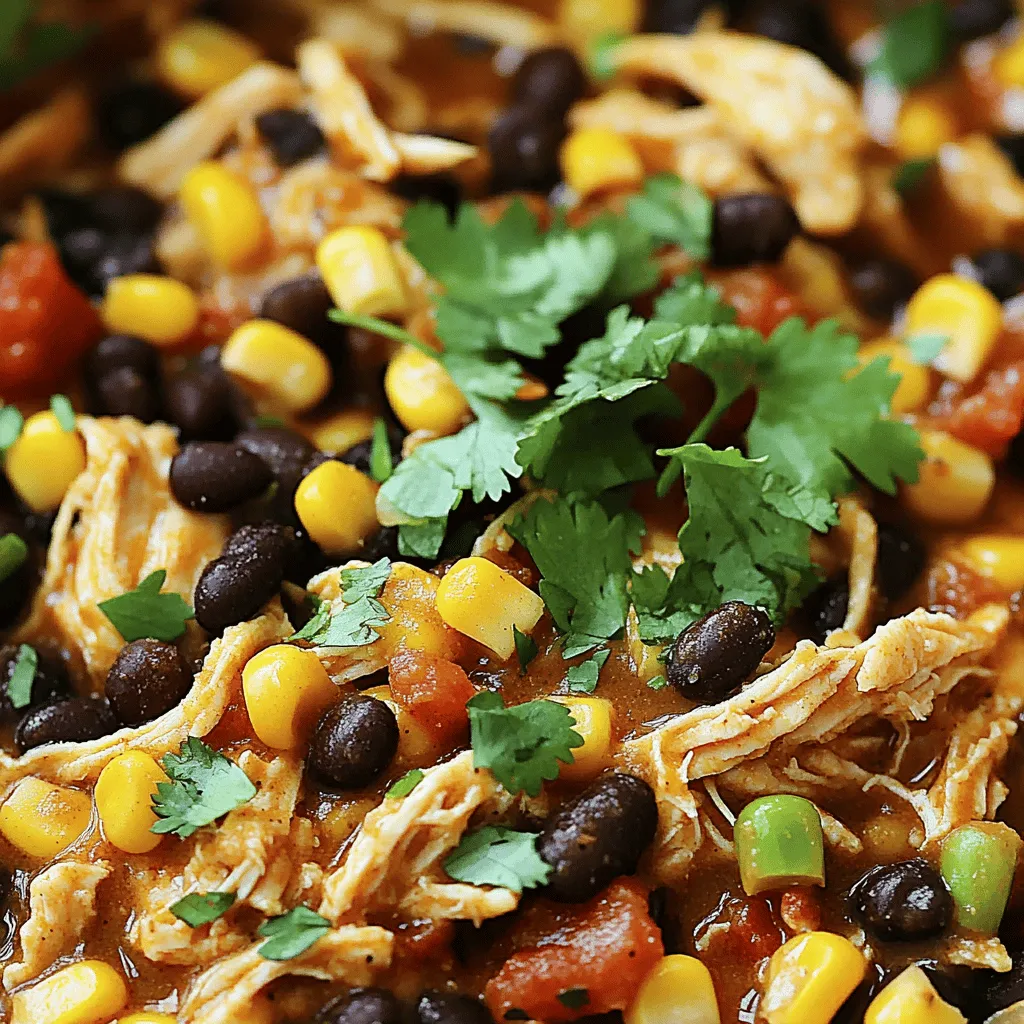
Crockpot Mexican Chicken Flavorful and Simple Recipe
Looking for a simple, tasty meal? You’re in the right place! This Crockpot Mexican Chicken is packed with bold flavors
Read more…
Spring Hash Brown Crust Quiche Delightful and Easy Recipe
Looking for a quick, tasty dish for spring? Try my Spring Hash Brown Crust Quiche! This recipe combines crispy hash
Read more…browse recipes


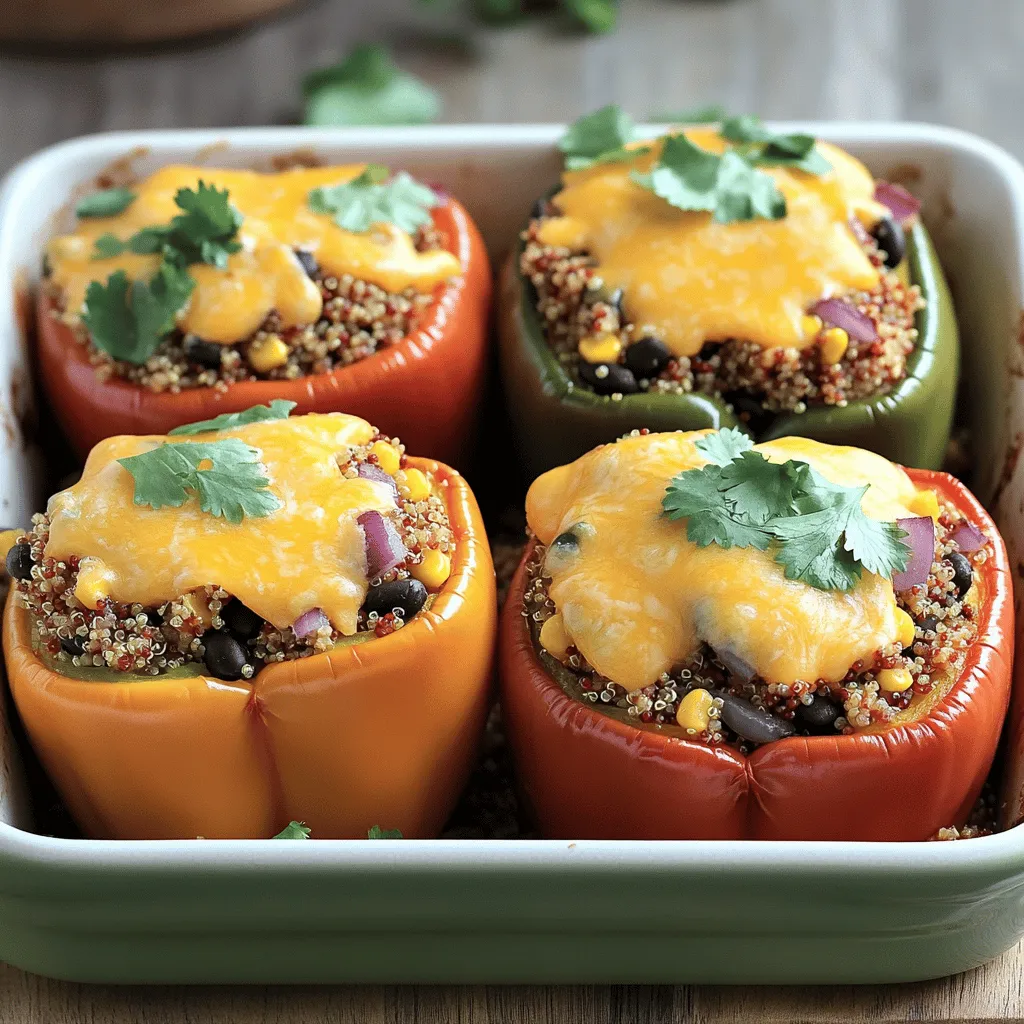
Savory Stuffed Bell Peppers with Quinoa Recipe
Looking for a tasty and healthy meal? You’re in the right place! My savory stuffed bell peppers with quinoa are a delightful way to…
My Latest Desserts
-

No Bake Oreo Cheesecake Bars Simple and Tasty Treat
Craving a sweet treat that’s simple to make? Look no further than these No Bake Oreo Cheesecake Bars! You’ll love Read Full Recipe -

Chewy Brown Butter Chocolate Chip Cookies Delight
Are you ready for the best cookies ever? These Chewy Brown Butter Chocolate Chip Cookies are a game changer! With Read Full Recipe -
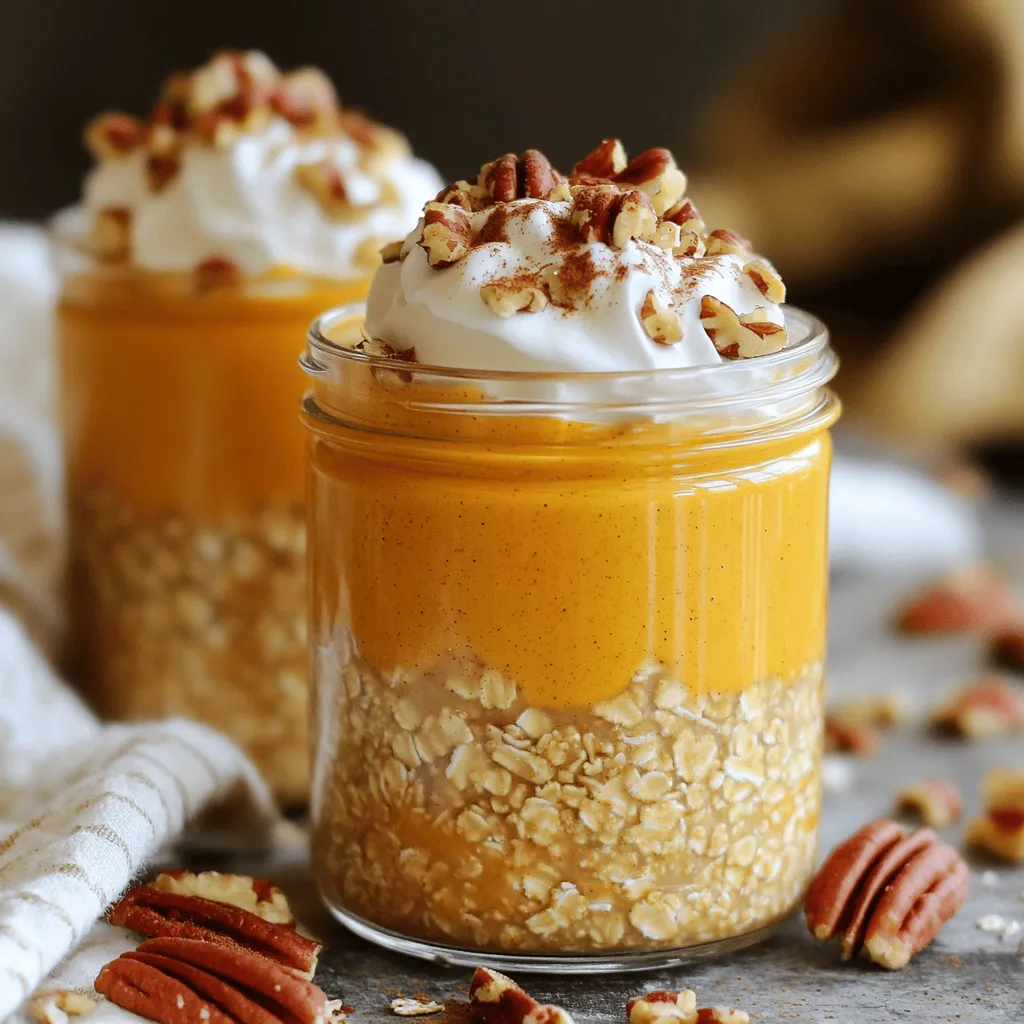
Easy Pumpkin Pie Overnight Oats Creamy and Delicious
If you’re looking for a quick, tasty breakfast that captures the essence of fall, you’re in for a treat! My Read Full Recipe -

Irresistible No Bake Oreo Cheesecake Bars Recipe
Are you craving a dessert that’s simple yet delicious? Look no further! My Irresistible No Bake Oreo Cheesecake Bars are Read Full Recipe -

Chewy Brown Butter Chocolate Chip Cookies Recipe
Are you ready for the best cookie recipe ever? These Chewy Brown Butter Chocolate Chip Cookies are rich, warm, and Read Full Recipe -
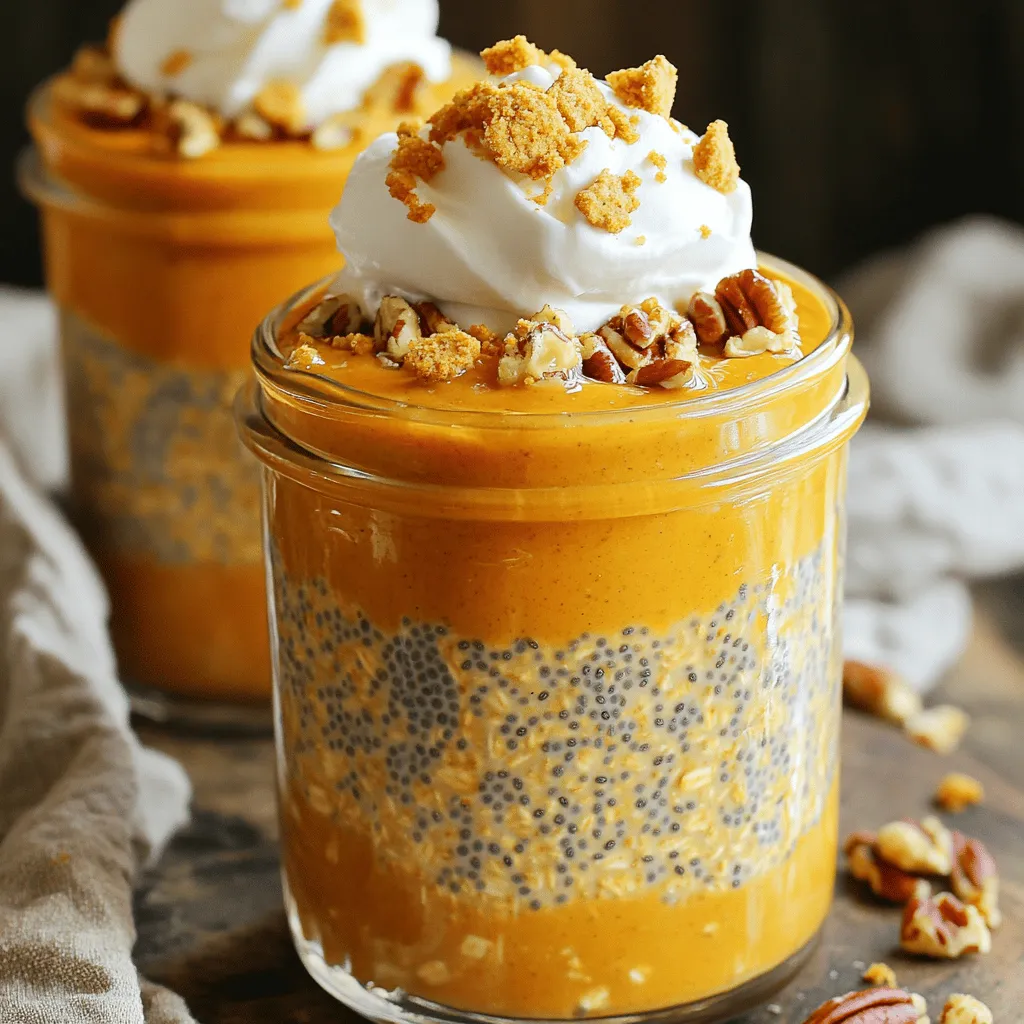
Easy Pumpkin Pie Overnight Oats Tasty and Simple Recipe
Ready to enjoy a warm slice of fall in a bowl? My Easy Pumpkin Pie Overnight Oats recipe brings the Read Full Recipe -
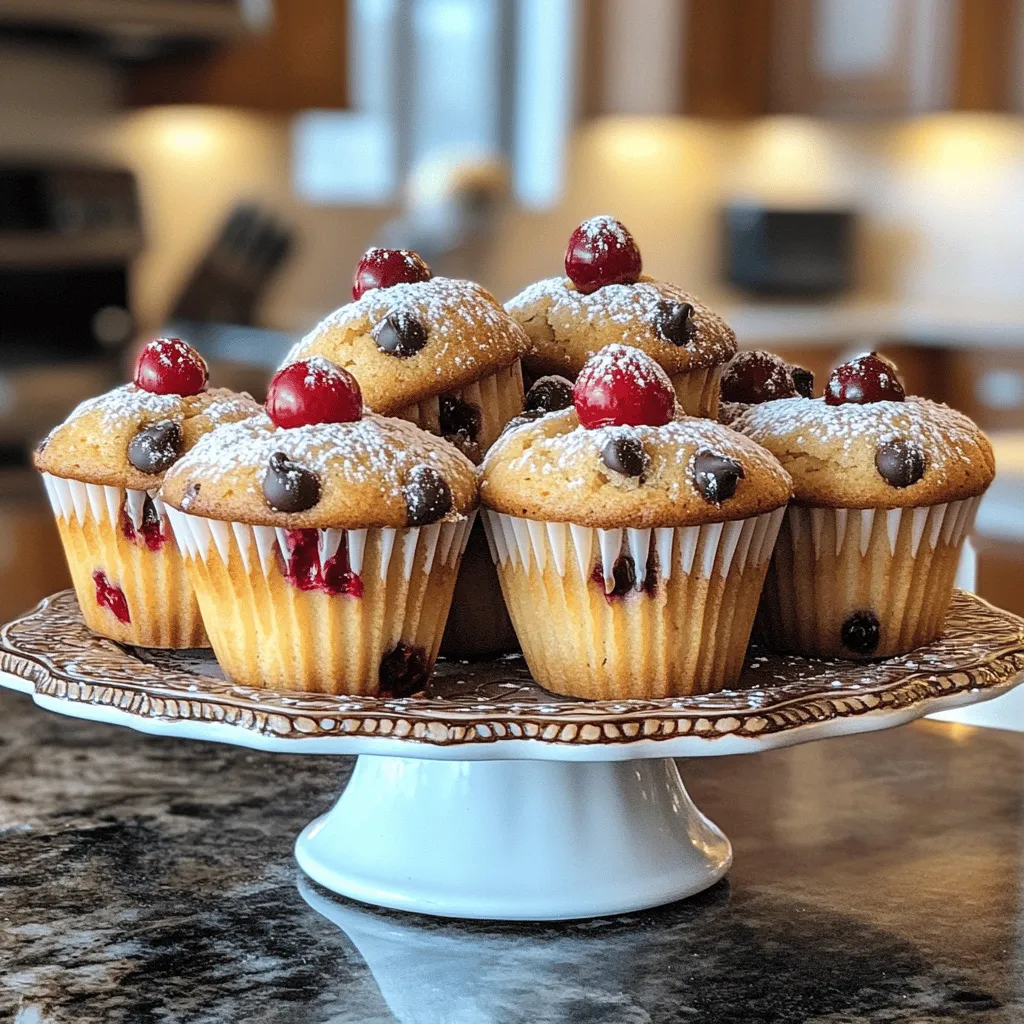
Cherry Chocolate Chip Muffins Irresistible and Easy Recipe
Get ready to bake some magic with my Cherry Chocolate Chip Muffins! This easy recipe combines tart cherries and rich Read Full Recipe -

Cherry Lemonade Popsicles Refreshing Summer Treat
Looking for a cool treat this summer? Try my Cherry Lemonade Popsicles! They combine tart lemon and sweet cherries, making Read Full Recipe -

Cream Soda Milkshake Pie Tasty and Simple Recipe
Are you ready to impress your friends with a sweet treat? This Cream Soda Milkshake Pie is not just tasty; Read Full Recipe -

Cherry Swirl Frozen Yogurt Bark Easy and Delicious Treat
Craving a sweet yet healthy treat? You’ll love this Cherry Swirl Frozen Yogurt Bark! It’s easy to make and packed Read Full Recipe
My Latest Recipes

hey,
i’m !
I’m so happy you’re here!
My kitchen is filled with stories, flavors, and love and I’m so happy to share them with you. Here’s to dishes that feel like home.
![- 1 lb Brussels sprouts, trimmed and halved - 3 tablespoons olive oil - 4 cloves garlic, minced - Zest and juice of 1 lemon - 1 teaspoon honey - Salt and pepper to taste - 1/4 teaspoon red pepper flakes (optional for heat) - 2 tablespoons grated Parmesan cheese (optional for garnish) - Fresh parsley, chopped for garnish Brussels sprouts are small but mighty. They are full of vitamins and minerals. They bring a nutty flavor that works well with garlic and lemon. Garlic adds depth and richness. The lemon brightens up the dish, making it fresh and lively. A serving of Lemon Garlic Roasted Brussels Sprouts has about 100 calories. Each serving contains: - 6g of fat - 10g of carbs - 4g of protein Brussels sprouts are a great source of vitamins C and K. They also help with digestion due to their fiber content. Garlic offers health benefits too. It may support immune function and heart health. Enjoying this dish gives you tasty flavors and nutrition. For the full recipe, check [Full Recipe]. First, you need to trim the Brussels sprouts. This means cutting off the tough stem end. Then, slice each sprout in half. This helps them cook evenly. Next, prepare the garlic and lemon. Mince four cloves of garlic until fine. For the lemon, zest it first, then squeeze it for juice. This will give a bright flavor to our dish. Now, let's mix our ingredients. In a large bowl, combine the halved Brussels sprouts with three tablespoons of olive oil. Add the minced garlic, lemon zest, lemon juice, and one teaspoon of honey. Don’t forget to season with salt, pepper, and if you like it spicy, add a pinch of red pepper flakes. Toss everything well. You want the Brussels sprouts to be nicely coated. Preheat your oven to 425°F (220°C). This high heat helps to caramelize the sprouts. Spread the Brussels sprouts on a baking sheet. Make sure they are cut-side down. This will give them a nice, crispy edge. Roast for 20-25 minutes. Check them halfway through and stir for even cooking. The sprouts should be tender and caramelized when done. If you like, sprinkle grated Parmesan cheese on top while they are hot. Garnish with chopped parsley to add color and freshness. For the full recipe, click here. To get the best results, set your oven to 425°F (220°C). This temperature is key for a crispy outside and tender inside. You want to ensure the Brussels sprouts cook evenly. Place them cut-side down on your baking sheet. This position helps them caramelize. The caramelization adds rich flavor and a nice texture. To amp up the taste, consider adding more spices. A sprinkle of smoked paprika can give a smoky flavor. If you like heat, try adding cayenne pepper instead of red pepper flakes. You can also mix in some fresh herbs, like thyme or rosemary, before roasting. For garnishes, Parmesan cheese is great, but you can switch things up. Try crumbled feta or goat cheese for a tangy twist. A squeeze of fresh lemon juice right before serving adds brightness. Play with flavors to find what you love best! For the full recipe, check out the [Full Recipe]. {{image_2}} If you want to switch things up, try using different oils or sweeteners. Instead of olive oil, you can use avocado oil for a richer taste. If you prefer a little sweetness, maple syrup works great instead of honey. Brussels sprouts are tasty, but you can use other veggies too. Broccoli, cauliflower, or green beans are great options. Just cut them into similar sizes to cook evenly. You can make Lemon Garlic Roasted Brussels Sprouts in different ways. The stovetop is quick and easy. Heat some oil in a pan, add the sprouts, and sauté until they are golden brown. This method takes about 10-15 minutes. Oven roasting gives a deeper flavor. The heat makes the edges crispy. For a faster option, try an air fryer. Set it to 400°F (200°C) and cook for 15 minutes. Shake the basket halfway through for best results. For the full recipe, check out the details above. To keep your Lemon Garlic Roasted Brussels Sprouts fresh, store them properly. Place them in an airtight container. Glass or plastic containers work well. Leave a little space at the top to prevent squishing. You can keep them in the fridge for up to three days. If you want to enjoy them later, make sure they are cool before sealing. When it's time to enjoy your leftovers, you want them to taste great. Reheat your Brussels sprouts in the oven for the best results. Preheat the oven to 350°F (175°C) and place them on a baking sheet. Heat for about 10-15 minutes. This method helps keep their crispiness. If you're short on time, the microwave is a quick option. Place them in a microwave-safe dish. Heat for about 1-2 minutes. Check them halfway through to avoid overcooking. Remember, reheating adds time, so keep a close eye! Yes, you can use frozen Brussels sprouts. However, fresh ones taste better. Frozen sprouts may have more water. To use them, thaw first. Pat them dry with a towel. This helps them roast well. You may need to bake them longer, about 30 minutes. Check for the same signs of doneness. Brussels sprouts are done when they are tender. Look for a golden-brown color on the edges. If you poke one with a fork, it should feel soft inside. You can also taste one to check. They should have a nice, sweet flavor when cooked well. Lemon garlic roasted Brussels sprouts pair well with many dishes. Try them with grilled chicken or fish. They also go great with pork chops or steak. For a vegetarian meal, serve them with quinoa or a hearty salad. These sprouts add a bright flavor to any meal. For the full recipe, visit the detailed cooking instructions. This blog post covered how to make delicious Lemon Garlic Roasted Brussels sprouts. We discussed key ingredients, the cooking process, and tips for perfecting your dish. You learned about storage and reheating methods, plus variations to try. Enjoy these tasty Brussels sprouts as a side or main dish. They are healthy and easy to make. I hope this inspires you to cook and share a joyful meal with others.](https://southerndishes.com/wp-content/uploads/2025/04/8808292a-aa62-4ffa-9be6-5a8cd0292cd2-300x300.webp)

![- 1 cup quinoa, rinsed - 2 cups vegetable broth - 1 cup chickpeas, cooked (canned is fine) - 1 medium sweet potato, peeled and diced - 1 cup broccoli florets - 1 cup cherry tomatoes, halved - 1 avocado, sliced - 1 carrot, grated - 2 tablespoons tahini - 2 tablespoons lemon juice - 1 tablespoon olive oil - 1 teaspoon garlic powder - Salt and pepper to taste - Fresh parsley for garnish (optional) - Other veggies: bell peppers, spinach, or cucumbers - Protein alternatives: tofu or tempeh - Different dressings: sesame, yogurt, or vinaigrette A veggie-packed Buddha bowl is a great way to enjoy fresh flavors and healthy food. The required ingredients create a colorful and tasty dish. Quinoa is the base, providing protein and fiber. Vegetable broth adds flavor while cooking the quinoa. Chickpeas offer protein and heartiness. Sweet potatoes bring sweetness and texture. Broccoli florets add crunch, and cherry tomatoes provide juiciness. Avocado gives creaminess, while the carrot adds color and flavor. You can adjust the recipe with optional ingredients. Bell peppers, spinach, or cucumbers can add freshness. For protein, try tofu or tempeh. You can also experiment with different dressings for variety. I love tahini and lemon juice for a bright taste. For the full recipe, you can refer to the vibrant veggie-packed Buddha bowl recipe mentioned earlier. It’s an easy dish to prepare and customize. Enjoy making your own Buddha bowl! - First, preheat your oven to 425°F (220°C). This makes the sweet potato crispy and tasty. - Next, rinse 1 cup of quinoa in cold water. This helps remove any bitterness. - In a pot, add the rinsed quinoa and 2 cups of vegetable broth. Bring it to a boil, then lower the heat. Cover it and let it simmer for about 15 minutes. - While the quinoa cooks, prepare the sweet potato. Peel and dice it into small cubes. - Toss the sweet potato with olive oil, garlic powder, salt, and pepper. This adds great flavor. - Spread the sweet potato on a baking sheet and roast it for 20-25 minutes. Make sure to toss halfway for even cooking. - For the broccoli, you can steam it or sauté it. Steaming takes about 5-7 minutes. This keeps it bright and crunchy. - Begin with a base of fluffy quinoa. This is your hearty foundation. - Next, layer the roasted sweet potato, steamed broccoli, cherry tomatoes, chickpeas, grated carrot, and sliced avocado artfully on top. - Drizzle the tahini dressing evenly over the layered ingredients. This adds a creamy touch. - For a pop of color, sprinkle fresh parsley on top if you like. - For sweet potatoes, roasting brings out their natural sweetness. Cut them small for quicker cooking. - When cooking broccoli, steaming keeps its bright color and crisp texture. Sautéing can make it softer, depending on your taste. - If you want a more tender bite, you can sauté the broccoli in olive oil for just a few minutes. Enjoy crafting your Veggie-Packed Buddha Bowl with these easy steps! Check out the [Full Recipe] for detailed instructions. To make a great Buddha bowl, balance flavors. Combine sweet, savory, and crunchy elements. Sweet potatoes offer sweetness. Chickpeas provide protein, while avocado adds creaminess. For crunch, include grated carrots or seeds. If your dressing is too thick, add water a little at a time. Stir until you reach a smooth texture. Meal prep saves time and effort. Cook quinoa in advance and store it in the fridge. Roast sweet potatoes ahead of time, too. Keep cooked chickpeas ready for quick use. Store veggies in airtight containers to keep them fresh. Use them within a week for the best taste. A colorful bowl looks inviting. Use contrasting colors like bright orange sweet potatoes and green broccoli. Add cherry tomatoes for a pop of red. For garnish, sprinkle herbs like parsley or seeds for texture. This makes your bowl not only tasty but also beautiful! {{image_2}} You can easily adapt this Buddha bowl to fit different diets. If you want a vegan option, all the ingredients are already plant-based. You can enjoy chickpeas and sweet potatoes without worry. If you are looking for gluten-free substitutes, try quinoa or rice. Both work well in this dish. Using seasonal ingredients makes your Buddha bowl fresh and tasty. In summer, add juicy cucumbers or sweet corn. In winter, consider roasted root vegetables like beets or parsnips. This adds warmth and comfort to your meal. You can also mix in greens like kale or spinach for added nutrition. Spice up your Buddha bowl with global ingredients. For a Korean twist, add kimchi for a spicy kick. If you prefer a Mediterranean flavor, try hummus or feta cheese. These additions bring unique taste profiles to your bowl. You can mix and match flavors to create your perfect meal. To keep your Buddha bowl fresh, use airtight containers. Glass containers work best, as they do not stain and are easy to clean. You can also use BPA-free plastic containers. Make sure to cool the bowl to room temperature before sealing it. The Buddha bowl will stay good in the fridge for about 3 to 5 days. You can freeze many parts of your Buddha bowl. Cooked quinoa and roasted sweet potatoes freeze well. However, avoid freezing fresh veggies like avocado or cherry tomatoes, as they may become mushy. When you want to eat your frozen bowl, move it to the fridge and let it thaw overnight. To reheat, microwave it until warm. Make sure to stir it halfway for even heating. A veggie-packed Buddha bowl is a colorful meal. It has a mix of grains, veggies, and protein. Traditionally, Buddha bowls come from Buddhist culture. They symbolize abundance and balance. They often include fresh, raw, or cooked ingredients. You can get creative with the flavors and textures. To make your Buddha bowl more filling, add grains like quinoa or brown rice. These grains are full of fiber and nutrients. You can also include proteins such as chickpeas, tofu, or beans. These options boost the protein content and keep you full longer. Buddha bowls are healthy due to their variety of ingredients. They include veggies, grains, and proteins, offering many nutrients. You can enjoy vitamins, minerals, and healthy fats in one bowl. Keep portion sizes in check. A balanced bowl helps maintain healthy eating habits. You can find a complete recipe for a veggie-packed Buddha bowl [Full Recipe]. In this post, we explored how to create delicious Buddha bowls. We covered essential ingredients like quinoa, chickpeas, and fresh veggies. You learned about preparing the base, assembling your bowl, and using various cooking techniques. I also shared tips for meal prep and enhancing visual appeal. Remember, you can adapt your bowl for dietary needs and seasonal flavors. With easy storage and reheating methods, you can enjoy these tasty creations anytime. Get creative and make this meal your own!](https://southerndishes.com/wp-content/uploads/2025/06/c30e4bd5-ccb9-48e8-aa0d-090f5c934aba-300x300.webp)
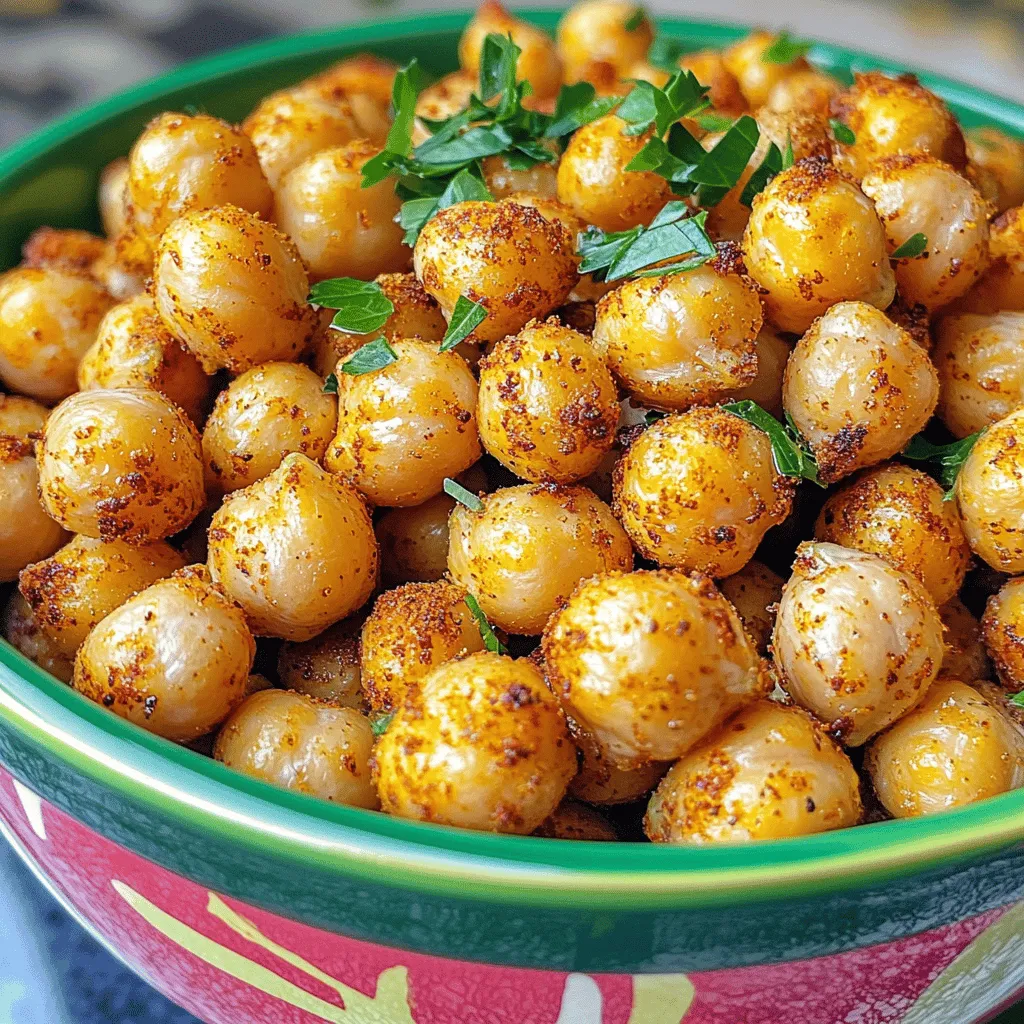
Crispy Air Fryer Chickpeas Flavorful Snack Delight
Craving a tasty, healthy snack? Crispy air fryer chickpeas are your answer! This easy recipe transforms simple canned chickpeas into a flavor-packed treat. With…