Latest & Greatest
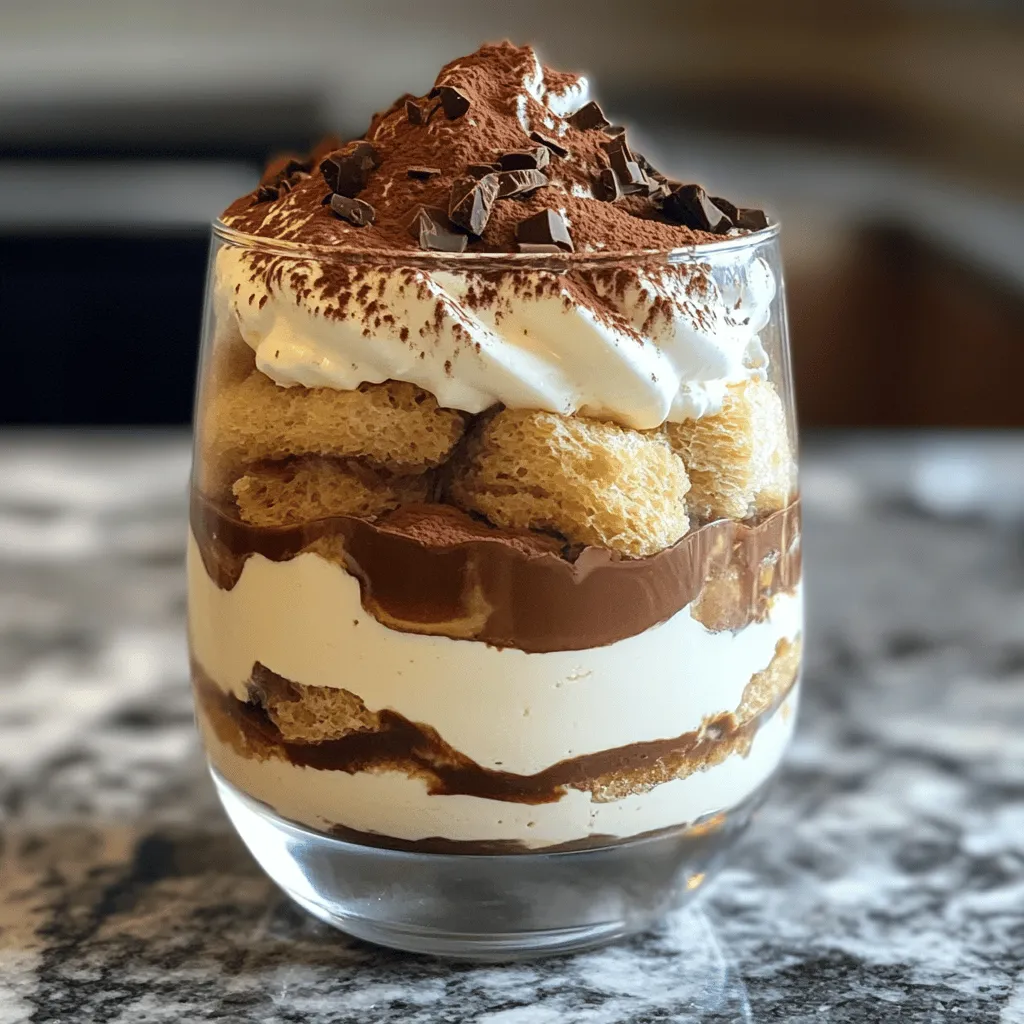
Easy No-Bake Tiramisu Delightful and Simple Recipe
If you crave a dessert that is both delicious and easy to make, you’re in the right place! This Easy
Read more…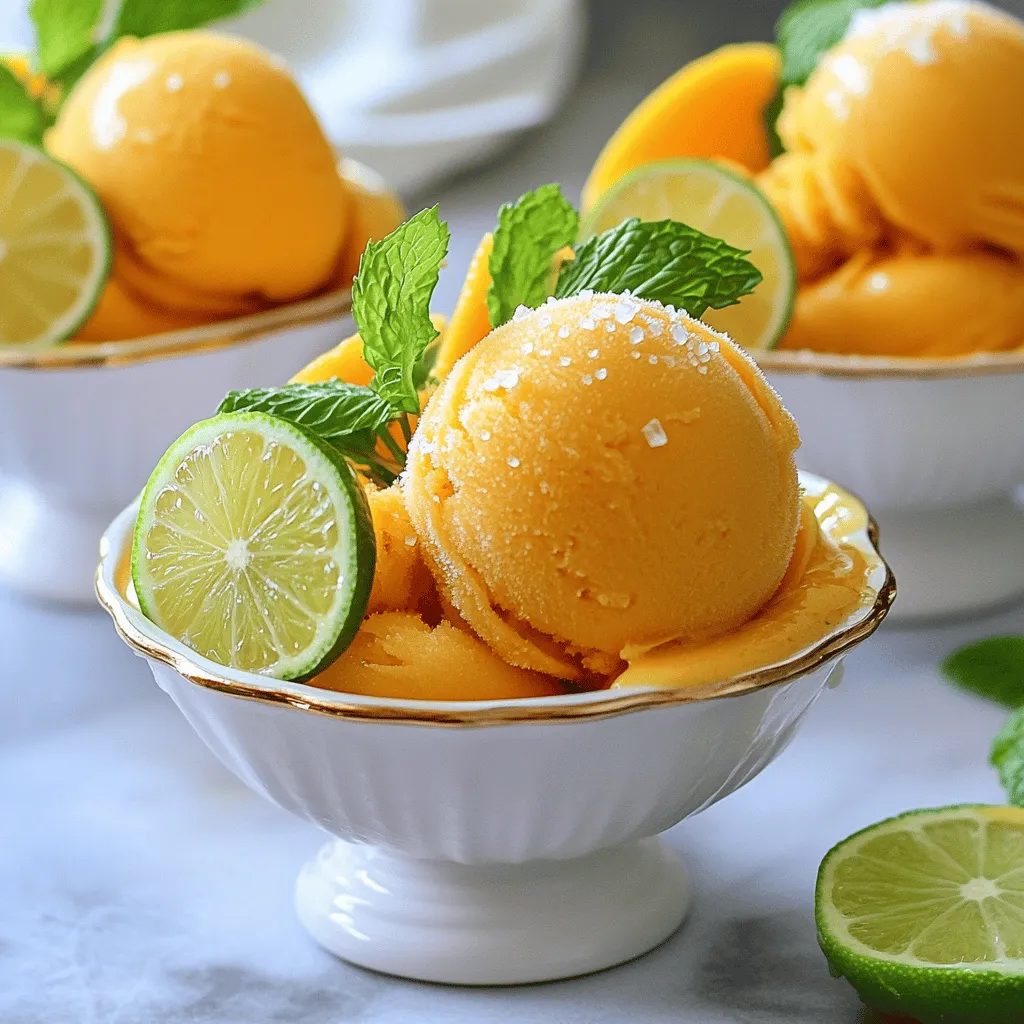
Mango Sorbet Delightful and Easy Summer Treat
Summer is here, and nothing beats a cool, fruity treat! Mango sorbet is easy to make and perfect for warm
Read more…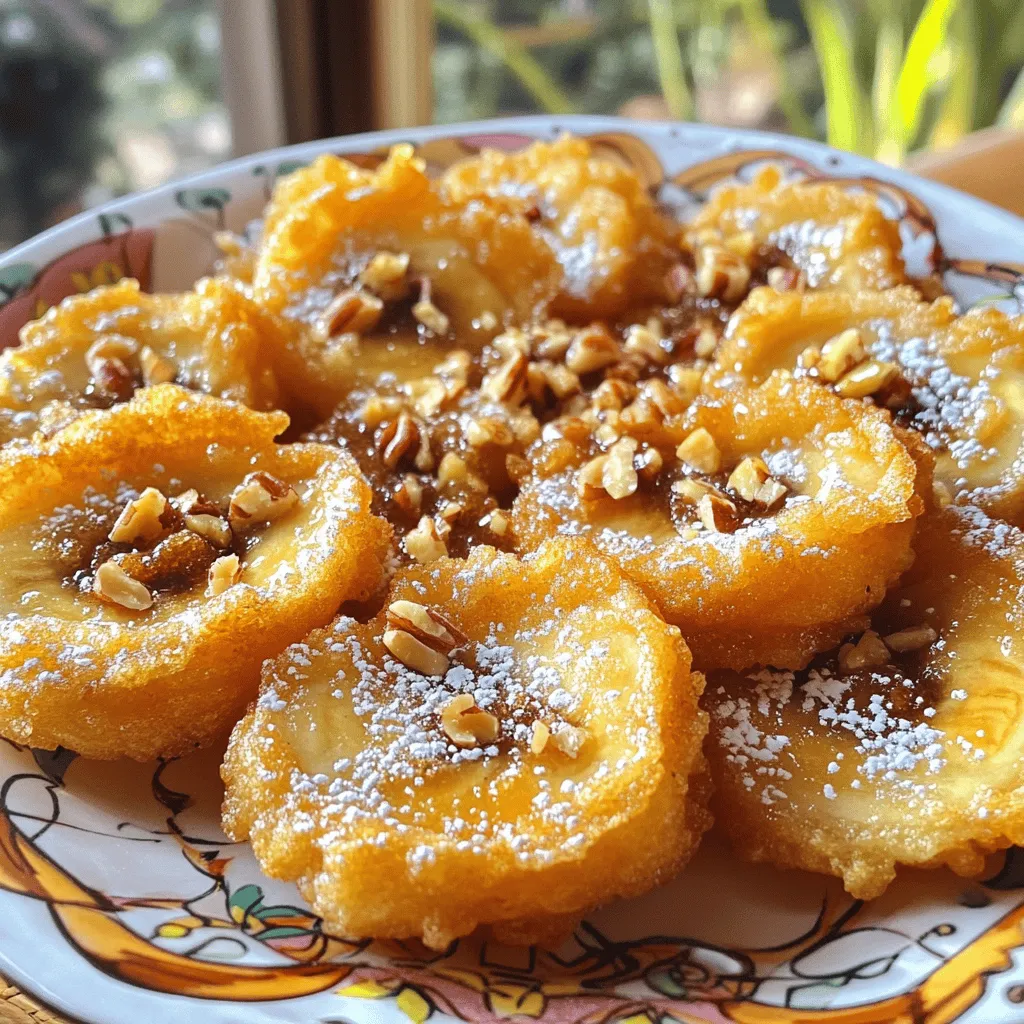
Fried Banana With Brown Sugar Sweet and Simple Delight
If you’re looking for a simple yet sweet treat, you’ve come to the right place. Fried banana with brown sugar
Read more…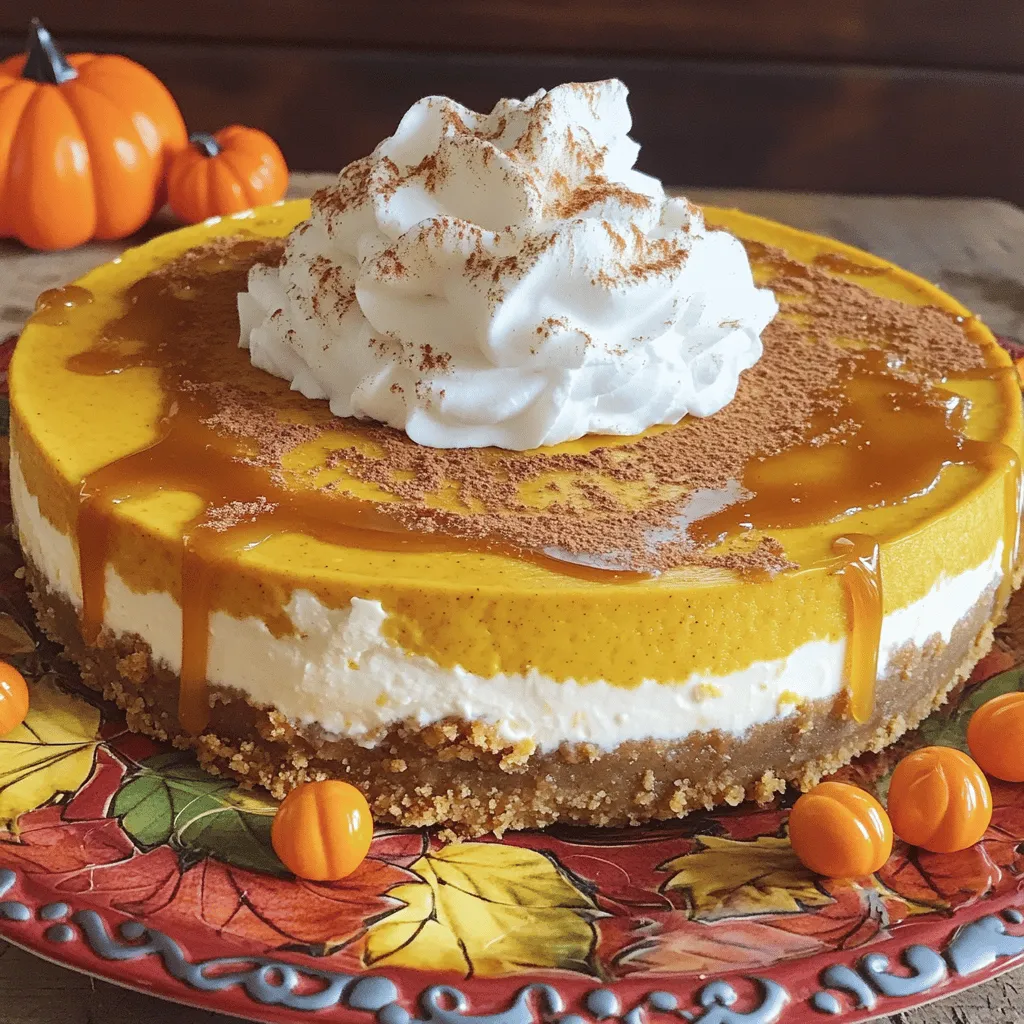
Best Pumpkin Cheesecake Rich and Creamy Delight Recipe
If you love the cozy flavors of fall, this Best Pumpkin Cheesecake recipe is for you! With rich cream cheese
Read more…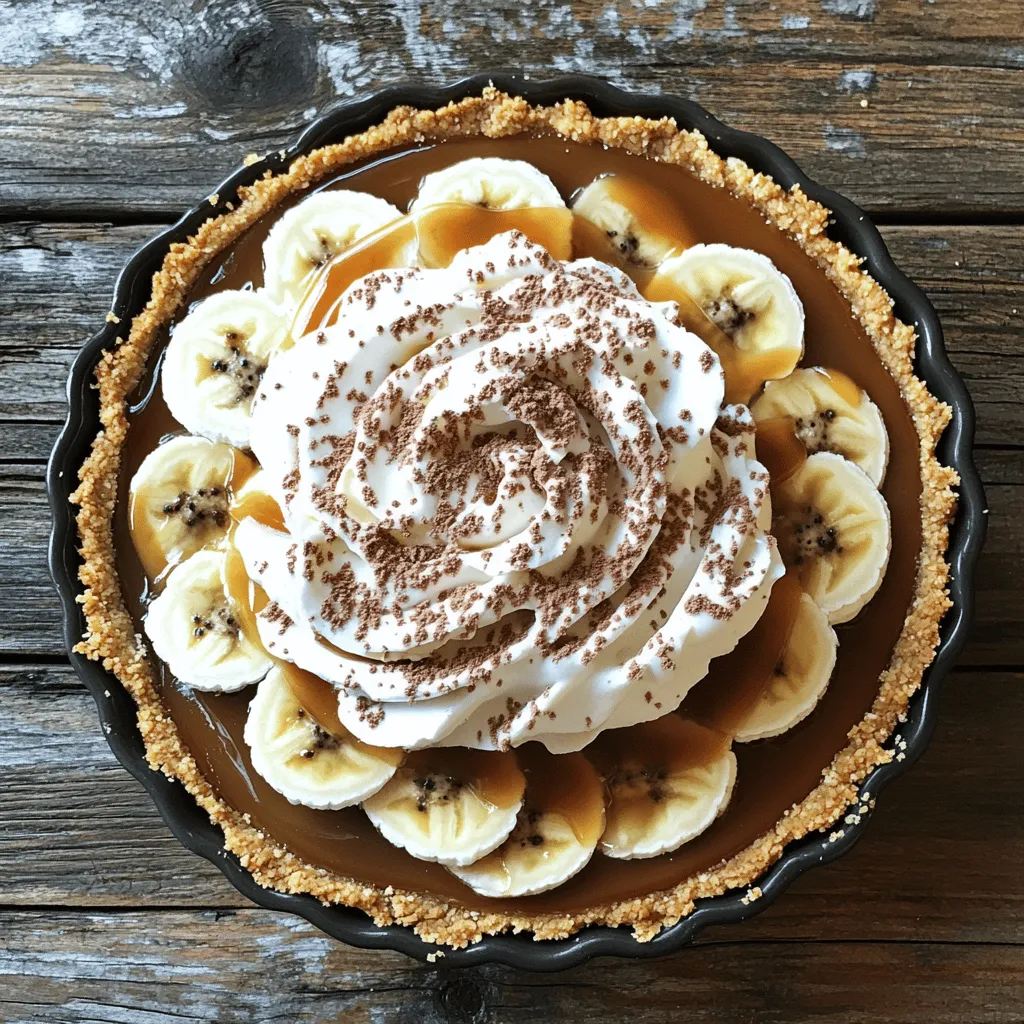
Easy Banoffee Pie with Caramel and Cream Delight
Are you craving a sweet treat that’s simple and decadent? Look no further! This Easy Banoffee Pie with Caramel and
Read more…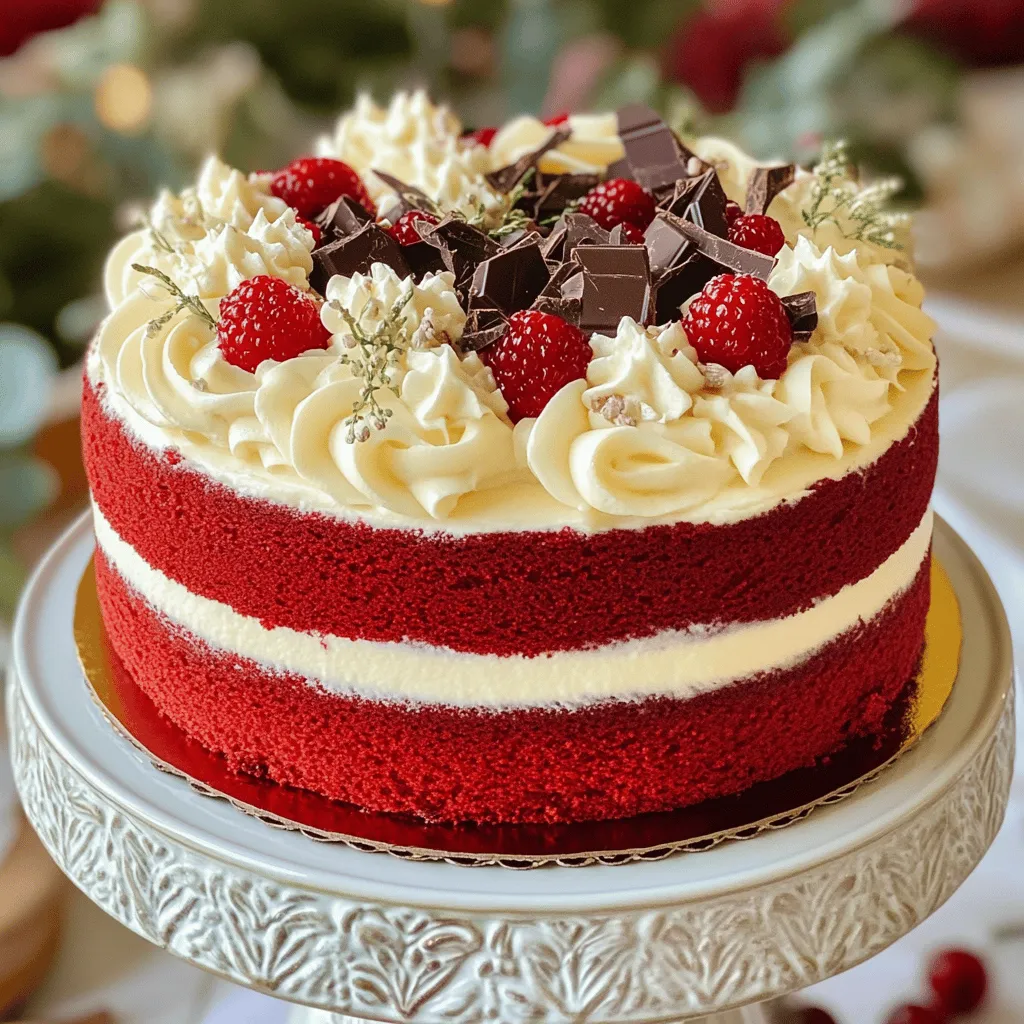
Red Velvet Cake Delight Simple and Tasty Recipe
Red Velvet Cake is a timeless favorite that never fails to impress. This deep red treat is not just beautiful;
Read more…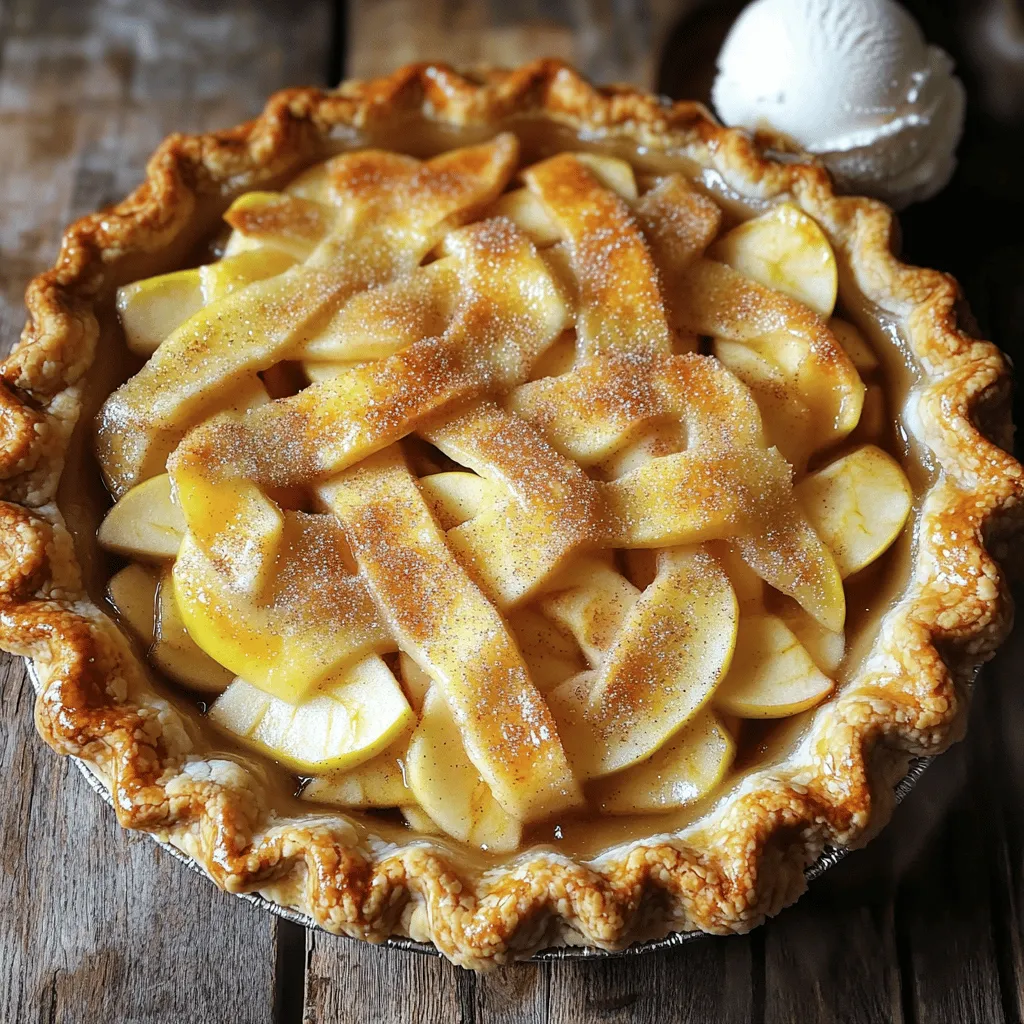
Apple Pie Delight Simple Steps for Perfect Recipe
Are you ready to bake the perfect apple pie? In “Apple Pie Delight: Simple Steps for Perfect Recipe,” I will
Read more…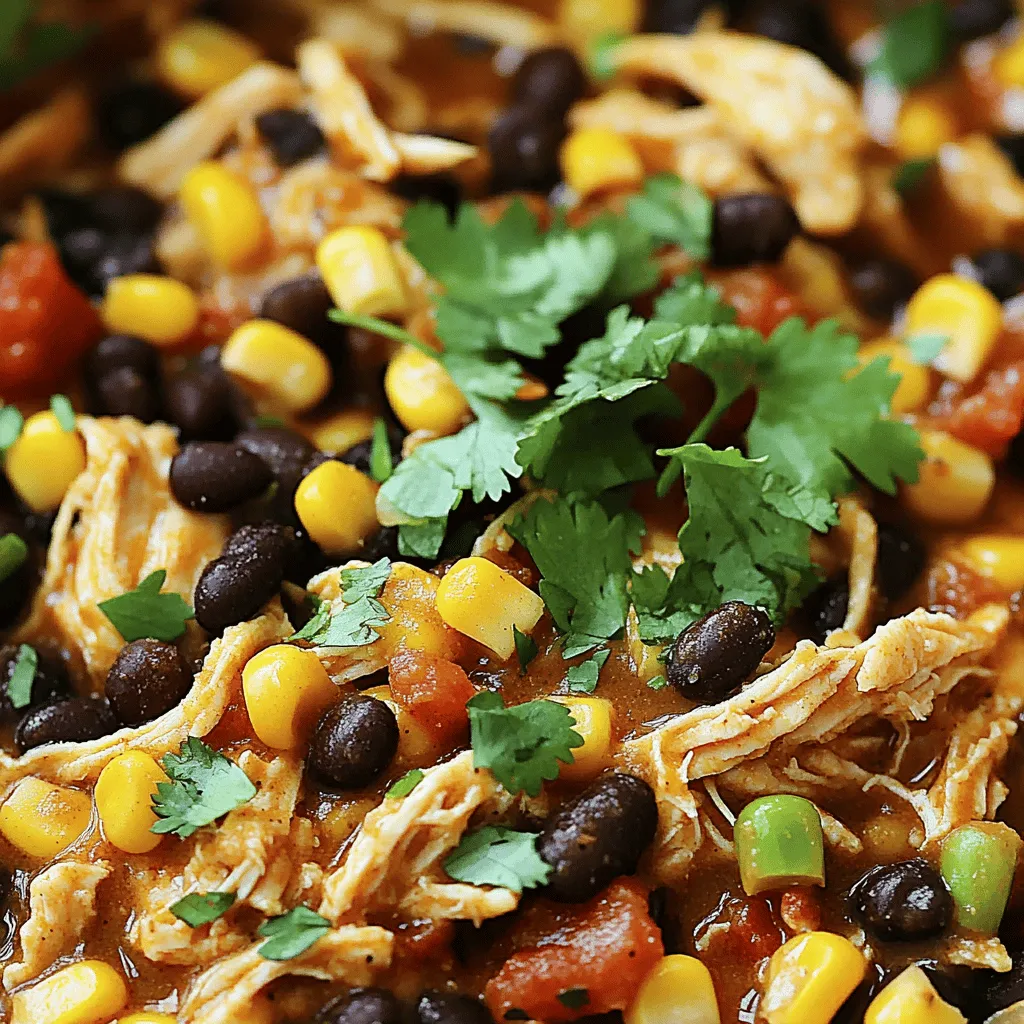
Crockpot Mexican Chicken Flavorful and Simple Recipe
Looking for a simple, tasty meal? You’re in the right place! This Crockpot Mexican Chicken is packed with bold flavors
Read more…browse recipes

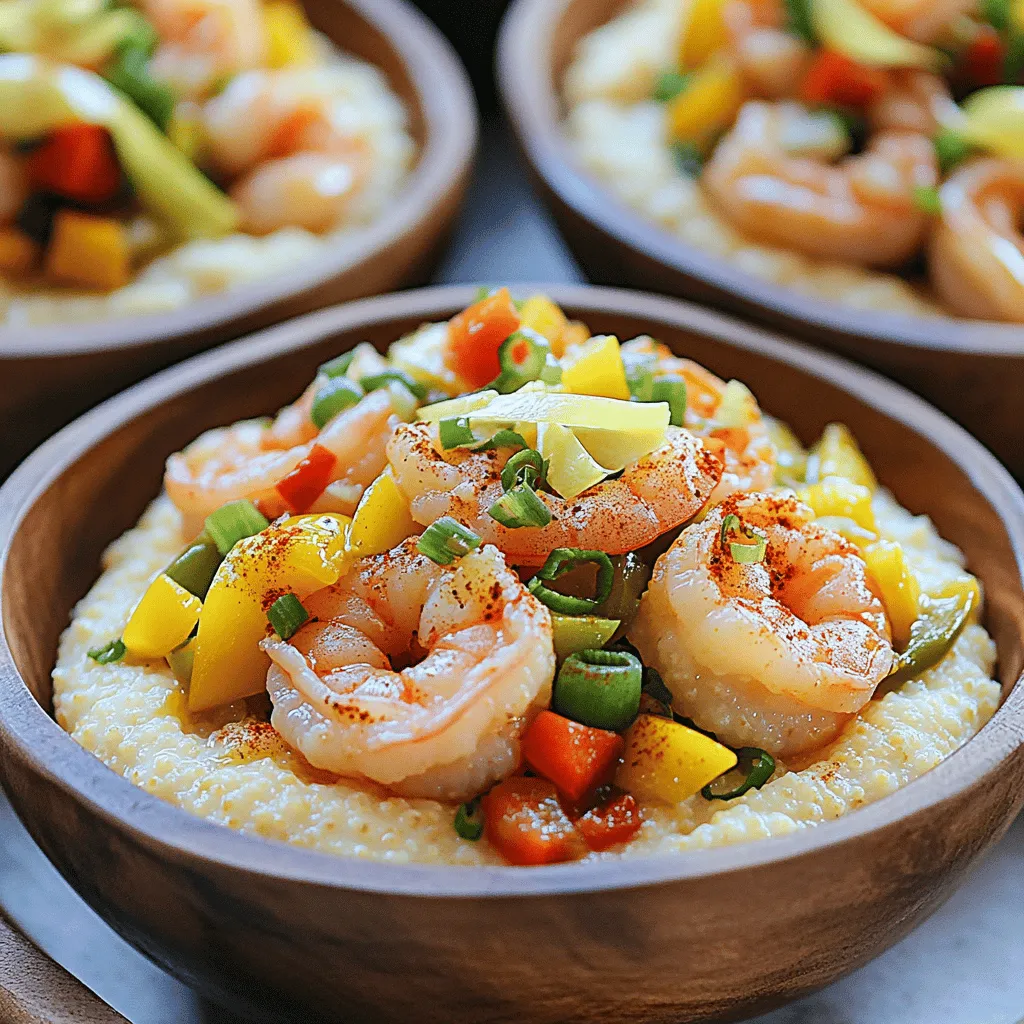
Zesty Shrimp and Grits Flavorful Comfort Recipe
Are you ready to dive into a dish that perfectly blends comfort and flavor? My Zesty Shrimp and Grits recipe will awaken your taste…
My Latest Desserts
-
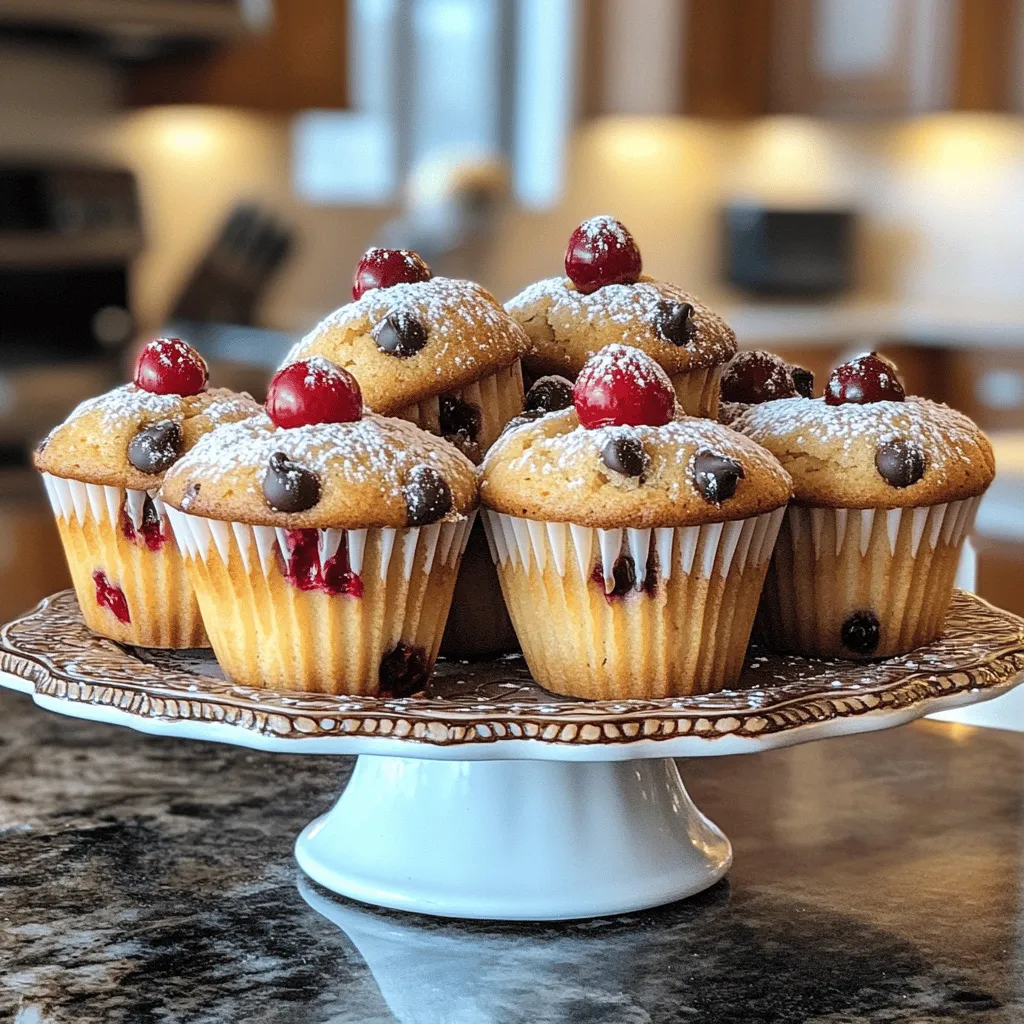
Cherry Chocolate Chip Muffins Irresistible and Easy Recipe
Get ready to bake some magic with my Cherry Chocolate Chip Muffins! This easy recipe combines tart cherries and rich Read Full Recipe -

Cherry Lemonade Popsicles Refreshing Summer Treat
Looking for a cool treat this summer? Try my Cherry Lemonade Popsicles! They combine tart lemon and sweet cherries, making Read Full Recipe -
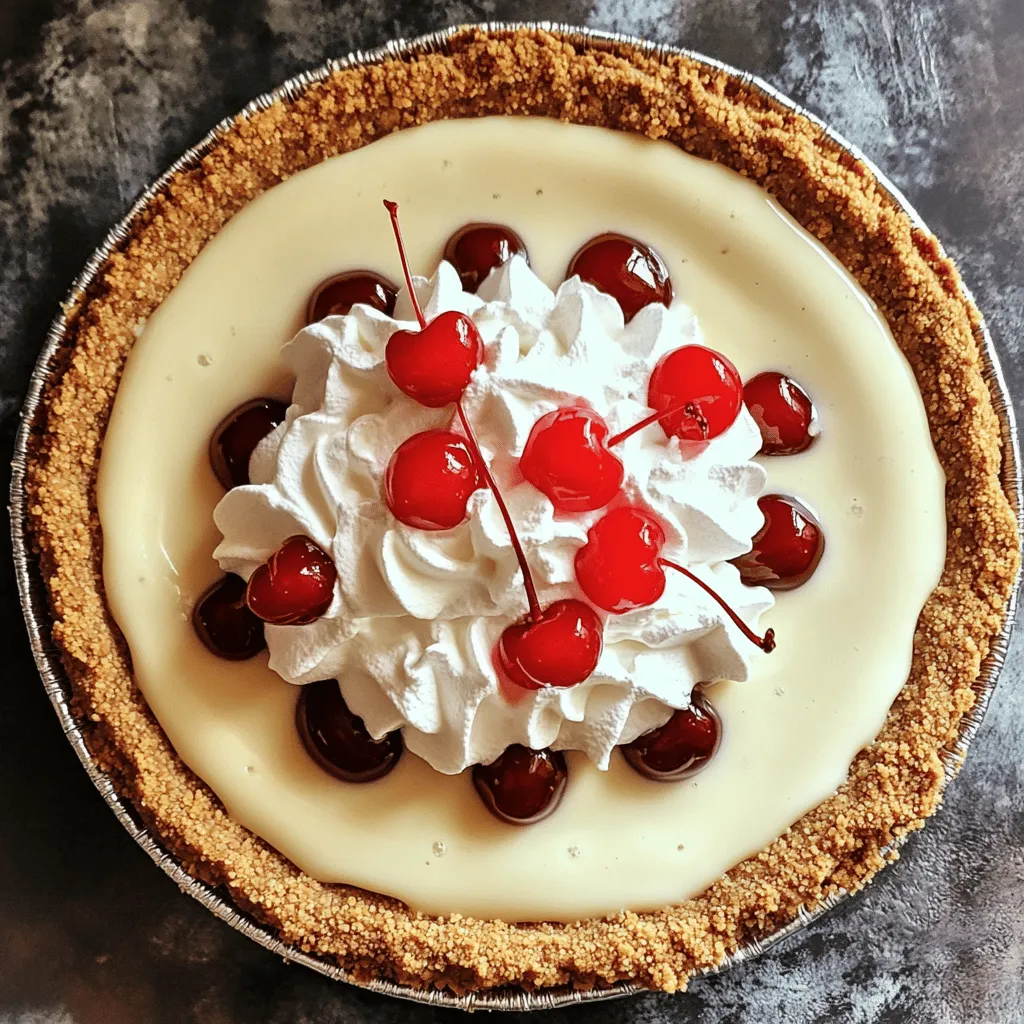
Cream Soda Milkshake Pie Tasty and Simple Recipe
Are you ready to impress your friends with a sweet treat? This Cream Soda Milkshake Pie is not just tasty; Read Full Recipe -

Cherry Swirl Frozen Yogurt Bark Easy and Delicious Treat
Craving a sweet yet healthy treat? You’ll love this Cherry Swirl Frozen Yogurt Bark! It’s easy to make and packed Read Full Recipe -
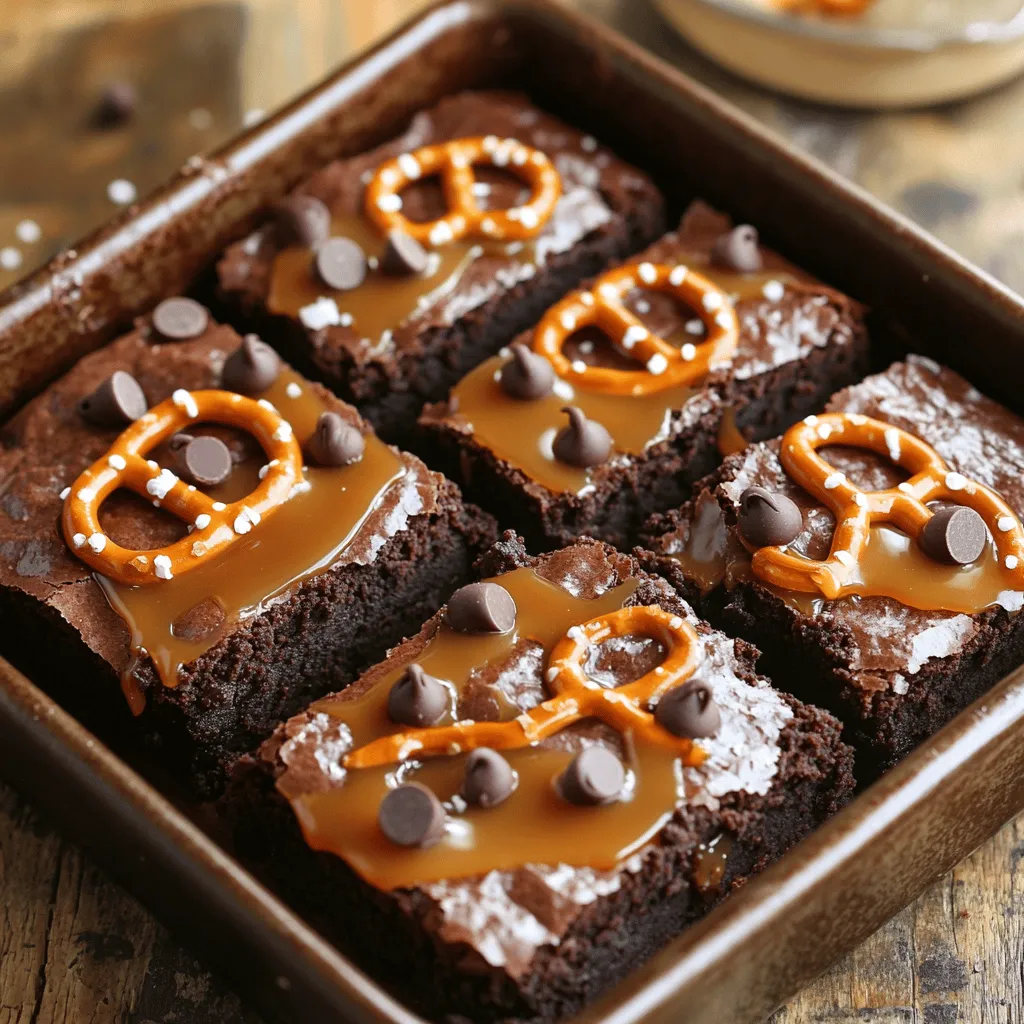
Brownies with Pretzel Crown Delightful and Sweet Treat
Looking for a sweet treat that’s packed with flavor? Try my Brownies with Pretzel Crown! This recipe combines soft, chewy Read Full Recipe -
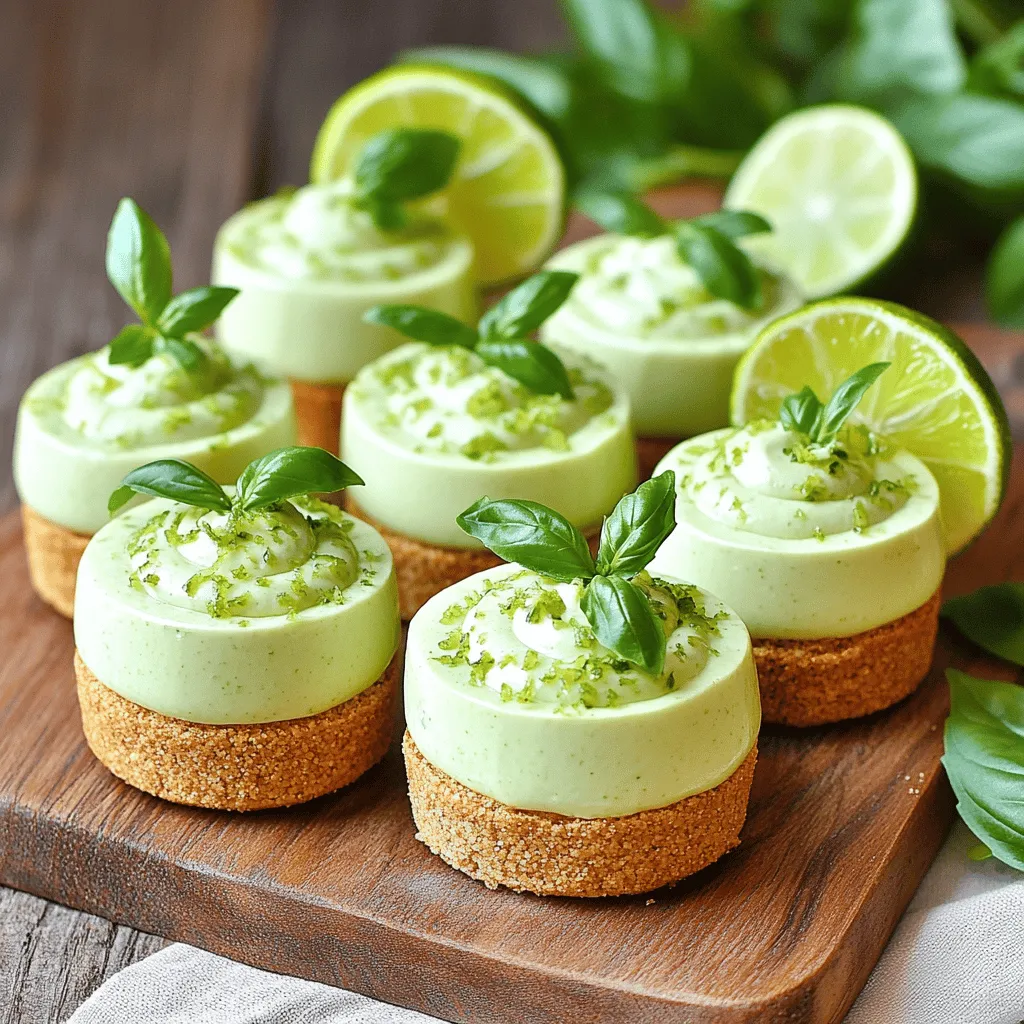
No Bake Basil Lime Cheesecake Cups Delightful Treat
Are you ready to treat yourself to something unique and delicious? These No Bake Basil Lime Cheesecake Cups are here Read Full Recipe -
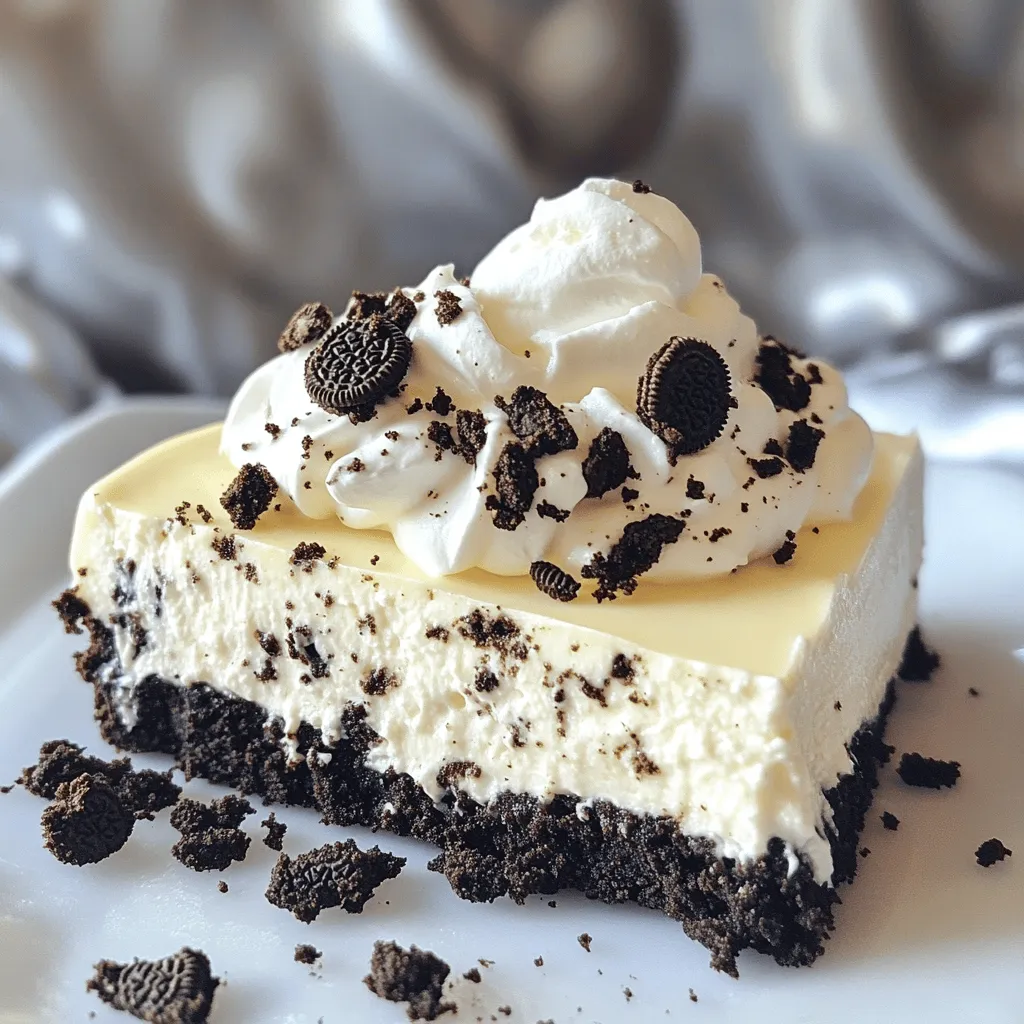
No-Bake Oreo Cheesecake Easy Dessert Treat Idea
Are you craving a sweet treat that requires no oven? I’ve got just the recipe for you: No-Bake Oreo Cheesecake! Read Full Recipe -

Savory Mini Cheesecake Bites Easy and Delicious Treat
If you’re looking for a quick and tasty dessert, these savory mini cheesecake bites are perfect! With their creamy texture Read Full Recipe -
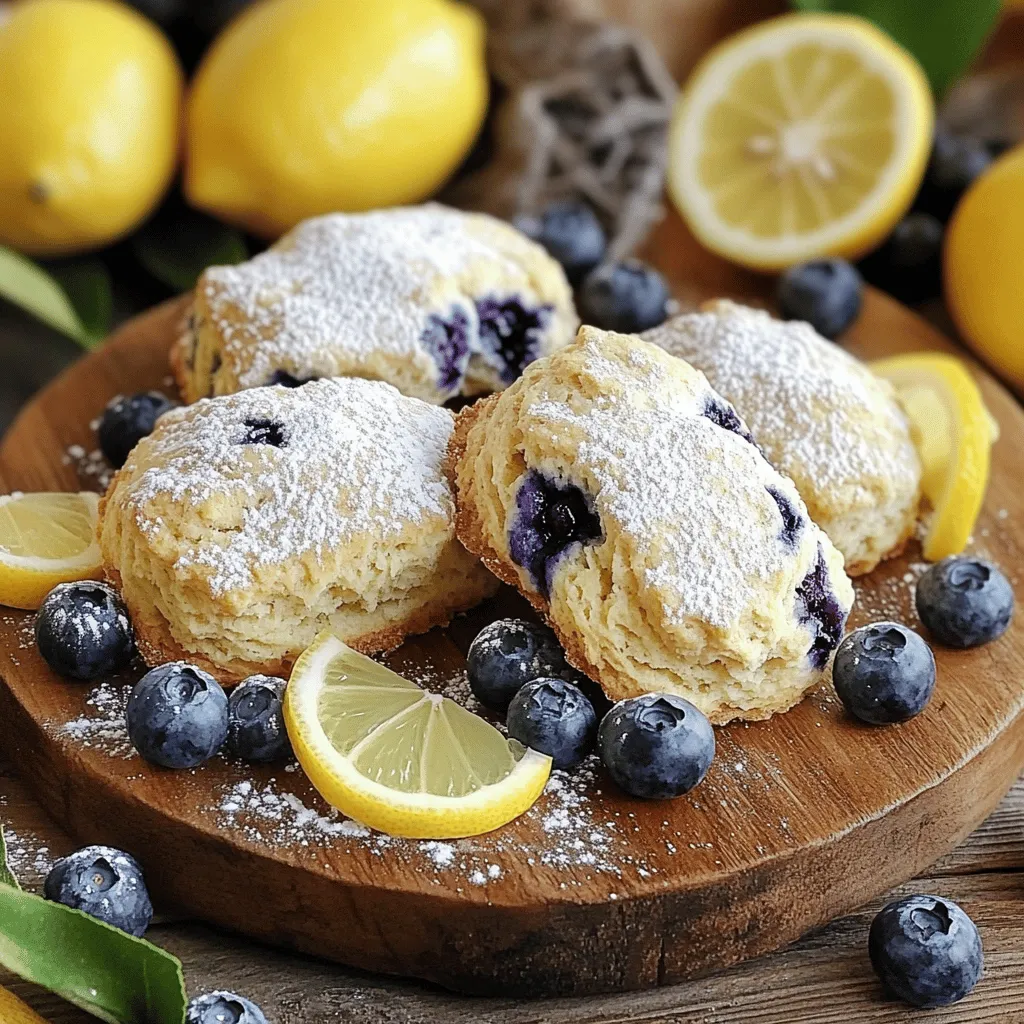
Blueberry Lemon Scones Fresh and Flavorful Delight
If you’re craving a burst of flavor, you’ll love these Blueberry Lemon Scones! These delightful treats blend fresh blueberries and Read Full Recipe -
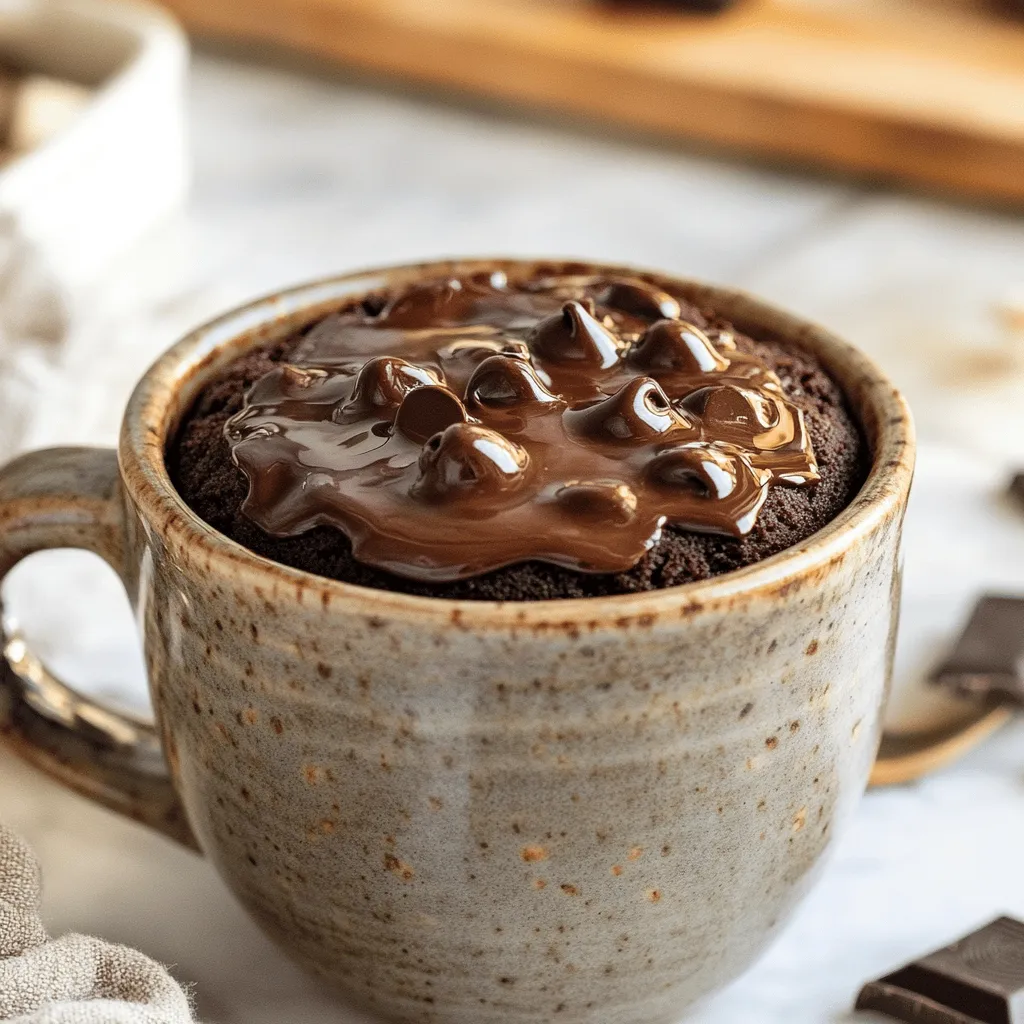
Vegan Chocolate Mug Cake Quick and Easy Dessert
Craving something sweet but short on time? This Vegan Chocolate Mug Cake is your answer! In just minutes, you can Read Full Recipe
My Latest Recipes

hey,
i’m !
I’m so happy you’re here!
My kitchen is filled with stories, flavors, and love and I’m so happy to share them with you. Here’s to dishes that feel like home.
![For this salad, you need fresh and colorful ingredients. Here’s what you’ll need: - 8 oz rice noodles - 1 cup shredded carrots - 1 bell pepper, sliced (choose red, yellow, or orange) - 1 cup sugar snap peas, trimmed and halved - 1 cup red cabbage, thinly sliced - ½ cup green onions, sliced - ½ cup fresh cilantro, chopped - ½ cup unsalted peanuts, roughly chopped These ingredients make a crunchy, fresh base for your salad. The mix of colors adds fun and flavor. This dressing is key to your salad's taste. Gather these items: - 3 tablespoons peanut butter - 2 tablespoons soy sauce - 1 tablespoon sesame oil - 1 tablespoon fresh lime juice - 1 teaspoon maple syrup (or you can use honey) - 1 clove garlic, minced - 1 tablespoon ginger, minced - 1 tablespoon water (to adjust the thickness) This dressing will bring a creamy, savory taste. It balances the crunch of the veggies. Garnishes can make your salad look even better. Consider these options: - Extra chopped peanuts - More fresh cilantro - Lime wedges for a zesty touch These garnishes enhance both the look and flavor of your salad. You can pick what you like best! For the full recipe, check out the complete guide. First, get a pot of water boiling. Add the rice noodles and cook them. Follow the package instructions for the right time. Once the noodles are soft, drain them. Rinse the noodles with cold water. This helps stop the cooking. Set them aside to cool. Next, grab a large bowl. Add the shredded carrots, sliced bell pepper, sugar snap peas, red cabbage, and green onions. Mix these veggies together. They add great color and crunch. Don’t forget to add the fresh cilantro. It gives a bright taste to the salad. Now, let’s make the peanut dressing. In a separate bowl, add peanut butter, soy sauce, and sesame oil. Squeeze in fresh lime juice. Add maple syrup for sweetness. Then, throw in minced garlic and ginger. Whisk everything together until smooth. If it’s too thick, add a little water. This dressing will make your salad tasty and creamy. After you have everything ready, combine the cooled rice noodles with the veggies. Pour the dressing over them and toss well. This ensures every bite is full of flavor. Add the chopped peanuts on top for crunch. You can serve it right away or chill it for 30 minutes. This time lets the flavors mix. Check the [Full Recipe] for all the details. To make a great peanut dressing, start with smooth peanut butter. Use 100% natural peanut butter for the best taste. Mix it with soy sauce for saltiness. Add sesame oil for a rich flavor. Fresh lime juice gives it a nice tang. Maple syrup or honey adds sweetness. Don't forget garlic and ginger for extra zest. If the dressing is too thick, add water. Stir until the dressing is smooth and creamy. Taste and adjust as you like! Serve your Thai peanut noodle salad in big bowls. For a pop of color, garnish with fresh cilantro. Sprinkle chopped peanuts on top for crunch. For a zingy touch, add lime wedges. This salad is great as a side dish or a main meal. You can serve it cold or at room temperature. If you want the flavors to blend, chill it for 30 minutes before serving. You can swap some ingredients to suit your taste. If you don’t have rice noodles, try soba or whole wheat noodles. For veggies, use whatever you have on hand. Cucumber and zucchini work well too. If you want protein, add cooked chicken or tofu. You can also try different nuts like cashews or walnuts. Experiment with the dressing by adding chili paste for heat. This recipe is flexible, so have fun with it! {{image_2}} You can make this salad heartier by adding protein. Cooked chicken adds a tasty touch. Simply chop it into bite-sized pieces and mix it in. If you prefer plant-based options, use tofu. Press it to remove water, then cube and sauté until golden. Both options bring flavor and texture to the dish. Feel free to mix in different veggies for fun. Broccoli, zucchini, or even spinach work great. Each adds color and nutrients. Just make sure to cut them into small pieces for easy eating. You can also use frozen veggies if fresh ones aren't available. They save time and still taste good. Want to add heat? It's easy to spice things up! You can chop in fresh chili peppers or add red pepper flakes to your dressing. If you like milder flavors, skip the heat altogether. Balance is key, so adjust based on your taste. This way, you can create a salad that fits your family's spice level. Try these variations to make the Thai Peanut Noodle Salad your own. For the complete recipe, check out the Full Recipe. To keep your Thai peanut noodle salad fresh, store it in an airtight container. If you have extra dressing, store that in a separate container. This helps keep the noodles and veggies crisp. Avoid mixing the salad with the dressing until you are ready to eat. When stored properly, the salad lasts about 3 to 5 days in the fridge. If you notice any change in color or smell, it's best to toss it. Always check leftovers before eating. You can eat the salad cold, but if you prefer it warm, reheat gently. Use a skillet over low heat. Add a splash of water or dressing to keep it moist. Stir often to avoid burning. Enjoy it warm, but remember, fresh is best! For the full recipe, check the details above. I love using rice noodles for this salad. They are light and absorb flavors well. You can find them in Asian grocery stores or the international aisle. Other good options are soba or whole wheat noodles. Just make sure they cook quickly. This keeps the texture nice and fresh. Yes, you can make this salad ahead! It holds well in the fridge. Make it up to a day before serving. Just keep the dressing separate until you're ready to eat. This keeps the veggies crisp and the noodles fresh. Mix it all right before serving for the best taste. Absolutely! This recipe is great for meal prep. You can store portions in containers for easy lunches. Just remember to pack the dressing separately. This way, you can enjoy a fresh salad every day. It keeps well for up to five days in the fridge. This blog post shared how to make a Thai Peanut Noodle Salad. We explored key ingredients, like rice noodles and peanut dressing. I gave you a step-by-step guide for cooking and prepping your meal. You learned helpful tips for the best dressing and fun variations to try. Proper storage and answers to common questions rounded it out. Making this salad is simple and fun. Enjoy your tasty, fresh dish anytime!](https://southerndishes.com/wp-content/uploads/2025/07/a83a9690-39e2-45d2-a690-585ff05f64b9-300x300.webp)
![To make these tasty blondies, gather the following ingredients: - 1 cup creamy peanut butter - 1/2 cup brown sugar - 1/4 cup granulated sugar - 1/2 cup coconut sugar (or more brown sugar) - 2 large eggs - 1 teaspoon vanilla extract - 1 teaspoon baking powder - 1/2 teaspoon baking soda - 1/4 teaspoon salt - 1 cup all-purpose flour - 1/2 cup chocolate chips (semisweet or dark) - Optional: 1/4 cup chopped nuts (like walnuts or peanuts) You can swap some ingredients if you need. Here are a few ideas: - Use almond butter instead of peanut butter for a nut-free treat. - Replace coconut sugar with more brown sugar for a sweeter taste. - If you want a vegan option, use flax eggs instead of regular eggs. - For gluten-free blondies, substitute all-purpose flour with almond flour or a gluten-free blend. - If you don't have chocolate chips, try using chopped chocolate bars or other mix-ins. Choosing quality ingredients can make your blondies even better. Here are some tips: - Use fresh peanut butter that is smooth and creamy. Avoid brands with added sugar or hydrogenated oils. - Choose brown sugar that feels moist. This keeps the blondies soft and chewy. - When picking chocolate chips, look for high-quality brands for the best flavor. - If using nuts, pick unsalted and fresh nuts to enhance the taste without extra salt. These ingredient tips help you create the best Peanut Butter Chocolate Chip Blondies. Check out the Full Recipe for detailed steps! To start, gather your ingredients. You need creamy peanut butter, brown sugar, granulated sugar, coconut sugar, eggs, vanilla extract, baking powder, baking soda, salt, all-purpose flour, and chocolate chips. If you want, add some chopped nuts too. 1. Preheat your oven to 350°F (175°C). Grease an 8x8 inch baking pan or use parchment paper. This makes it easier to lift the blondies out later. 2. In a large bowl, mix the peanut butter, brown sugar, granulated sugar, and coconut sugar. Stir until it’s smooth and well blended. 3. Add the eggs, one at a time. Mix well after each egg. Then stir in the vanilla extract until combined. In a separate bowl, whisk together the baking powder, baking soda, salt, and flour. This helps to mix the dry ingredients well. 1. Slowly add the dry mixture to the wet mixture. Stir gently until it’s just combined. Don’t overmix; a few lumps are okay. 2. Fold in the chocolate chips and nuts if you’re using them. Make sure they are spread out in the batter. 3. Pour the batter into your prepared pan. Smooth it out evenly with a spatula. Bake in your preheated oven for 20-25 minutes. The edges should turn lightly golden. A toothpick inserted in the center should come out mostly clean, with a few moist crumbs being just fine. After baking, let the blondies cool in the pan for about 10 minutes. Then, move them to a wire rack to cool completely. Once cool, slice them into squares. For a fun twist, serve them warm with a scoop of vanilla ice cream. Drizzle some melted chocolate on top for an extra treat. Enjoy your delicious peanut butter chocolate chip blondies! For the full recipe, check out the details above. Baking blondies seems simple, but small mistakes can ruin them. Here are common pitfalls to watch for: - Overmixing the batter: This can make your blondies tough. Mix just until the flour is combined. - Not measuring ingredients: Accurate measurements are key. Use measuring cups for wet and dry goods. - Skipping the cooling step: Letting blondies cool in the pan helps them set and makes slicing easier. To get that soft and chewy blondie texture, follow these tips: - Use creamy peanut butter: This helps create a smooth and rich batter. Avoid chunky peanut butter for this recipe. - Don’t overbake: Keep an eye on them. Remove the blondies when the edges are golden but the center is still soft. - Let them cool properly: Cooling allows the blondies to firm up. Don’t rush this step! Serving your blondies beautifully can impress anyone. Here are some ideas: - Warm with ice cream: Top each blondie with a scoop of vanilla ice cream. The warm and cold contrast is delightful. - Drizzle with chocolate: Melt some chocolate and drizzle over the blondies for a fancy touch. - Garnish with nuts: Sprinkle chopped nuts on top for added texture and flavor. For the complete recipe, check out the [Full Recipe]. {{image_2}} You can easily make vegan peanut butter blondies. Replace the eggs with flaxseed meal. Mix 1 tablespoon of flaxseed with 3 tablespoons of water. Let it sit for five minutes to thicken. This mix binds the ingredients just like eggs. Use maple syrup instead of granulated sugar for sweetness. This keeps the flavors rich and delicious. To make gluten-free blondies, swap all-purpose flour with almond flour or oat flour. These flours give a nutty taste and a moist texture. Check the labels to ensure no gluten is in your ingredients. You can also use a gluten-free flour blend. It often works well in baked goods. Spice up your blondies with cinnamon or nutmeg for warmth. Just add a teaspoon to your dry mix. You can also fold in a half-cup of mashed bananas or applesauce for extra moisture. For a fun twist, try adding white chocolate chips or chopped dried fruit. Each option brings new flavors to your blondies. For the full recipe, check out the earlier section! To keep your blondies fresh, store them in an airtight container. Place a piece of parchment paper between layers to prevent sticking. They can sit at room temperature for up to three days. If you want to keep them longer, move them to the fridge. They will last for about a week there. If you want to save some for later, freezing works great. First, let the blondies cool completely. Then, wrap each piece tightly in plastic wrap. Place them in a freezer-safe bag or container. They can stay in the freezer for up to three months. When you're ready to eat, just take out how many you need. To enjoy your blondies warm, you can quickly reheat them. Just pop a piece in the microwave for about 10-15 seconds. This will make them soft and gooey again. You can also warm them in the oven at 350°F (175°C) for about 5-10 minutes. Enjoy them with a scoop of ice cream or a drizzle of chocolate for an extra treat! You can tell if your blondies are done when the edges look golden. Insert a toothpick into the center. If it comes out with a few moist crumbs, they are ready! Overbaking will make them dry. Trust me, you want that soft, fudgy texture. Yes, you can use natural peanut butter! Just note that natural peanut butter can be more oily. This might change the texture a bit. If it seems too runny, add a little more flour. This will help keep your blondies firm. These blondies shine on their own, but serving them warm is extra nice. Try adding a scoop of vanilla ice cream on top! You can also drizzle melted chocolate over them for a sweet touch. Fresh fruit like strawberries can add a nice contrast too! You'll love how they taste together. For the full recipe, check out the complete instructions. Peanut Butter Chocolate Chip Blondies are fun to make and eat. You learned about key ingredients, baking steps, and expert tips. I shared tricks for perfect texture and storage info. With variations, you can customize to fit your taste. Remember, knowing when they’re done is key. Enjoy your baking journey and impress others with these treats!](https://southerndishes.com/wp-content/uploads/2025/05/3f57c6bc-d3f3-4928-adfa-123bd9454a21-300x300.webp)

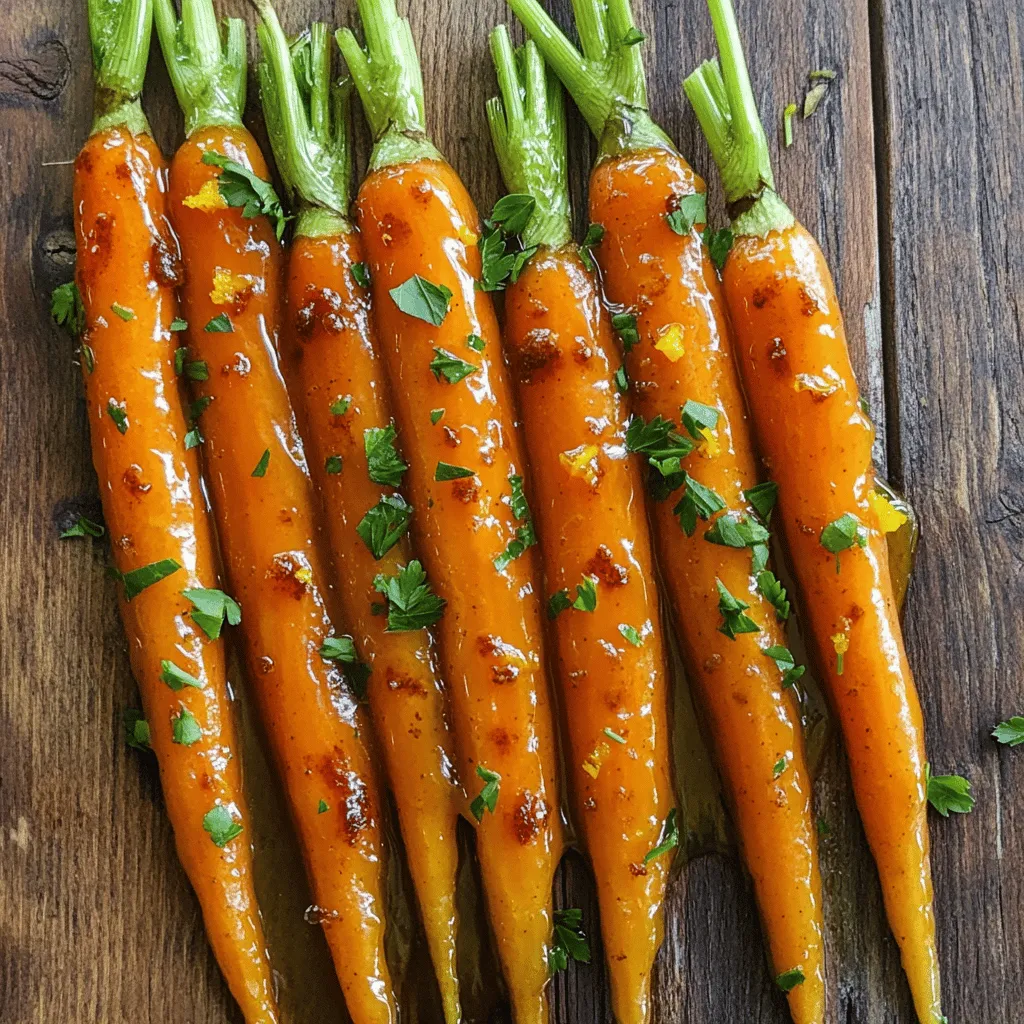
Flavorful Orange Glazed Carrots Simple and Tasty Recipe
Looking for a side dish that bursts with flavor and is easy to make? Try my delicious orange glazed carrots! This simple recipe highlights…