


Latest & Greatest
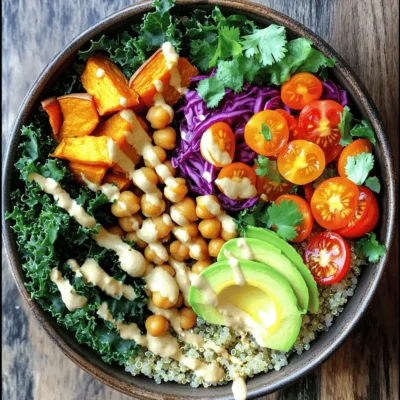
Vegan Buddha Bowl Flavorful and Healthy Delight
Looking for a tasty and healthy meal? Discover the Vegan Buddha Bowl, a colorful and nutritious delight packed with flavor!
Read more…
Cauliflower Fried Rice Tasty and Healthy Delight
Looking for a delightful dish that’s both tasty and healthy? Cauliflower fried rice is your answer! This colorful meal is
Read more…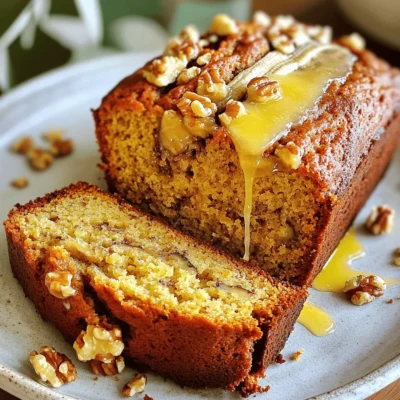
Classic Banana Bread Irresistible Recipe and Tips
Are you ready to bake the best banana bread ever? This classic recipe is simple, delicious, and perfect for using
Read more…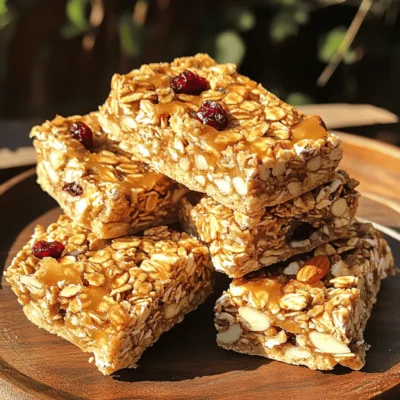
Homemade Granola Bars Simple and Nutritious Snack
Looking for a snack that’s tasty and healthy? Homemade granola bars are the answer! With simple ingredients like oats, nuts,
Read more…
Parmesan Crusted Zucchini Chips Crispy and Flavorful
Looking for a tasty snack that’s both crispy and flavorful? Parmesan crusted zucchini chips are your answer! They’re easy to
Read more…
Easy Peach Crisp Simple and Tasty Dessert Delight
Are you ready to indulge in a warm, fruity delight? My Easy Peach Crisp is the perfect dessert for any
Read more…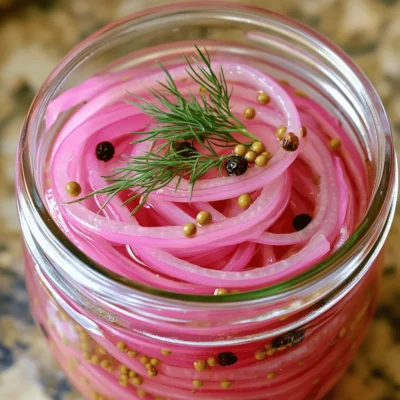
Homemade Pickled Red Onions Flavorful and Fresh Recipe
Homemade pickled red onions are simple, tasty, and full of flavor. In just a few steps, you can elevate any
Read more…
No Bake Peach Cheesecake Simple and Delicious Recipe
Are you ready to impress your friends and family with a dessert that’s both easy and crowd-pleasing? This No Bake
Read more…browse recipes


![- Zucchini - Bell Pepper - Red Onion - Cherry Tomatoes - Mushrooms - Olive Oil - Garlic Powder - Smoked Paprika - Dried Oregano - Salt and Pepper - Fresh Parsley (for garnish) The key to great grilled vegetable skewers is quality ingredients. Start with fresh produce. The vegetables should be firm and colorful. You want them to shine on the grill. Here’s a closer look at each ingredient: - Zucchini: Slice it into thick rounds. This keeps it juicy and tender. - Bell Pepper: Use red or yellow. They add sweetness and color. - Red Onion: Cut it into wedges. This gives a bold flavor when grilled. - Cherry Tomatoes: Use whole for a burst of sweetness. They cook quickly and add color. - Mushrooms: Whole or halved works well. They absorb flavors and add earthiness. Now, let’s talk about the seasoning. The right mix brings out the natural flavors of the vegetables. - Olive Oil: This adds richness and helps the spices stick. - Garlic Powder: A must for depth. It gives a nice kick without overpowering. - Smoked Paprika: This adds a lovely smokiness. It’s like a hint of barbecue. - Dried Oregano: This brings a Mediterranean touch. It pairs well with all the veggies. - Salt and Pepper: Simple but essential. They enhance the overall taste. - Fresh Parsley: Use it as a garnish. It adds a pop of color and freshness. For the Full Recipe, check the details at the start of this article. Each ingredient plays a role in making your skewers delicious and visually appealing. Enjoy the process of selecting and preparing them! Preheating the Grill Start by preheating your grill. Set it to medium-high heat, around 400°F or 200°C. This step is key for cooking the vegetables evenly. Soaking Wooden Skewers If you use wooden skewers, soak them in water for 30 minutes. This helps stop them from burning on the grill. Slicing and Cutting Next, slice the vegetables. Cut the zucchini into thick rounds. Dice the bell pepper into squares. Wedge the red onion. Halve the cherry tomatoes and mushrooms if needed. Mixing Vegetables in a Bowl Put all the sliced vegetables in a large bowl. Mix them well. This helps the flavors blend. Threading on Skewers Grab your soaked skewers. Start threading the vegetables onto the skewers. Alternate types of vegetables for a colorful look. Arranging for Aesthetic Appeal Leave some space between each piece. This ensures they cook evenly and look great on the plate. Cooking Time and Temperature Place the skewers on the hot grill. Cook them for about 10-12 minutes. The heat helps bring out the natural flavors. Turning the Skewers for Even Cooking Turn the skewers occasionally. This action helps all sides get those lovely grill marks. Enjoy the smell as they cook! - Temperature Control: Set your grill to medium-high heat. This gives a nice sear. The right heat helps the veggies cook evenly. If the grill is too hot, they may burn. Use a thermometer to check that it’s around 400°F or 200°C. - Timing When to Turn: Grill the skewers for about 10-12 minutes. Turn them every 3-4 minutes. This helps to get those perfect grill marks. Don’t rush, as turning too soon can stick to the grill. - Avoiding Overcrowding: Don’t pack the skewers too tightly. Each piece should have space. This allows heat to reach all sides, cooking them evenly. - Leaving Space Between Vegetables: Leave gaps between veggies on the skewer. This helps them get nice char marks. Plus, it makes them look pretty and colorful. - Marinade Tips: Soak your vegetables in olive oil and seasonings for at least 30 minutes. This adds flavor deep into the veggies. You can try different marinades, like balsamic vinegar or lemon juice. - Additional Seasonings to Try: Besides garlic powder and smoked paprika, try herbs like thyme or rosemary. A sprinkle of chili flakes can add heat. Experiment with your favorites to create unique flavors. For a full recipe, check out the details in the Full Recipe section. {{image_2}} You can change up your skewers by using seasonal vegetables. In summer, add fresh corn or eggplant. In fall, try squash or Brussels sprouts. Winter brings hearty options like carrots and parsnips. The key is to pick veggies that are fresh and in season. They taste better and add color to your dish. You can also substitute with fruits. Pineapple adds sweetness. Peaches bring a nice twist. Just remember, fruits cook faster than veggies. Keep an eye on them to avoid mushiness. You can grill your skewers in different ways. An outdoor grill gives a smoky flavor. Make sure it's preheated well. This will help achieve those nice grill marks. If you don’t have an outdoor grill, you can use your oven. Just set it to broil. Place the skewers on a baking sheet. This method works well, and you still get a great taste. Using a grill pan is another option. It’s perfect for indoor cooking. Just heat the pan on medium-high. The ridges will create grill marks and help with even cooking. Adding flavor is easy with marinades and sauces. A simple mix of olive oil, lemon juice, and herbs works great. You can let the veggies soak in it for an hour. This will boost the taste of your skewers. You can also try different sauces after grilling. A drizzle of balsamic glaze adds depth. You can use pesto for a fresh touch. Topping your skewers with fresh herbs like basil or cilantro can elevate your dish. For more detailed steps on preparing these delicious skewers, check out the Full Recipe. To store grilled vegetable skewers, let them cool first. Place them in an airtight container. This keeps them fresh and prevents drying out. You can put parchment paper between layers if stacking. For safe refrigeration, keep them in the fridge for up to 3 days. After that, the veggies may lose flavor and texture. Always check for any signs of spoilage before eating. When you want to reheat your skewers, the best method is using the oven. Preheat your oven to 350°F (175°C). Place the skewers on a baking sheet and cover them with foil. This keeps them moist while heating. You can also use a grill or stovetop. Heat a grill pan over medium heat. Turn the skewers every few minutes until warm. This method helps maintain their texture and flavor. Avoid microwaving, as it can make them soggy. For the full recipe, check back at the beginning of the article. To stop veggies from burning, keep them moist. Brush them with olive oil. This helps lock in moisture and adds flavor. Set your grill to medium-high heat. This way, the vegetables cook well without burning. Turn them often for even cooking. Yes, you can prepare skewers ahead of time. Just store them in the fridge. Wrap them tightly with plastic wrap. This keeps them fresh and tasty. Aim to grill within 24 hours for the best flavor. You can also chop veggies a day before. Just store them in a sealed container. I love to serve these skewers with hummus or tzatziki. They add a nice creaminess. Try a balsamic glaze for a sweet touch. For a spicy kick, serve with sriracha or chimichurri. These sauces pair well with the grilled flavors. For the complete recipe steps and ingredients, check out the [Full Recipe] for Grilled Rainbow Vegetable Skewers. Grilled vegetable skewers are easy and fun to make. You learned about choosing the right veggies and perfect seasonings. We also covered grilling tips for great flavor and texture. Remember to add your favorite sauces for extra delight. Whether it's a summer cookout or a cozy dinner, these skewers can fit any meal. Enjoy experimenting with different vegetables and techniques. Your next grilling adventure awaits!](https://southerndishes.com/wp-content/uploads/2025/05/3b967ebd-9eff-43c5-8560-f017b9ec9d55.webp)
Grilled Vegetable Skewers Flavorful and Easy Recipe
Are you ready to elevate your summer grilling game? Grilled vegetable skewers are not just colorful; they burst with flavor! In this easy guide,…
My Latest Desserts
-
Salted Caramel Apple Pie Cheesecake Delight
Craving a dessert that’s both comforting and indulgent? Let me introduce you to my Salted Caramel Apple Pie Cheesecake Delight! Read Full Recipe -

Minute Reese’s Snack Mix Tasty Treat for Everyone
Craving a sweet and crunchy snack? I’ve got just the treat for you! The Minute Reese’s Snack Mix is quick, Read Full Recipe -

Amish Apple Fritter Bread Irresistible Homemade Treat
Craving a sweet treat that’s both heartwarming and delicious? This Amish Apple Fritter Bread is an easy, homemade delight that Read Full Recipe -

Mini Pumpkin Pies Simple Delightful Dessert Recipe
Are you craving a sweet treat that captures the essence of fall? Look no further! My mini pumpkin pies are Read Full Recipe -

Fruity Pebbles Yogurt Parfait Simple and Tasty Treat
Are you ready to whip up a fun and tasty treat? My Fruity Pebbles Yogurt Parfait is a colorful delight Read Full Recipe -

No-Bake Oreo Cheesecake Bars Delicious and Simple Treat
Looking for a simple and sweet dessert? You’ll love these No-Bake Oreo Cheesecake Bars! They are creamy, rich, and super Read Full Recipe -

Fluffy Japanese Soufflé Pancakes Simple and Soft Delight
Are you ready to flip your breakfast game? Fluffy Japanese soufflé pancakes are a soft, delightful treat that will impress Read Full Recipe -
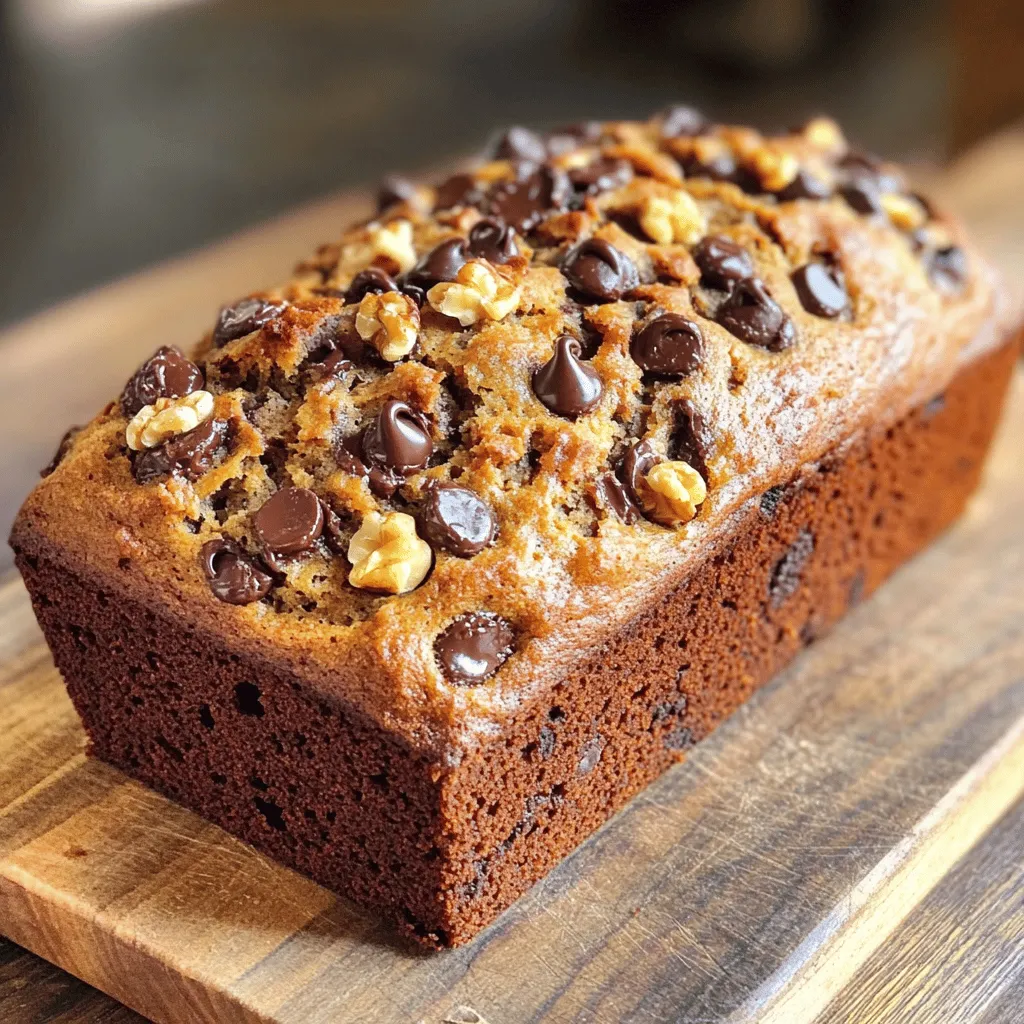
Chocolate Chip Banana Bread Rich and Flavorful Delight
Ready to indulge in a warm, gooey slice of Chocolate Chip Banana Bread? This rich and flavorful delight combines ripe Read Full Recipe -

No Bake Peanut Butter Chocolate Bars Simple Delight
Are you craving a sweet treat that’s both simple and delicious? Look no further! I’m excited to share my recipe Read Full Recipe -

Strawberry Cheesecake Icebox Cake Delightful Dessert
Craving a cool, creamy dessert that’s as easy to make as it is delicious? Look no further than this Strawberry Read Full Recipe
My Latest Recipes

hey,
i’m !
I’m so happy you’re here!
My kitchen is filled with stories, flavors, and love and I’m so happy to share them with you. Here’s to dishes that feel like home.


![To make these tasty hand pies, you need simple ingredients. Here is what you need: - 2 medium apples, peeled and diced - 1 tablespoon lemon juice - 1 tablespoon brown sugar - 1 teaspoon ground cinnamon - 1 tablespoon butter, melted - 1 package of refrigerated pie crusts (2 crusts) - 1 egg, beaten (for egg wash) - 1 tablespoon granulated sugar (for sprinkling) These ingredients blend well together. They create a sweet and tart filling that everyone loves. The type of apple you choose matters. I suggest using Granny Smith apples. They are tart and hold their shape well when cooked. Honeycrisp apples are also a great choice. Their sweet flavor makes the pies even yummier. You can mix different apples for a unique taste. If you want to jazz up your hand pies, try these options: - Nuts: Chopped walnuts or pecans add a nice crunch. - Raisins: These add a chewy sweetness. - Vanilla extract: Just a splash can enhance the flavor. - Nutmeg: A pinch gives a warm, spiced taste. Feel free to experiment with these extras. Each addition makes the pies special, and you can find your perfect mix. For the full recipe, check out [Full Recipe]. To make the filling, start by peeling and dicing two medium apples. I love using Granny Smith apples for their tart flavor. Place the diced apples in a medium bowl. Add one tablespoon of lemon juice, one tablespoon of brown sugar, and one teaspoon of ground cinnamon. Pour in one tablespoon of melted butter. Mix all the ingredients well. Let it sit for about ten minutes. This step helps the apples soften and soak in the flavors. Unroll a package of refrigerated pie crusts on a clean surface. Cut each crust into four equal circles using a large round cutter or the rim of a glass. Next, take half of the circles and place about one tablespoon of the apple mixture in the center. Be careful not to overfill them. Moisten the edges of the circles with a little water. Fold the dough over to create a half-moon shape. Use a fork to press the edges firmly and seal them well. Preheat your air fryer to 350°F (175°C) for five minutes. Brush the top of each hand pie with a beaten egg for a shiny finish. Sprinkle a little granulated sugar on top for extra sweetness. Place the hand pies in a single layer in the air fryer basket, making sure they aren't touching. Air fry them for ten to twelve minutes until they are golden brown and crisp. Depending on your air fryer size, you might need to cook in batches. Once cooked, let them cool slightly on a wire rack before enjoying your delicious air fryer apple hand pies. For the full recipe, check the details above. To get a great crust, keep your pie crust cold. Cold dough makes the crust flaky. When you roll out the dough, do it on a lightly floured surface. Don't use too much flour or it will change the texture. Press the edges well to seal. This keeps the filling inside while cooking. When brushing the egg wash, cover the crust but avoid the edges. This helps the crust turn golden brown. One mistake is overfilling the hand pies. If you add too much filling, they may burst open. Also, don't skip the egg wash. It gives the pies a nice shine and crunch. Make sure your air fryer is preheated. If it's not hot enough, the pies won't cook evenly. Lastly, let them cool for a few minutes before eating. They are very hot right out of the air fryer. Serve these hand pies warm for the best taste. They pair well with vanilla ice cream or whipped cream. For a fun twist, drizzle caramel sauce on top. You can also dust them with powdered sugar for a sweet touch. If you want to make them more special, try serving them with a side of warm apple cider or tea. These hand pies are not just a snack; they can be a delightful dessert too! For the complete recipe, check out the Full Recipe. {{image_2}} You can change the fruit in your hand pies. Try using pears, peaches, or cherries. These fruits work well with similar spices. Each fruit adds its own sweet touch. You can mix fruits too! A mix of apples and berries tastes great. Remember to adjust sugar based on the fruit's sweetness. Spices can make your hand pies special. Besides cinnamon, consider nutmeg or ginger for warmth. You can even add cardamom for a unique taste. Just a little spice can change the whole pie. Don’t be shy to experiment! A pinch can go a long way in flavor. You can make these hand pies gluten-free. Use gluten-free pie crusts found at stores. Many brands offer tasty options that work well. For a vegan version, swap the butter for coconut oil. You can also replace the egg wash with almond milk. These changes keep the pies delicious and friendly for all diets. Check the full recipe for tips on making these options work. Store leftover hand pies in an airtight container. Place parchment paper between layers to keep them from sticking. They will stay fresh for up to three days at room temperature. If you want to keep them longer, consider freezing. To reheat hand pies, use your air fryer for the best results. Preheat the air fryer to 350°F (175°C). Place the pies in the basket and heat for about 5 minutes. This method keeps the crust crispy and the filling warm. You can also use a microwave, but it may make the crust soggy. To freeze, wrap each hand pie in plastic wrap. Then, place them in a freezer bag or container. They can be frozen for up to three months. When ready to eat, you can cook them straight from the freezer. Just add a few extra minutes to the cooking time in your air fryer. For the full recipe, check out the steps above. Yes, you can make these hand pies ahead of time. Prepare the filling and assemble the pies. Cover them and store them in the fridge for up to 24 hours. This saves time when you want a quick snack. Just remember to brush them with egg wash before cooking. If you want to substitute for pie crust, try using phyllo dough or puff pastry. These options give a nice flaky texture. You can also use biscuit dough for a different taste. Just roll it out thinly and cut it into circles. Yes, you can use an oven! Preheat your oven to 375°F (190°C). Place the hand pies on a baking sheet lined with parchment paper. Bake for 15-20 minutes, or until golden brown. This method works well if you don’t have an air fryer. Check them often to avoid overcooking. Air fryer apple hand pies are a tasty treat. We covered essential ingredients, filling choices, and cooking steps. I shared tips for a perfect crust and showed you how to avoid common mistakes. You can explore different fruit fillings and even make gluten-free versions. Store leftovers properly to enjoy them later. Reheating tips keep them fresh and yummy. With these simple steps, you can impress anyone with your baking skills. Enjoy making these delightful pastries!](https://southerndishes.com/wp-content/uploads/2025/07/ca614fd6-c24d-4b10-a427-0f72ef3d9d37-300x300.webp)
![For the perfect sweet and spicy chicken wings, you need: - 2 lbs chicken wings - 1/4 cup honey - 1/4 cup sriracha sauce - 2 tablespoons soy sauce - 1 tablespoon rice vinegar - 2 cloves garlic, minced - 1 teaspoon ginger, grated - 1 teaspoon smoked paprika - Salt and pepper to taste These ingredients create a delicious marinade that makes the wings flavorful and juicy. The honey adds sweetness while the sriracha brings the heat. To take your wings to the next level, consider these toppings: - 2 tablespoons sesame seeds - 2 green onions, sliced Sesame seeds give a nice crunch, and green onions add freshness. You can also mix and match toppings based on what you like. For full details on how to make these wings, check the Full Recipe. Preheating the Oven First, preheat your oven to 400°F (200°C). This temperature helps the wings cook evenly. Line a baking sheet with foil. This makes cleanup easier. Place a wire rack on top of the baking sheet. This allows hot air to circulate around the wings, making them crispy. Mixing the Marinade Next, grab a large bowl. Combine the following ingredients: - 1/4 cup honey - 1/4 cup sriracha sauce - 2 tablespoons soy sauce - 1 tablespoon rice vinegar - 2 cloves garlic, minced - 1 teaspoon ginger, grated - 1 teaspoon smoked paprika - Salt and pepper to taste Mix well until smooth. This marinade gives the wings their sweet and spicy flavor. Add the chicken wings to the bowl. Make sure they are coated evenly. Let them marinate for at least 30 minutes. For best flavor, marinate for up to 2 hours in the fridge. Basting and Baking Place the marinated wings on the wire rack. Space them out evenly for proper cooking. Reserve any leftover marinade for basting. Bake the wings in the preheated oven for 25 minutes. After 25 minutes, take them out and baste with the reserved marinade. This adds more flavor and moisture. Crispiness Adjustment Return the wings to the oven for an extra 10-15 minutes. Watch them closely. You want them golden brown and crispy. For added crispiness, switch the oven to broil. Broil the wings for 2-3 minutes. Keep an eye on them to prevent burning. Once done, your sweet and spicy chicken wings are ready! You can sprinkle sesame seeds and sliced green onions on top before serving from the [Full Recipe]. - Marination Time Recommendations I recommend marinating the wings for at least 30 minutes. If time allows, marinate them for up to 2 hours. This helps the flavors soak in deeply. The longer they marinate, the better they taste. - Adjusting Sweetness and Spice Levels You can easily tweak the sweetness and spice. Add more honey for extra sweetness. To make it spicier, increase the sriracha sauce. Taste your marinade before using it to find your perfect balance. - Baking vs. Deep Frying Baking chicken wings is a healthier option than deep frying. It uses less oil and allows for more even cooking. Baking at 400°F gives you crispy skin without the mess of frying. - Broiling for Extra Crisp For those extra crispy wings, broil them for a few minutes at the end. Keep a close eye on them to avoid burning. Broiling can take your wings from good to great with just a bit of time. Enjoy these tips as you prepare your sweet and spicy chicken wings! For the full recipe, check out the recipe section above. {{image_2}} Alternative Sauces You can switch up the sauces in this recipe. Instead of sriracha, try barbecue sauce or buffalo sauce. Both add their own unique flavors. For a sweet touch, use teriyaki sauce. It pairs well with honey. You can also mix sauces to create your own blend. Experiment with different flavors to find your favorite. Heat Level Adjustments If you want less heat, reduce the sriracha. You can add more honey to balance it out. If you like it hotter, add more sriracha or some cayenne pepper. Just a pinch goes a long way. Always taste as you go to get it just right. Pairings with Sides Sweet and spicy chicken wings go well with many sides. Try serving them with celery and carrot sticks for crunch. A fresh salad can also balance the flavors. For a heartier option, pair them with rice or potato wedges. Consider adding coleslaw for a refreshing crunch. Dipping Sauce Ideas Dipping sauces can enhance the wings even more. Ranch or blue cheese dressing are popular choices. You can also use a creamy garlic sauce for a twist. For extra spice, serve with a hot sauce on the side. Having different dips lets everyone customize their meal. This recipe is versatile, making it fun to switch things up. You can find the full recipe to get started. To keep your sweet and spicy chicken wings fresh, use proper storage methods. First, let the wings cool down after cooking. Then, place them in an airtight container. This keeps moisture out and flavors in. You can also wrap them tightly in plastic wrap. This option works well if you don’t have a container. Aim to eat the wings within three to four days. This timeframe ensures they stay tasty and safe to eat. If you want to store them longer, consider freezing. When it’s time to enjoy leftovers, reheating is key. The best way to reheat wings is in the oven. Preheat your oven to 350°F (175°C). Place the wings on a baking sheet lined with foil for easy cleanup. Heat them for about 10 to 15 minutes. This keeps them warm and helps regain some crispiness. To maintain that crispy texture, avoid microwaving the wings. Microwaving makes them soggy. For extra crunch, finish them under the broiler for a few minutes. Watch them closely to avoid burning. Enjoy your wings just like the first time with these simple reheating tips. For the full recipe, check the earlier section. Can I use frozen chicken wings? Yes, you can use frozen wings. Just thaw them first. This helps them cook evenly. Pat them dry before marinating. This step makes the wings crispier. How to make wings crispy in the oven? To make wings crispy, place them on a wire rack. This allows air to flow around them. Bake at 400°F for 25 minutes, then baste. Broil for 2-3 minutes for extra crispiness. What is the best sauce for chicken wings? The best sauce is one that balances sweet and spicy flavors. The honey and sriracha mix in the Sweet and Spicy Chicken Wings is a great choice. It creates a rich, tasty glaze. How long to bake chicken wings at 400°F? Bake chicken wings for about 25 minutes. After that, baste with your sauce. Then bake for an additional 10-15 minutes. This ensures they are cooked through and golden brown. Are sweet and spicy chicken wings healthy? Sweet and spicy chicken wings can be part of a balanced diet. They have protein from chicken. However, watch the sauce for sugar and sodium levels. How many calories are in a serving of chicken wings? A serving of chicken wings has about 400-500 calories. This depends on the size and amount of sauce. You can check the Full Recipe for more details on nutritional info. You now have a clear guide to making delicious chicken wings. We covered essential ingredients, steps, and variations. Topping them with sesame seeds or green onions can enhance flavor. Adjust marination time for the best taste. Remember to store properly and use the right reheating techniques for crispiness. Whether you bake or fry, enjoy experimenting with flavors and techniques. Your perfect chicken wings await!](https://southerndishes.com/wp-content/uploads/2025/05/4dbb56e4-adae-4fc6-86da-57baae3d95f5-300x300.webp)
Lemon Garlic Roasted Asparagus Flavorful Side Dish
Looking to add a burst of flavor to your meals? Lemon Garlic Roasted Asparagus is the perfect side dish! With vibrant ingredients and simple…
![To make Lemon Garlic Roasted Asparagus, you need fresh and bright ingredients. Here’s what you'll need: - 1 pound fresh asparagus, trimmed - 3 tablespoons olive oil - 4 cloves garlic, minced - Zest of 1 lemon - Juice of 1 lemon These fresh ingredients bring a crisp taste to the dish. Make sure your asparagus is bright green and firm. This ensures you get the best flavor and texture. Seasonings add depth to your dish. For this recipe, you need: - 1 teaspoon sea salt - 1/2 teaspoon black pepper - 1/4 teaspoon red pepper flakes (optional) Sea salt enhances the natural taste of the asparagus. Black pepper gives it a nice kick, while red pepper flakes add a spicy touch. You can adjust the spice level based on your taste. Sometimes, a little extra flavor is just what you need. Consider these optional add-ins: - 2 tablespoons grated Parmesan cheese (optional) Parmesan cheese adds a creamy, savory layer to the dish. You can sprinkle it on during the last few minutes of roasting for a delightful finish. These add-ins can elevate your Lemon Garlic Roasted Asparagus to a whole new level. For the full recipe, check out the details above. Start with fresh asparagus. Choose firm, bright green stalks. Trim the tough ends. Aim for about an inch off the bottom. Rinse the asparagus under cold water. Pat it dry with a clean towel. This step helps the oil and flavors stick better. Grab a large mixing bowl. Add three tablespoons of olive oil. Next, mix in four minced garlic cloves. Zest one lemon and add that too. Squeeze in the juice of the same lemon. Then, toss in a teaspoon of sea salt, half a teaspoon of black pepper, and red pepper flakes if you want some heat. Stir everything well. Now, add the trimmed asparagus. Toss gently to coat all pieces evenly with the lemon garlic mixture. Preheat your oven to 425°F (220°C). Line a baking sheet with parchment paper. Spread the marinated asparagus in a single layer. Make sure none of the stalks overlap. This helps them roast evenly. Roast in the oven for 12-15 minutes. Turn them halfway through for a nice, even cook. The asparagus should be tender and slightly crispy. If you want, sprinkle grated Parmesan cheese over the top in the last two minutes. Remove from the oven and let it cool for a minute before serving. For the full recipe, check out the earlier section. Enjoy your tasty lemon garlic roasted asparagus! To get that perfect crunch, you need to roast your asparagus at a high heat. Set your oven to 425°F (220°C). This temperature helps to cook the asparagus fast while keeping it crisp. Spread the asparagus out evenly on the baking sheet. Avoid overcrowding; this lets the hot air circulate. Turn the asparagus halfway through cooking for even crispiness. One mistake is using old asparagus. Fresh asparagus should be firm and bright green. If it bends easily, it is past its prime. Another common error is not cutting the ends. Always trim the tough ends off before cooking. Lastly, don’t skip the lemon zest. It adds a bright flavor that makes a big difference. Adding fresh herbs can take your asparagus to the next level. Try adding thyme or rosemary for an earthy taste. You can sprinkle herbs on just before serving. This way, they stay fresh and flavorful. For a twist, consider fresh basil or parsley for a lighter touch. Mixing herbs can create unique flavor combinations. {{image_2}} You can switch up the asparagus with other veggies. Try broccoli, Brussels sprouts, or green beans. These veggies roast well and soak up the lemon garlic flavor. If you're feeling bold, add some cherry tomatoes. They burst with flavor when roasted. Boost your meal by adding protein. Grilled chicken or shrimp works great with this dish. For a vegetarian option, add chickpeas or white beans. You can also serve the asparagus over grains like quinoa or brown rice. This makes the dish heartier. Asparagus shines in spring, but you can enjoy this recipe all year. In summer, swap lemon for lime to give it a fresh twist. In fall, add some roasted squash for a warm flavor. In winter, pair it with roasted root vegetables for a cozy meal. For the full recipe, check out the Lemon Garlic Roasted Asparagus instructions above. After making Lemon Garlic Roasted Asparagus, let it cool to room temperature. Place it in an airtight container. Store it in the fridge. It stays fresh for up to 3 days. This way, you can enjoy it later without losing flavor. Always check for any signs of spoilage before eating. To reheat your leftovers, use an oven or a skillet. Preheat the oven to 350°F (175°C). Spread the asparagus on a baking sheet. Heat for about 10 minutes or until warm. If using a skillet, add a splash of oil. Cook over medium heat for 5 minutes. This keeps the asparagus crispy and tasty. You can freeze asparagus, but it's best to blanch it first. Boil water in a pot. Add the asparagus for 2-3 minutes. Then, plunge it into ice water. This stops the cooking. Drain and dry the asparagus, then place it in a freezer bag. Remove as much air as possible. Frozen asparagus keeps well for up to 6 months. When you're ready to use it, just thaw and roast it for a quick side dish! For the full recipe, check the section above. When choosing fresh asparagus, look for firm, bright green stalks. The tips should be tightly closed and not mushy. Avoid any yellow or wilted stalks. Hold the bunch and feel the weight; it should feel heavy and fresh. If you can, smell the asparagus. It should have a clean, earthy scent. Fresh asparagus tastes best and gives the best texture in your dish. Yes, you can use frozen asparagus, but it may change the texture. Frozen asparagus tends to be softer after cooking. This dish works best with fresh asparagus for a crisp bite. If using frozen, thaw it first and pat it dry to remove excess moisture. Adjust the cooking time, as frozen asparagus may need less time in the oven. Asparagus is fully cooked when it is tender yet still slightly crisp. You can check by piercing it with a fork. It should go in easily but not fall apart. The color will change to a bright green. If you prefer it softer, roast for a few extra minutes. For the best results, keep an eye on it while roasting. This ensures you get that perfect texture for your Lemon Garlic Roasted Asparagus. For the complete recipe, check out the [Full Recipe]. This blog post covered how to make delicious lemon garlic roasted asparagus. We explored fresh ingredients, seasonings, and optional add-ins. I shared step-by-step instructions for preparation, marinating, and roasting. You learned tips for crispiness and common mistakes to avoid. We also looked at flavor variations and how to store leftovers. With these insights, you can create a tasty side dish. Enjoy the flavor and health benefits of asparagus year-round. You can impress friends with your new skills in the kitchen.](https://southerndishes.com/wp-content/uploads/2025/05/6ab6965d-d0d9-469d-83a0-078784c602c6.webp)
