

Latest & Greatest

Copycat Chick-fil-A Nuggets Tasty Chicken Delight
Craving Chick-fil-A nuggets but can’t get to the drive-thru? You’re in luck! I’ve crafted a Copycat Chick-fil-A Nuggets recipe that
Read more…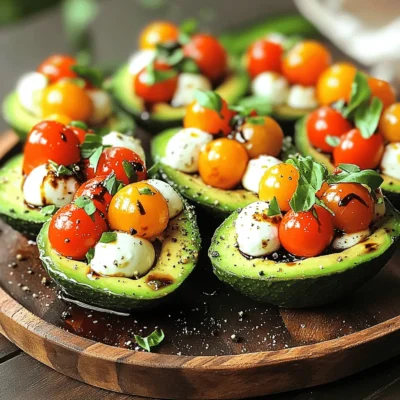
Caprese Stuffed Avocados Flavorful and Healthy Dish
Looking for a tasty and healthy dish? Let me introduce you to flavorful Caprese Stuffed Avocados! This simple recipe combines
Read more…
Air Fryer Parmesan Zucchini Fries Crispy and Quick
Looking for a tasty snack that’s both crispy and quick? Air Fryer Parmesan Zucchini Fries are your answer! I’ll guide
Read more…
Spicy Honey Garlic Shrimp Flavorful and Simple Dish
Are you ready to spice up your dinner routine with a dish that’s both simple and full of flavor? My
Read more…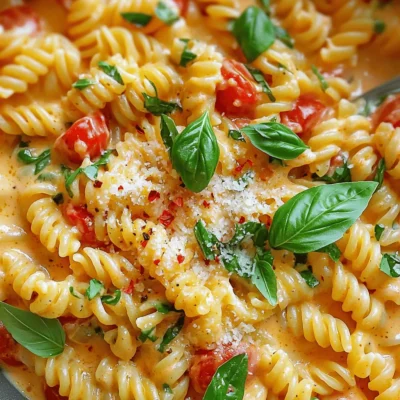
Creamy One Pot Tomato Basil Pasta Delight Recipe
Are you ready for a delicious and easy dinner? This Creamy One Pot Tomato Basil Pasta Delight is your answer!
Read more…
Greek Chicken Gyro Bowls Flavorful and Easy Recipe
Are you craving a fresh, flavorful meal that’s quick to whip up? Look no further than these Greek Chicken Gyro
Read more…
Everything Bagel Cucumber Bites Fresh and Light Snack
Looking for a fresh and light snack? Everything Bagel Cucumber Bites are your answer! These crunchy, flavorful bites are easy
Read more…
Vegan Chickpea Curry Flavorful and Easy Recipe
Looking for a quick, tasty meal that packs a punch? This Vegan Chickpea Curry is my go-to! It features creamy
Read more…browse recipes


![- 1 pound large shrimp - 4 tablespoons unsalted butter - 4 cloves garlic Large shrimp are the star of this dish. They cook fast and soak up all the flavors. I prefer using fresh shrimp when I can. Unsalted butter gives a rich taste and helps the garlic shine. Minced garlic adds depth and a warm aroma that fills your kitchen. - Zest of 1 lemon - 2 tablespoons fresh lemon juice - 1 teaspoon red pepper flakes (adjust to taste) - Salt and pepper to taste - 2 tablespoons fresh parsley, chopped Lemon zest adds a bright note. It wakes up the whole dish. Fresh lemon juice adds zing and balances the butter. Red pepper flakes give a nice kick. You can adjust the heat to your liking. Fresh parsley adds a pop of color and freshness. - 1 cup cherry tomatoes, halved - 1 cup baby spinach Cherry tomatoes bring a sweet burst. They soften and add color. Baby spinach wilts down and adds nutrition. This mix of veggies makes the dish vibrant and healthy. For the full recipe, check out [Full Recipe]. - Prep the shrimp: Start by patting the shrimp dry with paper towels. This helps them sear well. Next, season the shrimp with salt and pepper. Set them aside for later. - Melt the butter: In a large skillet, heat 2 tablespoons of butter over medium heat. Let it melt and get bubbly. This will add rich flavor to our dish. - Sauté garlic: Add minced garlic to the skillet. Cook it for about 1 minute. Keep an eye on it so it does not burn. You want it fragrant and golden. - Cook the shrimp: Turn the heat up to medium-high. Place the shrimp in the skillet in a single layer. Cook them for 2-3 minutes on one side. Watch for the shrimp to turn pink. Flip them over and cook for another 1-2 minutes until they are fully cooked. - Add tomatoes and spinach: Now, stir in the halved cherry tomatoes and baby spinach. Cook until the spinach wilts, which takes about 2 minutes. The bright colors add to the dish's appeal. - Flavor it up: Add the lemon zest, lemon juice, red pepper flakes, and the rest of the butter to the skillet. Stir well to combine all the flavors. Cook for another minute to let everything meld together. - Garnish and serve: Remove the skillet from heat. Sprinkle fresh parsley on top. Adjust the seasoning with salt and pepper to taste. Serve hot, right from the skillet, or plate it beautifully. For more details, check the Full Recipe. Enjoy this quick and tasty meal! To make your shrimp perfect, avoid overcooking. Shrimp cooks fast. When it turns pink and curls slightly, it's ready. If you cook it too long, it becomes tough. Best seasoning practices include using salt and pepper before cooking. This simple step boosts flavor. You can add red pepper flakes for a touch of heat. Adjust the amount based on your taste. Sautéing is key for great flavor. Start by melting butter in a hot skillet. This helps the garlic release its aroma. Add garlic and sauté for about a minute. Be careful not to let it burn. Heat management is important in skillet cooking. Start at medium heat to melt the butter. Then, increase to medium-high for the shrimp. This ensures they cook evenly and quickly. Pair your dish with crusty bread or rice. Both options soak up the delicious sauce. They add a nice texture to the meal. For presentation, serve the shrimp in the skillet for a rustic look. You can also plate each serving. Garnish with fresh parsley and lemon wedges. This adds color and freshness to your dish. For the full recipe, check out the details above. {{image_2}} You can easily swap shrimp for other proteins. Chicken works well here. Just cut it into small pieces. Tofu is a great option for a plant-based meal. Press it to remove excess water. This adds texture and absorbs flavors nicely. For veggies, you have many choices. Bell peppers add sweetness and color. Zucchini can bring a nice crunch. You can even use broccoli or asparagus for a different twist. Want to change the taste? Try adding fresh herbs like basil or cilantro. They give a fresh kick. You can also use dried herbs like oregano or thyme for added depth. Citrus lovers can explore other flavors too. Lime juice and zest can replace lemon. You could even try orange zest for a sweet twist. Each option will give your meal a new vibe. If you want a different cooking style, try oven-baking. Preheat your oven to 400°F. Spread the shrimp and veggies on a baking sheet. Drizzle with the lemon garlic butter and bake for about 10 minutes. Grilling shrimp adds a smoky flavor. Marinate the shrimp in the garlic butter first. Grill them on skewers for about 2-3 minutes per side. You’ll impress everyone at your next cookout. For more tips and a complete guide, check the Full Recipe. To keep your Lemon Garlic Butter Shrimp fresh, store it in an airtight container. This helps lock in flavors and moisture. Let the skillet cool before you pack it away. You can keep it in the fridge for up to three days. If you want to save it longer, freezing is a great option. For the best results, use glass containers. They are safe for reheating and do not absorb odors. If you use plastic, choose BPA-free options that are microwave-safe. When reheating, you want to keep the shrimp juicy and tasty. The stovetop is my go-to method. Heat a non-stick skillet over medium heat. Add a splash of water or a bit of butter to prevent sticking. Once warm, add your shrimp and heat for about 2-3 minutes. Stir gently to ensure even warming. You can also use a microwave. Place the shrimp in a microwave-safe dish. Cover it with a damp paper towel. Heat in short bursts of 30 seconds, checking in between. This method works, but it may not keep the same texture as the stovetop. If you have leftover shrimp, you can freeze them for later. Place the shrimp in a single layer on a baking sheet. Freeze until solid, then transfer to a freezer bag. Squeeze out as much air as you can. This helps prevent freezer burn. Frozen shrimp can last for up to three months. When you're ready to use frozen shrimp, thaw them in the fridge overnight. You can also run cold water over the sealed bag. Avoid thawing at room temperature, as it can lead to bacteria growth. After thawing, use the shrimp within one day for the best taste. To make this dish, follow these steps: 1. Prep the Shrimp: Pat the shrimp dry. Season with salt and pepper. 2. Melt the Butter: In a large skillet, melt 2 tablespoons of butter over medium heat. 3. Sauté Garlic: Add minced garlic and sauté for about 1 minute. 4. Cook the Shrimp: Raise the heat to medium-high. Add the shrimp and cook for 2-3 minutes on one side. Flip and cook 1-2 more minutes until pink. 5. Add Tomatoes and Spinach: Stir in cherry tomatoes and spinach. Cook until spinach wilts, about 2 minutes. 6. Flavor It Up: Add lemon zest, lemon juice, red pepper flakes, and the remaining butter. Stir and cook for another minute. 7. Garnish and Serve: Remove from heat, add parsley, and adjust seasoning as needed. This dish pairs well with: - Crusty bread for dipping. - Rice to soak up the sauce. - Pasta for a hearty meal. - A fresh salad for a light side. Yes, you can use frozen shrimp. Here are some tips: - Thawing: Thaw shrimp in the fridge overnight or under cold water for quick results. - Cooking: Cook them a bit longer to ensure they heat through. - Freshness: Fresh shrimp may taste better, but frozen works fine. Yes, this recipe is great for meal prep. Here are some storage tips: - Storing: Store in airtight containers in the fridge for up to 3 days. - Reheating: Reheat in the microwave or on the stove over low heat. Add a splash of water to keep it moist. - Freezing: You can freeze leftovers, but the texture may change when thawed. For the complete recipe, check the [Full Recipe]. This blog post detailed how to make a delicious Lemon Garlic Butter Shrimp Skillet. We covered the main ingredients like shrimp, butter, and garlic. You learned about cooking steps, tips for perfect shrimp, and fun variations. Serving ideas and storage tips helped wrap up your cooking journey. Incorporating these steps will enhance your cooking skills. Enjoy trying new flavors and techniques. Happy cooking!](https://southerndishes.com/wp-content/uploads/2025/07/3451ea3b-6e1f-4d53-b1a8-9729c245a3ee.webp)
Lemon Garlic Butter Shrimp Skillet Quick and Tasty Meal
If you’re craving a quick and tasty meal, look no further! This Lemon Garlic Butter Shrimp Skillet comes together in just minutes and bursts…
My Latest Desserts
My Latest Recipes

hey,
i’m !
I’m so happy you’re here!
My kitchen is filled with stories, flavors, and love and I’m so happy to share them with you. Here’s to dishes that feel like home.


![To create a delightful Fruity Pebbles Yogurt Parfait, gather these simple ingredients: - 2 cups Greek yogurt (plain or vanilla) - 1 cup Fruity Pebbles cereal - 1 cup mixed fresh berries (strawberries, blueberries, raspberries) - 2 tablespoons honey or maple syrup (optional for extra sweetness) - 1 teaspoon vanilla extract (optional) - Mint leaves for garnish These ingredients blend well together, making a tasty and colorful treat. The Greek yogurt adds creaminess and protein. Fruity Pebbles give that sweet, crunchy bite. Fresh berries add freshness and flavor. Using honey or maple syrup can make it even sweeter. Vanilla extract gives it a nice aroma. Finally, mint leaves add a touch of green and a refreshing taste. This recipe is quick and easy. You can enjoy it as breakfast or a snack. For the full recipe, check the earlier section. 1. First, get a mixing bowl. Combine the Greek yogurt with honey and vanilla. Stir until it is smooth. This yogurt mix is sweet and creamy. 2. Now, take serving glasses or bowls. Start with a layer of the sweetened yogurt at the bottom. This will be the base. 3. Next, add a layer of mixed fresh berries. Use strawberries, blueberries, and raspberries. Spread them evenly for color and flavor. 4. Then, add a layer of Fruity Pebbles cereal. Let those bright colors shine through. It makes the parfait look fun and tasty. 5. Repeat these layers until you fill the glass. Start with yogurt, then berries, and finish with Fruity Pebbles on top. 6. For the final touch, garnish each parfait with a mint leaf. This adds a fresh look. 7. Serve your parfait right away. You can also chill it for up to 30 minutes. This lets the flavors blend nicely. Follow these steps, and you will have a colorful and tasty treat. Check out the Full Recipe for more details. Choosing the right yogurt is key. I love using Greek yogurt for its creamy texture and high protein. Plain yogurt keeps it simple, while vanilla adds a sweet note. You can also try flavored yogurts, but keep in mind that they might change the taste of your parfait. Layering techniques matter a lot. Start with yogurt at the bottom. Make sure to spread it evenly. Next, add your fresh berries. I like to mix strawberries, blueberries, and raspberries. This adds both color and flavor. Then, sprinkle a layer of Fruity Pebbles cereal. Make sure they are visible. This creates a fun and vibrant look. Repeat the layers until you fill the glass. End with yogurt and a sprinkle of Fruity Pebbles on top. Timing is crucial for optimal freshness. Serve the parfait right after you make it. This keeps the Fruity Pebbles crunchy. If you need to chill it, do so for no more than 30 minutes. This allows the flavors to meld without making the cereal soggy. Enjoy your beautiful and tasty treat! For the complete recipe, check the [Full Recipe]. {{image_2}} You can easily switch things up with your Fruity Pebbles yogurt parfait. Here are some fun ideas: - Different fruit combinations: You can mix and match fruits. Try bananas, peaches, or even kiwi. Fresh fruits add great taste and color. Each fruit brings its own flavor. This keeps your parfait exciting every time you make it. - Using flavored yogurt: Instead of plain or vanilla yogurt, use strawberry or blueberry yogurt. Flavored yogurt adds another layer of taste. It makes your parfait even sweeter and more fun. If you love a specific flavor, go for it! - Making it dairy-free: If you want a dairy-free option, use almond or coconut yogurt. These alternatives are creamy and delicious. They work well with the Fruity Pebbles and fruits. You won’t miss the dairy at all. These variations let you create a parfait that fits your taste and needs. You can find the Full Recipe for a tasty guide to building your parfait base! - Storing leftovers: If you have extra parfaits, cover them tightly with plastic wrap. This keeps the parfait fresh. Store them in the fridge for up to two days. - Best practices for chilling: Chill the parfaits for at least 30 minutes before serving. This helps the flavors mix well. If you want to store them longer, keep the layers separate. Add the Fruity Pebbles just before serving to keep them crunchy. - Tips for maintaining freshness: Keep berries dry before you layer them. Wet fruit can make the yogurt watery. Use fresh berries to ensure the best taste. If you use honey or syrup, it can help keep flavors strong. For the complete guide on making this delicious treat, check out the Full Recipe. How long can you store a yogurt parfait? You can store a yogurt parfait for up to two days in the fridge. When you store it, keep it covered to maintain freshness. The yogurt and berries last well, but the Fruity Pebbles may get soggy. Can I make the parfait ahead of time? Yes, you can make the parfait ahead of time. I recommend making it the night before. Just keep it in the fridge. If you want to keep the crunch, add the Fruity Pebbles right before serving. This keeps them crispy and fun. What can I substitute for Fruity Pebbles? If you want a change, try other cereals. Options like Rice Krispies or Corn Pops work well. You can also use granola for a crunchier texture. For a fruity twist, consider adding dried fruit or using a fruit-flavored cereal. You now have the tools to create a delicious yogurt parfait. You learned about the key ingredients like Greek yogurt and fresh berries. We covered easy steps to prepare and layer your parfait for a great look. Tips on choosing yogurt and optimal freshness make your treat even better. Don't forget the fun variations and proper storage to keep it fresh. Enjoy making these parfaits, and impress family and friends with your tasty skills!](https://southerndishes.com/wp-content/uploads/2025/07/a1956a54-d9a8-4179-8dd6-cbdeb19abd98-300x300.webp)
![- 1 cup frozen spinach, thawed and drained - 1 cup canned artichoke hearts, drained and chopped - 1 cup cream cheese, softened - ½ cup sour cream - ½ cup mayonnaise - 1 cup shredded mozzarella cheese - ½ cup grated Parmesan cheese - 2 cloves garlic, minced - 1 teaspoon garlic powder - Salt and pepper to taste - ½ teaspoon red pepper flakes (optional) For cream cheese, you can use Greek yogurt or cashew cream. These will give you a nice creamy texture. If you want to swap out sour cream, try using plain yogurt or silken tofu. Both options work well and keep it smooth. For a vegan dip, use vegan cream cheese and yogurt. You can easily make this dip fit your needs! I love using these substitutions to keep my dip tasty for everyone. You can still enjoy the rich flavors without missing out. Don't forget to check the [Full Recipe] for all the details! First, you need to preheat your oven to 375°F (190°C). This step is key for a nice bake. While the oven heats up, grab a baking dish. A 9-inch dish works best. Grease it lightly with oil or butter to prevent sticking. It helps the dip come out easily. In a large mixing bowl, combine the cream cheese, sour cream, and mayonnaise. Use a hand mixer or a spatula to mix until smooth and creamy. This is where the magic starts. Next, add the chopped artichoke hearts and the spinach. Make sure it’s well-drained to avoid a watery dip. Then, toss in the minced garlic, shredded mozzarella, and grated Parmesan. These cheeses add a rich flavor. Finally, season the mixture with garlic powder, salt, pepper, and red pepper flakes if you want some heat. Stir everything until well mixed. Now, it's time to transfer your mixture into the prepared baking dish. Spread it out evenly with a spatula. Place the dish in your oven and bake for 25 to 30 minutes. Watch for the top to turn golden brown and bubbly. This means your dip is ready. Once done, take it out of the oven and let it cool for a few minutes. This gives the dip time to set and makes it safer to eat. Enjoy your Easy Spinach Artichoke Dip with chips or veggies! For the complete instructions, check the Full Recipe. To make your spinach artichoke dip truly creamy, start with softened cream cheese. This helps mix easily and gives a smooth texture. Use a hand mixer or a sturdy spoon to blend your ingredients well. When measuring, be precise. Too much or too little can change the dip's taste. Use dry measuring cups for solids and liquid measuring cups for liquids to ensure accuracy. This dip shines when served warm. Pair it with tortilla chips, sliced baguette, or fresh veggies. Arrange the chips around the dip for a nice look. You can also serve it in a bread bowl. This adds flair and gives your guests an extra treat. Want to boost the taste? Add spices like cumin or smoked paprika. Fresh herbs like parsley or basil can add brightness too. For some heat, sprinkle in red pepper flakes. Start with a little and taste as you go. This way, you control the spice level and keep your dip enjoyable for everyone. {{image_2}} You can add fun flavors to your spinach artichoke dip. One great option is to mix in a variety of cheeses. The creaminess from the mozzarella and the punch from Parmesan makes a perfect match. You might also want to try adding sun-dried tomatoes for a burst of tangy flavor. If you like a bit of spice, jalapeños can add some heat. Just chop them up and stir them in! If you need gluten-free options, most ingredients work well! Just make sure your mayonnaise and other products are labeled gluten-free. For those who want a dairy-free or vegan dip, you can swap cream cheese with cashew cream or a store-bought vegan cream cheese. Use plant-based sour cream and vegan cheese too. The flavors stay rich and tasty! You can serve this dip in many fun ways. For a cold dip, mix all the ingredients, chill it, and serve with chips. It’s fresh and bright! Another tasty idea is to use a bread bowl. Hollow out a loaf of bread, fill it with the dip, and bake it. The bread absorbs the flavors, making every bite special! After you enjoy this dip, store any leftovers in an airtight container. This keeps it fresh. You can put it in the fridge right away. It will last for about 3 to 5 days. Make sure it cools down before sealing it. If you plan to keep it longer, consider freezing it. When you're ready to eat the dip again, reheating is key. The best method is to use an oven or toaster oven. Preheat to 350°F (175°C). Place the dip in an oven-safe dish. Heat it for about 15 minutes, or until warm. This method keeps the dip creamy and tasty. You can also microwave it, but be careful. Heat it in short bursts, stirring in between. This helps keep the texture nice. Yes, you can freeze spinach artichoke dip! Just place it in a freezer-safe container. It can last for about 2 months in the freezer. When you want to eat it, thaw it overnight in the fridge. After thawing, reheat using the oven or microwave as mentioned before. This way, you maintain its great flavor and texture. For the best results, do not refreeze it after reheating. Enjoy your dip anytime! Yes, you can make this dip ahead of time. Here are some key points: - Prepare the dip and place it in a baking dish. - Cover it tightly with plastic wrap or foil. - Store it in the fridge for up to 24 hours. - When ready to bake, remove the cover and bake as directed. To check if your dip is done, look for these signs: - The top should be golden brown and bubbly. - You can also insert a fork in the center. - If it’s hot all the way through, it’s ready! Yes, fresh spinach is a great option! Here are some tips: - Use about 2 cups of fresh spinach for this recipe. - Rinse and chop the spinach before cooking. - Sauté it in a pan until wilted, then drain excess water. You can easily spice up your dip with these options: - Add more red pepper flakes to the mix. - Stir in some diced jalapeños for extra heat. - Consider using spicy cheeses or hot sauce for flavor. For the complete recipe, check out the Full Recipe link. This blog post covered ingredients, instructions, and tips for making Easy Spinach Artichoke Dip. You learned about what to use and how to mix and bake the dip. I shared ways to change up the recipe based on your taste and diet. Remember, this dip is fun and easy to make. Enjoy it with chips, veggies, or bread. Whether you are hosting a party or having a snack, this dip will impress everyone. Now, get cooking and share this tasty treat with friends!](https://southerndishes.com/wp-content/uploads/2025/05/d7e08ec6-a76f-44f5-a047-7638c80b6ef8-300x300.webp)
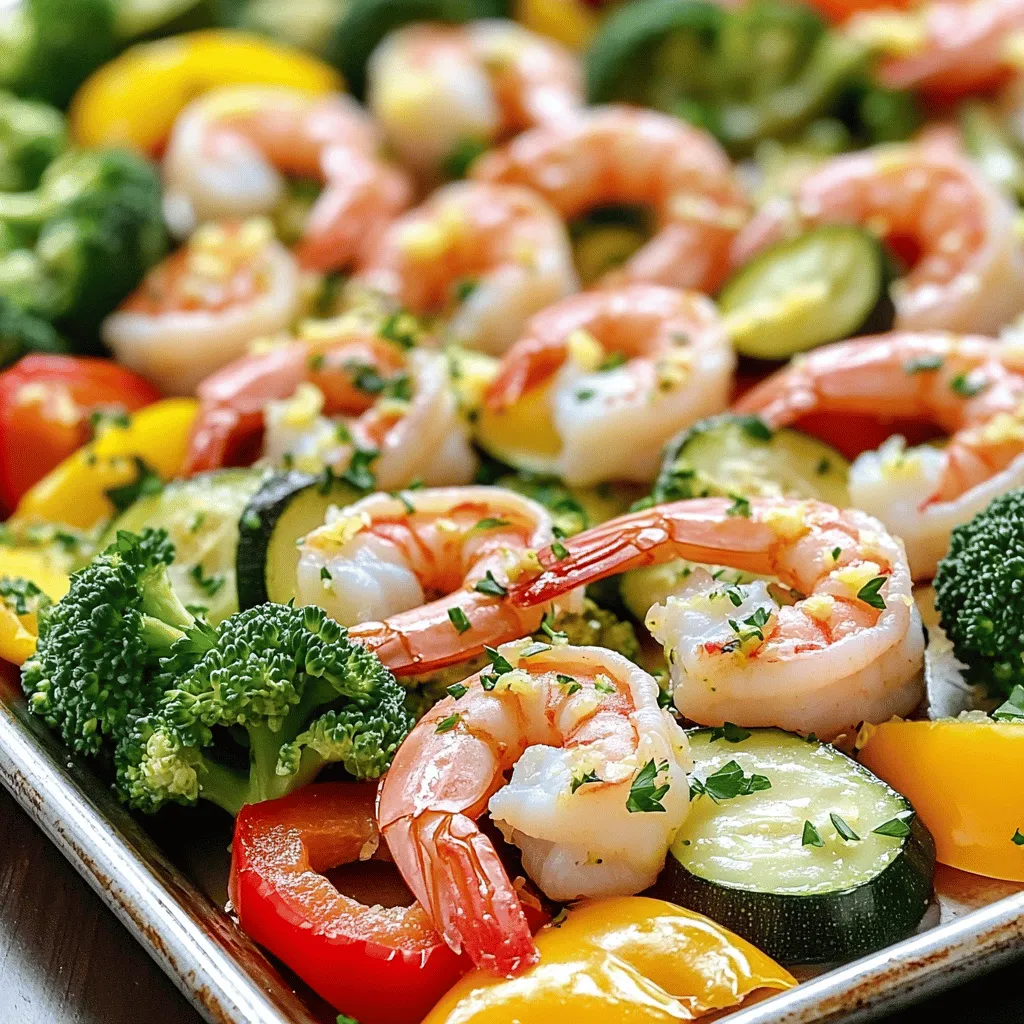
Lemon Garlic Shrimp Veggie Sheet Pan Simple Meal
Are you ready for a meal that’s quick, tasty, and healthy? My Lemon Garlic Shrimp Veggie Sheet Pan is just what you need! With…