

Latest & Greatest

Blueberry Streusel Coffee Cake Delightful Recipe Guide
Welcome to your new favorite recipe: Blueberry Streusel Coffee Cake! This easy guide shows you how to bake a moist,
Read more…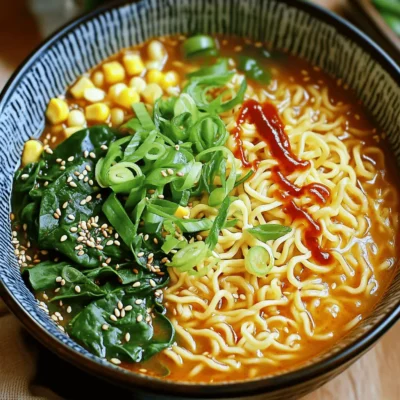
Minute Garlic Chili Ramen Quick and Flavorful Meal
Are you craving a quick, tasty meal that packs a punch? Look no further than Minute Garlic Chili Ramen! This
Read more…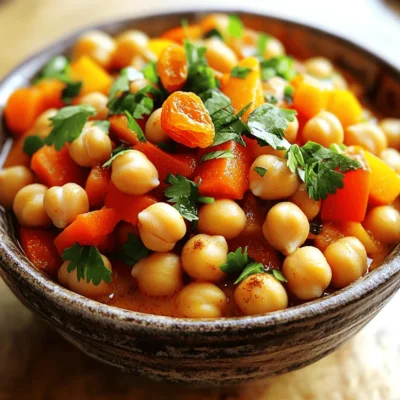
Slow Cooker Moroccan Chickpea Stew Flavor Boost
Looking for a hearty dish that packs a punch in flavor? Try my Slow Cooker Moroccan Chickpea Stew! With just
Read more…
Protein Cottage Cheese Chocolate Mousse Delightful Dish
Are you looking for a tasty treat that’s also good for you? Try my Protein Cottage Cheese Chocolate Mousse! This
Read more…
Savory Pumpkin Sage Cheese Scones Perfect for Fall
As the leaves turn and the air cools, there’s nothing better than warm, flaky scones. These Savory Pumpkin Sage Cheese
Read more…
Caramel Apple Toffee Dip Irresistible Fall Delight
Fall is the perfect time for cozy flavors, and what could be better than a Caramel Apple Toffee Dip? This
Read more…
Teriyaki Chicken Pineapple Sheet Pan Quick and Tasty
Are you ready to impress friends and family with a quick and tasty dinner? This Teriyaki Chicken Pineapple Sheet Pan
Read more…
Pumpkin Streusel Coffee Cake Delightful and Simple Recipe
Welcome to the cozy world of pumpkin delights! This Pumpkin Streusel Coffee Cake is not just a treat; it’s an
Read more…browse recipes


Baked Parmesan Zucchini Fries Crispy and Flavorful Snack
Are you ready to turn zucchini into a crispy, tasty snack? Baked Parmesan Zucchini Fries are your answer! These fries are not only simple…
My Latest Desserts
My Latest Recipes

hey,
i’m !
I’m so happy you’re here!
My kitchen is filled with stories, flavors, and love and I’m so happy to share them with you. Here’s to dishes that feel like home.
![- 200g ramen noodles - 1 can (400ml) coconut milk - 1 tablespoon red curry paste - 1 medium onion, sliced - 3 cloves garlic, minced - 1 tablespoon ginger, grated - 1 medium carrot, julienned - 1 red bell pepper, sliced - 1 cup baby spinach - Fresh cilantro - Sliced chili - Sesame seeds - Lime wedges Coconut curry ramen uses simple yet bold ingredients. You start with ramen noodles. They create a hearty base. Coconut milk adds creaminess and a tropical twist. Red curry paste brings heat and flavor. Next, you have the veggies. Onion, garlic, and ginger form a fragrant trio. They wake up your senses. Carrots and red bell peppers add color and crunch. Baby spinach offers a fresh touch and bright green hue. For optional toppings, fresh cilantro adds a burst of flavor. Sliced chili gives extra heat. Sesame seeds bring a nice crunch. Lime wedges finish the dish with a zing. This recipe blends flavors for a warm and tasty meal. You can find the full recipe at the beginning. Enjoy crafting your coconut curry ramen! To start, bring a pot of water to a boil. Add the ramen noodles and cook them for about 3 to 4 minutes. Make sure to check the package for exact times. Once cooked, drain the noodles and set them aside. This helps keep them firm and ready for your coconut curry. In a large pan, heat 1 tablespoon of olive oil over medium heat. Add 1 sliced onion and sauté until it turns translucent, which takes about 5 minutes. Next, stir in 3 minced garlic cloves and 1 tablespoon of grated ginger. Cook them for 1 to 2 minutes until they become fragrant. After that, mix in 1 tablespoon of red curry paste. Stir well for another minute. This step is crucial to developing rich flavors. Now, slowly pour in 1 can of coconut milk and 2 cups of vegetable broth. Stir until everything blends nicely. Toss in 1 cup of julienned carrots and 1 sliced red bell pepper. Bring the mix to a gentle simmer and cook for about 5 to 7 minutes. You want the veggies to be tender but still crisp. After that, add 1 cup of baby spinach, 1 teaspoon of soy sauce, and 1 tablespoon of lime juice. Cook for another minute until the spinach wilts. Finally, gently fold in the cooked ramen noodles. Make sure they are well coated in the delicious coconut curry broth. You can find the full recipe in the earlier section. To make your coconut curry ramen shine, you can adjust the spice levels. Start with one tablespoon of red curry paste. Taste it, then add more if you like it spicier. You can also add a pinch of chili flakes for extra heat. Adding acidity brightens the dish. Lime juice is perfect for this. A tablespoon adds a zesty kick. If you want more, squeeze in extra lime juice. This balances the creaminess of the coconut milk. The broth should be rich and smooth. If it feels too thin, you can thicken it. A cornstarch slurry works well for this. Mix one tablespoon of cornstarch with two tablespoons of water. Stir it into the broth and simmer until it thickens. You might need to adjust the broth with extra liquid. If it gets too thick, add more vegetable broth or water. This keeps the ramen from being dry. Garnishing makes your dish look inviting. Fresh cilantro adds color and flavor. Scatter it on top just before serving. Consider serving the ramen in deep bowls. This helps hold the broth and toppings. You can also add optional toppings. Sliced chili gives heat, while sesame seeds add crunch. Lime wedges on the side make it easy to add more zing. For the full recipe, check out the [Full Recipe]. {{image_2}} You can add protein to your Coconut Curry Ramen to make it heartier. Adding chicken is a great choice. Simply cook diced chicken in the pan before adding the curry paste. This will help infuse the chicken with flavor. If you prefer plant-based options, tofu works well too. Just cube the tofu and sauté it until golden. Shrimp or fish can also elevate your dish. For shrimp, add them after the vegetables. They cook quickly and add a nice touch. If you want to use fish, choose a firm type like salmon. Cook it gently to keep it flaky and tender. Coconut Curry Ramen can easily fit into vegan and gluten-free diets. To make it vegan, simply skip any animal proteins. Use tofu or just focus on the vibrant veggies. You can also swap out the soy sauce for a gluten-free alternative. Tamari is a good choice here. When it comes to noodles, traditional ramen includes wheat. You can use rice noodles instead. They work well with the coconut curry and keep the dish gluten-free. Always check the labels to ensure your noodles meet your dietary needs. Exploring different flavors is part of the fun with Coconut Curry Ramen. You can try various curry pastes to change the taste. Green curry paste offers a fresh and herbaceous note, while yellow curry paste is milder and sweeter. Switching up the vegetables adds new flavors too. Try adding bok choy, mushrooms, or even sweet potatoes. These vegetables not only provide great taste but also add color and nutrition. With these variations, you can make this dish your own. For the complete Coconut Curry Ramen experience, check out the Full Recipe. After you enjoy your Coconut Curry Ramen, store any leftovers in an airtight container. This keeps the dish fresh and prevents odors. It's best to eat the leftovers within three days. This way, you can enjoy the flavors without losing quality. When you want to warm up your ramen, use a pot on low heat. Stir gently to avoid breaking the noodles. You can also use the microwave, but cover the bowl to prevent splatters. Heat for a minute, then stir and check. Be careful not to overcook the noodles. Overcooked noodles turn mushy, and that ruins the dish. If you want to freeze your ramen, portion it into small containers. This makes it easy to thaw just what you need later. To thaw, place the container in the fridge overnight. When you're ready to enjoy it, reheat in a pot, adding a bit of broth if needed. This helps bring back the creamy texture of the sauce. Enjoy your meal again with that bold flavor! For the full recipe, check the recipe section. Coconut curry ramen is a warm, comforting bowl of noodles. It combines classic ramen with rich coconut milk and spicy red curry. The dish blends traditional Japanese ramen with Thai flavors. This fusion creates a unique taste that excites your palate. Making coconut curry ramen is quick and easy. The prep time is about 15 minutes. Cooking takes around 15 minutes, bringing the total to about 30 minutes. You can enjoy a delicious meal in no time. Yes, you can prepare coconut curry ramen ahead of time. Store the broth and noodles separately. This keeps the noodles from getting soggy. When you're ready to eat, just heat the broth and add the noodles. Enjoy the same great taste later! Coconut Curry Ramen is a simple yet flavorful dish. You learned about the main ingredients, steps to cook, and how to add your twist. Remember to experiment with proteins and spices to find your perfect flavor. Store leftovers well to enjoy this dish later. Making it ahead of time can save you effort on busy days. Now you have all the tools to create a delicious bowl. Enjoy your cooking adventure!](https://southerndishes.com/wp-content/uploads/2025/07/dbcbee01-aced-4e65-81e8-c26d334c6e0d-300x300.webp)


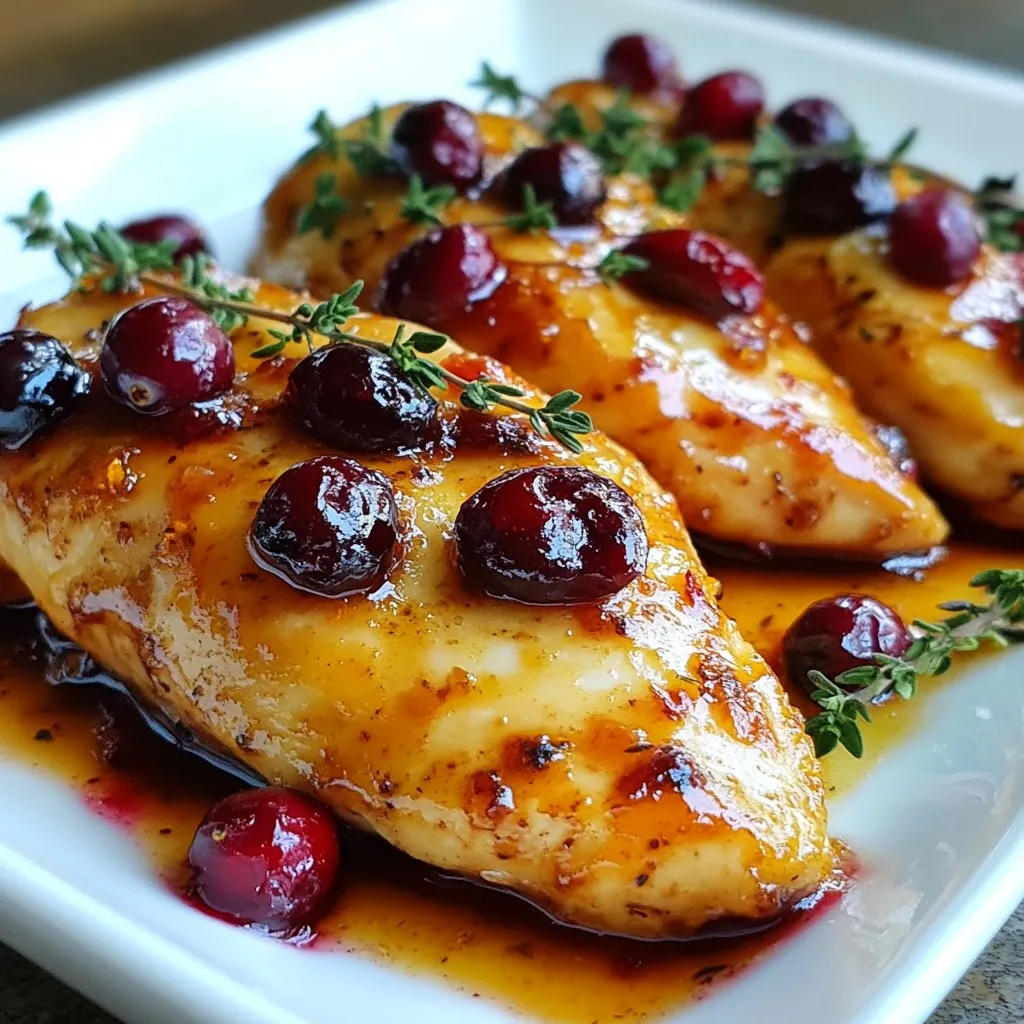
Cranberry Chicken Savory and Simple Weeknight Meal
Looking for a quick weeknight meal that’s bursting with flavor? Look no further! My Cranberry Chicken recipe blends savory and sweet in one delicious…