


Latest & Greatest

Beach Peach Lemonade Refreshing Summer Drink Recipe
Looking for the perfect summer drink to cool you down? Look no further than Beach Peach Lemonade! This refreshing beverage
Read more…
Strawberry Crunch Cheesecake Tacos Irresistible Delight
Looking for a fun and tasty twist on dessert? You’ve come to the right place! Strawberry Crunch Cheesecake Tacos are
Read more…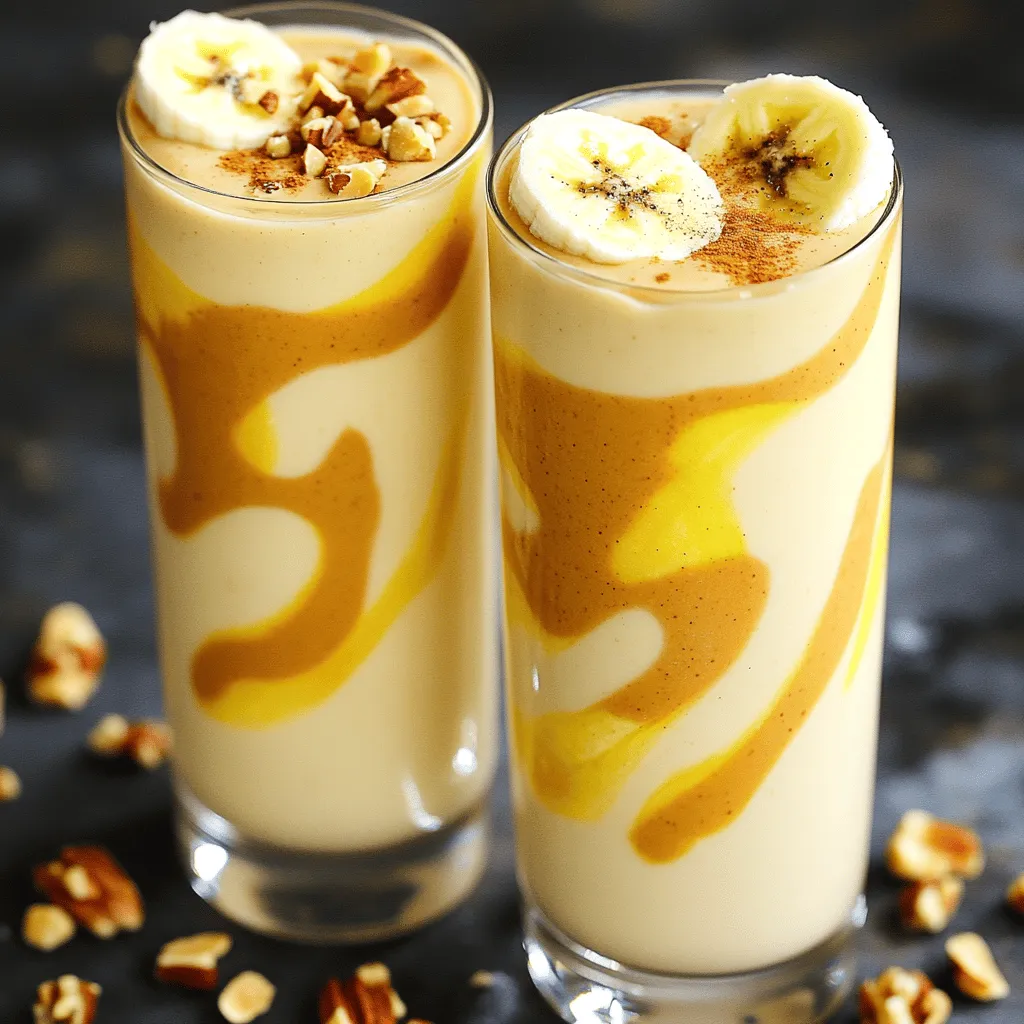
Peanut Butter Banana Smoothie Packed with Flavor
Looking for a quick, tasty treat? This Peanut Butter Banana Smoothie is packed with flavor and healthy goodness. You’ll love
Read more…
Chocolate Dipped Strawberries Simple and Delicious Treat
Chocolate dipped strawberries are a simple and tasty treat that everyone loves. No special skills are needed for this sweet
Read more…
Buffalo Cauliflower Bites Flavorful and Easy Snack
Looking for a tasty snack that’s both easy to make and packs a punch? Buffalo Cauliflower Bites are the perfect
Read more…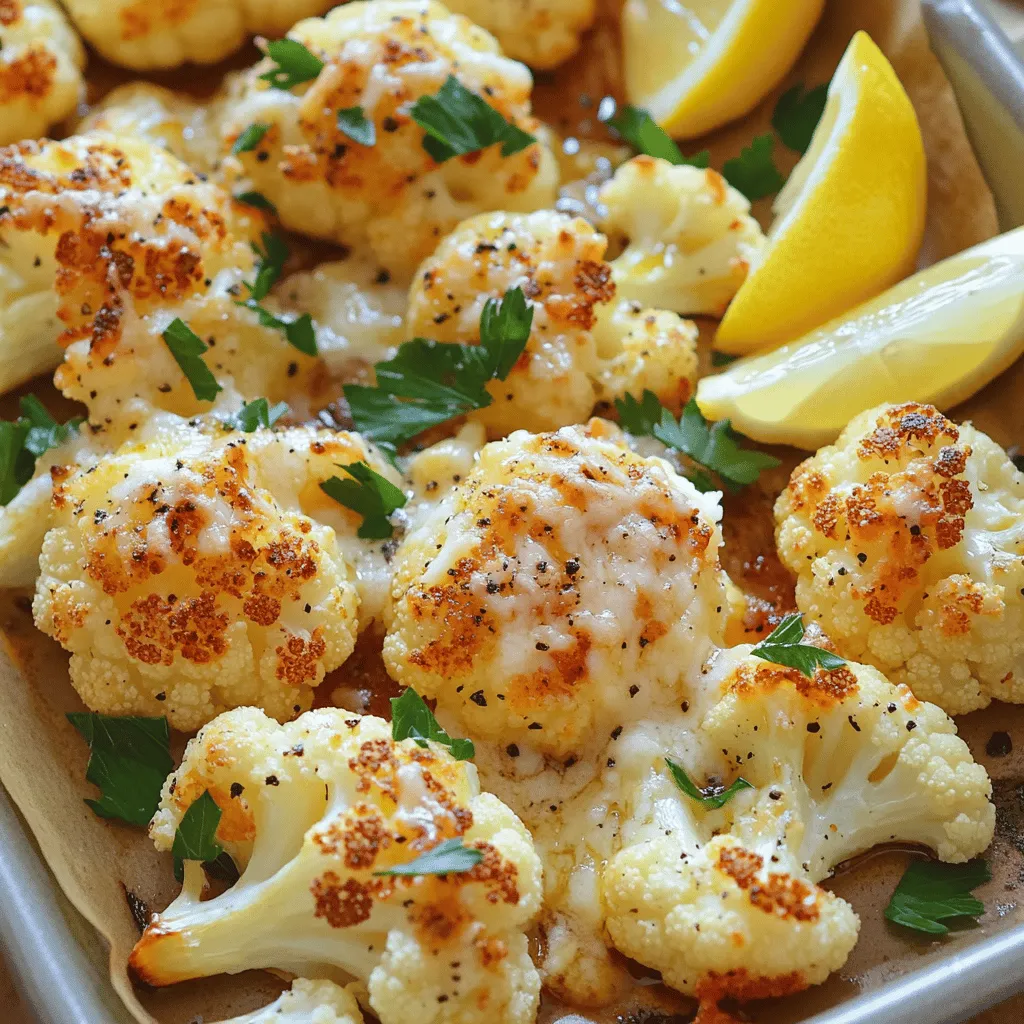
Garlic Parmesan Roasted Cauliflower Flavor Boost
Looking for a tasty way to enjoy vegetables? Try Garlic Parmesan Roasted Cauliflower! This dish turns humble cauliflower into a
Read more…
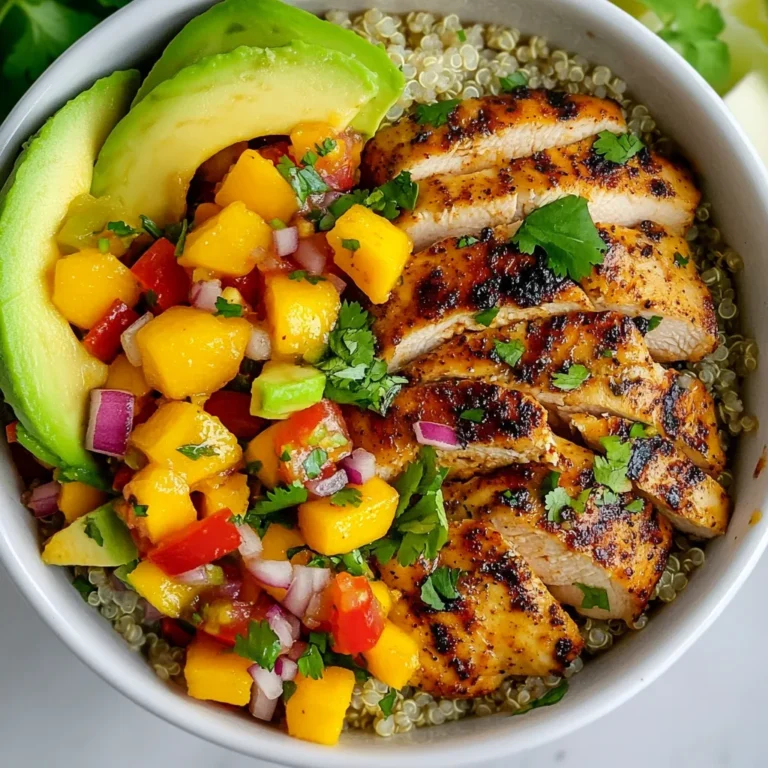
Spicy Tuna Poke Bowl Mouthwatering Flavor Explosion
Are you ready to dive into a burst of flavors with your next meal? My Spicy Tuna Poke Bowl is
Read more…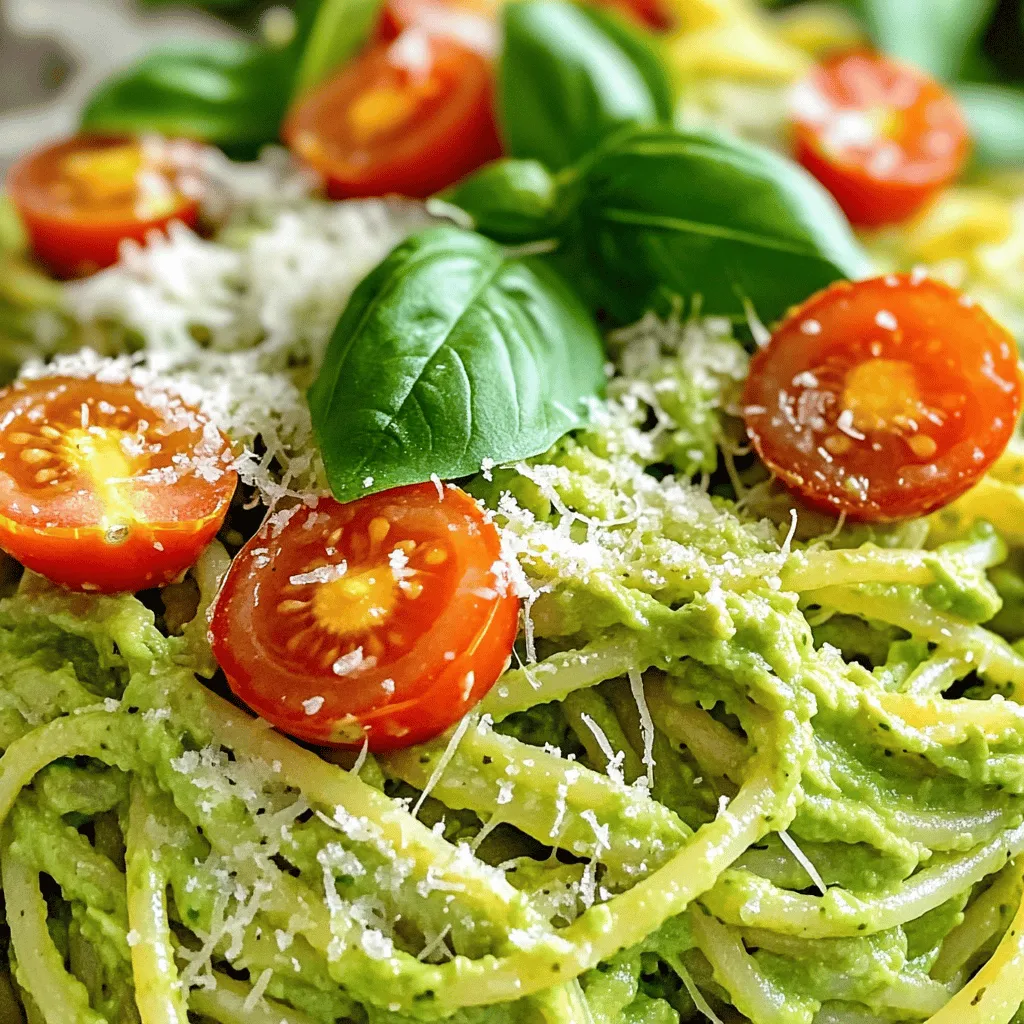
Creamy Avocado Pasta Easy and Flavorful Recipe
Looking for a quick, delicious meal? This creamy avocado pasta recipe is your answer! With vibrant flavors from fresh ingredients
Read more…browse recipes


Cheesy Scalloped Potatoes Creamy and Comforting Dish
If you’re craving a dish that’s creamy, cheesy, and downright comforting, look no further than Cheesy Scalloped Potatoes. This classic recipe takes simple ingredients…
My Latest Desserts
My Latest Recipes

hey,
i’m !
I’m so happy you’re here!
My kitchen is filled with stories, flavors, and love and I’m so happy to share them with you. Here’s to dishes that feel like home.
![To make Peanut Butter Banana Overnight Oats, you need these simple ingredients: - 1 cup rolled oats - 2 cups almond milk (or any milk of choice) - 2 ripe bananas, sliced - 1/2 cup creamy peanut butter - 2 tablespoons honey or maple syrup (optional) - 1 teaspoon vanilla extract - 1/2 teaspoon cinnamon - A pinch of salt - Chopped peanuts and banana slices for topping This mix creates a tasty, filling breakfast that keeps you energized. You can change the recipe to suit your taste. Here are some fun add-ins and variations: - Add chia seeds for more fiber. - Use Greek yogurt for extra protein. - Swap peanut butter with almond or cashew butter. - Mix in some chocolate chips for a sweet treat. - Try different fruits like berries or apples. These options let you enjoy your oats in new ways. Understanding the nutrition can help you make informed choices: - Rolled oats: High in fiber, they help with digestion and keep you full. - Almond milk: Low in calories and dairy-free, it's a great milk alternative. - Bananas: They add natural sweetness and provide potassium. - Peanut butter: Packed with protein and healthy fats, it boosts energy. - Honey or maple syrup: Adds sweetness but should be used in moderation. - Vanilla extract: Enhances flavor without extra calories. - Cinnamon: It may help regulate blood sugar levels. - Salt: Balances flavors and enhances taste. Each ingredient brings its own benefits, making this dish not only delicious but also healthy. For the complete recipe, you can check the [Full Recipe]. Making peanut butter banana overnight oats is simple. You only need ten minutes to prep. The oats soak overnight, so they are ready in the morning. This dish is great for busy days. 1. Start with a large mixing bowl. Add 1 cup of rolled oats and 2 cups of almond milk. 2. Next, add 1/2 cup of creamy peanut butter. If you want some sweetness, mix in 2 tablespoons of honey or maple syrup. 3. Pour in 1 teaspoon of vanilla extract and 1/2 teaspoon of cinnamon. Add a pinch of salt to boost the flavor. 4. Stir everything until it blends well. Make sure the peanut butter mixes in fully. 5. Now, fold in half of the sliced bananas. Save the rest for topping later. 6. Divide the mix evenly into two jars or airtight containers. Seal them tightly to keep them fresh. Place the jars in the fridge overnight. This allows the oats to soak and soften. In the morning, stir the oats before eating. Top with the remaining banana slices and some chopped peanuts for a nice crunch. You can enjoy them cold or heat them in the microwave for 30 seconds if you like them warm. For the full recipe, check out the complete guide. To make the best peanut butter banana overnight oats, use rolled oats. They soak up the liquid well and give the right texture. Always use ripe bananas for the sweetest flavor. If you want extra creaminess, use creamy peanut butter. You can even mix in yogurt for a protein boost. One mistake is not mixing well enough. Make sure the peanut butter blends in fully. If you leave clumps, the oats won't taste great. Another issue is not sealing the jars tightly. If air gets in, your oats may dry out. Finally, don’t forget to stir your oats before eating. This ensures even flavor and texture. These oats are perfect for meal prep. You can make a batch for the week. Just double the recipe and store in jars. Use mason jars for easy transport. They fit well in your bag and look nice, too. If you want variety, try different toppings each day. Chopped nuts, berries, or a sprinkle of chocolate can change things up. For the full recipe, check out the Peanut Butter Banana Bliss Overnight Oats section. {{image_2}} You can switch your oats for different types. Steel-cut oats give a chewy texture. Quick oats are softer and soak faster. Choose what you like best! For milk, use almond, cow, or oat milk. Each adds its own flavor. You can even try coconut milk for a tropical twist. Want to spice up your oats? Add a scoop of cocoa powder for chocolatey goodness. You can also mix in some chia seeds for extra fiber. If you like a hint of spice, try adding nutmeg or cardamom. These flavors blend well with banana and peanut butter. Toppings make your oats more fun! Try adding chopped nuts, like walnuts or pecans, for crunch. A sprinkle of granola adds a nice texture too. You can also drizzle some honey or maple syrup on top for sweetness. Fresh berries or shredded coconut bring a bright touch to your dish. For a full list of ingredients and their uses, check out the Full Recipe. To keep your Peanut Butter Banana Overnight Oats fresh, use airtight containers. Glass jars work great. Make sure to seal them tightly. This helps to keep air out and prevents spoiling. If you plan to make a batch, divide it into individual servings. This way, you can grab one easily when you need it. These oats can last in the fridge for about 3 to 5 days. After a few days, the bananas may brown and change texture. The oats will still taste good, but fresh slices on top will make them look better. If you notice a change in smell or texture, it's best to toss them. Always trust your senses! If you like your oats warm, you can heat them in the microwave. Take off the lid, then heat for 30 seconds. Stir them well, and check the temperature. If they need more heat, do it in 10-second bursts. Remember, you can also enjoy them cold straight from the fridge! Yes, you can use quick oats. Quick oats will cook faster. They absorb liquid more quickly than rolled oats. This means your oats might turn out creamier, but they may also lose some texture. If you like a softer oat, quick oats work well. If you want a chewier bite, stick with rolled oats. Soaking overnight is key for the best texture. It allows the oats to absorb the liquid fully. This makes them soft and creamy. If you skip soaking, your oats may be too chewy. However, if you’re in a hurry, you can soak them for just a few hours. Just remember, the longer they soak, the better they taste! You can add many tasty ingredients to make it your own. Here are some ideas: - Chia seeds: For extra fiber and nutrition. - Cocoa powder: For a chocolatey twist. - Greek yogurt: To boost protein and creaminess. - Different fruits: Try berries, apples, or mango for variety. - Nut butters: Swap peanut butter for almond or cashew butter. These options let you create different flavors each time. Feel free to experiment with what you love! For the full recipe, check out the detailed instructions above. Overnight oats are easy and fun to make. We covered key ingredients, step-by-step instructions, and smart tips. You can customize them with flavors and toppings to fit your taste. Remember to store them well for freshness. With these ideas, you can enjoy tasty oats any day. Experiment with your favorite ingredients and make them your own. Now, you have all the tools to make perfect overnight oats. Enjoy every bite!](https://southerndishes.com/wp-content/uploads/2025/04/8ed9226f-6661-4a9a-8415-94fdb197f358-300x300.webp)
![To make Buffalo Cauliflower Bites, you need some key ingredients. Here’s a quick list for you: - 1 large head of cauliflower, cut into bite-sized florets - 1 cup all-purpose flour (or gluten-free flour) - 1 cup unsweetened plant milk (like almond or oat milk) - 1 teaspoon garlic powder - 1 teaspoon onion powder - 1 teaspoon paprika - 1/2 teaspoon cayenne pepper (adjust for spice level) - Salt and pepper to taste - 1 cup buffalo sauce (store-bought or homemade) - 1 tablespoon olive oil - Fresh parsley for garnish (optional) These ingredients work together to create tasty bites. The cauliflower acts as the main star. The flour and plant milk form a light batter. The spices add flavor and a kick. You can also use optional ingredients to boost the flavor. Try adding: - A dash of smoked paprika for a deeper taste - A sprinkle of nutritional yeast for a cheesy flavor - Fresh herbs like thyme or oregano for an earthy touch These extras can enhance your Buffalo Cauliflower Bites. Experimenting with flavors keeps things fun and exciting. Here’s the nutritional breakdown per serving (about 4 bites): - Calories: 150 - Protein: 5 grams - Fat: 7 grams - Carbohydrates: 18 grams - Fiber: 3 grams Buffalo Cauliflower Bites are a healthier option compared to traditional buffalo wings. They pack flavor without the extra calories. They are also rich in nutrients, thanks to the cauliflower. Eating them makes you feel good about your choices. For the complete recipe, check out the Full Recipe section above! Start by washing the cauliflower. Make sure to remove any dirt or debris. Cut it into bite-sized florets. This size helps them cook evenly. Aim for pieces that are about one to two inches. Larger pieces may not cook through, while smaller ones may burn. Once cut, set them aside. In a large bowl, mix the flour and plant milk. You want a smooth batter, so whisk it well. Add garlic powder, onion powder, paprika, cayenne pepper, salt, and pepper. This mix adds great flavor. The batter should be thick enough to coat the florets, but not too thick. If it feels too thick, add a splash more milk. Preheat your oven to 450°F (232°C). Line a baking sheet with parchment paper for easy cleanup. Dip each cauliflower floret in the batter. Make sure each piece is fully coated. Place them in a single layer on the baking sheet. Bake for 20-25 minutes, flipping them halfway. They should look golden and crispy. While baking, mix the buffalo sauce and olive oil in a small bowl. This combo helps balance the heat. After the initial bake, drizzle this sauce over the florets. Toss gently to coat them evenly. Return to the oven for another 10-15 minutes. You want the sauce to caramelize slightly. Once done, let the bites cool for a couple of minutes. Garnish with fresh parsley if you want. Now, your buffalo cauliflower bites are ready to enjoy. For more detailed instructions, check the Full Recipe. To get that perfect crispiness, you need to follow a few steps. First, preheat your oven to 450°F (232°C). This high heat helps the batter turn golden and crispy. Next, make sure to coat each cauliflower floret well in the batter. A good coat keeps moisture in and helps the outside crisp up. When you bake them, place the florets in a single layer on your baking sheet. Crowding them can trap steam, which makes them soggy. Flip them halfway through baking to ensure even crispness on both sides. For extra crunch, try adding a bit of cornstarch to the batter. Buffalo sauce brings the heat. If you want a milder flavor, reduce the cayenne pepper in the batter. You can also use less buffalo sauce when coating. Start with half the amount and taste before adding more. For those who love heat, try adding more cayenne or use a hotter sauce. Mixing different hot sauces can create unique flavors. Just remember to taste as you go along! Here are some tools that can help you make the best Buffalo Cauliflower Bites: - Baking Sheet: A sturdy baking sheet helps with even cooking. - Parchment Paper: This keeps the bites from sticking and makes cleanup easy. - Mixing Bowls: Use one for the batter and another for tossing the florets. - Whisk: A whisk helps you mix the batter smoothly. - Tongs: Tongs make it easy to flip the florets without breaking them. These tools will make your cooking experience smoother and more enjoyable. For the full recipe, refer back to the main article. {{image_2}} You can easily make these bites vegan. Use plant milk and gluten-free flour. This keeps the recipe tasty and plant-based. The batter still stays rich and crispy. Just follow the same steps in the Full Recipe, and you’ll have a vegan treat everyone can enjoy. Buffalo sauce is classic, but feel free to experiment. Try barbecue sauce for a sweet twist. Hot honey can add a sweet heat. You might even love a garlic parmesan sauce. These options keep your meals fresh and exciting. Just coat the baked cauliflower in any sauce you prefer. To make these bites gluten-free, swap regular flour for gluten-free flour. There are many options, like almond or chickpea flour. They work great and keep the texture crispy. The sauce remains the same, so no need to change that part. Enjoy your gluten-free Buffalo Cauliflower Bites without missing out! After you enjoy your Buffalo Cauliflower Bites, you may have some left. To keep them fresh, let them cool completely. Place them in an airtight container. Store in the fridge for up to three days. This helps keep their flavor and texture. When you’re ready to eat the leftovers, reheating is key. Preheat your oven to 350°F (175°C). Spread the cauliflower bites on a baking sheet. Heat them for about 10-15 minutes. This method keeps them crispy. You can also use an air fryer at 350°F (175°C) for 5-7 minutes. You can freeze Buffalo Cauliflower Bites for later enjoyment. First, let them cool completely. Arrange them in a single layer on a baking sheet. Freeze them for about an hour until solid. Then, transfer them to a freezer-safe bag. They can last up to three months in the freezer. When you’re ready to eat, bake them straight from the freezer. Just add a few extra minutes to the cooking time. Enjoy your crispy treat anytime! For the full recipe, check out the [Full Recipe]. Yes, you can prepare Buffalo Cauliflower Bites ahead of time. I recommend baking them first. After baking, let them cool. Then, store them in an airtight container in the fridge. You can make these bites a day in advance. When you're ready to eat, just reheat them in the oven. This keeps them crispy. Making homemade buffalo sauce is simple. You need just a few ingredients. Start with 1 cup of hot sauce. Add 1/2 cup of melted butter. Mix in 1 tablespoon of vinegar and a dash of garlic powder. Adjust the flavor to your liking. If you want less heat, use less hot sauce. This sauce gives a perfect kick to your bites! There are many great ways to serve Buffalo Cauliflower Bites. Here are some ideas: - Pair them with ranch or blue cheese dressing. - Serve with fresh veggies like celery and carrots. - Add them to a salad for extra flavor. - Use them as a topping for nachos. - Try them in a wrap with lettuce and sauce. These ideas will make your Buffalo Cauliflower Bites even more fun! For the complete recipe, check out the Full Recipe. In this article, I covered how to make Buffalo Cauliflower Bites. We explored key ingredients, preparation steps, and tips for crispiness. I also shared fun variations and helpful storage info. These bites are a tasty snack for any occasion. Enjoy them with friends, or as a healthy treat. Now you can whip up these flavorful bites with ease! Happy cooking!](https://southerndishes.com/wp-content/uploads/2025/05/ffad4a6d-2578-42b8-b11d-5f770d5d4008-300x300.webp)

Chopped Cheese Sliders Easy and Tasty Recipe Guide
Are you ready to make the ultimate comfort food? Chopped cheese sliders are quick, easy, and delicious. In this guide, I’ll show you how…