Latest & Greatest
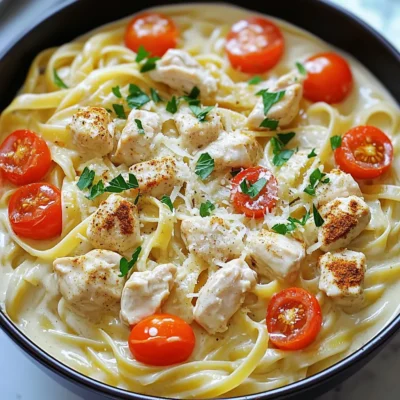
One-Pot Creamy Cajun Chicken Alfredo Delightful Meal
Craving a tasty meal that’s easy to make? Dive into my One-Pot Creamy Cajun Chicken Alfredo. This dish blends creamy
Read more…
Cinnamon Swirl Coffee Cake Muffins Delightful Recipe
Welcome to the world of delicious baking with my Cinnamon Swirl Coffee Cake Muffins! You’ll learn how to create warm,
Read more…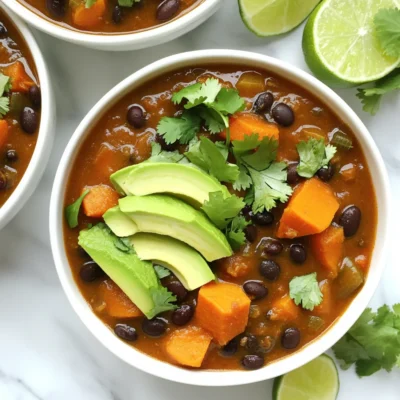
Slow Cooker Sweet Potato Black Bean Chili Recipe
If you’re craving a warm, filling dish, try my slow cooker sweet potato black bean chili! This recipe is easy,
Read more…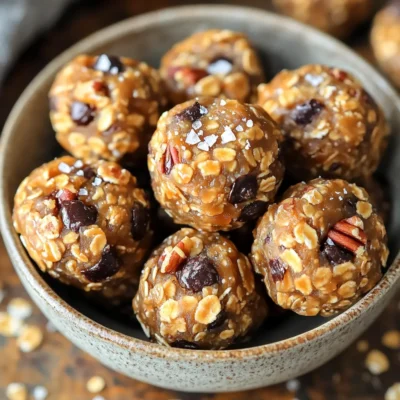
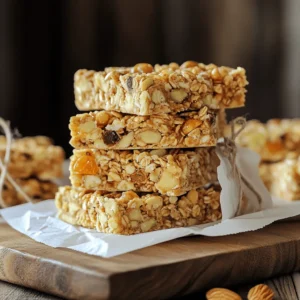
No Bake Salted Caramel Energy Bites Delightful Snack
Craving a tasty snack that fuels your day? Look no further than these No Bake Salted Caramel Energy Bites! Packed
Read more…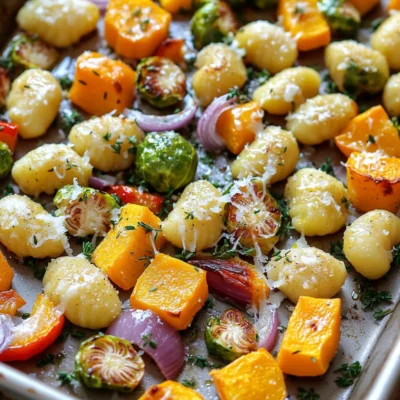
Sheet Pan Crispy Gnocchi Fall Veggies Delight
Get ready to delight your taste buds with my Sheet Pan Crispy Gnocchi Fall Veggies Delight! This easy recipe combines
Read more…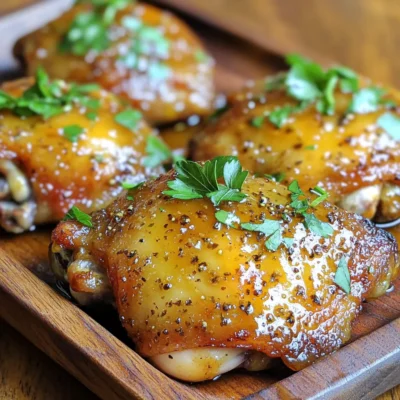
Apple Cider Glazed Chicken Thighs Flavorful Delight
Looking for a simple, tasty dish that impresses? Let me introduce you to Apple Cider Glazed Chicken Thighs! This recipe
Read more…
Pumpkin Oatmeal Chocolate Chip Cookies Delightful Treat
If you’re craving a treat that’s warm and cozy, I have just the thing for you! My Pumpkin Oatmeal Chocolate
Read more…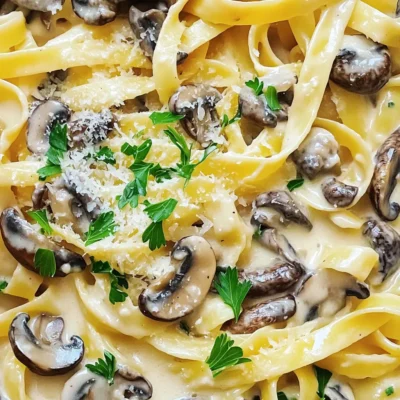
Creamy Mushroom Alfredo Fettuccine Delightfully Easy
If you crave a rich and creamy dish that’s quick and easy, you’re in the right place! My Creamy Mushroom
Read more…browse recipes


Low Carb Chicken Casserole Quick and Easy Meal
Looking for a tasty meal that won’t derail your low-carb diet? My Low Carb Chicken Casserole combines simple ingredients with easy steps to create…
My Latest Desserts
My Latest Recipes

hey,
i’m !
I’m so happy you’re here!
My kitchen is filled with stories, flavors, and love and I’m so happy to share them with you. Here’s to dishes that feel like home.
![For a tasty cauliflower rice stir-fry, gather these main ingredients: - 1 medium head of cauliflower, grated to make rice - 1 cup broccoli florets - 1 bell pepper, diced (either red or yellow for color) - 1 small carrot, julienned - 1 cup snap peas, trimmed - 2 cloves garlic, minced - 1 tablespoon ginger, minced These ingredients create a colorful and healthy base for your dish. Seasonings add depth and flavor. Use these: - 3 tablespoons soy sauce (or tamari for gluten-free) - 1 tablespoon sesame oil - 1 tablespoon olive oil - Salt and pepper to taste These choices will enhance the taste of your stir-fry. Garnishes make your dish look great. Try these: - 2 green onions, chopped - Sesame seeds for garnish These will add a nice crunch and a pop of color to your meal. For the complete recipe, check out the [Full Recipe]. To start, grab a medium head of cauliflower. Remove the leaves and stem. Cut the cauliflower into quarters. Use a grater or a food processor to turn it into rice-sized pieces. This is your base for the stir-fry. Set it aside while you prepare the other ingredients. Next, heat a large skillet or wok over medium-high heat. Add one tablespoon of olive oil. Once the oil is hot, toss in two cloves of minced garlic and one tablespoon of minced ginger. Cook them for about 30 seconds. You want them to be fragrant but not burnt. Now, add your veggies: one diced bell pepper, one small julienned carrot, one cup of broccoli florets, and one cup of trimmed snap peas. Stir-fry these for about 3 to 5 minutes. You want them tender but still crisp. It’s time to add the cauliflower rice to the skillet. Mix it thoroughly with the vegetables. Cook for an additional 4 to 5 minutes, stirring often. Then, drizzle in three tablespoons of soy sauce and one tablespoon of sesame oil. Toss everything to combine and cook for another 1 to 2 minutes. Before serving, taste your stir-fry. Add salt and pepper to your liking. Finally, mix in two chopped green onions. Transfer your stir-fry to a serving dish. A sprinkle of sesame seeds on top adds a nice touch. For the full recipe, check the earlier section. To make a great stir-fry, keep the heat high. This helps the veggies stay crisp. Cut all your ingredients small and even. This way, they cook at the same time. Start with garlic and ginger for flavor. Add them to the hot oil first. Then, add the veggies in stages. Put in the firmer ones like carrots and broccoli first. Add softer ones like bell peppers and snap peas later. This will keep everything tender but not mushy. You need a large skillet or a wok. A good wok heats fast and evenly. A sturdy spatula is key for tossing. If you have a grater or food processor, use it for the cauliflower. This makes the rice fast and easy. A sharp knife helps with cutting your veggies. Some folks like to use a lid to steam the veggies lightly. This can help keep them vibrant and fresh. Try adding spices to boost taste. A dash of red pepper flakes gives heat. You can add a splash of rice vinegar for tang. Want more umami? A bit of miso paste works wonders. Fresh herbs like cilantro or basil can brighten your dish. Lastly, don’t forget the sesame seeds! They add crunch and flavor. For a full recipe, check out the complete steps to make your stir-fry shine! {{image_2}} You can easily add protein to your stir-fry. Chicken works well here. Just cut it into small pieces and cook it before the vegetables. Tofu is another great choice. Use firm tofu, press it, and cut it into cubes. Cook the tofu until golden brown for added texture. Mix your chosen protein into the stir-fry during the last few minutes of cooking. This stir-fry is perfect for vegetarians and vegans. You can keep it plant-based by skipping any meat. Add chickpeas or edamame for extra protein. These options give you a good protein boost while keeping the dish vibrant and tasty. You can also include more veggies, like zucchini or spinach, to make it even heartier. Feel free to switch ingredients based on your taste. Instead of broccoli, try broccoli rabe or bok choy for a twist. Swap snap peas for green beans or asparagus if you like. You can also change the sauce. Use coconut aminos for a sweeter flavor or add a splash of lime juice for a zing. The choices are endless, so experiment and find your favorite mix! Check the Full Recipe for more ideas. Store leftover cauliflower rice stir-fry in an airtight container. Make sure it is cool before sealing. This helps keep the flavors fresh. Place it in the fridge if you plan to eat it within three days. To reheat, use a skillet over medium heat. Add a splash of water or oil to prevent sticking. Stir frequently for even heating. You can also use the microwave. Cover the dish and heat for 1-2 minutes. Stir halfway for best results. You can freeze cauliflower rice stir-fry for later. Pack it in a freezer-safe bag or container. Remove as much air as possible. It will last up to three months in the freezer. When you're ready to eat, thaw it overnight in the fridge before reheating. Check out the Full Recipe for more details. Cauliflower rice is made by grating cauliflower into small bits. It looks like rice but has fewer carbs. This makes it a great option for low-carb diets. It packs a lot of nutrients, too. You get vitamins C and K, plus fiber. Using cauliflower rice helps add more veggies to your meals. It cooks quickly and soaks up flavors well. Yes, you can prep cauliflower rice ahead of time. Grate the cauliflower and store it in an airtight container. Keep it in the fridge for up to four days. You can also freeze it for longer storage. Just make sure to spread it out on a baking sheet first. Once frozen, transfer it to a freezer bag. This way, you can use it whenever you want. Absolutely! This recipe is perfect for meal prep. You can cook a large batch and divide it into portions. Store the stir-fry in airtight containers in the fridge. It lasts up to four days. You can also freeze it for later. Just reheat it in a pan or microwave when you’re ready to eat. This makes a quick and healthy meal any day of the week. For the full recipe, check out the section above. Cauliflower rice stir-fry is easy and fun to make. We covered how to choose main ingredients, add flavors, and enjoy creative variations. Remember, cooking well means a great technique and the right tools. You can store leftovers or even freeze them for later. Experiment with proteins and veggies to suit your taste. This recipe can satisfy many dietary needs while being tasty. Embrace the world of cauliflower rice, and enjoy your cooking journey!](https://southerndishes.com/wp-content/uploads/2025/05/d2763455-9fff-4db4-8404-9caa1cc64a40-300x300.webp)


Air Fryer Lemon Pepper Wings Crispy and Flavorful Dish
Get ready to delight your taste buds with my Air Fryer Lemon Pepper Wings! This crispy and flavorful dish is perfect for game days…