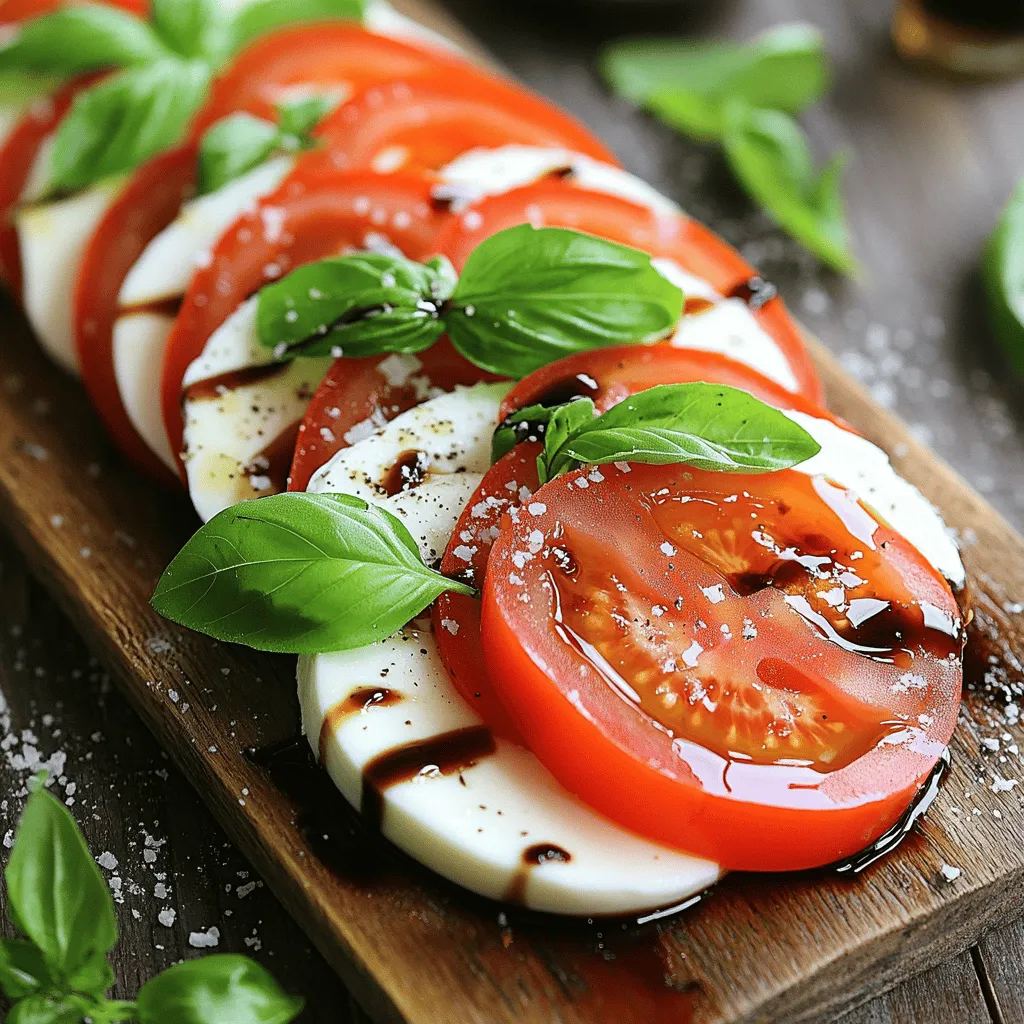
Fresh Caprese Salad Simple and Flavorful Dish
Are you craving a fresh, vibrant dish that bursts with flavor? Look no further than a classic Caprese salad! This
Are you craving a fresh, vibrant dish that bursts with flavor? Look no further than a classic Caprese salad! This
![- Cauliflower - Flour and Water - Spices Cauliflower is the star of this dish. You need one medium head, cut into bite-sized florets. The flour and water create a batter that coats the cauliflower. You'll use one cup of all-purpose flour and one cup of water. Spices add flavor and depth. I recommend one teaspoon each of garlic powder, onion powder, and smoked paprika. You will also need half a teaspoon of salt and a quarter teaspoon of black pepper. - Hot Sauce - Butter and Sweetener - Fresh Herbs For the sauce, hot sauce is a must. I love using one cup of Frank’s RedHot. It gives a great kick! To balance the heat, mix in two tablespoons of melted butter. If you want a touch of sweetness, add one tablespoon of honey or maple syrup. Fresh herbs, like parsley, can brighten up your dish. They make a lovely garnish. - Dipping Options - Accompaniments Buffalo cauliflower bites are great on their own, but dipping options make them even better. Serve them with ranch or blue cheese dressing. These cool dips pair well with the heat. You can also serve them alongside celery sticks or carrot sticks for crunch. They make a great snack for game days or parties. If you want, you can even serve them as part of a larger meal! Check the Full Recipe for more details. - Preheat your oven to 450°F (230°C). - Line a baking sheet with parchment paper. - In a large bowl, combine flour, water, garlic powder, onion powder, smoked paprika, salt, and black pepper. - Whisk until smooth to create a batter. - Dip each cauliflower floret into the batter. Make sure they get well coated. - Place the coated florets on the prepared baking sheet. - Bake the cauliflower for 20 minutes. Flip them halfway, so they brown evenly. - While they bake, mix the hot sauce, melted butter, and optional honey or maple syrup in a bowl. - Once the cauliflower bites are golden, take them out. Toss them in the buffalo sauce until they are coated. - Return the coated cauliflower to the baking sheet and bake for another 10 minutes. This helps the sauce set. - Let them cool slightly before serving. - If you want, garnish with fresh parsley and serve warm with ranch or blue cheese dressing on the side. For the full recipe, check out the detailed instructions. Enjoy your delicious buffalo cauliflower bites! To make your Buffalo Cauliflower Bites nice and crispy, start with the right oven settings. Preheat your oven to 450°F (230°C). This high heat helps to create a crunchy texture. Line your baking sheet with parchment paper. This prevents sticking and makes cleanup easier. Even coating is key. Dip each cauliflower floret fully into the batter. Make sure to shake off any excess batter. This ensures a light coat that crisps up nicely. You can adjust the spice level to suit your taste. If you like it hot, add more hot sauce to the batter. For a milder flavor, reduce the amount of hot sauce. You can also mix in some extra spices like cayenne pepper or chili powder for a kick. Adding crunch can take these bites to the next level. Try tossing in some breadcrumbs before the second bake. This adds a delightful crunch to each bite. Creative plating makes your dish pop. Arrange your Buffalo Cauliflower Bites on a colorful platter. Add some fresh herbs like parsley for a splash of color. You can also serve them in a small basket lined with parchment paper for a fun touch. Pairing your bites with dressings elevates the flavor. Classic ranch or blue cheese dressing works well. You can even make a homemade yogurt dip for a lighter option. Enjoy your tasty snack! For the full recipe, check out the details above. {{image_2}} Gluten-Free Options To make Buffalo Cauliflower Bites gluten-free, swap all-purpose flour for almond flour or a gluten-free flour mix. Both options coat the cauliflower well and still deliver that crunchy texture you want. Dairy-Free Alternatives If you want to keep this dish dairy-free, use a vegan butter in the sauce. For the sweetener, maple syrup works great instead of honey. This keeps the bites tasty and suitable for more diets. Spicy Versions If you like heat, add cayenne pepper to the batter or sauce. You can also use a spicy hot sauce like Sriracha. This will give your bites an extra kick and make them even more exciting. Different Sauce Combinations Try mixing different sauces for unique flavors. A teriyaki or barbecue sauce can give a sweet twist. You can also add garlic or ranch seasoning to the buffalo sauce for a fun twist. Adding Vegetables Want to add more nutrition? Toss in veggies like carrots or bell peppers with the cauliflower. They roast well and add color to your dish. This makes your snack not just tasty, but also healthy. Adding Proteins For a heartier option, add chickpeas or shredded chicken. This makes the dish more filling and turns it into a main course. Just adjust your baking time to ensure everything cooks evenly. For the full recipe of these tasty bites, check out the [Full Recipe]. To keep your buffalo cauliflower bites fresh, store them in the fridge. Place them in an airtight container to prevent moisture loss. They stay good for about 3 to 4 days. If you have more bites than you can eat, freezing is a great option. Just make sure they cool completely before freezing. Lay them flat in a single layer on a baking sheet. Once frozen, transfer them to a freezer-safe bag or container. They last for up to 3 months in the freezer. When it comes to reheating, the oven is your best friend. Preheat your oven to 350°F (175°C). Spread the bites on a baking sheet and heat them for about 10-15 minutes. This method keeps them crispy. If you’re in a hurry, you can use the microwave. However, this may make them soggy, so use it as a last resort. To avoid soggy bites, always reheat them in a single layer. For short-term storage, glass containers work well. They seal tightly and do not stain. If you’re planning to freeze, use heavy-duty freezer bags. Squeeze out as much air as you can before sealing. For both types of storage, ensure you label the containers with the date. This will help you keep track of freshness. To make Buffalo Cauliflower Bites spicy, you can adjust the hot sauce. Use more hot sauce in the batter or the buffalo sauce. You can also add chili powder or cayenne pepper to the batter for more heat. Taste as you go and find what works best for you. Adding these spices gives a nice kick and keeps it fun. Yes, you can make these bites vegan! Simply swap out the butter for a vegan butter alternative. Instead of honey, use maple syrup for sweetness. These easy swaps let you enjoy the flavor without using animal products. Your guests will love them, and they’ll never know they’re vegan. Buffalo Cauliflower Bites pair well with many sides. You can serve them with ranch or blue cheese dressing for dipping. Fresh veggie sticks like carrots and celery add crunch and balance. For a heartier option, serve them with a side of quinoa or a green salad. These bites are perfect for game day or any fun gathering. Check the Full Recipe for more great ideas! This blog post detailed how to make delicious Buffalo Cauliflower Bites. We covered the main ingredients, from cauliflower to spices, and discussed sauces and garnishes that add flavor. The step-by-step instructions outlined preparation, batter-making, and baking for perfect bites. Tips for crispiness and flavor enhancements helped elevate your dish. We explored variations and storage tips to enjoy leftovers later. Now, you’re ready to impress with these bites. Experiment and make them your own! Enjoy every tasty morsel.](https://southerndishes.com/wp-content/uploads/2025/07/eb469957-194e-4604-8f66-13d94fda6adf.webp)
Looking for a tasty snack that’s easy to make? Buffalo Cauliflower Bites are your answer! These crispy bites pack a
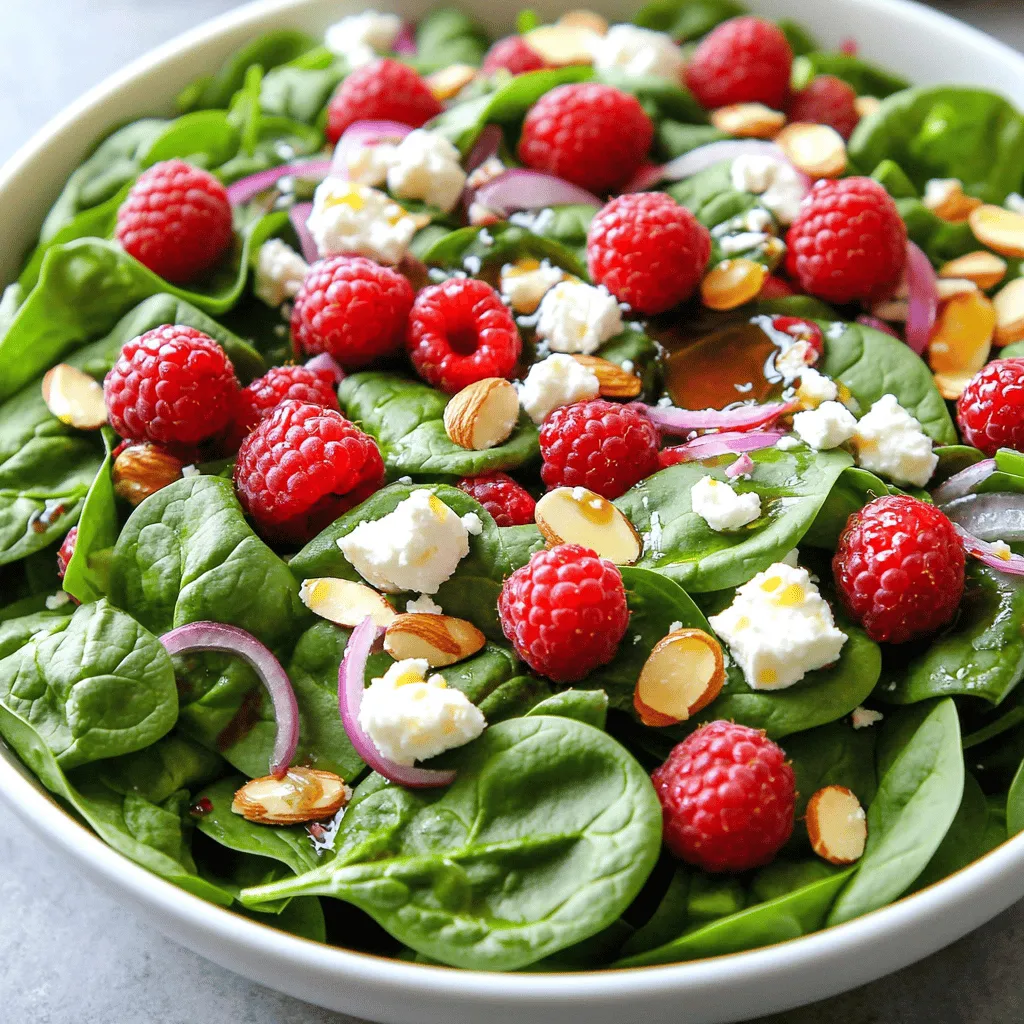
Looking for a fresh and simple delight? My Raspberry Spinach Salad is just what you need! Bursting with juicy raspberries,

If you’re looking for a quick and tasty dinner, Honey Garlic Salmon is the way to go. This recipe combines
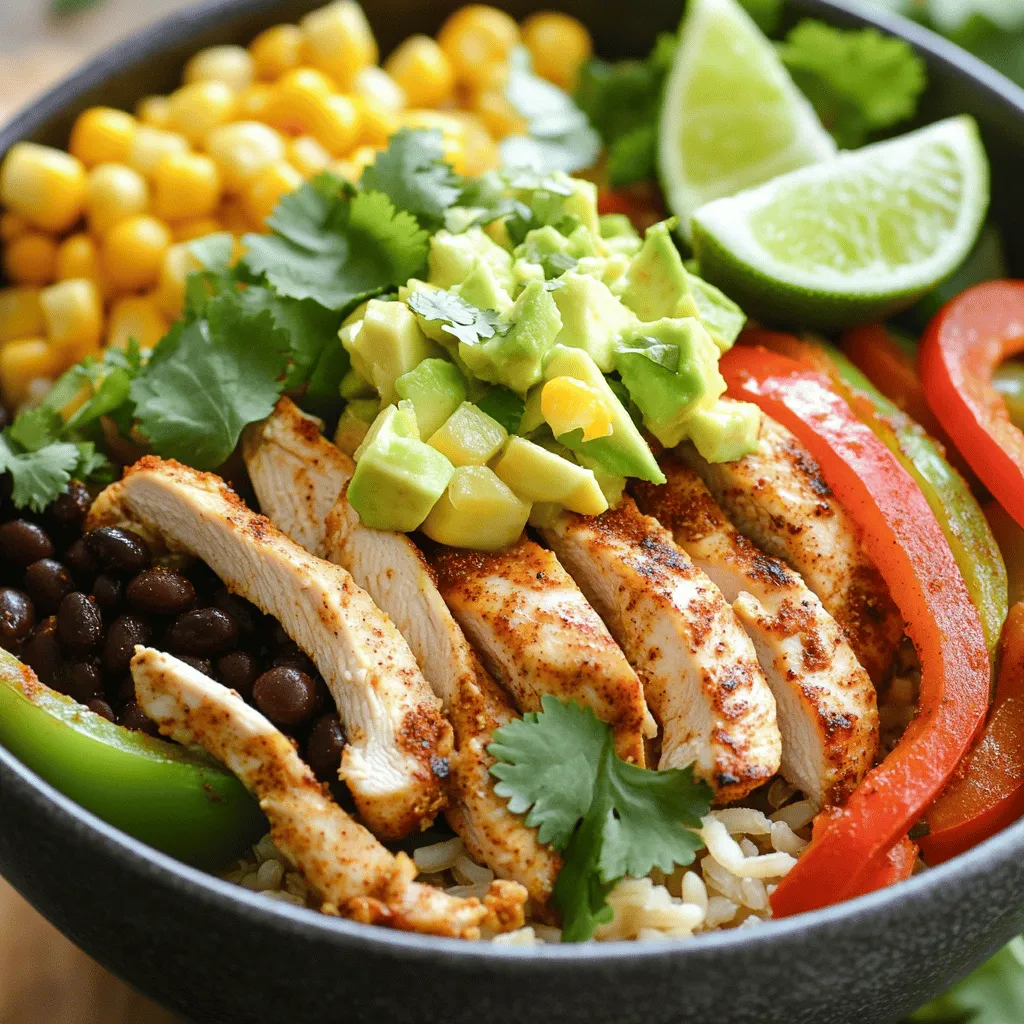
Busy nights don’t have to mean boring meals. With my Easy Chicken Fajita Bowls, you can whip up a flavorful
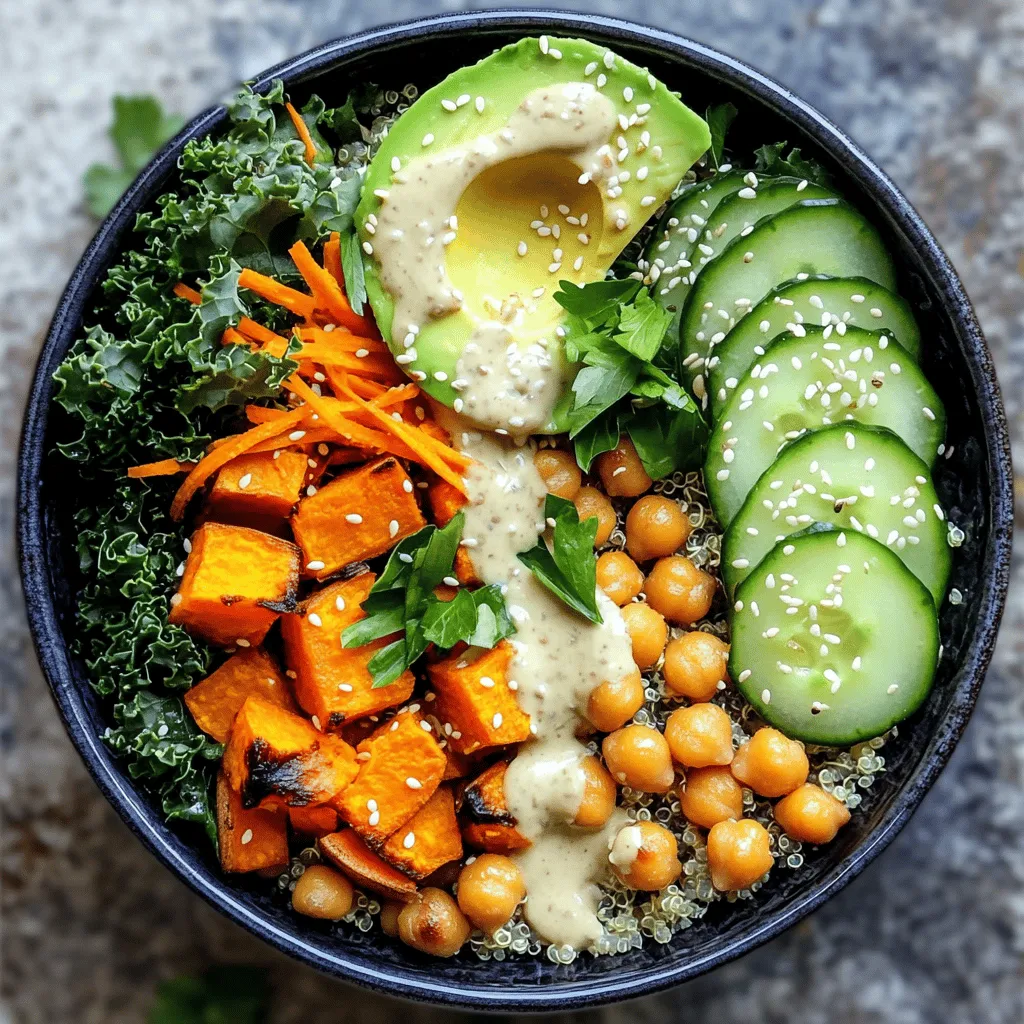
Are you ready to make a delicious Vegan Buddha Bowl? This dish is packed with vibrant ingredients that not only
![For this salad, you need fresh and colorful ingredients. Here’s what you’ll need: - 8 oz rice noodles - 1 cup shredded carrots - 1 bell pepper, sliced (choose red, yellow, or orange) - 1 cup sugar snap peas, trimmed and halved - 1 cup red cabbage, thinly sliced - ½ cup green onions, sliced - ½ cup fresh cilantro, chopped - ½ cup unsalted peanuts, roughly chopped These ingredients make a crunchy, fresh base for your salad. The mix of colors adds fun and flavor. This dressing is key to your salad's taste. Gather these items: - 3 tablespoons peanut butter - 2 tablespoons soy sauce - 1 tablespoon sesame oil - 1 tablespoon fresh lime juice - 1 teaspoon maple syrup (or you can use honey) - 1 clove garlic, minced - 1 tablespoon ginger, minced - 1 tablespoon water (to adjust the thickness) This dressing will bring a creamy, savory taste. It balances the crunch of the veggies. Garnishes can make your salad look even better. Consider these options: - Extra chopped peanuts - More fresh cilantro - Lime wedges for a zesty touch These garnishes enhance both the look and flavor of your salad. You can pick what you like best! For the full recipe, check out the complete guide. First, get a pot of water boiling. Add the rice noodles and cook them. Follow the package instructions for the right time. Once the noodles are soft, drain them. Rinse the noodles with cold water. This helps stop the cooking. Set them aside to cool. Next, grab a large bowl. Add the shredded carrots, sliced bell pepper, sugar snap peas, red cabbage, and green onions. Mix these veggies together. They add great color and crunch. Don’t forget to add the fresh cilantro. It gives a bright taste to the salad. Now, let’s make the peanut dressing. In a separate bowl, add peanut butter, soy sauce, and sesame oil. Squeeze in fresh lime juice. Add maple syrup for sweetness. Then, throw in minced garlic and ginger. Whisk everything together until smooth. If it’s too thick, add a little water. This dressing will make your salad tasty and creamy. After you have everything ready, combine the cooled rice noodles with the veggies. Pour the dressing over them and toss well. This ensures every bite is full of flavor. Add the chopped peanuts on top for crunch. You can serve it right away or chill it for 30 minutes. This time lets the flavors mix. Check the [Full Recipe] for all the details. To make a great peanut dressing, start with smooth peanut butter. Use 100% natural peanut butter for the best taste. Mix it with soy sauce for saltiness. Add sesame oil for a rich flavor. Fresh lime juice gives it a nice tang. Maple syrup or honey adds sweetness. Don't forget garlic and ginger for extra zest. If the dressing is too thick, add water. Stir until the dressing is smooth and creamy. Taste and adjust as you like! Serve your Thai peanut noodle salad in big bowls. For a pop of color, garnish with fresh cilantro. Sprinkle chopped peanuts on top for crunch. For a zingy touch, add lime wedges. This salad is great as a side dish or a main meal. You can serve it cold or at room temperature. If you want the flavors to blend, chill it for 30 minutes before serving. You can swap some ingredients to suit your taste. If you don’t have rice noodles, try soba or whole wheat noodles. For veggies, use whatever you have on hand. Cucumber and zucchini work well too. If you want protein, add cooked chicken or tofu. You can also try different nuts like cashews or walnuts. Experiment with the dressing by adding chili paste for heat. This recipe is flexible, so have fun with it! {{image_2}} You can make this salad heartier by adding protein. Cooked chicken adds a tasty touch. Simply chop it into bite-sized pieces and mix it in. If you prefer plant-based options, use tofu. Press it to remove water, then cube and sauté until golden. Both options bring flavor and texture to the dish. Feel free to mix in different veggies for fun. Broccoli, zucchini, or even spinach work great. Each adds color and nutrients. Just make sure to cut them into small pieces for easy eating. You can also use frozen veggies if fresh ones aren't available. They save time and still taste good. Want to add heat? It's easy to spice things up! You can chop in fresh chili peppers or add red pepper flakes to your dressing. If you like milder flavors, skip the heat altogether. Balance is key, so adjust based on your taste. This way, you can create a salad that fits your family's spice level. Try these variations to make the Thai Peanut Noodle Salad your own. For the complete recipe, check out the Full Recipe. To keep your Thai peanut noodle salad fresh, store it in an airtight container. If you have extra dressing, store that in a separate container. This helps keep the noodles and veggies crisp. Avoid mixing the salad with the dressing until you are ready to eat. When stored properly, the salad lasts about 3 to 5 days in the fridge. If you notice any change in color or smell, it's best to toss it. Always check leftovers before eating. You can eat the salad cold, but if you prefer it warm, reheat gently. Use a skillet over low heat. Add a splash of water or dressing to keep it moist. Stir often to avoid burning. Enjoy it warm, but remember, fresh is best! For the full recipe, check the details above. I love using rice noodles for this salad. They are light and absorb flavors well. You can find them in Asian grocery stores or the international aisle. Other good options are soba or whole wheat noodles. Just make sure they cook quickly. This keeps the texture nice and fresh. Yes, you can make this salad ahead! It holds well in the fridge. Make it up to a day before serving. Just keep the dressing separate until you're ready to eat. This keeps the veggies crisp and the noodles fresh. Mix it all right before serving for the best taste. Absolutely! This recipe is great for meal prep. You can store portions in containers for easy lunches. Just remember to pack the dressing separately. This way, you can enjoy a fresh salad every day. It keeps well for up to five days in the fridge. This blog post shared how to make a Thai Peanut Noodle Salad. We explored key ingredients, like rice noodles and peanut dressing. I gave you a step-by-step guide for cooking and prepping your meal. You learned helpful tips for the best dressing and fun variations to try. Proper storage and answers to common questions rounded it out. Making this salad is simple and fun. Enjoy your tasty, fresh dish anytime!](https://southerndishes.com/wp-content/uploads/2025/07/a83a9690-39e2-45d2-a690-585ff05f64b9.webp)
Looking for a quick and tasty meal? Try my Thai Peanut Noodle Salad! It’s packed with flavor, easy to make,
![To create this dish, you need three main items: - Block of feta cheese - Cherry tomatoes - Garlic and spices The block of feta cheese is the star. It becomes creamy and rich when baked. Cherry tomatoes add sweetness and color. Garlic brings a strong, savory taste that enhances the dish. Using simple spices like oregano and red pepper flakes adds depth to the flavor. Next, gather your cooking essentials: - Olive oil - Pasta variety - Fresh herbs and garnishing option Olive oil helps the flavors blend and adds richness. You can choose any pasta you like, such as penne or spaghetti. Fresh herbs, like basil, give a bright finish and make the dish look pretty. You can make this dish even better with optional add-ins: - Recommended vegetables - Protein options (chicken, shrimp, etc.) Adding vegetables like spinach or bell peppers can boost nutrition. You can also include proteins, such as chicken or shrimp, for extra heartiness. These add-ins make the meal more filling and satisfying, allowing for greater customization. For the full recipe, check out the Baked Feta Pasta Delight. First, preheat your oven to 400°F (200°C). This step is key. It helps the feta and tomatoes cook just right. Next, grab a 9x13 inch baking dish. Place the block of feta cheese right in the center. Then, surround it with the halved cherry tomatoes. Now, let's mix the flavors. In a small bowl, combine 3 minced garlic cloves, 1 teaspoon of dried oregano, 1 teaspoon of red pepper flakes, and 2 tablespoons of olive oil. Add salt and pepper to taste. Pour this tasty mix over the feta and tomatoes. Now, it’s time to bake! Place the dish in the oven and bake for about 25 to 30 minutes. You want the feta to get soft and the tomatoes to blister. Keep an eye on it. The cheese should look creamy and the tomatoes should be juicy. The smell will fill your kitchen. That’s how you know it's close to done. When baking is done, take the dish out of the oven. Use a fork to blend the feta and tomatoes together. It should look creamy. Now, cook 300g of pasta until al dente, following package instructions. Reserve about 1 cup of the pasta water, then drain the rest. Add the cooked pasta to the baking dish and toss it all together. If the sauce is too thick, sprinkle in some reserved pasta water. This helps achieve the right consistency. Serve hot, and don’t forget to add fresh basil leaves on top! For an extra zing, you can also sprinkle some lemon zest. Enjoy your Baked Feta Pasta! For the complete recipe, check the Full Recipe. When you cook the pasta, always save some pasta water. This starchy water helps the sauce cling better to the pasta. It also adds extra flavor and creaminess. For cooking times: - Penne usually takes around 11-13 minutes. - Fusilli cooks in about 8-10 minutes. - Spaghetti takes 8-10 minutes as well. Make sure to check the package instructions for the best results. To make this dish your own, adjust the spices to your liking. If you love heat, add more red pepper flakes. For a fresh taste, add more oregano. To enhance the creaminess of the sauce, you can mix in a splash of heavy cream or cream cheese. This will make the sauce rich and smooth. You can also add a bit of the reserved pasta water if you want a thinner sauce. Baked feta pasta pairs well with a simple salad. A light arugula salad or a Greek salad works great. You can also serve it with crusty bread for a complete meal. For presentation, serve the pasta in a large bowl. Top with fresh basil leaves and a sprinkle of lemon zest for color. This makes your dish look beautiful and inviting. {{image_2}} You can make baked feta pasta even more colorful and tasty. Try adding seasonal vegetables to the mix. Seasonal veggies like zucchini, bell peppers, or spinach work well. Just chop them up and toss them in with the tomatoes. You can also use other cheeses. Swap feta for goat cheese or a creamy ricotta. These cheeses can add a different flavor and texture to your dish. If you want more protein, add chicken or shrimp. Cook the chicken in a pan until it's golden. For shrimp, just toss them in the baking dish with the feta and tomatoes. Both options cook quickly and add a nice touch to the pasta. To easily incorporate proteins, cook them separately first. Then mix them in after baking. This keeps the flavors fresh and bright. You can boost the flavor by experimenting with herbs. Fresh thyme, rosemary, or parsley can add a lovely twist. Just sprinkle them on top before serving. Adding citrus is another great way to enhance the dish. A squeeze of lemon juice or some zest can brighten up the creamy sauce. Other seasonings like paprika or balsamic vinegar can also add depth. These variations make baked feta pasta fun and unique. You can mix and match to find your favorite combination! For the complete recipe, check out the [Full Recipe]. To keep your Baked Feta Pasta fresh, cool it to room temperature. Then, place it in an airtight container. This method helps avoid moisture loss. Glass containers work well, as they don't absorb odors. If you plan to eat it later, store it in the fridge. When you're ready to enjoy the leftovers, use the oven or a skillet. These methods help keep the pasta's texture. If you use the oven, preheat it to 350°F (175°C). Cover the dish with foil to avoid drying out the pasta. Heat for about 15-20 minutes. In a skillet, add a splash of water or olive oil to the pan. Stir gently until warmed through. If the sauce thickens, add a bit of reserved pasta water to refresh it. Leftovers can last in the fridge for about 3-5 days. Always check for signs of spoilage. If you see mold or smell something off, throw it out. Freshness matters for taste and health. Enjoy your Baked Feta Pasta knowing you stored it well! To make Baked Feta Pasta vegan, you can replace the feta cheese with plant-based cheese. Look for brands that mimic feta's tangy flavor. You can also use tofu, crumbled and marinated in lemon juice and herbs for added flavor. For pasta, choose gluten-free or whole grain options if desired. Yes, you can use various cheeses. Try goat cheese for a tangy twist or mozzarella for creaminess. Ricotta adds a smooth texture, while vegan cheese can provide a dairy-free option. Each type gives a unique flavor, so feel free to experiment. Pair Baked Feta Pasta with a fresh salad or garlic bread. A simple arugula salad with lemon vinaigrette complements the dish well. Roasted vegetables, like zucchini or bell peppers, can also enhance the meal. To prevent mushy pasta, cook it al dente according to package directions. Reserve some pasta water before draining. It helps to adjust the sauce's consistency later. Avoid overcooking and mix the pasta with the sauce gently for the best texture. Baked feta pasta is simple and tasty. You start with a block of feta, cherry tomatoes, and garlic. We discussed how to prepare and bake these ingredients for a delightful dish. I shared tips for cooking pasta and enhancing flavors. You can customize it with proteins or veggies too. Remember to store leftovers properly and enjoy them later. This dish is fun to make and easy to serve. Try experimenting and make it your own!](https://southerndishes.com/wp-content/uploads/2025/07/7e37bde8-25e9-440a-8c79-9fe6bb92d06b.webp)
If you’re looking for a quick and tasty dish, Baked Feta Pasta is a must-try! This simple recipe brings together

Looking for a treat that combines the richness of brownies with the creamy delight of cheesecake? You’re in for a
![To make Mango Black Bean Salsa, you need: - 2 ripe mangoes, diced - 1 can (15 oz) black beans, rinsed and drained - 1 red bell pepper, diced - 1 small red onion, finely chopped - 1 jalapeño, deseeded and minced - 1/4 cup fresh cilantro, chopped - Juice of 2 limes - 1 tablespoon olive oil - Salt and pepper to taste You can swap ingredients to suit your taste. - Use canned corn instead of black beans for a sweeter touch. - Green bell pepper works well if you prefer less sweetness. - If you want less heat, skip the jalapeño or use a milder pepper. - Lemon juice can replace lime juice if you like a different tang. - Fresh parsley can be a good stand-in for cilantro. - Mangoes: They are high in vitamin C and help boost your immune system. - Black Beans: Packed with protein and fiber, they support heart health. - Red Bell Peppers: They are rich in vitamins A and C, promoting healthy skin. - Red Onions: They have antioxidants that help reduce inflammation. - Jalapeño: Contains capsaicin, which may help boost metabolism. - Cilantro: This herb aids digestion and is full of vitamins. - Limes: They provide vitamin C and can help with hydration. - Olive Oil: It offers healthy fats that are good for your heart. - Salt and Pepper: These enhance flavor but should be used in moderation. This Mango Black Bean Salsa is not just tasty; it's also packed with good nutrients! You can find the full recipe above to get started. To make Mango Black Bean Salsa, start by gathering your ingredients. You will need two ripe mangoes, a can of black beans, a red bell pepper, a small red onion, a jalapeño, fresh cilantro, lime juice, olive oil, salt, and pepper. First, dice the mangoes and red bell pepper. Finely chop the red onion and minutely mince the jalapeño after removing the seeds. In a large mixing bowl, combine all these fresh ingredients with the black beans and cilantro. When mixing, use a gentle hand. You want to keep the mangoes intact, so be careful. Pour your dressing made from lime juice, olive oil, salt, and pepper over the mixture. Then, toss everything lightly until it is well mixed. Make sure every piece is coated in the dressing. This step ensures that each bite bursts with flavor. After mixing, let the salsa rest for at least 15 minutes. This time allows the flavors to blend nicely. If you can wait longer, 30 minutes works even better. The longer it sits, the more intense the taste becomes. This simple step makes a big difference in your salsa's flavor. For the full recipe, refer to the earlier section. Enjoy your fresh and colorful dish! To boost the taste of your mango black bean salsa, think about adding a pinch of cumin or smoked paprika. These spices give depth and warmth. You can also try adding diced avocados for creaminess. Fresh lime juice brightens the flavors, so don’t skip it. One mistake is using overripe mangoes. They can turn mushy and watery. Always choose ripe but firm mangoes. Another issue is skipping the resting time. Allowing the salsa to sit helps the flavors mix well. It makes the salsa taste better! Fresh ingredients add vibrant flavor and texture. However, canned black beans are great for quick prep. Just rinse them well to remove extra salt. If you use fresh beans, soak and cook them first. Fresh herbs, like cilantro, bring a burst of freshness that dried herbs can’t match. For the complete recipe, check out the [Full Recipe]. {{image_2}} You can modify this salsa by adding other fruits. Pineapple brings a nice sweetness. Try diced kiwi for a tart twist. Avocado adds creaminess and richness, making it even more satisfying. You can also use peaches or nectarines when they're in season. Each fruit changes the flavor, making your salsa unique. If you like heat, add more jalapeño. You can also try a dash of cayenne pepper. For a milder version, leave out the jalapeño or use a sweet pepper. If you want a smoky flavor, add smoked paprika. Adjusting spices helps you create the perfect heat balance for your taste. This salsa pairs well with many foods. Use it as a topping for grilled chicken or fish. It also goes great with tacos and quesadillas. Serve it with tortilla chips for a tasty snack. You can even mix it into salads for a fresh kick. The options are endless! For the complete dish, check out the [Full Recipe]. I recommend using airtight glass containers. They keep the salsa fresh and tasty. You can also use plastic containers with tight lids. Just make sure they are clean and dry before use. This way, your salsa stays crisp. Store your salsa in the fridge for up to three days. After that, the flavors may fade. If you notice any weird smell or color, it’s best to throw it out. Always check before you dig in! You can freeze Mango Black Bean Salsa if you want to keep it longer. Use freezer-safe bags or containers. Leave some space for the salsa to expand. It can last for up to three months in the freezer. When you want to eat it, thaw it in the fridge overnight. To make Mango Black Bean Salsa, you need fresh ingredients. Here’s how to do it: 1. Dice 2 ripe mangoes and add them to a large bowl. 2. Rinse and drain 1 can of black beans, then mix them in. 3. Chop 1 red bell pepper and 1 small red onion, and add both to the bowl. 4. Mince 1 jalapeño and toss it in for some heat. 5. Chop 1/4 cup of fresh cilantro and stir it into the mix. 6. In a separate bowl, whisk the juice of 2 limes, 1 tablespoon of olive oil, and some salt and pepper. 7. Pour this dressing over the salsa and mix gently. Allow the salsa to sit for at least 15 minutes. This lets the flavors blend well. You can find the Full Recipe above for more details. Mango Black Bean Salsa is very versatile. You can serve it with: - Tortilla chips for a crunchy snack. - Grilled chicken for a fresh topping. - Fish tacos to add some zest. - Burrito bowls for added flavor and color. It also pairs well with rice or quinoa for a healthy meal. Yes, you can prepare Mango Black Bean Salsa ahead of time. Make it up to a day in advance. Keep it in the fridge in an airtight container. The flavors will deepen as it sits. Just remember to give it a good stir before serving. Enjoy this fresh dish any time! In this post, we explored the essential ingredients for Mango Black Bean Salsa. We discussed swaps for each ingredient and their nutritional benefits. I detailed the preparation steps, mixing tips, and how to enhance flavors. We also addressed common mistakes and ways to adapt the salsa. Lastly, I offered storage tips to keep it fresh longer. Mango Black Bean Salsa is easy to make and enjoy. It’s a versatile dish for any meal. Dive in and get creative with your salsa today!](https://southerndishes.com/wp-content/uploads/2025/07/5191505e-4478-4589-9598-d64453435ea4.webp)
Are you ready to impress your taste buds? Mango Black Bean Salsa is a vibrant dish full of flavor. It
