![To make tasty mini cheesecake bites, you need a few key items. First, grab: - 1 cup graham cracker crumbs - 1/4 cup unsalted butter, melted - 2 tablespoons sugar - 1 (8 oz) package cream cheese, softened - 1/2 cup powdered sugar - 1 teaspoon vanilla extract - 1 large egg - 1/3 cup sour cream These ingredients help create a rich, creamy base and a crunchy crust. The graham cracker crumbs mixed with butter and sugar form the perfect foundation. Cream cheese gives these bites a smooth texture. The powdered sugar adds sweetness that balances the flavors. For an extra burst of flavor, consider these toppings: - Fresh berries (raspberries, blueberries, or strawberries) - Whipped cream Berries not only look beautiful but also add a refreshing taste. Whipped cream provides a light and airy finish. You can mix and match toppings based on your taste. To make these mini cheesecake bites, you’ll need some simple tools: - Mini muffin tin - Mixing bowls A mini muffin tin helps shape the bites perfectly. Mixing bowls are essential for combining all your ingredients. With these tools, you will be ready to whip up a delightful treat. For the complete recipe, check the Full Recipe section! To start, you need to preheat your oven to 325°F (160°C). This temperature helps the cheesecakes bake evenly. While it heats, take your mini muffin tin and line it with mini cupcake liners. This makes it easy to remove the bites later. Next, let’s make the crust. In a mixing bowl, combine 1 cup of graham cracker crumbs, 1/4 cup of melted unsalted butter, and 2 tablespoons of sugar. Mix these ingredients until they are well combined and moist. Then, take about a tablespoon of this mixture and place it into each cupcake liner. Press down firmly with a spoon or your fingers. This forms a solid base for your cheesecake bites. Now it’s time for the cheesecake filling. In another bowl, beat together 1 (8 oz) package of softened cream cheese, 1/2 cup of powdered sugar, and 1 teaspoon of vanilla extract until the mixture is smooth. Next, add 1 large egg and 1/3 cup of sour cream to the cream cheese mix. Stir it until everything is creamy, scraping the bowl sides as needed. Once mixed, spoon the cheesecake filling over the crusts in the muffin tin. Fill each cup about 3/4 full. Bake in your preheated oven for 15-18 minutes. You want the centers to be set but still a bit jiggly. After baking, let the mini cheesecakes cool in the pan for about 10 minutes. Then, transfer them to a wire rack to cool completely. For the best flavor, refrigerate the mini cheesecake bites for at least 2 hours. You can find the full recipe [here]. To make your mini cheesecake bites creamy, avoid overmixing. Overmixing adds too much air, which can make them puff up. Mix just until smooth and combined. Also, ensure your cream cheese is softened. Cold cream cheese does not blend well. Leave it out for about 30 minutes before you start. This step helps achieve a rich and velvety texture. To check for doneness, look for the centers of the bites. They should be set but still slightly jiggly. If they are too firm, they may be overbaked. Cooling is key. After baking, let them cool in the pan for about 10 minutes. Then, transfer them to a wire rack to cool completely. Chilling them in the fridge for at least two hours makes them taste even better. For garnishing, top each mini cheesecake with fresh berries, like raspberries or blueberries. This adds color and flavor. You can also add a dollop of whipped cream if you like. When serving, arrange them on a nice platter. This makes them look inviting for gatherings. Enjoy these bites as a sweet treat at parties or special events. For the full recipe, check out the recipe section above! {{image_2}} You can make mini cheesecake bites in many fun flavors. One tasty choice is chocolate mini cheesecake bites. Just mix melted chocolate into the cream cheese filling. It adds a rich and sweet taste. Another great option is lemon or orange-infused cheesecake bites. You can add fresh zest and juice to the mixture. This gives a bright and zesty flavor. Both variations are easy and delicious. Try them for a fun twist! You can switch up the crust for your mini cheesecakes too. Using Oreo crumbs makes a tasty and sweet base. Just crush the cookies and mix them with melted butter. Gingersnap cookies are another great option. They add a spicy kick that pairs well with the creamy filling. If you need a gluten-free option, use gluten-free cookies instead. They work well and taste great too. Toppings can make your mini cheesecakes even better. Drizzling chocolate or caramel sauce on top adds a sweet touch. You can also use different fruits like sliced strawberries or blueberries. They add color and flavor to your bites. If you prefer a simple look, skip the toppings altogether. The cheesecake bites are still tasty on their own. Explore these options and find your favorite! For a complete guide, check the Full Recipe. To keep your mini cheesecake bites fresh, store them in the fridge. Use an airtight container to prevent them from drying out. They will last for about five days in the refrigerator. This keeps their creamy texture and rich flavor intact. You can freeze mini cheesecake bites for longer storage. To freeze, wrap each bite in plastic wrap. Then, place them in a freezer-safe bag or container. When you're ready to enjoy them, take out what you need. Thaw in the fridge for a few hours or overnight. This method helps keep their taste and texture. After storing, it's best to serve them chilled. If you froze them, allow them to thaw completely. Once they are ready, top with fresh berries or whipped cream. This adds a nice touch before serving. Enjoy them as a sweet treat at any time! For the full recipe, check the earlier section. Yes, you can use low-fat cream cheese. However, it may change the taste and texture. Low-fat cream cheese has less fat. This can make your mini cheesecakes less creamy and rich. I recommend full-fat cream cheese for the best results. It gives a nice, smooth texture that melts in your mouth. Look for a slight jiggle in the center. The edges should be set and firm. If it looks too wobbly, they need more time. Bake for about 15-18 minutes at 325°F. Once cooled, they will firm up a bit more in the fridge. Trust your eyes; they will tell you when they are ready. Yes, you can make them a day or two before your event. Just store them in the fridge. They taste even better after chilling. This makes them great for parties, as you can prepare them ahead of time. Just add the toppings right before serving for a fresh look. You can find pre-made mini cheesecake bites at many grocery stores. Look in the bakery section. Some stores offer them in the frozen aisle too. Online retailers also sell them. This is a quick option if you want to save time. You can use a greased mini muffin tin instead. Just spray it well with cooking spray. You can also use parchment paper cut into small squares. This way, you can lift the cheesecakes out easily. If you don’t have those, try using silicone molds. They work great for easy removal. For the full recipe, check out the detailed instructions above! You now have a clear guide for making mini cheesecake bites. We covered essential ingredients, equipment, and step-by-step instructions. Don't forget the tips on texture, baking, and presentation to impress your guests. Feel free to try different flavors and toppings for a unique twist. Store them properly or freeze for later enjoyment. Making these treats can be fun and rewarding. Enjoy your delicious mini cheesecakes at your next gathering. You'll be glad you tried this simple recipe!](https://southerndishes.com/wp-content/uploads/2025/07/556e0ff1-aa25-444f-8d70-03550c41631d.webp)
Savory Mini Cheesecake Bites Easy and Delicious Treat
If you’re looking for a quick and tasty dessert, these savory mini cheesecake bites are perfect! With their creamy texture
If you’re looking for a quick and tasty dessert, these savory mini cheesecake bites are perfect! With their creamy texture

Get ready to delight your taste buds with my simple and flavorful Baked Chicken Parmesan guide! This dish combines crispy
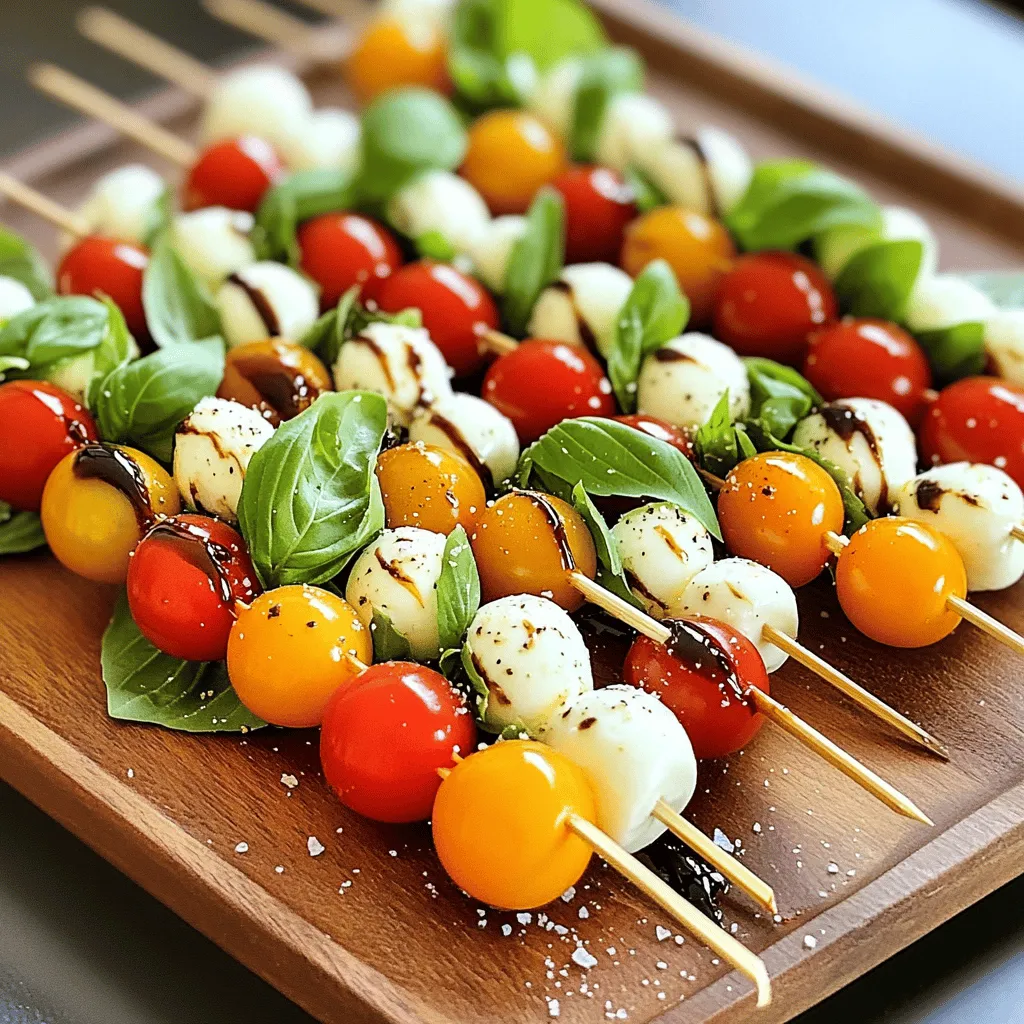
Looking for a quick and tasty appetizer? Easy Caprese skewers are perfect for you! These bright, colorful bites blend cherry
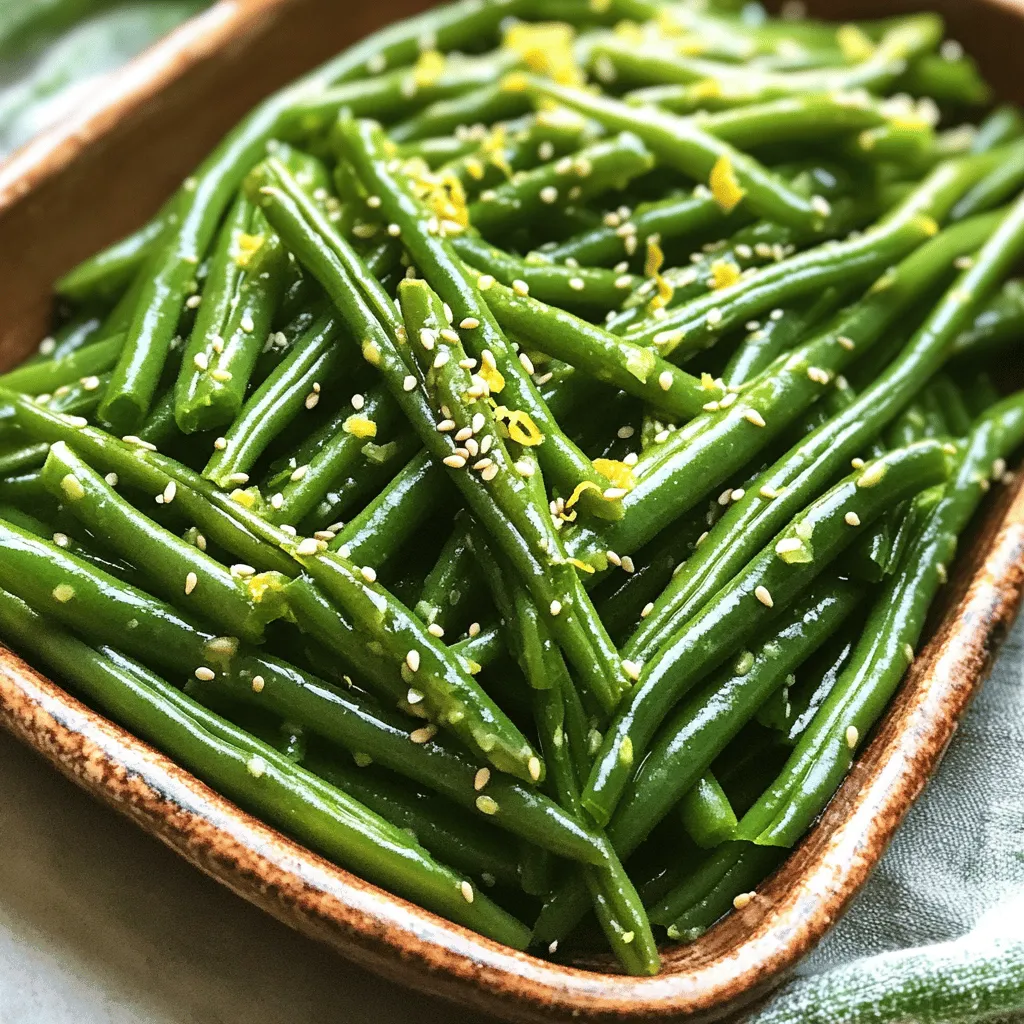
Looking for a simple and tasty side dish? Garlic Butter Green Beans are your answer! With fresh green beans tossed

If you’re searching for a delicious side dish, look no further than Roasted Garlic Parmesan Carrots. This simple recipe combines
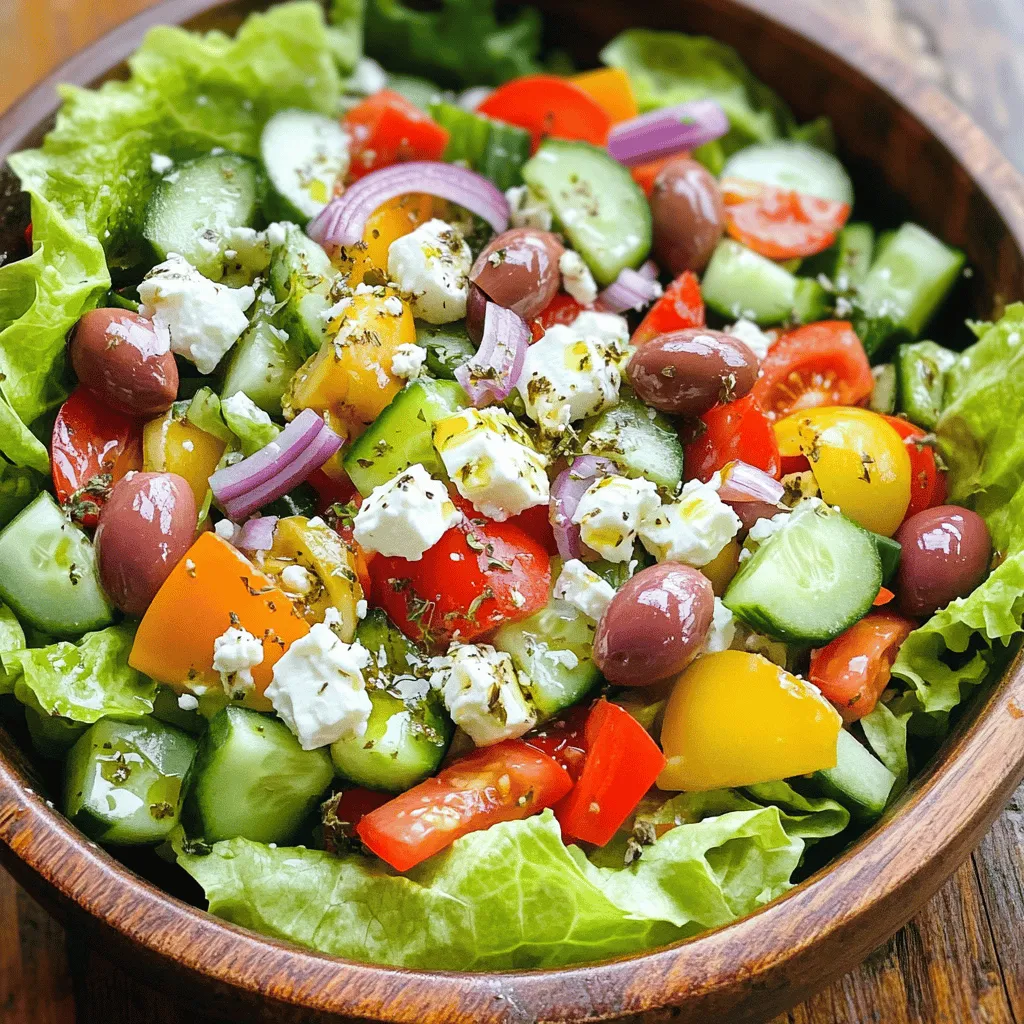
Are you ready to dive into a world of vibrant flavors with a classic Greek salad? This dish bursts with
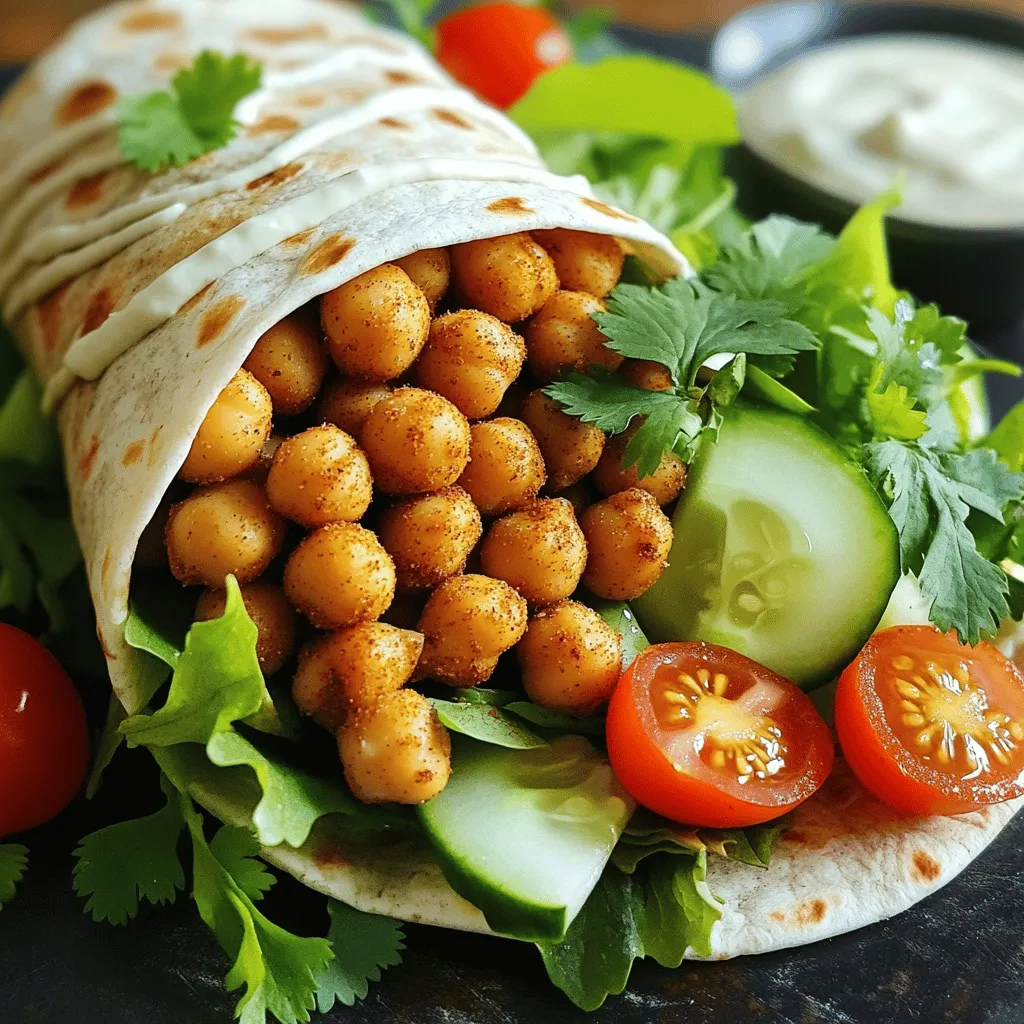
Are you ready for a meal that’s both delicious and easy to make? Crispy chickpea wraps are the perfect option!
![- 1 cup uncooked long-grain white rice - 2 cups broccoli florets (fresh or frozen) - 1 can (10.5 oz) cream of mushroom soup (or homemade) - 1 cup shredded cheddar cheese - 1 cup milk - 1 small onion, finely chopped - 2 cloves garlic, minced - 1 teaspoon garlic powder - 1 teaspoon onion powder - Salt and pepper to taste - 1 tablespoon olive oil - 1/2 cup breadcrumbs (optional, for topping) The key to a great Cheesy Broccoli Rice Casserole lies in the ingredients. First, the rice gives the dish its base. I always choose long-grain white rice. It cooks well and keeps a nice texture. The broccoli brings both color and nutrients. Fresh or frozen, either works nicely. Next, cream of mushroom soup adds a rich creaminess. You can make it homemade for a personal touch. Don't forget the cheddar cheese! It melts beautifully and gives a wonderful flavor. Milk helps to blend everything together. Now, let’s add some depth with the additional ingredients. Onions and garlic create a fragrant base. I finely chop the onion and mince the garlic for easy cooking. Garlic powder and onion powder give extra flavor. You can adjust salt and pepper to your taste. Finally, I often drizzle olive oil for a little richness. If you love a crunchy topping, breadcrumbs are a great option. They add a nice texture. Together, these ingredients create a comforting dish that warms the heart. For the full recipe, check [Full Recipe]. - Preheat oven to 350°F (175°C). - Cook rice in boiling water and prepare broccoli. Start by preheating your oven to 350°F. This ensures your casserole bakes evenly. Next, bring 2 cups of water to a boil in a large saucepan. Add 1 cup of uncooked rice. Cover the pot, reduce heat to low, and let it simmer. In about 18-20 minutes, the rice will be fluffy and ready. While the rice cooks, prepare 2 cups of broccoli florets. If you use fresh broccoli, blanch it in boiling water for 2 minutes. After that, plunge it into ice water. This stops the cooking process. If you are using frozen broccoli, just thaw and drain. - Combine cooked rice, sautéed onions, garlic, and other ingredients in a bowl. In a skillet, heat 1 tablespoon of olive oil over medium heat. Add 1 finely chopped onion and sauté it until soft. This takes about 5 minutes. Then, add 2 minced garlic cloves and stir for another minute. In a large bowl, mix the cooked rice, sautéed onions, garlic, and broccoli. Now, add 1 can of cream of mushroom soup, 1 cup of milk, and 1 cup of shredded cheddar cheese. Also, sprinkle in 1 teaspoon each of garlic powder and onion powder. Season with salt and pepper to your taste. Stir everything until well combined. - Transfer to greased baking dish, add toppings, and bake for 25-30 minutes. Pour the mixture into a greased 9x13-inch baking dish. For an extra crunch, sprinkle 1/2 cup of breadcrumbs and more cheese on top. This adds a nice texture to your dish. Bake in the preheated oven for 25-30 minutes. You want it to be hot and bubbly, with melted cheese on top. Once done, let it cool for a few minutes before serving. For the complete recipe, check the [Full Recipe]. To make sure your rice is fluffy and not sticky, follow these steps: - Use long-grain white rice. - Rinse it under cold water before cooking. - Use a 2:1 water-to-rice ratio. - Once boiling, reduce heat and cover. Let it simmer for 18-20 minutes. For perfect sautéing of onions and garlic: - Use medium heat to avoid burning. - Add olive oil to the pan first. - Sauté the onions until they turn translucent. This takes about 5 minutes. - Add garlic last, cooking for just one minute. This keeps the garlic fragrant. The right cheese makes this dish shine. Consider these options: - Cheddar cheese adds a sharp flavor. - Gruyère gives a creamy texture. - Mozzarella melts beautifully for a gooey effect. To achieve the perfect cheesy crust: - Sprinkle extra cheese on top before baking. - Add breadcrumbs if you like a bit of crunch. - Bake until the cheese is golden and bubbly. Adding herbs and spices can elevate your casserole: - Try thyme or rosemary for a fresh taste. - A pinch of red pepper flakes adds spice. - Consider a sprinkle of paprika for color and flavor. For extra veggies, think about: - Adding chopped bell peppers for sweetness. - Mixing in spinach for a healthy boost. - Throwing in peas for a pop of color and flavor. For the full recipe, check the Full Recipe section. {{image_2}} You can easily change the base of this dish. Instead of rice, try quinoa or another grain. Quinoa gives a nutty flavor and boosts protein. For the cream of mushroom soup, you can use a creamy cauliflower soup or a homemade version. This switch can make the dish lighter and just as tasty. To make a gluten-free version, use gluten-free breadcrumbs or skip them completely. You can also replace the cream of mushroom soup with a gluten-free version or a blend of cashews and vegetable broth for a creamy texture. If you want a vegetarian or vegan dish, swap the cheddar cheese for a plant-based cheese. Nutritional yeast is a great choice for added flavor. Using seasonal vegetables can enhance freshness. In spring, add asparagus or peas for a lovely crunch. In fall, try adding roasted butternut squash for sweetness. You can also mix different cheeses based on what you have. A blend of mozzarella, gouda, or pepper jack can change the flavor profile. These variations keep the casserole exciting and new every time you make it. For the full recipe, check out the section above! To keep your cheesy broccoli rice casserole fresh, place it in an airtight container. Make sure to let it cool down before sealing. This dish stays good in the fridge for about 3 to 5 days. If you plan to eat it later in the week, store it right after dinner. You can freeze the casserole for up to 3 months. Just wrap it tightly in plastic wrap and then in aluminum foil. This helps keep out air. When you’re ready to enjoy it, set it in the fridge overnight to thaw. For the best taste, reheat in the oven. Set it to 350°F (175°C) and bake for about 20 minutes. Cover it with foil to stop it from drying out. You can also use the microwave, but be careful. Stir it halfway through to heat evenly. Enjoy your cheesy goodness! How to make Cheesy Broccoli Rice Casserole ahead of time? You can prepare this casserole a day in advance. Cook the rice and mix all ingredients. Place the mixture in your baking dish. Cover it tightly and store it in the fridge. When you're ready to bake, add a few extra minutes to the cooking time. Can I use frozen broccoli instead of fresh? Yes, frozen broccoli works well here. It saves time and is easy to use. Just thaw it and drain any excess water before mixing it into your casserole. What can I serve with Cheesy Broccoli Rice Casserole? This dish pairs well with grilled chicken or roasted meats. You can also serve it with a side salad for freshness. It makes a great main or side dish for any meal. How do I know when the casserole is done baking? The casserole is done when it is hot and bubbly. The cheese on top should be melted and slightly golden. You can also check with a knife; it should come out clean. Can I add meat to the recipe? Absolutely! You can include cooked chicken, ham, or even ground beef. Just mix the meat in with the other ingredients before baking. What can I use instead of cream of mushroom soup? You can use cream of chicken soup or a homemade white sauce. If you want a dairy-free option, try a cashew cream or a thick vegetable broth. Are there any dairy-free options for this casserole? Yes, you can use dairy-free cheese and almond or oat milk. Make sure to check labels to ensure all ingredients fit your diet. This blog post shared a simple and tasty Cheesy Broccoli Rice Casserole recipe. We covered essential and extra ingredients, step-by-step instructions, and helpful tips. You can customize this dish to fit your taste and dietary needs. Feel free to mix in your favorite vegetables or cheeses. Remember, leftovers can be stored and reheated easily. Enjoy making this cheesy comfort food for your family today!](https://southerndishes.com/wp-content/uploads/2025/07/9792f75e-4f1d-4ac6-aec4-0bf8c855e545.webp)
Craving a warm, cheesy hug in a dish? Look no further than my irresistible Cheesy Broccoli Rice Casserole! This comforting
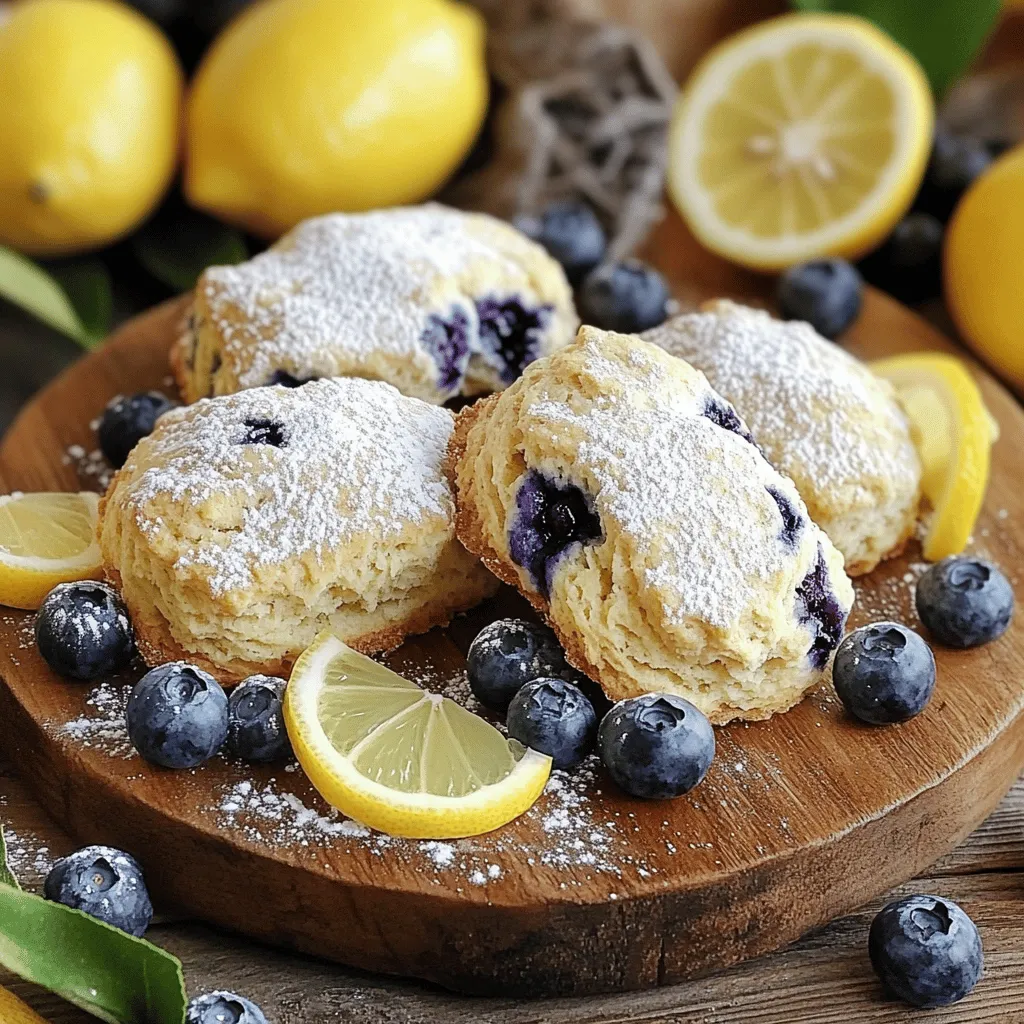
If you’re craving a burst of flavor, you’ll love these Blueberry Lemon Scones! These delightful treats blend fresh blueberries and
![To make a vegan chocolate mug cake, you need just a few simple items. Here’s what you’ll need: - 4 tablespoons all-purpose flour - 3 tablespoons cocoa powder - 3 tablespoons almond milk (or any plant-based milk) - 2 tablespoons maple syrup (or agave syrup) - 1 tablespoon vegetable oil - 1/4 teaspoon baking powder - A pinch of salt - 2 tablespoons dairy-free chocolate chips (optional) When choosing cocoa powder, look for high-quality brands. Dark cocoa gives a rich taste. Check for unsweetened cocoa, as sweetened options can alter the cake's flavor. For chocolate chips, opt for dairy-free ones. They melt nicely and add extra chocolatey goodness to each bite. If you don’t have almond milk, any plant-based milk works. Soy, oat, or coconut milk are great choices. For sweeteners, you can use agave syrup or any other liquid sweetener you prefer. If you need a gluten-free option, substitute all-purpose flour with a gluten-free flour blend. Make sure to use a blend meant for baking, as this will help achieve the right texture. To start, grab a microwave-safe mug. Add the dry ingredients first. This includes the flour, cocoa powder, baking powder, and salt. Mix these well with a fork. It helps to break any clumps. Next, pour in your wet ingredients: almond milk, maple syrup, and vegetable oil. Stir until you see a smooth batter. Make sure there are no dry bits at the bottom. This step is key for the cake’s texture. You want it fluffy and soft. If you like, fold in dairy-free chocolate chips for extra flavor. Now, it's time to cook. Place your mug in the microwave. Cook on high for about 1 minute and 30 seconds. Every microwave is different, so check at 1 minute. Look for rising cake. If it overflows, you need a shorter time next time. If it’s still wet, add a few more seconds. This step is so important for a perfect mug cake. Once your cake is done and cooled a bit, it’s time to serve. You can top it with whipped coconut cream for a treat. It adds a nice touch to the rich chocolate flavor. If you want a drink, pair it with almond milk or herbal tea. Both will complement the sweetness of your cake. Enjoy it right from the mug for a fun experience! For a full recipe, check out the entire guide. To make a great mug cake, avoid a few common mistakes. First, don’t overmix the batter. This can lead to a tough cake. Mix just until you see no dry flour. Second, watch your cooking time. Microwaves vary, so check at one minute. If it looks too wet, cook for a few more seconds. Lastly, use a larger mug. This helps prevent overflow while cooking. To achieve the perfect texture, ensure your ingredients are fresh. Old baking powder may not rise well. Use room temperature milk for a smoother mix. If your cake feels dense, you may have added too much flour. Stick to the measured amounts for the best results. To elevate your chocolate mug cake, consider adding extra ingredients. A tablespoon of peanut butter can give richness. Chopped nuts can add crunch and flavor too. You could try a splash of vanilla extract for warmth. Experimenting with spices can change your cake game. A dash of cinnamon adds warmth. A pinch of cayenne can give it a kick. Try adding a few drops of peppermint extract for a fresh twist. Each addition can turn a simple dessert into something special. For more ideas and the full recipe, check out the [Full Recipe]. {{image_2}} You can easily change the flavor of your vegan chocolate mug cake. Try adding a few drops of mint extract for a cool twist. Peanut butter can add a rich, nutty taste. Simply mix in a spoonful before cooking. You can also use fruit purees for a fresh flavor. Banana or apple sauce work well. These add moisture and sweetness without extra sugar. If you want a nut-free version, replace almond milk with oat milk or soy milk. You can also skip the oil for a lighter cake. Use applesauce or a bit of coconut yogurt instead. For a vegan sugar-free option, swap maple syrup for a sugar-free sweetener. Just make sure it measures the same as syrup. These simple swaps keep your dessert delicious and friendly for different diets. If you have leftover vegan chocolate mug cake, store it in an airtight container. This keeps it fresh for up to two days at room temperature. If you want to keep it longer, put it in the fridge. To reheat, use the microwave. Heat it for about 10 to 15 seconds. Check it often to avoid overheating. This keeps the cake soft and moist, just like fresh. You can freeze the mug cake batter or the cooked cake. For the batter, pour it into a freezer-safe container. Seal it tightly and label it with the date. It will last for about a month. When you want to use it, let it thaw overnight in the fridge. If you freeze the cooked cake, wrap it tightly in plastic wrap and then foil. This helps prevent freezer burn. To thaw, leave it in the fridge for a few hours or overnight. You can also warm it in the microwave for a quick snack. Enjoy it just like fresh! Yes, you can! If you don't have a microwave, you can bake the mug cake in the oven. - Preheat your oven to 350°F (175°C). - Pour the batter into a small, oven-safe dish. - Bake for about 15 to 20 minutes. - Check for doneness with a toothpick. It should come out clean when done. To check if your mug cake is done, look for a few signs: - The top should be set and no longer wet. - It should spring back when lightly touched. - The edges may pull away from the mug slightly. - A toothpick inserted into the center should come out clean. You can use other microwave-safe dishes for this recipe: - Small ramekins work well. - A glass bowl can also be a good choice. - Just make sure whatever dish you use is safe for the microwave. This blog post covered everything you need for a delicious vegan chocolate mug cake. We discussed key ingredients, helpful substitutions, and step-by-step instructions. You learned tips for success, flavor enhancements, and variations to try. Plus, we shared storage and reheating tips to keep your cake fresh. Making this mug cake is easy and fun. Enjoy exploring flavors and sharing it with friends. Now, it’s your turn to get started and enjoy this quick and tasty treat!](https://southerndishes.com/wp-content/uploads/2025/07/5e52054d-3d40-4213-8e9e-9db23d70865c.webp)
Craving something sweet but short on time? This Vegan Chocolate Mug Cake is your answer! In just minutes, you can
