Skip to content
DisclaimerTerms Of UseGDPR PolicyCookie Policy

Southern Dishes

  • Home
  • Drinks
  • Appetizers
  • Dinner
  • Dessert
  • About
  • Contact
  • Privacy Policy
DisclaimerTerms Of UseGDPR PolicyCookie Policy

Isabella

To make Sriracha honey cauliflower bites, gather these simple ingredients: - 1 medium head of cauliflower, cut into bite-sized florets - 1 cup all-purpose flour - 1 cup almond milk (or any milk of choice) - 1 cup breadcrumbs (panko for extra crunch) - 1 tablespoon olive oil - 1 teaspoon garlic powder - 1 teaspoon onion powder - ½ teaspoon salt - ½ teaspoon black pepper - ¼ cup Sriracha sauce - ¼ cup honey (or maple syrup for a vegan option) - 1 tablespoon soy sauce (or tamari for gluten-free) - Chopped green onions and sesame seeds for garnish You can swap ingredients for what you have on hand: - Use coconut milk or oat milk instead of almond milk. - Substitute whole wheat flour for all-purpose for a healthier option. - If you prefer a spicy kick, add more Sriracha to your sauce. - Maple syrup works great if you want a vegan option for honey. To keep your cauliflower bites fresh and tasty: - Choose a firm cauliflower head. It should feel heavy for its size. - Use fresh spices for the best flavor. Old spices can lose their punch. - Store leftover bites in an airtight container in the fridge. - For extra crispiness, reheat them in an oven or air fryer. For the complete recipe, check out the [Full Recipe]. To start, preheat your oven to 425°F (220°C). This keeps the bites crispy. Line a baking sheet with parchment paper for easy cleanup. Next, take a medium head of cauliflower and cut it into bite-sized florets. In a large bowl, toss the florets with one tablespoon of olive oil, one teaspoon of garlic powder, one teaspoon of onion powder, half a teaspoon of salt, and half a teaspoon of black pepper. Make sure all the florets are well-coated. This adds great flavor. In another bowl, whisk together one cup of all-purpose flour and one cup of almond milk until smooth. This will be your batter. Take each floret and dip it into the batter, letting any extra drip off. Then, roll it in one cup of breadcrumbs, making sure it is fully coated. Place each coated floret on the prepared baking sheet in a single layer. Bake in the oven for about 20 minutes. Turn them halfway through for even cooking. They should be golden and crispy. While the cauliflower bakes, prepare the sauce. In a small saucepan over low heat, mix together a quarter cup of Sriracha, a quarter cup of honey, and one tablespoon of soy sauce. Stir until warm and well-mixed. When the cauliflower is done baking, transfer it to a large bowl. Pour the warm Sriracha honey sauce over the bites and gently toss to coat them evenly. A few tips can help you achieve the best coating. First, use panko breadcrumbs for extra crunch. They make a big difference. Make sure the cauliflower is dry before coating. Moisture can prevent the batter from sticking well. If you want more flavor, add more spices to the flour batter. You can also let the coated bites rest for a few minutes before baking. This helps the coating stick better during cooking. For the full recipe, check out the details above. Enjoy your delicious snack! When making Sriracha honey cauliflower bites, avoid these pitfalls: - Not Preheating the Oven: Preheating helps the bites cook evenly. - Overcrowding the Baking Sheet: Give the bites space to get crispy. - Skipping the Coating Steps: The flour batter and breadcrumbs add texture and flavor. - Not Tasting the Sauce: Adjust the spice or sweetness to fit your taste. Using the right tools makes cooking easier. Here are my go-to items: - Baking Sheet: Use a large one to spread the bites out evenly. - Parchment Paper: It helps prevent sticking and makes cleanup easy. - Mixing Bowls: Have a couple ready for batter and coating. - Whisk: A whisk is handy for mixing the batter smoothly. - Tongs: Use tongs for easy flipping and coating of the cauliflower. These bites are great as a snack or party treat. Try these ideas: - With Dipping Sauce: Serve with ranch or blue cheese for a cool contrast. - On a Salad: Toss them on a bed of greens for a spicy crunch. - As a Side Dish: Pair with grilled meats or a hearty grain bowl. - Garnished: Add extra green onions or sesame seeds for a pop of color. For the full recipe of these bites, check out the complete guide above! {{image_2}} If you want a vegan twist, swap honey with maple syrup. This change keeps sweetness but makes it plant-based. You can also use any non-dairy milk. Almond, oat, or soy milk works well. For the batter, ensure you pick flour that fits your needs. Gluten-free flour can substitute all-purpose flour easily. Love heat? Add more Sriracha to the sauce for a fiery kick. You can also mix in chili powder or cayenne pepper. If you prefer a milder taste, reduce the Sriracha. A hint of sweet chili sauce can add flavor without too much spice. Balance is key to keep everyone happy! Get creative with add-ins! Try tossing in some chopped nuts for crunch or sesame seeds for extra flavor. You can also mix in grated carrots or zucchini for added nutrition. Top your bites with fresh herbs like cilantro or parsley for a fresh taste. Each variation brings a new twist to this dish! To keep your Sriracha honey cauliflower bites fresh, place them in an airtight container. Make sure they cool down first. Store them in the fridge for up to three days. This way, you can enjoy the flavors later without losing too much texture. Reheating these bites is simple. Preheat your oven to 350°F (175°C). Spread the cauliflower bites on a baking sheet. Bake for about 10-15 minutes. This method helps restore their crispy goodness. You can use an air fryer, too. Just heat them for 5-7 minutes at 350°F (175°C). If you want to freeze the bites, do it right after cooking. Let them cool entirely first. Place them in a freezer-safe bag or container. They can last up to three months in the freezer. When you’re ready to eat, thaw them overnight in the fridge. Reheat as mentioned above for best results. Keep the flavors fresh by following these steps! To make these bites extra crispy, use panko breadcrumbs. They add a nice crunch. You can also double-bake them. Bake the first time until golden, then coat in sauce and bake again. This helps lock in the crispiness. Don’t crowd the baking sheet; give them space. This allows hot air to circulate and crisp them up nicely. Yes, you can use frozen cauliflower. Just thaw it first and pat it dry. This helps remove excess moisture. When cauliflower is too wet, it won't crisp up well. After thawing, follow the same steps in the recipe. The flavor will still be great, but fresh cauliflower gives a better texture. To make these bites gluten-free, swap all-purpose flour for a gluten-free flour blend. You can also use gluten-free breadcrumbs instead of regular ones. Make sure the soy sauce is gluten-free or use tamari. This way, everyone can enjoy these tasty bites without concern. For the full recipe, check out the details above. We explored ingredients, steps, and tips to make delicious bites. You learned swaps for fresh ingredients and how to store leftovers. I shared common mistakes to avoid and how to make your dish unique. Remember, adjustments in spice and toppings can change flavor. With these insights, you can create bites that everyone will love. Enjoy your cooking adventure!

Sriracha Honey Cauliflower Bites Flavorful Snack Idea

If you’re craving a snack that’s bold and tasty, Sriracha Honey Cauliflower Bites are a perfect choice. These crunchy bites

- 1 can (15 oz) chickpeas, rinsed and drained - 2 tablespoons olive oil - 1 teaspoon smoked paprika - 1 teaspoon garlic powder - Salt and pepper, to taste - 4 cups mixed greens (arugula, spinach, and romaine) - 1 cup cherry tomatoes, halved - ½ cucumber, diced - ½ red bell pepper, diced - ¼ red onion, thinly sliced - ¼ cup feta cheese, crumbled (optional) - 2 tablespoons balsamic vinegar The crispy chickpea salad combines flavors and textures. The chickpeas add crunch and protein. Use rinsed and drained chickpeas for the best results. Olive oil helps them roast perfectly. Smoked paprika gives a rich flavor. Garlic powder adds depth. Adjust salt and pepper to your taste. For the greens, I love the mix of arugula, spinach, and romaine. They provide a fresh base. Cherry tomatoes bring sweetness and color. Cucumbers add a nice crunch. Red bell peppers offer a sweet touch, and red onions give a bit of bite. If you want a creamy element, feta cheese is a great choice. The balsamic vinegar ties it all together with a tangy burst. Each serving is packed with nutrients. You can expect a healthy amount of protein from the chickpeas. The salad is also rich in vitamins and minerals. If you want a lower-carb option, try other legumes like black beans. For a dairy-free choice, look for plant-based cheese to replace feta. These options keep the salad tasty and flexible for different diets. For the full recipe, check out the detailed steps later in this article. 1. First, preheat your oven to 400°F (200°C). This heat will make the chickpeas crispy. 2. Next, rinse and drain one can of chickpeas. Make sure to remove any excess water. 1. Spread the chickpeas on a baking sheet lined with parchment paper. 2. Drizzle two tablespoons of olive oil over the chickpeas. Then, add one teaspoon of smoked paprika and one teaspoon of garlic powder. 3. Sprinkle salt and pepper to taste. Toss everything until the chickpeas are well coated. 4. Bake for 25 to 30 minutes. Shake the baking sheet halfway through. Look for a golden-brown color and a crispy texture. 1. In a large bowl, mix together four cups of mixed greens, one cup of halved cherry tomatoes, half a diced cucumber, half a diced red bell pepper, and a quarter of a thinly sliced red onion. 2. Once the chickpeas cool slightly, add them to the salad. 3. If you like, sprinkle a quarter cup of crumbled feta cheese on top. 4. Drizzle two tablespoons of balsamic vinegar over the salad. Toss gently to mix all the flavors together. For the best crunch, serve immediately. You can find the full recipe above. To make your chickpeas crispy, start by rinsing and drying them well. This step is key. If you skip it, your chickpeas can turn out soggy. Use a clean kitchen towel to pat them dry after rinsing. Next, bake your chickpeas at 400°F (200°C). This high heat helps them crisp up. Bake for 25 to 30 minutes. Make sure to shake the pan halfway through. This ensures even cooking and a nice golden color. You can pair this salad with proteins like chicken or tofu. Both options add flavor and make the meal heartier. Serve the salad cold for a refreshing treat. However, you can also serve it warm if you prefer. To enhance the salad's look, add garnishes. Fresh herbs like parsley or cilantro add color and freshness. Serve the salad in a large, shallow bowl or on individual plates. Top it with a few extra crispy chickpeas for that wow factor. This small touch makes a big difference in how it looks! {{image_2}} You can make your crispy chickpea salad even better by adding toppings. Roasted veggies add a warm touch. Try carrots, zucchini, or bell peppers. Their flavors mix well with chickpeas. You can also add fruits for a sweet twist. Avocado brings creaminess, while pomegranate seeds add a burst of juiciness. Both give the salad a fresh taste. This salad is great for many diets. It’s vegan and vegetarian-friendly, thanks to chickpeas and veggies. For a gluten-free option, choose a gluten-free balsamic dressing. Many brands offer tasty dressings that fit this diet. Always check the label for hidden gluten. Use seasonal ingredients to keep the salad fresh. In spring, add peas or asparagus for a bright pop of color. Summer is perfect for ripe tomatoes or fresh corn. In fall, you can swap in roasted squash or sweet potatoes. For holiday themes, top the salad with cranberries or nuts for crunch. These swaps keep it exciting all year round. Make sure to check out the Full Recipe for more tips on making this dish. To keep your crispy chickpea salad fresh, store it in an airtight container. Use a container that fits the salad snugly. This helps prevent air from getting in and making your salad soggy. Place it in the fridge right after serving. To keep the chickpeas crispy, store them separately from the greens. Place them in a small bag or container without moisture. This way, they stay crunchy for later. When you are ready to eat, just toss them into the salad again. Can you freeze crispy chickpeas? Yes, you can freeze them! However, freezing may change their texture. They might lose some crunchiness when thawed. For best results, freeze chickpeas in a single layer on a baking sheet. Once frozen, transfer them to a freezer bag. This helps keep them from sticking together. When it is time to eat, thaw in the fridge overnight. To reheat, spread them on a baking sheet and bake at 400°F (200°C) for a few minutes. This brings back some of their crunch. How long can you keep the salad fresh? The salad stays good for about 3 days in the fridge. After that, the greens may wilt and lose flavor. Look for signs that the salad has spoiled. If you see brown or slimy greens, it’s time to toss it. A bad smell is also a clear sign that it is no longer good to eat. Make sure to check your salad often to enjoy it at its best! To make chickpeas crispy, start with dry ones. Rinse and drain them well. Pat them dry using a towel. Moisture can ruin crispiness. Toss them with olive oil and spices like smoked paprika. Bake them at 400°F (200°C) for 25–30 minutes. Shake the pan halfway through to ensure even cooking. Watch for a golden color, which means they are done. Yes, you can prepare this salad ahead of time. For meal prepping, keep the crispy chickpeas and salad fresh. Store the chickpeas in a separate container. Mix the greens and veggies in another. This keeps the crispiness intact. Add the dressing just before serving to avoid sogginess. You can serve this salad with various side dishes. Grilled chicken or tofu adds protein. It pairs well with quinoa or couscous for a hearty meal. For drinks, try a light white wine or sparkling water. These options enhance the flavors of the salad. This salad is perfect for meal prep. To prepare in bulk, double the recipe. Store the chickpeas in airtight containers. Use glass containers for better storage. They help keep everything fresh longer. Enjoy this easy, healthy meal throughout the week. For the full recipe, check out the Crispy Chickpea Salad section! This blog post covered a tasty crispy chickpea salad. We explored key ingredients, steps for prep, baking, and assembly. I shared tips for perfect chickpeas, serving ideas, and storage methods. You can enjoy this salad as a healthy meal that fits your diet. Experiment with variations for even more flavor. Keep it fresh and crispy for great taste every time! Enjoy crafting your new favorite salad!

Crispy Chickpea Salad Fresh and Flavorful Delight

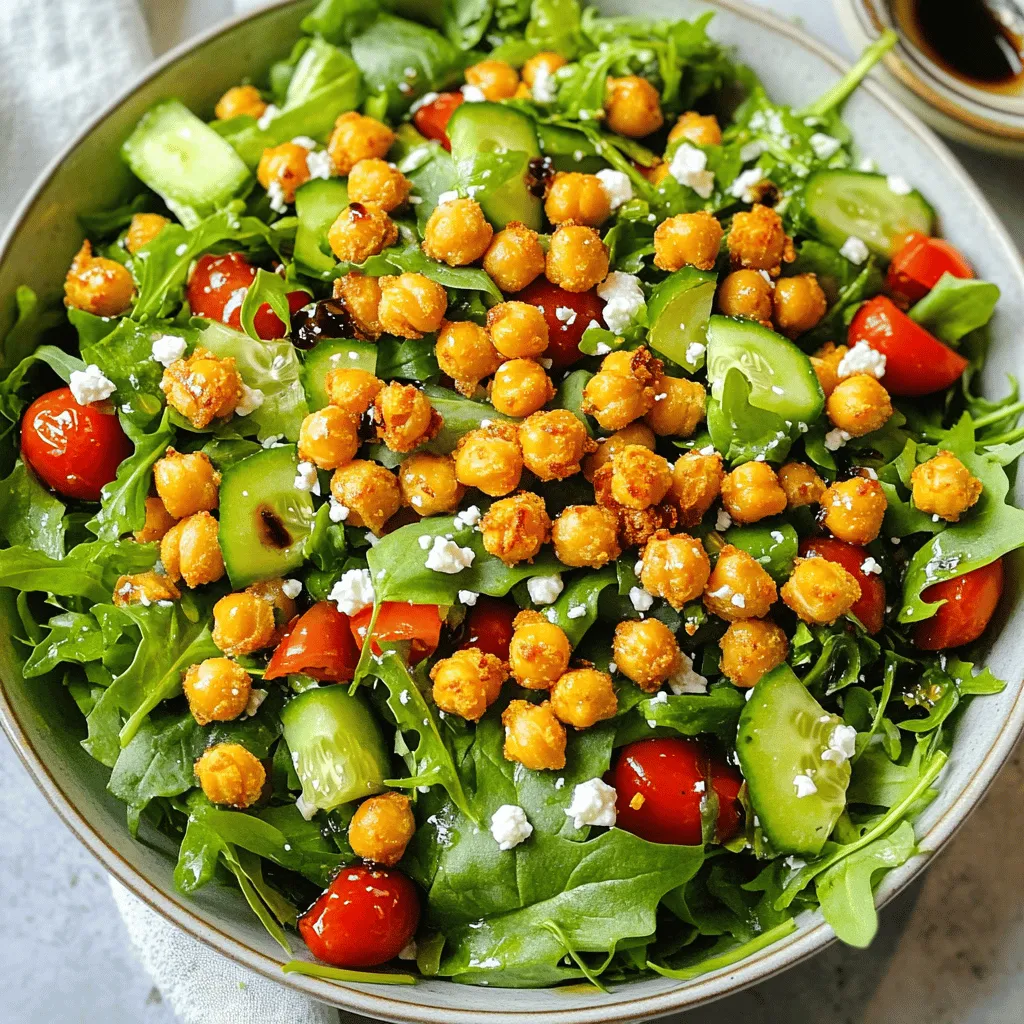
If you’re craving a salad that’s fresh, flavorful, and packed with crunch, look no further! My Crispy Chickpea Salad combines

- 1 pound flank steak, thinly sliced against the grain - 2 cups broccoli florets - 1/4 cup low-sodium soy sauce - 2 tablespoons oyster sauce - 1 tablespoon vegetable oil - 1 tablespoon sesame oil - Cornstarch and beef broth Gathering the right ingredients is key. Flank steak is my go-to because it is tender and flavorful. Slice it against the grain for the best texture. Broccoli brings crunch and bright flavor to this dish. You can use low-sodium soy sauce to keep the salt level down. Oyster sauce adds a nice depth and sweetness. Vegetable oil works well for cooking, while sesame oil gives a nutty finish. Cornstarch helps thicken the sauce, making it cling to the beef and broccoli. Beef broth adds extra flavor and makes the sauce rich. You can find all these items at your local grocery store or online. This recipe is simple and quick, perfect for busy nights. You can find the full recipe [here](#) to guide you through the cooking process. - Marinade the beef with sauces and spices: In a medium bowl, mix the soy sauce, oyster sauce, cornstarch, and half of the garlic and ginger. Add the flank steak, making sure each piece gets coated. Let it sit for 15-20 minutes. - Blanching the broccoli florets: Boil salted water in a pot. Add the broccoli and cook for 2-3 minutes until bright green. Drain and place it in ice water to stop cooking. Set it aside. - Sear the beef for optimal flavor: Heat vegetable oil in a large skillet over medium-high heat. Add the marinated beef in a single layer. Cook for 2-3 minutes without stirring. This helps create a nice sear. Stir-fry for another 2-3 minutes until browned. Remove the beef and set it aside. - Sauté garlic and ginger for aromatic enhancement: In the same skillet, add a bit more oil if needed. Toss in the remaining garlic and ginger. Cook for about 30 seconds until fragrant. - Mix the sautéed ingredients with marinated beef and broccoli: Pour in the beef broth and bring this mix to a simmer. Return the cooked beef and blanched broccoli to the skillet. Stir everything well. Let it simmer together for 2-3 minutes to meld the flavors. - Final adjustments and simmering to meld flavors: Drizzle in the sesame oil and stir to combine. Taste and adjust the seasoning with salt or extra soy sauce if you like. This dish comes together quickly and is full of flavor. For the full recipe, check out the details above. To make your beef tender, slice the flank steak thinly against the grain. This helps keep the meat juicy and soft. Marinate it for 15-20 minutes to let the flavors soak in. For the broccoli, timing is key. Blanch the florets for just 2-3 minutes in boiling salted water. This keeps them bright and crisp. I prefer using a wok for stir-frying. A wok heats evenly and allows for easy tossing. If you use a skillet, make sure it is heavy-bottomed to avoid hot spots. Also, using a thermometer helps check the beef doneness. Aim for 135°F for medium-rare. This ensures your meat is cooked just right. Add more veggies like bell peppers or snap peas for a colorful dish. You can also try homemade sauce alternatives. Mixing soy sauce with hoisin sauce or adding a touch of honey can elevate the flavor. Each option lets you personalize your dish for more fun! For the full recipe, check out the detailed instructions. {{image_2}} You can swap the beef for chicken or tofu. Thinly slice chicken breast and use it just like the beef. For tofu, press it to remove water, then cube and fry until golden. Both options work great! If you’re into seafood, try shrimp or scallops. Both cook quickly and add a light flavor. Just make sure to adjust cooking times to keep them tender. To make a vegan version, replace beef with tempeh or seitan. They give a nice texture. Use vegetable broth instead of beef broth to keep it plant-based. You can also switch out the sauces. Use a mix of soy sauce and hoisin sauce for a sweet kick. Check labels to ensure they’re vegan-friendly. Want some heat? Add chili flakes or sriracha to the dish. Start with a small amount and taste as you go. You can always add more! For a sweet and sour twist, toss in some pineapple chunks. They pair well with the savory beef and add a fun burst of flavor. To keep your Easy Beef and Broccoli fresh, use airtight containers. Glass or plastic containers work well. Make sure they seal tightly to avoid air. Store in the fridge for up to three days. If you want to keep it longer, freeze it. Beef and broccoli can last in the freezer for about three months. When reheating, avoid using high heat. Use the microwave for quick meals. Heat in short bursts to keep it juicy. Stir in between to ensure even heating. You can also reheat in a skillet. Add a splash of broth to keep it moist. If you freeze it, thaw overnight in the fridge before reheating. To save time, prepare your ingredients ahead of time. Slice the beef and store it in the marinade for one day. You can also wash and chop broccoli in advance. Keep them in the fridge until you are ready to cook. On busy weeknights, just reheat everything in a skillet for a quick meal. This is a great way to enjoy a healthy dish without much effort. For the full recipe, check out the complete guide above. You can serve this dish with several great sides. Here are my top picks: - Steamed white or brown rice - Noodles, such as lo mein or rice noodles - Fried rice for extra flavor - A side of spring rolls for crunch - Simple green salad with a light dressing Yes, you can prepare this dish ahead of time. Here’s how: - Short-term: You can marinate the beef up to 24 hours before cooking. Just store it in the fridge. - Long-term: You can freeze the beef after marinating. Thaw it overnight before cooking. The broccoli can also be blanched and stored in the fridge for a day. Tough beef usually comes from a few common mistakes. Here are some tips to avoid this: - Cut against the grain for tender slices. - Don’t overcook the beef; it should be just right. - Marinate the beef to help keep it tender. Use cornstarch in the marinade for better texture. Yes, you can use frozen broccoli. Here’s what to consider: - Pros: It’s quick and easy. Frozen broccoli is often pre-cut, saving you time. - Cons: It may not have the same crisp texture as fresh broccoli. It can also turn mushy if overcooked. Making this dish gluten-free is simple. Here are some alternatives: - Replace soy sauce with tamari, a gluten-free option. - Use coconut aminos instead of oyster sauce for a different flavor. Yes, Easy Beef and Broccoli can be a healthy choice. Here are some nutritional points: - It’s high in protein from the beef. - Broccoli adds fiber and vitamins. - Using low-sodium sauces helps keep sodium levels lower. For the full recipe, check out the complete guide to Easy Beef and Broccoli. This article showed you how to make Easy Beef and Broccoli. We covered the main ingredients, sauces, and seasonings you'll need. We reviewed cooking steps, best tips, and variations to suit your tastes. You can store leftovers and reheat them for quick meals. With these insights, cooking this dish can be easy and fun. Enjoy trying different flavors and adapting the recipe to your liking. You’ll impress everyone with your cooking skills!

Easy Beef and Broccoli Quick and Flavorful Recipe

Are you ready for a quick and tasty meal? My Easy Beef and Broccoli recipe is here to save your

To make the creamy chicken Alfredo bake, gather these simple ingredients: - 3 cups cooked rotini pasta - 2 cups cooked chicken breast, diced - 2 cups broccoli florets (fresh or frozen) - 1 cup Alfredo sauce (store-bought or homemade) - 1 cup shredded mozzarella cheese - 1 cup grated Parmesan cheese - 1 teaspoon garlic powder - 1 teaspoon Italian seasoning - Salt and pepper to taste - 2 tablespoons olive oil - Fresh parsley, chopped (for garnish) You can easily swap some ingredients if needed. Here are a few options: - Pasta: Use penne or fusilli instead of rotini. - Chicken: Cooked turkey or even chickpeas work well. - Broccoli: Try spinach, peas, or mixed veggies for a twist. - Alfredo Sauce: Use a creamy white sauce or a cheese sauce. - Cheese: Any melty cheese like gouda or cheddar can be used. Choosing fresh ingredients makes your dish taste better. Here’s how to do it: - Chicken: Look for chicken that is pink and firm. Avoid any that looks gray or slimy. - Broccoli: Choose bright green florets with no yellow spots. They should feel firm and fresh. - Cheese: Opt for cheese that is freshly grated or sliced. Pre-packaged cheese may not melt as well. - Pasta: Use high-quality pasta for better flavor and texture. Check the expiration date. For the full recipe, check back to get detailed instructions on how to create this tasty dish. Start by gathering all the ingredients. You need cooked rotini pasta, chicken, and broccoli. Chop the broccoli into small florets if using fresh. If you choose frozen, just rinse them under warm water. This helps them cook evenly. Measure out your Alfredo sauce, mozzarella, and Parmesan cheese. It’s best to have everything ready before you begin cooking. In a large bowl, mix the cooked rotini pasta, diced chicken, and broccoli florets. In another bowl, combine the Alfredo sauce with garlic powder, Italian seasoning, salt, and pepper. Stir this well until it’s smooth. Pour this mixture over the pasta, chicken, and broccoli. Toss everything together until all pieces are coated. This step ensures every bite is creamy and flavorful. Transfer the mixture into a greased 9x13 inch baking dish. Sprinkle the shredded mozzarella and grated Parmesan cheese evenly on top. Drizzle olive oil over the cheese for added flavor. Cover the dish with aluminum foil and bake in a preheated oven at 375°F (190°C) for 25 minutes. After that, remove the foil and bake for an extra 10-15 minutes. You want the cheese to be bubbling and golden brown. Let it cool a few minutes before serving. Garnish with fresh chopped parsley for a nice touch. For the full recipe, check the earlier section. To make the creamiest Alfredo sauce, start with high-quality ingredients. Use fresh cream or whole milk for richness. You can also blend in cream cheese for extra smoothness. Heat the sauce gently; do not let it boil. Stir in the cheese slowly until melted. This helps the sauce stay creamy and not clump. One common mistake is adding cheese too quickly. This can cause lumps in your sauce. Another mistake is not seasoning well. A pinch of salt and pepper can enhance the flavor. Avoid overcooking the pasta. It should be firm since it will bake more. Lastly, do not skip the olive oil drizzle. It adds flavor and helps the cheese brown. Creamy Chicken Alfredo Bake pairs well with a crisp salad. A simple green salad with lemon dressing works nicely. Garlic bread also complements this dish. You can serve it with a light white wine, like Pinot Grigio. For dessert, a light fruit sorbet refreshes the palate after the meal. For the full recipe, check out the detailed instructions above. {{image_2}} You can easily make a vegetarian version of this dish. Just swap the chicken for more veggies. Use 2 cups of mushrooms, bell peppers, or zucchini instead. These will add flavor and texture. You can also add beans for protein. The rest of the recipe stays the same. The Alfredo sauce works well with these veggies. If you need a gluten-free version, simply choose gluten-free pasta. Many brands offer rotini made from rice or corn. Check the labels to ensure they meet your needs. This change keeps the dish tasty without the gluten. The Alfredo sauce can also be gluten-free, so read the label carefully. Adding more vegetables boosts the nutrition of your bake. Try adding spinach, kale, or peas. These greens mix well with the pasta and sauce. You can also add carrots for a touch of sweetness. Aim for at least 2 cups of extra veggies. This way, you enjoy a balanced meal while keeping it creamy and delicious. If you want the full recipe, refer to the section above. To keep your creamy chicken Alfredo bake fresh, let it cool first. Transfer any leftovers to an airtight container. Store them in the fridge for up to three days. Make sure to cover the dish well if you leave it in the baking pan. This helps keep the moisture in. When you reheat your creamy chicken Alfredo bake, use the oven for the best results. Preheat your oven to 350°F (175°C). Place the leftovers in an oven-safe dish and cover it with foil. Heat for about 20 minutes. This keeps the dish creamy and warm. You can also add a splash of water or extra sauce for extra moisture. You can freeze creamy chicken Alfredo bake for longer storage. First, let it cool completely. Then, wrap it tightly in plastic wrap or foil. Place it in a freezer-safe container or bag. It can last up to three months frozen. When you're ready to eat it, thaw it overnight in the fridge. Then, reheat it in the oven for the best taste. For a quick meal, you can also bake it straight from frozen. Just increase the baking time to around 45-60 minutes. For Creamy Chicken Alfredo Bake, I recommend rotini. Rotini holds sauce well due to its twists. You can also use penne or fusilli if you prefer. These shapes keep every bite creamy and tasty. Yes, you can prepare this dish in advance. Just follow the recipe and assemble it in the baking dish. Cover it and store it in the fridge. When you’re ready to bake, add 10 extra minutes to the cooking time. This will help heat it through evenly. If you want a substitute for Alfredo sauce, try cream cheese or a white cheese sauce. You can also use a homemade blend of butter, cream, and parmesan. These options will still give you a creamy texture. For a lighter version, use Greek yogurt mixed with garlic and herbs. This will keep the flavor rich and delicious. For the complete method on how to make this dish, check out the Full Recipe. In this post, we covered key ingredients and their substitutions. I shared step-by-step instructions for prepping, cooking, and baking your dish. You found tips for a creamy sauce and common mistakes to avoid. We explored tasty variations, including vegetarian and gluten-free options. Lastly, I provided storage info and answered common FAQs. Remember, the secret to a great dish lies in fresh ingredients and careful prep. Happy cooking!

Creamy Chicken Alfredo Bake Simple and Tasty Recipe

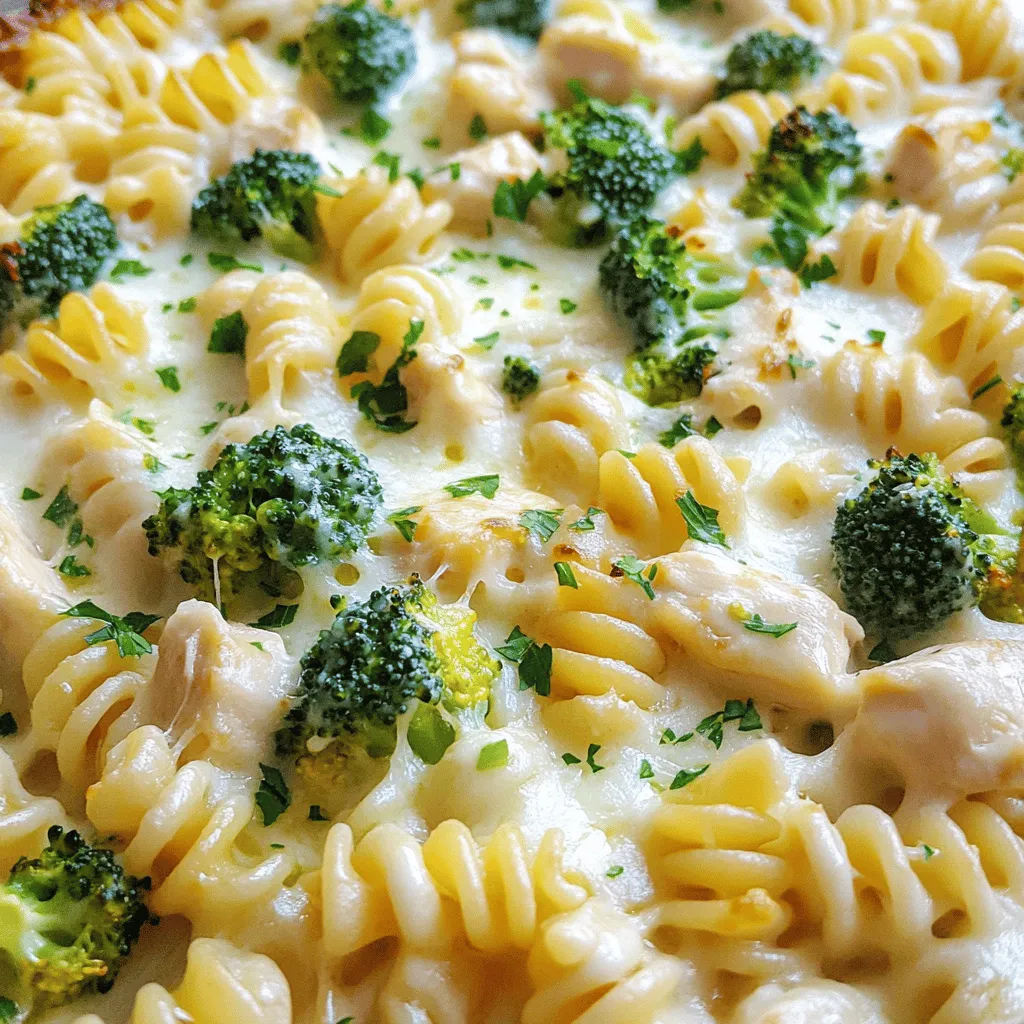
Are you ready to elevate your dinner game? My Creamy Chicken Alfredo Bake hits all the right notes. This easy

- Chicken thighs - Coconut milk - Red curry paste - Fresh vegetables - Coconut oil - Fish sauce or soy sauce - Brown sugar - Cooked rice - Garnishes like cilantro Coconut curry chicken is a delight that brings warm, tropical flavors to your plate. Here are the key ingredients you’ll need for this simple, tasty dish. Main Ingredients 1. Chicken thighs: I prefer using chicken thighs because they stay juicy and tender during cooking. They absorb flavors well, making each bite delicious. 2. Coconut milk: This adds a rich and creamy texture. It enhances the curry and gives it a smooth, velvety feel. 3. Red curry paste: This blend of spices gives your dish heat and depth. It's a key flavor in this recipe. 4. Fresh vegetables: Use colorful options like bell peppers and snap peas. These add crunch and nutrients. Pantry Staples 1. Coconut oil: This helps to sauté your ingredients and adds a hint of coconut flavor. 2. Fish sauce or soy sauce: Both add umami. Fish sauce gives a deeper taste, while soy sauce is a great vegetarian choice. 3. Brown sugar: A little sweetness balances the heat from the curry paste. Serving Suggestions 1. Cooked rice: Serve your curry over fluffy rice. This soaks up the sauce and completes the dish. 2. Garnishes like cilantro: Fresh herbs like cilantro add brightness and a pop of color. For those looking for a complete guide on how to prepare this dish, check out the Full Recipe. - Start by chopping your vegetables. You will need to finely chop the onion and slice the red bell pepper. - Next, cut the chicken thighs into bite-sized pieces. This helps them cook evenly. - Heat the coconut oil in a large skillet or pot over medium heat. - Add the chopped onion and sauté it for about 5 minutes. It should become soft and clear. - Stir in the minced garlic and grated ginger. Cook for an extra minute until you smell the great aroma. - Now, add the chicken pieces to the skillet. Cook for 5-7 minutes. Stir often until the chicken is brown on all sides. - Mix in the red curry paste. Make sure the chicken is well coated. Sauté for another 2 minutes to bring out the flavors. - Pour in the coconut milk and chicken broth. Add the fish sauce and brown sugar. Stir well to combine everything. - Bring your mixture to a gentle simmer. Then, add the sliced bell pepper and snap peas or green beans. - Let it simmer for about 10 minutes. The veggies should be tender but still crisp, and the chicken cooked through. - Just before serving, stir in the baby spinach and let it wilt for a minute. - Taste the curry and adjust the seasoning. Add more fish sauce or sugar if you want. - Serve the curry hot over cooked rice. Don’t forget to garnish it with fresh cilantro for a beautiful finish. For the full recipe, check out the Tropical Coconut Curry Chicken section. - Proper heat management: Start on medium heat. This helps cook the chicken evenly. If the heat is too high, the chicken may burn. Adjust as needed during cooking. - Timing for adding vegetables: Add hearty veggies like bell peppers early. For quick-cooking greens, like spinach, add them last. This keeps them vibrant and fresh. - Recommended spices or extra ingredients: Try adding lime juice for brightness. You can also toss in a tablespoon of peanut butter for creaminess. These small changes can enhance the dish. - Balancing flavors with seasoning: Taste as you cook. If it's too sweet, add a dash of fish sauce. If it needs depth, extra curry paste works wonders. - Serving style: Serve the curry in deep bowls. This allows the vibrant colors to shine. Pair with white rice to create a beautiful contrast. - Garnishing ideas: Top with fresh cilantro and lime wedges. A sprinkle of sesame seeds adds crunch and looks great. {{image_2}} You can easily make this dish vegetarian or vegan. Simply swap the chicken for tofu or chickpeas. Tofu adds protein and absorbs the curry's flavor well. For chickpeas, use canned ones for quick cooking. Both options work great and make the dish filling. If you don't have coconut milk, you can use almond milk or oat milk. These alternatives will change the flavor slightly but still taste good. For vegetables, feel free to mix and match. Carrots, zucchini, or even broccoli can add color and crunch. Use what you have on hand for a personal touch. You can also try different styles of coconut curry. For a Thai-style curry, use basil and lime leaves for a fresh twist. Adding fish sauce gives it an authentic flavor. For an Indian-style coconut chicken curry, add cumin and coriander for spice. Each version brings a unique taste and flair to the dish. You can store coconut curry chicken in the fridge for up to 3 days. Make sure to cool it down first before placing it in an airtight container. This helps keep it fresh and tasty. To freeze coconut curry chicken, let it cool completely. Then, place it in a freezer-safe container or bag. Squeeze out as much air as you can. Label it with the date. It can be frozen for up to 3 months without losing flavor. When you’re ready to eat, thaw it overnight in the fridge. For reheating, you can use the microwave or stovetop. If using the stovetop, heat it over low heat. Stir often to keep it from sticking. You may want to add a splash of coconut milk or broth to keep it moist. These methods help keep the curry fresh and delicious. Coconut curry chicken is a warm and creamy dish. It features chicken cooked in coconut milk and red curry paste. The dish has rich flavors from garlic, ginger, and spices. You can add fresh veggies like bell peppers and spinach for color and crunch. This meal is perfect over rice, making it filling and delicious. To make coconut curry chicken less spicy, use less red curry paste. Start with just one tablespoon and taste the dish as you cook. You can also add more coconut milk to cool the heat. If you want, include extra veggies like carrots or peas to balance the spice. Yes, you can use frozen chicken. If you use frozen chicken, cook it for longer to ensure it's safe. Thawing the chicken overnight in the fridge is best. If in a hurry, you can cook chicken directly from frozen. Just add extra time to your cooking. Coconut curry chicken is great with cooked rice. The rice soaks up the tasty sauce. You can also serve it with naan bread, which is perfect for dipping. Steamed broccoli or a fresh salad can add color and freshness to your plate. To make coconut curry chicken gluten-free, use gluten-free soy sauce or skip it. Check that your red curry paste is gluten-free, as some brands may contain wheat. Coconut milk is naturally gluten-free, so you can use that without worry. Enjoy a tasty meal that fits your diet! This blog post covered the key ingredients for coconut curry chicken, including chicken thighs and coconut milk. You learned the cooking steps, tips for best practices, and how to serve. We explored variations for different diets, along with storage and reheating guidelines. Coconut curry chicken is simple, tasty, and versatile. With this knowledge, you can make your own delicious versions at home. Enjoy creating dishes that thrill your taste buds!

Coconut Curry Chicken Flavorful and Simple Recipe

Craving a warm, comforting dish? My Coconut Curry Chicken recipe is both flavorful and simple! With juicy chicken thighs, creamy

For a great Peach Caprese Salad, you need fresh, tasty ingredients. Here’s what you’ll need: - 2 ripe peaches, sliced - 8 oz fresh mozzarella, sliced - 1 cup fresh basil leaves Using ripe peaches is key. They should feel soft but not mushy. The mozzarella should be fresh and creamy. Look for a good-quality brand for the best taste. Fresh basil adds a sweet aroma and bright flavor. You also need some simple seasonings to make the flavors pop. Here are the essentials: - 2 tablespoons balsamic glaze - 1 tablespoon olive oil - Salt and pepper to taste Balsamic glaze brings a tangy sweetness that pairs well with peaches. Olive oil adds richness. Salt and pepper balance the flavors perfectly. You can choose different types of balsamic glaze. Here are a few ideas: - Traditional balsamic for a classic taste - Fig balsamic for a fruity twist - Honey balsamic for extra sweetness Each type of glaze can change the flavor profile of your salad. Try them out to find your favorite! For the full recipe, refer to the section above. Start by washing the peaches. Use cold water to rinse them well. After that, slice the peaches into even wedges. This will show off their juicy insides. Next, grab the fresh mozzarella. Slice it into rounds that match the size of the peach slices. This helps the salad look great and taste good. Now, let’s build the salad. Take a large serving platter. Start layering the peach and mozzarella slices in an alternating pattern. You can create a circular shape for a pretty look. Next, tuck fresh basil leaves between the peach and mozzarella slices. This adds a fresh taste and a nice pop of green. For the final touches, drizzle olive oil over the whole salad. It adds richness and flavor. Then, drizzle balsamic glaze on top. This gives the dish a sweet and tangy kick. Don’t forget to season with salt and freshly cracked pepper. This enhances all the flavors. Serve the salad right away for the best taste. If you want, you can chill it for about 10 minutes. This melds the flavors nicely. Check out the Full Recipe for more details on this delightful dish. To make a great Peach Caprese Salad, start with ripe peaches. Look for peaches that feel soft but not mushy. They should smell sweet and fruity. When it comes to mozzarella, choose fresh mozzarella. It should feel slightly springy and moist. If possible, buy it from a local market. This gives you the freshest flavor. To make your salad even better, add a sprinkle of fresh herbs. Chives or mint can add a nice twist. You can also try adding a pinch of red pepper flakes for some heat. If you want a sweet touch, drizzle honey over the top. This balances the tangy balsamic glaze. Experiment with flavors that you enjoy. Presentation makes a dish more appealing. Arrange peach and mozzarella slices in a circle. This creates a beautiful pattern. You can use a large white plate for contrast. Add fresh basil leaves in between the layers for color. Drizzle the olive oil and balsamic glaze just before serving. This keeps the colors bright and fresh. For a fun touch, serve with small forks or skewers. It makes for easy eating! Check out the Full Recipe for detailed instructions and tips! {{image_2}} You can swap out the peaches for other fruits. Try ripe nectarines or juicy plums. They add a sweet and tart flair. You can also use burrata cheese instead of mozzarella. Burrata gives a creamier texture and rich taste. For a touch of spice, add some thinly sliced jalapeños. This twist brings heat and depth to the dish. Seasonal ingredients can change your salad's flavor. In summer, use fresh berries along with peaches. Strawberries or blueberries brighten up the dish. In fall, consider adding roasted butternut squash. It adds warmth and earthiness. You can also sprinkle in pomegranate seeds in winter for color and crunch. Adjusting ingredients based on seasons keeps the salad fresh. You can easily make this salad vegan. Just skip the mozzarella and use marinated tofu instead. It adds protein and flavor. For a gluten-free option, enjoy this salad as is. All the ingredients are naturally gluten-free. If you want more crunch, add nuts like walnuts or pecans. These options keep the salad tasty and healthy. Want more ideas or the full recipe? Check out the Full Recipe! Store any leftover Peach Caprese Salad in an airtight container. This keeps the salad fresh and safe. I recommend using glass containers, as they do not hold odors. Keep the salad in the fridge for up to two days. After that, the peaches may get mushy. To keep the salad fresh, layer ingredients with care. Place basil leaves on top. This helps keep moisture away from the peaches and cheese. If storing for a short time, add the balsamic glaze just before serving. This will maintain the salad's bright look and flavor. You do not need to reheat this salad. Peach Caprese is best served cold, straight from the fridge. If you prefer a warm dish, consider making a warm peach salad instead. For that, grill or roast the peaches and serve with cheese and basil. For the full recipe, refer to the instructions provided above. The best time to make Peach Caprese Salad is in summer. That’s when peaches are at their sweetest. You want ripe, juicy peaches for the best flavor. This salad also shines at picnics or barbecues. The fresh flavors make it perfect for warm days. Yes, you can add other fruits! Try using strawberries, nectarines, or even berries. These fruits pair well with mozzarella and basil. They add different tastes and colors. Feel free to mix and match based on what you like. The salad lasts about two days in the fridge. However, it’s best fresh. The peaches can get mushy over time. Keep it in a covered container to save space and flavor. If you want to enjoy it longer, store the ingredients separately. You can prep some parts ahead of time. Slice the peaches and mozzarella earlier in the day. However, I recommend assembling it right before serving. This keeps the salad fresh and colorful. You want to enjoy the best taste possible! For the full recipe, check out the earlier section. In this blog post, we explored how to make a delicious Peach Caprese Salad. We covered fresh ingredients, essential seasoning, and tasty balsamic glaze options. You learned step-by-step instructions for preparing peaches and mozzarella, along with fun assembly tips. We shared tricks for picking the best ingredients, enhancing flavors, and creative presentation ideas. You discovered variations for different seasons and dietary needs, plus smart storage tips for leftovers. Enjoying this salad can brighten any meal. Give it a try for a fresh twist!

Peach Caprese Salad Fresh and Flavorful Delight

If you’re looking for a fresh and vibrant dish, you’ll love Peach Caprese Salad. This simple salad combines juicy peaches

- 4 salmon fillets (about 6 oz each) - 2 tablespoons olive oil - Zest and juice of 1 lemon - 3 cloves garlic, minced - 1 teaspoon fresh dill, chopped - 1 teaspoon fresh parsley, chopped - 1 teaspoon fresh thyme, chopped - Salt and pepper to taste - Lemon wedges - Fresh herbs for garnish When choosing salmon, look for bright color and firm texture. Fresh salmon makes a big difference. The olive oil adds richness, while lemon brightens the dish. The zest gives a strong, fresh lemon flavor. For herbs, fresh is best. They enhance the salmon’s taste. Garlic adds depth and aroma. Dill, parsley, and thyme complement the fish perfectly. Finally, garnish your dish with lemon wedges and extra herbs. This adds beauty and fresh flavor. You can find the full recipe for Lemon Herb Grilled Salmon [here](#). - First, prepare the marinade. In a small bowl, whisk together: - 2 tablespoons olive oil - Zest and juice of 1 lemon - 3 cloves garlic, minced - 1 teaspoon fresh dill, chopped - 1 teaspoon fresh parsley, chopped - 1 teaspoon fresh thyme, chopped - Salt and pepper to taste This mix adds a bright flavor to the fish. - Next, coat the salmon fillets in the marinade. Make sure to cover them well. Place the fillets in a shallow dish and pour the marinade over them. Cover the dish and refrigerate for at least 30 minutes. For more flavor, you can marinate them for up to 2 hours. - Now, it's time to preheat the grill. Set it to medium-high heat. This helps the salmon cook evenly. - Oil the grill grates to prevent sticking. You can use a paper towel soaked in oil or a grill spray. This step is key to keeping the salmon intact while grilling. - Once the grill is hot, carefully place the salmon fillets on the grill, skin-side down. This helps protect the fish while it cooks. - Grill the salmon for about 6 to 8 minutes. The cooking time depends on the thickness of the fillets. Check for doneness: the salmon should be opaque and flake easily with a fork. - Flip the salmon halfway through cooking for nice grill marks. This also ensures even cooking. - After grilling, remove the salmon from the grill. Let it rest for a couple of minutes. Resting allows the juices to settle, making the salmon more tender. Feel free to check out the Full Recipe for more details! Grilling salmon can be fun and simple. Here are some tips to make it perfect. - Ideal grill temperature: Set your grill to medium-high heat. This gives you nice grill marks and helps the salmon cook evenly. Aim for about 375°F to 400°F. - Timing for varying thicknesses: The cook time depends on how thick your salmon is. For fillets that are about one inch thick, grill for 6-8 minutes. Thicker fillets will need more time, around 10-12 minutes. Always check if the salmon flakes easily with a fork. To make your grilled salmon even better, try these ideas. - Adding other herbs or spices: You can mix in herbs like basil or cilantro for a twist. A pinch of paprika can also add a smoky taste. Experiment with what you like! - Suggestions for citrus variations: Lemon is great, but don’t stop there! Try lime or orange juice for a fresh flavor. Citrus adds brightness and pairs well with the fish. If grilling isn't an option, you can still enjoy this dish. - Oven-baking instructions: Preheat your oven to 400°F. Place the salmon on a lined baking sheet. Bake for about 12-15 minutes, or until it is cooked through and flakes easily. - Stovetop options: Heat a non-stick skillet over medium heat. Add a bit of oil and cook the salmon for about 4-5 minutes on each side. This method gives a nice sear and keeps the salmon moist. For the full recipe, check out the instructions above and enjoy! {{image_2}} You can change the flavor of your salmon with different marinades. One fun option is honey mustard. To make this, mix honey, Dijon mustard, and olive oil. This blend adds a sweet tang that pairs well with the fish. Another great choice is a spicy chipotle version. Just add chipotle in adobo sauce to your olive oil and lemon juice. This will give your salmon a nice kick. Both of these marinades are easy to prepare and will excite your taste buds. If you want to switch up the fish, you have many options. Try using trout or mackerel instead of salmon. Both have rich flavors and grill well. They can absorb the lemon herb marinade nicely, too. For a vegetarian option, consider using portobello mushrooms. Their meaty texture makes them a great stand-in for fish. Marinate them just like the salmon and grill until tender. You will enjoy the smoky, herb-infused flavor. Pair your grilled salmon with tasty side dishes. Roasted vegetables or a fresh salad work well. You can also serve it with rice or quinoa for a heartier meal. These sides will complement the bright flavors of the salmon. When it comes to drinks, consider a crisp white wine, like Sauvignon Blanc. Its acidity balances the richness of the salmon. For a non-alcoholic option, serve sparkling water with lemon. This keeps the meal refreshing and light. For the full recipe, check out the [Full Recipe]. To store leftover salmon, place it in a shallow dish. Cover it tightly with plastic wrap or foil. You can also use an airtight container for better freshness. Make sure to refrigerate the salmon within two hours of cooking. This keeps it safe and tasty. Leftover salmon lasts in the fridge for up to three days. You can freeze salmon both before and after cooking. If you freeze it raw, wrap each fillet in plastic wrap. Then, place them in a freezer bag. Be sure to remove as much air as possible. Frozen raw salmon can last up to three months. If you freeze cooked salmon, let it cool first. Wrap it tightly in foil or plastic wrap. Place it in a freezer-safe bag. Cooked salmon also stays good for about three months. When you're ready to eat frozen salmon, thaw it in the fridge overnight. This helps keep the texture nice and smooth. For quicker thawing, you can use cold water. Just put the salmon in a sealed bag and submerge it in cold water for an hour. To reheat grilled salmon, you have a few good options. You can use the oven, stovetop, or microwave. If using the oven, preheat it to 275°F (135°C). Place the salmon on a baking sheet. Cover it with foil to avoid drying out. Heat for about 15 minutes, or until warmed through. If you prefer the stovetop, use a skillet over low heat. Add a splash of water or broth to keep it moist. Heat for about 5 minutes, flipping halfway through. For the microwave, place the salmon on a microwave-safe plate. Cover it with a damp paper towel. Heat in short bursts of 30 seconds to avoid overcooking. No matter how you reheat, check for dryness. Keeping it moist is key to enjoying your leftover salmon. I recommend marinating the salmon for at least 30 minutes. This time allows the flavors to soak in. You can marinate it for up to 2 hours if you want a stronger taste. Just don't go over 2 hours, as the acid from the lemon can make the fish mushy. Grilled salmon should reach an internal temperature of 145°F. This ensures the fish is safe to eat and still moist. You can use a meat thermometer to check the temperature. When it flakes easily with a fork, it is likely ready. Yes, you can use frozen salmon. However, it is best to thaw it before grilling. Cooking frozen salmon directly can lead to uneven cooking. To thaw, place it in the refrigerator overnight. If you are short on time, you can run it under cold water for about 30 minutes. Make sure to pat it dry before marinating and grilling. You now know how to grill salmon perfectly. We covered key ingredients, marinade tips, and cooking methods. I shared ways to elevate your salmon's flavor and explore variations. You learned proper storage to keep leftovers tasty. With these steps, you can enjoy delicious grilled salmon any time. Enjoy experimenting with new flavors and techniques. Happy cooking!

Lemon Herb Grilled Salmon Flavorful and Simple Recipe

If you’re looking for a quick, tasty meal, you’ve found it! This Lemon Herb Grilled Salmon recipe is simple yet

To create delicious stuffed zucchini boats, gather these fresh ingredients: - 4 medium zucchinis - 1 cup quinoa, rinsed - 2 cups vegetable broth - 1 cup cherry tomatoes, halved - 1/2 cup black olives, sliced - 1/2 cup feta cheese, crumbled - 1/4 cup fresh basil, chopped - 1 teaspoon dried oregano - 2 tablespoons olive oil - Salt and pepper to taste - 1/2 cup mozzarella cheese, shredded These ingredients come together to make a balanced meal. The quinoa adds protein, while the zucchini serves as a low-carb base. The combination of feta, olives, and basil brings a burst of Mediterranean flavor. For the full recipe, refer to Cheesy Mediterranean Stuffed Zucchini Boats. Each bite will surely delight your palate! How to prepare zucchini To start, grab your zucchinis. Slice them in half lengthwise. Use a spoon to scoop out the center flesh. Leave about a 1/4-inch thick shell. Set the scooped-out flesh aside for later. This will make your zucchini boats ready for stuffing. Cooking the quinoa Next, boil 2 cups of vegetable broth in a medium saucepan. Add 1 cup of rinsed quinoa. Reduce the heat and cover it. Let it simmer for about 15 minutes. The quinoa will become fluffy and absorb all the liquid. Once it's done, take it off the heat and set it aside. Sautéing the filling mixture Now, heat 2 tablespoons of olive oil in a skillet over medium heat. Add the reserved zucchini flesh, 1 cup of halved cherry tomatoes, and 1/2 cup of sliced black olives. Sauté this mix for about 5 to 7 minutes. You want the mixture to soften and blend together nicely. Stuffing the zucchini boats In a large bowl, combine the cooked quinoa, sautéed mixture, 1/2 cup of crumbled feta cheese, 1/4 cup of chopped basil, 1 teaspoon of dried oregano, salt, and pepper. Mix everything well. Generously stuff each zucchini half with this tasty filling. Press it down lightly to pack it in. Baking instructions Preheat your oven to 375°F (190°C) and line a baking dish with parchment paper. Place the stuffed zucchini in the dish. Sprinkle 1/2 cup of shredded mozzarella cheese on top of each boat. Tips for checking doneness Bake in the oven for 25 to 30 minutes. The zucchini should be tender, and the cheese should be bubbly and golden brown. To check, use a fork to poke the zucchini. If it goes in easily, they are ready. Let them cool for a few minutes before serving. Enjoy your healthy meal! For the full recipe, see above. To get the perfect texture when cooking zucchini, choose fresh and firm zucchinis. Cut them evenly to ensure they cook at the same rate. When you scoop out the center, leave a little flesh for flavor. This helps the zucchini stay strong while baking. To prevent sogginess, avoid overcooking your zucchini. Bake them just until they are tender. You can also sprinkle them with salt before baking. This draws out extra moisture so they stay firm. For tasty seasonings, try garlic powder, paprika, or even a pinch of cayenne. These spices add depth without overpowering the dish. You can also toss in fresh herbs like parsley or thyme for freshness. If you want to change up the cheese, consider using goat cheese for a tangy flavor, or even vegan cheese for a plant-based twist. Each cheese brings its own charm, so feel free to mix and match based on your taste. For the full recipe, check out Cheesy Mediterranean Stuffed Zucchini Boats. {{image_2}} You can change the filling in stuffed zucchini boats to fit your taste. For meat lovers, ground turkey or beef works great. Simply brown the meat before mixing it with the other filling ingredients. You can also use cooked chicken for a lighter option. For those who prefer plant-based meals, try lentils or black beans. Both add protein and are full of flavor. You can also use cooked rice or farro for a hearty filling. If you're vegan, skip the cheese or use a plant-based cheese alternative. Want to add some heat? Chop up jalapeños or add crushed red pepper to your filling. This gives your dish a nice kick. For milder flavors, add sweet bell peppers or fresh herbs like parsley or cilantro. Spices can also enhance your dish. Try adding cumin, smoked paprika, or garlic powder for depth. Fresh herbs like thyme or rosemary bring a unique taste. The beauty of stuffed zucchini boats is their versatility, so feel free to get creative! For the full recipe, check out the Cheesy Mediterranean Stuffed Zucchini Boats. To keep your stuffed zucchini boats fresh, place them in a sealed container. You can store them in the refrigerator for up to three days. Make sure they cool to room temperature before sealing. If you have more zucchini boats than you can eat, freezing is a great option. Wrap each boat in plastic wrap and place them in a freezer bag. They can last up to three months in the freezer. When it comes to reheating, I suggest using the oven. Preheat your oven to 350°F (175°C). Place the stuffed zucchini boats in a baking dish and cover with foil. Heat for about 15 minutes or until warmed through. This method keeps the zucchini tender and the filling moist. You can also use the microwave for quick reheating. Place them on a microwave-safe plate and cover. Heat in short bursts of one minute until hot. Just be careful, as the microwave may make the zucchini a bit soggy. Can I make stuffed zucchini boats in advance? Yes, you can! Prepare the zucchini and filling ahead of time. Stuff the zucchini just before baking. This helps keep them fresh and tasty. You can also freeze the stuffed zucchini before baking. Just thaw before cooking. What other vegetables can I use? You can use bell peppers, eggplants, or mushrooms. These veggies add great flavor and texture. Mix and match based on what you like. Just remember to adjust cooking times if needed. Are there gluten-free options for this recipe? Absolutely! Quinoa is naturally gluten-free. Use it as your base. Make sure to check your vegetable broth for gluten-free labels. This way, everyone can enjoy the dish with no worries! Caloric content and macros per serving Each serving has about 300 calories. It contains 10 grams of protein and 15 grams of fat. You also get 35 grams of carbs, making it a balanced meal. Health benefits of the main ingredients Zucchini is low in calories and high in water. This keeps you hydrated. Quinoa is a complete protein, full of fiber. Cherry tomatoes provide vitamins A and C. Feta cheese adds calcium and flavor. All these ingredients work together to nourish your body! Stuffed zucchini boats offer a tasty and healthy dish. We covered the ingredients, from fresh zucchinis to flavorful quinoa. You learned how to prepare, stuff, and bake them. Plus, I shared tips to avoid sogginess and enhance flavor. Exploring variations keeps this dish exciting for everyone, regardless of dietary needs. Remember, you can store leftovers and enjoy them later. With these steps, you can create a delicious meal that's sure to please. Happy cooking!

Stuffed Zucchini Boats Healthy and Quick Meal Idea

Looking for a tasty and healthy meal that’s quick to make? Stuffed zucchini boats are your answer! These vibrant, veggie-filled

To make a tasty Peanut Butter Banana Smoothie, gather these simple ingredients: - 2 ripe bananas, frozen - 2 tablespoons natural peanut butter - 1 cup unsweetened almond milk (or milk of choice) - 1 tablespoon honey or maple syrup (optional for sweetness) - 1/2 teaspoon vanilla extract - 1/4 teaspoon cinnamon - 1 tablespoon chia seeds (optional for added nutrition) - Ice cubes (if needed for thickness) These ingredients blend to create a rich and creamy smoothie. The frozen bananas give it a smooth texture. Natural peanut butter adds a nutty flavor and healthy fats. Almond milk keeps it light, while honey or maple syrup sweetens it up. Vanilla and cinnamon round out the taste with warmth. Chia seeds are a great way to add fiber and omega-3s. If you like it thicker, ice cubes can help. You can find the full recipe in the section above, which shows you how to make this delightful drink step-by-step. Enjoy the blend of flavors and nutrition with every sip! - Prepare Ingredients: Start by peeling the frozen bananas. Break them into chunks. This makes blending easier and quicker. - Add Ingredients to Blender: In your blender, combine the banana chunks with peanut butter, almond milk, honey or maple syrup, vanilla extract, cinnamon, and chia seeds. This mix brings a great flavor. - Blend Until Smooth: Blend the mixture on high speed. Keep blending until it is creamy and smooth. If it feels too thick, add a bit more almond milk to make it easier to pour. - Adjust Sweetness: After blending, taste your smoothie. If you want it sweeter, add more honey or maple syrup. Blend again for a few seconds to mix it in well. - Pour and Serve: Pour your smoothie into tall glasses. For a fun touch, sprinkle some cinnamon or drizzle peanut butter on top. This makes it look even more appealing. Enjoy your smoothie with a straw for a delightful sipping experience. To create the best peanut butter banana smoothie, you want a creamy texture. Here are some tips for blending: - Use frozen bananas. They add thickness and chill to the smoothie. - Start with liquids first. Pour the almond milk into the blender first. This helps the blades move smoothly. - Add ingredients in layers. Place heavier items like peanut butter on top of the lighter items. This method prevents clumping. Chia seeds are a great option to consider. They add fiber and omega-3s. Plus, they thicken the smoothie a bit, giving it a nice texture. Want to boost the flavor? Here are some fun ideas: - Add a pinch of nutmeg or ginger. These spices can bring warmth and depth to your smoothie. - Try a scoop of cocoa powder. This will give a chocolatey twist that pairs well with peanut butter. - Include a splash of coffee. It gives a nice kick and enhances the flavor profile. For presentation, serve your smoothie in tall glasses. You can garnish with sliced banana on top. A sprinkle of crushed nuts adds a lovely crunch. Enjoy it with a straw for a fun touch. For the full recipe, check out the creamy dreamy peanut butter banana smoothie! {{image_2}} Add Greens: Adding spinach or kale can boost nutrition. These greens blend well and add vitamins without changing the taste much. Spinach is mild, while kale gives a slight earthy note. You can start with a small handful and blend it in. This helps you sneak in extra nutrients, especially if you want a healthy kick. Protein Boost: If you want more protein, you can add protein powder or Greek yogurt. Both options add creaminess. They help keep you full longer, too. A scoop of protein powder mixes well without altering the flavor. Greek yogurt thickens the smoothie and adds a tangy taste. Choose plain yogurt to avoid extra sugar. Different Nut Butters: You can swap peanut butter for almond butter or cashew butter. Almond butter offers a nutty flavor and is slightly sweeter. Cashew butter is creamier and has a milder taste. Each option gives a unique twist to your smoothie. Feel free to experiment to find your favorite nut butter. Fruit Mix-ins: You can add other fruits for fun flavors. Try berries like strawberries or blueberries for a burst of color and taste. Mango adds a tropical flair, while apples give a crisp touch. Use what you have on hand or what you love most. Mixing fruits can change the whole vibe of your smoothie! For the complete recipe, don’t forget to check out the Full Recipe. To store your peanut butter banana smoothie, pour it into an airtight container. Seal it tightly to keep it fresh. The smoothie stays good in the fridge for up to 24 hours. When you’re ready to drink, shake or stir it well. It may separate a bit, but that’s normal. If it thickens, add a splash of almond milk to loosen it up. If you want to save your smoothie for later, freezing is a great option. Pour the smoothie into ice cube trays or freezer-safe bags. If using bags, squeeze out air before sealing. The smoothie can last up to three months frozen. To enjoy, thaw the cubes in the fridge overnight or blend them with a little almond milk for a quick drink. This method keeps the flavors fresh and delicious! For the full recipe, refer to the Creamy Dreamy Peanut Butter Banana Smoothie. How to make a Peanut Butter Banana Smoothie thicker? To make your smoothie thicker, add ice cubes or extra frozen bananas. Both options help create a creamy texture. If you want a richer taste, try adding more peanut butter. Can I use fresh bananas instead of frozen? Yes, you can use fresh bananas. However, the texture will be different. Fresh bananas make a thinner smoothie. If you want to chill it, add ice cubes to compensate. Is this smoothie suitable for kids? Absolutely! This smoothie is great for kids. It has natural sweetness and healthy fats. Plus, it’s easy to drink and fun to enjoy. How can I make this smoothie vegan? To make it vegan, use a plant-based milk like almond or oat milk. Also, replace honey with maple syrup or agave syrup for sweetness. Caloric Content: This smoothie has about 300 calories per serving. Here’s a quick breakdown: - Bananas: ~210 calories - Peanut butter: ~190 calories - Almond milk: ~30 calories - Optional honey: ~60 calories Health Benefits: This smoothie offers many health perks: - Bananas provide potassium and fiber. - Peanut butter adds protein and healthy fats. - Almond milk is low in calories and dairy-free. - Chia seeds boost nutrition with omega-3s and fiber if you add them. For the full recipe, check out the Creamy Dreamy Peanut Butter Banana Smoothie. This blog post has covered a simple and tasty peanut butter banana smoothie recipe. We discussed the ingredients needed, step-by-step instructions, and helpful tips for a perfect blend. You also learned about nutrient variations and how to store leftovers. Enjoying this smoothie adds great nutrition to your day. Feel free to experiment with flavors and ingredients. Your smoothie journey can improve both health and taste. So, grab your blender and start creating delicious drinks for yourself and your family!

Peanut Butter Banana Smoothie Packed with Flavor

Looking for a quick, tasty treat? This Peanut Butter Banana Smoothie is packed with flavor and healthy goodness. You’ll love

To make chocolate dipped strawberries, start with fresh strawberries. You want them ripe, juicy, and firm. Look for berries that have bright red color and green leaves. This recipe uses 1 pound of strawberries, which is about 20 to 25 berries. Make sure to wash them gently and pat them dry. If they are wet, the chocolate won’t stick well. For the coating, dark chocolate is the best choice. Use at least 70% cocoa for a rich flavor. You need 8 ounces of chocolate for this recipe. If you want a smoother texture, add 2 tablespoons of coconut oil. This will help the chocolate melt nicely and give a lovely shine. You can also use milk chocolate or white chocolate if you prefer a sweeter taste. To make your strawberries even more special, you can add some fun toppings! Consider using sea salt for a salty-sweet treat. Crushed dry rose petals can add a unique floral note. You can also sprinkle on chopped nuts, colorful sprinkles, or toasted coconut flakes. These extras can make your chocolate dipped strawberries look stunning and taste amazing. For the full recipe, check out the section titled Full Recipe. Start by rinsing the strawberries under cool water. Use a gentle touch to avoid bruising them. After rinsing, dry each strawberry well with a paper towel. This step is very important. If the strawberries are wet, the chocolate will not stick. Make sure you remove any dirt or leaves. Aim for fresh, ripe strawberries for the best taste. Next, take a microwave-safe bowl and add the dark chocolate. If you want smoother chocolate, add two tablespoons of coconut oil. Heat the bowl in the microwave for 30 seconds. Stop and stir the chocolate each time. It should melt in about 1-2 minutes. Be careful not to overheat. You want it smooth and shiny, not burnt. Now, grab a strawberry by the green stem. Dip it into the melted chocolate. Allow any extra chocolate to drip back into the bowl. For a nice touch, swirl the strawberry as you lift it. Place each dipped strawberry on a parchment-lined baking sheet. If you like, sprinkle a little sea salt or crushed rose petals on top. This adds a fun twist to the flavors. Once you finish dipping, put the baking sheet in the fridge. Chill the strawberries for about 30 minutes. This will help the chocolate harden. After that, you can serve them up and enjoy! For the full recipe, refer to the complete instructions above. To get a smooth and perfect chocolate coat, start with dry strawberries. Any water will make the chocolate clump. Melt your chocolate gently. Heat it in short bursts to avoid burning. Stir the chocolate well to keep it smooth. Dip each strawberry slowly. Coating it evenly gives a nice look. Allow excess chocolate to drip off before placing them on the parchment paper. If you have leftover chocolate dipped strawberries, store them properly. Place them in a single layer in an airtight container. Keep them in the fridge to stay fresh. They are best eaten within 2 days. After that, the chocolate may lose its shine. If you want to keep them longer, you can freeze them. Just remember, freezing will change their texture. For a special treat, make your chocolate dipped strawberries stand out. Use a fancy platter to display them. You can drizzle white chocolate over dark chocolate for a striking look. Add some crushed nuts or sprinkles for extra flair. Garnishing with sea salt or rose petals can impress guests. These little touches make your treats feel gourmet. Check out the Full Recipe for more details and tips! {{image_2}} You can switch things up by using white chocolate. It has a sweet, creamy taste. Just melt the white chocolate like you would with dark chocolate. Dip your strawberries and let them set. You can also add a bit of vanilla extract to the melted chocolate for extra flavor. White chocolate pairs well with fresh mint leaves or crushed cookies too. Dark chocolate is rich and bold. You can spice it up with a pinch of cinnamon or cayenne pepper. Just mix these spices into the melted chocolate. This adds a fun twist to the flavor. You can also use flavored extracts, like orange or almond. These flavors work great with the deep taste of dark chocolate. After dipping your strawberries, you can add toppings for a fun look. Chopped nuts add crunch and flavor. Sprinkles make them colorful and festive. Shredded coconut can give a tropical vibe. Just sprinkle these on while the chocolate is still wet. It makes your chocolate-dipped strawberries even more special. Try mixing and matching toppings to find your favorites! For more details on making these treats, check out the Full Recipe. To keep your chocolate dipped strawberries fresh, place them in the fridge. Use a covered container to prevent them from drying out. Make sure to layer them gently with paper towels between layers. This method helps absorb moisture and keeps the chocolate intact. Avoid stacking them too high, as they might get squished. You can freeze chocolate dipped strawberries for later use. First, allow them to set in the fridge for about 30 minutes. After that, place them in a single layer on a baking sheet. Freeze until solid, then transfer them to an airtight container. They can last up to three months in the freezer. When you want to enjoy them, let them thaw in the fridge. This method helps maintain their taste and texture. Chocolate dipped strawberries are best enjoyed fresh. When stored properly in the fridge, they can last for up to two days. After that, they may lose their flavor and texture. If you freeze them, you can extend their shelf life to about three months. Remember, the fresher you eat them, the better! For the full recipe, refer to the earlier section. You can skip the coconut oil. Just melt the dark chocolate alone. This will still work well. The chocolate may be a bit thicker, but it will taste great. If you find it hard to dip, add a tiny bit of warm milk. This can help thin it out. Just remember to dip the strawberries fast so the chocolate sticks well. Yes, you can use milk chocolate. It will taste sweeter and creamier. Keep in mind that milk chocolate melts differently than dark chocolate. You may need to adjust the melting time. Remember to watch it closely to avoid burning. If you want a richer flavor, mix dark chocolate with milk chocolate for a nice balance. You can find pre-made chocolate-dipped strawberries at many grocery stores. Check the fresh produce or bakery sections. Some stores even sell them in fancy boxes. You can also order them online from specialty shops. Be sure to read reviews to find the best quality. If you want something special, local chocolate shops often make great ones too. For an easy option, check out the Full Recipe to make your own! Making chocolate-dipped strawberries is simple and fun. We covered everything from ingredients to storage tips. You learned how to prepare fresh strawberries and melt chocolate perfectly. You also found variations, like using white or dark chocolate. Remember to store leftovers well and get creative with toppings. Whether it's a treat for yourself or a special occasion, these strawberries impress. Enjoy making and eating them. They are always a sweet delight!

Chocolate Dipped Strawberries Simple and Delicious Treat

Chocolate dipped strawberries are a simple and tasty treat that everyone loves. No special skills are needed for this sweet

Older posts
Newer posts
← Previous Page1 … Page23 Page24 Page25 … Page29 Next →

dsad

© 2025 Southern Dishes • Built with GeneratePress

Our Policies

  • Copyright Policy
  • Cookie Policy
  • GDPR Policy
  • Privacy Policy
  • Disclaimer
  • Terms Of Use

More Information

  • Home
  • About
  • Contact
  • Appetizers
  • Dessert
  • Dinner
  • Drinks
©2025, Southern Dishes About Back To Top