Skip to content
DisclaimerTerms Of UseGDPR PolicyCookie Policy

Southern Dishes

  • Home
  • Drinks
  • Appetizers
  • Dinner
  • Dessert
  • About
  • Contact
  • Privacy Policy
DisclaimerTerms Of UseGDPR PolicyCookie Policy

Isabella

To make a delicious Beef Stroganoff, you need these simple ingredients: - 1 lb beef sirloin, thinly sliced - 1 medium onion, diced - 2 cloves garlic, minced - 8 oz mushrooms, sliced - 2 tablespoons all-purpose flour - 2 cups beef broth - 1 cup sour cream - 2 tablespoons Dijon mustard - 2 tablespoons olive oil - Salt and pepper to taste - Fresh parsley, chopped (for garnish) - Cooked egg noodles or rice (for serving) Using fresh ingredients makes a huge difference in taste. Fresh beef gives a rich flavor. Fresh mushrooms add depth. Onions and garlic bring sweetness and aroma. When you use fresh items, your dish will taste better and look vibrant. Quality ingredients lead to a gourmet experience right at home. You can swap some items if needed. For a leaner option, use chicken or turkey instead of beef. If you prefer, try cream cheese instead of sour cream for a thicker sauce. You can use vegetable broth for a lighter flavor. If you’re gluten-free, swap all-purpose flour with cornstarch or a gluten-free blend. These changes keep the dish tasty while catering to different diets. To make classic beef stroganoff, start by heating olive oil in a large skillet over medium-high heat. Next, add 1 pound of thinly sliced beef sirloin. Season it well with salt and pepper. Cook the beef for about 4-5 minutes until it is nicely browned. Once done, remove it from the skillet and set it aside. In the same skillet, toss in 1 medium diced onion and cook until it turns translucent, which should take about 3 minutes. Add 2 cloves of minced garlic and 8 ounces of sliced mushrooms. Sauté this mixture until the mushrooms are tender and have released their moisture, around 5 minutes. Now, sprinkle 2 tablespoons of all-purpose flour over the mushroom mix. Stir well and let it cook for another minute. Gradually pour in 2 cups of beef broth while stirring. This helps prevent lumps. Bring the mixture to a gentle simmer. After that, return the browned beef to the skillet. Stir in 1 cup of sour cream and 2 tablespoons of Dijon mustard. Let it simmer for about 5 minutes until the sauce thickens. Taste and adjust the seasoning with more salt and pepper if needed. Finally, serve the stroganoff over cooked egg noodles or rice, and garnish it with fresh chopped parsley. Browning the beef is key for a great flavor. Make sure your skillet is hot enough before adding the beef. If the pan is too cold, the meat will steam instead of brown. Do not overcrowd the skillet. This can lower the temperature and cause uneven cooking. If you have a lot of beef, cook it in batches. Let the beef sit without stirring for a minute. This helps develop a nice crust. Once browned, remember to remove the beef right away. This keeps it juicy and tender. Using good-quality beef broth makes a big difference in flavor. If you want more depth, try adding a splash of Worcestershire sauce. Fresh herbs can also boost the taste. Thyme or bay leaves work well. When seasoning, remember to taste as you go. Each ingredient adds its own flavor. Adjust salt and pepper at the end for the best results. For a richer taste, consider adding a little red wine to the broth. Just remember to let it cook off a bit before adding the sour cream. This will ensure a balanced flavor profile in your dish. When making Beef Stroganoff, some common mistakes can ruin your dish. First, do not overcrowd the skillet when you brown the beef. If you do, the meat will steam instead of sear. This means it won’t get that lovely brown color. Also, be careful with the heat. Too high can burn your garlic and onions, making them bitter. Lastly, do not skip the simmering step after adding sour cream. This helps blend the flavors nicely. To make your Beef Stroganoff stand out, consider adding a few secret ingredients. A splash of Worcestershire sauce adds depth. You can also use a bit of red wine to enhance the beef flavor. If you love a bit of tang, try adding a teaspoon of lemon juice. Fresh herbs like thyme or dill also give your dish a fresh taste. Thickening the sauce is key for a rich Beef Stroganoff. The trick is to sprinkle flour over the mushroom mix early on. This helps it absorb the moisture. Stir well to coat everything evenly. If your sauce seems too thin, simmer it longer to reduce the liquid. You can also mix a little cornstarch with cold water and add it in. This gives you a nice, creamy texture. For the full recipe, check out the [Full Recipe]. {{image_2}} You can make a vegetarian or vegan beef stroganoff. Replace the beef with mushrooms or tofu. Use vegetable broth instead of beef broth for flavor. Swap sour cream for cashew cream or coconut yogurt. This keeps the dish creamy and rich without meat. To make beef stroganoff gluten-free, use gluten-free flour. You can also use cornstarch to thicken the sauce. Ensure your broth is gluten-free. Serve it over gluten-free pasta or rice. These changes let you enjoy stroganoff without gluten. Try adding different spices for an international flair. For a Mexican twist, add cumin and chili powder. To make an Asian version, use soy sauce and sesame oil. Each twist changes the taste while keeping the dish familiar. Explore these variations to find your favorite! After your meal, let the Beef Stroganoff cool down. Place it in an airtight container. Store it in the fridge for up to three days. If you want to keep it longer, freezing is a good option. To reheat, pour the Beef Stroganoff into a skillet. Heat it over medium-low heat. Stir often to ensure it warms evenly. If the sauce thickens too much, add a splash of beef broth or water. You can also use the microwave, but stir every minute for even heat. To freeze Beef Stroganoff, let it cool completely. Transfer it to a freezer-safe container. You can also use freezer bags, but remove as much air as you can. It will stay good for up to three months. When ready to eat, thaw it overnight in the fridge before reheating. For best results, use the Full Recipe when you prepare it again! Beef Stroganoff comes from Russia. It is named after the Stroganov family, who were wealthy. This dish became popular in the 19th century. It features tender beef with a creamy sauce. The recipe spread to many countries, each adding its twist. Yes, you can use various meats. Chicken or pork works well. You might even try turkey. Each meat will give a unique taste to the dish. Just remember to adjust cooking times for different meats. Thin cuts cook faster, while thicker cuts need more time. You can prepare Beef Stroganoff a day in advance. Cook the dish as normal and let it cool. Store it in an airtight container in the fridge. When you are ready to eat, reheat it on low heat. Add a splash of broth if the sauce is too thick. For the complete details, check the Full Recipe. Classic Beef Stroganoff offers a rich blend of flavors, textures, and options. We covered key ingredients, helpful cooking steps, and creative variations. Always use fresh items for the best taste. Avoid common mistakes to achieve a perfect dish. Whether you prefer vegetarian or gluten-free, there's a version for you. Storing and reheating leftover stroganoff is easy, making it a great meal prep choice. Enjoy this comforting dish and share it with friends and family!

Classic Beef Stroganoff Simple and Tasty Recipe

Welcome to my delicious journey into Classic Beef Stroganoff! You’ll love this simple and tasty recipe that packs tons of

- Cherry tomatoes - Mozzarella balls (bocconcini) - Fresh basil leaves For Caprese Salad Skewers, fresh ingredients are key. Choose ripe cherry tomatoes. They should be bright and firm. These little gems add sweetness and color. Next, select fresh mozzarella balls, often called bocconcini. They should be soft and creamy. Their mild flavor balances the tomatoes. Finally, pick fresh basil leaves. They should be vibrant green and fragrant. The basil adds a fresh, herbal note. - Balsamic glaze - Extra virgin olive oil - Salt and pepper To enhance your skewers, you will need balsamic glaze. This sweet and tangy glaze adds depth. Extra virgin olive oil is also essential. It brings richness and a smooth finish. Lastly, sprinkle salt and pepper. These simple seasonings elevate the dish. They enhance the natural flavors of your fresh ingredients. - Wooden skewers - Knife and cutting board - Serving platter You will need wooden skewers to assemble the ingredients. These make it easy to grab and enjoy. A knife and cutting board will help you prepare your ingredients. Use them to halve the tomatoes and slice any other components, if needed. Finally, a serving platter will showcase your beautiful skewers. A nice display adds to the overall enjoyment. For the full recipe, check out Caprese Salad Skewers with a Twist 🥗. - Prepare cherry tomatoes and mozzarella: First, halve the cherry tomatoes. Next, drain the mozzarella balls if needed. This ensures they taste fresh and delicious. - Threading technique for skewers: Grab a wooden skewer. Start by placing one cherry tomato half on it, cut side up. This helps keep everything secure. - Order of ingredients on the skewer: After the tomato, add a fresh basil leaf. You can fold the leaf to fit better. Then, slide on a mozzarella ball. Follow this with another basil leaf and finish with another tomato half. - Recommended number of ingredient sets per skewer: Aim for 3 to 4 sets of ingredients per skewer. This allows for a great balance of flavors in each bite. - Drizzle and seasoning: Once all skewers are ready, drizzle them with extra virgin olive oil and balsamic glaze. Sprinkle a bit of salt and pepper on top. This enhances the taste and makes them even more enjoyable. - Presentation suggestions: Arrange the skewers upright in a tall glass or vase. This not only looks great but also makes it easy for guests to grab one. You can add extra basil leaves around the base for a pop of color. Enjoy your vibrant and fresh appetizer! - Choosing ripe tomatoes: Look for tomatoes that are firm, juicy, and bright in color. A ripe cherry tomato should feel slightly soft when you squeeze it gently. This gives the best flavor. - Storing ingredients before assembly: Keep your mozzarella in water until you're ready to use it. Store the tomatoes at room temperature. Basil likes warmth, so keep it in a cool, dry place. - Customizing with spices and herbs: Try adding crushed garlic or fresh oregano to your skewers. A sprinkle of red pepper flakes can also add a nice kick. - Tips for the perfect balsamic glaze drizzle: Use a thick balsamic glaze for better flavor. Drizzle it lightly over the skewers right before serving. This adds a sweet touch that enhances all the flavors. - Can you prepare skewers in advance? Yes, you can! Make the skewers a few hours early. This helps the flavors blend nicely. - Best storage methods before serving: Store skewers in an airtight container in the fridge. Lay a damp paper towel on top to keep them fresh and prevent them from drying out. {{image_2}} You can switch up the cheese in your Caprese salad skewers. Try using feta or goat cheese for a new twist. These cheeses add a different flavor that pairs well with the tomatoes and basil. You can also add seasonal fruits or veggies. Try using peaches in summer or roasted bell peppers in fall. These fresh additions bring bright flavors to your skewers. Caprese salad skewers can be more than just a snack. You can serve them as a main meal. Add grilled chicken or shrimp to the skewers for protein. This makes a complete meal that is still light and fresh. You can also serve them on a bed of mixed greens. This adds color and texture to your plate. If you want a vegan option, you can use plant-based cheese. Look for creamy cashew or almond cheese. These alternatives work well and keep your dish plant-based. You can also try different plant-based dressings. A simple lemon vinaigrette adds brightness. This keeps your skewers fresh and flavorful. For the full recipe, check out Caprese Salad Skewers with a Twist! To keep your Caprese salad skewers fresh, store any unused skewers in the fridge. Place them in an airtight container. This helps to lock in their flavor. They can last up to two days in the fridge. After that, the ingredients lose their crispness and taste. You can freeze Caprese salad skewers, but it's not the best option. Freezing can change the texture of the tomatoes and cheese. If you want to freeze, separate the components. Freeze the mozzarella and tomatoes in separate bags. This way, they stay fresh longer. Use glass or plastic containers with tight seals for storage. These containers keep air out and help maintain freshness. To avoid sogginess, place a paper towel in the container. This absorbs any extra moisture from the ingredients. Enjoy your Caprese salad skewers fresh and vibrant! For the complete recipe, check out the Full Recipe. What can I serve with Caprese Salad Skewers? You can serve these skewers with fresh bread or crackers. A light soup or pasta salad also works well. Pairing them with a crisp white wine enhances the flavors. Can I make Caprese Salad Skewers in advance? Yes, you can prepare these skewers ahead of time. Store them in the fridge for up to 24 hours. Just drizzle the balsamic glaze right before serving for the best taste. Can I use different kinds of tomatoes? Absolutely! You can use heirloom tomatoes or grape tomatoes. Just ensure they are ripe and juicy for the best flavor. Is it okay to use dried herbs instead of fresh? While fresh herbs give the best taste, dried herbs can work in a pinch. Use about one-third of the amount since dried herbs are more potent. How should I present the skewers for a party? For a party, stand the skewers in a tall glass or a vase. This creates a fun display. You can also surround them with extra basil leaves for color. Are there any dips that pair well with Caprese Salad Skewers? While the skewers are tasty on their own, a light pesto or hummus makes a great dip. You can also serve them with a creamy ranch dressing for a fun twist. Caprese Salad Skewers offer a simple yet flavorful dish. Using fresh ingredients like cherry tomatoes and mozzarella brings out bold tastes. You can customize these skewers with spices or different proteins for variety. Remember, proper storage keeps them fresh longer. Whether you serve them at a party or enjoy them at home, these skewers are a hit. Try these tips, and enjoy your delicious creations!

Caprese Salad Skewers Fresh and Flavorful Delight

Are you ready to elevate your appetizer game? Caprese Salad Skewers are the perfect blend of fresh tomatoes, creamy mozzarella,

To make delicious zucchini noodles with pesto, you need the following ingredients: - 4 medium zucchini - 1 ripe avocado - 1 cup fresh basil leaves - 2 tablespoons lemon juice - 2 tablespoons tahini - 1 clove garlic, minced - 1/4 cup nutritional yeast - Salt and pepper to taste - 1 tablespoon olive oil (for drizzling) For added flavor and texture, consider these garnishes: - Cherry tomatoes, halved - Pine nuts, toasted You will need some simple kitchen tools: - Spiralizer or vegetable peeler - Food processor - Mixing bowl These tools make the process easy and fun. Using fresh ingredients creates a meal that is both satisfying and healthy. Explore the full recipe for detailed steps to create this fresh dish. Start by spiralizing the zucchini. A spiralizer works best, but a vegetable peeler will do. Cut the zucchini into long strands. Aim for thin noodles for the best texture. After spiralizing, place the noodles in a colander. Sprinkle a little salt over them. This step helps draw out excess water. Let the zucchini sit for about 15 minutes. While the zucchini drains, it’s time to make the avocado pesto. Take a ripe avocado and scoop it into a food processor. Next, add fresh basil leaves, lemon juice, tahini, and minced garlic. Don't forget the nutritional yeast, salt, and pepper. Blend everything together until it’s smooth and creamy. The pesto should look vibrant and green. Once your zucchini noodles are ready, gently pat them dry with paper towels. This helps remove any leftover moisture. Now, place the noodles in a large mixing bowl. Pour the creamy avocado pesto over the noodles. Toss them gently to coat every strand. Drizzle a bit of olive oil for extra flavor. Serve your zoodles right away. Top with halved cherry tomatoes and toasted pine nuts for a delightful crunch. If you want the full recipe, check out the [Full Recipe]. To make great zucchini noodles, start with firm zucchini. Look for ones that are smooth and free of blemishes. Use a spiralizer for best results. If you don't have one, a vegetable peeler works too. Cut the zucchini into sections about 6 inches long. This makes it easier to handle. Aim for thin, long strands. After spiralizing, sprinkle the noodles with salt. Let them sit for 15 minutes. This draws out excess moisture, making the noodles less soggy. To make your pesto even better, try adding different ingredients. Swap out tahini for cashew or almond butter. This gives a nutty twist. You can also add a pinch of red pepper flakes for heat. Want a tangy kick? Add a bit more lemon juice. Fresh herbs can add depth too. Try using mint or parsley along with basil. These small changes can really boost the flavor. When serving zucchini noodles, make it look fancy! Use a large platter to create a nest shape with the noodles. Scatter halved cherry tomatoes on top for color. Toasted pine nuts add a nice crunch too. Drizzle a little olive oil over everything for shine. This makes the dish look fresh and inviting. You can even add a sprinkle of fresh basil leaves as a final touch. This way, your dish will be not just tasty but also beautiful! {{image_2}} You can switch up the nuts or herbs in your pesto. Try using walnuts instead of pine nuts. They add a rich flavor. If you want a different taste, use parsley instead of basil. It gives a fresh twist to your dish. You can also try adding mint for a cool flavor. Just remember, use what you like! You can make your meal more filling by adding protein. Cooked chicken or shrimp works great. Just toss them in with the zucchini noodles. If you prefer plant-based options, add chickpeas or lentils. They blend well with the pesto and add a nice texture. You can mix in the protein as you toss the noodles. If you want a creamier pesto, try adding some yogurt or cream. Just mix it into the pesto until smooth. This gives a nice depth of flavor. You can also add a bit of cream cheese for extra richness. Use this tip if you enjoy a silkier texture in your sauce. It can elevate your dish to another level! Explore the [Full Recipe] for more ideas and tips. To keep your leftover zucchini noodles fresh, store them in an airtight container. Place a paper towel inside to absorb extra moisture. Keep them in the fridge for up to two days. Avoid adding any sauce until you are ready to eat. This helps prevent sogginess. You can freeze avocado pesto for later use. First, pour it into ice cube trays. Once frozen, transfer the cubes to a freezer bag. This way, you can take out just what you need. It will last for about three months in the freezer. When ready to use, let it thaw in the fridge overnight. When reheating zucchini noodles, do it gently. Use a skillet on low heat. Add a splash of water to steam them lightly. Stir often to keep them from getting mushy. Reheat the pesto separately, then mix them together. This keeps both the noodles and the sauce tasty and fresh. The best way to spiralize zucchini is to use a spiralizer. This tool makes long, thin noodles. If you don’t have one, a vegetable peeler works too. Slice the zucchini into thin strips. Make sure to hold it steady while you peel or spiralize. This keeps the noodles even and neat. Yes, you can use store-bought pesto. It saves time and still tastes good. However, making your own adds a fresh touch. Homemade pesto lets you adjust flavors to your liking. You can choose the herbs and nuts you prefer. Yes, this dish is great for meal prep. You can make the zucchini noodles and pesto ahead of time. Store them separately in the fridge. Just mix them right before eating. This helps keep the noodles fresh and crunchy. To fix mushy zucchini noodles, salt them before cooking. After spiralizing, sprinkle with salt and let them sit. This helps draw out excess water. Drain and pat them dry with a towel. This keeps the noodles firm and tasty. Zucchini noodles with pesto deliver a fresh twist on pasta. We covered essential ingredients, like zucchini and avocado, and necessary equipment, such as a spiralizer. You learned how to prepare the noodles and make creamy pesto. Tips for storage and variations help keep your meals exciting. Remember, cooking should be fun. Experiment with nuts, herbs, and protein to make it your own. Enjoy your dishes and share them with others. Healthy eating can be creative and delightful.

Zucchini Noodles with Pesto Satisfying and Fresh Meal

Looking for a fresh, satisfying meal that’s easy to make? Zucchini Noodles with Pesto is your answer! This dish combines

- 1 cup rolled oats - 1/2 cup natural peanut butter - 1/2 cup chocolate protein powder - 1/4 cup honey or maple syrup - 1/4 cup mini dark chocolate chips - 1/4 cup ground flaxseed (or chia seeds) - 1/2 teaspoon vanilla extract - A pinch of salt These ingredients create a great mix of taste and nutrition. Each item serves a purpose. The rolled oats give a hearty base. Natural peanut butter adds creaminess and protein. Chocolate protein powder packs in flavor and boosts your energy. Honey or maple syrup sweetens the mix, while mini dark chocolate chips provide little bursts of joy. Flaxseed or chia seeds add fiber and healthy fats. Vanilla extract enhances the overall flavor, and a pinch of salt balances sweetness. - Calories per serving: About 100 calories, depending on the size of the balls. - Macronutrient breakdown: Each ball has roughly 4 grams of protein, 10 grams of carbs, and 5 grams of fat. These protein balls are a great snack for any time of day. The oats and seeds offer fiber, which helps with digestion. Peanut butter adds heart-healthy fats and protein, making them filling. Dark chocolate chips increase antioxidants, adding a tasty twist. For those looking to snack smarter, these protein balls hit the spot. They are easy to make and pack well for on-the-go. You can find the full recipe above to whip up a batch today! To start, gather your ingredients. In a large bowl, mix these dry items: - 1 cup rolled oats - 1/2 cup chocolate protein powder - 1/4 cup ground flaxseed (or chia seeds) - A pinch of salt Next, add the wet ingredients: - 1/2 cup natural peanut butter - 1/4 cup honey or maple syrup - 1/2 teaspoon vanilla extract Mix everything well. You can use a spatula or even your hands. If the mix feels dry, add a teaspoon of water. If too wet, toss in more oats. Once it’s mixed, fold in: - 1/4 cup mini dark chocolate chips Now, roll the mixture into small balls. Aim for 1 inch in size. Place them on a parchment-lined baking sheet. Chilling is key! It firms up the balls and makes them easier to handle. This step helps the flavors meld together, too. Refrigerate for at least 30 minutes. You want them to be nice and firm. For a fun presentation, serve your protein balls in a decorative bowl. Add a sprinkle of chocolate chips on top for a treat that looks as good as it tastes. Enjoy these as a post-workout snack or a healthy treat. Pair them with a glass of cold almond milk or your favorite smoothie for a balanced and satisfying snack. For the full recipe, check the details above! To get the right texture for your chocolate peanut butter protein balls, start with moisture. If the mix feels dry, add a little water. A teaspoon should help. If it’s too wet, sprinkle in more oats. This helps balance the mix. Common pitfalls include making the mixture too wet or too dry. If you find your balls falling apart, they might need more oats. If they’re too sticky, they might need a tad more protein powder. Keep adjusting until you find the perfect balance. For best storage, keep your protein balls in an airtight container. They stay fresh in the fridge for up to a week. You can also freeze them for longer shelf life. Place them in a single layer on a tray first. Once frozen, transfer them to a freezer bag. This keeps them from sticking together. When you want a snack, just take out a few balls. Let them sit at room temperature for a few minutes before eating. This makes them easier to enjoy. To boost flavor, try adding spices like cinnamon or nutmeg. A little pinch can go a long way. You can also mix in a scoop of cocoa powder for more chocolate taste. Adjusting sweetness is easy too. If you want your balls sweeter, add a bit more honey or maple syrup. Just remember to mix well after adding any ingredients. This keeps your protein balls delicious and satisfying. For the full recipe, see the previous section. Enjoy your snack! {{image_2}} You can easily make these protein balls vegan. First, swap honey for maple syrup or agave nectar. Both options add a nice sweetness. For protein, use plant-based protein powder. This works well with the chocolate flavor. To keep it gluten-free, select certified gluten-free oats. Regular oats may have traces of gluten. You can also add other gluten-free ingredients, like sunflower seeds or pumpkin seeds. These add crunch and extra nutrition. Mix things up with different nut butters. Almond butter or cashew butter can bring new tastes. You can also add fun mix-ins like shredded coconut or seeds. These add texture and flavor to your protein balls. Chocolate peanut butter protein balls last about one week in the fridge. Store them in an airtight container to keep them fresh. If you want to save them longer, you can freeze these tasty snacks. They will stay good in the freezer for up to three months. Just wrap each ball in plastic wrap or place them in a freezer bag. Airtight containers are your best choice for storing these protein balls. Glass jars with tight lids work well. You can also use plastic containers that seal tightly. These types of containers help keep the protein balls fresh and prevent them from drying out. You usually don't need to reheat protein balls. They are great cold or at room temperature. If you want them warm, place them in the microwave for a few seconds. Keep an eye on them to avoid melting the chocolate. Enjoy your tasty snack straight from the fridge or warmed up! These tasty protein balls last up to a week in the fridge. Store them in an airtight container. If you want them to last longer, freeze them. They can stay good in the freezer for up to three months. Just remember to thaw them before enjoying! Yes, you can! Many protein powders work well. If you prefer plant-based options, try pea or hemp protein. Whey protein is another great choice if you're not vegan. Just make sure the flavor matches your taste. Vanilla or chocolate flavors blend nicely with the other ingredients. Absolutely! These protein balls are great for kids. They have healthy oats, peanut butter, and flaxseeds. These ingredients provide energy and important nutrients. Kids will love the sweet taste and chocolate chips. It’s a fun and healthy snack for after school or playtime. This post showed you how to make chocolate peanut butter protein balls. We covered the ingredients, their health benefits, and tips for mixing. You learned about storing and freezing techniques to keep them fresh. Variations for vegan and gluten-free diets can help everyone enjoy this treat. Remember, these protein balls are great snacks for both kids and adults. With the right ingredients and steps, you’ll have a tasty, healthy treat ready in no time. Enjoy your energy boost and the fun of making these delicious bites!

Chocolate Peanut Butter Protein Balls Delightful Snack

Are you ready to whip up a tasty snack that packs a protein punch? Chocolate Peanut Butter Protein Balls are

To make these tasty banana oatmeal muffins, gather these ingredients: - 2 ripe bananas, mashed - 1 cup rolled oats - 1/2 cup whole wheat flour - 1/4 cup brown sugar - 1/4 cup honey or maple syrup - 1/2 teaspoon baking powder - 1/2 teaspoon baking soda - 1/2 teaspoon cinnamon - 1/4 teaspoon salt - 1/3 cup milk (dairy or non-dairy) - 1 large egg - 1/4 cup melted coconut oil or unsalted butter - 1/2 cup chopped walnuts or pecans (optional) - 1/2 cup dark chocolate chips or raisins (optional) You can customize your muffins with these fun add-ins: - Swap walnuts for almonds or pecans. - Use dried fruit like cranberries or apricots instead of chocolate chips. - For a nut-free option, skip the nuts entirely. - Use agave syrup or sugar alternatives in place of honey or brown sugar. - For a gluten-free version, replace whole wheat flour with almond flour or a gluten-free blend. Understanding what goes into these muffins helps you make smart choices: - Bananas are great for potassium and fiber. They add natural sweetness. - Rolled oats provide whole grains and can lower cholesterol. - Whole wheat flour adds fiber and nutrients compared to white flour. - Honey or maple syrup add sweetness and antioxidants. - Coconut oil can boost your energy and provide healthy fats. - Eggs offer protein and help bind the ingredients together. This recipe makes healthy eating fun and easy. If you want to see the full details on how to prepare this dish, check out the Full Recipe. First, preheat your oven to 350°F (175°C). Line your muffin tin with liners or grease it lightly. In a large bowl, mash the ripe bananas until smooth. Next, mix in the honey or maple syrup and the melted coconut oil or butter. Stir until everything blends well. In a separate bowl, whisk the rolled oats, whole wheat flour, baking powder, baking soda, cinnamon, and salt. Make sure they mix evenly. Now, pour the dry mix into the banana mixture. Fold gently until just combined. Avoid over-mixing. Then, add the milk and egg. Fold them in carefully. If you like, add chopped nuts or dark chocolate chips, too. Scoop the batter into the muffin tin, filling each cup about two-thirds full. Place the tin in the preheated oven. Bake for 18 to 20 minutes. The muffins are done when a toothpick inserted in the center comes out clean. If you want a nice golden color, keep an eye on them in the last few minutes. Let the muffins cool in the tin for 5 minutes. This helps them set and makes them easier to remove. After that, transfer them to a wire rack. Let them cool completely before serving. To check if your muffins are done, use a toothpick. Insert it into the center of a muffin. If it comes out clean or with a few crumbs, they are ready. If the toothpick has wet batter, bake for another 2-3 minutes. This ensures your muffins are fluffy and not undercooked. Enjoy the delicious banana oatmeal muffins warm! You can find the full recipe above. To make the best banana oatmeal muffins, start with ripe bananas. They bring natural sweetness and moisture. Mash them well to avoid lumps. Use rolled oats for texture; they blend nicely with the batter. Next, mix your dry ingredients separately. This prevents clumps of baking powder or baking soda. Combine your wet ingredients until smooth. Then, gently fold the dry mix into the wet mix. Over-mixing can lead to dense muffins. Finally, fill each muffin cup about two-thirds full. This allows room for rising without spilling over. One common mistake is using unripe bananas. They lack flavor and sweetness. Another mistake is skipping the mixing bowls. Always mix wet and dry ingredients separately first. Do not skip the cooling step. Muffins need time to set after baking. If you try to eat them too soon, they may fall apart. Lastly, avoid opening the oven door too early. This can cause muffins to sink in the middle. Keep the door shut until the baking time is almost up. To get moist muffins, use enough bananas. The bananas add moisture naturally. You can also add yogurt or applesauce to boost moisture. Make sure to measure your flour properly. Too much flour can dry out the muffins. Use a spoon to fill your measuring cup, then level it off. Additionally, do not bake for too long. Check for doneness around 18 minutes. A toothpick should come out clean but not dry. If you follow these tips, your banana oatmeal muffins will turn out moist and delicious every time! For the full recipe, check the details above. {{image_2}} You can change the flavor of your banana oatmeal muffins easily. For a sweet touch, add chocolate chips. Just fold in half a cup before baking. If you love nuts, add walnuts or pecans. They give a nice crunch. You can also toss in dried fruit. Raisins or cranberries work well for extra sweetness. These small changes can make your muffins fun and unique! Want to make your muffins gluten-free? Swap the whole wheat flour for a gluten-free blend. You can also use almond flour or oat flour. Both give a great texture and flavor. Just make sure your oats are certified gluten-free. This way, you avoid any gluten cross-contamination. Your muffins will still be delicious and soft! If you prefer vegan muffins, it’s simple to adapt the recipe. Replace the egg with a flax egg. Just mix one tablespoon of ground flaxseed with three tablespoons of water. Let it sit for five minutes. This works as a great binder. For milk, use almond milk or oat milk instead. You can replace honey with maple syrup for sweetness. These swaps keep your muffins moist and tasty! For the full recipe, check the detailed instructions above! To keep your banana oatmeal muffins fresh, store them in an airtight container. Place them at room temperature for up to three days. If you need to keep them longer, refrigerate them in a sealed bag. Muffins can last about a week in the fridge. Freezing muffins is simple and keeps them tasty. Let the muffins cool completely. Wrap each muffin tightly in plastic wrap or foil. Then, place them in a freezer-safe bag. Use a marker to label the bag with the date. Your muffins will stay fresh for up to three months in the freezer. Reheating muffins brings back their warm, soft texture. For the best results, use the oven. Preheat it to 350°F (175°C). Place the muffins on a baking sheet and warm for about 10 minutes. You can also use the microwave. Heat each muffin for 15-20 seconds. This works well if you need a quick snack. For more details, check the Full Recipe. Yes, you can use frozen bananas. Just thaw them first. Frozen bananas are great for baking. They mash easily and add moisture. Make sure to drain any extra liquid before adding them to your mix. To make these muffins healthier, try these tips: - Use whole grain flour instead of regular flour. - Replace sugar with unsweetened applesauce. - Add seeds like chia or flax for extra nutrients. - Use less honey or maple syrup. These changes keep the muffins tasty and nutritious. To help your muffins rise, follow these tips: - Use fresh baking powder and baking soda. - Don’t over-mix the batter; mix just until combined. - Ensure your oven is preheated to 350°F (175°C). These steps help create air pockets, making your muffins light and fluffy. Yes, you can easily make this recipe dairy-free. Just use non-dairy milk like almond or oat milk. Substitute coconut oil for butter. Both changes keep the muffins moist and delicious without dairy. In this article, we covered how to make delicious banana oatmeal muffins. We explored the key ingredients and provided helpful tips for the baking process. We discussed variations, storage methods, and common questions. Making these muffins can be fun and easy. With a few simple steps, you can enjoy tasty and healthy snacks. Remember the tricks we shared to ensure your muffins turn out well. Enjoy baking and tasting your creations!

Delicious Banana Oatmeal Muffins Quick and Easy Recipe

If you love quick and tasty snacks, you’ll adore my Banana Oatmeal Muffins! They’re easy to make, packed with flavor,

- 1 lb Brussels sprouts, trimmed and halved - 3 tablespoons olive oil - 4 cloves garlic, minced - Zest and juice of 1 lemon - 1/2 teaspoon red pepper flakes (optional) - Salt and pepper to taste - 2 tablespoons grated Parmesan cheese (optional) - Fresh parsley for garnish The right mix of ingredients makes all the difference in flavor. For this recipe, I love using fresh Brussels sprouts. They bring a nice crunch. The olive oil adds a rich taste and helps with roasting. Garlic gives a warm, savory touch. Lemon zest and juice brighten the dish with a tangy kick. If you want heat, red pepper flakes work well. Salt and pepper balance everything out, while Parmesan gives a creamy finish. - Different oils: You can swap olive oil for avocado or grapeseed oil. - Cheese alternatives: Try nutritional yeast for a vegan option, or use feta for a salty twist. - Adjust spice levels: If you prefer less heat, skip the red pepper flakes. Use black pepper for a milder flavor instead. Feel free to mix and match these ingredients. This way, you can create a version that fits your taste. If you want to dive deeper into the full recipe, check the Full Recipe section. - Preheat your oven to 400°F (200°C). This high heat helps the Brussels sprouts get crispy. - Trim off the ends and remove any yellow leaves from the Brussels sprouts. Then, cut them in half. This ensures they cook evenly. - In a large bowl, add the Brussels sprouts, olive oil, minced garlic, lemon zest, and lemon juice. - Sprinkle in the red pepper flakes, salt, and pepper. Toss everything together well. Make sure each sprout gets a nice coat of seasoning. - Spread the Brussels sprouts on a parchment-lined baking sheet. Keep them in a single layer. This helps them roast rather than steam. - Bake for about 25 to 30 minutes. Stir halfway through. You want them golden brown and crispy. If you like cheese, add Parmesan cheese for the last 5 minutes. - Keep an eye on them as they roast. You’ll know they’re done when they are tender and have a nice crunch. For the full recipe, check the [Full Recipe]. To make your Brussels sprouts crispy, start by cutting them in half. This helps them cook evenly. Use a hot oven, set to 400°F (200°C). Spread the sprouts in a single layer on the baking sheet. Leaving space between them allows hot air to flow freely. This is key for that perfect crunch. If they touch, they will steam instead of roast. Roasting garlic brings out its sweetness. Add minced garlic to the bowl with your sprouts. Toss everything well before roasting. The garlic will caramelize and add depth to the dish. Lemon juice brightens the flavors. Squeeze fresh lemon juice after roasting to give a zesty kick. The zest also adds a lovely aroma and taste. Use both for a full lemon flavor. These roasted Brussels sprouts go well with many dishes. Pair them with grilled chicken or salmon for a great meal. They also shine alongside a hearty grain like quinoa. For a pop of color, top with fresh parsley. You can also add some grated Parmesan for added richness. This makes your dish look and taste gourmet. Check out the [Full Recipe] to explore more ways to enjoy this side. {{image_2}} To take your Lemon Garlic Roasted Brussels Sprouts to the next level, consider adding nuts or seeds. Chopped almonds or pine nuts add a nice crunch. You can also sprinkle sesame seeds for extra flavor. These additions not only enhance taste but also boost nutrition. You can mix in optional ingredients to cater to diverse tastes. Try adding cooked bacon bits for a smoky flavor. Or toss in some dried cranberries for a sweet contrast. You can even add a dash of balsamic glaze for a tangy kick. If you want a quicker method, try using an air fryer. Set the air fryer to 375°F. Toss the Brussels sprouts in the same mix of oil and seasonings. Cook them for about 15-20 minutes, shaking the basket halfway through. You will get a crispy finish in less time. For stovetop preparations, heat a skillet over medium heat. Add olive oil, then the seasoned Brussels sprouts. Sauté for about 10-15 minutes until they are tender and golden. This method gives you a unique texture and flavor. You can easily make this dish vegan by omitting the Parmesan cheese. It still tastes great without it. If you want to make it gluten-free, there are no gluten-containing ingredients in this recipe. Just make sure to check any packaged items for hidden gluten. Adjusting for different dietary preferences is simple. You can swap out olive oil for avocado oil if you prefer. Also, if you want more heat, add extra red pepper flakes. Enjoy making this dish fit your needs while keeping it delicious. To store leftovers of Lemon Garlic Roasted Brussels Sprouts, let them cool first. Place them in an airtight container. This keeps the sprouts fresh and prevents odors from other foods. You can use glass or plastic containers. Make sure they seal tightly to prevent moisture loss. To restore crispness when reheating, use the oven. Preheat it to 350°F (175°C). Spread the sprouts on a baking sheet in a single layer. Bake for about 10-15 minutes until they are hot and crispy again. You can also use a skillet on medium heat. Stir the sprouts for even heating. Always check that they are heated through to ensure safety. If you want to freeze Brussels sprouts, do it before roasting. Clean and trim them, then blanch in boiling water for 3-4 minutes. After blanching, cool them in ice water. Drain and place in freezer bags. Remove as much air as possible before sealing. To reheat from frozen, bake them directly from the freezer. Preheat the oven to 400°F (200°C) and roast for 30-35 minutes. This method retains flavor and texture. For the full recipe, refer back to the beginning of the article. Roasted Brussels sprouts last about 3 to 5 days in the fridge. Store them in an airtight container for best results. If you freeze them, they can last up to 3 months. However, freezing may change their texture. To reheat, simply bake them again until warm. Yes, you can prep Brussels sprouts ahead of time. Trim and halve them, then store in the fridge for up to 24 hours. Combine with the lemon and garlic just before roasting. This keeps the flavors fresh. You can also roast them in advance. Just reheat them in the oven before serving. If you can't use garlic, try shallots or onion for a similar flavor. You can also use herbs like thyme or rosemary. Lemon zest adds brightness without garlic. Consider using a pinch of smoked paprika for a different taste. Look for a golden brown color on the outside. The sprouts should feel tender when pierced with a fork. A crispy outer layer means they are well-roasted. You can also check for a slightly caramelized edge, which adds great flavor. This article covered a delicious roasted Brussels sprouts recipe. We discussed the ingredients, preparation steps, and tips for perfect results. You can easily adjust the recipe for your taste or dietary needs. Remember to store leftovers properly and reheat for crispness. This dish can pair well with many meals or stand alone as a tasty snack. Enjoy experimenting with flavors and cooking methods to make it your own! Your journey to perfect Brussels sprouts starts now.

Lemon Garlic Roasted Brussels Sprouts Flavor Boost

Are you ready to take your Brussels sprouts from bland to grand? My Lemon Garlic Roasted Brussels Sprouts recipe brings

To make these churros, gather these key items: - 1 cup water - 1/2 cup unsalted butter - 1 tablespoon sugar - 1/4 teaspoon salt - 1 cup all-purpose flour These ingredients create a rich dough. The water and butter will melt together, forming the base. Sugar adds a slight sweetness, while salt enhances the flavors. All-purpose flour gives the churros their structure. Next, we add layers of flavor: - 2 large eggs - 1 teaspoon vanilla extract - 1/2 cup granulated sugar - 1 tablespoon ground cinnamon - Oil for frying The eggs make the dough light and airy. Vanilla extract adds warmth and depth. For the coating, granulated sugar and ground cinnamon mix to create that classic churro taste. Frying oil is crucial for that crispy texture. Add a little extra fun with: - Chocolate or caramel dip - Extra cinnamon sugar for dusting Dips can elevate your churros. They add a rich contrast to the cinnamon flavor. Extra cinnamon sugar can give a delightful crunch. For the full recipe, check the details above. 1. In a medium saucepan, combine the water, butter, sugar, and salt. 2. Stir until the butter melts and the mix boils gently. 3. Remove the pan from heat and add flour all at once. 4. Stir quickly until a dough forms and pulls away from the pan. 5. Transfer to a bowl and let it cool for a few minutes. 6. Add eggs one at a time, mixing well after each. 7. Stir in vanilla extract until the dough is smooth. 1. Heat oil in a deep skillet over medium-high heat (about 350°F). 2. Fill a piping bag with the churro dough. 3. Pipe strips of dough, about 4-6 inches long, directly into the hot oil. 4. Fry until golden brown and crispy, about 2-3 minutes per side. 5. Use a slotted spoon to remove churros and drain on paper towels. 1. In a shallow bowl, mix granulated sugar and cinnamon for the coating. 2. While still warm, roll churros in the cinnamon sugar mix. 3. Serve warm on a plate with a side of chocolate or caramel dip. For the full recipe, check the main article. Enjoy these delicious treats! To make great churros, dough consistency is key. The dough should be thick but smooth. If it’s too runny, your churros will not hold their shape. Heat your oil to 350°F (175°C). This temperature ensures the churros fry evenly. If the oil is too cool, churros will soak up oil and become soggy. To avoid sogginess, fry only a few churros at a time. This keeps the oil hot and gives a nice crispy texture. You can add different flavors to your churros. Try adding a bit of orange zest for a citrus twist. You can also use almond extract instead of vanilla for a nutty taste. Always use high-quality ingredients. Fresh eggs and real vanilla give the best flavor. Adjust the sweetness to your liking. If you want less sweetness, reduce the sugar in the dough or the topping. Make your churros look amazing when serving. Arrange them on a pretty plate. You can place a small bowl of chocolate or caramel sauce in the center for dipping. Dust them with extra cinnamon sugar for a nice touch. If you want to impress, add fresh berries or mint leaves for color. These small details make your churros stand out on any table. {{image_2}} Churros are fun to change up! You can fill them with chocolate for a rich treat. For a fall twist, try pumpkin spice churros. They bring warmth and sweetness to chilly days. You can also use Nutella or various fruits for a fresh option. Each filling adds a new layer of flavor. If you want a lighter option, consider baked churros. They still taste great but use less oil. You can also make churros gluten-free. Use almond or coconut flour instead of all-purpose flour. Reducing sugar helps too, making them a bit more guilt-free. Churros are great on their own, but you can make them even better! Pair them with seasonal fruits for a fresh touch. Try creating churro sundaes with ice cream for a fun dessert. You can also add churros to dessert platters for a festive look. Don’t forget the chocolate dip from the Full Recipe for extra joy! To keep your churros fresh, store them in an airtight container. This helps keep air out and moisture in. If you have extra churros, consider freezing them. Lay them on a baking sheet first, freeze until firm, then transfer to a freezer bag. This keeps them from sticking together. When you want to enjoy them, reheat in the oven. Set the oven to 350°F (175°C) and bake for about 10 minutes. This brings back their crispy texture. Churros last about 1-2 days at room temperature. After that, they may lose their crispness. Always check for signs of spoilage. If they smell off or feel soggy, toss them. Storing in an airtight container keeps them better for longer. A good rule is to eat them within a day for the best taste. Don’t throw away stale churros! You can turn them into fun treats. One great idea is churro bread pudding. Cut the stale churros into pieces and mix with eggs, milk, and sugar. Bake until set for a tasty dessert. You can also blend them into crumbs for topping ice cream or cupcakes. These ideas help reduce waste and create something new. For the full recipe, check out the main article! To make churros crispy, you need to focus on two key things: the dough and oil. First, make sure your dough is thick. A thicker dough holds air when frying, creating a crispy shell. Second, manage the oil temperature. Heat the oil to about 350°F (175°C). If it's too low, churros absorb more oil and become soggy. If it's too high, they burn on the outside but stay raw inside. Yes, you can bake churros! Baking is a healthier option. To bake them, pipe the dough onto a lined baking sheet. Brush them lightly with oil and bake in a preheated oven at 400°F (200°C) for about 20 minutes. However, baked churros may not be as crispy as fried churros. They will have a different texture, being softer and less airy. Churros taste great with many dips. Some popular choices include chocolate sauce, caramel sauce, and even warm Nutella. For a fun twist, try a spicy chocolate sauce! You can also make your own dip by mixing melted chocolate with cream. This adds a rich flavor that pairs well with the cinnamon sugar. Traditional churros are not gluten-free because they use all-purpose flour. However, you can make gluten-free churros. Use a gluten-free flour blend instead. Just ensure it’s a blend that includes starches for the right texture. When cooking gluten-free churros, keep an eye on their frying time, as they can cook faster than regular ones. For the full recipe, refer to the original section above. Cinnamon sugar churros are fun and easy to make. You learned the key ingredients, like butter, sugar, and flour. I shared steps for preparing and frying the churros, along with tips for perfect texture and flavor. You can even explore variations, like pumpkin spice or healthier baked options. Enjoy your churros warm with your favorite dip. Making these treats can bring joy to any gathering. Try mixing it up with creative presentations or use leftovers in new recipes. Happy churro-making!

Cinnamon Sugar Churros Irresistible Crispy Delight

Cinnamon sugar churros are the ultimate treat, and you can make them at home! Imagine crispy, warm churros rolled in

To make this bright salad, gather these tasty ingredients: - 1 can (15 oz) chickpeas, rinsed and drained - 1 cup cherry tomatoes, halved - 1 cucumber, diced - ½ red onion, finely chopped - 1 bell pepper (any color), diced - ½ cup kalamata olives, pitted and sliced - ¼ cup feta cheese, crumbled - ¼ cup fresh parsley, chopped - 3 tablespoons olive oil - 2 tablespoons lemon juice - 1 teaspoon dried oregano - Salt and pepper to taste This salad packs a punch of nutrition. Chickpeas offer protein and fiber. They help keep you full. Tomatoes and cucumbers add hydration and vitamins. Feta cheese gives flavor and calcium. Olives provide healthy fats. Overall, this dish is balanced and energizing. It suits many diets. You can swap some ingredients if you want. Try black beans instead of chickpeas for a twist. Use diced zucchini instead of cucumber for a different crunch. If you don’t like feta, try goat cheese or skip it altogether. For a vegan option, replace feta with avocado. Enjoy experimenting with flavors! You need only 15 minutes to prepare this salad. It’s quick and easy for busy days. Gather your ingredients first. This makes the process smooth and fun. 1. Take a large mixing bowl. Add the rinsed and drained chickpeas. 2. Next, toss in the halved cherry tomatoes, diced cucumber, and chopped red onion. 3. Add the diced bell pepper and sliced kalamata olives for crunch. 4. Then, sprinkle in the crumbled feta cheese and freshly chopped parsley. 5. In a small bowl, whisk the olive oil, lemon juice, dried oregano, salt, and pepper. 6. Pour this dressing over the salad mixture. Toss gently to coat everything well. 7. Taste your salad. Adjust the salt, pepper, or lemon juice if needed. 8. Let it rest for at least 15 minutes. This helps the flavors blend. For a great texture, use fresh vegetables. Crunchy cucumbers and ripe tomatoes make a big difference. If you like a bit more flavor, add more feta cheese. The feta adds creaminess and saltiness. Also, let the salad sit. This allows all the flavors to mix well. It tastes even better after a short wait. You can find the full recipe online for more details. To boost the taste of your Mediterranean chickpea salad, consider these tips: - Add fresh herbs: Chopped mint or basil can add a burst of flavor. - Use fresh lemon zest: This adds a bright, citrus note that lifts the dish. - Try different olives: Green olives or even marinated ones can change the flavor. - Experiment with spices: A pinch of cumin or smoked paprika can add depth. - Marinate longer: Letting the salad sit for a few hours enhances the flavors. When serving your Mediterranean chickpea salad, think about these ideas: - Serve it chilled: This salad tastes best when it’s cold. - Pair with pita bread: Soft pita is great for scooping up the salad. - Use as a side dish: It goes well with grilled meats or fish. - Top with extra feta: A little more cheese adds a nice touch. - Garnish with parsley: A sprinkle of fresh parsley makes it look pretty. This salad works for many occasions: - Perfect for lunch: Light and filling, it’s great for midday meals. - Ideal for picnics: Its portability makes it a picnic favorite. - Great for barbecues: It adds color and flavor to any outdoor gathering. - Wonderful for meal prep: Make it ahead for easy lunches during the week. - Serve at parties: It’s a crowd-pleaser that everyone enjoys. For the detailed preparation steps and full recipe, check the [Full Recipe]. {{image_2}} You can boost your Mediterranean chickpea salad with protein. Grilled chicken adds flavor and texture. Use cooked chicken breast, diced into bite-sized pieces. Tuna is a great choice too. It gives a rich taste without overpowering the salad. Just mix in canned tuna, drained and flaked. Both options make your salad more filling. To keep your salad vegan, skip the feta cheese. Instead, use avocado for creaminess. It adds healthy fats and a rich flavor. You can also try marinated tofu. It soaks up the dressing well and adds protein. Another option is to use a vegan cheese substitute. This keeps the salad flavorful and satisfying. Change your salad with the seasons. In summer, add fresh corn or zucchini for crunch. In fall, diced apples or roasted squash work well. For winter, try pomegranate seeds for a pop of color and sweetness. These seasonal swaps keep your chickpea salad exciting and fresh all year round. For the full recipe, check out the Mediterranean Chickpea Salad. To keep your Mediterranean chickpea salad fresh, store it in an airtight container. Place the container in the fridge right after you finish eating. This helps to seal in flavors and keep ingredients crisp. Use the salad within three days for the best taste. If you notice any extra liquid, drain it before eating. Though I don’t recommend freezing this salad, you can freeze chickpeas separately. Place them in a freezer-safe bag. Remove as much air as you can before sealing. When you want to enjoy them, thaw the chickpeas in the fridge overnight. Mix them with fresh veggies and dressing for a quick meal. Mediterranean chickpea salad lasts about three days in the fridge. Look for signs of spoilage like a sour smell or slimy texture. If the tomatoes or cucumber look mushy, it’s time to toss it out. Always trust your senses! Keeping these tips in mind will help you enjoy the salad at its best. For the full recipe, check the earlier section. To make Mediterranean Chickpea Salad, you will need these fresh ingredients: - 1 can (15 oz) chickpeas, rinsed and drained - 1 cup cherry tomatoes, halved - 1 cucumber, diced - ½ red onion, finely chopped - 1 bell pepper (any color), diced - ½ cup kalamata olives, pitted and sliced - ¼ cup feta cheese, crumbled - ¼ cup fresh parsley, chopped - 3 tablespoons olive oil - 2 tablespoons lemon juice - 1 teaspoon dried oregano - Salt and pepper to taste Start by mixing the chickpeas, tomatoes, cucumber, onion, bell pepper, and olives in a large bowl. Then, add the feta cheese and parsley. For the dressing, whisk olive oil, lemon juice, oregano, salt, and pepper in another bowl. Pour the dressing on the mixture and toss gently. Let it sit for 15 minutes before serving. You can find the Full Recipe for exact steps and tips. Yes, you can prepare Mediterranean Chickpea Salad in advance. It tastes better after sitting for a while. Make it up to a day ahead. Just store it in the fridge in a tight container. The flavors will deepen, and it will stay fresh. However, if you add feta cheese, wait until you serve it to keep it from getting soggy. Mediterranean Chickpea Salad pairs well with many dishes. You can serve it with pita bread for a classic combo. Grilled chicken or fish also works nicely. For a light meal, enjoy it with a bowl of soup. You can even serve it as a side dish with your favorite Mediterranean main course. This article covered everything you need for Mediterranean Chickpea Salad. You learned the key ingredients, nutritional facts, and how to swap items. I shared step-by-step cooking details and tips for the best texture. We explored ways to enhance flavor and suggested serving ideas. You now know how to store the salad and when to use it. In conclusion, this salad is versatile and easy to make. Try different variations to find your favorite. Enjoy this fresh and healthy dish often!

Mediterranean Chickpea Salad Fresh and Flavorful Dish

Are you ready to enjoy a fresh and tasty dish? Mediterranean Chickpea Salad bursts with flavor and is packed with

- 1 cup quinoa, rinsed - 2 cups vegetable broth or water - 1 red bell pepper, chopped - 1 yellow zucchini, diced - 1 cup cherry tomatoes, halved - 1 red onion, diced - 2 tablespoons olive oil - 1 teaspoon garlic powder - 1/2 teaspoon smoked paprika - Salt and pepper to taste Quinoa is the star of this dish. It is high in protein and fiber. It cooks up fluffy and adds a nice texture. Fresh vegetables make it colorful and tasty. I love using bell pepper, zucchini, and cherry tomatoes. They roast well and bring out their natural sweetness. Red onion adds a nice bite. You will need olive oil to help the veggies roast nicely. Garlic powder and smoked paprika add great flavor. Salt and pepper are a must for seasoning. - 1/4 cup fresh parsley, chopped - 1/4 cup feta cheese (optional) Fresh parsley brings a bright touch to the salad. You can add feta cheese for a rich, creamy flavor. It’s not needed but makes the dish feel special. Each serving has around 250 calories. It offers protein, fiber, and healthy fats. You will get plenty of vitamins from the veggies, too. This dish is perfect for a healthy meal. It is filling and satisfying without being heavy. Enjoy it warm or cold. It’s a great choice for lunch or dinner. For the full recipe, check out the detailed instructions above. Preheating your oven to 425°F (220°C) is key. The right temperature helps the vegetables roast perfectly. This high heat brings out their natural sweetness and creates a lovely texture. A well-preheated oven ensures even cooking and reduces cooking time. Rinse 1 cup of quinoa under cold water. This step removes any bitter taste. In a medium saucepan, mix the rinsed quinoa with 2 cups of vegetable broth or water. Bring this to a boil, then lower the heat. Cover and let it simmer for about 15 minutes. When done, the quinoa should be fluffy and the liquid absorbed. Set it aside to cool. On a large baking sheet, toss the chopped red bell pepper, diced yellow zucchini, halved cherry tomatoes, and diced red onion with 2 tablespoons of olive oil. Add 1 teaspoon of garlic powder, 1/2 teaspoon of smoked paprika, and season with salt and pepper. Spread the veggies evenly on the sheet. Roast them for 20-25 minutes. Stir halfway through to ensure even roasting. This step gives the vegetables a nice caramelization that boosts their flavor. In a large bowl, mix the cooked quinoa with the roasted vegetables. Gently fold them together to keep the quinoa fluffy. This combination makes a beautiful medley of colors and flavors. Add 1/4 cup of chopped fresh parsley for a pop of color and flavor. If you like, sprinkle in 1/4 cup of feta cheese for richness. You can enjoy the salad warm or let it cool. This salad looks great on a plate and tastes even better. For the full recipe, check out the ingredients and instructions above. To avoid mushy quinoa, start by rinsing it well. Rinsing removes the saponins that can make quinoa taste bitter. Use a fine-mesh strainer for best results. After rinsing, cook the quinoa in two cups of vegetable broth or water for every cup of quinoa. Bring it to a boil, then reduce the heat to low. Cover and let it simmer for about 15 minutes. When done, fluff it with a fork. This method gives you light and fluffy quinoa every time. Roasting vegetables can bring out their sweet flavors. To get that perfect caramelization, cut your veggies into similar sizes. This helps them cook evenly. Toss the chopped veggies with olive oil, salt, and spices before roasting. Spread them out on the baking sheet. Avoid crowding the pan, as this can lead to steaming instead of roasting. Roast at 425°F for 20-25 minutes. Stir them halfway through for even cooking. To boost the flavor of your salad, try adding spices like cumin or chili powder. A splash of lemon juice or balsamic vinegar adds brightness. You can also mix in fresh herbs like basil or cilantro for a fresh taste. If you want a creamy touch, sprinkle feta cheese on top. For a vegan option, skip the cheese or use a plant-based alternative. These small tweaks can take your salad from good to great. Don't forget to check the full recipe for detailed steps! {{image_2}} You can boost your Roasted Vegetable Quinoa Salad by adding protein. Chicken is a great choice. Simply grill or roast it, then chop it into bite-sized pieces. Mix it in with the quinoa and veggies for a heartier meal. Chickpeas are another excellent option. They add texture and flavor. Use canned chickpeas for ease. Just rinse and toss them in. Beans, like black beans or kidney beans, also work well. They add a nice, creamy touch. Just drain and rinse them before adding to the salad. These options make the dish more filling and nutritious. The best part about this salad is how flexible it is. You can swap vegetables based on the season. In spring, try asparagus or fresh peas. They add a crisp, bright taste. Summer is perfect for using corn or eggplant. Their sweetness pairs well with quinoa. In fall, roasted carrots and Brussels sprouts shine. Their earthy flavors add warmth. Winter calls for root veggies like sweet potatoes or parsnips. They bring heartiness to the dish. Feel free to mix and match to keep things exciting! If you follow a vegan diet, simply skip the feta cheese. You can replace it with avocado for creaminess. This keeps your salad rich without dairy. For gluten-free needs, quinoa is already a safe grain. Just make sure any added ingredients, like broth, are gluten-free. This ensures everyone can enjoy this delicious dish without worry. Adapting the recipe to fit your needs makes it even more enjoyable. Each variation brings new flavors and textures to your table. To keep your roasted vegetable quinoa salad fresh, store it in an airtight container. This helps prevent moisture loss and keeps flavors intact. You can place it in the fridge for up to four days. If you want to enjoy it later, avoid adding fresh herbs or cheese until you serve it. This keeps everything looking and tasting great. You can freeze your quinoa salad for longer storage. First, let it cool completely. Then, place it in a freezer-safe container or bag. Make sure to remove as much air as possible to prevent freezer burn. It can stay frozen for up to three months. When you're ready to eat it, move it to the fridge to thaw overnight. To reheat your quinoa salad, use the microwave or stovetop. If using a microwave, warm it in short bursts of 30 seconds. Stir in between to ensure even heating. On the stovetop, add a splash of water and heat on low. This keeps the texture nice and fluffy. Avoid reheating it too long, as this can make the quinoa mushy. Enjoy your meal! The Roasted Vegetable Quinoa Salad lasts about 3 to 5 days in the fridge. To keep it fresh, store it in an airtight container. This helps prevent moisture and keeps the flavors intact. Always check for smell or color changes before eating. If something seems off, it's best to throw it away. You can serve this salad warm or cold. If you prefer a warm dish, enjoy it right after mixing. For a refreshing option, let it cool to room temperature. It tastes great either way, so choose what you like best. If you want a substitute for quinoa, try brown rice, farro, or bulgur. Each option brings a unique texture and flavor. You can also use cauliflower rice for a low-carb alternative. Just make sure to adjust cooking times based on the grain you choose. Yes, this salad is gluten-free. Quinoa is a gluten-free grain, making it safe for those with gluten sensitivities. However, check the labels on any added ingredients, like feta cheese, to ensure they are also gluten-free. Yes, you can make this salad ahead of time. It’s perfect for meal prep! Prepare the quinoa and roasted vegetables in advance. Mix them together the day you plan to serve. This helps the flavors blend nicely, making it tastier. This blog post covered how to make a tasty roasted vegetable quinoa salad. We talked about main and optional ingredients, plus their nutritional value. I shared step-by-step instructions to ensure you achieve the best flavor. Tips and tricks helped you cook quinoa perfectly and enhance flavors. We also explored variations and how to store leftovers. In the end, this salad is not just yummy; it fits many diets. Enjoy making it your own!

Roasted Vegetable Quinoa Salad Healthy and Tasty Dish

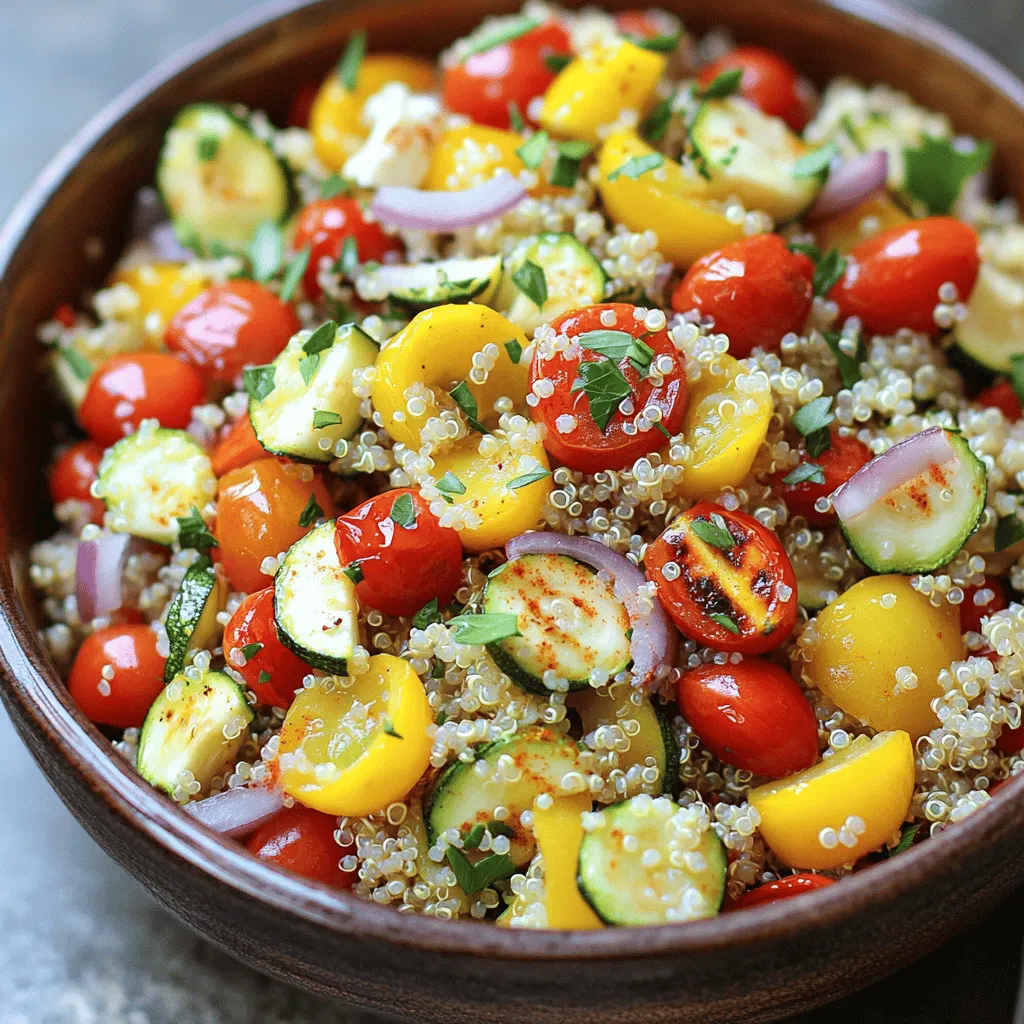
Looking for a healthy and tasty dish that’s quick to make? You’ll love this Roasted Vegetable Quinoa Salad! Packed with

- 3 ripe bananas, mashed - 1/2 cup unsalted butter, melted - 1/2 cup brown sugar - 1/4 cup granulated sugar - 2 large eggs - 1 teaspoon vanilla extract - 1 teaspoon baking soda - 1/4 teaspoon salt - 1 1/2 cups all-purpose flour - 1 cup semi-sweet chocolate chips - 1/2 teaspoon cinnamon (optional) You need ripe bananas for this recipe. The riper they are, the sweeter your bread will be. I like to mash them with a fork until smooth. Melt your butter to blend nicely with the sugars. Brown sugar adds moisture and deep flavor. Granulated sugar gives a light texture. The eggs add richness and help the bread rise. Vanilla extract brings a lovely aroma. Baking soda is key for leavening. Salt balances the sweetness. All-purpose flour forms the base of the bread. Chocolate chips are the star! They make every bite a treat. You can add a pinch of cinnamon for warmth and spice. - Nuts (e.g., walnuts or pecans) - Different types of chocolate (e.g., dark chocolate, white chocolate) Feel free to mix in nuts for a crunch. Walnuts or pecans work great. You can also use dark chocolate or white chocolate chips for fun variations. - Mixing bowls - 9x5 inch loaf pan - Oven - Whisk or spatula Gather your tools before you start. You will need mixing bowls for combining ingredients. A 9x5 inch loaf pan is perfect for baking. Preheat your oven to 350°F (175°C) while you prepare your batter. A whisk or spatula helps mix everything smoothly. For the complete recipe, check out the Full Recipe link. - Preheat the oven to 350°F (175°C). - Grease the loaf pan with butter or cooking spray. - In a large bowl, mash the ripe bananas. Mix in the melted butter until smooth. - Add the brown and granulated sugars to the banana mix. Stir until well combined. - Crack in the eggs one at a time, mixing well after each. Add the vanilla extract and mix again. - Sprinkle the baking soda and salt over the banana mix. Stir to combine all the ingredients. - Gradually add the all-purpose flour, mixing gently until just combined. Do not overmix! - Carefully fold in the chocolate chips, ensuring they spread evenly throughout the batter. - Pour the batter into the prepared loaf pan. Smooth the top with a spatula. - Bake in the preheated oven for 60 minutes. Check doneness with a toothpick. - Once done, let the bread cool in the pan for 10 minutes. Then, transfer it to a wire rack to cool completely. For the complete recipe, refer to the [Full Recipe]. To bake perfect banana bread, use a toothpick to check for doneness. Insert it in the center. It should come out clean when the bread is done. If it has batter on it, bake a bit longer. This simple test helps you avoid undercooked bread. Also, avoid overmixing the batter. Overmixing makes the bread dense and tough. Stir just until the ingredients blend together. It’s okay if there are some lumps. They will bake out, and you will have a light texture. Use fresh, ripe bananas for the best sweetness. The riper the bananas, the sweeter your bread will be. Look for bananas with brown spots. They add great flavor! You might also want to enhance the taste by adding a pinch of nutmeg. Nutmeg gives a warm, cozy feel to the bread. Another option is to replace some sugar with honey. Honey adds moisture and a unique flavor. Slice and serve your banana bread warm or at room temperature. Warm bread is delightful and brings out the chocolate chips’ flavor. For a nice touch, drizzle melted chocolate on top. It looks great and tastes amazing! You can also sprinkle powdered sugar over the slices. This adds a sweet, decorative finish. Serve the bread with fresh fruit or a dollop of whipped cream. It makes the dish even more special. For the full recipe, refer to the Choco-Banana Delight Bread section. {{image_2}} You can make your chocolate chip banana bread a bit healthier. - Substitute whole wheat flour for all-purpose flour. - Use less sugar or a sugar alternative like honey or agave. These changes add more fiber and reduce sugar. Whole wheat flour gives a nutty taste. You still get a tasty result. Want to mix things up? You can add different flavors to your bread. - Incorporate spices like nutmeg or cardamom for warmth. - Add zests of citrus like lemon or orange for a fresh twist. These flavors can brighten your banana bread. They make each bite a new adventure! You can change your recipe with the seasons. - Include pumpkin puree for a fall-inspired treat. - Mix in dried fruits like cranberries for a holiday edition. These options keep your bread exciting all year. You can enjoy banana bread in many ways! For the full recipe, check out [Full Recipe]. Store banana bread at room temperature in an airtight container for up to 3 days. This keeps it fresh and soft. If you have a lot left, it’s best to save some for later. You can refrigerate your banana bread for up to a week. If you want to keep it longer, freeze it. Wrap it in plastic wrap or foil before freezing. This helps it stay moist and tasty. To enjoy your banana bread again, thaw it in the refrigerator or at room temperature. If you want it warm, pop slices in the microwave for a few seconds. This brings back that fresh-baked taste. You can use flaxseed meal or applesauce as an egg substitute. For flaxseed meal, mix one tablespoon with three tablespoons of water. Let it sit for five minutes to thicken. This mix binds ingredients like eggs do. For applesauce, use one-fourth cup in place of each egg. This keeps your banana bread moist and sweet. Yes, thawed frozen bananas work well. They are often softer and easier to mash. Just be sure to drain any excess moisture before mixing them into your batter. This helps to keep the right texture in your banana bread. To ripen bananas quickly, place them in a paper bag with an apple. The apple gives off ethylene gas, which speeds up the ripening process. In just one to two days, your bananas will be soft and ready for baking. To check if your banana bread is done, insert a toothpick into the center. If it comes out clean, your bread is ready. If it has batter on it, give it a few more minutes in the oven. This simple test helps ensure your banana bread is baked just right. You now have all you need to bake delicious banana bread. Remember to use ripe bananas for natural sweetness. Experiment with add-ins and flavors to find your favorite twist. Store your bread properly to keep it fresh longer. Whether it's for snacks or sharing with friends, homemade banana bread is always a hit. Enjoy your baking journey, and make it your own!

Chocolate Chip Banana Bread Delightful and Easy Recipe

If you’re craving something sweet and comforting, you have to try my Chocolate Chip Banana Bread! This easy recipe combines

Older posts
Newer posts
← Previous Page1 … Page96 Page97 Page98 … Page122 Next →

dsad

© 2025 Southern Dishes • Built with GeneratePress

Our Policies

  • Copyright Policy
  • Cookie Policy
  • GDPR Policy
  • Privacy Policy
  • Disclaimer
  • Terms Of Use

More Information

  • Home
  • About
  • Contact
  • Appetizers
  • Dessert
  • Dinner
  • Drinks
©2025, Southern Dishes About Back To Top