Skip to content
DisclaimerTerms Of UseGDPR PolicyCookie Policy

Southern Dishes

  • Home
  • Drinks
  • Appetizers
  • Dinner
  • Dessert
  • About
  • Contact
  • Privacy Policy
DisclaimerTerms Of UseGDPR PolicyCookie Policy

Isabella

- 6 large eggs - 1 cup milk (or dairy-free alternative) - 1 cup bell peppers, diced - 1 cup fresh spinach, roughly chopped - 1/2 cup cherry tomatoes, halved - 1/2 cup onion, diced - 1 cup shredded cheese (cheddar or feta) - 2 tablespoons olive oil - Salt and pepper to taste - 1 teaspoon dried oregano - Fresh basil leaves for garnish To create a great oven-baked frittata, you only need these main ingredients. Eggs serve as the base and give it structure. Milk adds creaminess and helps the frittata rise. The bell peppers and spinach bring color and nutrition. Cherry tomatoes add a burst of sweetness. Onions give a nice flavor boost. Cheese adds richness and depth. - Additional vegetables (zucchini, mushrooms) - Different cheese options (goat cheese, mozzarella) - Protein additions (cooked bacon, sausage) Feel free to change things up! You can add more veggies like zucchini or mushrooms. If you love cheese, try goat cheese or mozzarella. Want some protein? Add cooked bacon or sausage for extra flavor. - 9x13 inch baking dish - Large mixing bowl - Whisk - Skillet Make sure you have a 9x13 inch baking dish for the frittata. You will also need a large mixing bowl to blend the ingredients. A whisk helps combine the eggs and milk well. A skillet is great for cooking the veggies before adding them to the dish. For the full recipe, check out the Baked Veggie Delight Frittata. Enjoy cooking! - Preheat the oven to 375°F (190°C). - Grease the baking dish with olive oil. - In a large bowl, whisk together eggs and milk. Add salt, pepper, and oregano. - Heat olive oil in a skillet. Sauté onions and bell peppers until translucent. This takes about 4-5 minutes. - Add spinach to the skillet and cook until it wilts, about 2 minutes. - Spread the sautéed vegetables evenly in the baking dish. - Pour the egg mixture over the vegetables. Stir in cherry tomatoes and cheese gently. - Place the dish in the oven. Bake for 25-30 minutes until set and golden. - Remove from the oven and cool for a few minutes. Slice into squares for serving. - Garnish with fresh basil leaves before enjoying. For more details, check the Full Recipe for all the steps! To perfect your frittata, stir the mixture gently before baking. This ensures even cooking. A well-stirred frittata will rise nicely and cook through without any soggy spots. Once baked, let it cool for a few minutes. This cooling time helps you slice it easily into perfect pieces. You can enhance the flavor of your frittata by using fresh herbs like basil or parsley. Fresh herbs add a bright taste. You can also experiment with spices such as paprika or cumin for a warm kick. These small additions change the dish from good to great! One common mistake is overbaking the frittata. This can lead to a dry texture. Keep an eye on it! Remove it from the oven once it is set. Another mistake is not greasing the dish properly. A well-greased dish helps the frittata slide out easily. Avoid these missteps to enjoy a perfect frittata every time. For the full recipe, check out the Baked Veggie Delight Frittata. {{image_2}} Frittatas are fun to customize. You can change the flavors and ingredients based on your taste. Here are some great variations to try! - Meat Lover’s Frittata: Add crispy bacon and savory sausage for a hearty meal. This combo adds great flavor and protein. - Mediterranean Frittata: Toss in olives and feta cheese. This mix gives a fresh and tangy taste. Perfect for those who love Mediterranean flavors. - Gluten-Free Variations: Frittatas are naturally gluten-free. You can enjoy them without worry. Just stick with fresh veggies and meats. - Vegan Frittata Alternatives: Use chickpea flour instead of eggs. Mix it with water to create a batter. Add your favorite veggies for a tasty vegan option. - Spring Frittata: Use fresh asparagus and sweet peas. These bright veggies bring life to your dish during springtime. - Fall Frittata: Incorporate pumpkin and sage for a warm, cozy flavor. This combo fits perfectly with cooler weather. These variations keep your frittata exciting and delicious. You can find the full recipe to get started! To store your leftover frittata, let it cool first. Cut it into slices for easy storage. Place the slices in an airtight container. This keeps the frittata fresh and tasty. Use a container that fits well in your fridge. Glass or plastic containers work great. You can reheat your frittata in two ways: oven or microwave. For the oven, preheat it to 350°F (175°C). Place the frittata on a baking sheet. Heat for about 10-15 minutes until warm. The oven keeps the texture nice. In the microwave, place a slice on a plate. Use a microwave-safe cover to avoid splatters. Heat for 1-2 minutes, checking every 30 seconds. This method is faster but can make the frittata a bit soggy. Freezing frittata is simple. Wrap each slice tightly in plastic wrap. Then, place the wrapped slices in a freezer bag. Be sure to remove as much air as possible. This helps prevent freezer burn. To thaw, move the frittata to the fridge overnight. Reheat in the oven or microwave after thawing. This keeps the flavor strong and delicious. A frittata can last in the fridge for up to four days. Store it in an airtight container to keep it fresh. If you notice any odd smells or changes in texture, it’s best to toss it. Yes, you can make a frittata ahead of time. It’s a great meal prep option. Just bake it, let it cool, and store it in the fridge. You can reheat it when you’re ready to eat. The main difference lies in the crust. A quiche has a pie crust, while a frittata does not. Frittatas are also thicker and more egg-focused. Quiches tend to have a creamier filling due to the added cream. Yes, you can use egg substitutes like tofu or chickpea flour. These work well for a vegan frittata. You may need to adjust the liquid amounts in your recipe when using substitutes. For a full recipe, check out Baked Veggie Delight Frittata for detailed steps and tips. This blog post covered how to make a delicious frittata. You learned about the key ingredients, cooking steps, and tips for the best results. Remember to customize your frittata with your favorite veggies and proteins. Don’t forget to store leftovers properly to enjoy them later. With these simple steps, you'll impress friends and family with your cooking skills. Enjoy creating your frittata masterpiece!

Easy Oven Baked Frittata Quick and Tasty Recipe

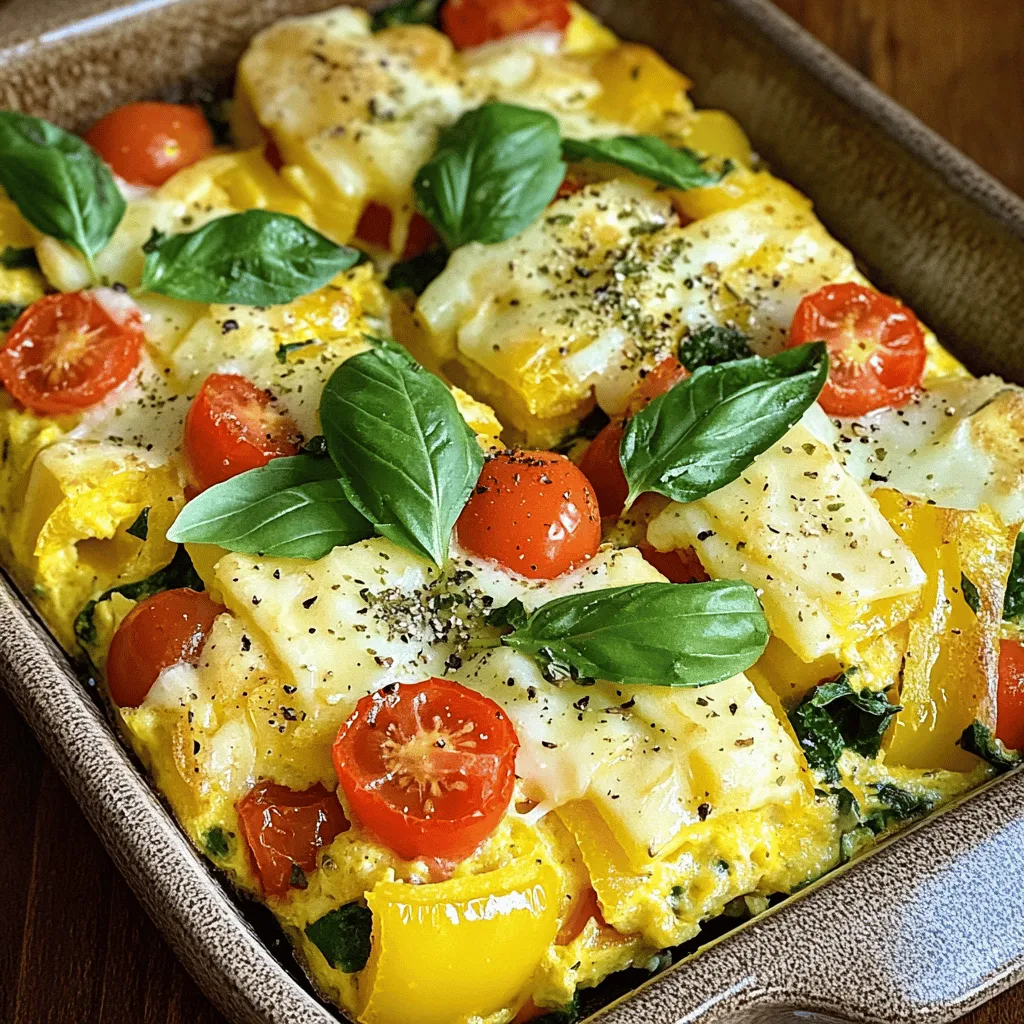
Are you looking for a quick and tasty meal? This Easy Oven Baked Frittata is your answer. Packed with vibrant

For a delicious chicken pot pie, you need these main ingredients: - 2 cups cooked chicken, shredded - 1 cup carrots, diced - 1 cup frozen peas - 1 cup potatoes, diced - 1/2 cup onion, chopped - 1/2 cup celery, chopped - 1/3 cup butter - 1/3 cup all-purpose flour - 1 3/4 cups chicken broth - 2/3 cup milk - 1 package (2 crusts) refrigerated pie crusts - 1 egg, beaten (for egg wash) These ingredients create a filling that warms the soul and satisfies hunger. The chicken gives protein, while the veggies add color and crunch. To enhance your dish, don’t forget the key seasonings: - 1 teaspoon dried thyme - Salt and pepper to taste Thyme brings a warm, earthy flavor to the pot pie. Adjust the salt and pepper to make it just right for your taste. For the best results, gather these baking supplies: - 9-inch pie dish - Large saucepan - Whisk - Rolling pin Using these tools will help you create a perfect chicken pot pie. A good pie dish helps with even baking, while a whisk mixes your filling smoothly. For a crisp crust, a rolling pin is essential. For a full recipe, check out the [Full Recipe]. To start, melt the butter in a large saucepan over medium heat. Once the butter melts, add the chopped onion, carrots, celery, and potatoes. Cook these veggies until they soften, which takes about 5 to 7 minutes. Next, stir in the flour to create a roux. Cook this for 1 to 2 minutes to get the raw flour taste out. Then, slowly whisk in the chicken broth and milk. Keep stirring until the mixture thickens, which should take around 3 to 5 minutes. Now it’s time to add the shredded chicken, frozen peas, dried thyme, salt, and pepper. Mix everything well, then remove it from the heat. Grab one of the refrigerated pie crusts and roll it out. Place the rolled crust into a 9-inch pie dish. Make sure it covers the bottom and sides. After that, pour the chicken filling into the crust evenly. Now, roll out the second pie crust and lay it over the top of the pie. Seal the edges by crimping them with a fork. This keeps all the tasty filling inside. Don’t forget to cut a few slits in the top crust. This allows steam to escape as the pie bakes. Before you put the pie in the oven, brush the top crust with the beaten egg. This gives the crust a golden finish. Preheat your oven to 425°F (220°C) and bake the pie for 30 to 35 minutes. You’ll know it’s ready when the crust is golden brown and the filling is bubbly. Once it’s done, let the pot pie cool for 10 minutes before slicing. Serve it with a sprinkle of fresh parsley. A side salad makes a great addition to your meal. For the full recipe, refer back to the beginning. Enjoy your cozy comfort food! To make your chicken pot pie shine, herbs and spices are key. I love using dried thyme; it adds a warm, earthy taste. You can also try rosemary or sage for a different flavor twist. A pinch of garlic powder can bring out all the flavors in your filling. Remember to taste as you go. Adjust the salt and pepper for your liking. This small step makes a big difference. One common mistake is not cooking the vegetables long enough. They should be soft before you add the chicken. Another error is not sealing the pie crust properly. If you don’t crimp the edges well, the filling might leak. Avoid overfilling the pie, too; it can bubble over in the oven. Lastly, don’t forget to cut slits in the top crust. This allows steam to escape and keeps your crust from getting soggy. Baking at the right temperature is crucial. Preheat your oven to 425°F (220°C) before placing the pie inside. This ensures a golden, flaky crust. I suggest using a dark pie pan. It helps with even cooking. For the filling, whisk the broth and milk slowly to prevent lumps. Stir constantly until thick. This technique gives you a smooth, creamy filling. If you want a beautiful finish, brush the top crust with a beaten egg before baking. That golden color looks stunning! For more details on the recipe, check the Full Recipe. {{image_2}} You can switch up the protein in your pot pie. Try turkey instead of chicken. This works well with leftover turkey. You can also use cooked beef or pork for a twist. Each protein adds a unique flavor. For seafood lovers, shrimp or crab can be a delicious choice too. For a vegetarian pot pie, use vegetable broth and replace chicken with hearty tofu or mushrooms. You can add lentils for protein. If you want a vegan pot pie, swap out the milk for almond or soy milk. Use a plant-based butter for the roux. These changes keep your pie creamy and flavorful without meat. Feel free to mix up the veggies in your pot pie. You could use green beans, corn, or bell peppers. Sweet potatoes can add a nice sweetness to the dish. Try adding spinach or kale for extra nutrition. Mixing different vegetables can make your pot pie colorful and fun. Explore your favorites to find the best combination for your taste. For more details, check the Full Recipe. To store leftover pot pie, let it cool first. Cover the pie tightly with plastic wrap or foil. You can also transfer slices to an airtight container. Keep it in the fridge for up to four days. This keeps the filling fresh and tasty. If you want to freeze chicken pot pie, it's best to do this before baking. Assemble the pie and wrap it well in plastic wrap. Then, place it in a freezer-safe bag. It can stay frozen for up to three months. When you're ready to bake, just remove it from the freezer and bake directly from frozen. To reheat leftover pot pie, preheat your oven to 350°F (175°C). Cover the pie with foil to prevent burning. Heat for about 25-30 minutes. If you're reheating slices, place them on a baking sheet and cover them. This method keeps the crust crispy and the filling warm. For a quick option, you can also use the microwave. However, this may make the crust a bit soggy. Enjoy your cozy comfort food! For the full recipe, check out the link. You can use any cooked chicken for pot pie. I like to use rotisserie chicken. It saves time and adds great flavor. You can also use leftover chicken from dinner. Just shred it and toss it in. Always ensure the chicken is cooked through to keep your pot pie safe. Yes, you can make chicken pot pie ahead of time. Prepare the filling and crust as normal. Then, store the filling in the fridge. You can also freeze the filling for up to three months. Assemble and bake it when you're ready to enjoy. It will taste fresh and warm. To make a flaky crust, keep your butter cold. Use cold water when mixing the dough. I also suggest not overworking the dough. This helps keep the layers light and airy. When baking, brush the top with egg wash. This gives it a nice golden color and shine, too. Absolutely! Frozen vegetables work great for chicken pot pie. They are easy to use and save time. Just add them straight to the filling. They will cook perfectly in the oven. This makes your meal quick and simple. Chicken pot pie is hearty on its own. You can serve it with a side salad for freshness. Steamed veggies also pair well. If you want something warm, try garlic bread. These sides balance the meal and add more flavors. Your pot pie is done when the crust is golden brown. Check if the filling is bubbling. You can also insert a knife into the filling. If it comes out hot, it's ready to serve. Let it cool a bit before slicing. For the full recipe, check out the Homestyle Chicken Pot Pie section above! In this blog post, I covered classic chicken pot pie, from ingredients to baking it. You'll find the main ingredients and key seasonings that bring it to life. I also shared tips for preparing the filling and crust, along with serving advice. Different protein options and even vegetarian versions offer variety. Don’t forget the storage tips for leftovers! In the end, chicken pot pie is fun to make and share. Enjoy your cooking adventure!

Classic Chicken Pot Pie Cozy Comfort Food Recipe

Looking for a warm meal that feels like a hug? Classic Chicken Pot Pie is the answer. This cozy dish

To create a tasty Sheet Pan Lemon Salmon, gather these fresh ingredients: - 4 salmon fillets (6 oz each) - 2 lemons (1 for slices, 1 for juice) - 3 tablespoons olive oil - 3 cloves garlic, minced - 1 teaspoon dried oregano - 1 teaspoon dried thyme - Salt and pepper to taste - 1 pound asparagus, trimmed - Fresh parsley for garnish These ingredients work together to bring bright flavors to your plate. The salmon fillets are rich in omega-3 fatty acids, making them healthy and delicious. Fresh lemons add a zesty kick, while garlic gives a savory depth. Olive oil keeps everything moist and adds a nice richness. Using fresh asparagus not only adds color but also provides a crisp texture. Dried herbs like oregano and thyme enhance the dish with earthy notes. Finally, the parsley garnish brings a fresh touch, making your meal look even more inviting. You can find the full recipe linked above to make this delightful dish. Enjoy each bite! 1. Preheat oven and prepare sheet pan: Start by preheating your oven to 400°F (200°C). This step warms the oven, making sure your meal cooks evenly. Line a large sheet pan with parchment paper. This helps with easy cleanup and prevents sticking. 2. Whisk together olive oil and seasonings: In a small bowl, take three tablespoons of olive oil. Add three cloves of minced garlic and the juice of one lemon. Then mix in one teaspoon each of dried oregano and dried thyme. Season with salt and pepper to taste. Whisk this well until combined. 3. Arrange salmon and asparagus on the sheet pan: Place four salmon fillets on one side of the sheet pan. Drizzle half of your olive oil mixture over the salmon. Make sure each fillet is coated well. On the other side, lay down one pound of trimmed asparagus. Drizzle the rest of the olive oil mixture over the asparagus and toss them to coat properly. - How long to bake salmon: Now it’s time to bake! Put the sheet pan in your preheated oven. Bake for 12 to 15 minutes. The salmon should be opaque and flake easily with a fork when it’s done. - How to check for doneness: To check if the salmon is cooked through, use a fork to gently poke it. If it flakes easily, it's ready. The asparagus should be tender yet slightly crisp. - Garnishing with parsley: After removing the pan from the oven, let it cool for a few minutes. Chop some fresh parsley and sprinkle it on top of the salmon and asparagus for a lovely finish. - Serving suggestions: Serve this dish warm. It pairs well with rice or a fresh salad. You can also add extra lemon slices for a zesty kick. For the full recipe, check the ingredients and steps above! Ensuring perfect salmon texture To get the best salmon, choose fresh fillets. Look for vibrant color and no strong odor. Bake it until it flakes easily with a fork. This usually takes 12 to 15 minutes at 400°F. If you want it juicier, check it early. Salmon cooks fast, and you can always put it back in the oven if needed. How to keep asparagus crisp For crisp asparagus, do not overcook it. Bake it for around 10 to 12 minutes. To check, look for a bright green color and a slight bend. Toss it in the olive oil mix but avoid too much heat. This way, your asparagus stays crunchy and fresh. Additional seasoning variations You can change the flavor of your salmon with spices. Try adding paprika for a smoky taste or some chili flakes for heat. You can also mix in a bit of honey for a sweet touch. These small changes can make your dish exciting every time. Using fresh herbs vs. dried Fresh herbs provide a bright taste, while dried herbs offer a deeper flavor. If you use fresh parsley or thyme, add them at the end. Dried oregano or thyme works well baked in. Both have their charm, so choose what you love. Importance of using parchment paper Line your sheet pan with parchment paper. This step makes cleanup easy. It also helps prevent sticking, so your salmon and veggies slide off without a mess. Parchment paper can handle high heat and keeps your food from burning. Tips for even cooking on the sheet pan Spread the salmon and asparagus evenly on the sheet pan. Avoid crowding them, as this leads to uneven cooking. If you have extra space, consider adding more veggies. This way, you will ensure everything cooks at the same time, resulting in a perfect meal. For more detailed cooking steps, check out the Full Recipe. {{image_2}} You can swap the salmon for other fish. Try using trout, cod, or tilapia. These fish cook well and have great flavor. Each brings a different taste but pairs nicely with lemon. For vegetables, asparagus is a classic choice, but you can use others. Broccoli, green beans, or bell peppers work well too. Just cut them into similar sizes to ensure even cooking. You can grill or bake your salmon. Grilling gives a nice smoky flavor. Just preheat your grill and cook for about six minutes per side. Baking is easy and keeps the salmon moist. Follow the recipe for the best results. Another method is sous-vide. This is cooking food in a water bath. It keeps the fish tender, and you can infuse flavors easily. Cook at 125°F (52°C) for about 45 minutes for a perfect finish. Citrus adds great taste. You can use lime or orange instead of lemon. Each citrus fruit brings its unique twist to the dish. Try different herb-infused marinades too. Basil, dill, or cilantro can change the flavor profile. Just mix them with olive oil and garlic for a tasty twist. Explore these variations to make your meal exciting. Check out the Full Recipe for more ideas! After enjoying your sheet pan lemon salmon, you may have some leftovers. To keep them fresh, place the salmon and asparagus in an airtight container. Make sure to cool them down to room temperature first. Store the container in the fridge. This keeps the food safe and flavorful for later. If you want to keep the leftovers for a longer time, freezing is a great option. Wrap each salmon fillet tightly in plastic wrap. Then, place the wrapped salmon in a freezer bag. This helps prevent freezer burn. You can freeze the asparagus too, but it may lose some crunch. When it’s time to enjoy your leftovers, the best way to reheat salmon is in the oven. Preheat your oven to 350°F (175°C). Place the salmon on a baking sheet and cover it with foil. This keeps the moisture in. Heat for about 10 minutes or until warm. This method helps maintain the salmon’s texture and flavor. If you’re in a hurry, you can use the microwave. Place the salmon on a microwave-safe plate. Cover it with a damp paper towel to keep it moist. Heat in 30-second intervals until warm. Be careful not to overcook it, or the salmon may dry out. Properly stored, your cooked salmon lasts about 3 to 4 days in the fridge. If you freeze it, it can last for about 2 to 3 months. However, for the best taste, try to eat it within a month. Always check for any off smells or changes in texture before eating. Enjoy your delicious meals safely! How can I tell when the salmon is cooked? You can tell salmon is cooked when it flakes easily. Use a fork to test it. The inside should be a light pink color. If it's still dark or raw, cook it a bit longer. Aim for an internal temperature of 145°F (63°C). Can I prepare the salmon in advance? Yes, you can prepare the salmon ahead of time. Marinate the salmon and store it in the fridge. You can keep it for up to two hours. Avoid marinating for too long, as it can change the texture. What sides pair well with Sheet Pan Lemon Salmon? Some great sides include: - Roasted potatoes - Quinoa - Green salad - Rice These sides complement the salmon's bright flavors and add a nice touch. Best serving temperature for salmon Serve salmon warm, right after taking it from the oven. Let it sit for a few minutes before serving. This helps the juices settle and keeps the fish moist. Suggestions for sauces or dips You can enhance the dish with simple sauces. A lemon butter sauce or a light yogurt dip works well. Try a fresh herb sauce for extra flavor. These add richness and depth to the meal. Caloric content per serving Each serving of Sheet Pan Lemon Salmon has about 300 calories. This includes salmon and asparagus. It’s a healthy choice that fills you up without heavy calories. Health benefits of salmon and asparagus Salmon is rich in omega-3 fatty acids. These fats support heart health and brain function. Asparagus is low in calories and high in vitamins. It’s a great source of fiber, which aids digestion. Together, they make a nutritious meal. This blog post shared a simple way to cook sheet pan lemon salmon. You learned the ingredients and steps involved. We explored tips to make your salmon and asparagus shine. Options for ingredient swaps and different cooking methods were discussed too. Cooking can be fun and easy. With this guide, you can create a tasty meal. Enjoy the flavors and feel proud of your dish! Keep experimenting and have fun in the kitchen!

Sheet Pan Lemon Salmon Flavorful and Easy Dinner

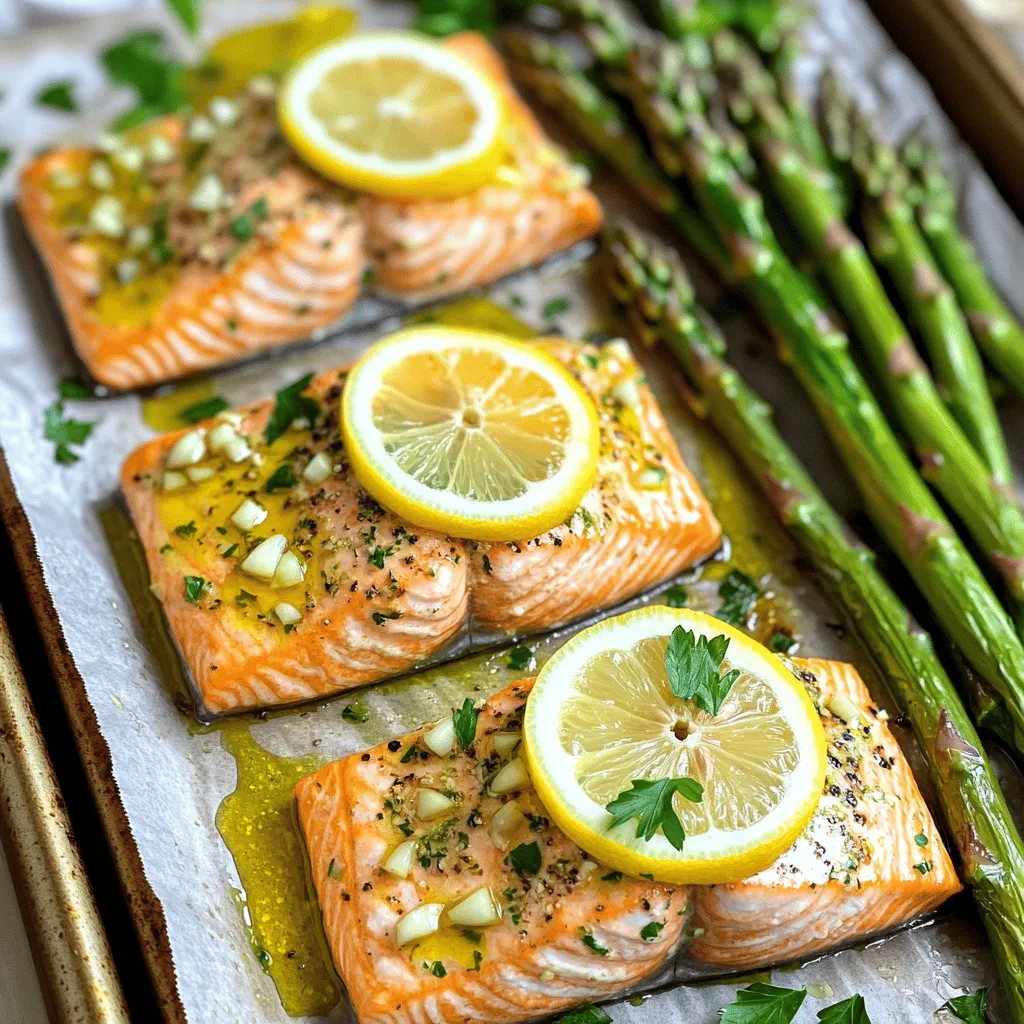
Looking for a quick and tasty dinner? You’ve found it! Sheet Pan Lemon Salmon is flavorful, easy to make, and

- 1 pound ground beef or turkey - 1 medium onion, chopped - 2 cloves garlic, minced - 1 bell pepper, diced (any color) - 2 tablespoons taco seasoning - 1 (14.5 oz) can diced tomatoes with green chilies - 2 cups low-sodium chicken or vegetable broth - 8 oz pasta (like penne or rotini) - 1 cup corn (frozen or canned) - 1 cup black beans (rinsed and drained) - 1 cup shredded cheese (cheddar or Mexican blend) - 1 tablespoon olive oil - Salt and pepper to taste - Fresh cilantro, chopped (for garnish) - Sour cream (for serving) When I make One Pot Taco Pasta, I focus on quality ingredients. The ground beef or turkey is key for protein. I love using fresh vegetables like onions and bell peppers. They add great taste and color. Garlic brings a nice aroma and flavor to the dish. Taco seasoning is a must for that classic taste. Diced tomatoes with green chilies give a nice kick. The broth adds depth and helps cook the pasta perfectly. I prefer using pasta shapes like penne or rotini for a hearty bite. Corn and black beans make it filling and nutritious. Lastly, I finish with shredded cheese, which melts beautifully. The cilantro and sour cream on top add freshness and creaminess. You can find the full recipe in the link above. 1. Sautéing the vegetables: Start by heating the olive oil in a large pot over medium heat. Add the chopped onion. Sauté it for about 3-4 minutes until it turns translucent. Then, add the minced garlic and diced bell pepper. Cook these for another 2 minutes until they become fragrant. 2. Cooking the meat: Next, stir in the ground beef or turkey. Cook the meat until it turns brown. Break it into small pieces as it cooks. If there is any fat, drain it off to keep the dish light. 3. Mixing the key ingredients: Once the meat is ready, add the taco seasoning. Mix well to coat the meat. Then, pour in the diced tomatoes with their juice, along with the chicken or vegetable broth. Finally, add the pasta to the pot. Stir everything to combine well. 1. Bringing to a boil and reducing heat: Increase the heat to bring the mixture to a boil. Once it bubbles, reduce the heat to low. Cover the pot and let it simmer for 10-12 minutes. Stir it occasionally so nothing sticks. 2. Cooking the pasta to al dente: During the simmering, keep an eye on the pasta. It should cook to al dente, which means it will be firm but not hard. 3. Adding final touches: After the pasta is cooked, add the corn and black beans. Stir gently to mix. Cook for an extra 2-3 minutes until everything is heated. Remove the pot from heat and stir in the shredded cheese until it melts and becomes creamy. Adjust the flavor with salt and pepper. By following these steps, you'll create a tasty One Pot Taco Pasta that is quick and satisfying. For the complete recipe, refer to the Full Recipe section. - Browning meat for added flavor Start by browning the meat well before adding other ingredients. This step builds deep flavors that make the dish tastier. - Properly stirring and monitoring cooking time Stir the pot often while it cooks. This keeps the pasta from sticking and helps the flavors mix well. Keep an eye on the time so the pasta cooks just right. - Adjusting the consistency if necessary If the dish seems too dry, add a little more broth. If it's too wet, let it cook a bit longer. Always taste and adjust to your liking. - Ideal accompaniments and garnishes Serve your One Pot Taco Pasta with fresh cilantro on top. A dollop of sour cream adds creaminess. You can also offer tortilla chips for some crunch. - Creative ways to serve Try serving it in taco shells for a fun twist. You can also layer it in a bowl with extra cheese and toppings for a hearty meal. {{image_2}} You can easily change this One Pot Taco Pasta to fit your needs. For a vegetarian or vegan option, swap the meat for plant-based ground meat or lentils. Use vegetable broth instead of chicken broth for a full plant-based dish. For gluten-free options, choose gluten-free pasta. Many brands offer great taste and texture. Just make sure to check the cooking time, as it may differ from regular pasta. To make your dish even better, try adding different spices or sauces. A dash of cumin or paprika can bring out new flavors. You can also mix in some hot sauce for a spicy kick. Consider swapping out ingredients for a unique taste. Try different types of beans, like pinto or kidney beans. You can also add diced jalapeños for a kick or some olives for extra flavor. For the full recipe, check the link above. Enjoy experimenting with these variations! To keep your One Pot Taco Pasta fresh, cool it down first. Place it in a container with a lid. Make sure to seal it well to keep out air. Store it in the fridge. It can last up to three days. After three days, it might lose flavor and texture. When it's time to eat your leftovers, reheat gently. You can use the microwave or a pot on the stove. If using a microwave, heat in short bursts. Stir each time to spread the heat. If using the stove, add a splash of broth. This helps keep it moist and tasty. To avoid clumping, stir well while reheating. Enjoy your meal just as delicious as before! Can I make this dish ahead of time? Yes, you can make One Pot Taco Pasta in advance. Just cook it, let it cool, and store it in the fridge. It stays good for about 3 days. When you are ready to eat, heat it in a pot or microwave until hot. What other toppings can I use? You can get creative with toppings! Here are some ideas: - Sliced jalapeños for heat - Avocado or guacamole for creaminess - Chopped green onions for freshness - Extra cheese for a cheesy finish - Tortilla chips for crunch Can I freeze leftover One Pot Taco Pasta? Yes, you can freeze this dish. Place it in an airtight container and store it in the freezer for up to 3 months. To reheat, thaw it in the fridge overnight. Then, heat it on the stove or microwave until hot. For the full recipe, check out the details above! In this blog post, we explored making a tasty One Pot Taco Pasta. We covered essential ingredients, preparation steps, and cooking tips. I shared how to enhance flavors and suggested fun serving ideas. Remember, you can adjust this meal to fit dietary needs or preferences. With proper storage, this dish will stay fresh longer. Enjoy creating your own version, and don’t forget to experiment with different toppings. Cooking can be fun and creative!

One Pot Taco Pasta Quick and Flavorful Recipe

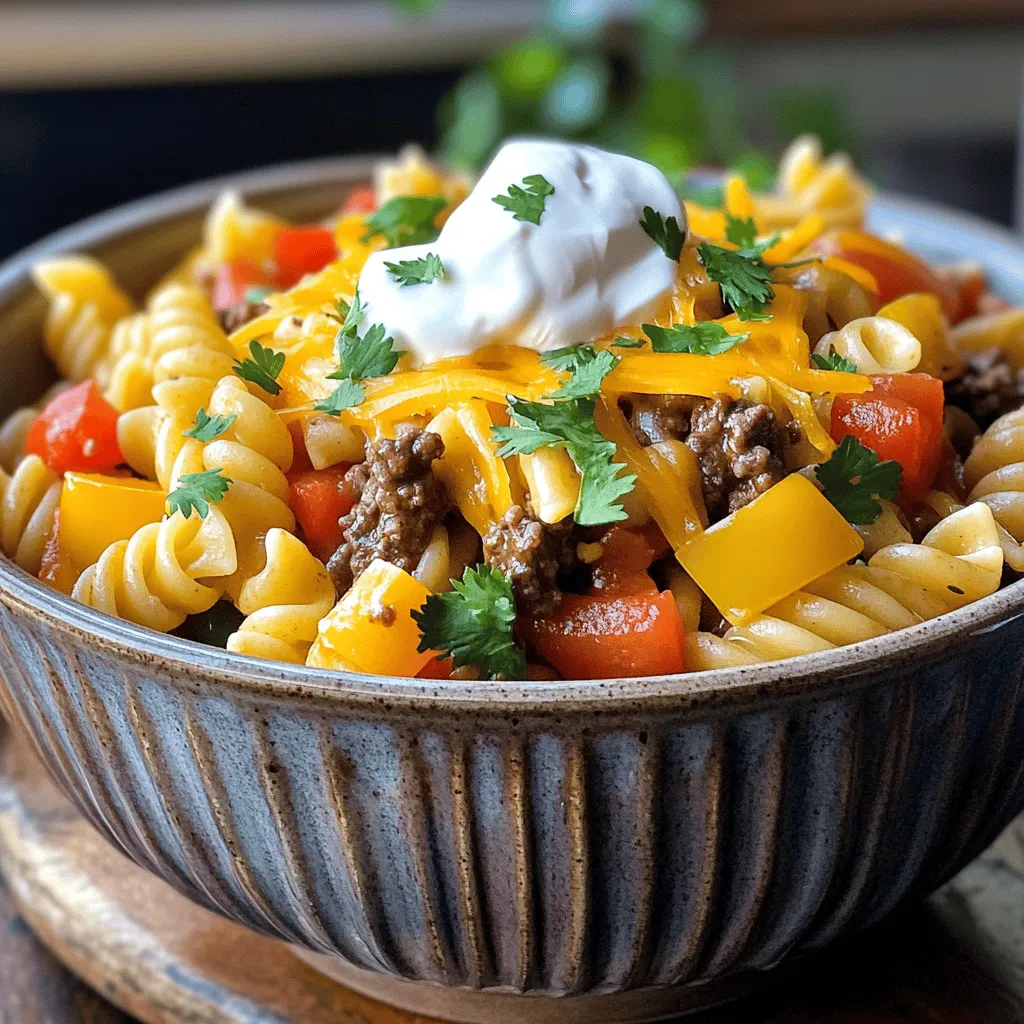
Get ready to spice up your weeknight dinners with my One Pot Taco Pasta recipe! This dish is quick, tasty,

To make a classic Caprese salad, you need just a few key items. Here’s what you’ll need: - 3 large ripe tomatoes, sliced - 8 oz fresh mozzarella cheese, sliced - 1 cup fresh basil leaves - 3 tablespoons extra-virgin olive oil - 1 tablespoon balsamic glaze - Salt and freshly cracked black pepper to taste These ingredients come together to create a fresh and colorful dish that shines. Choosing the best ingredients is key to a great Caprese salad. Here are some tips: - Tomatoes: Look for firm, ripe tomatoes. The better the tomato, the better the salad. - Mozzarella: Use fresh mozzarella. It should feel soft and moist. - Basil: Pick vibrant green basil leaves. Avoid wilted or brown leaves. - Olive Oil: Go for high-quality extra-virgin olive oil. It adds rich flavor. - Balsamic Glaze: A good balsamic glaze should be thick and sweet. Using fresh, high-quality ingredients makes your salad taste amazing. While the basic recipe is great, you can add a twist. Here are some optional ingredients: - Avocado: Sliced avocado adds creaminess. - Pine Nuts: Toasted pine nuts give a nice crunch. - Arugula: Adding arugula brings a peppery kick. - Prosciutto: Thin slices of prosciutto add a savory touch. Feel free to mix in these extras for a unique take on your Caprese salad. For the full recipe, check out the details above! First, gather all your ingredients. You will need three large ripe tomatoes, eight ounces of fresh mozzarella cheese, and one cup of fresh basil leaves. Get three tablespoons of extra-virgin olive oil and one tablespoon of balsamic glaze. Don’t forget salt and black pepper. With everything ready, you can make a fresh Caprese salad in just ten minutes. 1. Start by slicing the tomatoes and mozzarella. Aim for even slices for a nice look. 2. On a large serving platter, lay down the tomato and mozzarella slices. Alternate each piece. 3. Place fresh basil leaves between the layers. This adds a burst of flavor. 4. Next, drizzle the olive oil over the entire salad. Make sure to cover it well. 5. Add balsamic glaze for sweetness. This gives the salad a nice touch. 6. Finally, sprinkle salt and freshly cracked black pepper on top to taste. 7. Serve your salad right away. It tastes best when fresh! To make your salad look even better, use a large white plate. This lets the colors pop. You can also cut the basil leaves into smaller pieces for a more delicate look. Try to arrange the slices in a circle for a beautiful display. If you want, add a few extra basil leaves on top. It makes the salad more appealing. Enjoy the fresh and vibrant look of your Easy Caprese Salad! To make a great Caprese salad, use fresh, ripe tomatoes. They should feel firm but have a little give. Slice them right before serving to keep them juicy. Choose high-quality mozzarella cheese. The creaminess of the cheese balances the tomatoes perfectly. Use fresh basil leaves for the best flavor. Look for bright green leaves without brown spots. Drizzle extra-virgin olive oil generously. It adds a rich taste that brings all the flavors together. A touch of balsamic glaze adds sweetness and acidity. One common mistake is using tomatoes that are not ripe. Unripe tomatoes lack flavor and can ruin the dish. Another mistake is over-seasoning. A pinch of salt and pepper is enough. Too much can overpower the fresh ingredients. Avoid cutting the ingredients too early. They can wilt and lose flavor. Finally, do not skip the fresh basil. It adds an essential herbal note that you cannot replace. In summer, try adding peaches or strawberries for sweetness. In the fall, swap in roasted butternut squash for a warm touch. You can also use heirloom tomatoes for added color and flavor. For winter, consider using pomegranate seeds for a pop of color and tartness. These variations keep the salad fresh and exciting. You can find the full recipe to explore these ideas further. {{image_2}} For a creamy twist, add avocado to your Caprese salad. Slice ripe avocado and layer it with mozzarella and tomatoes. The rich flavor of avocado pairs well with fresh basil. It adds a smooth texture and healthy fats, making your salad even better. This variation is great for those who love avocados. Make Caprese skewers for a fun, easy-to-eat option. Use small skewers or toothpicks. Thread cherry tomatoes, mozzarella balls, and basil leaves onto the sticks. Drizzle with olive oil and balsamic glaze. These skewers are perfect for parties or picnics. They are colorful and tasty, which makes everyone happy. Turn your Caprese salad into a pasta dish. Cook your favorite pasta, then cool it. Mix in mozzarella, tomatoes, and fresh basil. Drizzle with olive oil and balsamic glaze. This pasta salad is filling and perfect for lunch. It’s easy to make and can be served cold or warm. You can find the full recipe for this delicious dish in the Easy Caprese Salad section above. If you have extra Caprese salad, store it in an airtight container. Place it in the fridge. The salad stays fresh for up to two days. Avoid leaving it out at room temperature for long. This keeps the flavors bright and the ingredients safe to eat. To keep your ingredients fresh, buy them just before you plan to use them. Look for tomatoes that feel firm and smell sweet. Choose mozzarella that is moist, not dry. Store basil in a glass of water like a bouquet. This helps it stay fresh longer. Keep olive oil in a cool, dark place. This will maintain its flavor and quality. Reheating Caprese salad is not ideal. The fresh taste of the salad shines best when served cold. Instead, you can repurpose leftovers. Chop the salad and mix it into pasta or use it on a sandwich. You can even add it to omelets for a tasty breakfast. These options will give your leftovers a new life! If you don’t have fresh mozzarella, you can use other cheeses. Burrata is a great choice. It has a soft and creamy center. You can also try ricotta cheese. It gives a nice texture and flavor. Feta is another option, but it has a stronger taste. You can even use sliced provolone for a different twist. Just remember, the goal is to keep it fresh and light. Yes, you can prep parts of the salad ahead. Slice the tomatoes and mozzarella in advance. Store them in airtight containers in the fridge. This keeps them fresh. However, wait to add the basil, olive oil, and balsamic glaze until right before serving. This way, your salad stays fresh and vibrant. You will enjoy it more if it looks and tastes great. Serve Caprese salad on a large platter for a beautiful display. Arrange the tomatoes and mozzarella in a circle or layers. Tuck in fresh basil leaves for color. Drizzle the olive oil and balsamic glaze just before serving. This keeps the salad from getting soggy. You can also serve it in individual bowls for a personal touch. Enjoy it as a starter or side dish. It’s best enjoyed fresh! In this post, we explored the key ingredients and steps for an easy Caprese salad. We discussed how to choose the best ingredients and tips for great taste. I shared variations like Caprese with avocado and pasta salad. Remember to store leftovers properly to keep them fresh. With these tips, you can make a tasty Caprese salad anytime. Enjoy mixing flavors and impressing your friends! Keep experimenting to find your perfect twist on this classic dish.

Easy Caprese Salad Fresh and Flavorful Dish

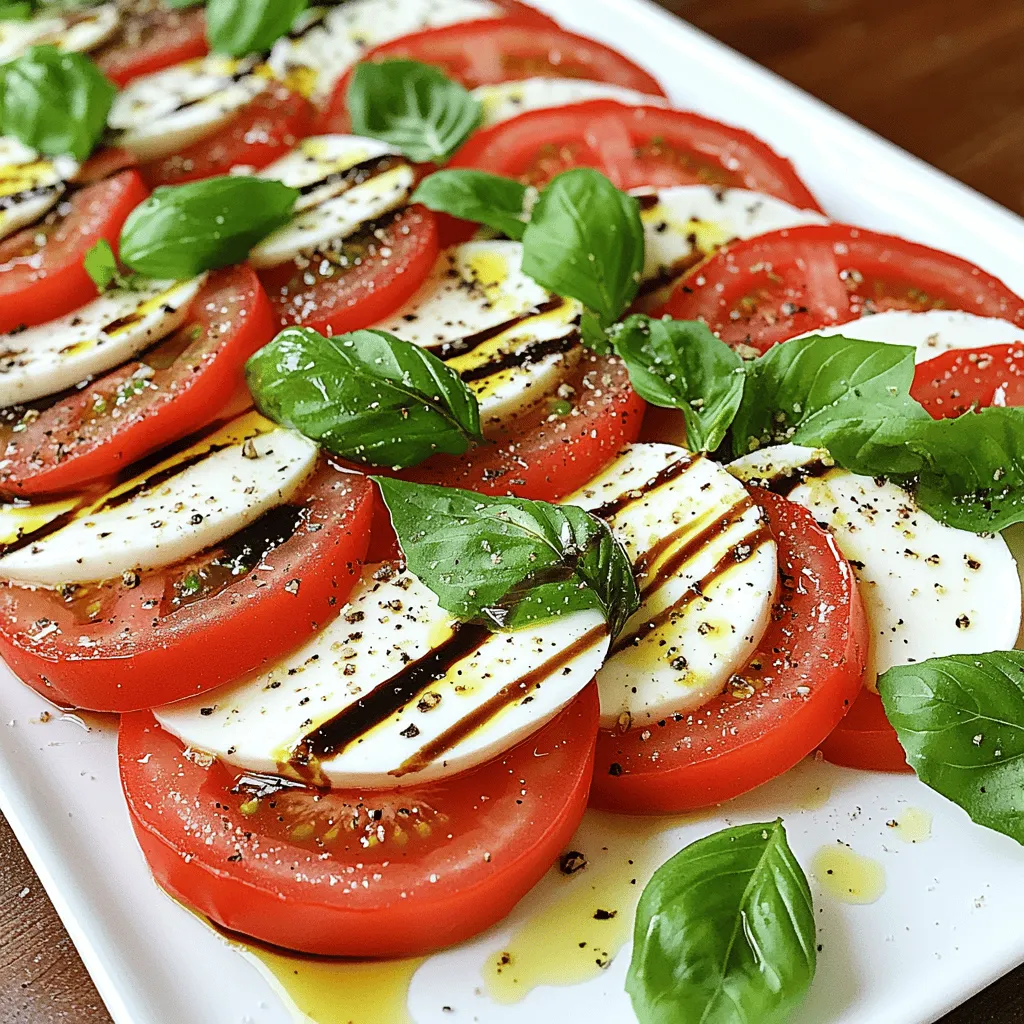
Looking for a dish that’s fresh, simple, and bursting with flavor? You’ve come to the right place! This Easy Caprese

- 4 boneless, skinless chicken thighs - 1 medium onion, diced - 3 cloves garlic, minced - 1 cup long-grain rice - 4 cups low-sodium chicken broth - 1 cup frozen peas and carrots - 1 tablespoon dried thyme - 1 teaspoon paprika - Salt and pepper to taste - 2 tablespoons olive oil - Fresh parsley for garnish For this recipe, I like to use boneless, skinless chicken thighs. They cook well in the crockpot and stay juicy. You can also add some fun veggies. I often choose onion and garlic for a great base. Frozen peas and carrots add color and nutrition. When it comes to spices, I use thyme and paprika. They give a warm flavor to the dish. I always reach for low-sodium chicken broth. It keeps the dish tasty without being too salty. For the rice, long-grain works best. It cooks evenly and absorbs all the flavors. Finally, I top the dish with fresh parsley. It adds a nice touch and brightens the meal. You can find the full recipe to make this comforting dish. Seasoning the chicken is simple. I like to use salt, pepper, thyme, and paprika. Rub these spices on both sides of the chicken thighs. This step adds great flavor. Next, sear the chicken thighs. Heat olive oil in a skillet over medium heat. Place the chicken in the skillet for 3-4 minutes on each side. You want them slightly golden. This gives depth to the dish. Now, it’s time to layer ingredients in the crockpot. Start with diced onion and minced garlic at the bottom. This helps create a tasty base. Then, add the seared chicken thighs on top. Pour in the chicken broth next. Add the long-grain rice and frozen peas and carrots. Gently stir everything together, but don’t disturb the chicken too much. For cooking time, set the crockpot on low for 4-5 hours or high for 2-3 hours. It’s important to check the chicken and rice for doneness. The chicken should be fully cooked, and the rice should be tender. A good tip is to test the chicken with a fork. If it pulls apart easily, it's done. The rice should be fluffy and not hard. Once cooking is done, remove the chicken thighs. Use two forks to shred them. This makes it easy to mix back into the dish. Mix all the ingredients together in the crockpot. This helps blend the flavors nicely. Taste it to see if you need more seasoning. For serving, dish out the chicken and rice hot. Garnish each plate with freshly chopped parsley for a nice touch. This adds color and flavor. Enjoy your meal! For the full recipe, check out the [Full Recipe]. To make tender chicken, choose thighs over breasts. Thighs stay juicy during cooking. Searing the chicken first adds great flavor. Brown them in olive oil for a few minutes. This helps lock in moisture and taste. For perfect, fluffy rice, use long-grain rice. Rinse it under cold water first. This removes excess starch and prevents sticking. Make sure the broth is hot when you add it. This helps the rice cook evenly and absorb flavors well. You can swap chicken thighs for chicken breasts or turkey. Both will work well in this recipe. Chicken breasts are leaner, but thighs are juicier. Turkey adds a different flavor to the dish. For rice, try brown rice or jasmine rice. Brown rice has more fiber but takes longer to cook. Jasmine rice has a lovely aroma and fluffy texture. Adjust the cooking time based on the type you use. Add herbs and spices to boost flavor. Fresh thyme or rosemary can add a nice touch. A pinch of red pepper flakes gives heat without overpowering the dish. You can also try adding a bay leaf for depth. Incorporate different veggies for added nutrition. Bell peppers, broccoli, or spinach work great. Add them in during the last hour of cooking. This way, they stay bright and fresh. For more ideas, check the Full Recipe. {{image_2}} You can make your Crockpot chicken and rice even better with some fun twists. - Creamy version: Add a cup of cream cheese or shredded cheese. This makes the dish rich and smooth. Stir it in at the end for a cheesy delight. - Spicy options: Want some heat? Toss in jalapeños or a splash of hot sauce. This adds a nice kick to the meal. Adjust the amount to match your taste. Change the flavor profile to explore new cuisines. - Italian-inspired: Swap out some broth for marinara sauce. This gives the dish a fresh tomato flavor. You can also add Italian herbs like basil or oregano. - Asian-fusion: Use soy sauce and sesame oil instead of broth. This brings an earthy, nutty taste. Add some green onions or bok choy for extra crunch. You can use fresh veggies and herbs based on the season. - Seasonal vegetables: In spring, add asparagus or peas. In fall, try squash or sweet potatoes. These seasonal choices keep the dish fresh and exciting. - Incorporating seasonal herbs: Use fresh herbs like basil, cilantro, or thyme. They boost flavor and add color. Toss them in during the last hour of cooking for the best taste. These variations make your Crockpot chicken and rice a dish you can enjoy all year long. For the full recipe, check out the link. After you enjoy your Crockpot Chicken and Rice, store the leftovers right away. To keep them fresh, put them in airtight containers. You can use glass or plastic containers with lids. Divide the food into smaller portions. This way, you can grab just what you need later. If you want to save some for later, freezing is a great option. Let the dish cool completely before you pack it. Use freezer-safe bags or containers. Squeeze out extra air from bags to prevent freezer burn. When you are ready to eat, thaw it in the fridge overnight. Reheat it on the stove or in the microwave until hot. In the fridge, your dish stays good for about 3 to 4 days. Always check for signs of spoilage. If it has an off smell, strange color, or mold, throw it away. Safety first! Enjoy your meal with peace of mind. How to make Crockpot Chicken and Rice? To make this dish, start by seasoning chicken thighs with salt, pepper, thyme, and paprika. Sear them in olive oil until golden. Next, layer diced onion and minced garlic in a crockpot. Place the chicken on top, then add chicken broth, long-grain rice, and frozen peas and carrots. Cook on low for 4-5 hours or high for 2-3 hours. Finally, shred the chicken, stir, and serve hot. For full details, check the Full Recipe. Can I use different types of meat? Yes, you can use chicken breast or turkey. Both options work well. Just adjust the cooking time, as chicken breasts may cook faster than thighs. Other meats, like pork or beef, can also be used, but they will change the flavor profile. What can I serve with this dish? Crockpot chicken and rice pairs nicely with a simple green salad or steamed vegetables. You could also serve it with crusty bread to soak up the tasty broth. If you want to add a crunch, try some toasted nuts on top. What is the best crockpot setting for chicken and rice? For best results, use the low setting. It allows the flavors to meld and keeps the chicken tender. If you're short on time, the high setting is fine, but the dish may not be as rich in flavor. How do I know when the chicken is done cooking? Check the chicken's internal temperature with a meat thermometer. It should reach 165°F (75°C). If you don’t have a thermometer, cut into the chicken. The meat should be white, and the juices should run clear. Caloric content per serving Each serving of this dish contains about 350 calories. This can vary based on the exact ingredients used. If you want to know the precise content, check the labels on your ingredients. Tips for making it healthier (low sodium options) To make this dish healthier, use low-sodium chicken broth. You can also reduce the amount of added salt. Adding more vegetables is another great way to boost nutrition without adding many calories. Consider incorporating spinach, bell peppers, or zucchini for added vitamins and minerals. In this blog post, you learned how to make delicious Crockpot Chicken and Rice. We covered key ingredients like chicken, veggies, and seasonings. I provided step-by-step instructions for cooking and serving. Plus, there are tips for perfecting your dish and making tasty variations. Remember, cooking should be fun and flexible. Substituting ingredients can lead to new flavors. Enjoy experimenting and making this meal your own! Use these tips, and your family will love dinner.

Crockpot Chicken and Rice Simple Comfort Food Recipe

Are you ready for a warm, cozy meal that practically cooks itself? Today, I’m excited to share my simple recipe

When you're ready to make Creamy Garlic Tuscan Chicken, gather these simple ingredients: - 4 boneless, skinless chicken breasts - 2 tablespoons olive oil - 4 cloves garlic, minced - 1 cup heavy cream - 1 cup cherry tomatoes, halved - 1 cup spinach, fresh - ½ cup grated Parmesan cheese - 1 teaspoon Italian seasoning - Salt and pepper to taste - Fresh basil leaves for garnish Each ingredient plays a key role in creating a rich, satisfying dish. The chicken breasts provide a hearty base packed with protein. Olive oil adds a touch of flavor and helps cook the chicken beautifully. Garlic gives that warm aroma and taste that we all love. Heavy cream is the star, making the sauce rich and creamy. Cherry tomatoes bring a pop of color and sweetness, while fresh spinach adds nutrition and a lovely green hue. Parmesan cheese adds depth and umami, making the sauce irresistible. To make this dish even better, season with salt and pepper. Finally, garnish with fresh basil leaves for a burst of freshness. For the full recipe, check out the details in the recipe card! To start, season the chicken breasts with salt and pepper. This small step packs a lot of flavor. Heat the olive oil in a large skillet over medium-high heat. Once the oil is hot, add the chicken. Cook for about 5-7 minutes on each side. You want the chicken to be golden brown and cooked all the way through. Once done, remove the chicken from the skillet and set it aside on a plate. Next, it’s time to make the creamy sauce. In the same skillet, add the minced garlic. Sauté the garlic for about 30 seconds until it smells amazing. Then, pour in the heavy cream, stirring to mix it with the garlic. Now, add the halved cherry tomatoes and Italian seasoning. Stir well and let it simmer for about 3-4 minutes. This allows the sauce to thicken. Now, add the fresh spinach to the sauce. Cook it for another 2 minutes until the spinach wilts down. Next, reduce the heat to low and sprinkle in the grated Parmesan cheese. Stir until the cheese melts into the sauce. Finally, return the chicken to the skillet. Spoon the creamy sauce over the chicken and let it cook for an additional 2-3 minutes to heat through. If you want, garnish with fresh basil leaves before serving. For the full recipe, check out the earlier section. To get that rich and smooth sauce, use heavy cream. Heavy cream adds body to your sauce. It keeps the sauce thick and tasty. If you want it extra creamy, add a bit more cream. When melting cheese, do it slowly. Stir the cheese into the warm sauce. This helps it melt evenly. Always keep the heat low to avoid clumps. For the best results, use a heavy skillet. A cast-iron skillet works great for even cooking. It holds heat well and gives a nice sear to the chicken. When cooking, keep the heat at medium-high. This helps brown the chicken quickly. Then lower the heat when you add the sauce to keep it from burning. To boost flavor, try adding fresh herbs. Basil and thyme work well with this dish. You can also toss in a pinch of red pepper flakes for some heat. If you want a different taste, switch up the cheese. Instead of Parmesan, try using mozzarella or feta. Each cheese gives a unique twist to the dish. For the full recipe, check the detailed instructions above. {{image_2}} You can change the main protein in this dish. Instead of chicken, try shrimp or tofu. Both options absorb the sauce well. This adds a unique twist to the meal. You can also swap in different vegetables. Mushrooms and zucchini work great in this recipe. They give extra flavor and texture. Feel free to experiment with what you have on hand. If you need gluten-free options, use gluten-free pasta or serve with rice. For dairy-free, substitute heavy cream with coconut milk. It will still be creamy and delicious. You can also adapt this dish for a low-carb diet. Skip the pasta and serve the chicken with a fresh salad. This keeps it light and healthy. Pair your creamy garlic Tuscan chicken with sides like pasta or a crisp salad. The sauce is rich, so a light side balances the meal. You can also add garlic bread for a fun touch. For a drink, consider a glass of white wine. A Chardonnay or Pinot Grigio complements the dish well. Enjoy the flavors coming together with every bite! To store your creamy garlic Tuscan chicken, use airtight containers. This keeps the chicken fresh. Make sure to let it cool before sealing. You can refrigerate it for up to three days. If you want to keep it longer, freezing is a good option. When reheating, use a skillet on low heat. This method helps keep the chicken moist. You can also add a splash of cream or broth for extra moisture. Avoid using the microwave, as it can dry out the chicken. To freeze, place the chicken in freezer bags. Make sure to remove excess air. This keeps the chicken from getting freezer burn. When you’re ready to eat, thaw it in the fridge overnight. Reheat it gently in a skillet for the best taste. Enjoy your delicious meal again! Creamy Garlic Tuscan Chicken is a rich and flavorful dish. It features tender chicken breasts in a creamy garlic sauce. This sauce blends heavy cream, garlic, cherry tomatoes, and spinach. The dish has roots in Italian cooking, showcasing the use of fresh ingredients. The result is a comforting meal with a touch of elegance. Making Creamy Garlic Tuscan Chicken takes about 30 minutes. You need around 10 minutes for prep. Cooking the chicken and sauce takes about 20 minutes. This quick time frame makes it perfect for a weeknight dinner. Yes, you can make this dish ahead. Cook the chicken and sauce, then store them in the fridge. Use airtight containers to keep it fresh. You can reheat it later on the stove or in the microwave. Just be careful not to overcook it when reheating. This dish tastes great even after a day or two! In this post, I covered how to make Creamy Garlic Tuscan Chicken. You learned about the ingredients and step-by-step cooking methods. I shared tips for achieving the best texture and flavor, plus variations to suit your taste. Remember, you can also adapt the recipe for different diets. Experimenting with new sides can enhance your meal. This dish is easy to make and perfect for any night. Dive in, and enjoy every delicious bite!

Creamy Garlic Tuscan Chicken Flavorful Dinner Delight

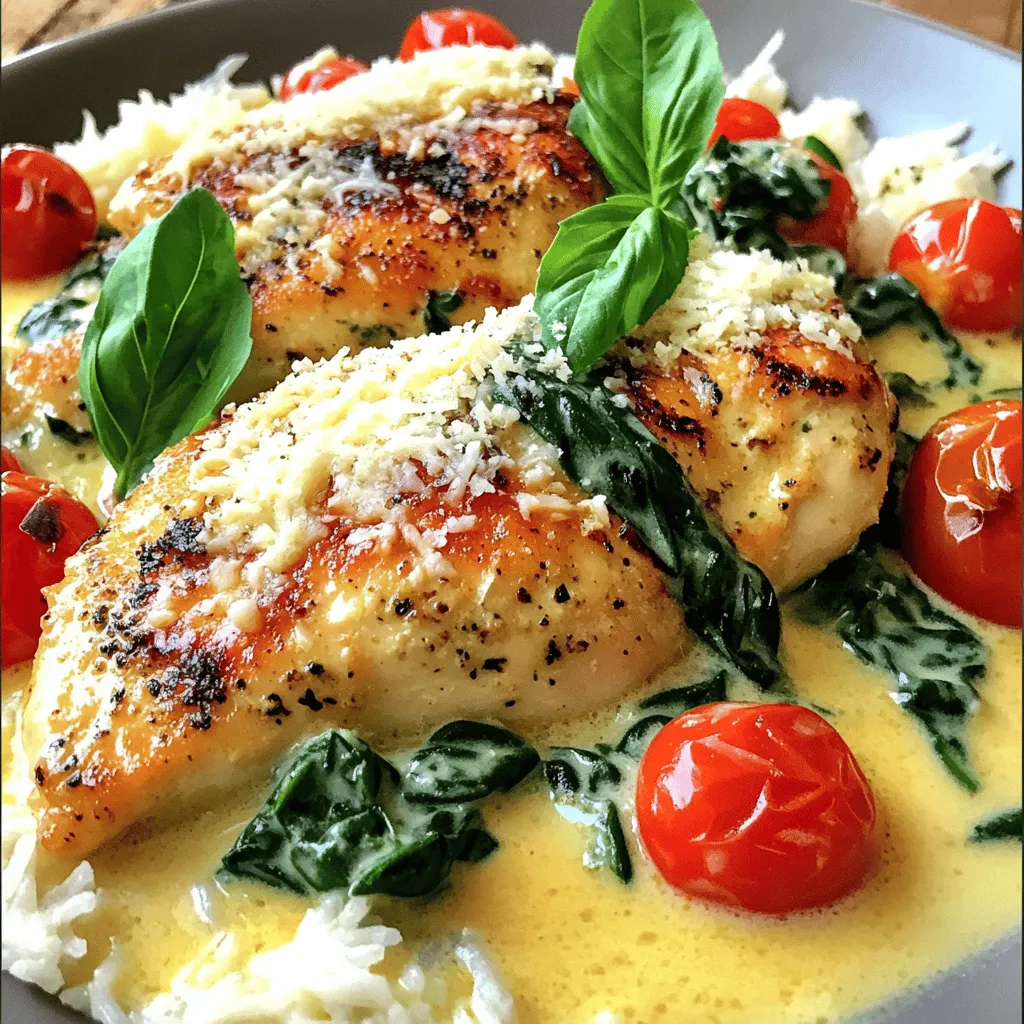
Are you ready to elevate your dinner game with a dish that’s bursting with flavor? Creamy Garlic Tuscan Chicken is

To make Pineapple Teriyaki Chicken, you need a few key ingredients. Here they are: - 4 boneless chicken thighs - 1 cup fresh pineapple, diced - 1/2 cup soy sauce (low sodium preferred) - 1/4 cup brown sugar - 1 tablespoon rice vinegar - 1 tablespoon sesame oil - 1 teaspoon garlic powder - 1 teaspoon ginger, grated - 1/2 teaspoon black pepper - 2 tablespoons cornstarch mixed with 2 tablespoons water (for thickening) - 2 green onions, chopped (for garnish) - Sesame seeds (for garnish) These ingredients blend together to create a sweet, tangy, and savory dish that will impress anyone. You can add more ingredients to boost the flavor even further. Consider these options: - 1 tablespoon of sriracha for heat - 1 tablespoon of honey for extra sweetness - Chopped bell peppers for crunch and color - Chopped cilantro for freshness These ingredients can give your dish a unique twist. Feel free to mix and match based on your taste. If you don’t have certain ingredients, don’t worry! Here are some easy swaps: - Use chicken breast instead of thighs for a leaner choice. - Substitute coconut aminos for soy sauce to make it soy-free. - Maple syrup can replace brown sugar for a different sweet flavor. - Apple cider vinegar works well if you don’t have rice vinegar. These substitutions keep the spirit of the dish while adapting to what you have on hand. For the full recipe, check out the details provided earlier! Start by gathering your ingredients. In a bowl, mix together soy sauce, brown sugar, rice vinegar, sesame oil, garlic powder, ginger, and black pepper. This mix is your marinade. It makes the chicken flavorful and tender. Add the chicken thighs to the bowl, making sure they are fully coated. Cover the bowl and place it in the fridge for at least 30 minutes. For the best taste, marinate overnight if you can. The longer the chicken sits, the more flavor it absorbs. Heat a tablespoon of oil in a large skillet over medium heat. Take the marinated chicken out of the fridge. Remove the chicken from the marinade, but save that liquid for later. Sear the chicken thighs in the hot skillet. Cook for about 5-7 minutes on each side until they are golden brown. Once the chicken is cooked through, take it out of the skillet and set it aside. This step gives you a nice crust on the chicken. In the same skillet, pour in the reserved marinade. Bring it to a boil. Add the diced fresh pineapple to the skillet. Let it cook for about 3-5 minutes. This step adds sweetness and a fruity taste to the sauce. Next, stir in the cornstarch mixed with water. This thickens the sauce quickly. Allow it to simmer until you reach your desired thickness. Slice the cooked chicken thighs into pieces. Return them to the skillet, tossing them in the thickened sauce. Let the chicken simmer for another 2-3 minutes. This allows the flavors to come together. Once done, remove the skillet from heat. Garnish with chopped green onions and sesame seeds. This adds a pop of color and crunch to your dish. Serve your Pineapple Teriyaki Chicken with rice or noodles for a complete meal. For the full recipe, check out the instructions above. Enjoy! To really boost the flavor, marinate the chicken longer. I suggest overnight if you can. The soy sauce and brown sugar blend well, giving the chicken depth. Also, using fresh pineapple adds a sweet and tangy burst. You can grill or broil the chicken for a smoky taste. For juicy chicken, cook it over medium heat. Sear each side for about 5-7 minutes. This will give it a nice crust. Make sure not to overcrowd the pan. If you do, the chicken will steam instead of sear. Once cooked, let it rest for a few minutes before slicing. This helps keep the juices inside. One common mistake is not marinating enough. If you marinate for less than 30 minutes, the flavor won’t sink in. Another mistake is using high heat. This can burn the outside while leaving the inside raw. Lastly, don’t skip the cornstarch mixture. It thickens the sauce and makes it stick to the chicken. For the complete guide, check out the Full Recipe. {{image_2}} If you want to switch things up, use other proteins. Chicken is great, but try pork or shrimp. Both of these options cook quickly and soak up the teriyaki flavor well. For pork, use boneless chops or tenderloin. For shrimp, opt for large, raw shrimp. They take just a few minutes to cook. These alternatives bring new tastes to your plate. You can easily make this dish vegetarian or vegan. Use firm tofu instead of chicken. Tofu absorbs flavors well when marinated. Cut it into cubes and treat it like chicken. Another option is tempeh, which has a nutty flavor. Cook it just like you would chicken. Both tofu and tempeh give a healthy twist to this recipe. Pineapple isn’t the only fruit that works here. You can try mango, peach, or even apricot. Each fruit brings a unique sweetness. Just dice the fruit and add it to the sauce as you cook. This change gives your dish a fun twist. Experimenting with different fruits allows you to personalize your meal. For the full recipe, check out the Tropical Pineapple Teriyaki Chicken section. To keep your Pineapple Teriyaki Chicken fresh, follow these steps. First, let the dish cool to room temperature. Then, transfer your leftovers to an airtight container. This helps seal in flavor and moisture. Store the container in the fridge for up to three days. Always label it with the date. This way, you can enjoy it later without worry. When reheating Pineapple Teriyaki Chicken, aim for the best texture. I recommend using a skillet. Heat it over medium heat. Add a splash of water or broth to the pan. This keeps the chicken juicy. Place the chicken pieces in the pan and cover it. Let it warm for about 5-7 minutes, stirring occasionally. You can also use a microwave, but the skillet gives a better texture. If you want to freeze Pineapple Teriyaki Chicken, it’s easy. Place the cooled chicken in a freezer-safe bag. Remove as much air as possible before sealing. You can freeze it for up to three months. When ready to eat, thaw it in the fridge overnight. Then, reheat it as mentioned above. Enjoy your tasty meal anytime! For the complete cooking process, check the Full Recipe. You should marinate the chicken for at least 30 minutes. This gives the chicken time to soak up the flavors. For the best taste, marinate it overnight. The longer it sits, the more tender and flavorful it becomes. Yes, you can use canned pineapple if fresh is not available. Just make sure to drain it well. Canned pineapple adds sweetness but may lack the fresh taste of the real fruit. If you want more texture, use fresh pineapple when you can. Several sides work well with Pineapple Teriyaki Chicken. Here are some great options: - Steamed white rice - Fried rice with vegetables - Grilled vegetables - A fresh green salad - Roasted sweet potatoes These sides balance the sweetness and add a nice crunch to your meal. For more details, check out the Full Recipe! You now know the key ingredients and steps for making Pineapple Teriyaki Chicken. We explored how to marinate the chicken and craft a flavorful sauce. I shared tips to avoid common mistakes and suggested fun variations to try. Remember, you can store leftovers properly for future meals. Enjoy this tasty recipe with your choice of sides. With these insights, you’re set to create a dish that impresses every time. Happy cooking!

Pineapple Teriyaki Chicken Flavorful Easy Recipe

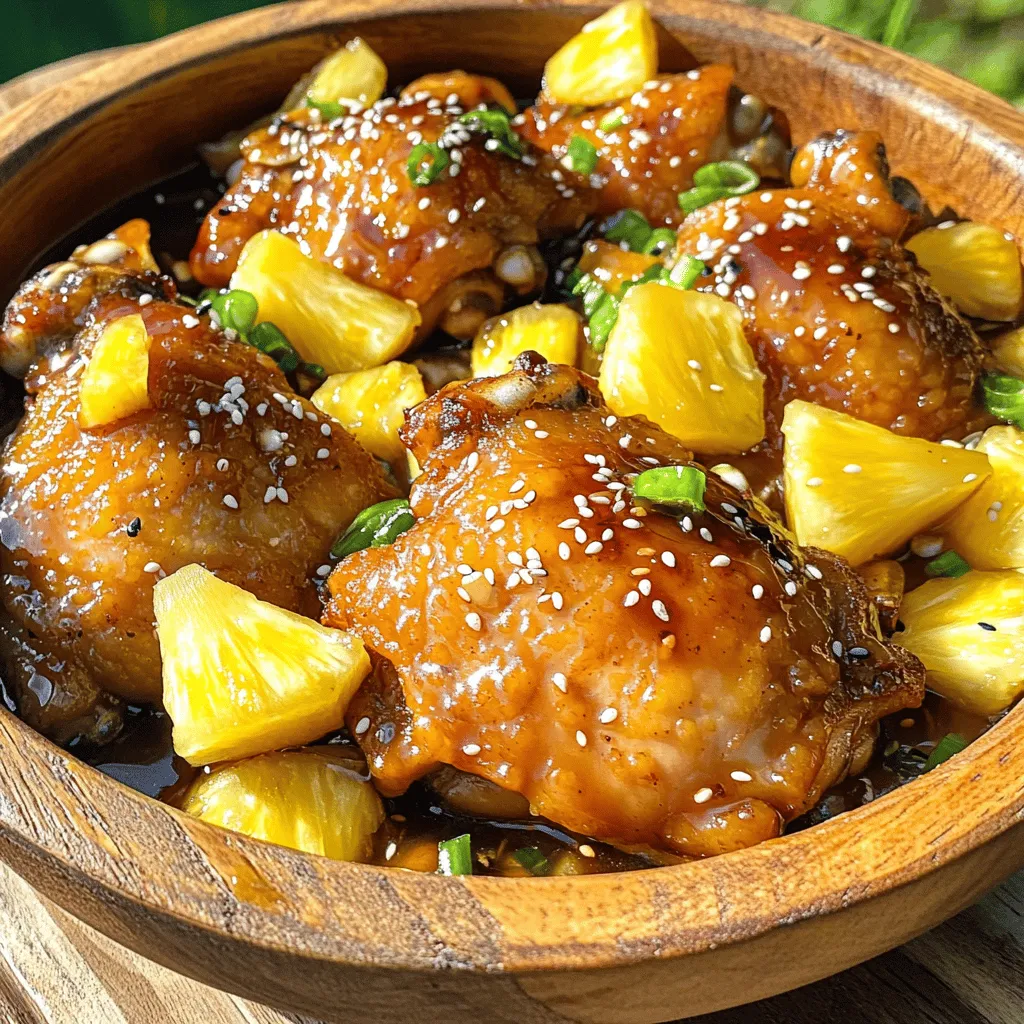
Looking for a tasty dish that’s both simple and flavorful? You’re in the right place! This Pineapple Teriyaki Chicken recipe

To make fluffy Japanese pancakes, you need some key ingredients. Here’s what you’ll need: - 1 cup all-purpose flour - 2 tablespoons sugar - 1 tablespoon baking powder - 1/4 teaspoon salt - 1/2 cup milk (warm) - 2 large eggs, separated - 1/2 teaspoon vanilla extract - 1 tablespoon vegetable oil (for cooking) - Butter, for serving - Maple syrup, for drizzling - Fresh fruit (such as berries or banana slices) for garnish These ingredients work together to create a light, airy texture. The egg whites are especially important. They provide the lift that makes these pancakes rise. While the pancakes are delicious on their own, toppings can enhance their flavor. Consider using: - Whipped cream - Sliced fruits like strawberries or kiwi - Chocolate sauce - Nuts or granola These options add flavor and make your pancakes look beautiful. You can mix and match to suit your taste. When picking your ingredients, quality matters. Here are some tips: - Flour: Choose all-purpose flour for the best results. - Sugar: Use granulated sugar for sweetness. Avoid brown sugar; it changes the texture. - Eggs: Fresh eggs give the best flavor and fluffiness. - Milk: Warm milk helps the batter mix better. - Vanilla Extract: Use pure vanilla for the best taste; it adds a lovely aroma. Selecting high-quality ingredients ensures your pancakes turn out amazing. Always check expiration dates and choose organic products when possible. If you're ready to cook, refer to the Full Recipe for guidance on making these delightful pancakes. To make fluffy Japanese pancakes, gather your ingredients. You need flour, sugar, baking powder, salt, milk, eggs, vanilla, vegetable oil, butter, syrup, and fruit. This recipe is simple but requires some care. I recommend measuring all ingredients before you start. This helps keep the process smooth and fun. 1. Mix Dry Ingredients: In a bowl, whisk together 1 cup of flour, 2 tablespoons of sugar, 1 tablespoon of baking powder, and 1/4 teaspoon of salt. Make sure everything blends well. 2. Mix Wet Ingredients: In another bowl, mix 1/2 cup of warm milk, 2 egg yolks, and 1/2 teaspoon of vanilla extract. Pour this into the dry mix. Stir gently until just combined. Remember, some lumps are fine. 3. Beat Egg Whites: In a clean bowl, beat 2 egg whites until stiff peaks form. This step makes your pancakes light and fluffy. It’s very important to get this right. 4. Combine Mixtures: Carefully fold the beaten egg whites into the batter in three parts. Be gentle so you don’t lose the air. The batter should look light and airy. 5. Heat the Skillet: Preheat a non-stick skillet on low heat and lightly grease it with vegetable oil. 6. Cook the Pancakes: Use a 1/4 cup measuring cup to scoop the batter onto the skillet. You can stack the batter for taller pancakes. 7. Cover and Cook: Cover the skillet with a lid. Cook for about 4-5 minutes on each side until golden brown. If they are thick, cook longer. 8. Keep Warm: Once cooked, place the pancakes in a low oven to keep warm while you cook the rest. 9. Serve: Stack the pancakes high and top them with butter, syrup, and fresh fruit. Flipping pancakes can be tricky. Use a thin spatula to slide under the pancake. Make sure to flip gently to keep them fluffy. If they stick, check your skillet temperature. Cooking on low heat helps prevent burning and keeps them soft. Enjoy your fluffy Japanese pancakes! For the full recipe, check the earlier section. To get that light and airy texture, whisk your egg whites until they form stiff peaks. This step is key! Fold the whites into the batter gently. You want to keep as much air in as possible. Also, use warm milk. It helps the batter mix well and rise nicely. First, don’t overmix your batter. Some lumps are okay. Overmixing makes the pancakes tough. Second, avoid high heat. Cooking on low heat cooks them evenly and keeps them fluffy. Lastly, be patient when cooking. Wait for a good golden brown color before flipping. Use a non-stick skillet for easy cooking. A lid is important too; it traps steam and helps the pancakes rise. A spatula is needed for flipping. A measuring cup is also helpful for portioning the batter. For the best results, use a whisk for the egg whites and a mixing bowl for the batter. You can find the full recipe for these tips in the Full Recipe section above. {{image_2}} You can change the flavor of your fluffy pancakes easily. To make chocolate pancakes, add 2 tablespoons of cocoa powder to your dry mix. For matcha pancakes, mix in 1-2 teaspoons of matcha powder. Both options give a fun twist to the classic taste. You can also add spices like cinnamon or nutmeg for extra warmth. Topping your pancakes can be just as fun. Try fresh berries like strawberries, blueberries, or raspberries for a fruity burst. Sliced bananas and a sprinkle of nuts add crunch. For a sweet touch, drizzle whipped cream or chocolate sauce on top. You can also add a dollop of yogurt for creaminess. The toppings can change with the seasons, so get creative! Fluffy Japanese pancakes can fit any occasion. For breakfast, stack them high and serve with butter and maple syrup. At brunch, pair them with coffee or tea. For dessert, serve with ice cream and hot fudge. You can even make mini pancakes for kids’ parties. They love the fun, fluffy shapes. These pancakes are a treat for any meal or celebration! After enjoying your Fluffy Japanese Pancakes, you may have some left. To store them, let them cool down first. Place the pancakes in an airtight container. You can stack them with parchment paper in between. This keeps them from sticking. Store the container in the fridge. They will stay fresh for up to three days. When you are ready to eat your leftover pancakes, a few simple steps will help. You can use the microwave or the stovetop. For the microwave, place the pancakes on a plate. Heat them for 20 to 30 seconds. Check to see if they are warm enough. If using the stovetop, add a little butter to a pan. Heat the pancakes over low heat for a few minutes on each side. This keeps them soft and tasty. If you want to save pancakes for later, freezing is a great option. First, let them cool completely. Then, layer them with parchment paper in a freezer-safe bag. Seal the bag tightly to avoid air. You can freeze them for up to two months. When you want to eat them, just thaw in the fridge overnight. Reheat as described above for the best results. Enjoy your Fluffy Japanese Pancakes anytime! Fluffy Japanese pancakes are taller and softer than regular ones. They use whipped egg whites. This method creates a light and airy texture. Regular pancakes mix all ingredients together. The Japanese version focuses on separating the eggs. This makes them rise beautifully when cooked. Yes, you can! Use gluten-free flour instead of all-purpose flour. Look for a blend that works well in baking. Check the package for best results. You might also need to adjust the baking powder. This ensures the pancakes stay fluffy and rise properly. To avoid sticking, use a non-stick skillet. Preheat it on low heat. Add a small amount of vegetable oil before cooking. Wipe out any excess oil with a paper towel. This helps create a smooth cooking surface. Make sure the pan is hot enough before adding the batter. I love serving these pancakes with a pat of butter on top. Drizzle warm maple syrup over them for sweetness. Fresh fruit like berries or banana slices adds color and flavor. You can also sprinkle some powdered sugar for a nice touch. For a twist, try adding whipped cream or chocolate sauce. Enjoy these pancakes stacked high for a fun presentation! For the full recipe, check out the [Full Recipe]. Fluffy Japanese pancakes are a treat you can enjoy anytime. We covered essential ingredients and tips to achieve that perfect fluffy texture. Following the steps ensures you get it right every time. Remember to experiment with various flavors and toppings to make them truly yours. By storing and reheating properly, you can enjoy leftovers without losing quality. With the right knowledge and practice, you can impress anyone with your pancake skills. Dive in and make these pancakes a new favorite!

Fluffy Japanese Pancakes Soft and Delicious Delight

If you love pancakes, you need to try Fluffy Japanese Pancakes. Their soft, cloud-like texture is a game changer! In

- 1 can (15 oz) chickpeas, drained and rinsed - 1/4 cup vegan mayonnaise - 1 stalk celery, finely chopped - 1/4 red onion, finely chopped - 1/4 cup bell pepper (any color), finely chopped - 1 tablespoon Dijon mustard - 1 tablespoon lemon juice - 1 tablespoon fresh dill or parsley, chopped - Salt and pepper to taste Chickpeas are the star of this salad. They give a nice texture and protein boost. Rinsing them helps remove extra sodium, making your meal healthier. Mixing in vegan mayonnaise adds creaminess. You can use different veggies like celery, red onion, or bell pepper. They add crunch and flavor. - Leafy greens (spinach or lettuce) for serving - Sliced tomatoes or cucumbers for added toppings Adding leafy greens makes your sandwich fresh and colorful. Spinach or lettuce works well. You can also add sliced tomatoes or cucumbers for extra taste and nutrition. These toppings bring a nice balance to the creamy chickpea salad. - Whole grain - Sourdough - Gluten-free options The bread you choose makes a big difference. Whole grain bread adds fiber. Sourdough gives a tangy flavor and a great crunch. If you need gluten-free, look for brands that use almond or rice flour. Each choice can change your sandwich experience. For the full recipe, check out the detailed steps to create this delicious Vegan Chickpea Salad Sandwich! How do I mash chickpeas effectively? To mash chickpeas, use a fork or potato masher. Press down until some chickpeas are smooth and others stay whole. This mix gives your salad the right texture. What steps do I take to mix the chickpea salad ingredients? In a medium mixing bowl, add your mashed chickpeas. Then, pour in 1/4 cup of vegan mayonnaise, 1 tablespoon of Dijon mustard, and 1 tablespoon of lemon juice. Stir to combine these ingredients well. Next, add 1 stalk of finely chopped celery, 1/4 red onion, and 1/4 cup of bell pepper. Finish by adding your herbs, salt, and pepper to taste. Mix everything thoroughly until it looks colorful and tasty. How do I spread the chickpea salad on the bread? Take your favorite bread. If you like it toasted, go ahead and toast it first. Then, spread a good amount of the chickpea salad mixture on one slice. Make sure to cover the slice well. What are some tips for stacking additional toppings? After spreading the chickpea salad, add leafy greens like spinach or lettuce. You can also include sliced tomatoes or cucumbers. These toppings add crunch and freshness. Stack them neatly so each bite is full of flavor. How can I present the sandwich beautifully? Serve your sandwiches on a wooden board or a bright plate. You can add sprigs of dill or parsley for a pop of color. Pair it with carrot sticks or vegetable chips for a fun and healthy lunch. What are some good pairing ideas with sides or drinks? Serve your chickpea salad sandwich with a refreshing drink like iced tea or lemonade. For sides, consider a simple green salad or crunchy veggie sticks. These pair well and make your meal even more delightful. To get the right consistency, mash the chickpeas with a fork. Leave some whole for texture. Too much mashing can make it mushy. Aim for a mix of smooth and chunky. For seasoning, start with a small amount of salt and pepper. Taste as you mix. Add more if needed. Do not over-season. You want to enhance the flavors, not drown them. Fresh herbs add a lot. Consider adding chopped basil or cilantro. You can also add a pinch of garlic powder for a kick. If you want a creamy base but don’t have vegan mayonnaise, use mashed avocado instead. It’s rich and tasty. You can also try tahini for a nutty flavor. Prep ingredients the night before. Chop vegetables and store them in the fridge. This makes mixing easier when you’re ready to eat. Making a larger batch is smart too. You can keep it in the fridge for a few days. This way, you always have a quick meal ready. Just grab your bread and build your sandwich. {{image_2}} You can swap chickpeas for other legumes. Black beans or white beans work great! They add a different flavor and texture. If you want to mix it up, use lentils. They are soft and tasty. Try using different dressings or spreads to change the taste. Instead of vegan mayo, you can use hummus. It adds creaminess and a rich flavor. You can also try using avocado for a fresh twist. Adding tofu or tempeh boosts protein in your sandwich. Cube the tofu and toss it in with the chickpeas. If using tempeh, steam it first for a softer bite. Both options help make your meal more filling. Nuts or seeds add a nice crunch. Almonds or sunflower seeds work well. Just sprinkle them in the salad for extra texture and flavor. Infusing global flavors is easy with this salad. For a Mediterranean twist, add olives and sun-dried tomatoes. Toss in some oregano for a fresh taste. If you want an Asian flair, try adding sesame oil and ginger. You can even mix in some edamame for a fun crunch. Different cultures have their own takes on chickpea salad. In India, you might find spices like cumin and coriander. In the Middle East, they often add tahini. These variations bring unique flavors to your sandwich. For the full recipe, check out the Chickpea Delight Sandwich. Store leftover chickpea salad in an airtight container. This keeps it fresh. It lasts about three to four days in the fridge. Make sure to stir it well before serving. You can serve the salad cold or at room temperature. If you want to heat it, use a microwave for about 30 seconds. Do not heat it too long; it can change the texture. Freezing is another option. Place the salad in a freezer-safe container. It can last up to three months in the freezer. When ready to eat, thaw it in the fridge overnight. To avoid soggy bread, keep the salad and bread separate until you are ready to eat. You can toast the bread just before serving. This adds crunch and keeps it fresh. If you plan to make sandwiches ahead, use sturdy bread like whole grain or sourdough. This type of bread holds up better. Enjoy your chickpea salad sandwich at its best! To make a gluten-free chickpea salad sandwich, choose gluten-free bread. Many stores offer great options. Look for brands made with rice flour, almond flour, or oat flour. You can also use lettuce leaves as a wrap. This keeps it fresh and fun. Yes, you can prepare the chickpea salad in advance. Store it in an airtight container in the fridge. It stays fresh for up to three days. Just wait to assemble the sandwich until you are ready to eat. This keeps the bread from getting soggy. Chickpeas are packed with nutrients. They are high in protein and fiber. This helps keep you full and satisfied. They also contain vitamins and minerals like iron and folate. Eating chickpeas can boost heart health and help with digestion. They are a smart addition to your diet. Yes, this sandwich is fun for kids! You can make it appealing by adding colorful veggies. Let them choose their own toppings, like sliced tomatoes or cucumbers. Serve it with a side of carrot sticks or veggie chips. This makes lunch exciting and healthy. This blog post shared how to create a tasty chickpea sandwich. You learned about key ingredients, preparation steps, and serving ideas. Plus, we covered variations and storage tips for your leftovers. Chickpeas are great for health, and this sandwich is fun to make. You can swap spices, add greens, or choose your favorite bread. Enjoy this recipe with your own twist!

Vegan Chickpea Salad Sandwich Nutritious and Easy Meal

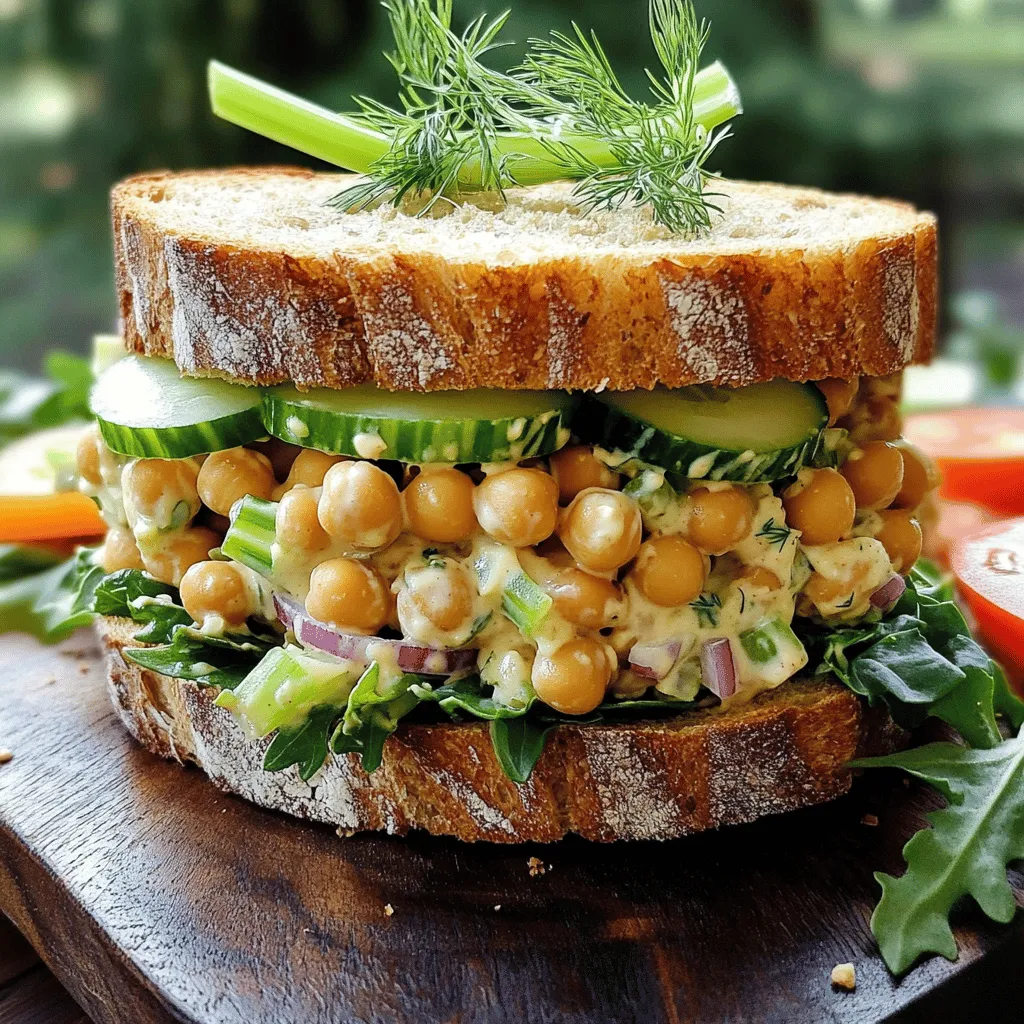
Are you looking for a quick, tasty, and healthy meal? The Vegan Chickpea Salad Sandwich is just the solution! Packed

Older posts
Newer posts
← Previous Page1 … Page73 Page74 Page75 … Page126 Next →

dsad

© 2025 Southern Dishes • Built with GeneratePress

Our Policies

  • Copyright Policy
  • Cookie Policy
  • GDPR Policy
  • Privacy Policy
  • Disclaimer
  • Terms Of Use

More Information

  • Home
  • About
  • Contact
  • Appetizers
  • Dessert
  • Dinner
  • Drinks
©2025, Southern Dishes About Back To Top