Skip to content
DisclaimerTerms Of UseGDPR PolicyCookie Policy

Southern Dishes

  • Home
  • Drinks
  • Appetizers
  • Dinner
  • Dessert
  • About
  • Contact
  • Privacy Policy
DisclaimerTerms Of UseGDPR PolicyCookie Policy

Isabella

- Fresh raspberries - Ripe peaches - Freshly squeezed lemon juice - Granulated sugar - Cold water - Fresh mint leaves - Ice cubes - You can use frozen raspberries if fresh ones are not available. They will work well and still taste great. For peaches, canned peaches can be a quick option, but fresh is best. - For a healthier drink, try using honey or agave syrup instead of granulated sugar. They add a unique flavor and have a lower glycemic index. - You can infuse your lemonade with herbs like basil or rosemary for a twist. Just muddle them with the fruit before blending. - When selecting ripe peaches, look for ones that are slightly soft and have a sweet aroma. This means they are ready to eat. Avoid hard or overly soft peaches. - Choose plump, firm raspberries that are deep red. They should not be mushy or moldy. Fresh is best for the brightest flavor. - Always use fresh lemon juice. Bottled juice lacks the zing and brightness that fresh juice brings. Squeeze your lemons just before use for the best taste. {{ingredient_image_1}} - Blending the raspberry and peach mixture First, gather 1 cup of fresh raspberries and 2 ripe peaches. Pitting and dicing the peaches helps them blend better. Place both fruits in a blender. Blend until the mix is smooth. - Straining the puree Next, strain the blended mixture. Use a fine mesh sieve over a bowl. Press the mixture with a spatula. This step removes seeds and pulp, giving you a smooth puree. - Mixing ingredients in the pitcher In a large pitcher, combine the strained raspberry-peach puree. Add 1 cup of freshly squeezed lemon juice and 1 cup of granulated sugar. Stir well until the sugar completely dissolves. Then, pour in 4 cups of cold water. Mix again to combine all the flavors. - Recommended chilling time Refrigerate the mixture for at least 30 minutes. This chilling time allows all the flavors to meld nicely. - How to serve for optimal flavor Serve the lemonade over ice cubes in tall glasses. This keeps the drink cold and refreshing. - Garnishing tips To make it look nice, garnish with fresh mint leaves. They add a pop of color and a hint of freshness. - Pairing with food This drink pairs well with grilled chicken or fresh salads. Its light and fruity taste complements many dishes. - Creative glassware ideas Use mason jars or colorful tumblers for a fun touch. They make the drink feel special and vibrant. - Adding garnishes for a festive touch Consider adding lemon slices or whole raspberries as a garnish. This adds visual appeal and enhances the drink's flavor. - Adjusting sweetness: Taste your lemonade before serving. If it's too tart, add more sugar. Start with one tablespoon at a time. Stir well and taste again. You want a nice balance. - Balancing acidity: The lemon juice gives a bright flavor. If it feels too sharp, add a bit more peach. This helps soften the acidity and creates a smoother sip. - Over-blending the fruits: Blend the raspberries and peaches just until smooth. If you blend too long, the seeds break down. This can make your lemonade gritty. Aim for a silky texture. - Not chilling the lemonade: Don’t skip the chill time! Refrigerate for at least 30 minutes. This step helps the flavors mix. A cold drink is much more refreshing on a hot day. - Ideas for vibrant garnishes: Use fresh mint leaves. They add a pop of color and aroma. You can also slice extra peaches for a fun look. Place them on top of your drink. - Using colorful ice cubes: Freeze some lemonade in ice cube trays. Use these cubes in your drinks. They keep your lemonade cold without watering it down. Plus, they look great! Pro Tips Choose Ripe Fruits: Selecting peaches that are slightly soft to the touch and raspberries that are vibrant in color will enhance the flavor of your lemonade. Adjust Sweetness: Depending on the sweetness of your peaches and personal preference, feel free to adjust the amount of sugar added to the lemonade. Strain for Smoothness: Straining the puree helps create a smoother lemonade without any pulp or seeds, making it more enjoyable to drink. Garnish Creatively: Fresh mint leaves not only add a pop of color but also a refreshing aroma that complements the fruity flavors beautifully. {{image_2}} You can make raspberry peach lemonade even more exciting by mixing in other fruits. Try adding strawberries or blueberries for extra berry flavor. These berries blend well with the peaches and raspberries. You can also add tropical fruits like pineapple or mango. These fruits give your drink a sweet and tangy twist. The mix of flavors will take your lemonade to a new level. You can keep raspberry peach lemonade non-alcoholic for a refreshing drink. But if you want to spice it up, try a spiked version. Add vodka or rum for a fun adult drink. This twist makes it perfect for parties. If you prefer mocktails, mix soda water with the lemonade. This gives you bubbles and keeps it light and refreshing. You can enjoy raspberry peach lemonade in every season. In winter, try a warm version. Heat the lemonade on the stove and enjoy a cozy drink. Add spices like cinnamon or nutmeg for warmth. In summer, keep it chill with ice cubes and fresh mint. You can even freeze some of the lemonade into popsicles. These are perfect for hot days. To keep your raspberry peach lemonade fresh, store it in a clean pitcher. Make sure to cover it tightly. The best temperature is in the fridge. Homemade lemonade lasts about 3 to 5 days. After that, the flavor may fade. You can freeze leftover lemonade for later use. Pour it into ice cube trays. Once frozen, store the cubes in a freezer bag. This way, you can enjoy a cool drink anytime! To thaw, leave the cubes at room temperature for a few minutes. You can also blend them into smoothies for a delicious treat. Do not waste any leftover puree! You can use it in many ways. Mix it into yogurt for a fruity snack. You can also swirl it into oatmeal or spread it on toast. For smoothies, blend the puree with milk or yogurt. It adds great flavor and nutrition! Raspberry peach lemonade stays fresh for about 3 to 5 days in the fridge. To ensure it lasts longer, store it in a sealed container. This keeps out air and light, which can spoil the drink faster. Make sure to give it a good stir before serving, as some ingredients may settle. Yes, you can use frozen fruit. It adds a chill to your drink right away. However, frozen fruit may change the texture. It can make the lemonade a bit thicker. Fresh fruit gives a brighter flavor, but frozen is still tasty. Just be mindful of the sweetness, as frozen fruit can be sweeter. You can sweeten your lemonade with granulated sugar, honey, or agave syrup. Granulated sugar is the most common choice. It dissolves well in the lemonade. Honey adds a nice flavor but may not dissolve as easily. Start with less sweetener, then taste. Add more if you want it sweeter. Raspberry peach lemonade is a refreshing drink you can easily make at home. We covered key ingredients, tasty substitutes, and quality tips. I shared step-by-step instructions and ways to enhance flavor and presentation. You learned about variations and how to store your lemonade. Remember, the right balance of sweetness and acidity makes all the difference. Enjoy your delicious drink with friends or on a hot day! Create your own twists to surprise your taste buds.

Raspberry Peach Lemonade Refreshing Summer Drink

Craving a refreshing drink that perfectly blends fruit flavors? Look no further! This Raspberry Peach Lemonade is your ultimate summer

- 2 boneless, skinless chicken breasts - 2 cups broccoli florets - 1 tablespoon olive oil - 2 cloves garlic, minced - 1 tablespoon soy sauce - 1 tablespoon honey - 1 teaspoon sesame oil - Cooked quinoa or brown rice for serving - Sesame seeds for garnish - Green onions, sliced for garnish Using fresh ingredients is key. The chicken breasts are the star here. They are lean and soak up flavor well. Broccoli adds color and crunch. I love how it pairs with the garlic sauce. The garlic sauce is simple but packed with flavor. Soy sauce gives it a salty kick. Honey adds a touch of sweetness, balancing the flavors. Sesame oil adds a nutty depth. For serving, I recommend using cooked quinoa or brown rice. Both add a nice base. They also boost fiber and nutrients. Don’t forget the garnishes! Sesame seeds give a nice crunch. Green onions add freshness and color. These small touches make your bowl look great and taste even better. {{ingredient_image_1}} - Preheat your grill to medium-high heat. This helps the chicken cook evenly. - In a small bowl, combine 2 cloves of minced garlic, 1 tablespoon of soy sauce, 1 tablespoon of honey, and 1 teaspoon of sesame oil. Mix well to create a tasty garlic sauce. - Season 2 boneless, skinless chicken breasts with salt and pepper on both sides. This adds flavor. - Brush olive oil over the grill grates to prevent sticking. Grill the chicken for 6-7 minutes per side. Check the chicken reaches an internal temperature of 165°F (74°C). Once cooked, remove it and let it rest for 5 minutes before slicing. - While the chicken rests, steam 2 cups of broccoli florets until they are tender yet crisp, about 4-5 minutes. - Slice the grilled chicken into strips. - In each bowl, layer cooked quinoa or brown rice, steamed broccoli, and sliced chicken. Drizzle the garlic sauce over the top. - Finish with a sprinkle of sesame seeds and sliced green onions for garnish. Enjoy your delicious Grilled Chicken Broccoli Bowls! To grill chicken right, aim for an internal temperature of 165°F (74°C). This ensures the chicken is safe to eat. Use a meat thermometer for accuracy. To avoid dryness, do not overcook the chicken. Grill each side for about 6-7 minutes. Let the chicken rest after grilling. This keeps the juices inside, making it tender and juicy. To spice things up, consider adding paprika or chili powder to the chicken. These spices give it an extra kick. For the garlic sauce, mix in some chopped herbs like cilantro or parsley. You can also add a splash of lime juice for a zesty twist. This customization makes the dish more fun and personal to your taste. When serving, use colorful bowls to make the dish pop. Bright colors make food more appealing. Garnish with sesame seeds and sliced green onions for extra flair. This not only looks great but adds texture too. A wedge of lemon on the side brings freshness and a nice touch to your meal. Pro Tips Marinate for Flavor: For an even richer taste, marinate the chicken in the garlic sauce for at least 30 minutes before grilling. This allows the flavors to penetrate the meat. Perfectly Cooked Broccoli: To keep the broccoli vibrant and crunchy, steam it just until bright green. It should be tender but still have a bit of a bite to it. Use a Meat Thermometer: To ensure your chicken is cooked perfectly, use a meat thermometer to check that it has reached an internal temperature of 165°F (74°C). Garnish for Presentation: Don’t skip the garnishes! A sprinkle of sesame seeds and sliced green onions not only add visual appeal but also enhance the dish's flavor. {{image_2}} You can swap chicken for tofu or tempeh for a tasty vegetarian option. Tofu absorbs flavors well, making it perfect with the garlic sauce. Tempeh adds a nutty taste and a nice texture. If you crave seafood, shrimp is a great choice. Grill it quickly for just a few minutes. You can also use beef strips if you prefer red meat. Just remember to adjust cooking times based on the protein you choose. Broccoli works great, but you can try other veggies too. Asparagus and bell peppers add vibrant colors and flavors. You might use green beans or zucchini for a fresh twist. For more nutrients, load your bowl with spinach, kale, or carrots. Mix and match to keep things exciting. The more colors on your plate, the better it looks and tastes. The garlic sauce is a star, but you can switch it up too. Try adding lime juice for a zesty kick. A splash of sriracha gives it heat, or you can use peanut sauce for a nutty flavor. If you like creaminess, blend Greek yogurt with herbs for a dressing. Explore different marinades, like teriyaki or BBQ, to keep your bowls fun and flavorful. To keep your grilled chicken broccoli bowls fresh, put leftovers in an airtight container. Store them in the fridge. They taste best within three days. If you want to freeze them, separate the chicken, broccoli, and grains. This method helps keep flavors and textures. Use freezer bags for easy storage. They can last up to three months in the freezer. For reheating grilled chicken, use the microwave or an oven. If using a microwave, heat it for 1-2 minutes. Check every 30 seconds to avoid overcooking. To keep the chicken juicy, add a splash of water before heating. For broccoli, steam it for a few minutes. This method helps keep it crisp and bright. Avoid reheating in the microwave for too long, as it can turn mushy. In the fridge, grilled chicken lasts about 3-4 days. Broccoli remains good for 3-5 days. Cooked quinoa or brown rice lasts around 4-6 days. If you freeze chicken, it stays safe for 3 months. Broccoli can also freeze well for up to 10 months, but it may lose some texture. Yes, you can make this recipe in advance. Here are some tips for meal prep and storage: - Cook Chicken: Grill the chicken earlier in the day. Let it cool, slice it, and store it in an airtight container. - Prepare Broccoli: Steam the broccoli and store it the same way. It keeps well for a few days. - Make Garlic Sauce: You can mix the sauce ahead of time. Just keep it in the fridge until you need it. - Assemble Later: When you are ready to eat, heat the chicken and broccoli. Then, layer everything in bowls with the sauce. These bowls are great on their own, but you can enhance your meal with these side dishes: - Salad: A fresh green salad adds a nice crunch. - Fruit: Sliced fruit, like apples or oranges, brings sweetness. - Bread: Serve with crusty bread for a filling meal. - Nuts: Sprinkle some nuts for a crunchy texture. Yes, but you should choose the right ingredients. Soy sauce often contains gluten. Use gluten-free soy sauce or tamari instead. This swap keeps the dish safe for those with gluten sensitivities. Enjoy your meal without worry! This blog post covered a tasty recipe for Grilled Chicken Broccoli Bowls. We discussed the key ingredients, from chicken to garlic sauce. You learned step-by-step grilling and cooking tips. Flavor enhancing ideas and variations help customize your meal. Finally, we shared proper storage methods for leftovers. In short, this dish is quick, flexible, and healthy. Enjoy it your way, and share your creation!

Grilled Chicken Broccoli Bowls with Garlic Sauce Delight

Craving a quick and tasty meal? You’ve come to the right place! My Grilled Chicken Broccoli Bowls with Garlic Sauce

To make a delightful Easy Peach Crisp, you need: - 4 large ripe peaches, peeled and sliced - 1 tablespoon lemon juice - 1/4 cup brown sugar - 1 teaspoon cinnamon - 1 cup rolled oats - 1/2 cup flour (all-purpose or whole wheat) - 1/3 cup granulated sugar - 1/2 cup cold unsalted butter, cubed - 1/2 cup chopped nuts (walnuts or pecans, optional) - Pinch of salt Peaches are the star of this recipe. They need to be ripe for the best taste. Look for peaches that feel slightly soft when you press them. Their sweet juice makes the crisp juicy and flavorful. The lemon juice adds a bit of tang, balancing the sweetness. Brown sugar gives the topping a rich, caramel flavor. Oats provide a crunchy texture that contrasts nicely with the soft peaches. The butter makes the topping crisp and golden. When picking peaches, choose ones that are fragrant. This means they are ripe and ready to eat. Check for smooth skin without any blemishes. If the peach is too hard, it may not be sweet. If it's too soft, it may be overripe. If you can’t find fresh peaches, frozen ones work too. Just thaw them and drain any extra juice before using them. This will keep your crisp from getting soggy. For the best flavor, use peaches in season, which is usually summer. You can find the full recipe for more details on how to prepare your peach crisp! First, gather your ingredients. You need ripe peaches, lemon juice, brown sugar, and more. Next, preheat your oven to 350°F (175°C). This heat will make your crisp golden and yummy. Now, slice your peaches. You want about four large ones. In a big bowl, toss the sliced peaches with one tablespoon of lemon juice. Add a quarter cup of brown sugar and one teaspoon of cinnamon. Mix well until the peaches are coated. Spread this peach mixture into a greased 8x8 inch baking dish. The sweet and tangy flavor will shine through! In another bowl, combine one cup of rolled oats, half a cup of flour, and one-third cup of granulated sugar. Add a pinch of salt to enhance the flavor. Then, take half a cup of cold unsalted butter, cubed. Use your fingers or a pastry cutter to mix it in until it looks like coarse crumbs. If you like, stir in half a cup of chopped nuts for some crunch. Finally, sprinkle this topping evenly over your peach layer in the dish. Baking will bring everything together into a delightful dessert. For the full recipe, check the instructions above! To get a great crisp, focus on your topping. Use cold butter, not melted. This keeps the topping light. Mix until the butter looks like coarse crumbs. This texture gives you that nice crunch. You want the oats to stay whole. If you crush them too much, the topping will be soft. Baking it until golden brown is key. This shows the topping is crispy and ready. One common mistake is using overripe peaches. They can turn mushy in the oven. Make sure your peaches are ripe but firm. Don't skip the lemon juice. It adds flavor and helps keep the peaches bright. Another mistake is packing the topping too tightly. Lightly sprinkle it over the peaches for even cooking. Lastly, keep an eye on the bake time. Ovens vary, so check for golden brown color. Serve your peach crisp warm, right from the oven. It tastes great with a scoop of vanilla ice cream. The cold ice cream melts into the warm crisp. You can also add a dollop of whipped cream. For a twist, drizzle some caramel sauce on top. Pair it with a cup of coffee or tea for dessert. Enjoy it after dinner or as a sweet snack. For more ideas, check the Full Recipe for other fun options! {{image_2}} You can switch up the fruit in your peach crisp for a fun twist. Try using ripe pears, sweet cherries, or tart apples. Each fruit adds its own unique flavor. You can also mix different fruits together. Adding berries, like blueberries or raspberries, brings a nice color and taste. For extra crunch, toss in some nuts. Walnuts and pecans work great for this. Want a lighter version of peach crisp? Use less sugar. You can cut the brown sugar in half. Instead, try honey or maple syrup for a natural sweet taste. For a gluten-free option, swap the flour for almond flour or oat flour. You can also replace the butter with coconut oil. This keeps it rich while making it a bit lighter. Each season brings its own fruit. In summer, use nectarines or plums. In fall, apply apples and pears for a cozy treat. Winter offers citrus fruits like oranges or tangerines. In spring, fresh strawberries can brighten your dish. Seasonal choices not only add flavor but also keep your dessert fresh and exciting. Check out the full recipe to see how easy it is to make this delightful dessert! After you enjoy your peach crisp, store leftovers in an airtight container. This keeps the crisp fresh. Let it cool completely before sealing. You can keep it in the fridge for up to four days. If you like, you can also cover it tightly with plastic wrap. To reheat, warm the peach crisp in the oven. Preheat your oven to 350°F. Place the crisp in an oven-safe dish. Heat for about 10-15 minutes, or until warm. You can also use the microwave for a quick option. Heat in 30-second bursts until warm. If you want to save some peach crisp for later, freezing works well. Cut the crisp into portions. Wrap each piece in plastic wrap and then in foil. Label and date the packages. You can freeze it for up to three months. To eat, thaw it in the fridge overnight. Then, reheat as described earlier for a tasty dessert anytime. To make Easy Peach Crisp vegan, swap the butter for a plant-based alternative. Use coconut oil or a vegan butter substitute. This change keeps the flavor rich while making it dairy-free. You can also replace the granulated sugar with coconut sugar for a healthier option. Yes, you can use frozen peaches for this recipe. Thaw them first and drain excess liquid. This step helps prevent a soggy crisp. Keep in mind that frozen peaches may be softer than fresh ones, so adjust the baking time slightly if needed. For gluten-free options, use certified gluten-free oats and almond flour instead of regular flour. You can also try coconut flour or a gluten-free blend. These options will still give you that lovely crisp topping you crave without any gluten. Easy Peach Crisp is a simple dessert that highlights fresh peaches. You learned how to choose the best peaches and prepare a tasty topping. I shared tips to get the perfect crisp and avoid common mistakes. You can also explore variations and healthier options. In short, this recipe lets you enjoy delicious flavors with ease. Try it and impress your friends and family. Happy baking!

Easy Peach Crisp Simple and Tasty Dessert Delight

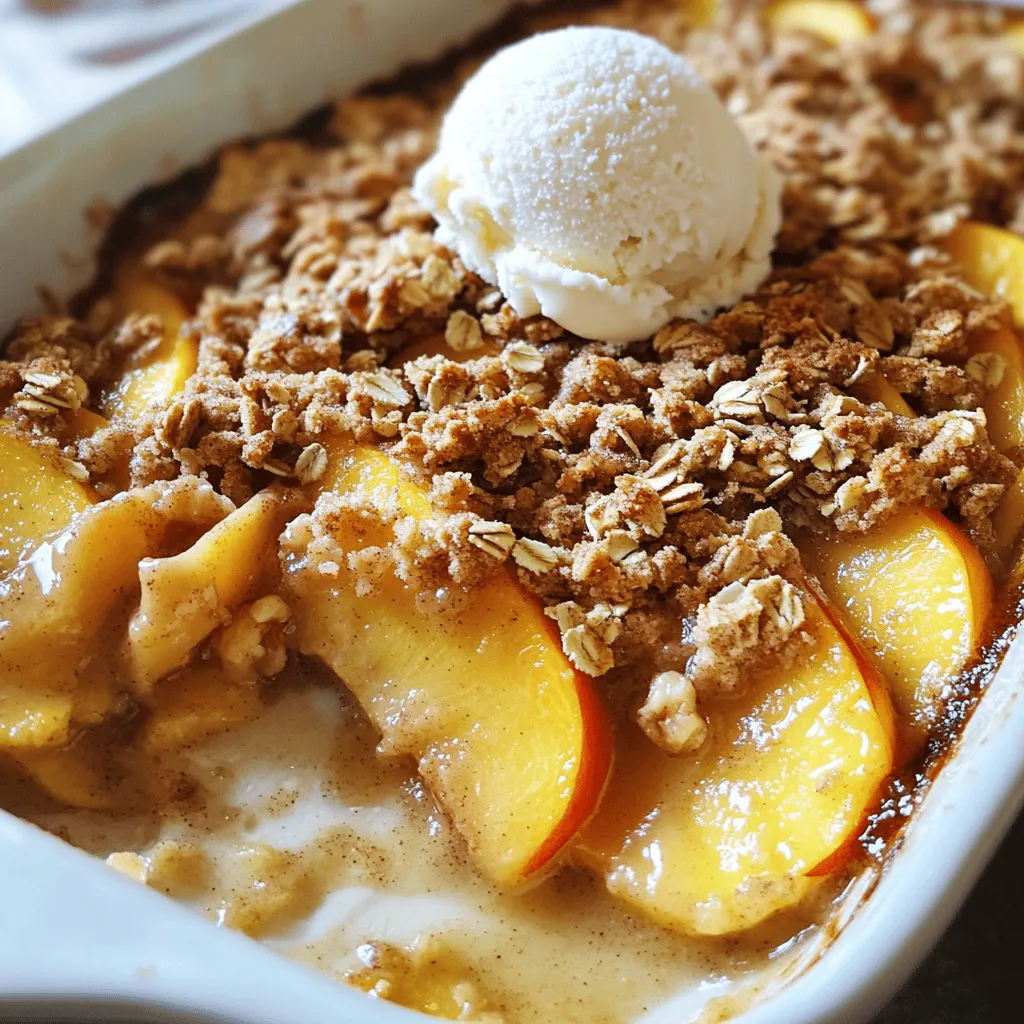
Are you ready to indulge in a warm, fruity delight? My Easy Peach Crisp is the perfect dessert for any

To make delicious pickled red onions, you need a few simple ingredients: - 2 large red onions - 1 cup apple cider vinegar - 1/2 cup water - 1 tablespoon sugar - 1 teaspoon salt - Optional spices and herbs These ingredients create a zesty and fresh flavor that enhances any dish. Red onions are sweet and crunchy, making them perfect for pickling. Apple cider vinegar adds tang, while sugar balances the flavor. You can also add some optional ingredients for a twist: - 1 tablespoon mustard seeds - 1/2 teaspoon black peppercorns - 1/4 teaspoon crushed red pepper flakes - Fresh herbs like dill or thyme These extra spices bring depth to your pickles. Mustard seeds add a nice crunch, while red pepper flakes give a hint of heat. Fresh herbs like dill or thyme can brighten the flavor and make your pickles unique. For the full recipe, check out Zesty Pink Pickled Onions. Start by peeling your red onions. Use a sharp knife or a mandoline to slice them thinly. Thin slices help the onions absorb the pickling solution better. If you want uniform pieces, a mandoline is your best friend. A knife works too, but it may not give you the same evenness. In a medium saucepan, combine these ingredients: - 1 cup apple cider vinegar - 1/2 cup water - 1 tablespoon sugar - 1 teaspoon salt - 1 tablespoon mustard seeds - 1/2 teaspoon black peppercorns - 1/4 teaspoon crushed red pepper flakes (optional) Bring the mixture to a gentle simmer over medium heat. Stir until the sugar dissolves completely. This step creates a balanced flavor and ensures your onions will taste great. Next, pack the sliced onions into a clean glass jar. Leave some space at the top for the solution. Carefully pour the pickling solution over the onions. Make sure they are fully submerged. If you want to add extra flavor, toss in some fresh herbs like dill or thyme. Afterward, let the jar cool to room temperature. Seal it with a lid and place it in the fridge. Chill for at least 1 hour before serving. For the best taste, wait a full 24 hours. These pickled onions can last in the fridge for up to two weeks. Enjoy them as a vibrant topping for tacos, salads, or sandwiches. For the full recipe, check out the details above. To make great pickled red onions, I have a few tips for you. First, always let the vinegar mixture cool before pouring it over the onions. This step helps keep the onions crunchy and bright. If you pour the hot mixture directly onto the onions, they might become too soft. Next, for the best flavor, let the pickled onions sit for at least 24 hours in the fridge. This time allows the onions to soak up all the tangy goodness. The longer they sit, the more flavorful they become. You can even try adding fresh herbs like dill or thyme for a unique twist. Storing your pickled red onions is simple. Use a clean glass jar with a tight lid. This keeps the onions fresh longer. I recommend placing them in the refrigerator right after making them. For the best taste, chill your pickled onions for at least one hour before serving. However, they taste even better after a full day. You can enjoy them for up to two weeks if stored properly. These onions make a fun topping for tacos, salads, or sandwiches. {{image_2}} You can change the flavor of your pickled red onions easily. Adding garlic gives them a bold kick. Just crush a few cloves and add them to the jar. Garlic blends nicely with the vinegar and spices. You can also try citrus zest. Adding lemon or lime zest brightens the taste. It adds a fresh, zesty note that wakes up the onions. Fresh herbs like dill or thyme work too. Just sprinkle some into the jar before pouring the pickling solution. This will give a lovely herbal flavor. You can use different types of vinegar to alter the taste. Apple cider vinegar is common, but you might try white vinegar. It has a sharper taste and can make the onions more tangy. Rice vinegar is another option. It is milder and adds a touch of sweetness. Each vinegar changes the flavor profile. Experimenting with these options lets you find your perfect taste. When you use different vinegars, note how the flavors shift. This way, you can create a batch that suits your palate. For the complete recipe, check the Full Recipe section. To keep your pickled red onions fresh, glass jars work best. Glass is non-reactive and won’t change the flavor. Plastic can absorb flavors and odors. Always use a clean jar to avoid spoilage. Store your pickled onions in the fridge. The cold temperature helps keep them crisp. Make sure the onions stay submerged in the vinegar mixture. This ensures they stay flavorful and fresh. Pickled red onions can last up to two weeks in the fridge. After this time, they may lose flavor and crunch. If you see any mold or a strange smell, it’s best to throw them out. Always check your jar before using. For the best taste, wait a day after pickling. This allows the flavors to meld together. Use them as toppings on tacos, salads, or sandwiches to add a pop of color and flavor. Enjoy your homemade pickled red onions! For the full recipe, check the section above. How long do pickled red onions last? Pickled red onions last about two weeks in the fridge. After that, they may lose crunch and flavor. Always check for any signs of spoilage before using. Can I use other types of onions for pickling? Yes, you can use yellow or white onions. Each onion gives a different taste. Red onions are sweeter and brighter, while yellow onions are more savory. What dishes pair well with pickled red onions? Pickled red onions are great on tacos, salads, and sandwiches. They add a nice tang and color. You can also use them in grain bowls or as a topping for burgers. Why are my pickled onions too salty or too sweet? If your pickled onions taste too salty, reduce the salt next time. For sweetness, cut back on the sugar. Adjusting these amounts can help you find the perfect balance. What to do if the onions lose their color? If the onions turn pale, they may have been in the pickling solution too long. Store them in the fridge and use them within two weeks to keep their bright color. Making homemade pickled red onions is easy and fun. We covered essential ingredients, like red onions and apple cider vinegar, along with optional spices to enhance flavor. The step-by-step instructions guide you through slicing, pickling, and storing. For best results, remember to cool the mixture before combining and store them properly. These onions can last long in your fridge and add zest to many dishes. Enjoy your pickling journey and experiment with flavors to make it uniquely yours!

Homemade Pickled Red Onions Flavorful and Fresh Recipe

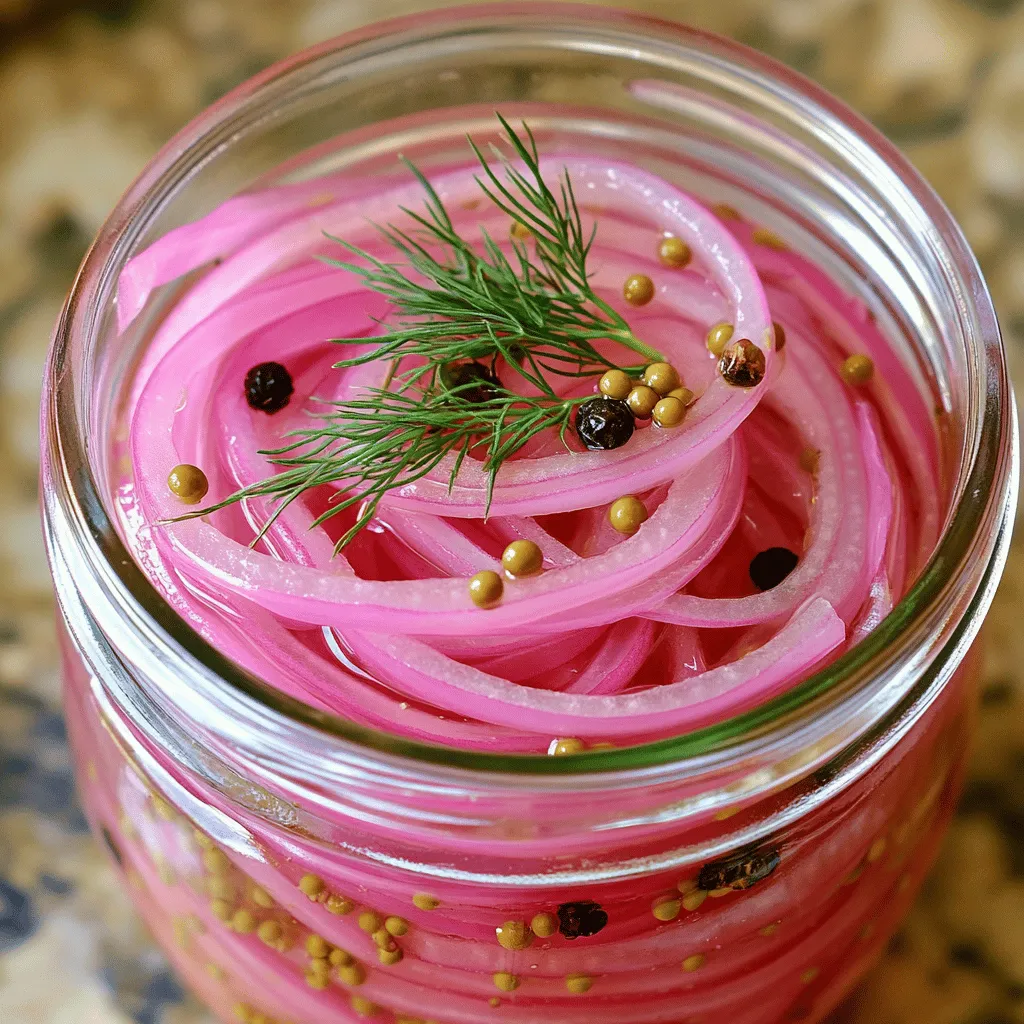
Homemade pickled red onions are simple, tasty, and full of flavor. In just a few steps, you can elevate any

- 1 ½ cups graham cracker crumbs - ½ cup unsalted butter, melted - 2 cups cream cheese, softened - 1 cup powdered sugar - 1 teaspoon vanilla extract - 1 cup heavy whipping cream - 2 cups fresh peaches, sliced - ½ teaspoon cinnamon In this recipe, each ingredient plays a key role. The graham cracker crumbs form a sweet and crunchy base. Melted butter binds the crumbs together, creating a perfect crust. Cream cheese gives the cheesecake its rich and creamy texture. Powdered sugar sweetens the mix without making it grainy. Vanilla extract adds a warm, comforting flavor. Heavy whipping cream makes the filling light and fluffy. Fresh peaches bring a juicy burst of flavor, while cinnamon adds a hint of warmth. - Fresh mint leaves for garnish - Other fruit toppings While the essential ingredients make a great peach cheesecake, you can enhance it with some optional items. Fresh mint leaves give a pop of color and a refreshing taste. You can also use different fruit toppings like berries or cherries to mix it up. This flexibility lets you personalize your cheesecake to suit your taste. For the complete recipe, check out the [Full Recipe]. Start by combining 1 ½ cups of graham cracker crumbs with ½ cup of melted unsalted butter in a medium bowl. Mix them well until the crumbs look like wet sand. This mixture will form the base of your cheesecake. Once combined, press the crust firmly into the bottom of a 9-inch springform pan. Use your fingers or the back of a measuring cup to make it even. After you press it, put the crust in the refrigerator to chill while you make the cheesecake filling. In a large bowl, beat 2 cups of softened cream cheese with an electric mixer. Mix until it's smooth and creamy. This will be the rich base for your filling. Next, gradually add in 1 cup of powdered sugar and 1 teaspoon of vanilla extract. Continue mixing until everything combines. The mixture should be thick and creamy. In a separate bowl, whip 1 cup of heavy whipping cream using high speed until soft peaks form. This means the cream should hold its shape but still be soft. Gently fold this whipped cream into the cream cheese mixture. Make sure to mix it well, but be careful not to deflate the whipped cream. Now it’s time to assemble your cheesecake. Spoon the cheesecake filling over the crust and smooth it out evenly with a spatula. This step is crucial for a nice finish. Then, take 2 cups of fresh sliced peaches and toss them with ½ teaspoon of cinnamon in a small bowl. This adds a warm flavor to the peaches. Layer the cinnamon peaches over the cheesecake filling, arranging them beautifully. Refrigerate the cheesecake for at least 4 hours, or until it sets firm. For best results, leave it overnight to chill. Once set, run a knife around the edges to release the springform. Now, you’re ready to slice and serve this delicious treat! You can find the full recipe above. To get the best texture, start by ensuring your cream cheese is softened. Cold cream cheese will clump, making it hard to mix. Leave it out for about 30 minutes before you start. This will help you achieve a smooth filling. Properly whipping the heavy cream is key too. Use a chilled bowl and beaters. Start at a low speed, then increase to high. Watch for soft peaks to form. This means it’s ready to fold into the cream cheese mixture. The whipped cream adds lightness, so don’t skip this step! When serving your cheesecake, consider some tasty accompaniments. A dollop of whipped cream adds a nice touch. You can also drizzle some honey or maple syrup for sweetness. Fresh fruit pairs well too. Try berries or more peaches on the side. The ideal serving temperature is cold. Let your cheesecake chill in the fridge for at least four hours. For the best flavor, serve it straight from the fridge. Cleanup can be a breeze with a few simple tricks. After mixing, soak your bowls and utensils in warm, soapy water. This helps loosen the cream cheese and whipped cream. For stubborn residue, sprinkle a little baking soda on the bowl. Let it sit for a few minutes. Then, scrub gently with a sponge. This will make your cleanup much easier! {{image_2}} You can change the flavor of your no bake peach cheesecake in fun ways. Try using different fruits like strawberries or blueberries. These fruits add bright colors and fresh tastes. If you love chocolate, drizzle melted chocolate on top. Caramel sauce also adds a sweet touch. Both options make your dessert more special. If you need a gluten-free option, simply use gluten-free graham cracker crumbs. Many brands offer these now, so you can enjoy the same great taste. For a vegan version, swap out cream cheese for a plant-based cream cheese. Coconut cream or cashew cream can also work well. This way, everyone can enjoy this tasty treat. Making mini cheesecakes is easy and fun! Use a muffin tin to create individual portions. Instead of a 9-inch springform pan, line the muffin cups with paper liners. Press the crust mixture into each cup. Then, fill them with the cheesecake mixture just like usual. You can add peach slices on top for a lovely finish. These mini versions are perfect for parties or small gatherings. For the full recipe, check out the original guide and enjoy your cheesecake adventure! To keep your no bake peach cheesecake fresh, store it in the fridge. Place it in an airtight container or cover it tightly with plastic wrap. This helps keep moisture out and taste in. Your cheesecake will stay good for about 3 to 5 days. If you notice any changes in smell or texture, it’s best to toss it out. For the best flavor, serve your cheesecake cold. This makes each bite creamy and refreshing. Avoid cutting slices until you're ready to serve. This will help keep the rest of the cheesecake intact and fresh. You can freeze slices of cheesecake for later enjoyment. Start by wrapping each slice in plastic wrap. Then, place the wrapped slices in a freezer-safe bag or container. This keeps them free from freezer burn. The cheesecake can last up to 2 months in the freezer. When you’re ready to eat, take a slice out of the freezer. Place it in the fridge overnight to thaw. This helps maintain a smooth texture. Avoid using a microwave, as it can make the cheesecake soggy. Enjoy your peachy treat whenever you want! No bake peach cheesecake lasts about 5 to 7 days in the fridge. To keep it fresh, store it in an airtight container. Look for signs of spoilage, such as off smells or a change in texture. If it feels slimy or has a strange odor, it's best to toss it. Yes, you can use canned peaches. However, they may change the texture and taste. Canned peaches are softer and sweeter than fresh ones. If you choose canned, drain them well to avoid extra moisture in your cheesecake. Your cheesecake is set when it feels firm to the touch. Gently shake the pan; it should not jiggle too much. After chilling for 4 hours, it should hold its shape. For best results, let it set overnight for a perfect slice. To make a no-bake peach cheesecake, gather all essential ingredients. Combine them carefully for the crust and filling. Follow the simple steps to assemble your dessert. Remember the tips for the best texture and presentation. You can also explore tasty variations or healthy adaptations. In conclusion, this delightful dessert is easy and quick. The fresh peaches add a sweet touch. Enjoy your cheesecake and share it with friends! Your kitchen will smell amazing, and your taste buds will thank you.

No Bake Peach Cheesecake Simple and Delicious Recipe

Are you ready to impress your friends and family with a dessert that’s both easy and crowd-pleasing? This No Bake

- 2 medium zucchinis - 1 cup breadcrumbs (panko recommended) - 1/2 cup grated Parmesan cheese - 1 teaspoon garlic powder - 1 teaspoon onion powder - 1 teaspoon Italian seasoning - Salt and pepper to taste - 1 large egg, beaten - Olive oil spray To make great air fryer zucchini chips, start with fresh, firm zucchinis. Slice them thinly, about 1/8 inch thick. This size helps them cook evenly and get crispy. You’ll need breadcrumbs for the coating. I like using panko because it gives extra crunch. Parmesan cheese adds a rich, savory flavor that makes these chips hard to resist. Next, gather your seasonings. Garlic powder, onion powder, and Italian seasoning add a wonderful taste. Don’t forget to season with salt and pepper. This simple mix makes a big difference in flavor. For binding, you’ll use a beaten egg. This helps the breadcrumbs stick to the zucchini. Finally, an olive oil spray is key for a nice, crispy finish. It keeps the chips from sticking and helps them brown perfectly. You can find the full recipe [here](#). - Step 1: Thinly slice the zucchinis. Aim for even rounds, about 1/8 inch thick. This helps them cook evenly and become crispy. - Step 2: Prepare the egg wash. In a bowl, beat one large egg until smooth. This will help the breadcrumbs stick to the zucchini. - Step 3: Mix the breadcrumbs and seasonings. In another bowl, combine 1 cup of breadcrumbs, 1/2 cup of grated Parmesan cheese, 1 teaspoon garlic powder, 1 teaspoon onion powder, and 1 teaspoon Italian seasoning. Add salt and pepper to taste. Stir until everything is well mixed. - Step 4: Dip zucchini in the egg and coat with breadcrumbs. Take each slice of zucchini and first dip it in the egg wash. Then, coat it in the breadcrumb mixture, pressing lightly to ensure it sticks. - Step 5: Preheat the air fryer to 375°F (190°C) for about 5 minutes. Preheating ensures that the zucchini cooks evenly. - Step 6: Arrange zucchini in the air fryer. Place the coated zucchini chips in a single layer in the air fryer basket. Make sure not to overcrowd them; this helps them crisp up. - Step 7: Air fry to golden perfection. Cook for 8-10 minutes, flipping halfway through. When they are golden brown and crispy, they are ready to enjoy. For the full recipe, check the details above. To make your zucchini chips crispy, pay close attention to cooking times and temperatures. I recommend setting your air fryer to 375°F (190°C). This temperature helps achieve a perfectly golden, crunchy texture. Cook for 8-10 minutes, flipping the chips halfway through. Flipping them ensures they cook evenly on both sides. If you want extra crunch, try air frying a minute longer, but watch closely to avoid burning. To boost the flavor of your zucchini chips, consider adding different seasonings. You can sprinkle smoked paprika for a smoky taste or cayenne pepper for some heat. For a tangy twist, mix in some lemon zest with your breadcrumbs. Dipping sauces can elevate your snack even more. Try a yogurt dip with herbs or marinara sauce for a classic pairing. The thickness of your zucchini slices greatly affects the texture. Aim for 1/8 inch thick slices. This thickness helps them cook evenly and become crisp. For consistent slicing, I recommend using a mandoline slicer. It makes cutting easy and ensures all slices are the same size, leading to even cooking. {{image_2}} You can change the taste of your zucchini chips easily. For a spicy kick, add cayenne pepper to your breadcrumb mix. A little goes a long way; start with 1/4 teaspoon. Mix it well and enjoy the heat! If you prefer herbs, try making herb-infused zucchini chips. Add dried herbs like thyme or rosemary to the breadcrumbs for a fresh twist. You can also use Italian seasoning for a classic flavor. Each variation adds a unique taste to your crispy snacks. If you want gluten-free options, almond flour works great. It gives a nice crunch and keeps the chips light. For a cheesy taste without cheese, try nutritional yeast. It adds that savory flavor everyone loves. Simply mix it into your breadcrumb mix. Both options keep your zucchini chips tasty and satisfying while catering to different diets. Zucchini chips are perfect for dipping! Pair them with a yogurt dip or marinara sauce. These dips add creaminess and zest that make every bite better. You can also add the chips to salads. Crumble them on top for extra crunch and flavor. They make a great topping for soups too, adding texture and taste. Enjoy these chips any way you like! For the full recipe, check out the [Full Recipe]. To keep your leftover zucchini chips fresh, place them in an airtight container. This helps to prevent moisture from making them soggy. You can enjoy them for up to three days at room temperature. If you want to keep them longer, store them in the fridge. For the best taste, reheat the chips in the air fryer at 350°F for about 3-5 minutes. This way, they’ll regain their crunch. You can freeze your zucchini chips for long-term storage. If you freeze them before cooking, lay the slices flat on a baking sheet. Once they freeze solid, transfer them to a freezer bag. If you freeze them after cooking, make sure they cool completely first. To thaw, just leave them in the fridge overnight. Re-crisp them in the air fryer at 375°F for 5-7 minutes for the best texture. At room temperature, your zucchini chips will stay fresh for about one day. If you store them in the fridge, they can last up to three days. Just remember, the longer they sit, the less crispy they become. Always check for any signs of spoilage before enjoying your snack! To make zucchini chips, start by slicing the zucchinis thinly. Aim for about 1/8 inch thick. Next, mix breadcrumbs, Parmesan cheese, and spices in a bowl. In another bowl, beat the egg. Dip each zucchini slice in the egg, then coat it with the breadcrumb mix. Preheat your air fryer to 375°F (190°C). Lightly spray the basket with olive oil. Arrange the zucchini slices in a single layer and spray them lightly with oil. Air fry for 8-10 minutes, turning halfway, until they are golden and crispy. If your zucchini chips are not crispy, a few things might be wrong. First, the slices may be too thick. Thin slices cook better and crisp up nicely. Second, if you overcrowd the air fryer, the chips will steam instead of crisp. Make sure to lay them in a single layer. Lastly, ensure you use enough oil. A light spray helps them brown and crisp up. Yes, you can use other vegetables! Carrots, sweet potatoes, and beets work well too. Just slice them thinly, like zucchini. Adjust cooking times as needed, since different veggies may take longer or shorter to cook. Experiment with your favorites to find new crunchy snacks. In this post, we've explored how to make crispy air-fried zucchini chips. We covered the main ingredients, step-by-step instructions, and tips for the best results. Remember, the right slicing and cooking techniques are key to achieving that perfect crunch. I encourage you to try different flavors and serving ideas. With practice, making these snacks can turn into a fun kitchen project. Enjoy your delicious zucchini chips today!

Air Fryer Zucchini Chips Crunchy and Flavorful Snack

Craving a delicious yet healthy snack? Look no further than these Air Fryer Zucchini Chips! With just a few simple

- 4 large russet potatoes, thinly sliced - 2 cups sharp cheddar cheese, grated - 1 cup mozzarella cheese, grated - 1 medium onion, finely chopped - 3 cloves garlic, minced - 2 cups heavy cream - 2 tablespoons unsalted butter - 1 teaspoon dried thyme - 1 teaspoon paprika - Salt and pepper to taste Cheesy scalloped potatoes need the right mix of tasty ingredients. Each one plays a vital role. The russet potatoes give a great texture. The sharp cheddar and mozzarella create a rich, gooey cheese layer. The onion and garlic add depth to the flavor. Heavy cream makes everything creamy and dreamy. - Options for cheese variations: You can use gouda or fontina for a different taste. Mixing cheeses can add fun flavors. - Alternative potatoes for different textures: Yukon gold potatoes work well too. They are creamier and add a different taste. - Dairy-free alternatives for cream: Use coconut cream or almond milk for a dairy-free option. These can still give you that rich feel without dairy. For the full recipe, check the details included earlier. This dish is all about balance. Enjoy the creamy, cheesy goodness with your own twist! To start, you need to prep the potatoes. Take 4 large russet potatoes and slice them thin. Aim for about 1/8 inch thick. Thin slices cook evenly and soak up the creamy goodness. Next, let's layer the potatoes. In a greased baking dish (9x13 inches), lay half of the potato slices. Overlap them slightly for even cooking. Pour half of the cream mixture over these potatoes and then add half of the cheese. You want to use both cheddar and mozzarella for the best flavor. Repeat this process with the remaining potatoes, cream, and cheese. The top layer should be cheesy and inviting. Now, let’s make the cream mixture. In a large bowl, combine 2 cups of heavy cream, 1 teaspoon dried thyme, 1 teaspoon paprika, and salt and pepper to taste. Whisk it all together until blended. Preheat your oven to 375°F (190°C). This is key for the perfect bake. Cover the baking dish with aluminum foil. This helps trap steam, allowing the potatoes to cook without drying out. Bake for 45 minutes. After 45 minutes, remove the foil. Continue baking for 20 to 25 minutes. This step is crucial for that golden and bubbly finish. The cooking time can vary, so check the potatoes with a fork. They should be tender. To get a golden top, keep an eye on the dish in the last few minutes of baking. If you want an extra crispy finish, you can broil it for the last 2 minutes. Just watch it closely so it doesn't burn. Before serving, let the cheesy scalloped potatoes cool for about 10 minutes. This helps the layers set and makes serving easier. Enjoy your rich and creamy delight, perfect for any occasion! For the full recipe, check out the details provided above. To make cheesy scalloped potatoes, I follow a few steps. First, I ensure even cooking of the potatoes. Thinly slice the potatoes to about 1/8 inch. This helps them cook uniformly. Layer them well in the baking dish, with some space between the slices. This allows heat to circulate and cook them properly. Next, I focus on the cheese blend. I mix sharp cheddar and mozzarella for the perfect taste and texture. The sharp cheddar adds a rich flavor, while mozzarella gives it a creamy melt. Feel free to experiment with other cheeses, but a mix works best. When making scalloped potatoes, I see two common mistakes. The first is overcooking or undercooking. If you cook them too long, the potatoes will turn mushy. If you don’t cook them long enough, they will be hard. I recommend checking for doneness after the initial cooking time. The potatoes should be tender but not falling apart. The second mistake is not seasoning enough. Always add salt and pepper to the cream mixture. You can also sprinkle extra seasoning between the layers. Don't be shy with the spices; they enhance the flavors. For presentation, I love serving cheesy scalloped potatoes in the baking dish. It looks rustic and inviting. If you want a more elegant touch, scoop portions onto plates. Garnish with fresh thyme leaves or chopped parsley. This adds color and freshness. Pair scalloped potatoes with roasted meats or a fresh salad. They complement many dishes, making them a perfect side. Enjoy your rich and creamy delight! For the full recipe, check the recipe section. {{image_2}} You can make cheesy scalloped potatoes even better by adding veggies. Spinach or broccoli brings color and nutrition. Chop them finely and layer them with the potatoes. Bacon or ham adds a savory touch. Cook the bacon crisp, then crumble it. Mix it in or sprinkle it on top before baking. This will make each bite extra special. Try a slow cooker for a hands-off approach. Just layer the ingredients like the full recipe says. Cook on low for about 6-8 hours. The potatoes get soft and the cheese melts perfectly. If you’re short on time, use an Instant Pot. Layer the potatoes and cream mixture in the pot. Use the pressure cook setting for about 25 minutes. This creates creamy and tender potatoes in no time. Don't be afraid to experiment with herbs and spices. Adding rosemary or basil can change the whole dish. Just sprinkle them in with the cream mixture for a fresh taste. You can also try different cheeses. Gouda, Gruyère, or even pepper jack can add unique flavors. Mix and match to find your favorite blend. Each cheese brings its own charm to cheesy scalloped potatoes. To keep your cheesy scalloped potatoes fresh, store leftovers in an airtight container. Place them in the fridge within two hours of cooking. They should last for about three to four days. If you want to keep them longer, freeze the leftovers. Cut them into smaller portions for easy thawing. Wrap each portion well in plastic wrap, then place it in a freezer-safe bag. This way, you can enjoy them later. When reheating, you want to keep the cheese creamy. The best way is to use the oven. Preheat it to 350°F (175°C). Place the potatoes in an oven-safe dish, cover it with foil, and heat for about 20 minutes. You can also use a microwave. Just add a splash of cream or milk to keep the cheese from drying out. Heat in 30-second bursts until warm. For the best taste, eat your cheesy scalloped potatoes within four days if stored in the fridge. If frozen, they can last for two to three months. However, for the best flavor and texture, consume them within one month. Always check for signs of spoilage, like off smells or discoloration, before eating. Scalloped potatoes use cream and no cheese. They are soft and smooth. Au gratin potatoes have cheese baked on top. This gives them a crispy, cheesy crust. Both are rich and tasty, but the main difference is the cheese. Yes, you can prep cheesy scalloped potatoes in advance. Slice the potatoes and layer them in the dish. Pour the cream mixture over the layers. Cover it tightly with plastic wrap. Store it in the fridge. When ready, bake it straight from the fridge. You may need to add some time to bake. Cheesy scalloped potatoes pair well with many dishes. Try serving them with roasted chicken or grilled steak. They also go well with a fresh salad. You can add some steamed veggies for color and flavor. The creamy potatoes balance well with lighter dishes. To avoid watery scalloped potatoes, start by draining the sliced potatoes. Rinse them under cold water and pat them dry. This helps remove extra starch. Also, use a good quality heavy cream. A thicker cream helps keep the dish creamy without being runny. Cheesy scalloped potatoes are a great comfort food. We covered key ingredients, from potatoes to the right cheese. You learned about easy steps to prepare and bake them perfectly. I shared tips to avoid common mistakes and ways to present your dish. Don't forget the fun variations and how to store leftovers. Experiment with flavors and enjoy a great meal. With these ideas, you can impress anyone at your table. Keep cooking and enjoy every bite!

Cheesy Scalloped Potatoes Rich and Creamy Delight

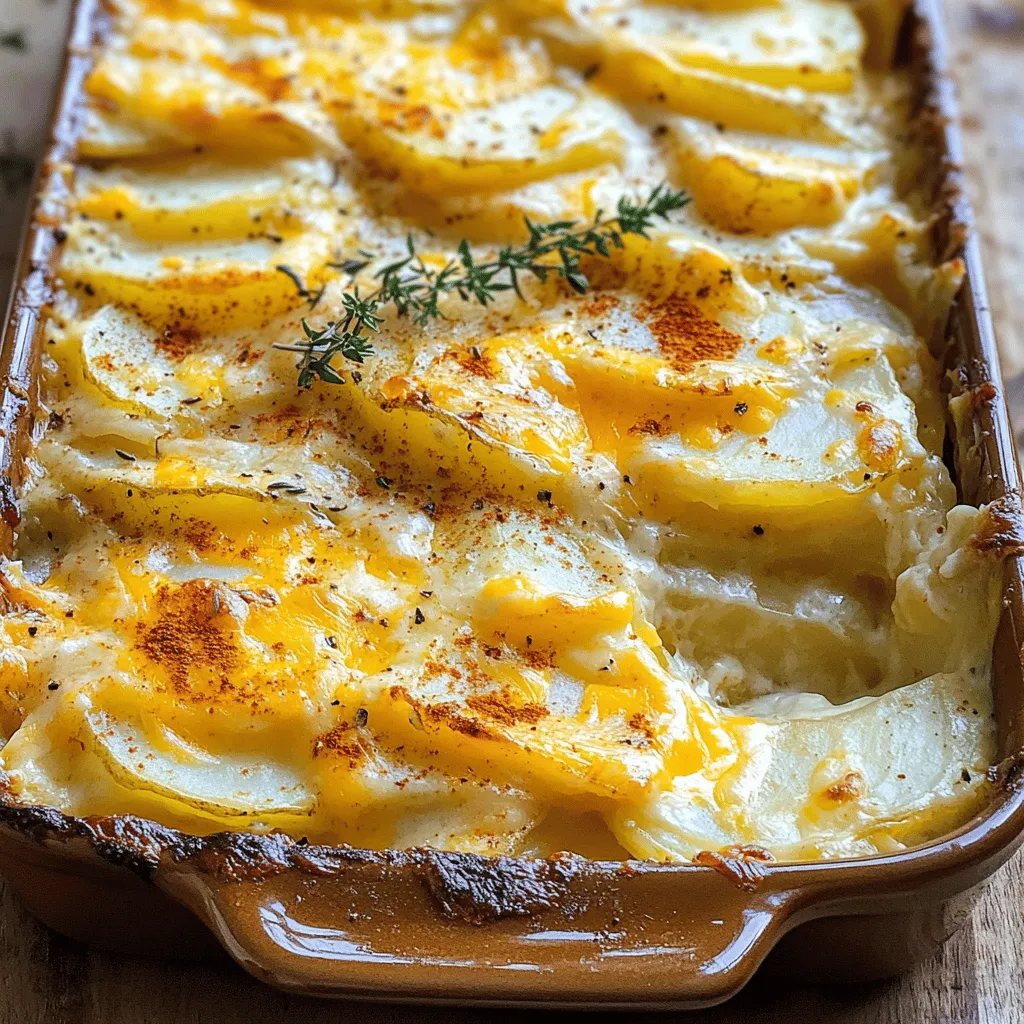
Are you craving a comforting dish that warms the heart? Look no further than cheesy scalloped potatoes! This rich and

- 1 cup all-purpose flour - 1/2 cup powdered sugar - 1/4 cup unsalted butter, melted - 1/2 teaspoon salt - 2 large eggs - 1 cup granulated sugar - 1/4 cup fresh lemon juice - Zest of 1 lemon - 1/2 teaspoon baking powder These ingredients are the heart of my classic lemon bars. Each one plays a big role. The all-purpose flour gives structure. Powdered sugar makes the crust sweet and soft. Unsalted butter adds rich flavor. Fresh lemon juice brings the tartness we love. The zest gives a bright, fragrant note. - Additional lemon zest for garnish - Fresh berries for serving These optional ingredients can take your lemon bars to the next level. Extra lemon zest adds a pop of color and flavor on top. Fresh berries like raspberries or blueberries can provide a nice contrast. They look pretty and taste great with the tangy bars. For the full recipe and step-by-step instructions, refer to the [Full Recipe]. 1. First, preheat your oven to 350°F (175°C). This step warms the oven for even baking. 2. In a medium bowl, combine the following ingredients: - 1 cup all-purpose flour - 1/2 cup powdered sugar - 1/4 cup unsalted butter, melted - 1/2 teaspoon salt Mix until it looks like coarse crumbs. 3. Press this mixture into the bottom of an 8x8-inch baking dish. Make sure it covers the whole bottom. 4. Bake the crust for about 15-18 minutes. You want it to be lightly golden. 5. Once baked, remove the crust from the oven and let it cool slightly. 1. In a separate bowl, whisk together: - 2 large eggs - 1 cup granulated sugar - 1/4 cup fresh lemon juice - Zest of 1 lemon - 1/2 teaspoon baking powder Whisk until smooth and combined. 1. Pour the lemon filling over the slightly cooled crust. Spread it evenly. 2. Return the dish to the oven. Bake for another 20-25 minutes. Look for a light golden color to know it’s done. 3. After baking, let the lemon bars cool completely in the pan. 4. Lift the bars out using the parchment paper. Dust with powdered sugar before slicing. You can find the full recipe details for these tangy treats in the recipe section. Enjoy your lemon bars! To get the perfect crust, start with cold butter. Cut it into small cubes, then mix with flour and sugar. This keeps the crust flaky. Press the mixture firmly, but not too hard. You want it to hold together without being dense. Bake until it turns light golden. This takes about 15 to 18 minutes. Let the crust cool for a bit before adding the filling. Cooling helps the crust stay crisp. If you skip this step, the filling may make the crust soggy. When measuring lemon juice, use fresh lemons for the best taste. Roll the lemons on the counter before cutting. This helps release more juice. Strain the juice to remove seeds or pulp. Make sure to whisk the eggs and sugar until smooth. This ensures a creamy filling. When pouring the filling over the crust, do it gently. This helps keep the layers separate. Bake until the filling is set, about 20 to 25 minutes. The edges should look firm, while the center can still have a little jiggle. Dusting with powdered sugar should be light and even. Use a fine sieve for the best results. Hold it high above the bars to create an even layer. Lemon bars pair well with beverages like tea or lemonade. The tartness of the bars complements sweet drinks well. You can also serve them with fresh berries for a nice touch. For the full recipe, check out the complete details. {{image_2}} For a gluten-free version, swap the all-purpose flour for a gluten-free blend. Look for blends that include xanthan gum for better texture. You can also use almond flour or coconut flour, but adjust the amounts. These flours may need more liquid. For the filling, ensure the granulated sugar and eggs are gluten-free. Most lemon juice is gluten-free, but check the label. This will keep the lemon bars safe for all to enjoy. To add a twist, try herbs like basil. Basil pairs well with lemon's tang. Simply chop fresh basil finely and mix it into the filling. This will give a fresh, unique flavor. You can also use other citrus juices. Lime or orange juice can replace some lemon juice. This gives the bars a new taste. Mix and match for your favorite flavor! If you want bite-sized treats, use a mini muffin tin. Grease the tin well to prevent sticking. Pour the filling into each cup, filling them halfway. Adjust the baking time to around 15-18 minutes. Check for doneness by inserting a toothpick. If it comes out clean, they are ready! Mini lemon bars are perfect for parties or snacks. For the full recipe and to discover more about classic lemon bars, check out the [Full Recipe]. To keep your classic lemon bars fresh at room temperature, let them cool completely. Once cool, cover them with plastic wrap or place them in an airtight container. This keeps them moist and tasty. Avoid stacking them to prevent sticking. If you dust them with powdered sugar, do this just before serving to keep it pretty. If you want to save lemon bars for later, freezing is a great option. First, let them cool completely. Then, wrap each bar in plastic wrap and place them in a freezer bag. This helps prevent freezer burn. When you are ready to eat, take out the number of bars you want. Let them thaw in the fridge overnight. For a quick treat, you can also thaw them at room temperature. Lemon bars last about a week in the fridge. Keep them covered to stay fresh. If you see any mold or notice an off smell, it’s best to throw them away. Enjoy your lemon bars while they are still bright and zesty! Yes, you can make lemon bars ahead of time. To do this, bake and cool them fully. Then, cover them tightly in plastic wrap or store in an airtight container. They can stay fresh in the fridge for up to a week. If you want to store them longer, freeze them. Just remember to thaw them slowly in the fridge before serving. Look for a light golden top and a firm filling. The edges should look set. If you gently shake the pan, the filling should have a slight jiggle but not be liquid. This means the bars are done. Keep an eye on them, as overbaking can lead to dry lemon bars. Yes, you can use lime, orange, or grapefruit juice. Each citrus brings a unique flavor. Lime gives a more tropical taste, while orange adds sweetness. Adjust the sugar as needed, as some citrus can be sweeter than lemon. If your lemon bars taste too tart, you can add more sugar next time. If they are too sweet, cut back on the sugar or use less lemon juice. Finding the right balance is key for a perfect flavor. Taste as you mix to get it just right. To cut lemon bars cleanly, use a sharp knife. Dip the knife in hot water, then wipe it dry before cutting. This helps reduce sticking. Cut the bars while they are chilled for cleaner edges. Dust with powdered sugar after cutting for a beautiful finish. For a detailed recipe, check out the [Full Recipe]. Classic lemon bars are a sweet and tangy treat. They have a buttery crust and a smooth lemon filling. You can make them with just a few simple ingredients. The magic lies in the balance of flavors. The tartness of lemons pairs perfectly with the sweet sugar. - 1 cup all-purpose flour - 1/2 cup powdered sugar, plus extra for dusting - 1/4 cup unsalted butter, melted - 1/2 teaspoon salt - 2 large eggs - 1 cup granulated sugar - 1/4 cup fresh lemon juice - Zest of 1 lemon - 1/2 teaspoon baking powder Each ingredient plays a key role. The all-purpose flour forms the crust. Powdered sugar adds sweetness and a soft texture. Unsalted butter makes the crust rich. Salt enhances the flavors. The eggs bind the filling together. Granulated sugar sweetens the tart lemon juice. Fresh lemon juice gives a bright flavor. Lemon zest adds extra citrus aroma. Baking powder helps the filling rise slightly. The filling is the star of the show. Start with whisking the eggs and sugars until smooth. This step is important for a creamy texture. Next, add the fresh lemon juice and zest. They bring a burst of flavor. Finally, mix in the baking powder. This ensures your filling sets well. Once your crust is ready, pour the lemon filling over it. Bake it until the filling is set. You want it to be a light golden color. This usually takes about 20 to 25 minutes. After baking, let the bars cool in the pan. This helps them firm up. When cool, lift them out using the parchment paper. Dust with powdered sugar for a lovely finish. You can find the Full Recipe for this delicious treat. Enjoy every bite of this tangy delight! Lemon bars are easy to make with simple ingredients like flour, butter, and fresh lemons. We covered step-by-step instructions to help you achieve the perfect crust and filling. Plus, I shared tips for variations, storage, and serving suggestions. With this guide, you can enjoy classic lemon bars or explore new flavors. Remember, practice makes perfect. Enjoy your baking journey, and savor every bite of your delicious lemon bars!

Classic Lemon Bars Irresistible Tangy Delight

Get ready to bite into a classic treat that’s both tangy and sweet! These Classic Lemon Bars deliver a bright

- Zucchini and Yellow Squash Essentials - 2 medium zucchinis, thinly sliced - 2 medium yellow squashes, thinly sliced - Dairy and Seasoning Components - 1 cup grated Gruyère cheese - 1 cup heavy cream - 2 cloves garlic, minced - 1 teaspoon fresh thyme leaves - 1/2 teaspoon salt - 1/4 teaspoon black pepper - Topping Ingredients for Gratin - 1/2 cup breadcrumbs - 2 tablespoons olive oil - Fresh parsley, chopped (for garnish) Gathering these ingredients sets the stage for a great dish. Fresh zucchini and yellow squash bring color and flavor. Gruyère cheese adds a rich taste. Heavy cream gives the gratin its creamy texture. Using fresh herbs like thyme enhances the dish. Don't skip the garlic; it adds depth. The breadcrumbs on top create a crunchy finish that contrasts with the soft veggies. This combination makes every bite a delight. I recommend picking the freshest veggies for the best taste. You can find the full recipe [here]. Slicing Zucchini and Yellow Squash Start by washing your zucchinis and yellow squashes. Grab a sharp knife and slice them into thin rounds, about 1/4 inch thick. Thin slices cook well and absorb flavors nicely. You want to create a beautiful mix of colors for your dish. Aim for even slices to ensure they cook evenly. Seasoning the Mixture In a large bowl, combine your sliced zucchinis and yellow squashes. Add minced garlic, fresh thyme, salt, and black pepper. Toss everything together gently. The salt brings out the moisture and flavor in the veggies. Make sure each piece is well coated with the seasoning for a tasty outcome. Layering Techniques for Optimal Flavor Grease your baking dish with olive oil to prevent sticking. Start layering half of your seasoned zucchini and squash mixture evenly across the bottom. This base will soak up all the flavors. Then, pour half of the cheese and cream mixture over the first layer. Sprinkle half of the grated Gruyère cheese on top. Repeat the process with the remaining vegetables, cheese, and cream. Finish with the rest of the Gruyère cheese. This layered approach creates rich, deep flavors in every bite. Adding Cheese and Cream In a separate bowl, mix your heavy cream with half of the grated Gruyère cheese. This blend adds a creamy texture and cheesy goodness to your gratin. Pour this mixture over each layer to ensure an even distribution. Setting the Oven Temperature Preheat your oven to 375°F (190°C). A hot oven is key to a perfectly baked gratin. It helps the dish cook evenly while achieving a lovely golden crust on top. Baking Time and Doneness Indicators Place your assembled gratin in the oven and bake for 35-40 minutes. You know it’s done when the top is golden and bubbly. Let it cool for about 5 minutes before serving. This brief cooling time helps set the layers, making it easier to serve. For a delightful finish, garnish with fresh parsley right before you serve. Enjoy your Zucchini Gratin with Yellow Squash! For the full recipe, see the section above. Achieving the Right Creaminess To get that perfect creaminess, use heavy cream. It makes the dish rich. Mix it well with your cheese. This helps it melt evenly. You want every bite to be smooth. If you find it too thick, add a splash of milk. This will balance the texture. Ensuring a Golden Top A golden top makes your gratin look great. To achieve this, sprinkle breadcrumbs evenly on top. Drizzle a bit of olive oil over the breadcrumbs. This will help them brown nicely. Bake until the top is golden and bubbly. The oven's heat should create a crunchy layer. Presentation Ideas for Zucchini Gratin For a rustic look, serve it in the baking dish. It adds charm to your table. You can also portion it onto individual plates. Garnish each plate with chopped parsley. This adds color and freshness. Pairing with Main Dishes Zucchini gratin pairs well with many main dishes. Try it with grilled chicken or fish. It also complements roasted meats nicely. For a vegetarian option, serve it with a hearty salad. This balance makes your meal satisfying. {{image_2}} Alternative Cheeses to Use You can switch the Gruyère cheese for other types. Cheddar gives a sharp taste. Mozzarella melts well and adds creaminess. Feta adds a nice tang. Try a mix for unique flavors. Adding Proteins or Other Vegetables To boost protein, add cooked chicken or turkey. Cooked bacon adds a smoky flavor. For veggies, consider spinach or bell peppers. They add color and nutrition. Mixing in these extras makes the dish your own. Gluten-Free Breadcrumb Options If you need gluten-free crumbs, use crushed rice crackers. Ground nuts work too, like almonds. These keep the crunch without gluten. Make sure to check labels for safety. Making it Vegan-Friendly To make this dish vegan, use plant-based cheese. Coconut cream can replace heavy cream. Use nutritional yeast for a cheesy flavor. Swap breadcrumbs for a gluten-free option if needed. This way, everyone can enjoy it! For the full recipe, check the details above. To keep your zucchini gratin fresh, store leftovers in the fridge. Use an airtight container. It stays good for about three days. When you store it, let it cool first. This helps avoid extra moisture, which can make it soggy. If you want to keep it longer, freezing is an option. Cut the gratin into portions. Wrap each piece in plastic wrap. Then place the wrapped portions in a freezer bag. They can last up to three months in the freezer. When you're ready to eat, just thaw it in the fridge overnight. Reheat your zucchini gratin gently to keep it tasty. The best way is to use an oven. Preheat your oven to 350°F (175°C). Place the gratin in a baking dish and cover it with foil. This helps it heat evenly. Bake for about 20-25 minutes. Check that it's hot throughout. You can also use a microwave for quick reheating. Put a portion in a microwave-safe dish. Heat it for about 1-2 minutes. Stir halfway through to ensure even heating. But be careful; it might lose some texture compared to the oven method. For perfect serving, let it rest for a minute before enjoying. You want to savor every bite of this delicious zucchini gratin with yellow squash. For the full recipe, you can refer back to the earlier sections. Can I make this dish ahead of time? Yes, you can prepare the gratin a day in advance. Just layer the veggies and cream mix, then cover and refrigerate. Bake it just before serving. This saves time and allows flavors to meld. What can I substitute for heavy cream? If you want a lighter option, use half-and-half or whole milk. For a dairy-free choice, try coconut cream or cashew cream. Both can give you a creamy texture without heavy cream. How do I know when the gratin is done? The gratin is done when it’s golden on top and bubbly around the edges. A knife should slide easily through the layers. If it’s still firm, bake it a bit longer. What dishes pair well with zucchini gratin? This dish goes great with roasted chicken or grilled fish. You can also serve it with a fresh salad or crusty bread for a full meal. The flavors complement each other nicely. Can I use frozen zucchini and squash for this recipe? You can use frozen zucchini and squash, but make sure to thaw and drain them first. Excess water can make the gratin soggy. Fresh veggies give the best texture and flavor. How many calories are in zucchini gratin? One serving of zucchini gratin has about 300 calories. This can vary based on the cheese and cream you use. It's a tasty way to enjoy veggies while keeping calories in check. Is zucchini gratin healthy? Zucchini gratin can be healthy if you use less cream and cheese. Zucchini and squash are low in calories and high in vitamins. This dish is a nice way to eat more vegetables. For the full recipe, check out the Zucchini & Yellow Squash Gratin. This blog post covers making a tasty zucchini and yellow squash gratin. You learned about essential ingredients, preparation steps, and baking tips. I shared ways to enhance texture and flavor while offering serving and storage advice. You even found answers to common questions. In my view, this dish is fun and flexible. You can easily adapt it to fit your needs. Enjoy your cooking journey and don't hesitate to try new flavors and ingredients!

Zucchini Gratin with Yellow Squash Savory and Simple

If you’re looking for a dish that’s both tasty and simple, zucchini gratin with yellow squash is a perfect choice.

To make an easy zucchini casserole, you need a few key ingredients. Here’s what I use: - 4 medium zucchinis, sliced - 1 cup cherry tomatoes, halved - 1 cup corn kernels (fresh or frozen) - 1 bell pepper (red or yellow), diced - 1 onion, finely chopped - 2 cloves garlic, minced - 1 cup shredded mozzarella cheese - ½ cup grated Parmesan cheese - 1 cup breadcrumbs (preferably whole wheat) - 2 tablespoons olive oil - 1 teaspoon dried oregano - 1 teaspoon dried basil - Salt and pepper to taste These ingredients create a colorful and delicious base for the casserole. The zucchinis add moisture and texture, while the tomatoes and corn bring sweetness. The cheese gives a creamy finish, making every bite rich and savory. You can add your favorite flavors to make this dish unique. Here are some optional ingredients: - Spinach or kale for added greens - Mushrooms for a hearty touch - Ground turkey or beef for protein - Different cheeses like cheddar or feta - Spices like red pepper flakes for heat These options let you mix and match based on what you enjoy or have on hand. Feel free to experiment and find your favorite combination! A serving of this zucchini casserole is not only tasty but also healthy. Here’s a quick look at its nutritional benefits: - High in vitamins A and C from the vegetables - Good source of fiber from zucchini and corn - Contains protein from cheese and optional meat This dish can fit well in many diets. It’s filling, flavorful, and packed with nutrients. For the full recipe, check the section above! Start by washing the zucchinis. Slice them into thin rounds. Next, chop the onion and garlic. Dice the bell pepper. Halve the cherry tomatoes. If you use frozen corn, no need to thaw it. Fresh corn works well, too. In a skillet, heat olive oil over medium heat. Add the chopped onion and garlic. Sauté for about 3-4 minutes until they smell great. Add the sliced zucchini and bell pepper next. Cook this for about 5-7 minutes. Stir often until they soften. Then, mix in the cherry tomatoes and corn. Season with oregano, basil, salt, and pepper. Cook for another 2-3 minutes to blend the flavors. In a large bowl, combine the veggie mixture with half of the mozzarella and half of the Parmesan. Stir this well until everything is mixed. Grease a 9x13 inch casserole dish. Pour the veggie mixture into it and spread it evenly. In a separate bowl, mix the breadcrumbs with the remaining mozzarella and Parmesan. Sprinkle this over the top of the casserole. Now, it’s time to bake! Preheat your oven to 375°F (190°C). Place the casserole in the oven and bake for 25-30 minutes. Look for a golden top and melted cheese. Once done, let it cool for about 5 minutes before you serve. Enjoy your Easy Zucchini Casserole! For the complete recipe, check out the Full Recipe. To make your zucchini casserole shine, focus on the slicing. Cut the zucchinis evenly. This helps them cook at the same rate. Use fresh veggies for the best taste. Fresh zucchini and tomatoes bring great flavor and texture. When sautéing, don’t rush the process. Letting the onion and garlic get fragrant adds depth. Mix in herbs like oregano and basil early. This helps release their oils and flavor. One common mistake is overcooking the zucchini. If you cook it too long, it gets mushy. Aim for a tender but firm texture. Another error is not seasoning enough. A pinch of salt and pepper makes a big difference. Be careful not to skip the breadcrumbs. They add a nice crunch and texture on top. Lastly, avoid skipping the cooling step after baking. Letting it rest helps the casserole set and slice better. Serve your zucchini casserole with a side salad. A fresh green salad complements the dish well. You can also pair it with crusty bread for a filling meal. For extra flavor, drizzle with a bit of balsamic glaze. This adds a tangy kick that enhances the dish. If you have leftovers, try them cold in a wrap. It makes a tasty lunch the next day. For more ideas, check out the Full Recipe. {{image_2}} You can make this dish even more veggie-friendly! Swap out the zucchini for other great vegetables. Try eggplant, mushrooms, or spinach. You can also add in some herbs like thyme or parsley for more flavor. This keeps the dish light and fresh while still being filling. If you love meat, you can easily add it to your casserole. Ground turkey or chicken works well. Simply brown the meat in the skillet before adding the veggies. You can also use cooked sausage or diced ham. This gives the dish a hearty twist and extra flavor. For a gluten-free version, you can substitute the breadcrumbs with gluten-free breadcrumbs or crushed rice crackers. You can also omit the breadcrumbs for a lighter option. Just make sure to check labels on all your ingredients to keep it gluten-free. Enjoy this tasty dish without worry! For the full recipe, check out the Zesty Zucchini Delight Casserole. To keep your zucchini casserole fresh, let it cool first. Then, place it in an airtight container. You can store it in the fridge for up to three days. If you want to save it longer, consider freezing it. When you're ready to enjoy leftovers, preheat your oven to 350°F (175°C). Place the casserole in an oven-safe dish. Cover it with foil to keep it moist. Heat for about 20 minutes. If you like it crispy, remove the foil for the last 5 minutes. To freeze your casserole, let it cool completely. Cut it into portions for easy thawing. Wrap each portion tightly in plastic wrap, then place them in a freezer bag. Label the bag with the date. It will stay good for up to three months. When ready to eat, thaw in the fridge overnight and reheat as mentioned. Enjoy your delicious zucchini casserole anytime! Yes, you can use other vegetables. Try bell peppers, spinach, or mushrooms. Each adds its own taste and texture. Mixing in your favorites can make this dish special for you. Just remember to cut them into small pieces for even cooking. You can store zucchini casserole for about three to five days. Keep it in an airtight container in the fridge. This helps keep the flavors fresh. If you want to keep it longer, consider freezing it. Absolutely! You can prepare the casserole a day ahead. Just follow the steps until you are ready to bake it. Cover it well and place it in the fridge. When you’re ready, bake it straight from the fridge; it may need a few extra minutes. The best way to reheat it is in the oven. Preheat your oven to 350°F (175°C). Place the casserole in a baking dish and cover it with foil. Heat it for about 20 minutes. This helps keep it moist and warm. Yes, zucchini casserole is healthy! It includes fresh veggies and low-fat cheese. You can also use whole wheat breadcrumbs for extra fiber. This dish is a great way to enjoy vegetables while getting important nutrients. It’s perfect for a balanced meal. For the full recipe, check the Zesty Zucchini Delight Casserole. Enjoy! You learned about zucchini casserole's key ingredients and easy steps to make it. We discussed tips for perfecting your dish and avoiding common mistakes. You can also customize it with different proteins and veggies. Zucchini casserole is versatile and simple to prepare. Try making it tonight for a tasty meal. You can also store leftovers for easy future meals. Enjoy experimenting with your own flavors!

Easy Zucchini Casserole Delightfully Simple Recipe

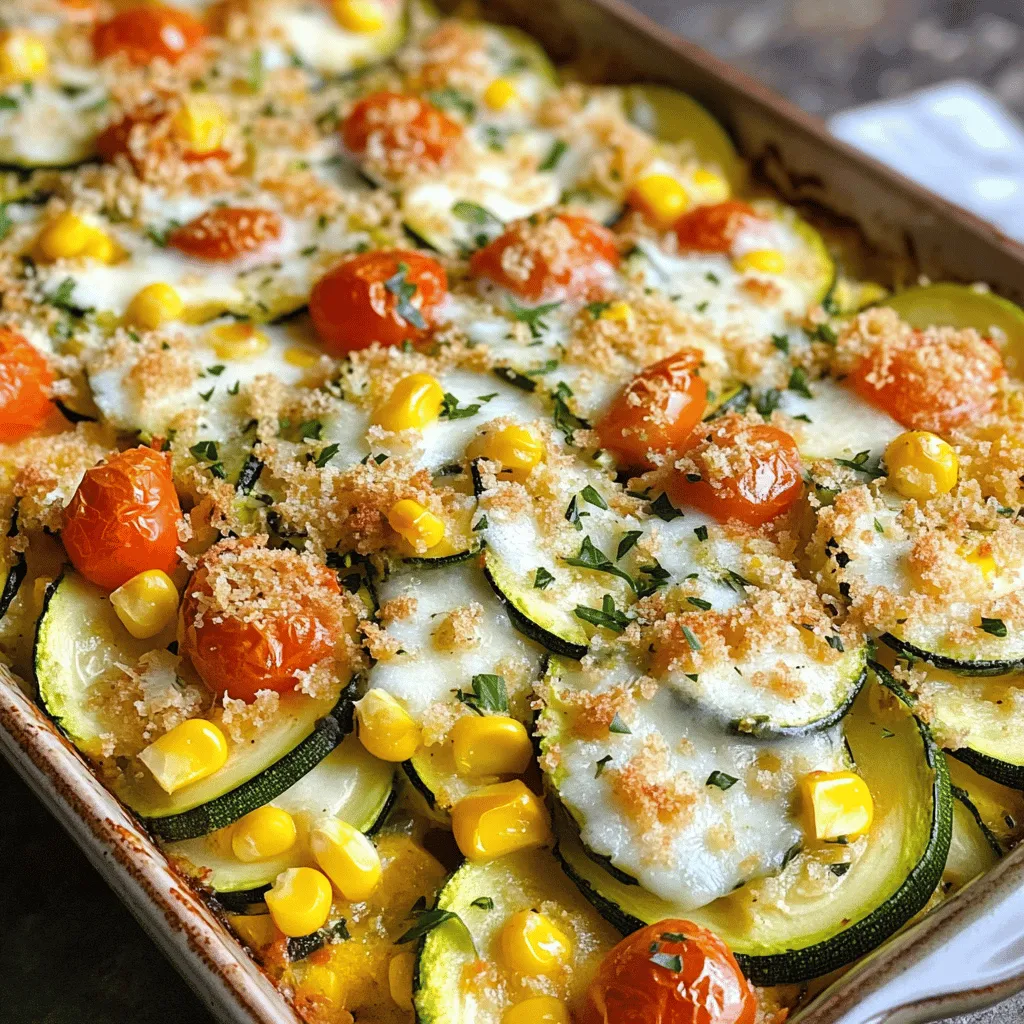
If you’re looking for a quick, tasty, and healthy dish, you’ve come to the right place! My Easy Zucchini Casserole

Older posts
Newer posts
← Previous Page1 … Page72 Page73 Page74 … Page126 Next →

dsad

© 2025 Southern Dishes • Built with GeneratePress

Our Policies

  • Copyright Policy
  • Cookie Policy
  • GDPR Policy
  • Privacy Policy
  • Disclaimer
  • Terms Of Use

More Information

  • Home
  • About
  • Contact
  • Appetizers
  • Dessert
  • Dinner
  • Drinks
©2025, Southern Dishes About Back To Top