Skip to content
DisclaimerTerms Of UseGDPR PolicyCookie Policy

Southern Dishes

  • Home
  • Drinks
  • Appetizers
  • Dinner
  • Dessert
  • About
  • Contact
  • Privacy Policy
DisclaimerTerms Of UseGDPR PolicyCookie Policy

Isabella

- 4 large bell peppers (any color) - 1 cup quinoa, rinsed - 2 cups vegetable broth - 1 cup black beans, rinsed and drained - 1 cup corn (fresh or frozen) - Salt and pepper to taste - 1 teaspoon cumin - 1 teaspoon smoked paprika - 1 teaspoon chili powder - Fresh cilantro or parsley, for garnish - 1 cup diced tomatoes (canned or fresh) - 1 cup shredded cheese (cheddar or pepper jack) When you make stuffed bell peppers, the right ingredients matter. I love using large bell peppers because they hold the filling well. Quinoa is my go-to grain here. It cooks up fluffy and adds great texture. Vegetable broth gives the quinoa flavor. Black beans and corn bring in color and nutrition. They fill you up without being heavy. For seasoning, I like to keep it simple but tasty. Cumin, smoked paprika, and chili powder give a nice kick. Don't forget salt and pepper to pull all the flavors together. Feel free to mix in diced tomatoes or cheese for a twist. These optional ingredients can change the dish completely. You can add your favorites to make it your own. For a full list of ingredients and how to make this dish, check out the Full Recipe. 1. Preheat the oven to 375°F (190°C). 2. Slice the tops off the bell peppers and remove seeds. Lightly sprinkle the inside with salt and pepper. Place them upright in a baking dish. 1. In a medium pot, combine the rinsed quinoa and vegetable broth. 2. Bring to a boil, then reduce the heat to a simmer, cover, and cook for about 15 minutes until fluffy. 1. In a large skillet over medium heat, add a splash of olive oil. 2. Sauté the chopped onion until soft, about 5 minutes. Add minced garlic and cook for one more minute. 3. Stir in black beans, corn, diced tomatoes, cooked quinoa, cumin, smoked paprika, salt, and pepper. Mix well and let it cook for about 5 minutes to meld flavors. 1. Remove the skillet from heat and mix in half of the shredded cheese. 2. Stuff each bell pepper with the filling mixture, pressing down lightly. 3. Top each pepper with the remaining shredded cheese. 4. Cover the dish with aluminum foil and bake for 30 minutes. 5. Remove the foil and bake for another 10-15 minutes until the peppers are tender and cheese is bubbly and golden. Follow these steps carefully for a tasty dish. For the full recipe, check the above sections. - Ensure quinoa is thoroughly rinsed before cooking. This removes the bitter coating. - Adjust seasoning according to your taste preferences. Taste as you cook for balance. - Serve on colorful plates; garnish with fresh herbs for a nice touch. - Drizzle with olive oil or yogurt dressing for added flavor and creaminess. - If peppers are too crunchy, extend baking time by 5 to 10 minutes. - For less cheese, use low-fat alternatives or skip it altogether. {{image_2}} You can make stuffed bell peppers even more fun with veggies. Consider adding zucchini or spinach to the mix. Both add color and taste. You can also swap quinoa for brown rice. This gives a nice change in texture and flavor, making each bite unique. If you want a lighter dish, try cauliflower rice instead of quinoa. It cuts carbs but still fills you up. You can also skip grains and use cheese as a base. This option keeps the dish rich and satisfying while being low-carb. Want to spice things up? Incorporate herbs like oregano or basil. They add depth and aroma, making your dish pop. Don't be afraid to experiment with different types of cheese. You can even skip the cheese for a dairy-free version. Each choice brings a new taste, keeping your stuffed bell peppers exciting. For the full recipe, check out the main article. - Store leftovers in an airtight container for up to 4 days. - Reheat in the oven to maintain texture. You want to keep your stuffed bell peppers fresh. When you store them, use a container that seals tightly. This keeps air out and flavors in. The oven is best for reheating. It warms the peppers without making them mushy. - Wrap individual servings tightly and freeze for up to 3 months. - Thaw overnight in the fridge before reheating. If you have extra stuffed peppers, you can freeze them. Wrap each one tightly in plastic wrap. This helps avoid freezer burn. When you want to eat them, just thaw them in the fridge. It makes reheating easier and keeps the flavor intact. - Reheat in the oven or microwave until heated through. - Add a splash of broth when reheating to restore moisture. When reheating, you can use either the oven or the microwave. If you want the peppers to stay moist, add a bit of broth. This helps avoid dryness and keeps every bite tasty. - Follow the step-by-step instructions outlined above. Start by preheating your oven. Slice the tops off the bell peppers and remove the seeds. Cook the quinoa in broth until fluffy. Sauté onion and garlic, then mix in beans, corn, and tomatoes. Finally, stuff the peppers, top with cheese, and bake until tender. - Yes, any color or variety of bell pepper works well. Green, red, yellow, or orange peppers all taste great. Each color offers a unique flavor, so choose your favorite. You can even use mini peppers for bite-sized treats. - Consider serving with a salad, crusty bread, or steamed vegetables. A light green salad adds freshness. Crusty bread is perfect for soaking up any juices. Steamed veggies provide a nice crunch and color to your meal. - Yes, prepare the filling and stuff the peppers ahead of time, then bake when ready to serve. Store the filled peppers in the fridge for up to a day. Just remember to cover them to keep them fresh. - They can be healthy, especially when loaded with veggies and lean proteins. Adjust ingredients for dietary needs. Use whole grains and fresh veggies to boost nutrition. This dish can fit various diets, from vegetarian to gluten-free. Stuffed bell peppers are a great dish to try. You need just a few key ingredients, like quinoa, beans, and peppers. I shared easy steps for preparation and cooking. You can also add your favorite spices and veggies for more flavor. Remember to store any leftovers properly, so they stay fresh. No matter how you make them, stuffed bell peppers are tasty and fun to eat. Enjoy creating your own version of this dish!

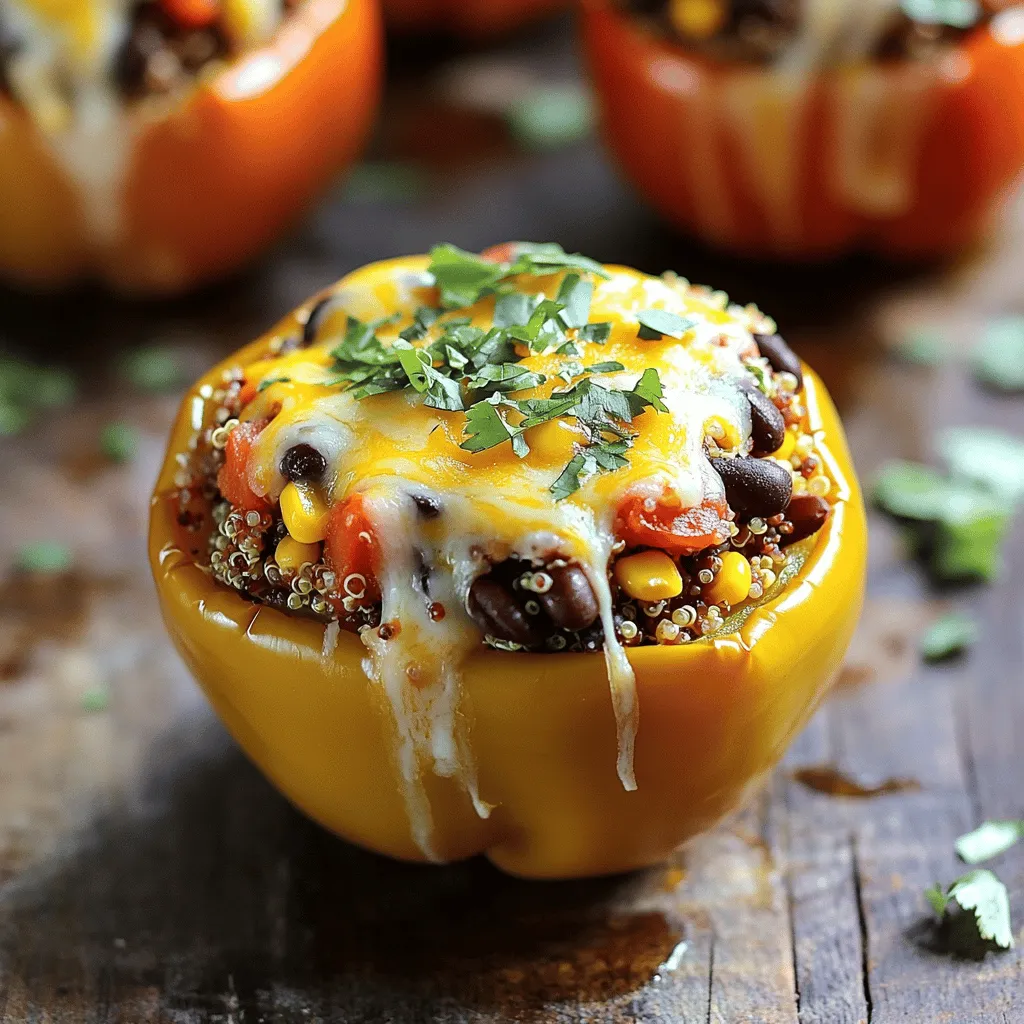
Stuffed Bell Peppers Flavorful and Easy Recipe

Are you ready to impress your family with a colorful and tasty dish? Stuffed bell peppers are not only easy

- 1/2 cup chia seeds - 2 cups almond milk (or any milk of choice) - 2 tablespoons maple syrup (or honey) - 1 teaspoon vanilla extract - 1/4 teaspoon cinnamon - Fresh berries (strawberries, blueberries, raspberries) for topping - Sliced bananas for topping - Nuts or seeds (e.g., walnuts, pumpkin seeds) for added crunch To make overnight chia pudding, you need simple ingredients. Chia seeds are small but mighty. They soak up liquid and turn into a thick pudding. Almond milk creates a creamy base. You can use any milk you prefer. Maple syrup or honey adds natural sweetness. Vanilla extract gives a nice flavor boost, while cinnamon adds warmth. Fresh berries and sliced bananas are great on top. They add color and taste. You can also sprinkle nuts or seeds for a crunch. This mix of flavors and textures makes the dish exciting. The ingredients come together to create a nutritious meal. Chia seeds are full of fiber, protein, and healthy fats. They help you feel full longer. This pudding is not just easy; it is also a smart choice for breakfast or snack. For the full recipe, check out the instructions to get started. To make overnight chia pudding, start by mixing the ingredients. In a medium bowl, combine: - 1/2 cup chia seeds - 2 cups almond milk (or any milk of choice) - 2 tablespoons maple syrup (or honey) - 1 teaspoon vanilla extract - 1/4 teaspoon cinnamon Use a whisk to mix everything together. It’s important to whisk well. This helps to break up any clumps of chia seeds. Ensure the seeds are evenly spread in the mixture. Now it’s time to chill your mixture. Cover the bowl with plastic wrap or move it to a sealed container. Place it in the fridge for at least 4 hours. For the best results, let it sit overnight. This allows the chia seeds to absorb the liquid and thicken. When you're ready to serve, check the pudding. It should be thick and creamy. If it seems too thick, add a splash of almond milk and stir. For serving sizes, divide the pudding into bowls or jars. I recommend giving each person a generous portion. Top each serving with fresh berries, sliced bananas, and a sprinkle of nuts or seeds. You can also drizzle a bit of extra maple syrup on top for sweetness. This pudding is not just a treat; it's a healthy breakfast or snack. It is packed with nutrients and keeps you full. Enjoy your delicious chia pudding! For the full recipe, check above. To get a creamy consistency, choose your milk wisely. Almond milk works well, but you can use oat or coconut milk. Mix the chia seeds with the milk right away. Whisk until the seeds are evenly spread. This helps avoid clumps. Let the mixture sit for a few minutes, then whisk again. If the pudding is too thick, simply add a splash of milk. Stir until it reaches your desired thickness. You can enhance the flavor in many ways. Try adding cocoa powder for a chocolatey twist. Fresh fruits like mango or peaches also add great taste. Use spices like nutmeg or cardamom for warmth. A few drops of almond or peppermint extract can change the game. Be brave and mix flavors to find your favorite. Presentation is key! Use clear jars or glasses to show off the layers. Start with a layer of pudding, then add fruits and nuts. Repeat this until you fill the jar. You can top it with a few whole berries or a mint leaf. This adds color and makes it look fancy. Serve it chilled for a refreshing treat. {{image_2}} You can use different types of milk for chia pudding. Almond milk is light and nutty. It adds a nice flavor without being too heavy. Oat milk is creamy and sweet. This milk is great for a richer taste. Coconut milk has a tropical twist. It gives a creamy texture and a hint of coconut. Pros and cons of each type: - Almond Milk: - Pros: Low in calories, nutty flavor. - Cons: May not be suitable for nut allergies. - Oat Milk: - Pros: Creamy texture, naturally sweet. - Cons: Higher in carbs than almond milk. - Coconut Milk: - Pros: Rich and creamy, adds tropical flavor. - Cons: Higher in fat and calories. You can choose sweeteners based on your taste. Natural sweeteners like honey and maple syrup are great options. They add flavor while being less processed. Refined sugars are sweeter but lack nutrients. If you want to cut carbs, use stevia or erythritol. These options are sugar-free and low in calories. Natural sweeteners vs. refined sugars: - Natural Sweeteners: - Pros: Better flavor, more nutrients. - Cons: Higher in calories. - Refined Sugars: - Pros: Very sweet, easy to find. - Cons: Lacks health benefits. Toppings make chia pudding fun. You can add many fruits like bananas, strawberries, or blueberries. Each fruit brings unique flavors and colors. Nuts add crunch. Try walnuts, almonds, or hazelnuts for texture. Seeds like pumpkin or sunflower seeds also add a satisfying crunch. Mix and match for your favorite flavors! The best seeds for extra crunch: - Pumpkin Seeds: Nutty flavor, high in zinc. - Sunflower Seeds: Crunchy, great for added texture. - Chia Seeds: Extra nutritious, boosts fiber and protein. For the full recipe, check out the Overnight Chia Pudding Delight. To keep your overnight chia pudding fresh, store it in the fridge. Use a sealed container to avoid odors from other foods. Make sure the lid is tight. This helps maintain the pudding's creamy texture. Homemade chia pudding lasts about 5 days in the fridge. You can enjoy it throughout the week. Yes, you can freeze chia pudding! This is great if you want to save some for later. Use an airtight container or a freezer bag. Leave some space at the top as it may expand. To thaw, place it in the fridge overnight. Stir it well before serving. You can add fresh toppings to make it tasty again. Check for signs of spoilage before eating. If it smells funny or has a strange color, it’s best to toss it. Chia pudding can sit at room temperature for about 2 hours. If it’s hot outside, limit this to 1 hour. Keeping track of time helps ensure your food stays safe. Chia pudding needs at least 4 hours to set. I recommend letting it sit overnight for the best flavor and texture. This gives the chia seeds time to absorb the liquid and swell. You want your pudding to be thick and creamy, not runny. Yes! You can easily make chia pudding without dairy. Almond milk is a great option, but you can also use oat milk, coconut milk, or soy milk. Each type of milk adds its own flavor. If you want a creamy texture, choose full-fat coconut milk. You have many options to sweeten chia pudding. Maple syrup is my favorite. It adds a rich flavor. Honey works well, too, but it’s not vegan. You can also use agave nectar or stevia if you want a low-calorie choice. Each sweetener changes the taste a little, so try them all! This blog post shared a simple recipe for chia pudding and its many variations. We covered the key ingredients, nutrition facts, and ways to prepare and serve the dish. You can enjoy it with different toppings and flavors to fit your taste. Storing it properly helps keep it fresh and tasty. With these tips, you can create a healthy treat that’s fun to make and eat. Try it out, and adjust it to your liking! Enjoy your chia pudding journey.

Overnight Chia Pudding Easy and Nutritious Recipe

Ready to whip up a tasty treat that’s also good for you? In this article, I’ll show you how to

- 4 boneless, skinless chicken breasts - 3 tablespoons olive oil - Juice of 2 lemons - Zest of 1 lemon - 3 cloves garlic, minced - 2 tablespoons fresh parsley, chopped - 1 tablespoon fresh thyme, chopped (or 1 teaspoon dried thyme) - 1 tablespoon fresh rosemary, chopped (or 1 teaspoon dried rosemary) - 1 teaspoon paprika - Salt and pepper to taste - Lemon slices and parsley for garnish In this recipe, the chicken is the star. I use four boneless, skinless chicken breasts for a tender bite. The chicken gets a burst of flavor from the juice and zest of two lemons. This brings a bright taste that pairs well with the herbs. I add three tablespoons of olive oil for richness. Olive oil also helps the chicken stay moist while cooking. Minced garlic is key for depth. I use three cloves for a nice kick. Fresh herbs add life to this dish. I often use two tablespoons of chopped parsley. It brings a fresh taste. I add one tablespoon each of fresh thyme and rosemary, or you can use dried herbs if fresh is not available. Paprika gives a hint of warmth. Salt and pepper enhance all these flavors. Finally, I like to garnish with lemon slices and parsley. This not only looks nice but adds a fresh touch when serving. For the full recipe, check out the provided details. - Preheat the oven to 400°F (200°C). - In a bowl, whisk together 3 tablespoons of olive oil, juice of 2 lemons, zest of 1 lemon, 3 cloves of minced garlic, 2 tablespoons of chopped parsley, 1 tablespoon of chopped thyme, 1 tablespoon of chopped rosemary, 1 teaspoon of paprika, salt, and pepper. This mix brings bright flavors. The lemon juice adds a tangy taste. The herbs give a fresh and savory touch. - Place 4 boneless, skinless chicken breasts in a large baking dish. Cover them with the marinade. Make sure each piece is well coated. - Let the chicken marinate for at least 30 minutes or up to 2 hours. Marinating is key. It helps the chicken soak up all those delicious flavors. The longer it sits, the better it tastes! - After marinating, place the baking dish in the oven. Bake for 25-30 minutes until the chicken is cooked through (165°F or 75°C). - For a golden finish, you can broil the chicken for an additional 2-3 minutes. This step seals in the juiciness. The chicken will be tender and flavorful. Enjoy the wonderful aroma that fills your kitchen! For the full recipe, check the details above. - Marinate longer for deeper flavor. I suggest marinating for at least 30 minutes. This lets the chicken soak up all the lemon and herb goodness. If you have time, let it sit in the fridge for up to 2 hours. You will taste the difference! - Use fresh herbs for the best results. Fresh parsley, thyme, and rosemary bring bright flavors. Dried herbs can work, but fresh herbs really shine in this dish. - Let chicken rest after baking for juiciness. Once you take the chicken out of the oven, let it sit for about 5 minutes. This helps the juices stay inside, making each bite moist. - Check internal temperature with a meat thermometer. The chicken should reach 165°F (75°C). This ensures it is fully cooked and safe to eat. - Pair with roasted vegetables or a fresh salad. The bright flavors of the chicken work well with colorful veggies. Try carrots, zucchini, or bell peppers for a tasty side. - Serve over rice or quinoa for a complete meal. Both options soak up the juices and add a nice texture. You can also use couscous or a grain of your choice for variety. For the complete recipe, check out the Full Recipe section. {{image_2}} When you cook Baked Lemon Herb Chicken, you can switch things up for fun. Here are some tasty variations to try. You can change the herbs to match your taste. Here are a few ideas: - Use oregano for a more Mediterranean flavor. - Try basil for a sweet twist. - For a quick change, sprinkle on lemon pepper seasoning. It adds a nice zest. Mix up your cooking style for a new experience: - Grilling gives the chicken a smoky flavor. - Pan-searing can create a nice crust. - If you want ease, use a slow cooker. It makes the chicken tender with less fuss. Add more excitement to your dish with these add-ins: - Sun-dried tomatoes bring a rich taste. - Olives add a briny kick. - Want a touch of elegance? Add a splash of white wine into the marinade. It enhances the chicken’s flavor. These small changes can make your Baked Lemon Herb Chicken feel fresh and exciting. Try them out to find your favorite twist! For the full recipe, check out the [Full Recipe]. Store leftovers in an airtight container for up to 3-4 days. This keeps the chicken juicy and tasty. When you reheat, the oven works best. It helps maintain the texture and flavor. You can freeze cooked chicken for up to 3 months. This is great for meal prep. Before you reheat, thaw it in the refrigerator. This way, it stays safe and delicious. You can reheat in a microwave or oven until heated through. If you use the oven, add a splash of water. This keeps the chicken moist during reheating. It makes every bite just as good as fresh! Use a meat thermometer to check for an internal temperature of 165°F (75°C). This step is vital. It ensures that the chicken is safe to eat. Insert the thermometer in the thickest part of the chicken. If it reads 165°F, you are good to go. Yes, marinated chicken can be stored in the fridge for up to 2 hours before baking. This time allows the flavors to soak in. If you want to prep earlier, marinating overnight is also great. Just remember to bring it back to room temp before cooking. It is low in carbs and packed with protein. You can adjust the olive oil for calorie control. Using less oil is an easy way to make it lighter. The fresh herbs add nutrients and flavor, making it a healthy choice. Roasted vegetables, salad, rice, or quinoa are great accompaniments. These sides add color and texture to your meal. Roasted veggies bring out sweetness, while rice or quinoa adds fiber. This combination makes your meal satisfying and balanced. For the full recipe, check out the earlier section. This article provided a simple baked lemon herb chicken recipe. It covered essential ingredients, step-by-step instructions, helpful tips, and variations. You can explore different herbs and cooking methods to make it your own. Remember to store leftovers properly and reheat them with care. This dish is healthy, packed with flavors, and easy to prepare. It’s perfect for any meal. Enjoy creating deliciousness in your kitchen!

Baked Lemon Herb Chicken Flavorful and Juicy Delight

Ready for a dish that’s bursting with flavor? Baked Lemon Herb Chicken is not only juicy but also easy to

- 1 cup broccoli florets - 1 cup bell peppers (red, yellow, and green), sliced - 1 cup snap peas or snow peas - 1 medium carrot, julienned - 1 cup baby corn, cut in half - 1 tablespoon ginger, minced - 2 cloves garlic, minced - 3 tablespoons soy sauce (or tamari for gluten-free) - 1 tablespoon sesame oil - 1 tablespoon vegetable oil - 1 teaspoon sesame seeds (for garnish) - Fresh cilantro or green onions for garnish - Salt and pepper to taste To make your veggie stir fry pop, garnish it with fresh cilantro or chopped green onions. This adds color and flavor. Serve it with steamed rice or noodles for a complete meal. You can even add a side of crispy spring rolls for extra crunch. For a vibrant look, arrange the stir fry in a bowl. Sprinkle sesame seeds on top to finish. Try to use a mix of colors for a feast for the eyes! Start by prepping your veggies. First, wash them under cold water. Next, peel any skins, like the carrot. Finally, slice everything into even pieces. This step is key. Uniform sizes help all the veggies cook at the same time. If you cut them too big or small, some will be mushy while others stay hard. Heat a large skillet or wok over medium-high heat. Add the vegetable oil and let it get hot. Then, toss in the minced ginger and garlic. Stir-fry for about 30 seconds. You want them fragrant but not burnt. Now, add the broccoli and carrot. Stir them for 2 to 3 minutes. They should start to soften. Next, mix in the bell peppers and baby corn. Keep stirring for another 2 minutes. Finally, add the snap peas. Stir-fry everything together for 1 to 2 minutes. You want all veggies to be tender-crisp for the best texture. Now comes the fun part: flavoring your stir fry! Pour the soy sauce and sesame oil over the veggies. Stir to coat everything evenly. Taste it and adjust the seasonings as needed. If it needs more salt, add a pinch of salt or more soy sauce. Remember, the soy sauce adds saltiness, so go easy! Remove from heat and sprinkle sesame seeds on top. For a fresh touch, add chopped cilantro or green onions as a garnish. For the full recipe, check out the details above to make your colorful veggie extravaganza stir fry! To make a great stir fry, keep a few tips in mind. First, always use high heat. This helps cook the veggies quickly and keeps them crispy. It also enhances their colors. Stir-frying means cooking fast. You want to toss the veggies around often. This ensures even cooking. Using a large skillet or wok is best. It gives the food room to move. If the pan is crowded, the veggies will steam instead of fry. So, ensure you have enough space. If you need a soy sauce alternative, try tamari or coconut aminos. Both options taste great and work well in your stir fry. Coconut aminos add a slight sweetness, which some love. Feel free to mix in other veggies too. You can use zucchini, mushrooms, or asparagus. Just chop them into similar sizes to keep cooking even. This way, you create a colorful and tasty dish. One big mistake is overcooking the vegetables. If you cook them too long, they lose crunch and color. Aim for tender-crisp veggies. They should still have a bite to them. Another mistake is not prepping before cooking. Always wash, peel, and slice your ingredients first. This saves time and helps you avoid burning the garlic or ginger while you rush. Prepping makes the whole cooking process much smoother. {{image_2}} You can add protein to your veggie stir fry to make it heartier. Tofu, tempeh, or edamame works great. Tofu brings a nice texture and absorbs flavors well. Tempeh adds a nutty taste and is rich in protein. Edamame gives a fun crunch and is full of nutrients. For cooking, here’s what to do: - Tofu: Press it to remove excess water. Cube it and fry until golden brown. - Tempeh: Slice it thin and pan-fry until crispy. - Edamame: Simply cook in boiling water for a few minutes before adding to the stir fry. Stir fry sauces can change the taste of your dish. You can try different sauces or marinades to mix it up. Soy sauce is a classic, but you can also use teriyaki or hoisin sauce. For a spicy kick, add chili paste or sriracha. Want something sweet? Try adding honey or maple syrup. You can easily customize the flavor: - Spicy: Use extra chili paste. - Sweet: Mix in a splash of orange juice. - Savory: Add a bit of sesame oil for depth. Using seasonal veggies makes your stir fry fresh and bright. In spring, use asparagus or snap peas. Summer is great for zucchini and bell peppers. In fall, add carrots and squash. Winter brings hearty greens like kale or bok choy. Here are some suggested mixes: - Spring: Asparagus, snap peas, and green onions. - Summer: Zucchini, bell peppers, and corn. - Fall: Carrots, butternut squash, and broccoli. - Winter: Kale, bok choy, and Brussels sprouts. These variations keep your veggie stir fry exciting and full of flavor! For the full recipe, check out the Colorful Veggie Extravaganza Stir Fry. To store leftover stir fry, let it cool down first. Place it in an airtight container. This keeps it fresh and tasty. Leftover stir fry stays good for about 3 to 4 days in the fridge. Check for any signs of spoilage before eating. You can freeze stir fry, but do it right. Cool the stir fry completely. Then, put it in freezer-safe bags or containers. Remove as much air as you can. This helps prevent freezer burn. It lasts up to 3 months in the freezer. When you're ready to eat, thaw it in the fridge overnight. Reheat it in a pan on medium heat. This keeps the veggies from getting mushy. Making this recipe ahead of time is easy. Chop veggies and store them in separate bags. This speeds up cooking time. You can also cook a big batch and divide it into portions. Store individual servings in the fridge or freezer. This way, you have quick meals ready for busy days. Yes, you can! Use tamari instead of soy sauce. Tamari tastes similar but is gluten-free. You can also try coconut aminos for a sweeter flavor. Both options work well in this veggie stir fry. Serve your stir fry over rice or noodles. Jasmine rice is a great choice. You can also use brown rice for a healthier touch. If you prefer noodles, try rice noodles or soba noodles. Both pair nicely with the fresh flavors of the stir fry. This stir fry is quick! It takes about 10 minutes to prep the veggies. The cooking part takes about 10 minutes. So, you can make this dish in around 20 minutes. Perfect for a busy weeknight dinner! Of course! You can add more veggies like zucchini, bell peppers, or mushrooms. Just cut them into similar sizes. This way, they cook evenly. Keep an eye on the cooking time. Add denser veggies first, and softer ones later for the best texture. This guide covers all you need for a delicious veggie stir fry. We discussed key ingredients, from vibrant vegetables to tasty seasonings. I explained step-by-step instructions for perfect cooking and shared tips to enhance your dish. You now have ideas for variations and storage to keep meals fresh. Remember, stir-frying is quick and fun. Enjoy experimenting with different flavors and textures. Your next meal will impress!

Easy Veggie Stir Fry Quick and Flavorful Recipe

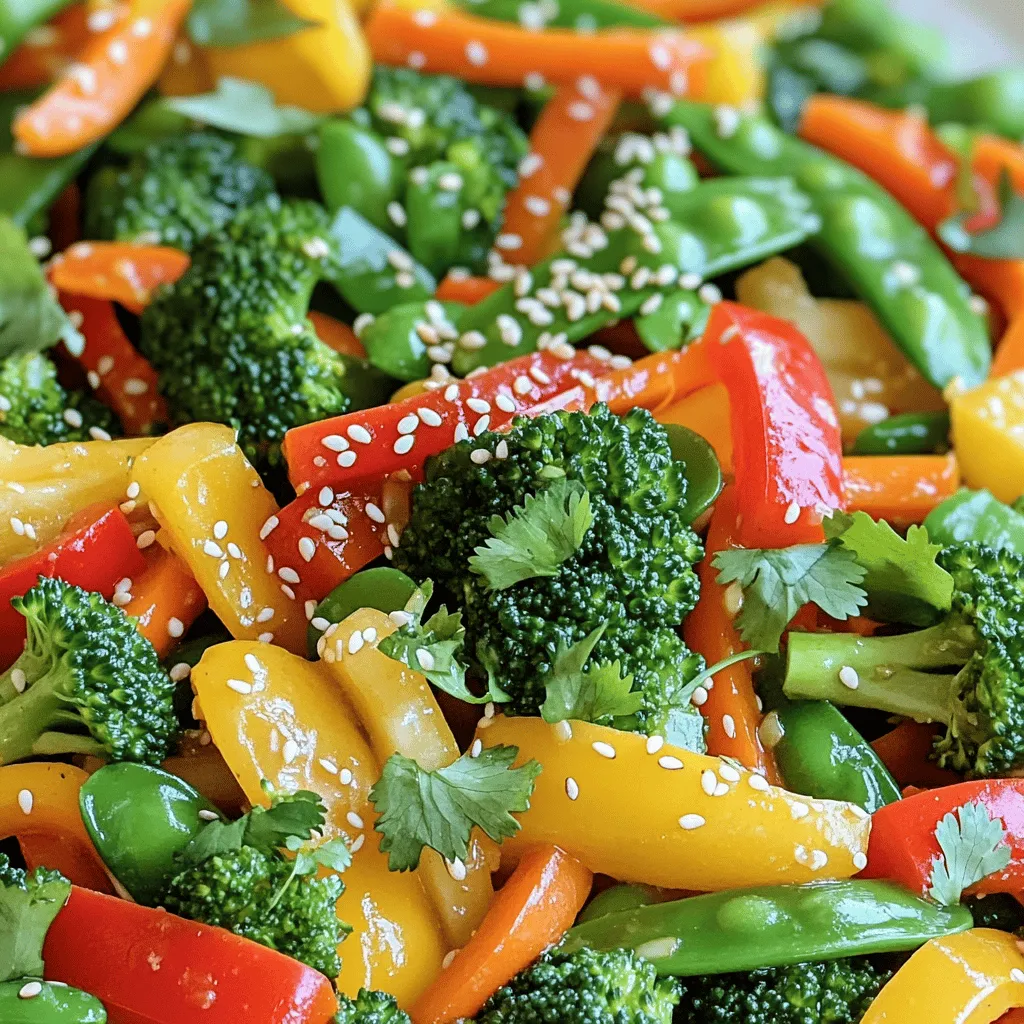
Looking for a quick and tasty meal? My Easy Veggie Stir Fry is just what you need! Packed with fresh

- 2 ripe avocados - 4 slices of whole grain bread - 4 large eggs - 1 tablespoon olive oil - 1 teaspoon garlic powder - 1 teaspoon smoked paprika - Salt and pepper to taste - Fresh cilantro leaves for garnish - Sliced radishes for topping - Squeeze of fresh lime juice When I make this avocado toast with egg, I love the vibrant flavors and simple steps. Each ingredient plays a vital role in creating a tasty dish. For the avocados, I pick ripe ones. They should feel soft but not mushy. The bread must be whole grain for that hearty texture. I often go with a thick slice, as it holds all the toppings well. The eggs bring protein and richness. I choose large eggs, which cook up nicely. Olive oil adds healthy fat and a bit of flavor. In terms of seasonings, garlic powder and smoked paprika add depth. I also use salt and pepper to enhance all the flavors. Fresh cilantro leaves provide a pop of color and freshness. Sliced radishes add crunch and a bright touch. Lastly, a squeeze of lime juice brightens the whole dish. With these ingredients, I feel confident that my avocado toast will turn out delicious. You can find the full recipe in this article, which guides you through each step. Toast the slices until golden brown and crispy. This step makes the toast crunchy and keeps it from getting soggy. I love using whole grain bread for added flavor and nutrients. Aim for a nice crispness; it makes a big difference in the dish. Scoop the ripe avocados into a bowl. Mash them with a fork until smooth. Add garlic powder, smoked paprika, salt, and pepper. Mix in a squeeze of fresh lime juice. This adds a bright flavor and keeps the avocado from browning. The seasoning gives the mash a nice kick. Heat olive oil in a non-stick skillet over medium heat. Crack the eggs into the skillet gently. Cook them sunny-side up until the whites are set. If you like them more done, cook a bit longer. Sprinkle with salt and pepper while cooking; it adds flavor to the eggs. Spread a generous amount of the avocado mix on each slice of toasted bread. Make sure to cover the toast well. This creamy layer is the star of the dish. It's important to get good coverage for every bite. Top each slice with a sunny-side-up egg. Add fresh cilantro leaves and sliced radishes for color. These garnishes add crunch and make the dish look beautiful. The radishes give a nice contrast to the creaminess of the avocado and egg. For the complete recipe, check out the [Full Recipe]. To make the best avocado mash, use ripe avocados. They should feel soft when you press them gently. If they are too firm, wait a few days for them to ripen. The right texture makes a big difference in flavor and creaminess. Mash them with a fork for a chunky mix or blend for a smooth finish. Add a squeeze of lime juice to keep the color bright and fresh. When cooking eggs for your toast, you can choose sunny-side up or scrambled. Sunny-side up gives you a nice runny yolk that flows over the avocado. Scrambled eggs offer a soft texture that mixes well with the avocado. Both styles are tasty, so pick what you like best. Cook the eggs in olive oil for added flavor and a smooth finish. To make your meal more balanced, add a side salad or fresh fruit. A simple green salad with lemon dressing pairs well. You can also choose seasonal fruits like berries or sliced oranges. These sides add color and nutrients to your plate. If you want to impress, serve the toast on a large platter. Drizzle extra olive oil on top and add lime wedges for a fun touch. For a detailed recipe, check out the [Full Recipe]. {{image_2}} You can make your avocado toast even better with tasty toppings. Feta cheese adds a creamy, salty kick. Cherry tomatoes bring a sweet burst of flavor. Try adding sliced radishes for a crunchy bite. You can also sprinkle some seeds or nuts for extra texture and nutrition. Want to spice things up? Add chili flakes for a kick of heat. A dash of cayenne pepper works well too. You can mix in fresh herbs like basil or dill for a fresh taste. Even a drizzle of balsamic glaze can add depth and sweetness to your dish. Experiment and find what excites your taste buds! The bread you choose can change your toast game. Whole grain is great, but don’t stop there! Try gluten-free bread if you need it. Sourdough adds a tangy flavor and chewy texture. You can even use bagels or English muffins for a fun twist. Choose your favorite, and enjoy your creation! For a full recipe, check out my Avocado Toast with a Twist. To keep leftover avocado toast fresh, store it in an airtight container. This helps prevent air from reaching the toast. If you have extra ingredients, store them separately. This way, your toast stays crisp and tasty. Try to eat leftovers within 1 day for the best flavor. To reheat avocado toast, use a toaster oven or regular oven. Heat it at a low temperature, around 300°F (150°C). This warms the toast without making it soggy. Avoid using a microwave, as it can ruin the texture. Just a few minutes in the oven will revive the crunch. To stop mashed avocado from browning, add lime juice. The acidity slows down oxidation. You can also cover the avocado tightly with plastic wrap. Press the wrap directly onto the surface to limit air exposure. Storing it in a sealed container with a piece of onion can help too. These tricks keep your avocado fresh and green. For the full recipe, check out the Avocado Toast with a Twist section. It takes about 10 minutes to prep and 20 minutes to cook. The total time is 30 minutes. You can serve four people with this quick meal. Just toast the bread, mash the avocado, and cook the eggs. Yes, you can make the avocado mix ahead of time. Store it in an airtight container. Add a bit of lime juice to keep it fresh. It stays good for about one day in the fridge. Avocado toast is very nutritious. Avocados are full of healthy fats. They help with heart health and keep you full longer. Eggs provide protein, which is great for muscles. Together, they make a balanced meal. Yes, it is great for meal prep! You can toast the bread and store it. Prepare the avocado mix and eggs in advance. Just assemble them when you are ready to eat. Enjoy fresh, easy meals all week long! This blog post covered how to make the perfect avocado toast with eggs. We explored ingredients, from ripe avocados to fresh lime juice. You learned to prepare the bread, mash the avocado, and cook the eggs. We also discussed tips for variations, storage, and reheating. Avocado toast is not just tasty; it’s good for you too. Enjoy making your own delicious, healthy meals!

Nutritious Avocado Toast with Egg for a Quick Meal

Looking for a quick and tasty meal? Look no further than nutritious avocado toast topped with a perfectly cooked egg.

Here is a simple list of what you need for this delicious dish. - 4 boneless, skinless chicken breasts - 2 cups fresh spinach, chopped - 1 cup feta cheese, crumbled - 1/2 cup cream cheese, softened - 1/4 cup sun-dried tomatoes, chopped - 2 cloves garlic, minced - 1 teaspoon dried oregano - 1 teaspoon lemon zest - Salt and pepper to taste - Olive oil for drizzling - Toothpicks or kitchen twine for securing stuffed chicken Each ingredient plays a key role in making this meal flavorful and fun. The spinach adds freshness, while the feta cheese gives a nice tang. Cream cheese adds richness, making the filling creamy. Sun-dried tomatoes bring a sweet and savory kick. Using fresh garlic and oregano enhances the taste, making each bite a delight. I always recommend using fresh ingredients. They make a big difference in flavor. If you want to explore more about this recipe, check out the full recipe for tips on preparation and cooking. First, we will make the filling. Start by heating a skillet over medium heat. Add a drizzle of olive oil. Once the oil is hot, add 2 cloves of minced garlic. Sauté the garlic for about 1 minute until you smell its great aroma. Next, add 2 cups of chopped fresh spinach and 1/4 cup of chopped sun-dried tomatoes to the skillet. Cook this mixture for about 2 to 3 minutes. The spinach will wilt down nicely. Now, in a mixing bowl, combine the cooked spinach, 1 cup of crumbled feta cheese, and 1/2 cup of softened cream cheese. Add 1 teaspoon of dried oregano, 1 teaspoon of lemon zest, and some salt and pepper. Mix everything well until it's nicely blended. Next, it’s time to prep the chicken. Take 4 boneless, skinless chicken breasts and carefully cut a pocket into each one. Slice horizontally, making sure not to cut all the way through. You want to create a nice space for the filling. Now, stuff each chicken breast with the spinach and feta mixture. Make sure to pack it in well. Once filled, secure the opening with toothpicks or tie them with kitchen twine. This keeps the filling from spilling out while cooking. For the cooking process, start by searing the chicken. Heat a tablespoon of olive oil in an oven-safe skillet over medium-high heat. Once hot, add the stuffed chicken breasts. Sear them for about 3 to 4 minutes on each side until they turn golden brown. After they are nicely browned, transfer the skillet to your preheated oven at 375°F (190°C). Bake the chicken for 20 to 25 minutes. You want the chicken to reach an internal temperature of 165°F (75°C) to ensure it's fully cooked. Once done, take the skillet out of the oven. Let the chicken rest for about 5 minutes. Finally, remove the toothpicks or twine before slicing. Enjoy your savory spinach and feta stuffed chicken! For the complete recipe, refer to the Full Recipe section. To stuff chicken well, first, create a pocket in each breast. Slice into the thickest part of the chicken, but don’t cut all the way through. This keeps the filling inside while cooking. Next, pack the filling in gently. Make sure to fill each pocket evenly. This ensures that each bite is full of flavor. For even cooking, ensure each chicken breast is about the same size. Thicker pieces take longer to cook. You can use a meat mallet to pound the chicken to an even thickness. This gives you the best results. Cooking time varies based on the thickness of chicken breasts. Thin breasts may take only 20 minutes, while thicker ones need about 25 to 30 minutes. Check the internal temperature to be sure. Use a meat thermometer to ensure the chicken hits 165°F (75°C). This guarantees it is safe to eat. To boost the taste of your dish, add herbs and spices. Try thyme, basil, or parsley for fresh notes. A sprinkle of paprika can add warmth. You can also pair your stuffed chicken with a sauce. A light lemon sauce or a garlic cream sauce works wonders. These options elevate the dish and make it even more enjoyable. {{image_2}} You can change the cheese in this recipe. Try mozzarella or goat cheese instead of feta. Each cheese brings its own flavor. You can also add roasted red peppers for sweetness. Olives can add a nice briny taste. Just chop them up and mix them in. If you need dairy-free options, use dairy-free cream cheese and cheese. This keeps the dish creamy without dairy. For low-carb variations, skip the cream cheese and serve the chicken with a salad. You can enjoy the flavors while cutting carbs. You can grill or bake this dish. Grilling gives it a nice smoky flavor. To grill, cook over medium heat for about 6-8 minutes per side. Baking is simple and keeps the chicken moist. Bake at 375°F for 20-25 minutes. For busy days, try a slow cooker. Just follow the same steps, then cook on low for 4-5 hours. These variations let you make this dish fit your taste and needs. For the full recipe, check out the main article. Store leftover spinach and feta stuffed chicken in an airtight container. This keeps it fresh and safe. Use it within 3 to 4 days for the best taste. To freeze stuffed chicken, wrap each piece tightly in plastic wrap. Place them in a freezer bag, removing as much air as possible. They can last up to 3 months in the freezer. When ready to eat, thaw in the fridge overnight. To reheat, bake at 350°F until heated through. This dish pairs well with roasted vegetables, rice, or a fresh salad. For meal prep, you can slice the chicken and add it to wraps or salads for quick lunches. Yes, you can use frozen spinach. It is a good time-saver. - Considerations and preparation: Thaw the frozen spinach first. Squeeze out extra water. This keeps your filling from becoming too wet. - Impact on flavor and texture: Frozen spinach can taste milder. Fresh spinach has a brighter flavor. Texture may be softer, but it still works well. Check the internal temperature with a meat thermometer. It should reach 165°F (75°C). - Understanding internal temperature: This ensures the chicken is safe to eat. It also keeps it juicy and tender. - Visual cues for doneness: Look for clear juices when you cut into the chicken. The meat should be white, not pink. This dish pairs well with many sides. You can choose vegetables or grains. - Popular vegetable side dishes: Roasted broccoli, green beans, or a garden salad are great options. - Suggestions for starches or grains: Quinoa, rice, or mashed potatoes complement the meal nicely. This blog post showed you how to make delicious spinach and feta stuffed chicken. You learned about the ingredients, preparation steps, cooking methods, and tips for perfecting your dish. Don't forget to explore variations and storage tips to keep your meals fresh. Cooking can be fun and rewarding. Enjoy trying new flavors and techniques. With practice, you’ll impress everyone at your table. Now, go make that stuffed chicken and savor every bite!

Spinach and Feta Stuffed Chicken Savory Dinner Delight

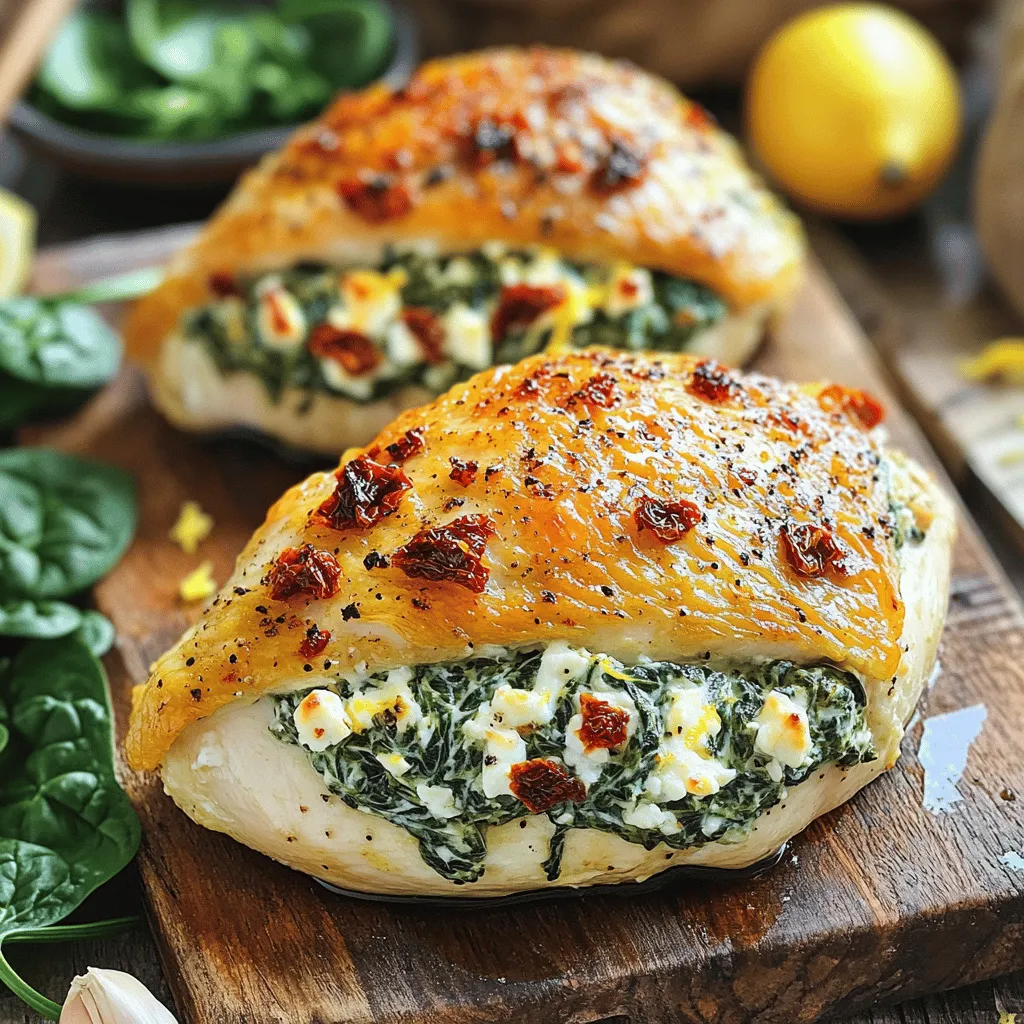
Get ready to impress your family with a delicious Spinach and Feta Stuffed Chicken! This savory dinner delight is easy

To make cheesy scalloped potatoes, you will need: - 4 large russet potatoes, thinly sliced - 2 cups sharp cheddar cheese, shredded - 1 cup whole milk - 1 cup heavy cream - 1 medium onion, finely chopped - 3 cloves garlic, minced - 3 tablespoons butter - 1 teaspoon dried thyme - 1 teaspoon smoked paprika - Salt and pepper to taste - Fresh parsley, chopped (for garnish) These ingredients create the rich and creamy flavors that make this dish so comforting. The key to cheesy scalloped potatoes lies in the cheese. I use sharp cheddar for its bold taste. The creamy mixture of milk and heavy cream adds richness. The butter, onion, and garlic give depth. Thyme and smoked paprika add layers of flavor. Each bite should be a balance of creaminess and cheesy goodness. You can easily make this dish vegan. Use plant-based cheese and cream. Almond or oat milk works well instead of dairy milk. For butter, use vegan butter or coconut oil. These swaps keep the dish creamy while meeting dietary needs. The flavors may differ slightly, but the dish remains delicious. Feel free to experiment until you find your perfect blend. To make your cheesy scalloped potatoes shine, start with fresh and firm russet potatoes. Thinly slice them. A sharp knife or mandoline works best. For even cooking, try to keep all slices the same thickness. Gather your ingredients ahead of time. This way, you can work smoothly and efficiently. 1. First, preheat your oven to 375°F (190°C). Grease a 9x13 inch baking dish with butter. 2. Next, melt the butter in a saucepan over medium heat. Add the chopped onion and minced garlic. Sauté them until the onion turns translucent, which takes about five minutes. 3. Pour in the whole milk and heavy cream. Stir to mix well. Add the dried thyme, smoked paprika, salt, and pepper. Heat this mixture until it is just warm. 4. Now, start layering your potatoes. Place them in the greased baking dish, overlapping slightly. Pour a thin layer of the cream mixture over the potatoes. Then, sprinkle some shredded cheddar cheese on top. 5. Repeat this process with the remaining potatoes, cream mixture, and cheese. Finish off with a generous layer of cheese on top. 6. Cover the baking dish with aluminum foil. Bake it in the preheated oven for 40 minutes. 7. After 40 minutes, remove the foil. Continue baking for another 20-30 minutes. You want the potatoes to be tender and the cheese to be bubbling and golden brown. 8. Once done, let the dish cool for 10 minutes before serving. Garnish it with fresh parsley for added color and flavor. Serve cheesy scalloped potatoes hot. They pair well with roasted meats or a fresh salad. You can also enjoy them on their own as a hearty side dish. If you want to impress, sprinkle extra cheese or herbs on top right before serving. For the full recipe, check out the details above. To get creamy potatoes, slice them thin. Use a sharp knife or a mandolin. Thin slices cook evenly. Soak the potatoes in water for a bit to remove starch. This helps with creaminess. When you layer them, pour the cream mixture slowly. Let it seep in. Cover the dish with foil at first, so the steam helps cook the potatoes. Remove the foil later to brown the cheese. Sharp cheddar is the star of cheesy scalloped potatoes. It melts well and has a strong taste. You can mix in Gruyère for a nutty flavor. Fontina adds creaminess, while mozzarella gives a gooey texture. Try using a mix of these cheeses for depth. Just make sure to use about 2 cups of cheese total. Always shred your cheese fresh for the best melt. One big mistake is not seasoning enough. Always add salt and pepper to the cream mix. Another error is overcooking the potatoes. They should be tender but not mushy. Lastly, avoid skipping the resting time. Let the dish cool for 10 minutes before serving. This helps the layers set and makes it easier to cut. For the full recipe, check the details above. {{image_2}} You can make cheesy scalloped potatoes even tastier by adding bacon or ham. Cook about 6 slices of bacon until crispy. Chop it into small pieces. If you prefer ham, use about 1 cup of diced ham. Layer these meaty bits between the potatoes and cheese. This addition brings a smoky flavor that pairs well with the creamy sauce. Fresh herbs can brighten up your cheesy scalloped potatoes. Try adding fresh rosemary or basil. Chop about 1 tablespoon of either herb and mix it into the cream sauce. You can also sprinkle some on the top before baking. This adds a pop of color and fresh taste. Other good options include parsley or chives, which give a mild flavor. If you want to make your dish vegetarian, consider adding spinach or mushrooms. For spinach, use about 2 cups of fresh leaves. Sauté them briefly until they wilt, then layer them between the potatoes. For mushrooms, slice about 8 ounces and cook until soft. This will add a rich, earthy flavor that works well with the cheese. You can find these ideas in the Full Recipe, which has more ways to customize your dish. After enjoying your cheesy scalloped potatoes, let them cool down. Place leftovers in an airtight container. Store them in the fridge. They will stay fresh for about three to four days. Make sure to cover the dish tightly to keep moisture in. When you're ready to enjoy the leftovers, preheat your oven to 350°F (175°C). Place the potatoes in an oven-safe dish. Add a splash of milk or cream to keep them moist. Cover the dish with foil to prevent drying out. Heat for about 20 minutes, or until warmed through. You can also microwave them for faster results, but the oven gives a better texture. You can freeze cheesy scalloped potatoes for longer storage. First, let them cool completely. Then, portion them into freezer-safe containers or bags. Remove as much air as possible. They can last up to two months in the freezer. To reheat, thaw them in the fridge overnight and then bake as directed. This helps maintain the creamy texture. For the full recipe, check out the [Full Recipe]. I prefer using russet potatoes for scalloped potatoes. They have a high starch content. This gives the dish a creamy texture. You can also use Yukon Gold potatoes. They add a buttery flavor and hold up well. Avoid waxy potatoes like red or new potatoes. They won’t soften as nicely in the oven. Yes, you can prepare cheesy scalloped potatoes ahead of time. Assemble the dish up to the baking step. Cover it tightly with plastic wrap and store it in the fridge. It can stay fresh for up to 24 hours. When you're ready to bake, remove the wrap and bake as directed. You may need to add a few extra minutes to the baking time. To make cheesy scalloped potatoes gluten-free, simply replace the flour with cornstarch. You can also use gluten-free cream. Most heavy creams are naturally gluten-free. Always check the labels to be sure. This way, you can enjoy a delicious dish without any gluten concerns. In this article, we covered key ingredients for cheesy scalloped potatoes. You learned about essential ingredients, vegan options, and detailed cooking tips. I shared ways to make your dish creamy and the best cheese blends for taste. Remember, adding bacon or fresh herbs can enhance flavor, while proper storage keeps leftovers tasty. Embrace these ideas, avoid common mistakes, and enjoy your cheesy creation!

Cheesy Scalloped Potatoes Creamy and Comforting Dish

If you’re craving a warm, cheesy dish that’s both creamy and satisfying, you’re in the right place! Cheesy scalloped potatoes

To make no-bake peanut butter bars, you need simple ingredients. Here’s what you need: - 1 cup creamy peanut butter - 1 cup rolled oats - 1/2 cup honey or maple syrup - 1/4 cup coconut flour - 1/2 cup dark chocolate chips (dairy-free if preferred) - 1/4 teaspoon vanilla extract - Pinch of salt These ingredients work together to create a sweet and nutty flavor. The peanut butter gives it a rich taste, while oats add a nice texture. Honey or maple syrup acts as a sweetener and helps bind everything together. I love adding some extras to enhance the flavor. Here are some fun options: - Chopped nuts (like almonds or walnuts) - Dried fruits (like cranberries or raisins) - A sprinkle of cinnamon or cocoa powder Feel free to mix and match based on your taste. These add-ins can make your bars even more delightful and unique. If you have dietary needs, you can swap out ingredients easily. Here are some ideas: - Use crunchy peanut butter for a different texture. - Substitute agave nectar for honey or maple syrup. - Swap coconut flour with almond flour for a nutty flavor. These substitutions make it easy for everyone to enjoy these tasty bars. You can find the full recipe for no-bake peanut butter bars to get started! Start by gathering all your ingredients. You will need creamy peanut butter, honey, rolled oats, coconut flour, dark chocolate chips, vanilla extract, and a pinch of salt. In a large mixing bowl, combine the creamy peanut butter and honey. Mix until it is smooth. This step creates a rich base for your bars. Next, add the rolled oats, coconut flour, vanilla extract, and salt to the peanut butter mixture. Stir everything together well. You want to ensure that each ingredient blends in nicely. This helps create a uniform texture in your bars. After that, fold in the dark chocolate chips. Make sure they are evenly distributed throughout your mixture. Line an 8x8-inch baking dish with parchment paper. This makes it easy to lift the bars out later. Pour the peanut butter mixture into the dish. Press it down firmly with a spatula or your hands. Make sure the layer is even and well-packed. After that, place the dish in the refrigerator. Let it chill for at least 1-2 hours. Once firm, lift the bars out using the parchment overhang. Cut them into squares or bars. Enjoy your no-bake peanut butter bars! For the full recipe, check the link. To get the best texture, use creamy peanut butter. This keeps the bars smooth. If you want a slight crunch, add chopped nuts. Make sure to mix well. This helps all the ingredients blend evenly. Press the mixture firmly into the baking dish. This step is key for a solid bar. You can save time by measuring all your ingredients first. This way, you have everything ready to go. Use quick-cooking oats if you want a softer texture. They mix in faster. Also, line your baking dish with parchment paper. This helps with easy cleanup and removes the bars easily. A large mixing bowl is important for this recipe. You will also need a spatula to mix and press the bars. A measuring cup helps to get exact amounts. Using a sharp knife makes cutting the bars easier. Lastly, a refrigerator is needed to set the bars firm. For the full recipe, check the details above. {{image_2}} You can switch up the nut butters in this recipe. Almond butter and cashew butter work great. Each nut butter gives a unique flavor. You can even mix different nut butters. This fun twist keeps your bars exciting and fresh. Adding fruit can make your bars even tastier. Dried fruits like cranberries, raisins, or apricots add sweetness and chewiness. You can also add fresh fruit like banana slices. Just keep in mind that fresh fruit may change the texture. Experiment with different fruits to find your favorite blend. These bars can fit various diets. To make them gluten-free, use certified gluten-free oats. For dairy-free options, choose dairy-free chocolate chips. Coconut flour is already gluten-free, so it works well. This way, everyone can enjoy these delicious no-bake peanut butter bars. Check the Full Recipe for more ideas and tips. Store your no-bake peanut butter bars in an airtight container. This keeps them fresh. Place a piece of parchment paper between layers to prevent sticking. Keep them in the fridge for the best taste. If you plan to eat them within a week, the fridge works well. These bars can last up to one week in the fridge. After that, they may lose flavor or texture. If you notice any changes, it's best to toss them. Always check for odd smells or colors before eating. You can freeze no-bake peanut butter bars for longer storage. Wrap each bar in plastic wrap and place them in a freezer bag. They can last up to three months in the freezer. Thaw them in the fridge overnight before enjoying. This way, you can always have a sweet treat on hand! For the complete recipe, check the [Full Recipe]. Yes, you can use crunchy peanut butter. It adds a nice texture. The bars will still taste great. Just remember, the chunks may change how they feel in your mouth. If you like a bit of crunch, go for it! You can use agave syrup or brown rice syrup. Both work well and offer sweetness. If you want a low-sugar option, try using mashed bananas. They will add natural sweetness and moisture. To make these bars vegan, simply use maple syrup instead of honey. Choose dairy-free chocolate chips too. This way, you keep the bars tasty and plant-based. It’s a simple swap that still gives great flavor. Yes, you can add protein powder! Start with one scoop and mix it in. This will boost the protein content without changing the taste much. Just be sure to adjust the wet ingredients a bit if it gets too dry. Check the Full Recipe for the best results! In this article, we explored how to make no-bake peanut butter bars. We covered key ingredients, options for adding flavor, and substitutions for dietary needs. The step-by-step instructions guide you through mixing and forming the bars. Tips and tricks help you achieve great texture and prepare quickly. We also shared variations and storage tips for keeping your bars fresh. Enjoy these bars as a tasty snack that fits your dietary choices. Feel free to experiment and make them your own!

No-Bake Peanut Butter Bars Perfectly Simple Treat

Are you ready to whip up a sweet treat that’s both easy and delicious? My No-Bake Peanut Butter Bars are

For a classic banana bread, you need just a few key items: - 3 ripe bananas, mashed - 1/3 cup melted coconut oil - 1/2 cup brown sugar - 1 large egg, beaten These ingredients work together to create a rich and moist flavor. Ripe bananas are key; they should be soft and speckled. Coconut oil adds a nice richness and helps keep the bread moist. Brown sugar brings a hint of caramel flavor, making each bite delightful. The egg acts as a binder, helping everything stick together. You can make your banana bread even better with some fun extras: - Chopped walnuts or pecans - Ground cinnamon Adding nuts gives a nice crunch. They also add healthy fats. Cinnamon adds a warm spice that pairs well with bananas. Feel free to adjust the amounts based on your taste. Sometimes, you might need to swap out ingredients: - For allergens, use alternatives like applesauce for the egg. - If you want less sugar, reduce the brown sugar by a few tablespoons. This recipe is flexible. Adjusting sweetness is easy. Just taste your batter before baking to find the right balance. Remember, the Full Recipe provides all the details you need! First, heat your oven to 350°F (175°C). This step is key for even baking. While the oven warms up, grab a 9x5-inch loaf pan. Coat it well with cooking spray or a bit of coconut oil. This will help the bread slide out easily after baking. In a big bowl, mash your ripe bananas until smooth. Add in the melted coconut oil and mix well. Next, stir in the brown sugar, beaten egg, and vanilla extract. Make sure everything blends nicely. Now, sprinkle the baking soda and salt over the wet mix. Stir it all together. Slowly add the flour and ground cinnamon. Mix just until combined. A few lumps are fine; don’t overmix. If you want a crunch, fold in the chopped walnuts or pecans. Pour the batter into your greased loaf pan. Smooth the top with a spatula. Bake in the preheated oven for 55 to 60 minutes. To check for doneness, insert a toothpick into the center. If it comes out clean, your bread is ready. Once it’s done, take it out and let it cool in the pan for about 10 minutes. Then, move it to a wire rack to cool completely. Enjoy the lovely smell that fills your kitchen! For the full recipe, check out the section above. To make the best banana bread, avoid overmixing. When you mix too much, the bread can turn tough. Mix just until you see the dry flour disappear. A few lumps are okay! Next, ensure the right moisture level. Ripe bananas add natural sweetness and moisture. They should be soft and spotty. If your bananas are not very ripe, your bread may be dry. Using fresh ingredients is key for great flavor. Fresh bananas give the best taste. Coconut oil adds richness and depth. Always check your spices for freshness, too. You can also add spices or extracts. A pinch of nutmeg or a splash of almond extract can elevate the taste. Ground cinnamon adds warmth and pairs well with bananas. For ideal accompaniments, serve your banana bread warm. A drizzle of honey or a spread of cream cheese adds a nice touch. You can also get creative with presentation. Serve slices on a rustic wooden board. Garnish with extra banana slices or a sprinkle of nuts for a lovely look. Try these tips to elevate your banana bread game! For the full recipe, check out the section above. {{image_2}} You can add chocolate chips to your banana bread for a sweet twist. I love using semi-sweet or dark chocolate. They melt and blend well with the banana flavor. Just mix in about a cup of chips when you combine the dry and wet ingredients. This way, you keep a fun balance of sweetness, so it’s not overwhelming. If you enjoy a sweeter bread, feel free to add a little extra sugar. For a healthier option, you can swap all-purpose flour for whole wheat flour. This change adds fiber and nutrients. Gluten-free flour works well too if you have dietary needs. You can also cut down on sugar. Try using just 1/3 cup of brown sugar or a sugar substitute. Your bread will still taste great! Adding mix-ins can really boost the flavor of your banana bread. Dried fruits like raisins, cranberries, or chopped dates add nice sweetness and texture. You can also add zest from citrus fruits. Lemon or orange zest brings a fresh taste to the bread. Just a teaspoon goes a long way in brightening the flavor. For the full recipe, check out the detailed steps above. To keep your banana bread fresh, store it in a cool, dry place. Use an airtight container or wrap it in plastic wrap. This helps prevent it from drying out. At room temperature, it lasts about 3 to 4 days. After that, it may lose its taste and texture. If you want to save banana bread for later, freezing is a great option. Slice the bread first, then wrap each slice tightly in plastic wrap. Place the wrapped slices in a freezer-safe bag. This way, you can take out only what you need. Banana bread can stay fresh in the freezer for up to 3 months. To reheat, remove a slice from the freezer. Let it sit at room temperature for about 15 minutes. Then, warm it in the microwave for 10 to 15 seconds. You can also toast it for a crispy edge. Check for mold or an off smell to ensure safety. If the bread feels too hard or dry, it may no longer be good. Dark spots on the bread can indicate spoilage as well. Trust your senses; when in doubt, throw it out! You want your bananas to be very ripe. Look for bananas with brown spots or ones that are almost black. The riper the banana, the sweeter your bread will be. This natural sweetness helps give your banana bread a rich flavor. Overripe bananas will also mash easily, making them perfect for mixing. Yes, you can use frozen bananas. First, take them out of the freezer and thaw them. You can do this by leaving them in the fridge overnight or placing them in a bowl of warm water for a quicker option. Once thawed, peel and mash them like fresh bananas. They work great in banana bread and help keep the bread moist. If your banana bread turns out too dense, it could be from overmixing the batter. Mix just until the dry ingredients are combined. Another cause can be using too much flour. Make sure to measure your flour accurately. If you want a lighter texture, try adding a bit of baking powder along with the baking soda. Remember, a little extra care in mixing can make a big difference in your final loaf. In this article, we explored the key elements of making delicious banana bread. You learned about traditional ingredients, optional add-ins, and adjustments for allergens. We discussed easy steps for mixing, baking, and storage. Perfect texture tips and various tasty variations were highlighted too. Lastly, I provided answers to common questions. Enjoy creating your banana bread masterpiece. Simple tweaks can make it your own. Trust these methods to bake with confidence!

Classic Banana Bread Simple and Flavorful Recipe

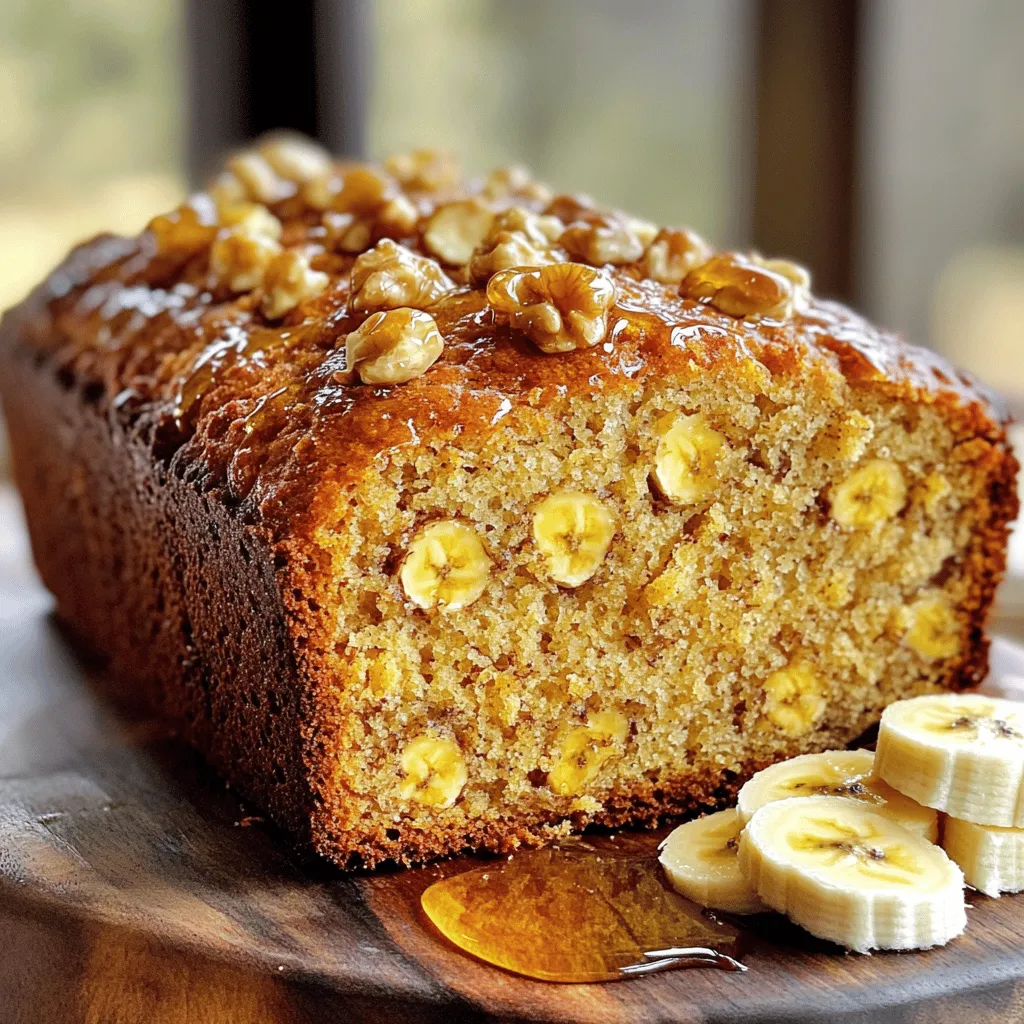
Do you want to bake the perfect banana bread? You’re in the right place! My simple and flavorful recipe will

- 2 cups cooked chicken, shredded - 1 cup black beans, drained and rinsed - 1 cup corn kernels (frozen or fresh) - 1 cup enchilada sauce (store-bought or homemade) - 8 small flour tortillas - 1 cup shredded cheese (cheddar or a Mexican blend) - 1/2 teaspoon cumin - 1/2 teaspoon chili powder - 1/4 cup fresh cilantro, chopped (plus extra for garnish) - 1/2 cup sour cream (for serving) - Salt and pepper to taste - Diced avocado - Sliced jalapeños - Green onions You can swap the shredded chicken for shredded beef or tofu. Use lentils or chickpeas instead of black beans for a plant-based option. If you want a dairy-free meal, try using vegan cheese. 1. Preheat your oven to 350°F (175°C). This ensures even cooking. 2. In a large bowl, combine the filling ingredients. Mix well to blend flavors. - 2 cups cooked chicken, shredded - 1 cup black beans, drained and rinsed - 1 cup corn kernels (frozen or fresh) - 1 cup enchilada sauce (store-bought or homemade) - 1/2 teaspoon cumin - 1/2 teaspoon chili powder - 1/4 cup fresh cilantro, chopped - Salt and pepper to taste 1. Take one tortilla and spoon about 1/4 cup of the chicken mixture into the center. 2. Roll the tortilla tightly around the filling. Place it seam-side down in a greased baking dish. Repeat with the rest of the tortillas. 3. After all the enchiladas are in the dish, pour any remaining enchilada sauce over the top. 1. Sprinkle shredded cheese evenly over the sauce. - 1 cup shredded cheese (cheddar or a Mexican blend) 2. Bake in the preheated oven for 20-25 minutes. Look for bubbly and golden cheese. 3. Remove from the oven and let cool for a few minutes. Enjoy your tasty enchiladas warm! For the complete recipe, check the Full Recipe. To make your chicken enchiladas turn out great, focus on even cooking. Ensure your oven is preheated to 350°F before baking. This helps to cook the enchiladas evenly. When you pour the sauce over the top, try to cover all areas. This keeps the tortillas from getting too dry. For a bubbly cheese topping, use shredded cheese that melts well, like cheddar or a Mexican blend. Sprinkle the cheese evenly over the enchiladas. You want every bite to have that cheesy goodness. Bake until the cheese is golden and bubbly, about 20-25 minutes. Pair your enchiladas with tasty side dishes for a full meal. Rice and beans complement them well. You can also serve a fresh salad to balance the flavors. Don't forget about sour cream! A dollop of sour cream adds creaminess. It cools the heat from the spices, making each bite delightful. You can also add salsa or guacamole for extra flavor. Watch out for overfilling your tortillas. If you stuff them too much, they can burst open while baking. Aim for about 1/4 cup of filling per tortilla. Also, don't skip the resting time after baking. Let the enchiladas cool for a few minutes before serving. This helps the flavors settle and makes them easier to serve. Enjoy your delicious meal! {{image_2}} You can switch up the protein in your enchiladas. Use beef or pork instead of chicken. Ground beef gives a hearty taste. Shredded pork adds a nice texture. For a vegetarian option, try black beans or lentils. These choices keep the dish tasty and fun. Enchiladas can shine with different sauces. You can choose red or green enchilada sauce. Red sauce has a rich flavor, while green sauce offers a zesty kick. You can make your own sauce or grab a bottle at the store. Both options work well and save time. Feel free to get creative with your enchiladas. Add more veggies like bell peppers, spinach, or zucchini. These extra ingredients add color and nutrition. You can also spice things up with jalapeños or diced onions. For garnishes, try avocado slices, fresh lime, or extra cilantro. These touches enhance your meal and make it look great. For the full recipe, check out the Easy Chicken Enchiladas section above. To keep your enchiladas fresh, store them in an airtight container. This helps prevent drying out. Place them in the fridge within two hours of cooking. They will last about three to four days. If you want to save them longer, consider freezing. Wrap each enchilada in plastic wrap. Then, place them in a freezer bag. This method helps keep them tasty for up to three months. When it’s time to enjoy your leftovers, you have two great options: the oven or microwave. For the oven, preheat it to 350°F (175°C). Place the enchiladas in a baking dish and cover them with foil. Heat for about 20 minutes. This method keeps the texture nice. For the microwave, place one enchilada on a plate. Cover it with a damp paper towel. Heat for about one to two minutes. Check to see if it's hot all the way through. In the fridge, your enchiladas will stay good for three to four days. If you freeze them, they can last up to three months. Mark the date on the bag to keep track. Enjoy your Easy Chicken Enchiladas any time with these simple storage tips. For the full recipe, check the original section. Making Easy Chicken Enchiladas is quick! It takes about 15 minutes to prep and 25 minutes to cook. In total, you can enjoy this dish in about 40 minutes. That’s fast for a tasty meal! Yes, you can make enchiladas ahead. Assemble them, then cover and store in the fridge for up to 24 hours. This saves time on busy days. Just remember to add some sauce on top before baking. This keeps them moist and delicious. To reheat chicken enchiladas, the best method is the oven. Preheat it to 350°F (175°C). Place the enchiladas in a baking dish. Cover with foil to keep them from drying out. Heat for about 15-20 minutes. You can also use the microwave, but this may not keep them as crispy. In this blog post, I shared how to make easy chicken enchiladas from scratch. We covered the necessary ingredients, clear steps for cooking, and tips to avoid common mistakes. Remember, you can mix things up with different proteins and sauces. Enjoy your meal with fun garnishes and tasty sides. Whether it's a weeknight dinner or a special occasion, homemade enchiladas make it special. Start cooking and have fun in the kitchen!

Easy Chicken Enchiladas Quick and Tasty Recipe

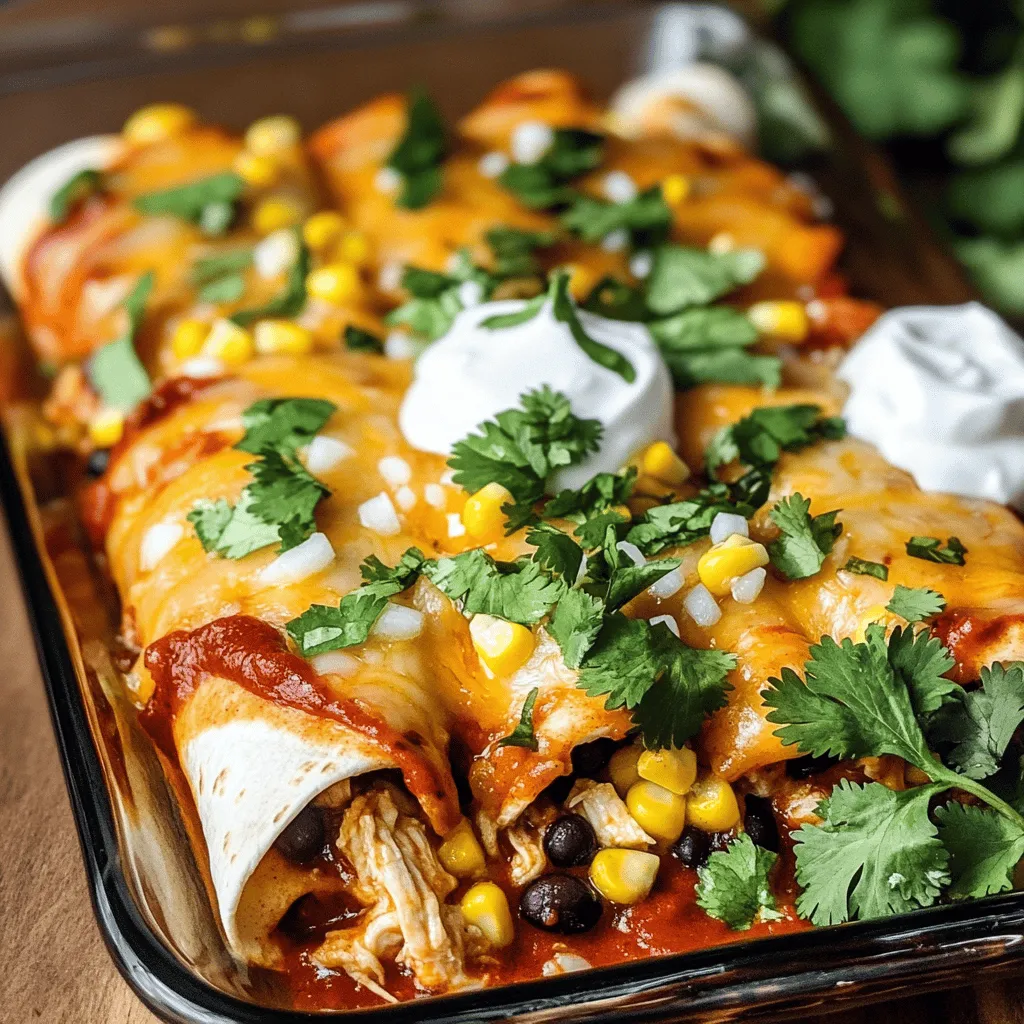
Are you ready to spice up your dinner routine? I’ve got a quick and tasty recipe for Easy Chicken Enchiladas

Older posts
Newer posts
← Previous Page1 … Page70 Page71 Page72 … Page126 Next →

dsad

© 2025 Southern Dishes • Built with GeneratePress

Our Policies

  • Copyright Policy
  • Cookie Policy
  • GDPR Policy
  • Privacy Policy
  • Disclaimer
  • Terms Of Use

More Information

  • Home
  • About
  • Contact
  • Appetizers
  • Dessert
  • Dinner
  • Drinks
©2025, Southern Dishes About Back To Top