Skip to content
DisclaimerTerms Of UseGDPR PolicyCookie Policy

Southern Dishes

  • Home
  • Drinks
  • Appetizers
  • Dinner
  • Dessert
  • About
  • Contact
  • Privacy Policy
DisclaimerTerms Of UseGDPR PolicyCookie Policy

Isabella

For a great Peach Caprese Salad, you need fresh, tasty ingredients. Here’s what you’ll need: - 2 ripe peaches, sliced - 8 oz fresh mozzarella, sliced - 1 cup fresh basil leaves Using ripe peaches is key. They should feel soft but not mushy. The mozzarella should be fresh and creamy. Look for a good-quality brand for the best taste. Fresh basil adds a sweet aroma and bright flavor. You also need some simple seasonings to make the flavors pop. Here are the essentials: - 2 tablespoons balsamic glaze - 1 tablespoon olive oil - Salt and pepper to taste Balsamic glaze brings a tangy sweetness that pairs well with peaches. Olive oil adds richness. Salt and pepper balance the flavors perfectly. You can choose different types of balsamic glaze. Here are a few ideas: - Traditional balsamic for a classic taste - Fig balsamic for a fruity twist - Honey balsamic for extra sweetness Each type of glaze can change the flavor profile of your salad. Try them out to find your favorite! For the full recipe, refer to the section above. Start by washing the peaches. Use cold water to rinse them well. After that, slice the peaches into even wedges. This will show off their juicy insides. Next, grab the fresh mozzarella. Slice it into rounds that match the size of the peach slices. This helps the salad look great and taste good. Now, let’s build the salad. Take a large serving platter. Start layering the peach and mozzarella slices in an alternating pattern. You can create a circular shape for a pretty look. Next, tuck fresh basil leaves between the peach and mozzarella slices. This adds a fresh taste and a nice pop of green. For the final touches, drizzle olive oil over the whole salad. It adds richness and flavor. Then, drizzle balsamic glaze on top. This gives the dish a sweet and tangy kick. Don’t forget to season with salt and freshly cracked pepper. This enhances all the flavors. Serve the salad right away for the best taste. If you want, you can chill it for about 10 minutes. This melds the flavors nicely. Check out the Full Recipe for more details on this delightful dish. To make a great Peach Caprese Salad, start with ripe peaches. Look for peaches that feel soft but not mushy. They should smell sweet and fruity. When it comes to mozzarella, choose fresh mozzarella. It should feel slightly springy and moist. If possible, buy it from a local market. This gives you the freshest flavor. To make your salad even better, add a sprinkle of fresh herbs. Chives or mint can add a nice twist. You can also try adding a pinch of red pepper flakes for some heat. If you want a sweet touch, drizzle honey over the top. This balances the tangy balsamic glaze. Experiment with flavors that you enjoy. Presentation makes a dish more appealing. Arrange peach and mozzarella slices in a circle. This creates a beautiful pattern. You can use a large white plate for contrast. Add fresh basil leaves in between the layers for color. Drizzle the olive oil and balsamic glaze just before serving. This keeps the colors bright and fresh. For a fun touch, serve with small forks or skewers. It makes for easy eating! Check out the Full Recipe for detailed instructions and tips! {{image_2}} You can swap out the peaches for other fruits. Try ripe nectarines or juicy plums. They add a sweet and tart flair. You can also use burrata cheese instead of mozzarella. Burrata gives a creamier texture and rich taste. For a touch of spice, add some thinly sliced jalapeños. This twist brings heat and depth to the dish. Seasonal ingredients can change your salad's flavor. In summer, use fresh berries along with peaches. Strawberries or blueberries brighten up the dish. In fall, consider adding roasted butternut squash. It adds warmth and earthiness. You can also sprinkle in pomegranate seeds in winter for color and crunch. Adjusting ingredients based on seasons keeps the salad fresh. You can easily make this salad vegan. Just skip the mozzarella and use marinated tofu instead. It adds protein and flavor. For a gluten-free option, enjoy this salad as is. All the ingredients are naturally gluten-free. If you want more crunch, add nuts like walnuts or pecans. These options keep the salad tasty and healthy. Want more ideas or the full recipe? Check out the Full Recipe! Store any leftover Peach Caprese Salad in an airtight container. This keeps the salad fresh and safe. I recommend using glass containers, as they do not hold odors. Keep the salad in the fridge for up to two days. After that, the peaches may get mushy. To keep the salad fresh, layer ingredients with care. Place basil leaves on top. This helps keep moisture away from the peaches and cheese. If storing for a short time, add the balsamic glaze just before serving. This will maintain the salad's bright look and flavor. You do not need to reheat this salad. Peach Caprese is best served cold, straight from the fridge. If you prefer a warm dish, consider making a warm peach salad instead. For that, grill or roast the peaches and serve with cheese and basil. For the full recipe, refer to the instructions provided above. The best time to make Peach Caprese Salad is in summer. That’s when peaches are at their sweetest. You want ripe, juicy peaches for the best flavor. This salad also shines at picnics or barbecues. The fresh flavors make it perfect for warm days. Yes, you can add other fruits! Try using strawberries, nectarines, or even berries. These fruits pair well with mozzarella and basil. They add different tastes and colors. Feel free to mix and match based on what you like. The salad lasts about two days in the fridge. However, it’s best fresh. The peaches can get mushy over time. Keep it in a covered container to save space and flavor. If you want to enjoy it longer, store the ingredients separately. You can prep some parts ahead of time. Slice the peaches and mozzarella earlier in the day. However, I recommend assembling it right before serving. This keeps the salad fresh and colorful. You want to enjoy the best taste possible! For the full recipe, check out the earlier section. In this blog post, we explored how to make a delicious Peach Caprese Salad. We covered fresh ingredients, essential seasoning, and tasty balsamic glaze options. You learned step-by-step instructions for preparing peaches and mozzarella, along with fun assembly tips. We shared tricks for picking the best ingredients, enhancing flavors, and creative presentation ideas. You discovered variations for different seasons and dietary needs, plus smart storage tips for leftovers. Enjoying this salad can brighten any meal. Give it a try for a fresh twist!

Peach Caprese Salad Fresh and Flavorful Delight

If you’re looking for a fresh and vibrant dish, you’ll love Peach Caprese Salad. This simple salad combines juicy peaches

- 4 salmon fillets (about 6 oz each) - 2 tablespoons olive oil - Zest and juice of 1 lemon - 3 cloves garlic, minced - 1 teaspoon fresh dill, chopped - 1 teaspoon fresh parsley, chopped - 1 teaspoon fresh thyme, chopped - Salt and pepper to taste - Lemon wedges - Fresh herbs for garnish When choosing salmon, look for bright color and firm texture. Fresh salmon makes a big difference. The olive oil adds richness, while lemon brightens the dish. The zest gives a strong, fresh lemon flavor. For herbs, fresh is best. They enhance the salmon’s taste. Garlic adds depth and aroma. Dill, parsley, and thyme complement the fish perfectly. Finally, garnish your dish with lemon wedges and extra herbs. This adds beauty and fresh flavor. You can find the full recipe for Lemon Herb Grilled Salmon [here](#). - First, prepare the marinade. In a small bowl, whisk together: - 2 tablespoons olive oil - Zest and juice of 1 lemon - 3 cloves garlic, minced - 1 teaspoon fresh dill, chopped - 1 teaspoon fresh parsley, chopped - 1 teaspoon fresh thyme, chopped - Salt and pepper to taste This mix adds a bright flavor to the fish. - Next, coat the salmon fillets in the marinade. Make sure to cover them well. Place the fillets in a shallow dish and pour the marinade over them. Cover the dish and refrigerate for at least 30 minutes. For more flavor, you can marinate them for up to 2 hours. - Now, it's time to preheat the grill. Set it to medium-high heat. This helps the salmon cook evenly. - Oil the grill grates to prevent sticking. You can use a paper towel soaked in oil or a grill spray. This step is key to keeping the salmon intact while grilling. - Once the grill is hot, carefully place the salmon fillets on the grill, skin-side down. This helps protect the fish while it cooks. - Grill the salmon for about 6 to 8 minutes. The cooking time depends on the thickness of the fillets. Check for doneness: the salmon should be opaque and flake easily with a fork. - Flip the salmon halfway through cooking for nice grill marks. This also ensures even cooking. - After grilling, remove the salmon from the grill. Let it rest for a couple of minutes. Resting allows the juices to settle, making the salmon more tender. Feel free to check out the Full Recipe for more details! Grilling salmon can be fun and simple. Here are some tips to make it perfect. - Ideal grill temperature: Set your grill to medium-high heat. This gives you nice grill marks and helps the salmon cook evenly. Aim for about 375°F to 400°F. - Timing for varying thicknesses: The cook time depends on how thick your salmon is. For fillets that are about one inch thick, grill for 6-8 minutes. Thicker fillets will need more time, around 10-12 minutes. Always check if the salmon flakes easily with a fork. To make your grilled salmon even better, try these ideas. - Adding other herbs or spices: You can mix in herbs like basil or cilantro for a twist. A pinch of paprika can also add a smoky taste. Experiment with what you like! - Suggestions for citrus variations: Lemon is great, but don’t stop there! Try lime or orange juice for a fresh flavor. Citrus adds brightness and pairs well with the fish. If grilling isn't an option, you can still enjoy this dish. - Oven-baking instructions: Preheat your oven to 400°F. Place the salmon on a lined baking sheet. Bake for about 12-15 minutes, or until it is cooked through and flakes easily. - Stovetop options: Heat a non-stick skillet over medium heat. Add a bit of oil and cook the salmon for about 4-5 minutes on each side. This method gives a nice sear and keeps the salmon moist. For the full recipe, check out the instructions above and enjoy! {{image_2}} You can change the flavor of your salmon with different marinades. One fun option is honey mustard. To make this, mix honey, Dijon mustard, and olive oil. This blend adds a sweet tang that pairs well with the fish. Another great choice is a spicy chipotle version. Just add chipotle in adobo sauce to your olive oil and lemon juice. This will give your salmon a nice kick. Both of these marinades are easy to prepare and will excite your taste buds. If you want to switch up the fish, you have many options. Try using trout or mackerel instead of salmon. Both have rich flavors and grill well. They can absorb the lemon herb marinade nicely, too. For a vegetarian option, consider using portobello mushrooms. Their meaty texture makes them a great stand-in for fish. Marinate them just like the salmon and grill until tender. You will enjoy the smoky, herb-infused flavor. Pair your grilled salmon with tasty side dishes. Roasted vegetables or a fresh salad work well. You can also serve it with rice or quinoa for a heartier meal. These sides will complement the bright flavors of the salmon. When it comes to drinks, consider a crisp white wine, like Sauvignon Blanc. Its acidity balances the richness of the salmon. For a non-alcoholic option, serve sparkling water with lemon. This keeps the meal refreshing and light. For the full recipe, check out the [Full Recipe]. To store leftover salmon, place it in a shallow dish. Cover it tightly with plastic wrap or foil. You can also use an airtight container for better freshness. Make sure to refrigerate the salmon within two hours of cooking. This keeps it safe and tasty. Leftover salmon lasts in the fridge for up to three days. You can freeze salmon both before and after cooking. If you freeze it raw, wrap each fillet in plastic wrap. Then, place them in a freezer bag. Be sure to remove as much air as possible. Frozen raw salmon can last up to three months. If you freeze cooked salmon, let it cool first. Wrap it tightly in foil or plastic wrap. Place it in a freezer-safe bag. Cooked salmon also stays good for about three months. When you're ready to eat frozen salmon, thaw it in the fridge overnight. This helps keep the texture nice and smooth. For quicker thawing, you can use cold water. Just put the salmon in a sealed bag and submerge it in cold water for an hour. To reheat grilled salmon, you have a few good options. You can use the oven, stovetop, or microwave. If using the oven, preheat it to 275°F (135°C). Place the salmon on a baking sheet. Cover it with foil to avoid drying out. Heat for about 15 minutes, or until warmed through. If you prefer the stovetop, use a skillet over low heat. Add a splash of water or broth to keep it moist. Heat for about 5 minutes, flipping halfway through. For the microwave, place the salmon on a microwave-safe plate. Cover it with a damp paper towel. Heat in short bursts of 30 seconds to avoid overcooking. No matter how you reheat, check for dryness. Keeping it moist is key to enjoying your leftover salmon. I recommend marinating the salmon for at least 30 minutes. This time allows the flavors to soak in. You can marinate it for up to 2 hours if you want a stronger taste. Just don't go over 2 hours, as the acid from the lemon can make the fish mushy. Grilled salmon should reach an internal temperature of 145°F. This ensures the fish is safe to eat and still moist. You can use a meat thermometer to check the temperature. When it flakes easily with a fork, it is likely ready. Yes, you can use frozen salmon. However, it is best to thaw it before grilling. Cooking frozen salmon directly can lead to uneven cooking. To thaw, place it in the refrigerator overnight. If you are short on time, you can run it under cold water for about 30 minutes. Make sure to pat it dry before marinating and grilling. You now know how to grill salmon perfectly. We covered key ingredients, marinade tips, and cooking methods. I shared ways to elevate your salmon's flavor and explore variations. You learned proper storage to keep leftovers tasty. With these steps, you can enjoy delicious grilled salmon any time. Enjoy experimenting with new flavors and techniques. Happy cooking!

Lemon Herb Grilled Salmon Flavorful and Simple Recipe

If you’re looking for a quick, tasty meal, you’ve found it! This Lemon Herb Grilled Salmon recipe is simple yet

To create delicious stuffed zucchini boats, gather these fresh ingredients: - 4 medium zucchinis - 1 cup quinoa, rinsed - 2 cups vegetable broth - 1 cup cherry tomatoes, halved - 1/2 cup black olives, sliced - 1/2 cup feta cheese, crumbled - 1/4 cup fresh basil, chopped - 1 teaspoon dried oregano - 2 tablespoons olive oil - Salt and pepper to taste - 1/2 cup mozzarella cheese, shredded These ingredients come together to make a balanced meal. The quinoa adds protein, while the zucchini serves as a low-carb base. The combination of feta, olives, and basil brings a burst of Mediterranean flavor. For the full recipe, refer to Cheesy Mediterranean Stuffed Zucchini Boats. Each bite will surely delight your palate! How to prepare zucchini To start, grab your zucchinis. Slice them in half lengthwise. Use a spoon to scoop out the center flesh. Leave about a 1/4-inch thick shell. Set the scooped-out flesh aside for later. This will make your zucchini boats ready for stuffing. Cooking the quinoa Next, boil 2 cups of vegetable broth in a medium saucepan. Add 1 cup of rinsed quinoa. Reduce the heat and cover it. Let it simmer for about 15 minutes. The quinoa will become fluffy and absorb all the liquid. Once it's done, take it off the heat and set it aside. Sautéing the filling mixture Now, heat 2 tablespoons of olive oil in a skillet over medium heat. Add the reserved zucchini flesh, 1 cup of halved cherry tomatoes, and 1/2 cup of sliced black olives. Sauté this mix for about 5 to 7 minutes. You want the mixture to soften and blend together nicely. Stuffing the zucchini boats In a large bowl, combine the cooked quinoa, sautéed mixture, 1/2 cup of crumbled feta cheese, 1/4 cup of chopped basil, 1 teaspoon of dried oregano, salt, and pepper. Mix everything well. Generously stuff each zucchini half with this tasty filling. Press it down lightly to pack it in. Baking instructions Preheat your oven to 375°F (190°C) and line a baking dish with parchment paper. Place the stuffed zucchini in the dish. Sprinkle 1/2 cup of shredded mozzarella cheese on top of each boat. Tips for checking doneness Bake in the oven for 25 to 30 minutes. The zucchini should be tender, and the cheese should be bubbly and golden brown. To check, use a fork to poke the zucchini. If it goes in easily, they are ready. Let them cool for a few minutes before serving. Enjoy your healthy meal! For the full recipe, see above. To get the perfect texture when cooking zucchini, choose fresh and firm zucchinis. Cut them evenly to ensure they cook at the same rate. When you scoop out the center, leave a little flesh for flavor. This helps the zucchini stay strong while baking. To prevent sogginess, avoid overcooking your zucchini. Bake them just until they are tender. You can also sprinkle them with salt before baking. This draws out extra moisture so they stay firm. For tasty seasonings, try garlic powder, paprika, or even a pinch of cayenne. These spices add depth without overpowering the dish. You can also toss in fresh herbs like parsley or thyme for freshness. If you want to change up the cheese, consider using goat cheese for a tangy flavor, or even vegan cheese for a plant-based twist. Each cheese brings its own charm, so feel free to mix and match based on your taste. For the full recipe, check out Cheesy Mediterranean Stuffed Zucchini Boats. {{image_2}} You can change the filling in stuffed zucchini boats to fit your taste. For meat lovers, ground turkey or beef works great. Simply brown the meat before mixing it with the other filling ingredients. You can also use cooked chicken for a lighter option. For those who prefer plant-based meals, try lentils or black beans. Both add protein and are full of flavor. You can also use cooked rice or farro for a hearty filling. If you're vegan, skip the cheese or use a plant-based cheese alternative. Want to add some heat? Chop up jalapeños or add crushed red pepper to your filling. This gives your dish a nice kick. For milder flavors, add sweet bell peppers or fresh herbs like parsley or cilantro. Spices can also enhance your dish. Try adding cumin, smoked paprika, or garlic powder for depth. Fresh herbs like thyme or rosemary bring a unique taste. The beauty of stuffed zucchini boats is their versatility, so feel free to get creative! For the full recipe, check out the Cheesy Mediterranean Stuffed Zucchini Boats. To keep your stuffed zucchini boats fresh, place them in a sealed container. You can store them in the refrigerator for up to three days. Make sure they cool to room temperature before sealing. If you have more zucchini boats than you can eat, freezing is a great option. Wrap each boat in plastic wrap and place them in a freezer bag. They can last up to three months in the freezer. When it comes to reheating, I suggest using the oven. Preheat your oven to 350°F (175°C). Place the stuffed zucchini boats in a baking dish and cover with foil. Heat for about 15 minutes or until warmed through. This method keeps the zucchini tender and the filling moist. You can also use the microwave for quick reheating. Place them on a microwave-safe plate and cover. Heat in short bursts of one minute until hot. Just be careful, as the microwave may make the zucchini a bit soggy. Can I make stuffed zucchini boats in advance? Yes, you can! Prepare the zucchini and filling ahead of time. Stuff the zucchini just before baking. This helps keep them fresh and tasty. You can also freeze the stuffed zucchini before baking. Just thaw before cooking. What other vegetables can I use? You can use bell peppers, eggplants, or mushrooms. These veggies add great flavor and texture. Mix and match based on what you like. Just remember to adjust cooking times if needed. Are there gluten-free options for this recipe? Absolutely! Quinoa is naturally gluten-free. Use it as your base. Make sure to check your vegetable broth for gluten-free labels. This way, everyone can enjoy the dish with no worries! Caloric content and macros per serving Each serving has about 300 calories. It contains 10 grams of protein and 15 grams of fat. You also get 35 grams of carbs, making it a balanced meal. Health benefits of the main ingredients Zucchini is low in calories and high in water. This keeps you hydrated. Quinoa is a complete protein, full of fiber. Cherry tomatoes provide vitamins A and C. Feta cheese adds calcium and flavor. All these ingredients work together to nourish your body! Stuffed zucchini boats offer a tasty and healthy dish. We covered the ingredients, from fresh zucchinis to flavorful quinoa. You learned how to prepare, stuff, and bake them. Plus, I shared tips to avoid sogginess and enhance flavor. Exploring variations keeps this dish exciting for everyone, regardless of dietary needs. Remember, you can store leftovers and enjoy them later. With these steps, you can create a delicious meal that's sure to please. Happy cooking!

Stuffed Zucchini Boats Healthy and Quick Meal Idea

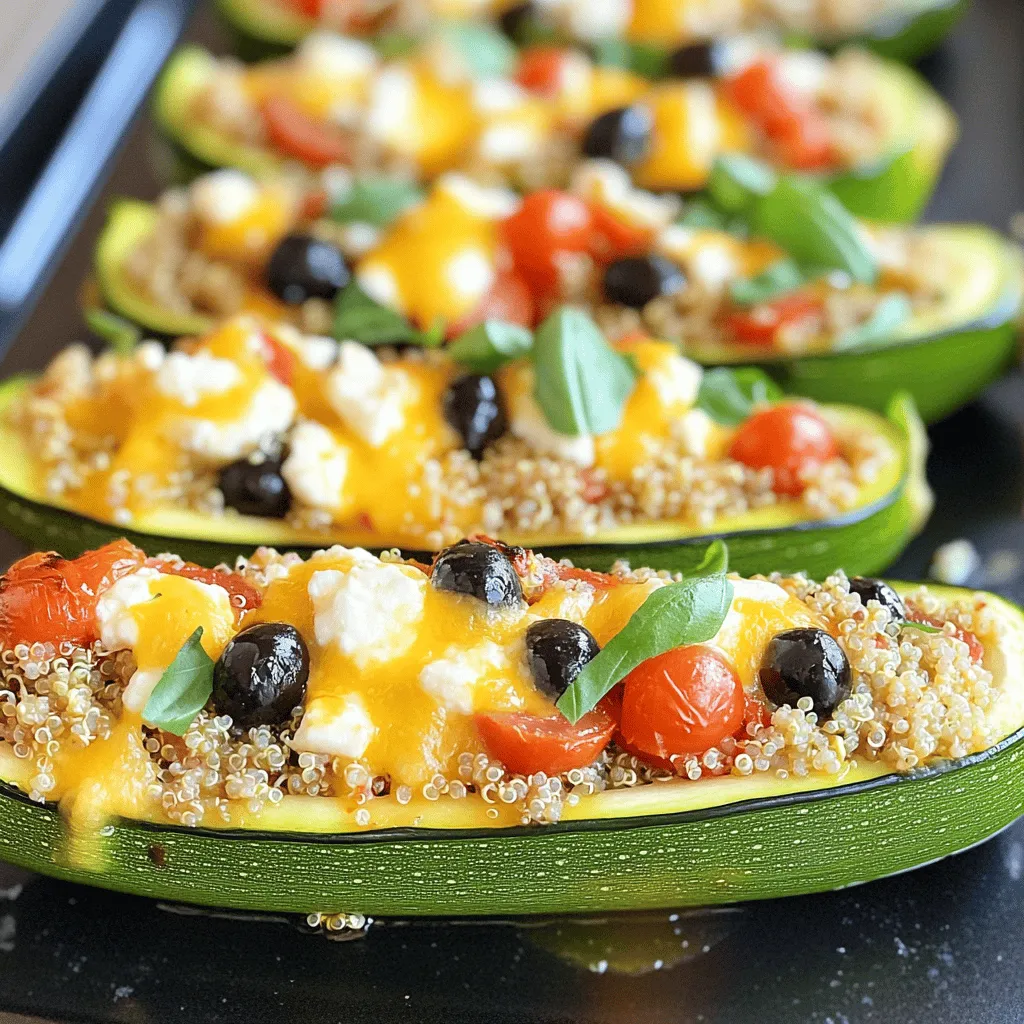
Looking for a tasty and healthy meal that’s quick to make? Stuffed zucchini boats are your answer! These vibrant, veggie-filled

- 4 ripe peaches, pitted and sliced - 1 cup fresh lemon juice (about 4-6 lemons) - 1/2 cup granulated sugar (adjust to taste) - 4 cups cold water - 1/2 cup fresh mint leaves, plus extra for garnish To make Beach Peach Lemonade, start with ripe peaches. They should be sweet and juicy. Fresh lemons give the drink its bright, zesty flavor. Granulated sugar balances the tartness of the lemons. You can adjust the sugar to your taste. Fresh mint leaves add a refreshing touch, and you'll want extra for garnish. - Blender - Fine mesh sieve - Pitcher For this recipe, you need a blender to puree the peaches. A fine mesh sieve helps strain the puree. This step removes any solids, giving you a smooth drink. Finally, a pitcher holds your mixed lemonade. - Ice cubes - Lemon slices - Extra mint leaves To serve, use ice cubes to keep your lemonade cool. Lemon slices add a nice visual touch. Extra mint leaves are a fun garnish and enhance the flavor. {{ingredient_image_1}} First, gather your ripe peaches. You need four of them, pitted and sliced. Place the sliced peaches in a blender with one cup of cold water. Blend until the mixture is smooth and frothy. This makes a delicious peach puree. Next, strain the peach puree through a fine mesh sieve into a large pitcher. This step removes the solids, leaving you with a smooth juice. You want to keep only the liquid for your lemonade. Now, it’s time to mix in the flavors. Add one cup of fresh lemon juice to the pitcher. This is about four to six lemons, depending on their size and juiciness. Then, add half a cup of granulated sugar. Stir well until the sugar fully dissolves into the juice. Next, pour in the remaining three cups of cold water. Mix everything together until it is fully combined. You can taste the lemonade now. If it’s not sweet enough, add more sugar until you reach your desired sweetness. To give your drink a fresh flavor, add half a cup of fresh mint leaves to the pitcher. Use a spoon to lightly muddle the mint. This step helps release the mint’s aroma and taste. Finally, chill the lemonade in the refrigerator for at least thirty minutes. This makes the drink refreshing and cool. When you’re ready to serve, pour the Beach Peach Lemonade over ice cubes in glasses. Garnish with lemon slices and a sprig of mint for a lovely touch. Enjoy your summer drink! You can change the sugar level in your Beach Peach Lemonade easily. If you want it sweeter, just add more sugar. Start with a little. Taste it, then add more if needed. If you want a healthier option, try these alternatives: - Honey - Agave syrup - Maple syrup These can give a nice flavor twist. To get a smooth drink, blending is key. When you blend the peaches, make sure to add enough water. This helps the blender work better. Blend until you see no chunks. After that, strain the mixture using a fine mesh sieve. This will catch any solids. Push the puree through with a spoon for the best results. Serving this drink is fun and easy. Use tall glasses filled with ice. Pour the lemonade over the ice. For a pretty touch, add a lemon slice and a mint sprig on top. Pair it with light snacks like: - Chips and salsa - Fresh fruit - Light salads These snacks will complement the lemonade's flavor nicely. Pro Tips Choose the Right Peaches: Use ripe, juicy peaches for the best flavor. Look for ones that are fragrant and slightly soft to the touch. Adjust Sweetness: Taste your lemonade before serving and adjust the sugar to your liking. You can also use honey or agave syrup as a natural alternative. Chill Thoroughly: Allow the lemonade to chill for at least 30 minutes to enhance the flavors. For quicker chilling, you can place the pitcher in an ice bath. Garnish Creatively: Elevate your presentation with lemon slices and fresh mint leaves. You can also add a few peach slices for a vibrant touch. {{image_2}} You can make your Beach Peach Lemonade fizzy. Just add sparkling water or soda. This addition creates a fun, bubbly drink. Mix in about two cups of sparkling water right before serving. The fizz adds excitement and helps cool you down. Want a grown-up twist? Infuse your lemonade with vodka or rum. Start with one cup of your favorite spirit. Stir it in after mixing the lemonade. This option is perfect for summer parties. It pairs well with the peach and lemon flavors. You can switch up the fruits in your lemonade too. Try using strawberries or blueberries for a twist. Blend them just like the peaches. Use one cup of any fruit puree you choose. This gives your drink a new taste and color, making it even more fun! To keep your Beach Peach Lemonade fresh, store it in the fridge. Use a sealed pitcher or jar. This prevents any odors from mixing in. Make sure to drink it within three days for the best taste. Beach Peach Lemonade stays fresh for about three days in the fridge. After that, the flavors may fade. The mint can lose its bright taste too. If you notice any off smells, it’s best to toss it out. You can make peach ice cubes for a fun twist. Simply blend ripe peaches with a little water. Pour the puree into ice cube trays and freeze. These cubes add flavor to your drinks as they melt. Plus, they look great in your lemonade! Yes, you can use canned peaches. They save time and are easy to find. However, they may change the taste and texture. Canned peaches are softer and sweeter. You might need less sugar. Always choose peaches in juice, not syrup. This keeps the flavor fresh and light. If you don’t have fresh lemons, use bottled lemon juice. It works well but may taste different. Try to pick a brand with no added sugar or preservatives. This way, the lemonade stays bright and zesty. You can also use lime juice for a fun twist. Yes, Beach Peach Lemonade is vegan-friendly. All the ingredients are plant-based. The peaches, lemons, sugar, and mint leaves come from nature. This drink is perfect for everyone, whether you follow a vegan diet or not. Enjoy this tasty treat on a sunny day! This blog post covered how to make a refreshing Beach Peach Lemonade. We explored the fresh ingredients needed, equipment required, and helpful tips for adjusting sweetness. I shared step-by-step instructions for preparing the peach puree and mixing it with lemon juice. You can also try fun variations, like adding sparkling water. Storing leftovers was discussed, ensuring you enjoy this drink longer. Enjoy your homemade lemonade and impress friends with your tasty creation!

Beach Peach Lemonade Refreshing Summer Drink Recipe

Looking for the perfect summer drink to cool you down? Look no further than Beach Peach Lemonade! This refreshing beverage

To make a tasty Peanut Butter Banana Smoothie, gather these simple ingredients: - 2 ripe bananas, frozen - 2 tablespoons natural peanut butter - 1 cup unsweetened almond milk (or milk of choice) - 1 tablespoon honey or maple syrup (optional for sweetness) - 1/2 teaspoon vanilla extract - 1/4 teaspoon cinnamon - 1 tablespoon chia seeds (optional for added nutrition) - Ice cubes (if needed for thickness) These ingredients blend to create a rich and creamy smoothie. The frozen bananas give it a smooth texture. Natural peanut butter adds a nutty flavor and healthy fats. Almond milk keeps it light, while honey or maple syrup sweetens it up. Vanilla and cinnamon round out the taste with warmth. Chia seeds are a great way to add fiber and omega-3s. If you like it thicker, ice cubes can help. You can find the full recipe in the section above, which shows you how to make this delightful drink step-by-step. Enjoy the blend of flavors and nutrition with every sip! - Prepare Ingredients: Start by peeling the frozen bananas. Break them into chunks. This makes blending easier and quicker. - Add Ingredients to Blender: In your blender, combine the banana chunks with peanut butter, almond milk, honey or maple syrup, vanilla extract, cinnamon, and chia seeds. This mix brings a great flavor. - Blend Until Smooth: Blend the mixture on high speed. Keep blending until it is creamy and smooth. If it feels too thick, add a bit more almond milk to make it easier to pour. - Adjust Sweetness: After blending, taste your smoothie. If you want it sweeter, add more honey or maple syrup. Blend again for a few seconds to mix it in well. - Pour and Serve: Pour your smoothie into tall glasses. For a fun touch, sprinkle some cinnamon or drizzle peanut butter on top. This makes it look even more appealing. Enjoy your smoothie with a straw for a delightful sipping experience. To create the best peanut butter banana smoothie, you want a creamy texture. Here are some tips for blending: - Use frozen bananas. They add thickness and chill to the smoothie. - Start with liquids first. Pour the almond milk into the blender first. This helps the blades move smoothly. - Add ingredients in layers. Place heavier items like peanut butter on top of the lighter items. This method prevents clumping. Chia seeds are a great option to consider. They add fiber and omega-3s. Plus, they thicken the smoothie a bit, giving it a nice texture. Want to boost the flavor? Here are some fun ideas: - Add a pinch of nutmeg or ginger. These spices can bring warmth and depth to your smoothie. - Try a scoop of cocoa powder. This will give a chocolatey twist that pairs well with peanut butter. - Include a splash of coffee. It gives a nice kick and enhances the flavor profile. For presentation, serve your smoothie in tall glasses. You can garnish with sliced banana on top. A sprinkle of crushed nuts adds a lovely crunch. Enjoy it with a straw for a fun touch. For the full recipe, check out the creamy dreamy peanut butter banana smoothie! {{image_2}} Add Greens: Adding spinach or kale can boost nutrition. These greens blend well and add vitamins without changing the taste much. Spinach is mild, while kale gives a slight earthy note. You can start with a small handful and blend it in. This helps you sneak in extra nutrients, especially if you want a healthy kick. Protein Boost: If you want more protein, you can add protein powder or Greek yogurt. Both options add creaminess. They help keep you full longer, too. A scoop of protein powder mixes well without altering the flavor. Greek yogurt thickens the smoothie and adds a tangy taste. Choose plain yogurt to avoid extra sugar. Different Nut Butters: You can swap peanut butter for almond butter or cashew butter. Almond butter offers a nutty flavor and is slightly sweeter. Cashew butter is creamier and has a milder taste. Each option gives a unique twist to your smoothie. Feel free to experiment to find your favorite nut butter. Fruit Mix-ins: You can add other fruits for fun flavors. Try berries like strawberries or blueberries for a burst of color and taste. Mango adds a tropical flair, while apples give a crisp touch. Use what you have on hand or what you love most. Mixing fruits can change the whole vibe of your smoothie! For the complete recipe, don’t forget to check out the Full Recipe. To store your peanut butter banana smoothie, pour it into an airtight container. Seal it tightly to keep it fresh. The smoothie stays good in the fridge for up to 24 hours. When you’re ready to drink, shake or stir it well. It may separate a bit, but that’s normal. If it thickens, add a splash of almond milk to loosen it up. If you want to save your smoothie for later, freezing is a great option. Pour the smoothie into ice cube trays or freezer-safe bags. If using bags, squeeze out air before sealing. The smoothie can last up to three months frozen. To enjoy, thaw the cubes in the fridge overnight or blend them with a little almond milk for a quick drink. This method keeps the flavors fresh and delicious! For the full recipe, refer to the Creamy Dreamy Peanut Butter Banana Smoothie. How to make a Peanut Butter Banana Smoothie thicker? To make your smoothie thicker, add ice cubes or extra frozen bananas. Both options help create a creamy texture. If you want a richer taste, try adding more peanut butter. Can I use fresh bananas instead of frozen? Yes, you can use fresh bananas. However, the texture will be different. Fresh bananas make a thinner smoothie. If you want to chill it, add ice cubes to compensate. Is this smoothie suitable for kids? Absolutely! This smoothie is great for kids. It has natural sweetness and healthy fats. Plus, it’s easy to drink and fun to enjoy. How can I make this smoothie vegan? To make it vegan, use a plant-based milk like almond or oat milk. Also, replace honey with maple syrup or agave syrup for sweetness. Caloric Content: This smoothie has about 300 calories per serving. Here’s a quick breakdown: - Bananas: ~210 calories - Peanut butter: ~190 calories - Almond milk: ~30 calories - Optional honey: ~60 calories Health Benefits: This smoothie offers many health perks: - Bananas provide potassium and fiber. - Peanut butter adds protein and healthy fats. - Almond milk is low in calories and dairy-free. - Chia seeds boost nutrition with omega-3s and fiber if you add them. For the full recipe, check out the Creamy Dreamy Peanut Butter Banana Smoothie. This blog post has covered a simple and tasty peanut butter banana smoothie recipe. We discussed the ingredients needed, step-by-step instructions, and helpful tips for a perfect blend. You also learned about nutrient variations and how to store leftovers. Enjoying this smoothie adds great nutrition to your day. Feel free to experiment with flavors and ingredients. Your smoothie journey can improve both health and taste. So, grab your blender and start creating delicious drinks for yourself and your family!

Peanut Butter Banana Smoothie Packed with Flavor

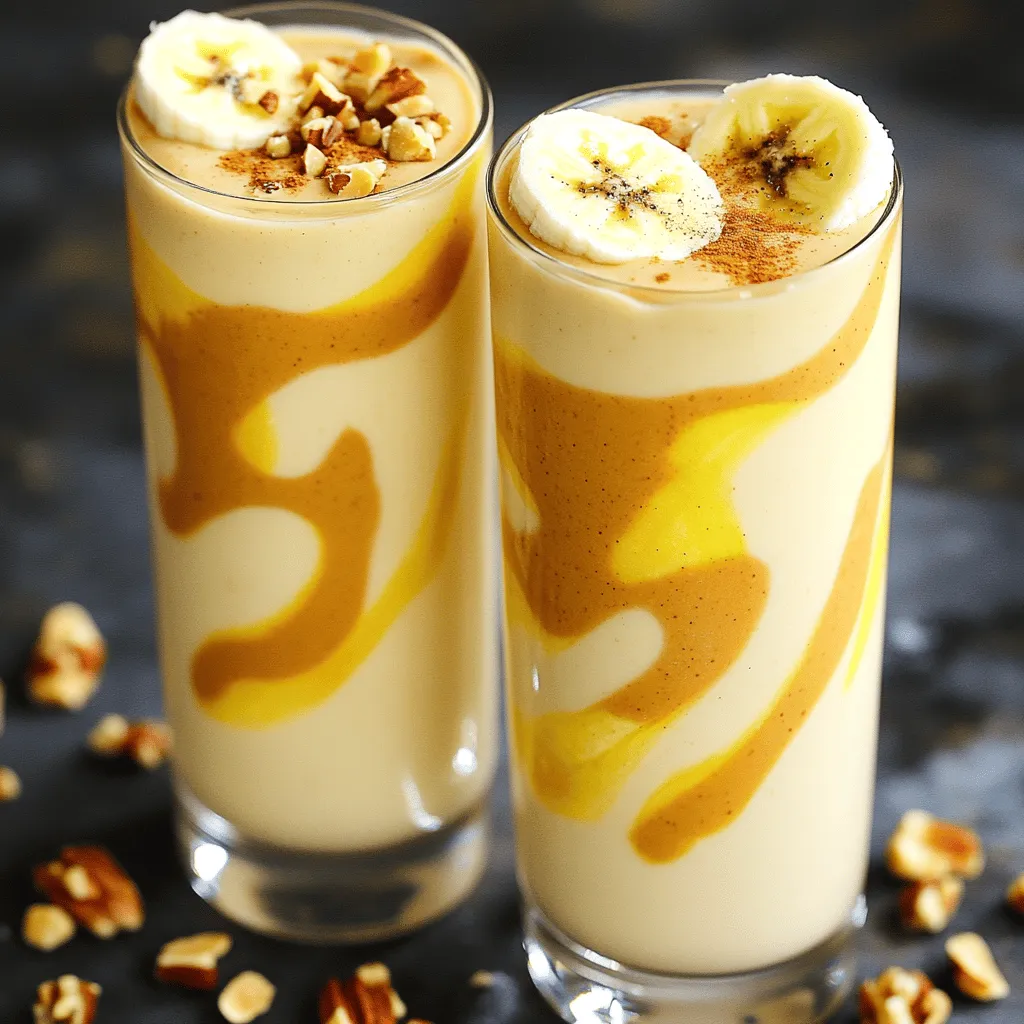
Looking for a quick, tasty treat? This Peanut Butter Banana Smoothie is packed with flavor and healthy goodness. You’ll love

To make chocolate dipped strawberries, start with fresh strawberries. You want them ripe, juicy, and firm. Look for berries that have bright red color and green leaves. This recipe uses 1 pound of strawberries, which is about 20 to 25 berries. Make sure to wash them gently and pat them dry. If they are wet, the chocolate won’t stick well. For the coating, dark chocolate is the best choice. Use at least 70% cocoa for a rich flavor. You need 8 ounces of chocolate for this recipe. If you want a smoother texture, add 2 tablespoons of coconut oil. This will help the chocolate melt nicely and give a lovely shine. You can also use milk chocolate or white chocolate if you prefer a sweeter taste. To make your strawberries even more special, you can add some fun toppings! Consider using sea salt for a salty-sweet treat. Crushed dry rose petals can add a unique floral note. You can also sprinkle on chopped nuts, colorful sprinkles, or toasted coconut flakes. These extras can make your chocolate dipped strawberries look stunning and taste amazing. For the full recipe, check out the section titled Full Recipe. Start by rinsing the strawberries under cool water. Use a gentle touch to avoid bruising them. After rinsing, dry each strawberry well with a paper towel. This step is very important. If the strawberries are wet, the chocolate will not stick. Make sure you remove any dirt or leaves. Aim for fresh, ripe strawberries for the best taste. Next, take a microwave-safe bowl and add the dark chocolate. If you want smoother chocolate, add two tablespoons of coconut oil. Heat the bowl in the microwave for 30 seconds. Stop and stir the chocolate each time. It should melt in about 1-2 minutes. Be careful not to overheat. You want it smooth and shiny, not burnt. Now, grab a strawberry by the green stem. Dip it into the melted chocolate. Allow any extra chocolate to drip back into the bowl. For a nice touch, swirl the strawberry as you lift it. Place each dipped strawberry on a parchment-lined baking sheet. If you like, sprinkle a little sea salt or crushed rose petals on top. This adds a fun twist to the flavors. Once you finish dipping, put the baking sheet in the fridge. Chill the strawberries for about 30 minutes. This will help the chocolate harden. After that, you can serve them up and enjoy! For the full recipe, refer to the complete instructions above. To get a smooth and perfect chocolate coat, start with dry strawberries. Any water will make the chocolate clump. Melt your chocolate gently. Heat it in short bursts to avoid burning. Stir the chocolate well to keep it smooth. Dip each strawberry slowly. Coating it evenly gives a nice look. Allow excess chocolate to drip off before placing them on the parchment paper. If you have leftover chocolate dipped strawberries, store them properly. Place them in a single layer in an airtight container. Keep them in the fridge to stay fresh. They are best eaten within 2 days. After that, the chocolate may lose its shine. If you want to keep them longer, you can freeze them. Just remember, freezing will change their texture. For a special treat, make your chocolate dipped strawberries stand out. Use a fancy platter to display them. You can drizzle white chocolate over dark chocolate for a striking look. Add some crushed nuts or sprinkles for extra flair. Garnishing with sea salt or rose petals can impress guests. These little touches make your treats feel gourmet. Check out the Full Recipe for more details and tips! {{image_2}} You can switch things up by using white chocolate. It has a sweet, creamy taste. Just melt the white chocolate like you would with dark chocolate. Dip your strawberries and let them set. You can also add a bit of vanilla extract to the melted chocolate for extra flavor. White chocolate pairs well with fresh mint leaves or crushed cookies too. Dark chocolate is rich and bold. You can spice it up with a pinch of cinnamon or cayenne pepper. Just mix these spices into the melted chocolate. This adds a fun twist to the flavor. You can also use flavored extracts, like orange or almond. These flavors work great with the deep taste of dark chocolate. After dipping your strawberries, you can add toppings for a fun look. Chopped nuts add crunch and flavor. Sprinkles make them colorful and festive. Shredded coconut can give a tropical vibe. Just sprinkle these on while the chocolate is still wet. It makes your chocolate-dipped strawberries even more special. Try mixing and matching toppings to find your favorites! For more details on making these treats, check out the Full Recipe. To keep your chocolate dipped strawberries fresh, place them in the fridge. Use a covered container to prevent them from drying out. Make sure to layer them gently with paper towels between layers. This method helps absorb moisture and keeps the chocolate intact. Avoid stacking them too high, as they might get squished. You can freeze chocolate dipped strawberries for later use. First, allow them to set in the fridge for about 30 minutes. After that, place them in a single layer on a baking sheet. Freeze until solid, then transfer them to an airtight container. They can last up to three months in the freezer. When you want to enjoy them, let them thaw in the fridge. This method helps maintain their taste and texture. Chocolate dipped strawberries are best enjoyed fresh. When stored properly in the fridge, they can last for up to two days. After that, they may lose their flavor and texture. If you freeze them, you can extend their shelf life to about three months. Remember, the fresher you eat them, the better! For the full recipe, refer to the earlier section. You can skip the coconut oil. Just melt the dark chocolate alone. This will still work well. The chocolate may be a bit thicker, but it will taste great. If you find it hard to dip, add a tiny bit of warm milk. This can help thin it out. Just remember to dip the strawberries fast so the chocolate sticks well. Yes, you can use milk chocolate. It will taste sweeter and creamier. Keep in mind that milk chocolate melts differently than dark chocolate. You may need to adjust the melting time. Remember to watch it closely to avoid burning. If you want a richer flavor, mix dark chocolate with milk chocolate for a nice balance. You can find pre-made chocolate-dipped strawberries at many grocery stores. Check the fresh produce or bakery sections. Some stores even sell them in fancy boxes. You can also order them online from specialty shops. Be sure to read reviews to find the best quality. If you want something special, local chocolate shops often make great ones too. For an easy option, check out the Full Recipe to make your own! Making chocolate-dipped strawberries is simple and fun. We covered everything from ingredients to storage tips. You learned how to prepare fresh strawberries and melt chocolate perfectly. You also found variations, like using white or dark chocolate. Remember to store leftovers well and get creative with toppings. Whether it's a treat for yourself or a special occasion, these strawberries impress. Enjoy making and eating them. They are always a sweet delight!

Chocolate Dipped Strawberries Simple and Delicious Treat

Chocolate dipped strawberries are a simple and tasty treat that everyone loves. No special skills are needed for this sweet

To make Buffalo Cauliflower Bites, you need fresh ingredients. Here’s what you will need: - 1 large head of cauliflower, cut into bite-sized florets - 1 cup all-purpose flour (or gluten-free flour) - 1 cup water - 1 teaspoon garlic powder - 1 teaspoon onion powder - 1 teaspoon smoked paprika - 1/2 teaspoon salt - 1/2 teaspoon black pepper - 1 cup Buffalo sauce (store-bought or homemade) - 2 tablespoons melted butter (optional, for richness) - Fresh parsley, finely chopped (for garnish) These ingredients come together to create a tasty snack. Cauliflower is the star here. It absorbs the spicy sauce well. You can use gluten-free flour for a different option. The garlic and onion powders give good flavor. Smoked paprika adds a nice touch. Melted butter makes the sauce richer, but it's not a must. Fresh parsley brightens the dish and adds color. These ingredients are easy to find, making this recipe fun to prepare. For the full recipe, check out the link provided. First, gather your ingredients. You will need a large head of cauliflower and some basic pantry items. This recipe is quick and easy, making it perfect for any snack time. Set your oven to 450°F (230°C) and line your baking sheet with parchment paper. 1. In a large bowl, whisk together the flour, water, garlic powder, onion powder, smoked paprika, salt, and black pepper. Mix until smooth. The batter should be thick enough to coat the cauliflower. 2. Cut the cauliflower into bite-sized florets. Dip each floret into the batter. Make sure to let any extra batter drip off. 3. Place the coated florets on the baking sheet. Do not overcrowd them; this helps them get crispy. 4. Bake the cauliflower for 20-25 minutes. You want them golden brown and crispy on the outside. 5. While the cauliflower bakes, mix the Buffalo sauce with melted butter in a bowl until combined. This adds richness to the sauce. 6. Once the cauliflower is done baking, take it out and toss the florets in the Buffalo sauce mixture. Make sure each piece is fully coated. 7. Return the coated florets to the baking sheet and bake again for 10 more minutes. This step crisps up the sauce. After the second bake, remove the cauliflower from the oven. Let them cool slightly, then garnish with freshly chopped parsley. This adds a nice pop of color. Serve with ranch or blue cheese dressing for dipping. Enjoy your Buffalo Cauliflower Bites! For the complete recipe, check the Full Recipe link. To get that perfect crunch, you need the right batter. Use equal parts flour and water for a thick coat. If you want more crispiness, add a little cornstarch to the flour. Make sure to preheat your oven to 450°F (230°C). This heat helps the batter fry and crisp nicely. Spread the cauliflower florets out on the baking sheet. If they touch, they won’t crisp up well. Bake until golden brown, then toss in the sauce for a crispy finish. Buffalo sauce is key, but you can amp up the flavor. Try adding more spices to the batter. Cumin, cayenne, or even a splash of lemon juice can work wonders. Want a kick? Add more garlic powder. If you love smoke, use smoked paprika or a dash of liquid smoke. You can also mix in a bit of ranch seasoning to the sauce for extra zest. Experiment with different sauces for new flavors, too! Using the right tools makes cooking easier. A large mixing bowl helps when making the batter. A whisk ensures no lumps and a smooth mix. Use a baking sheet lined with parchment paper for easy cleanup. A good-quality baking sheet will help with even cooking. If you own an air fryer, that’s a great option too! It can give you the same crispy texture with less oil. For serving, small bowls for dips like ranch or blue cheese are perfect. For the full recipe, check out the [Full Recipe]. {{image_2}} You can change up the flavor of your Buffalo cauliflower bites by using different sauces. If you love heat, try a spicy sriracha sauce. For a smoky twist, use a chipotle sauce. You can even mix BBQ sauce with Buffalo sauce for a sweet and spicy kick. Don't be afraid to experiment! Each sauce gives a unique taste that can please any crowd. Making Buffalo cauliflower bites gluten-free is easy. Just swap out the all-purpose flour for a good gluten-free flour blend. For a vegan version, you can skip the melted butter or use a plant-based butter. Your bites will still be tasty and full of flavor. These simple swaps allow everyone to enjoy this snack without worry. Want to boost the flavor? Add more spices to the batter! Try using cayenne pepper for heat, or add cumin for a warm, earthy note. You might also sprinkle in some dried herbs like oregano or thyme. Mixing in nutritional yeast can give a cheesy flavor without the dairy. These small changes can take your Buffalo cauliflower bites to a whole new level. For the complete recipe, see [Full Recipe]. After you enjoy your Buffalo cauliflower bites, store leftovers in an airtight container. They will stay fresh in the fridge for about 3 to 4 days. Make sure they cool down before sealing them. This keeps them from getting soggy. If you want to keep them longer, consider freezing. To reheat your bites, use an oven for the best results. Preheat your oven to 350°F (175°C). Place the cauliflower bites on a baking sheet. Heat them for about 10 to 15 minutes. This will help make them crispy again. You can also use a toaster oven if you prefer. Avoid the microwave, as it can make them soft. If you want to freeze your Buffalo cauliflower bites, do it before adding the sauce. Place the uncooked battered florets on a baking sheet. Freeze them for about an hour to set. Then, transfer them to a freezer bag. They can stay frozen for up to 3 months. When you’re ready to cook, bake them straight from the freezer. Just add a few extra minutes to the cooking time. For the sauce, you can make it fresh or freeze it separately. This way, you have a quick snack ready whenever you want. For the full recipe, check out the original instructions above. To add heat, use more Buffalo sauce. You can also mix in cayenne pepper. Another option is to choose a hotter sauce. If you enjoy extra flavor, try adding crushed red pepper flakes to the batter. Yes, you can prepare the batter ahead of time. Just keep it in the fridge. Make sure to stir it before using. This will keep the flavors fresh. However, I recommend using it within 24 hours for the best taste. Buffalo Cauliflower Bites pair well with many sides. Here are some favorites: - Celery sticks with ranch dressing - Carrot sticks for crunch - A fresh garden salad for balance - Homemade potato wedges for a hearty option - A creamy coleslaw for a cool contrast These sides enhance the tasty bites and make a lovely spread. For the full recipe, check out the complete guide to Buffalo Cauliflower Bites. Buffalo cauliflower bites are easy to make with a few ingredients. You learned how to prep, cook, and serve them for a tasty dish. Remember tips for the best texture and flavor. You can swap in different sauces and adjust for diets. Store leftovers correctly and reheat for the best taste. Enjoy these bites at your next gathering or snack time. They are sure to impress!

Buffalo Cauliflower Bites Flavorful and Easy Snack

Looking for a tasty snack that’s both easy to make and packs a punch? Buffalo Cauliflower Bites are the perfect

- 1 large head of cauliflower - 4 tablespoons olive oil - 4 cloves garlic, minced - ¾ cup grated Parmesan cheese - 1 teaspoon salt - ½ teaspoon black pepper - 1 teaspoon smoked paprika - 2 tablespoons fresh parsley (for garnish) - Lemon wedges (for serving) Garlic Parmesan Roasted Cauliflower packs big flavor into every bite. The main ingredients shine, but the magic lies in how they work together. Cauliflower acts as a blank canvas. It absorbs the garlic and olive oil well. Garlic adds a savory punch. Freshly minced garlic gives the best taste, so use it if you can. Olive oil helps crisp the edges while roasting. The star of the show here is the Parmesan cheese. When it melts, it creates a rich, cheesy layer that pairs perfectly with the tender cauliflower. Choose good-quality Parmesan for the best results. Next, we have the seasoning. Salt brings out the natural flavor. Black pepper adds a slight heat. Smoked paprika introduces a warm depth. It gives a bit of smokiness that makes the dish feel cozy. Don’t skip the garnish. Fresh parsley brightens the dish and adds color. A squeeze of lemon enhances all the flavors, giving a fresh finish. For the full recipe, check the details above. You will love how easy it is to make this dish burst with flavor! - Preheat oven to 425°F (220°C). - Prepare the cauliflower florets by washing and cutting them into bite-sized pieces. - In a large mixing bowl, combine the cauliflower florets, olive oil, minced garlic, salt, black pepper, and smoked paprika. - Toss until the cauliflower is well coated. This step is key for flavor! - Spread the cauliflower mixture evenly on a baking sheet lined with parchment paper. - Roast in the preheated oven for about 25 minutes. Stir halfway through for even cooking. - After 25 minutes, remove the cauliflower and sprinkle the grated Parmesan cheese over the roasted florets. - Return the baking sheet to the oven for an additional 5-7 minutes. Wait for the cheese to melt and become bubbly. With these steps, you create a dish full of flavor. Each bite of Garlic Parmesan Roasted Cauliflower offers a crunchy texture and rich taste. Follow the Full Recipe for perfect results every time! To get the best results when roasting, keep a few tips in mind: - Ensure even roasting: Cut the cauliflower into uniform florets. This helps them cook at the same rate. If some pieces are larger, they won’t roast as well. - Choosing the right baking sheet: Use a large, rimmed baking sheet. This allows space for the florets. Crowding can lead to steaming instead of roasting. You can easily boost the flavor of roasted cauliflower. Here are some ideas: - Additional spice suggestions: Try adding cumin or chili powder for a warm kick. You can also sprinkle some Italian herbs for a fresh taste. - Optional toppings for extra flavor: Consider adding a drizzle of balsamic glaze after roasting. Or, sprinkle some crushed red pepper for heat. Serving garlic Parmesan roasted cauliflower is simple yet delightful: - Pairing with main dishes: This dish goes well with grilled chicken or fish. It also complements a hearty grain bowl. - Ideal serving temperature: Serve it hot right out of the oven. The cheese should be melty, and the cauliflower should be tender with a slight crunch. For the complete recipe, check out the Full Recipe. {{image_2}} You can make this dish vegan by swapping out the Parmesan. Use nutritional yeast for a cheesy flavor. This option adds a nice nutty taste. For gluten-free options, ensure your spices and any extras are gluten-free. Most cauliflower is naturally gluten-free, which makes it a great choice. If you're not a fan of Parmesan, try using Pecorino Romano. It has a strong taste that works well. Another great option is cheddar for a sharper flavor. For dairy-free cheese, look for brands that offer vegan mozzarella. These options melt nicely and keep the dish creamy. You can serve this roasted cauliflower with dips like ranch or tzatziki for a tasty twist. It also makes a great salad base. Just chop the roasted cauliflower and mix it with arugula, cherry tomatoes, and a light vinaigrette. This adds freshness and color to your meal. For the full recipe, check out Garlic Parmesan Roasted Cauliflower. To store leftover Garlic Parmesan Roasted Cauliflower, let it cool first. Place the cooled cauliflower in an airtight container. You can keep it in the fridge for about 3 to 4 days. When you want to reheat, use the oven for the best results. Preheat your oven to 350°F (175°C). Spread the cauliflower on a baking sheet and heat for about 10 minutes. This keeps it crispy and tasty. Yes, you can freeze roasted cauliflower. First, let it cool completely. Then, place it in a freezer-safe bag or container. Make sure to remove as much air as possible to avoid freezer burn. You can freeze it for up to 3 months. When you want to enjoy it again, take it out and thaw it in the fridge overnight. To reheat, bake it at 350°F (175°C) for about 15-20 minutes. This will help restore some of its original texture and flavor. For the best results, enjoy it fresh from the oven, but frozen works too! For the full recipe, check the section above. How long does it take to roast cauliflower? It takes about 25 minutes to roast cauliflower at 425°F (220°C). You should stir it halfway to ensure even cooking. Can I make this recipe in advance? Yes, you can prep the cauliflower mix ahead of time. Store it in the fridge and roast just before serving. Substitutions for Parmesan cheese? You can use nutritional yeast for a vegan twist. Grated Pecorino Romano also works well if you want a sharper taste. What type of cauliflower is best for roasting? Look for fresh, firm heads of cauliflower. White cauliflower is common, but purple or yellow varieties can add color and taste. Can I omit garlic? Yes, you can skip garlic if you prefer a milder flavor. Try adding more spices instead for depth. Is there a way to make it spicier? To add heat, sprinkle some crushed red pepper flakes or cayenne pepper before roasting. Adjust to your spice level! This guide covers all you need to roast cauliflower perfectly. We explored the ingredients, from cauliflower to spices. The step-by-step instructions ensure a tasty dish, while tips help you achieve the best flavor. You learned about variations, storage, and common questions. Roasting cauliflower is easy and fun. With these insights, you can enjoy a delicious and healthy side dish. Try different flavors to keep it exciting. Get creative, and enjoy your cooking!

Garlic Parmesan Roasted Cauliflower Flavor Boost

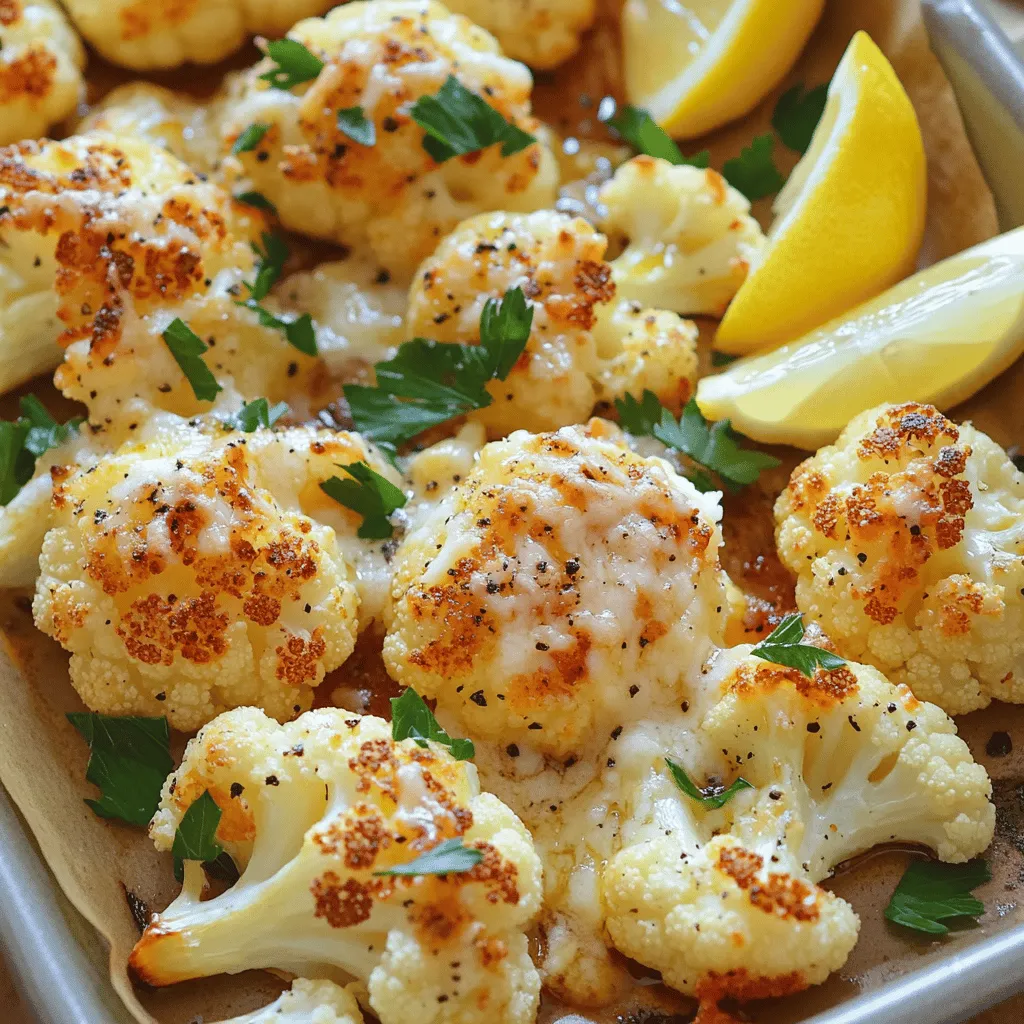
Looking for a tasty way to enjoy vegetables? Try Garlic Parmesan Roasted Cauliflower! This dish turns humble cauliflower into a

- Sushi-grade tuna: This is the star of the dish. It must be fresh and safe to eat raw. Always choose high-quality tuna to get the best flavor and texture. - Sushi rice and water ratio: For perfect sushi rice, use a 1:1.5 ratio. That means for every cup of sushi rice, use 1.5 cups of water. This will yield soft, fluffy rice that holds its shape well. - Essential seasonings: You need soy sauce, sesame oil, and sriracha. Combine these to create a flavorful dressing for your tuna. Adjust the sriracha to control the heat level. - Sliced avocado and cucumber: Avocado adds creaminess, while cucumber gives a fresh crunch. Both balance the spice of the tuna. - Radish and green onions: Radish adds a peppery bite and color. Green onions bring a mild onion taste and enhance the overall flavor. - Additional garnishes: Seaweed salad adds a briny touch. Pickled ginger provides a refreshing contrast. Microgreens on top make your bowl look gourmet and add extra flavor. Use these fresh ingredients to make your spicy tuna poke bowl a mouthwatering flavor explosion. For the complete recipe and detailed instructions, check out the Full Recipe. First, rinse the sushi rice under cold water. Keep rinsing until the water runs clear. This step removes extra starch. It helps the rice stay fluffy and not too sticky. Next, in a medium saucepan, mix the rinsed rice with water. Bring it to a boil over medium-high heat. Once boiling, lower the heat, cover, and let it cook for 15 minutes. After this, turn off the heat but let it sit for another 10 minutes. This resting time really helps the rice absorb moisture. While the rice cooks, it’s time to make the spicy tuna. In a medium bowl, combine the diced tuna, soy sauce, sesame oil, and sriracha. Use a spoon to gently fold the mixture. You want to coat the tuna evenly. If you like it spicier, add more sriracha. Taste it to find your perfect heat level. Now, let’s put the bowl together. Start with a generous scoop of sushi rice at the bottom of a large bowl. Then, spoon the spicy tuna mixture right on top. Next, add a fan of avocado slices, cucumber, and radish. Don't forget the green onions for color! Sprinkle sesame seeds on top for crunch and flavor. For a beautiful finish, garnish with seaweed salad and a few pieces of pickled ginger. If you want a gourmet touch, add some microgreens. Serve it in deep, wide bowls to show off the colors. Enjoy this fresh and tasty meal right away! For the full recipe, check the link provided. For a great poke bowl, start with the right sushi rice. Rinse the rice well. This helps remove excess starch. You want each grain to be separate and fluffy. Use a 1:1.5 ratio of rice to water. Cook it on low heat for 15 minutes, then let it sit. This resting time is key to getting the right texture. If you have leftover rice, store it in an airtight container. Keep it in the fridge for up to three days. When reheating, add a splash of water to help it steam back to life. Spice is key in a spicy tuna poke bowl. Start with 1 tablespoon of sriracha, then taste and adjust. You can add more if you like heat. Try mixing in some lime juice for a zesty kick. Other flavors can add depth too. Consider adding sesame seeds or even a bit of garlic. These will bring out the best in your tuna. A beautiful poke bowl is all about presentation. Start with the sushi rice as your base. Layer the spicy tuna on top, spreading it evenly. Arrange the avocado, cucumber, and radish slices in a fan shape. Use green onions as a bright pop of color. To make it even more eye-catching, sprinkle sesame seeds on top. Adding seaweed salad or microgreens can enhance the look. Serve it in deep, wide bowls to show off all the colors and textures. This makes each bite a feast for the eyes! For the full recipe, check out the detailed steps provided. {{image_2}} You can switch up the protein in your spicy tuna poke bowl. Salmon makes a great substitute. It has a rich flavor that pairs well with the other ingredients. If you prefer a plant-based option, try tofu. Firm tofu absorbs the flavors nicely. You can also use shrimp or crab for a twist. Both add a different texture and taste to the bowl. Don’t be afraid to get creative with toppings. Seasonal vegetables can add color and crunch. Think about using sliced radishes, shredded carrots, or even edamame. These veggies enhance the texture and taste. Fruits like mango or pineapple can also brighten up your bowl. Their sweetness contrasts nicely with the spicy tuna. Sriracha is a classic choice, but you can explore other sauces too. Try a spicy mayo or a chili oil for a different kick. Citrus sauces with lime or lemon juice can add freshness. Miso sauce brings a unique umami flavor that complements the poke bowl well. Mixing and matching sauces can make your dish even more exciting. For the full recipe, check out the detailed instructions above. To keep your poke bowl fresh, you need to store it well. First, put the sushi rice and tuna in separate containers. This helps maintain their flavors and textures. Use airtight containers for the best results. A glass or plastic container with a tight lid works great. Make sure to let the rice cool before sealing it. If you store warm rice, it can become mushy. You should eat your poke bowl within two days for the best taste. Tuna can spoil quickly, so check it often. If it looks or smells off, do not eat it. When reheating sushi rice, add a splash of water. Heat it gently in the microwave. This helps revive the rice without drying it out. Enjoy that poke bowl while it’s fresh for the best mouthwatering flavor explosion. For the full recipe, check out the Spicy Tuna Poke Bowl section above! A poke bowl is a Hawaiian dish. It features diced raw fish, usually tuna. The fish is marinated and served over rice. Traditionally, you find it with fresh toppings like avocado and seaweed. Poke means "to slice" in Hawaiian, which describes the fish preparation. The dish blends flavors and textures, making it a delight to eat. You can customize it with many toppings and sauces. Yes, you can use frozen tuna for your poke bowl. However, ensure it is sushi-grade. This means it is safe to eat raw. Freezing can kill parasites, making the fish safe. When using frozen tuna, thaw it in the fridge overnight. This keeps the texture and flavor intact. Always check for quality before using any fish in your meal. Making a poke bowl vegetarian is easy. You can replace the tuna with tofu or tempeh. Both options absorb flavors well and provide texture. You can also add marinated mushrooms for a savory touch. Consider using fruits like mango or pineapple for sweetness. You can still use all the fresh toppings, like avocado and cucumber, for a colorful dish. Many sides pair well with a poke bowl. Consider serving a light seaweed salad for added crunch. Pickled ginger complements the spicy tuna nicely. You might also enjoy a refreshing cucumber salad. For drinks, try green tea or a light lager. These choices balance the flavors and enhance your meal. Making a Spicy Tuna Poke Bowl is fun and simple. You learned about key ingredients, cooking sushi rice, and assembling the bowl. Don't forget your fresh garnishes for extra flavor and color. Try different proteins and toppings to make it your own. Following my tips will help you create a visually appealing dish. Experimenting with flavors will keep each bowl exciting. Enjoy this delicious meal, and share it with friends or family!

Spicy Tuna Poke Bowl Mouthwatering Flavor Explosion

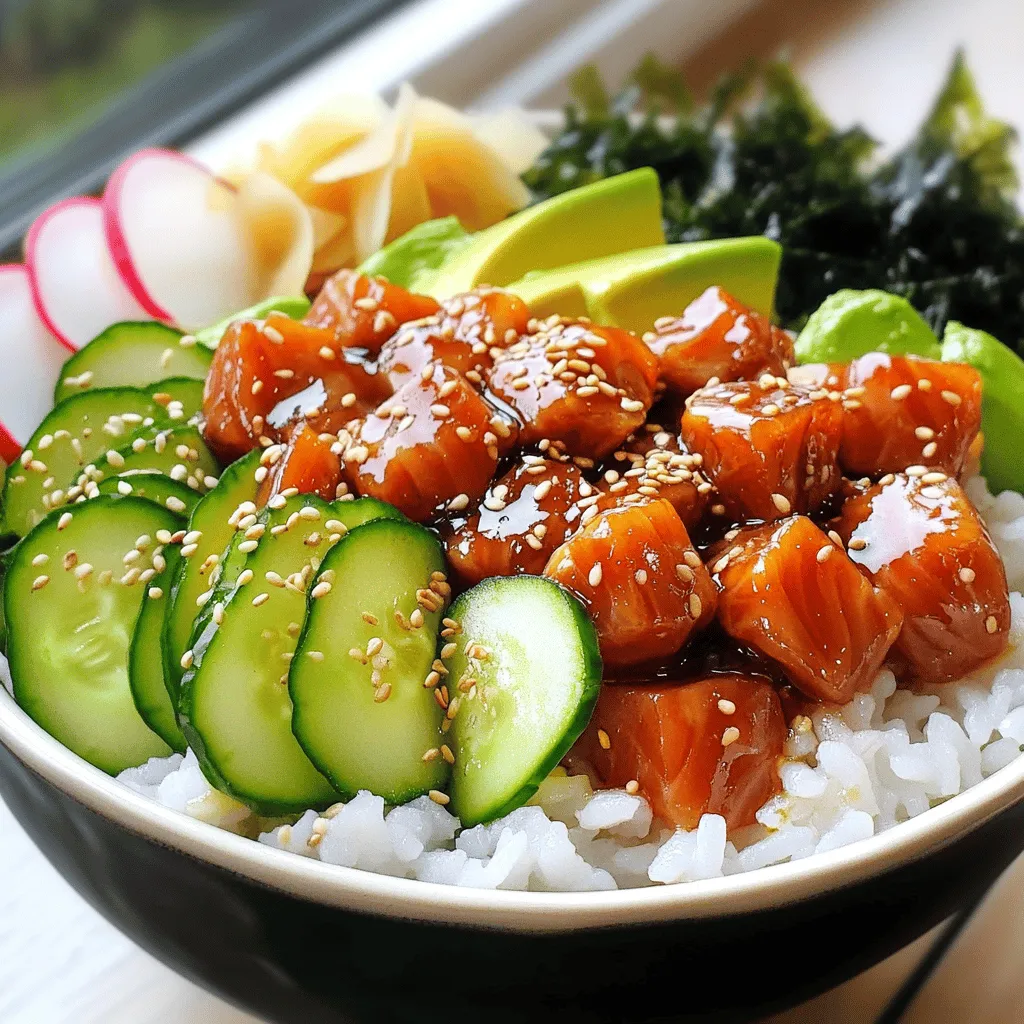
Are you ready to dive into a burst of flavors with your next meal? My Spicy Tuna Poke Bowl is

- 2 ripe avocados - 3 cloves garlic, minced - 1 tablespoon lemon juice - 1/4 cup fresh basil leaves - 3 tablespoons olive oil - 1/2 teaspoon red pepper flakes - Salt and pepper to taste - 12 oz spaghetti or your pasta of choice - 1/4 cup grated Parmesan cheese (optional) - Cherry tomatoes, halved (for garnish) - Extra basil leaves for garnish For this creamy avocado pasta, you need fresh and ripe avocados. They give the dish its smooth texture. Garlic adds a nice punch, while lemon juice brightens the flavor. Fresh basil leaves bring an aromatic touch to the sauce. Olive oil adds richness, and red pepper flakes give a hint of heat. You can use any pasta you like, but I recommend spaghetti. The Parmesan cheese is optional but adds a nice salty finish to the dish. - Alternative pasta choices (gluten-free, whole wheat) - Dairy-free Parmesan options - Additional herbs and spices If you want to change up the pasta, gluten-free or whole wheat options work well. For a dairy-free version, try using plant-based Parmesan. You can also add extra herbs, like parsley or cilantro, to enhance the flavors. - Calories and macronutrient breakdown - Potential health benefits of ingredients This dish is packed with healthy fats from avocados. They are a great source of fiber and vitamins. Garlic has many health benefits, too, including boosting immunity. The olive oil adds heart-healthy monounsaturated fats. Each serving is satisfying and full of nutrients, making it a smart choice for any meal. Check the full recipe for more details on the exact nutritional values. To cook spaghetti to al dente, bring a large pot of salted water to a boil. Add your spaghetti and cook it according to the package instructions. This usually takes about 8 to 10 minutes. Keep an eye on it. You want it firm to the bite, not mushy. Tips for boiling pasta perfectly: - Use a large pot for even cooking. - Stir the pasta in the first minute to prevent sticking. - Reserve 1 cup of pasta water before draining. For the avocado sauce, grab your food processor or blender. Add the ripe avocados, minced garlic, lemon juice, basil leaves, olive oil, and red pepper flakes. Blend until the mixture is smooth and creamy. Tips for achieving the right sauce consistency: - If the sauce is too thick, add a bit of reserved pasta water. - Taste the sauce and adjust salt and pepper as needed. In a large mixing bowl, toss the cooked spaghetti with the creamy avocado sauce. Make sure each piece is well coated. Tips for adjusting sauce thickness: - If the sauce feels too thick, slowly add more reserved pasta water. - Mix well until you reach your desired creaminess. For the full recipe, check the previous section. Enjoy this simple yet delicious dish! To boost the taste of your creamy avocado pasta, you can add spices. Try mixing in garlic powder or onion powder for extra depth. A pinch of cayenne pepper can give your dish a nice kick. You might also like to add nuts or seeds. Toasted pine nuts or walnuts can add a great crunch. Sprinkle some pumpkin seeds on top for a fun twist. These additions enhance both flavor and texture. When serving, pair the pasta with a fresh salad. A light arugula salad with lemon vinaigrette works well. You can also serve alongside garlic bread for a filling meal. For drinks, a crisp white wine complements this dish nicely. If you prefer non-alcoholic options, try sparkling water with lemon. Both pair perfectly with the creamy flavors of the pasta. Preparing ingredients ahead of time makes cooking easier. Chop your garlic and basil the night before. You can also slice the avocados and store them in lemon juice to prevent browning. Serve your creamy avocado pasta right after mixing. This keeps it fresh and creamy. If you let it sit, the sauce may thicken too much. Enjoy it straight from the bowl for the best taste! For the full recipe, check out the detailed instructions above. {{image_2}} To make this dish vegan, swap the Parmesan cheese for a dairy-free option. You can use nutritional yeast for a cheesy taste. Also, check your pasta. Make sure it has no eggs. Whole wheat or gluten-free pasta works great, too. If you like heat, add more red pepper flakes. You can also use fresh chili peppers. Jalapeños or serranos add a nice kick. Adjust the amount based on your taste. Spice levels can really change the dish! For a refreshing twist, turn this pasta into a salad. Use cold pasta with the creamy avocado sauce. Add in cherry tomatoes, cucumber, and bell peppers for crunch. This version is perfect for picnics or summer meals. Check the full recipe to see how to prepare it! To keep your creamy avocado pasta fresh, store it in an airtight container. Place it in the fridge. It stays good for about 1 to 2 days. Make sure to cover it well to avoid drying out. If your pasta has some creaminess left, it will taste better later! You can freeze creamy avocado pasta, but it may change texture. To freeze, pack the pasta in a freezer-safe bag. Remove as much air as possible. It can last up to 3 months in the freezer. When you’re ready to eat, thaw it in the fridge overnight. This method helps keep some creaminess. When reheating, avoid the microwave if you can. It can make the sauce too thick. Instead, use a pan on low heat. Add a splash of water or olive oil to keep it creamy. Stir often until warm. This way, you keep the delicious flavor intact! For the complete recipe, check out the Full Recipe. Yes, you can make this recipe ahead of time. To prepare in advance, follow these tips: - Cook the pasta and let it cool. - Make the avocado sauce separately. - Store both items in airtight containers. - Combine them just before serving for the best texture. If you are allergic to avocados, consider these alternatives for a creamy texture: - Use silken tofu for a smooth base. - Try cashew cream made by blending soaked cashews. - Use a ripe banana for a different flavor. Each option brings a unique taste, but they keep the dish creamy. Yes, creamy avocado pasta is great for meal prep. Here are some storage tips: - Store the pasta and sauce separately to maintain freshness. - Keep them in airtight containers in the fridge. - Consume within 3 days for the best quality. To stop your avocado from browning, try these tips: - Add lemon juice to the cut avocado. - Cover tightly with plastic wrap to limit air contact. - Store it with onion slices in a sealed container. These methods help keep your avocado fresh and green for longer. You can create a delicious creamy avocado pasta using simple ingredients. The main elements include ripe avocados, garlic, and fresh basil. You can customize it with optional items like gluten-free pasta or dairy-free cheese. Cooking the pasta properly and making a smooth sauce are key steps. Remember, this dish is not only tasty but also healthy. So, go ahead and enjoy this easy, creamy pasta that you can share with others and feel great about!

Creamy Avocado Pasta Easy and Flavorful Recipe

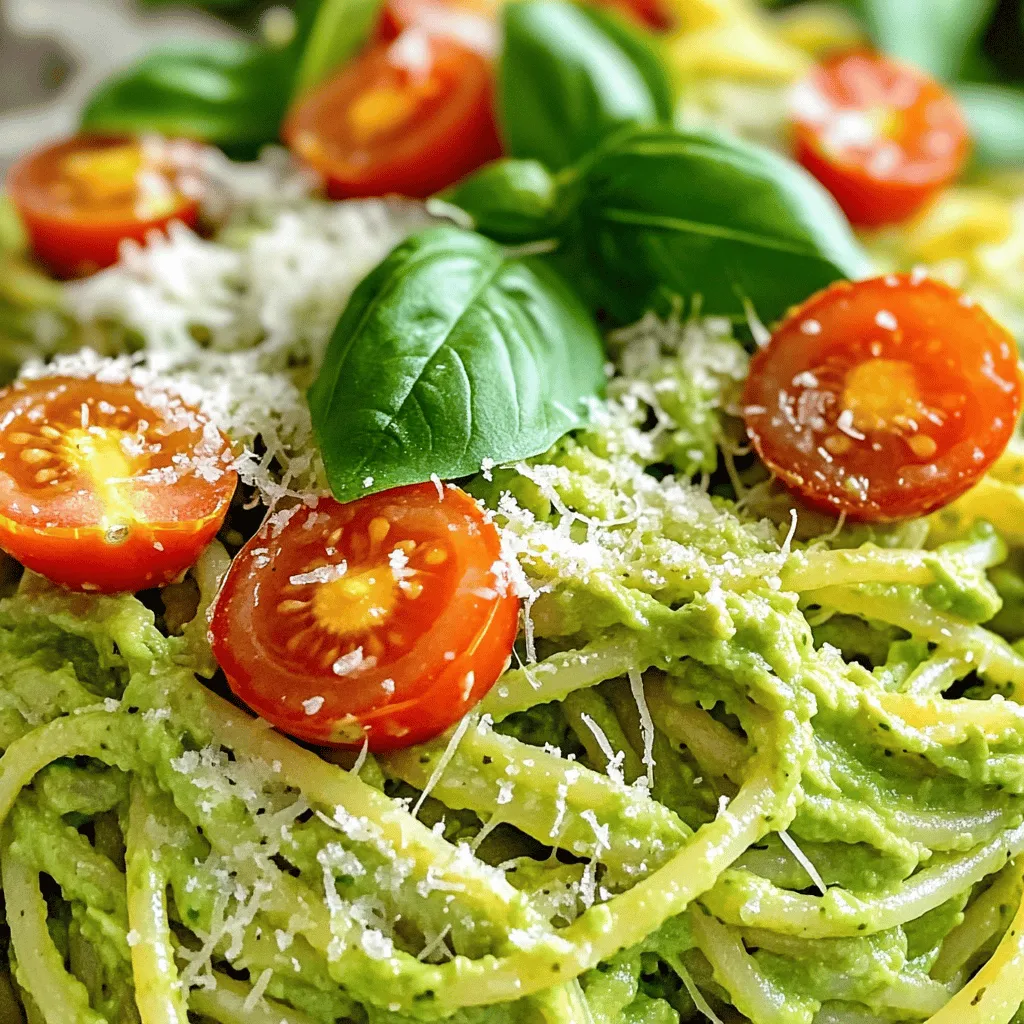
Looking for a quick, delicious meal? This creamy avocado pasta recipe is your answer! With vibrant flavors from fresh ingredients

Older posts
Newer posts
← Previous Page1 … Page113 Page114 Page115 … Page120 Next →

dsad

© 2025 Southern Dishes • Built with GeneratePress

Our Policies

  • Copyright Policy
  • Cookie Policy
  • GDPR Policy
  • Privacy Policy
  • Disclaimer
  • Terms Of Use

More Information

  • Home
  • About
  • Contact
  • Appetizers
  • Dessert
  • Dinner
  • Drinks
©2025, Southern Dishes About Back To Top