Skip to content
DisclaimerTerms Of UseGDPR PolicyCookie Policy

Southern Dishes

  • Home
  • Drinks
  • Appetizers
  • Dinner
  • Dessert
  • About
  • Contact
  • Privacy Policy
DisclaimerTerms Of UseGDPR PolicyCookie Policy

NO-ING-IMG

To make this delicious treat, gather these simple ingredients: - 24 Oreo cookies (plus extra for garnish) - 1/4 cup unsalted butter, melted - 16 oz cream cheese, softened - 1/2 cup powdered sugar - 1 teaspoon vanilla extract - 1 1/2 cups heavy whipping cream - 1/2 cup crushed Oreo cookies (for the filling) These ingredients work together to give you a rich and creamy cheesecake. The Oreo cookies add a wonderful crunch and flavor. The cream cheese creates that smooth texture we all love. You can add some fun garnishes to make your cheesecake shine: - Whole Oreo cookies - Whipped cream - Chocolate sauce - Crushed Oreos These add-ons make your dessert look fancy. They also enhance the taste. I love using whole Oreos on top. It makes each slice feel special. Here’s what you need to make your cheesecake: - 9-inch springform pan - Food processor or plastic bag and rolling pin - Mixing bowls - Electric mixer - Spatula - Plastic wrap Having the right tools makes the process easy. A springform pan helps you remove the cheesecake easily. A food processor saves time when crushing the cookies. You’ll be amazed at how simple it is to whip this up with the right gear. For the full recipe, check out the details above. Start with 24 Oreo cookies. Crush them in a food processor. Aim for fine crumbs. Add 1/4 cup of melted unsalted butter to the crumbs. Mix until it looks like wet sand. Grab a 9-inch springform pan. Press this mixture into the bottom of the pan firmly. Make sure it's even. Pop it in the fridge while you work on the filling. In a large bowl, beat 16 oz of softened cream cheese. Use an electric mixer at medium speed. Mix until it’s creamy and smooth. Slowly add 1/2 cup of powdered sugar. Add 1 teaspoon of vanilla extract too. Keep mixing until it’s all combined. In a separate bowl, whip 1 1/2 cups of heavy cream. You want stiff peaks, so don’t overwhip. Now, fold this whipped cream into the cream cheese mixture. Do this gently until no streaks remain. Finally, fold in 1/2 cup of crushed Oreo cookies to add a nice crunch. Take the crust out of the fridge. Spoon the cream cheese filling over the crust. Use a spatula to smooth the top. Cover the pan with plastic wrap. Let it chill in the fridge for at least 4 hours. For best results, let it rest overnight. When it's set, take it out of the springform pan. Decorate the top with whole Oreos and more crushed Oreos for a fun look. Now, you’re ready to slice and serve! Whipping cream is key for a light cheesecake. Start with very cold heavy cream. Use a clean bowl and beaters to help it whip better. Beat on medium speed until soft peaks form. Watch closely; stop once you see stiff peaks. Overwhipping can turn it into butter. A well-set cheesecake is creamy and firm. Make sure to chill it for at least four hours. Overnight is even better. The cold helps it set nicely. Avoid opening the fridge often; it can change the temperature. Use a springform pan for easy removal, too. Presentation makes your cheesecake shine. Cut clean slices with a hot knife for neat edges. Serve on individual plates for a gourmet feel. Drizzle with chocolate sauce or add whipped cream on top. Garnish with whole Oreo cookies or crushed Oreos for a fun touch. For more ideas, check the Full Recipe. {{image_2}} You can easily change the flavor of your no-bake Oreo cheesecake. Try adding mint extract for a fresh twist. Use just a tiny amount, about 1/4 teaspoon. Chocolate lovers can mix in cocoa powder for a richer taste. You can also fold in peanut butter for a nutty surprise. Each of these options will give your dessert a fun new flavor. If you want to mix things up, use other cookies for the crust. Chocolate sandwich cookies work well if you want a similar taste. You could try vanilla wafers for a lighter flavor. Graham crackers also make a great base. Each choice will create a different taste and texture for your cheesecake. You can turn your cheesecake into parfaits for a fun twist. Layer the cheesecake filling in cups with crushed Oreos. Start with a layer of filling, then add cookies, and repeat. This makes a great dessert for parties or gatherings. Each person can have their own cup, which is easy to serve. You can even top it with whipped cream for extra flair. For the full recipe, check the [Full Recipe] link. To keep your No-Bake Oreo Cheesecake fresh, cover it tightly with plastic wrap. This keeps air out and prevents it from drying. Store it in the fridge. It stays good for about 4-5 days. If you want to save some for later, you can freeze the cheesecake. First, let it set in the fridge. Then, slice it into pieces. Wrap each slice in plastic wrap. Place the wrapped slices in a freezer-safe bag or container. It can last for about 1-2 months in the freezer. To thaw, just move it to the fridge for a few hours or overnight before serving. The best containers for storing your cheesecake are airtight ones. A glass container with a lid works great. You can also use a plastic food storage container. Make sure the lid closes tightly to keep your cheesecake safe and fresh. For the best taste, try to eat it within a week or two. This easy and delicious dessert is perfect for sharing or enjoying all by yourself! For the full recipe, click here: [Full Recipe]. Yes, you can make this cheesecake ahead of time. In fact, it tastes better when chilled overnight. Prepare it a day before your event for the best flavor. Just cover it in plastic wrap and keep it in the fridge. This will let all the flavors blend well. Plus, it saves you time on the day of your party. If you need a cream cheese substitute, try Greek yogurt. It gives a nice tang and creamy texture. You can also use mascarpone cheese for a richer taste. Just keep in mind that the flavor might change a little. Each option can make your cheesecake unique, so choose what you like best. To stop your cheesecake from cracking, beat the cream cheese well. Make sure it is smooth and free of lumps. Also, avoid overmixing once you add the whipped cream. This keeps air out. Lastly, let it chill slowly in the fridge. A sudden temperature change can cause cracks. Follow these tips for a perfect, smooth cheesecake. You learned how to make a no-bake Oreo cheesecake using simple steps. From the crust to the filling, each part adds great taste. I shared tips for perfecting your whip and serving. You can try fun flavors and easy storage ideas to keep your cheesecake fresh. Remember, this treat is simple and fun to make. With these steps, you can impress friends and family. Enjoy your cheesecake journey; each bite will be worth it!

No-Bake Oreo Cheesecake Easy and Delicious Dessert

Ready for a treat that’s both easy and delicious? This No-Bake Oreo Cheesecake is the perfect dessert for any occasion!

- 8 ounces elbow macaroni - 2 cups sharp cheddar cheese, shredded - 1 cup mozzarella cheese, shredded - 1 tablespoon butter - 1 tablespoon all-purpose flour - 2 cups milk (whole or 2%) - 1/2 teaspoon garlic powder - 1/2 teaspoon onion powder - 1/4 teaspoon cayenne pepper (optional for heat) - Salt and pepper to taste - 1/2 cup breadcrumbs (for topping) - 1 tablespoon olive oil (for toasting breadcrumbs) Gathering the right ingredients is key for a great mac and cheese. I love using elbow macaroni because it holds the cheese sauce well. Sharp cheddar gives a rich flavor, while mozzarella adds creaminess. For the sauce, butter and flour make a tasty roux. The milk is crucial for the creamy base. I usually use whole milk for the best results, but 2% works too. To season, I add garlic and onion powder for extra taste. A touch of cayenne pepper can spice things up, but it’s not needed if you prefer mild flavors. For the topping, breadcrumbs give a nice crunch. Toasting them in olive oil adds depth and flavor. The perfect mac and cheese needs a mix of creamy, cheesy goodness and a crispy topping. For the full recipe, you can check the earlier sections. Happy cooking! - Boil and cook the elbow macaroni until al dente. - Drain and set aside. To cook the pasta, bring salted water to a rolling boil. I use a large pot for this. Add the elbow macaroni and stir it gently. Follow the package instructions for timing. You want the pasta to be firm but not hard. This is called al dente. After cooking, pour the pasta into a colander to drain all the water. Set the pasta aside, and let it rest for a moment. - Melt butter and create a roux with flour. - Gradually whisk in milk until thickened. Now, let’s make the cheese sauce. Start by melting a tablespoon of butter in a medium saucepan over medium heat. Once the butter is melted, add the flour. Stir it constantly for about a minute. This mix is called a roux. It helps to thicken the sauce. Next, slowly add the milk, whisking well to avoid lumps. Keep stirring until the sauce is smooth and thickens, which takes about 5 to 7 minutes. - Add shredded cheeses and seasonings to the sauce. - Mix the cooked pasta into the cheese sauce. - Optional: Toast breadcrumbs for topping. Lower the heat and add the shredded cheddar and mozzarella cheese to the sauce. Stir until the cheese melts and blends in. I like to add garlic powder and onion powder for extra flavor. Don't forget to season with salt and pepper to taste. Now, mix the cooked pasta into the cheese sauce. Make sure every piece of macaroni is coated well. If you want a crunchy topping, toast your breadcrumbs in a skillet with olive oil until golden brown. This adds a nice texture to your dish. For more details, check out the Full Recipe. To get that creamy texture, add milk slowly. If you pour it in fast, the sauce can become lumpy. Whisk the milk in small amounts. This helps the sauce thicken without any bumps. Choosing the right cheese is key too. I love using sharp cheddar for its bold flavor. Mixing in mozzarella makes it stretchy and creamy. A blend of cheeses gives depth and taste. For extra flavor, think about adding spices. A dash of paprika or a sprinkle of mustard powder can really brighten your dish. You can also try nutmeg for a warm touch. Using different cheeses can change the whole dish. Try gouda for a smoky taste or pepper jack for some heat. Mixing cheeses keeps things interesting and adds layers of flavor. When cooking mac and cheese, you can choose stovetop or baked. Stovetop is quicker and keeps it creamy. For baked, you get a crispy top that’s delicious. If you go baked, make sure to cover it with foil first. This keeps it moist while baking. To avoid a grainy cheese sauce, don’t rush. Stir the cheese in slowly and keep the heat low. If the sauce gets too hot, the cheese can break down. That’s not what you want. Patience is the key to a smooth sauce. For the full recipe, check out the detailed instructions. Enjoy cooking this classic dish! {{image_2}} You can switch out some ingredients for different needs. Here are a few options: - Gluten-free pasta options: Use gluten-free elbow macaroni or any gluten-free pasta you like. They work just as well. - Dairy-free cheese alternatives: Try plant-based cheese. Brands like Daiya and Violife melt nicely. Want to spice up your mac and cheese? Here are some tasty ideas: - Adding cooked bacon or sausage: Crispy bacon adds a salty crunch. Sausage gives it a hearty flavor. Just cook them first, then mix them in. - Incorporating vegetables like spinach or peas: Add some green! Spinach wilts down nicely. Peas add a sweet pop. They’re great for adding nutrition. You can also change how you prepare mac and cheese. Consider these fun twists: - One-pot mac and cheese for easy cleanup: Cook the pasta and sauce in one pot. Just add everything together. It saves time and mess. - Mac and cheese with a crunchy topping: For a little crunch, toast some breadcrumbs. Sprinkle them on top before baking. It adds texture and flavor. For all these variations, check the Full Recipe for more details! To store leftover mac and cheese, let it cool first. Place it in a tight container. This helps keep it fresh. I recommend using glass or BPA-free plastic containers. These keep the taste better than metal ones. You can store it in the fridge for up to three days. If you want to freeze mac and cheese, use a freezer-safe container. Make sure to leave some space at the top. The cheese will expand when it freezes. It can last for up to three months in the freezer. To reheat frozen mac and cheese, you can use the oven or microwave. If using the oven, preheat it to 350°F (175°C). Transfer the mac and cheese to a baking dish. Add a splash of milk to keep it creamy. Cover it with foil and bake for 20-30 minutes. For the microwave, place a portion in a bowl. Add a little milk and cover it. Heat in short bursts, stirring in between, until hot. Enjoy your creamy comfort dish! The best cheese for mac and cheese is sharp cheddar. It gives a great flavor. I also like to mix in mozzarella for creaminess. Gruyère adds a nice taste, too. You can try gouda or pepper jack for a twist. Experiment to find your favorite blend! Yes, you can make mac and cheese ahead of time! Cook the pasta and sauce, then mix them. Store it in a dish and cover it well. You can keep it in the fridge for up to two days. When ready, bake it straight from the fridge. Add a little milk to keep it creamy. You can make mac and cheese without flour by using cornstarch. Mix cornstarch with cold milk before adding it to heat. This will help thicken the sauce. Another option is to use pureed cauliflower or potato. They add creaminess without flour. You can also skip the roux and just melt cheese in warm milk. For the complete ingredients and steps, check out the Full Recipe. It has all you need for this creamy comfort dish! This post covered how to make delicious mac and cheese. We discussed main ingredients, cooking methods, and expert tips to enhance flavor. Remember, you can personalize your dish with different cheeses or toppings. Experiment with spices and veggies for new twists. Whether you prefer stovetop or baked, you can create a creamy, cheesy delight. Don’t forget about storage tips to keep leftovers fresh. Enjoy making this comforting dish your own!

Classic Homemade Mac and Cheese Creamy Comfort Dish

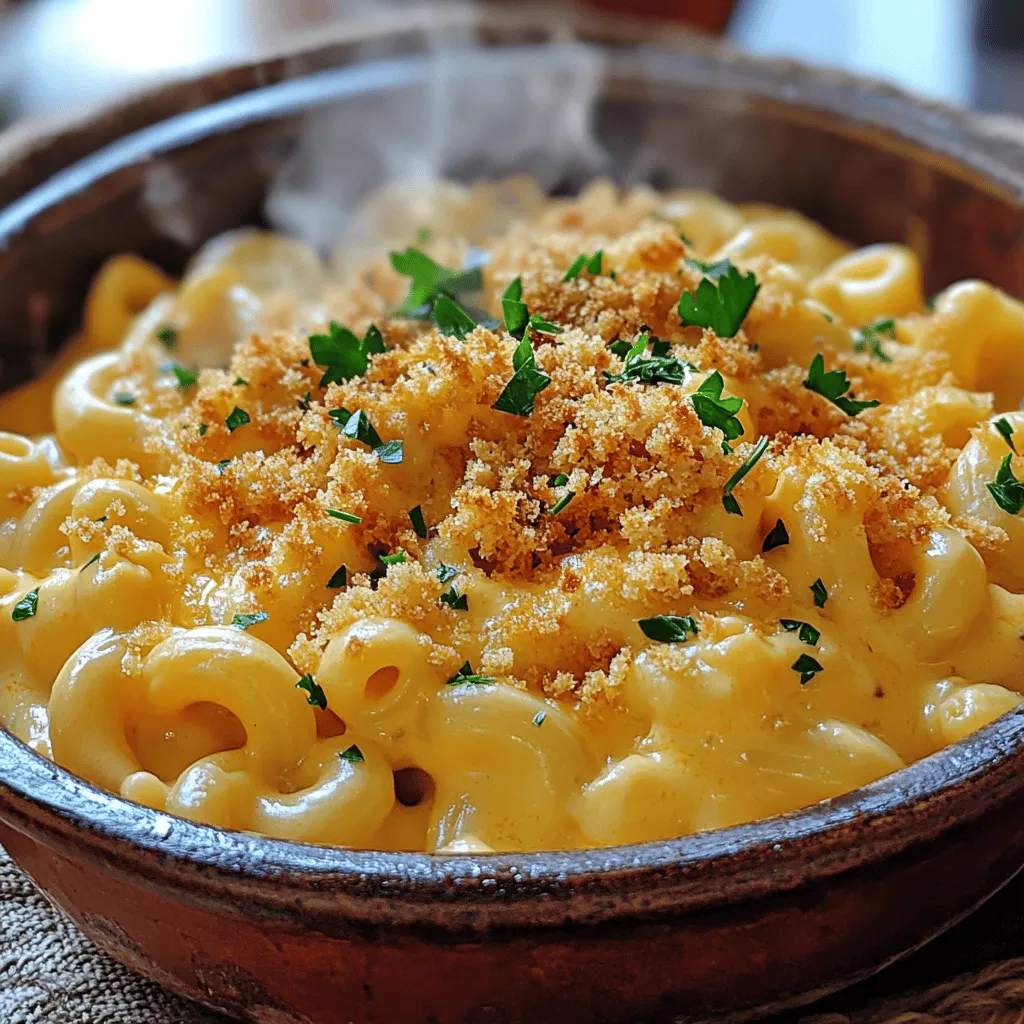
Are you ready to dive into the creamy, cheesy world of homemade mac and cheese? This classic dish is perfect

To make a delicious Crunchy Asian Slaw, you need some fresh and tasty ingredients. These ingredients give the slaw its vibrant colors and flavors. Here’s what you will need: - Fresh Produce: - 4 cups green cabbage, thinly sliced - 1 cup red cabbage, thinly sliced - 1 cup carrots, julienned - 1 cup bell pepper, thinly sliced (any color) - Aromatics: - 1/2 cup scallions, chopped - 1/4 cup fresh cilantro, chopped - 1 clove garlic, minced - 1 tablespoon fresh ginger, grated - Dressing Components: - 1/4 cup sesame oil - 2 tablespoons soy sauce (or tamari for gluten-free) - 2 tablespoons rice vinegar - 1 tablespoon honey or agave syrup - Toppings: - 1/4 cup roasted peanuts, roughly chopped - Salt and pepper to taste This combination of ingredients makes the slaw crunchy, fresh, and full of flavor. You can find the full recipe at the top. Enjoy creating this colorful dish! Combine the Vegetables First, grab a large mixing bowl. Add 4 cups of thinly sliced green cabbage. Then mix in 1 cup of red cabbage, 1 cup of julienned carrots, and 1 cup of thinly sliced bell pepper. Don't forget to include 1/2 cup of chopped scallions and 1/4 cup of fresh cilantro. Toss all these veggies together until they blend well. Prepare the Dressing Next, take a smaller bowl. Whisk together 1/4 cup of sesame oil, 2 tablespoons of soy sauce, and 2 tablespoons of rice vinegar. Add 1 tablespoon of grated fresh ginger and 1 minced garlic clove. Mix in 1 tablespoon of honey or agave syrup. Keep whisking until the dressing is smooth and well combined. Toss and Season the Slaw Now, pour the dressing over your veggie mix. Toss gently to coat every piece of vegetable evenly. Taste the slaw, then season with salt and pepper as you like. Let it sit for at least 15 minutes. This wait lets the flavors mix and the veggies soften slightly. Right before serving, sprinkle 1/4 cup of roughly chopped roasted peanuts on top for that perfect crunch. Presentation Tips For a beautiful presentation, serve the slaw in a large, shallow bowl. Garnish it with extra chopped cilantro and a few peanut pieces on top. This makes the dish look inviting and colorful. Best Pairings with Crunchy Asian Slaw Crunchy Asian slaw goes well with many meals. Try it as a side dish with grilled chicken or fish. It also pairs nicely with tacos or a rich curry. The fresh, crisp flavors balance heavier dishes perfectly. For a fun twist, serve it in a wrap or as a topping on a rice bowl. Enjoy this vibrant slaw with any meal you love! To get the best crunch from your slaw, let it sit. After mixing the veggies and dressing, give it at least 15 minutes. This time allows the flavors to blend. It also softens the vegetables just enough, keeping them crisp. For added crunch, try using different vegetables. Radishes or jicama work well. You can also add some snow peas for a pop of texture. They bring a nice snap and extra color. Want to spice it up? Add some chili flakes. A pinch can bring a nice heat. Adjust the amount based on your taste. It complements the sweetness of the dressing well. Citrus can also add a fresh twist. Try squeezing some lime or lemon juice over the slaw. This adds brightness and balances the flavors. You can also mix in some orange segments for a fruity kick. These enhancements make your crunchy Asian slaw even more exciting. For the full recipe, check the earlier section. {{image_2}} If you want a gluten-free slaw, use tamari instead of soy sauce. Tamari gives you the same rich taste without gluten. It is a perfect swap for those with dietary needs. You can also change up the veggies in your slaw. Try adding: - Broccoli slaw - Snap peas - Radishes - Jicama These add color and crunch. Each option brings a new flavor to the dish. You can play with the oil and acid in your dressing too. Instead of sesame oil, try using olive oil. For a tangy twist, use lime juice instead of rice vinegar. Each choice can change the whole taste. For sweeteners, honey works great, but agave syrup is a good choice too. You can also try maple syrup for a unique sweetness. Experimenting with these swaps keeps the slaw fresh and exciting. Check the full recipe for detailed steps to make your own Crunchy Asian Slaw, which is perfect for any meal! To keep your Crunchy Asian Slaw fresh, use airtight containers. Glass or plastic containers work well. Make sure they seal tightly. This keeps air out and helps maintain crunchiness. - Best Storage Containers: - Airtight glass containers - BPA-free plastic containers The slaw stays fresh in the fridge for about 3 days. After that, the veggies may become soggy. If you want to keep it longer, consider freezing the slaw without the dressing. It’s best to add the dressing right before you eat. - Storage Duration Recommendations: - In the fridge: up to 3 days - In the freezer: up to 2 months (without dressing) You can prep the slaw ahead and store it. Just leave the dressing out until ready to serve. This helps keep the slaw crunchy and fresh. - Prepping Ahead vs. Ready-to-Eat: - Prep the slaw 1-2 days before serving. - Add dressing just before serving. If you have leftovers and they sit for a while, you can reconstitute the slaw. Just toss it a bit. This helps mix the flavors and revive the crunch. - Reconstituting the Slaw Before Serve: - Toss gently to mix. - Add a bit more dressing if needed. For the full recipe, check out the Crunchy Asian Slaw section above! How long can I keep Crunchy Asian Slaw in the fridge? You can keep Crunchy Asian Slaw in the fridge for up to three days. The veggies stay crisp during this time. However, the dressing may make the slaw soggy if left too long. To keep it fresh, store it in an airtight container. Can I use frozen vegetables in this recipe? Using frozen vegetables is not ideal for this slaw. Fresh veggies give the best crunch and taste. Frozen veggies lose their crispness when thawed. If you’re in a pinch, thaw them completely and drain excess water before mixing. What can I serve with Crunchy Asian Slaw? Crunchy Asian Slaw pairs well with many dishes. Try it with grilled chicken, fish tacos, or even as a topping on sandwiches. The bright flavors enhance any meal. It also works well as a side for stir-fries or Asian-inspired dishes. Is Crunchy Asian Slaw healthy? Yes, Crunchy Asian Slaw is healthy! It has lots of fresh veggies, which are low in calories. The healthy fats from peanuts and sesame oil add flavor and nutrients. This slaw is rich in vitamins and fiber, making it a great choice. What are the calorie counts for the ingredients used? Here’s a rough breakdown of calories for the main ingredients in Crunchy Asian Slaw: - Green cabbage (4 cups): ~100 calories - Red cabbage (1 cup): ~25 calories - Carrots (1 cup): ~50 calories - Bell pepper (1 cup): ~25 calories - Scallions (1/2 cup): ~15 calories - Fresh cilantro (1/4 cup): ~1 calorie - Roasted peanuts (1/4 cup): ~200 calories - Sesame oil (1/4 cup): ~480 calories - Soy sauce (2 tablespoons): ~20 calories - Rice vinegar (2 tablespoons): ~5 calories - Fresh ginger (1 tablespoon): ~5 calories - Garlic (1 clove): ~5 calories - Honey (1 tablespoon): ~64 calories Total calories for the whole slaw come to about 1,020 calories. Divide by servings for a better idea of calorie count per serving. This is a great, healthy option to add to your meals! Crunchy Asian Slaw combines fresh veggies, bold flavors, and easy steps. You learned about the key ingredients, how to prepare, and some great serving ideas. This slaw is versatile, with tips on texture and flavor boost. Experiment with variations and enjoy it fresh. Store leftovers well to keep them crisp. Embrace this fun dish in your meals!

Crunchy Asian Slaw Perfect for Any Meal

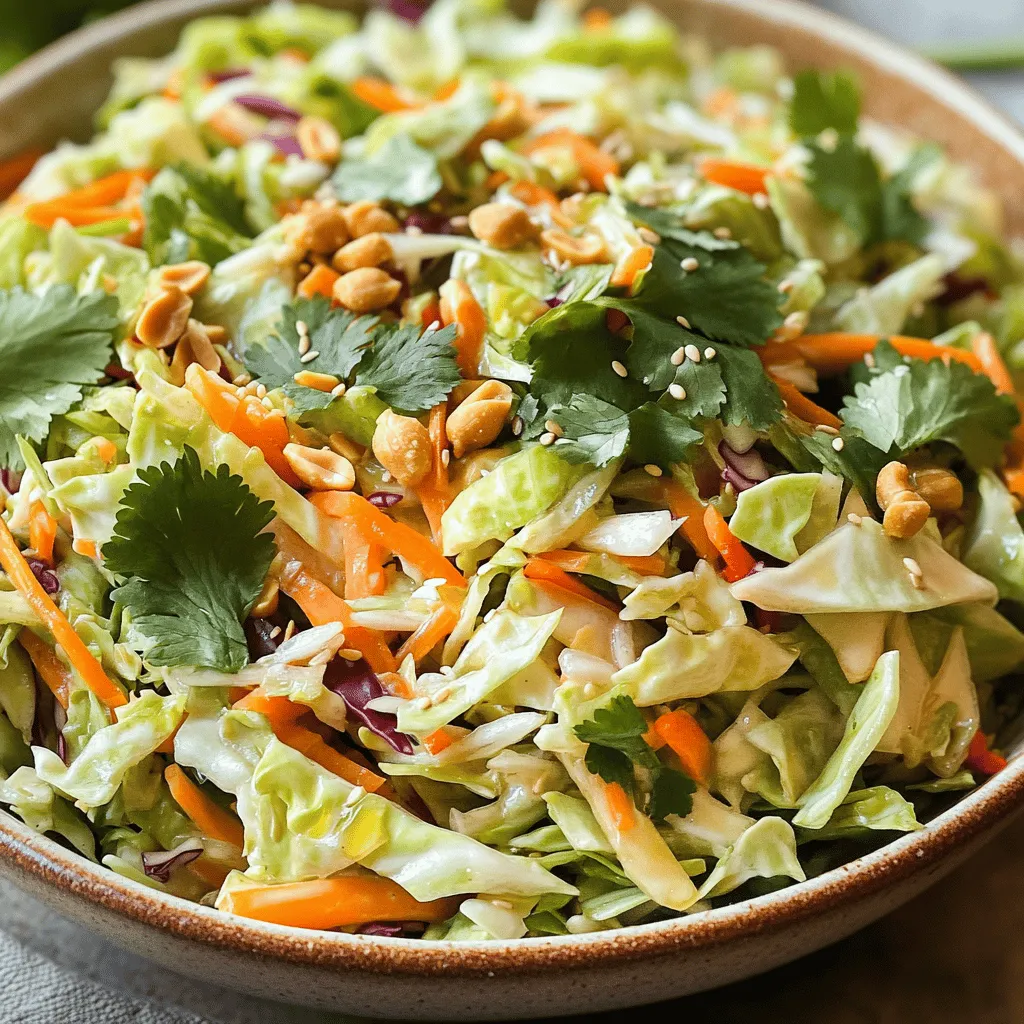
Want a side dish that brings crunch and flavor to any meal? Look no further than my Crunchy Asian Slaw!

For this tasty dish, gather these main items: - 4 salmon fillets - 3 tablespoons unsalted butter, melted - 4 cloves garlic, minced - 1 teaspoon lemon zest - 1 tablespoon fresh lemon juice - 1 teaspoon dried dill - Salt and pepper, to taste - 1 cup cherry tomatoes, halved - 1 zucchini, sliced into half-moons - 1 bell pepper, sliced - 1 red onion, sliced These ingredients make the salmon rich and flavorful. The garlic butter adds a nice touch. You can dress up your dish with: - Fresh parsley - Additional seasonings Adding fresh parsley boosts flavor and color. You can also sprinkle on some extra spices for more zest. For this recipe, you will need: - Sheet pan - Parchment paper - Mixing bowls Using parchment paper helps with easy cleanup. A sheet pan fits everything nicely. Mixing bowls let you combine flavors well for a perfect meal. For the full recipe, check out [Full Recipe]. First, you need to preheat your oven to 400°F (200°C). This step warms up the kitchen and helps cook the salmon evenly. While the oven heats, grab a large sheet pan. Line the pan with parchment paper. This makes cleanup simple and keeps your fish from sticking. In a small bowl, combine three tablespoons of melted butter with four minced garlic cloves. Add one teaspoon of lemon zest and one tablespoon of fresh lemon juice. Mix in one teaspoon of dried dill, plus salt and pepper to taste. Use a whisk to blend it all well. Whisking helps the flavors mix together smoothly. Now, place the salmon fillets on one side of the sheet pan. Brush each fillet with the garlic butter mixture. Make sure to coat them well. Next, in a big bowl, toss together the cherry tomatoes, zucchini, bell pepper, and red onion. Drizzle the remaining garlic butter over the veggies and toss again. Spread the veggie mix on the other side of the sheet pan. Keep everything in a single layer for even cooking. Set your timer for 15 to 20 minutes. The salmon should flake easily when done. Check the veggies, too; they should be tender and a bit caramelized. If you're unsure, you can use a fork to test the salmon. It should break apart easily. Enjoy this simple and quick dish, and don’t forget to check out the Full Recipe for more details! When picking salmon, look for bright color and firm texture. The fish should smell fresh, not fishy. Clear eyes and shiny skin show good quality. You can choose skin-on or skinless salmon. Skin-on keeps the fish moist while cooking. It also adds flavor. Skinless salmon cooks faster and is easier to eat. Both options are great, but your choice may depend on your taste. Cooking time can change based on the thickness of the salmon. Thicker fillets may need a few extra minutes. Always check for doneness by looking for flakiness. Use a fork to gently press the salmon. If it flakes easily, it is done. If not, give it a couple more minutes in the oven. You can also use a meat thermometer. Salmon is done at 145°F (63°C). To make your sheet pan garlic butter salmon even tastier, add herbs and spices. Fresh dill, thyme, or basil work well. You can also try smoked paprika for a nice kick. For butter, switch it up with flavored options. Garlic herb butter or lemon butter can add a new twist. Experiment with your favorite flavors to find what you love! {{image_2}} What veggies work best? I love using colorful vegetables. Cherry tomatoes, zucchini, bell peppers, and red onions work great in this dish. They add flavor and texture. For summer, try asparagus or fresh green beans. These veggies roast well and stay crisp. In winter, opt for root vegetables like carrots or sweet potatoes. They bring warmth and sweetness to the meal. Want to switch things up? Lemon herb marinade is a fresh choice. Mix olive oil, lemon juice, and chopped herbs like parsley or basil. This adds a bright taste. Teriyaki garlic sauce is another fun option. It gives a sweet and savory twist. Just mix soy sauce, garlic, and honey. Brush it on the salmon for a tasty change. Not a salmon fan? Swap it for chicken or tofu. Chicken fillets work well and cook similarly. Just keep an eye on the cooking time. It may need a few extra minutes. For tofu, use firm blocks. Cut them into slices and bake until golden. Adjust cooking time to ensure everything cooks perfectly. You can enjoy this dish with different proteins while keeping the same great flavors. To keep your salmon fresh, use proper containers. Glass or plastic containers with tight lids work best. Store your leftover salmon and veggies in these containers. In the fridge, they last about three days. After that, the flavor and texture may change. When reheating salmon, aim to keep it moist. The best methods include using an oven or a skillet. Preheat the oven to 350°F (175°C). Place the salmon on a baking sheet, cover it with foil, and heat for about 10 minutes. If using a skillet, add a bit of water and cover it. This helps avoid dryness, making your salmon taste fresh again. You can freeze leftover salmon for later use. First, let it cool completely. Then, wrap each piece in plastic wrap. Place the wrapped salmon in a freezer bag. Remove as much air as possible to prevent freezer burn. To thaw, move the salmon to the fridge overnight. This keeps it safe and helps retain its taste. For quick thawing, you can submerge the sealed bag in cold water for about an hour. It takes about 15-20 minutes to cook salmon in the oven at 400°F (200°C). Salmon is done when it flakes easily with a fork. Thicker fillets may need a few extra minutes. Keep an eye on it to avoid overcooking. Using a timer helps ensure perfect results every time. Yes, you can use frozen salmon for this recipe! Just make sure to thaw it first. Place the frozen salmon in the fridge overnight or run it under cold water for quicker thawing. Pat the salmon dry before cooking. This helps the garlic butter stick well and ensures even cooking. I love to pair sheet pan garlic butter salmon with a variety of sides. Here are some great ideas: - Rice: A fluffy bed of jasmine or brown rice works well. - Quinoa: This nutty grain adds a healthy touch. - Salad: A crisp green salad with a light vinaigrette is refreshing. - Roasted Potatoes: Crispy potatoes complement the salmon perfectly. - Steamed Veggies: Broccoli or asparagus add color and nutrition. These sides balance the rich flavors of the salmon and enhance your meal. Check out the Full Recipe for more details! This post walked you through making a great sheet pan garlic butter salmon. You learned about key ingredients, necessary kitchen tools, and step-by-step cooking tips. Don’t forget to explore variations and storage options too. Cooking salmon can be easy and fun! With the right tips and tricks, your meals will be tasty and satisfying. Try this recipe out and enjoy your delicious creation. Your kitchen can become a place for great meals and happy moments!

Sheet Pan Garlic Butter Salmon Simple and Quick Dish

Do you want a quick, tasty meal that anyone can make? My Sheet Pan Garlic Butter Salmon is just what

To make Creamy Cajun Pasta, you need fresh ingredients. Here’s what you’ll need: - 8 oz fettuccine pasta - 2 tablespoons olive oil - 1 pound shrimp, peeled and deveined - 1 bell pepper, diced (any color) - 1 small onion, finely chopped - 3 cloves garlic, minced - 1 teaspoon Cajun seasoning - 1/2 teaspoon smoked paprika - 1 cup heavy cream - 1/2 cup grated Parmesan cheese - Salt and pepper to taste - Fresh parsley for garnish Fettuccine is the star in this dish. It has a wide shape that holds the sauce well. You can also use penne or rigatoni if you prefer. Just remember to cook it until it’s al dente. This ensures your pasta has the right bite. Fresh produce adds flavor and texture. Use any color bell pepper you like. The onion gives sweetness. Garlic adds a strong aroma. Together, these ingredients bring brightness to the dish. Cajun seasoning is key for that bold flavor. It’s spicy and savory, giving the pasta a kick. Smoked paprika adds a hint of smokiness. Heavy cream makes everything rich and smooth. Finally, Parmesan cheese brings a salty, nutty taste. These combine to create a delightful sauce. For the full recipe, check out the details above! Cooking the Pasta Start by boiling a large pot of salted water. Once the water is bubbling, add 8 oz of fettuccine pasta. Cook it according to the package directions until it reaches an al dente texture. This usually takes about 8 to 10 minutes. After cooking, drain the pasta and set it aside. Sautéing the Vegetables While the pasta cooks, grab a large skillet. Heat 2 tablespoons of olive oil over medium heat. Add 1 small onion, finely chopped, and 1 diced bell pepper. Sauté these for about 3 to 4 minutes until they become soft and aromatic. Adding Protein and Seasoning Next, stir in 3 cloves of minced garlic. Cook for another minute until it smells great. Now add 1 pound of peeled and deveined shrimp to the skillet. Sprinkle in 1 teaspoon of Cajun seasoning and 1/2 teaspoon of smoked paprika. Cook the shrimp until they turn pink and are fully cooked, which takes about 3 to 4 minutes. Creating the Cream Sauce Now, lower the heat a bit. Pour in 1 cup of heavy cream. Stir well to mix everything. Allow it to simmer for 2 to 3 minutes. You want the sauce to thicken slightly during this time. Combining Pasta with Sauce Take your drained fettuccine and add it to the skillet. Toss the pasta gently to coat it in the creamy sauce. Add 1/2 cup of grated Parmesan cheese, mixing until it melts and combines well. Don’t forget to season with salt and pepper to taste. Final Touches and Plating Remove the skillet from heat. Chop some fresh parsley and sprinkle it over the top for a lovely garnish. Serve your creamy Cajun pasta hot and enjoy this rich and flavorful delight. For a detailed recipe, check the Full Recipe section. - Achieving the Ideal Al Dente Texture Cook your fettuccine in boiling salted water. Follow the package instructions closely. Check it a minute early. You want it firm but not hard. - Avoiding Rubbery Shrimp Shrimp cook quickly. Add them to the pan last. Only cook until they turn pink, about 3-4 minutes. This keeps them tender. - Ensuring the Sauce is Creamy Use heavy cream and low heat to make the sauce. Stir often and let it simmer. This thickens the sauce without burning it. - Overcooking Ingredients Keep an eye on your veggies and shrimp. Overcooking makes them mushy. Aim for a slight crunch in your veggies for great texture. - Skipping Key Ingredients Don’t skip the Parmesan cheese. It adds rich flavor. Also, Cajun seasoning brings the dish to life. Each ingredient plays a part in the overall taste. - Ideal Side Dishes Pair your pasta with a fresh salad. A simple green salad works well. You could also serve garlic bread on the side. - Garnishing Ideas Use fresh parsley for color and flavor. You can also add lemon zest for brightness. A sprinkle of extra Parmesan cheese also works wonders. {{image_2}} When it comes to Creamy Cajun Pasta, you can mix things up! Here are some fun variations. - Chicken or Tofu Options: If you prefer chicken, use one pound of cooked, diced chicken breast. For a plant-based choice, swap in tofu. Press and cube firm tofu, then sauté it like shrimp. - Vegetarian Alternatives: You can skip meat altogether. Use extra veggies like zucchini or mushrooms to add more flavor. - Gluten-Free Pasta Suggestions: If you need gluten-free pasta, look for rice or corn-based fettuccine. They work well and taste great. - Whole Wheat Alternatives: For a healthier option, whole wheat fettuccine gives a nice nutty flavor. It also adds fiber to your meal. - Spiciness Adjustments: Want more heat? Add extra Cajun seasoning or red pepper flakes. Just a pinch can boost the flavor. - Additional Vegetables: Add more color and nutrition by including spinach, cherry tomatoes, or broccoli. Toss them in during the sauté step for a fresh touch. Feel free to explore these variations to make this dish your own. For the full recipe, check the [Full Recipe]. To store leftovers, let the creamy Cajun pasta cool first. Place it in an airtight container. Keep it in the fridge. Your pasta will last about 3 to 4 days. Always check for signs of spoilage, like an off smell or mold. If you see these, throw it away. When reheating creamy sauces, avoid high heat. Use a gentle method to keep the sauce smooth. The best way is to use a skillet. Add a splash of milk or cream to help it stay creamy. Stir often and heat until warm. You can also use a microwave. Heat in short bursts, stirring in between. This helps maintain the texture and flavor of your delicious dish. Check the [Full Recipe] for details on making this creamy Cajun pasta. What is Cajun Seasoning? Cajun seasoning is a blend of spices. It usually includes paprika, cayenne, garlic, and onion powder. This mix gives dishes a bold, spicy flavor. You can find it in most grocery stores. You can also make your own blend at home. Can I make this dish dairy-free? Yes, you can make Creamy Cajun Pasta dairy-free. Use coconut milk or cashew cream instead of heavy cream. For cheese, use a dairy-free alternative. This gives a similar creamy texture without the dairy. How can I adjust the spiciness? To adjust spiciness, start with less Cajun seasoning. You can always add more later. If you want mild flavors, skip the cayenne. For more heat, add crushed red pepper flakes or hot sauce. How long does it take to make Creamy Cajun Pasta? It takes about 30 minutes to make this dish. You spend about 10 minutes prepping and 20 minutes cooking. This quick time makes it great for busy weeknights. Can I prepare this pasta ahead of time? Yes, you can prepare it ahead. Cook the pasta and sauce separately. Store them in the fridge for up to two days. When ready to eat, reheat them together in a pan. What can I use instead of shrimp? If you cannot find shrimp, try chicken or tofu. Chicken cooks quickly, just like shrimp. Tofu is great for a vegetarian option. Make sure to season it well to enhance the flavor. What if I can’t find fettuccine? If fettuccine is not available, use any pasta shape you like. Penne, spaghetti, or linguine work well too. Just follow the cooking time on the pasta package for best results. For the full recipe, check out the detailed steps above. This blog covered all you need for Creamy Cajun Pasta. We explored key ingredients and how to prepare them. You learned helpful tips for cooking and serving. Variations let you customize the dish with different proteins and pasta types. Remember to store leftovers safely and reheat properly for the best taste. Enjoy making this dish, and don't hesitate to experiment. Your culinary skills will shine with every bite!

Creamy Cajun Pasta Rich and Flavorful Delight

Are you ready to spice up your dinner routine? My Creamy Cajun Pasta is a rich, flavorful delight that brings

- 4 large russet potatoes - 1 cup shredded cheddar cheese - 1 cup black beans - 1 jalapeño - Additional toppings: sour cream, pico de gallo, fresh cilantro - 2 tablespoons olive oil - 1 teaspoon garlic powder - 1 teaspoon smoked paprika - Salt and pepper to taste - Baking sheet - Parchment paper - Large mixing bowl When I make loaded nacho fries, I love to start with fresh, crispy russet potatoes. They fry up perfectly and hold all the toppings well. For the cheese, I always go for sharp cheddar. It melts beautifully and adds a great flavor. Black beans are a must for a hearty touch. The jalapeño adds just the right kick. You can slice it thin for more heat or leave it off if you prefer milder flavors. Don’t forget the toppings! Sour cream adds creaminess, while pico de gallo gives a fresh taste. Fresh cilantro brightens everything up! For seasoning, I use olive oil to help everything stick together. Garlic powder and smoked paprika give the fries a nice depth of flavor. Adjust salt and pepper to your taste. You’ll need a baking sheet lined with parchment paper for easy cleanup. A large mixing bowl helps with tossing the fries in oil and seasonings. I find this setup makes the whole cooking process smooth and simple. For the full recipe, check out the detailed instructions to create these tasty loaded nacho fries! - Step 1: Preheat your oven to 425°F (220°C). This helps the fries get crispy. - Step 2: In a large bowl, toss the cut fries with 2 tablespoons of olive oil, 1 teaspoon of garlic powder, 1 teaspoon of smoked paprika, salt, and pepper. Make sure each fry has plenty of flavor. - Step 3: Spread the fries out on a baking sheet lined with parchment paper. This keeps them from sticking. - Step 4: Bake for 25-30 minutes until the fries turn golden brown and crispy. Flip them halfway for even cooking. - Step 5: Take the fries out of the oven and sprinkle 1 cup of shredded cheddar cheese over them. Then, add 1 cup of black beans and sliced jalapeños on top. - Step 6: Return the fries to the oven for another 5 minutes. This melts the cheese and blends the flavors. - Step 7: Drizzle the fries with 1/2 cup of sour cream. Add 1/2 cup of pico de gallo and some fresh cilantro for a bright touch. Enjoy your loaded nacho fries while they are hot! For a complete guide to make this dish, refer to the Full Recipe. To make great fries, start by cutting your potatoes evenly. This helps them cook at the same rate. Aim for pieces about 1/4 inch thick. A sharp knife works best for this. After cutting, soak the fries in cold water for at least 30 minutes. This step removes extra starch and makes fries crispier. When it comes to cooking, you can choose to bake or fry. Baking is healthier and easier. Preheat your oven to 425°F (220°C) and line a baking sheet with parchment paper. Toss fries with olive oil and seasonings before spreading them in a single layer. Bake for 25-30 minutes, flipping halfway through. If you prefer frying, heat oil in a deep pot. Fry the fries in small batches until golden brown. To add more flavor, try using different spices. Besides garlic powder and smoked paprika, consider chili powder or cumin. These spices can give your fries a nice kick. You can also mix in some herbs like oregano or thyme for a fresh taste. Homemade pico de gallo makes a great topping for loaded nacho fries. To make it, chop fresh tomatoes, onions, and cilantro. Add a squeeze of lime juice and a pinch of salt. This fresh mix brightens up your fries and adds a burst of flavor. Cheese is key to loaded nacho fries. I recommend using sharp cheddar for its strong flavor. You can also mix in Monterey Jack or pepper jack for a spicy twist. For the best melt, grate your cheese instead of using pre-shredded. Pre-shredded cheese often has anti-caking agents that can prevent it from melting well. When it's time to melt the cheese, add it to the fries while they are still hot. Return the fries to the oven for a few minutes. This ensures that the cheese melts evenly and creates that gooey topping everyone loves. {{image_2}} You can easily make Loaded Nacho Fries vegetarian. Start by substituting cheese. Use plant-based cheese for a dairy-free option. You can also replace black beans with lentils or chickpeas for extra protein. Mix in different vegetables too. Try bell peppers, corn, or mushrooms. These add color and flavor. Roasting them enhances their taste, making your nacho fries even better. For meat lovers, add some seasoned ground beef or chicken. You can also use shredded rotisserie chicken for a quick option. If you prefer meat alternatives, consider tempeh or tofu. Just season them with taco spices for more flavor. When cooking protein, use spices like cumin and chili powder. These will amp up the taste of your Loaded Nacho Fries. Want to spice things up? Adjust the amount of jalapeño. Remove the seeds for less heat or keep them for more. You can also use hot sauce as a topping to bring some fire. For alternative spicy toppings, try pickled jalapeños or spicy salsa. You can also add a sprinkle of crushed red pepper flakes. This lets you control the heat to match your taste. Experimenting with these variations can create a dish everyone loves. Check out the Full Recipe for more details on making these tasty Loaded Nacho Fries! To keep your loaded nacho fries fresh, follow these tips. Let the fries cool down first. Place them in an airtight container. This keeps moisture out and helps them stay crispy. You can store them in the fridge for up to 3 days. Reheating fries can be tricky. I recommend using an oven or an air fryer. Preheat the oven to 375°F (190°C). Lay the fries on a baking sheet and bake for about 10-15 minutes. If you use an air fryer, set it to 350°F (175°C) for 5-7 minutes. This helps retain their crunch. Spritz with a little oil before reheating for a fresher taste. You can freeze loaded nacho fries, but timing matters. If you freeze before baking, spread the fries on a baking sheet. Freeze them until solid, then transfer them to a freezer bag. This keeps them from sticking together. If you freeze after baking, let them cool completely. Wrap the fries securely in plastic wrap, then place them in a freezer-safe container. Thaw them in the fridge overnight before reheating. This method helps maintain their flavor and texture. Loaded nacho fries are crispy fries topped with cheese, beans, and other toppings. They blend the fun of fries with the tasty flavors of nachos. Some popular variations include adding guacamole, salsa, or even grilled chicken. You can explore different cheese types or spicy toppings to make it your own. Yes, you can prepare loaded nacho fries ahead of time. For meal prep, cook the fries and store them in the fridge. Put them in an airtight container. When you’re ready to eat, just reheat and add your toppings. This way, you save time and enjoy delicious snacks quickly. To make loaded nacho fries healthier, consider these tips: - Use sweet potatoes instead of russet potatoes. - Bake instead of frying for fewer calories. - Choose low-fat cheese or skip it for a lighter version. - Add more veggies, like bell peppers or onions, for extra flavor and nutrition. You can find loaded nacho fries at many popular chains. Places like Taco Bell and Buffalo Wild Wings offer great versions. Additionally, local pubs or sports bars often have their own take on this dish. Check your area for unique recipes and flavors. Yes, you can easily customize loaded nacho fries for dietary needs. For gluten-free options, ensure your toppings and sauces are gluten-free. Use dairy-free cheese or yogurt for those avoiding dairy. If you want a vegan version, skip the cheese and add more veggies or beans for protein. Loaded nacho fries are a fun and tasty dish. We covered the main ingredients like russet potatoes, cheese, and jalapeños. You learned how to season, bake, and assemble them for the best flavor. Tips included how to get perfect fries and enhance their taste. Plus, I shared ways to customize for different diets or heat levels. Now, it's time to make these loaded nacho fries your own. Enjoy experimenting with your flavors, toppings, and personal touches. Happy cooking!

Loaded Nacho Fries Tasty and Easy Recipe Guide

Craving a flavorful snack that’s quick and easy to make? Look no further! Loaded Nacho Fries bring together crispy potatoes,

- 1 lb ground chicken or turkey - 1/4 cup breadcrumbs - 1 egg - 2 cloves garlic, minced - 1 tablespoon fresh ginger, grated - 2 tablespoons cilantro, finely chopped - 1 tablespoon fish sauce - 1 tablespoon red curry paste To make the meatballs, I start with ground chicken or turkey. This gives them a nice, lean texture. I mix in breadcrumbs and an egg to bind everything together. Garlic and ginger add great flavor, while cilantro brings a fresh touch. Fish sauce gives a salty depth, and red curry paste adds warmth and spice. - 1 can (13.5 oz) coconut milk - 1 cup vegetable broth - 1 bell pepper, sliced - 1 cup snap peas - Juice of 1 lime - 1 tablespoon olive oil For the coconut curry sauce, I use creamy coconut milk and vegetable broth. These create a rich base. I add sliced bell pepper and snap peas for crunch. Lime juice brightens the sauce and adds a zing. A little olive oil helps everything cook evenly. - Salt and pepper to taste Finally, I always finish with salt and pepper. This step makes sure the flavors shine. Adjust these to your taste. This mix of ingredients creates a delicious Thai coconut curry meatball dish that is simple yet satisfying. {{ingredient_image_1}} - In a large bowl, mix together: - 1 lb ground chicken (or turkey) - 1/4 cup breadcrumbs - 1 egg - 2 cloves garlic, minced - 1 tablespoon fresh ginger, grated - 2 tablespoons cilantro, finely chopped - 1 tablespoon fish sauce - 1 tablespoon red curry paste - Salt and pepper to taste Mix everything until it's well combined. It should feel sticky but not too wet. - Shape the mixture into small meatballs, about 1-inch wide. Make sure they are even in size. Place them on a tray to keep them organized. - Heat 1 tablespoon olive oil in a large skillet over medium heat. This helps to brown the meatballs evenly. - Once the oil is hot, add the meatballs. Brown them on all sides for about 5-7 minutes. Keep an eye on them to avoid burning. When they are golden brown, remove them from the skillet and set them aside. - In the same skillet, pour in: - 1 can (13.5 oz) coconut milk - 1 cup vegetable broth Stir well to combine the liquids. - Next, add: - 1 sliced bell pepper - 1 cup snap peas Bring the mixture to a gentle simmer. This step helps the vegetables soften and release their flavors. - Carefully place the browned meatballs back into the skillet. Let everything simmer together for about 10-15 minutes. This helps the meatballs cook through and the sauce thicken a bit. - Just before serving, squeeze the juice of 1 lime over the mixture and stir gently. This adds a bright, fresh flavor. To make juicy meatballs, use fresh ground chicken or turkey. The right fat content makes a big difference. If you can, add a bit more fat for flavor. Mix your ingredients gently. Overmixing can make them tough. Aim for a light touch when forming the meatballs. Another trick is to chill the mixture before shaping. It helps them hold their shape better. Common mistakes include using too much bread or not enough moisture. These can lead to dry meatballs. Also, don't skip the fish sauce. It adds depth and umami. Remember, undercooking is better than overcooking. You can simmer them longer to heat through. For spices, use fresh herbs like cilantro and ginger. They bring brightness to the dish. Red curry paste is key for a rich flavor. Start with one tablespoon, but you can adjust it. If you want more heat, add another spoon. You can also mix in lime zest for a fragrant touch. Don't forget to taste as you cook. Adjust salt and pepper to your liking. This helps the flavors develop fully. Pair these meatballs with jasmine rice or rice noodles. Both soak up the curry sauce well. For a colorful plate, add steamed veggies like broccoli or carrots. When plating, stack the meatballs high for a nice look. Drizzle extra sauce over them for shine. Garnish with fresh cilantro for that pop of green. A lime wedge on the side adds a nice touch too. Pro Tips Texture Matters: For a lighter meatball, consider using panko breadcrumbs instead of regular breadcrumbs. They will give a crispier texture. Customize the Spice: Adjust the amount of red curry paste according to your spice tolerance. Start with a smaller amount and add more if desired. Freshness is Key: Use fresh lime juice for the best flavor. The acidity brightens the dish and enhances the overall taste. Meal Prep Friendly: These meatballs freeze well! Make a double batch and freeze half for an easy meal later. {{image_2}} You can swap out the ground chicken for ground beef or pork. This change adds a different taste and texture. Just keep in mind that cooking times may vary slightly. If you prefer a meat-free option, use plant-based meat. Many brands offer great substitutes that mimic the taste of meat. They work well and absorb the curry flavors nicely. You can change the coconut curry sauce by using different types of curry paste. Red, green, or yellow curry paste all bring unique flavors. Red curry is spicier, while yellow is milder. For a dairy-free option, stick with coconut milk. This keeps the sauce creamy and rich without any dairy. Adding more vegetables to the dish can enhance its flavor and nutrition. Carrots, zucchini, or broccoli can mix well with the curry. You can also swap in seasonal vegetables to keep the dish fresh and exciting. Try using asparagus in spring or squash in fall for different tastes. To store leftovers, place the meatballs and sauce in an airtight container. This keeps them fresh. You can refrigerate them for up to four days. Make sure they cool down before sealing the container. This helps prevent condensation. Yes, you can freeze Thai coconut curry meatballs. Just make sure to cool them first. Place the meatballs in a freezer-safe bag or container. They can last for up to three months in the freezer. To reheat, thaw them overnight in the fridge for best results. For quick reheating, use a microwave. Place the meatballs in a microwave-safe dish. Cover with a damp paper towel to keep them moist. Heat in 30-second bursts until warm. You can also use an oven. Preheat it to 350°F. Place the meatballs in an oven-safe dish and cover with foil. Heat for about 15-20 minutes. This method keeps the meatballs juicy and tasty. Yes, you can! Ground turkey or pork works well too. If you prefer beef, that’s fine. Just remember to adjust cooking times. The meat needs to be fully cooked. Keep an eye on it while it browns. The spice level can change based on your taste. The red curry paste gives it heat. If you want a milder dish, add less paste. You can also add a little sugar to balance the heat. For more spice, add extra curry paste or red pepper flakes. These meatballs pair great with jasmine rice or rice noodles. You can also serve them with a fresh salad. Steamed vegetables make a good side too. Think bell peppers, snap peas, or broccoli for color and crunch. To make this dish gluten-free, swap regular breadcrumbs for gluten-free ones. Check the fish sauce label; some brands are gluten-free. Always read labels to be sure. This way, everyone can enjoy the meal! This blog post covered how to make Thai coconut curry meatballs. We talked about the main ingredients, like ground chicken, garlic, and red curry paste. Then, I shared step-by-step instructions that help you mix, shape, and cook the meatballs. I also provided tips for perfect flavor and texture. In conclusion, you can create a delicious meal that’s easy to adjust to your tastes. Experiment with different proteins, sauces, and side dishes for endless options. Enjoy making these meatballs again and again!

Thai Coconut Curry Meatballs Flavorful and Easy Recipe

If you’re craving a warm, hearty dish that’s packed with flavor, you’re in the right place! My Thai Coconut Curry

- 200g pasta (fusilli or penne) - 200g feta cheese - 300g cherry tomatoes, halved - 4 cloves garlic, minced - 3 tablespoons olive oil - 1 teaspoon dried oregano - 1 teaspoon red pepper flakes (optional) - Salt and pepper to taste - Fresh basil leaves for garnish - Grated Parmesan cheese for serving (optional) For Baked Feta Pasta, the right ingredients make all the difference. You begin with pasta. Fusilli or penne works best. They hold the sauce well. Next is feta cheese. It adds creaminess and tang. Cherry tomatoes bring sweetness and color. Halve them for even roasting. Garlic gives a nice kick. Use fresh and minced for the best taste. Olive oil helps everything bake nicely. Dried oregano adds an earthy flavor. You can add red pepper flakes for heat, but this is optional. Don’t forget salt and pepper for seasoning. Fresh basil leaves make a great garnish. If you like cheese, try grated Parmesan on top. These ingredients create a bright, flavorful dish that everyone will love. You can find the Full Recipe at the end of this article. - Preheat the oven to 200°C (400°F). - In a large baking dish, combine the halved cherry tomatoes, minced garlic, olive oil, dried oregano, salt, and pepper. Toss until the tomatoes are coated. - Place the block of feta cheese right in the center of the tomato mix. - Drizzle a bit of olive oil over the feta and add a pinch of salt and pepper. - Put the baking dish in the oven and bake for 25-30 minutes. You want the tomatoes to blister and the feta to get soft. - While the feta and tomatoes bake, cook the pasta in boiling water. Cook until it is al dente, then drain the pasta. - Once the feta and tomatoes are out of the oven, use a fork to mash the feta into the roasted tomatoes. This makes a creamy sauce. - Add the cooked pasta to the dish and gently mix it until the pasta is coated evenly with the sauce. - Garnish your dish with fresh basil leaves. If you like, sprinkle some grated Parmesan cheese on top before serving. Enjoy your delicious Baked Feta Pasta! - Choose high-quality feta cheese for the best flavor. - Don't overcrowd the baking dish for even roasting. This helps the tomatoes cook right. - Add lemon zest for brightness. It makes the dish taste fresh and lively. - Incorporate other vegetables like bell peppers or zucchini. These add color and nutrition. - Prep ingredients ahead of time for a quicker cooking experience. This saves you time during busy nights. - Adjust baking time based on your oven's efficiency. Every oven heats a bit differently, so keep an eye on it. Experiment with these tips to make your Baked Feta Pasta even better. Each step helps bring out the flavors. Enjoy creating your perfect dish! {{image_2}} You can make this dish even better! Add spinach or kale for more nutrients. These greens cook down well and mix with the creamy feta. If you want a vegan twist, swap feta with a plant-based cheese. This keeps the creamy texture while making it dairy-free. Want some protein? Grilled chicken or shrimp can make this meal heartier. Simply cook your protein on the side and add it before serving. For a vegetarian option, toss in chickpeas. They are tasty and fill you up while keeping the meal meat-free. Let’s explore flavors! You can try different herbs like thyme or rosemary. These will give your dish a new taste. Also, don’t be afraid to change up the pasta shape. Use farfalle or spaghetti for a fun twist. Each shape can change how the sauce clings to your meal. Store any leftovers in an airtight container in the refrigerator. This keeps the pasta fresh for up to 3 days. Let the dish cool before sealing it. This helps maintain the best flavor and texture. To reheat, use your oven. Preheat it to 180°C (350°F). Place the dish in the oven for 10-15 minutes. This ensures the pasta gets warm all the way through. You can also microwave it. Use short bursts to warm it up. This prevents the pasta from drying out. You can freeze Baked Feta Pasta for up to a month. Just make sure the feta cheese stays intact before freezing. Thaw it in the refrigerator overnight for best results. Reheat it after thawing, and enjoy the creamy goodness again! Fusilli and penne are great options for holding the sauce. Fusilli twists catch the creamy feta and tomatoes well. Penne's shape helps it soak up the flavors too. Yes, you can prep ingredients ahead. Chop the tomatoes and garlic, and store them. Bake right before serving for the best flavor and texture. To make this dish gluten-free, use gluten-free pasta. Many brands offer delicious options that work well in this recipe. You can control the heat by adjusting red pepper flakes. Omit them for a milder flavor or add more for extra heat. It’s your dish, so make it how you like! For the complete cooking instructions, check out the Full Recipe section. Baked feta pasta is simple and delicious. You need just a few key ingredients: pasta, feta, and cherry tomatoes. Our step-by-step guide helps you bake everything to perfection. You can add veggies or protein to make it your own. Remember, high-quality feta makes a big difference. Store any leftovers in the fridge or freezer for later. This dish is easy to prepare, great for sharing, and always satisfies. Enjoy your tasty creation and feel free to experiment with flavors next time!

Baked Feta Pasta with Cherry Tomatoes Delightful Recipe

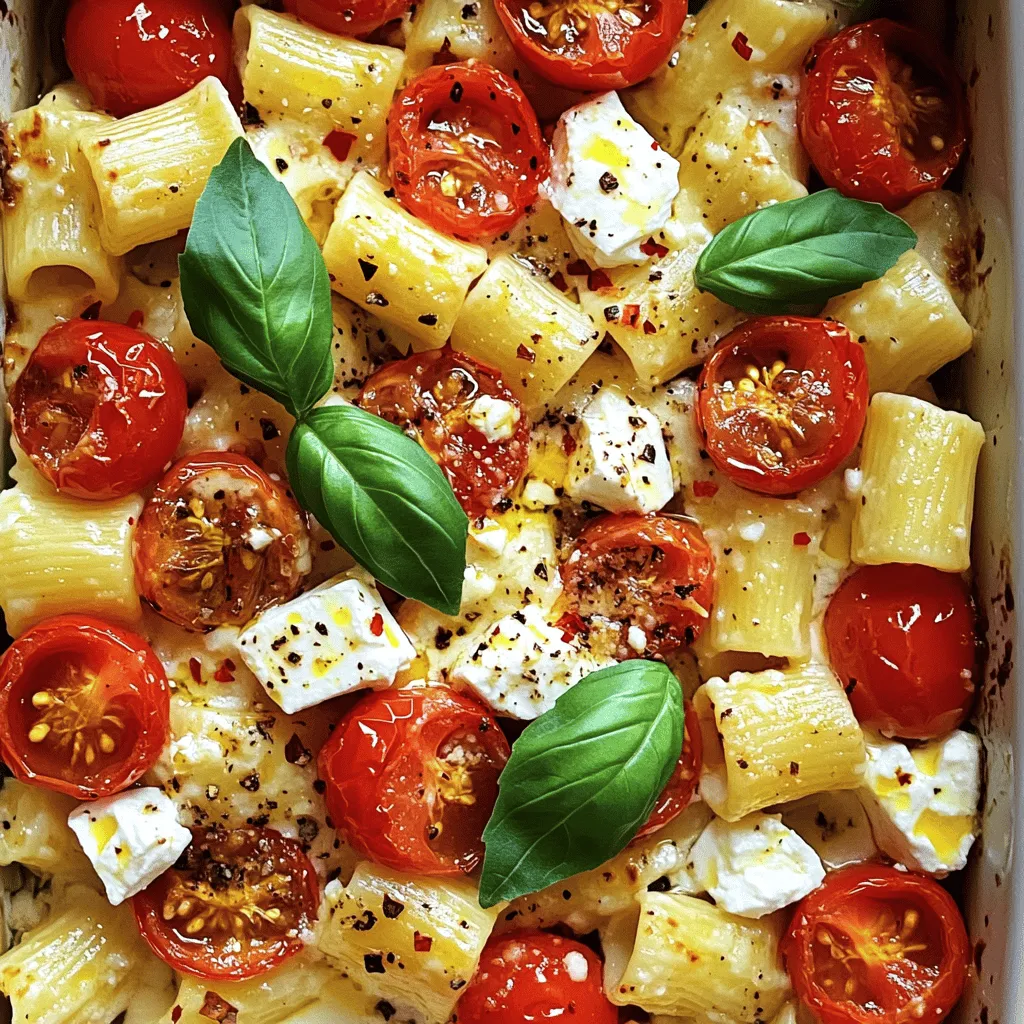
Are you ready to delight your taste buds with a simple yet scrumptious meal? Baked Feta Pasta with Cherry Tomatoes

To make a Classic Chicken Caesar Salad, you need fresh and tasty ingredients. Here is the list of what you'll need: - Boneless, skinless chicken breasts - Romaine lettuce - Cherry tomatoes - Parmesan cheese - Homemade or store-bought ranch dressing - Croutons - Olive oil - Garlic powder - Salt and black pepper - Fresh herbs for garnish Each ingredient plays a key role in this salad. The chicken provides protein, while romaine gives crunch. Cherry tomatoes add a pop of color and sweetness. Parmesan cheese brings a salty, nutty flavor. Dressing binds everything together and adds creaminess. When choosing your ingredients, freshness is important. Look for vibrant romaine and ripe cherry tomatoes. High-quality cheese makes a big difference too. If you have time, consider making your own ranch dressing for a personal touch. Now you have your ingredients ready! You can find the Full Recipe to prepare this delightful dish. Enjoy your cooking! To start, we need to marinate the chicken. Rub the chicken breasts with olive oil, garlic powder, salt, and black pepper. Let it marinate for 15 minutes. This step adds flavor and keeps the chicken juicy. Next, let's cook the chicken. You can grill or bake it. If you choose to grill, preheat to medium-high heat. Place the chicken on the grill and cook for about 6-7 minutes on each side. Make sure it reaches 165°F (75°C). If you prefer baking, preheat your oven to 400°F (200°C). Bake the chicken for 20-25 minutes until fully cooked. After cooking, let the chicken rest for 5 minutes. This helps the juices settle, making the meat tender when you slice it. Now, we can assemble the salad. In a large mixing bowl, combine chopped romaine lettuce, halved cherry tomatoes, and half of the shaved Parmesan cheese. This mix adds a fresh crunch. Next, it’s time to dress the salad. Drizzle your ranch dressing over the salad ingredients. Toss gently until everything is well coated. You want each bite to have that creamy flavor. Finally, add the sliced chicken on top of the tossed salad. Sprinkle croutons and the remaining Parmesan cheese over the salad for extra texture and flavor. For serving, you can plate the salad individually or serve it family-style in a large bowl. This makes it fun and easy for everyone to enjoy. To finish, garnish with fresh herbs like parsley or basil. This adds a pop of color and freshness. Your Classic Chicken Caesar Salad is now ready to be enjoyed! For the full recipe, check out the detailed instructions above. Resting chicken is key to juicy meat. When you cook chicken, it loses some juices. Letting it rest for about 5 minutes helps those juices return. This makes each bite tender and full of flavor. For safety, the internal temperature of chicken must reach 165°F (75°C). Use a meat thermometer to check the temperature. This ensures that all harmful bacteria are gone. Trust me, a perfectly cooked chicken makes your salad shine. Making your own ranch dressing is easy and fun. Just mix together: - 1 cup mayonnaise - 1 cup buttermilk - 1 teaspoon garlic powder - 1 teaspoon onion powder - Salt and pepper to taste This dressing pairs wonderfully with your salad. If you want something different, try a zesty vinaigrette instead. You can mix olive oil, vinegar, and herbs for a fresh spin. You can choose between store-bought and homemade croutons. Homemade croutons are simple and tasty. Just cut bread into cubes, toss them in olive oil, and season with garlic powder, salt, and pepper. Bake them in the oven until crispy. If you want to save time, store-bought croutons work just fine. Look for options that have good flavor. You can also season your croutons with herbs like oregano or thyme for extra taste. For the full recipe, check out the Crispy Ranch Chicken Caesar Salad. {{image_2}} You can change the main protein in your salad. Shrimp or tofu work well. They add unique flavors and textures. If you want a lighter option, try grilled shrimp. For a plant-based choice, use tofu. You can also change the greens. While romaine is classic, kale or spinach adds a new twist. Toss in some bell peppers or cucumbers for extra crunch. The dressing can change the whole taste of your salad. While the classic Caesar dressing is rich and creamy, a vinaigrette offers a lighter touch. Try a lemon vinaigrette for a fresh taste. You can even mix your own dressings at home. Combine yogurt, garlic, and lemon juice for a healthy twist. Using local ingredients can make your salad special. If you are near the coast, add fresh seafood. Fresh herbs from your garden can enhance flavor. Incorporate spices from local cuisine to create a unique blend. Think about adding chili flakes or smoked paprika. This way, you can enjoy your Chicken Caesar Salad with a local flair. For a full recipe, check out the Crispy Ranch Chicken Caesar Salad recipe. To keep your Chicken Caesar Salad fresh, follow these steps: - Use airtight containers: Glass or plastic containers with tight lids work best. - Separate ingredients: Store the salad and dressing apart to avoid sogginess. - Cover chicken strips: Wrap them in plastic wrap or foil to keep moisture in. Your Chicken Caesar Salad stays fresh in the fridge for about 3 days. After that, the quality might drop. Always check for any odd smells or changes in texture before eating leftovers. When you reheat chicken, you want it juicy and tender. Here’s how: - Use low heat: Reheat in a pan on low heat, adding a splash of water or broth for moisture. - Cover with a lid: This traps steam, keeping the chicken from drying out. - Check often: Heat until just warm, about 5-7 minutes, to avoid overcooking. For the full recipe, check the Crispy Ranch Chicken Caesar Salad section above. You can try many options if you want to skip chicken. Here are some good choices: - Grilled shrimp: Quick and tasty. - Tofu: Great for a plant-based meal. - Grilled steak: Adds rich flavor. - Seared scallops: A fancy touch. - Chickpeas: Easy and filling. Each option brings a unique taste and texture. Pick what you like best! Yes, you can prepare parts of this salad ahead of time. Here are some tips: - Chicken: Cooked chicken stays fresh for up to three days in the fridge. - Lettuce: Wash and dry it. Store it in a sealed bag to keep it crisp. - Dressing: Make your ranch dressing a day before. Keep it in an airtight container. - Croutons: Store croutons in a dry place. They stay crunchy longer. Assemble the salad just before serving. This keeps everything fresh and tasty! A classic Chicken Caesar Salad has about 500 to 600 calories per serving. Here’s a quick breakdown: - Chicken breast: Around 200 calories. - Romaine lettuce: About 15 calories. - Cherry tomatoes: Roughly 30 calories. - Parmesan cheese: Around 110 calories. - Ranch dressing: About 150 calories. - Croutons: Approximately 100 calories. The total can change based on the amount of dressing and toppings you use. Enjoy this tasty salad without worry! This blog post covered how to make a tasty Chicken Caesar Salad. We talked about the key ingredients, cooking and assembling steps, and tips for perfecting your dish. You learned about ingredient swaps, storage tips, and variations to keep things fun. With this knowledge, you can enjoy your salad in many ways. Experiment with flavors, and make it your own! Get ready to impress your family and friends with your cooking skills.

Classic Chicken Caesar Salad Tasty and Healthy Recipe

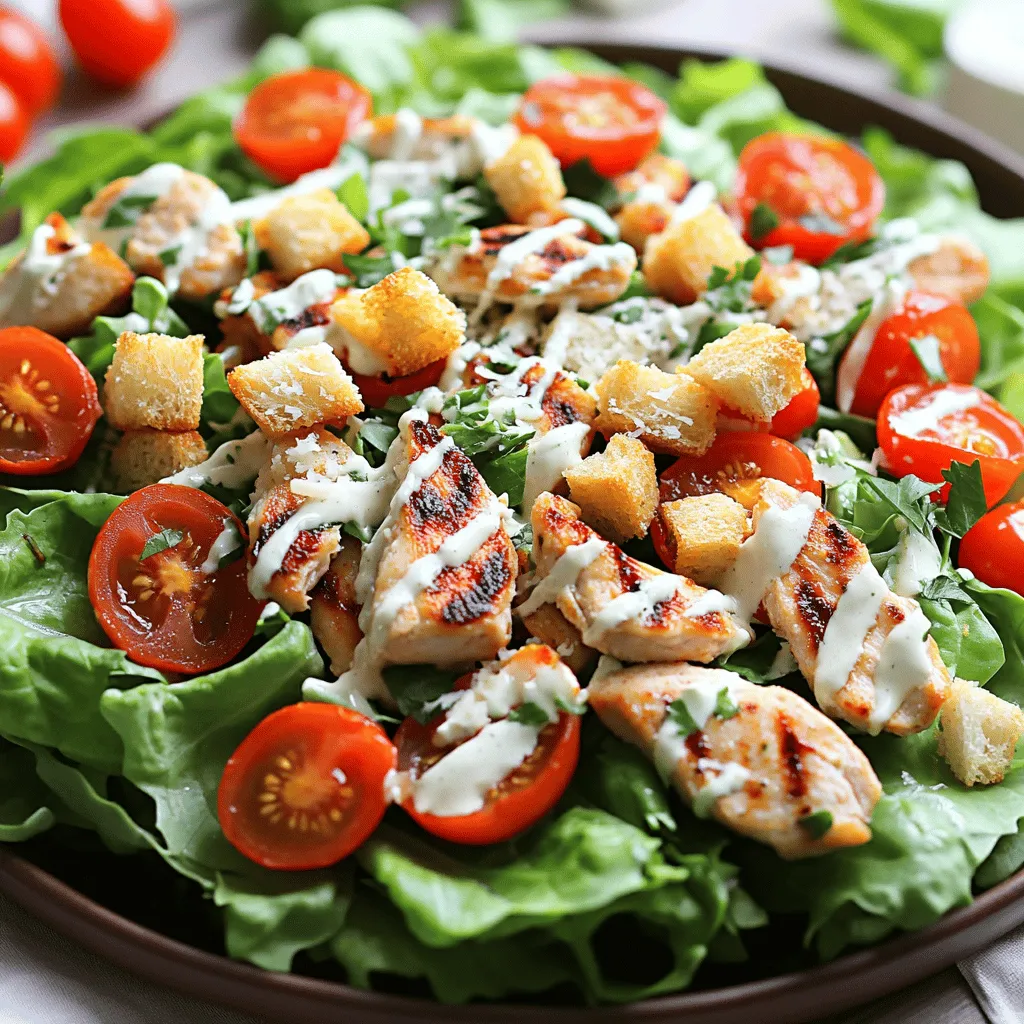
Are you craving a delicious dish that’s both tasty and healthy? Look no further! My Classic Chicken Caesar Salad recipe

- 1 lb large shrimp, peeled and deveined - 2 tablespoons honey - 3 cloves garlic, minced - 1 tablespoon soy sauce - 1 tablespoon sriracha (adjust for spice preference) - 1 tablespoon olive oil - 1 teaspoon sesame oil - 1 tablespoon fresh ginger, grated These main ingredients create a sweet and spicy flavor that makes this dish shine. The honey adds a rich sweetness. Garlic gives it depth, while sriracha brings the heat. - 2 green onions, sliced (for garnish) - Sesame seeds (for garnish) - Fresh herbs for added flavor Garnishing your shrimp with green onions and sesame seeds adds a colorful touch. Fresh herbs also boost flavor and freshness. I love using cilantro or parsley for this dish. These options help make the meal look beautiful and inviting. For the full recipe, check the detailed instructions included. How to properly season the shrimp Start by patting the shrimp dry with paper towels. This step helps the shrimp sear better. Next, sprinkle salt and pepper on both sides of the shrimp. This simple seasoning brings out the natural flavors. Making the honey garlic sauce In a medium bowl, mix together honey, minced garlic, soy sauce, sriracha, sesame oil, and fresh ginger. Use a whisk to blend everything until smooth. This sauce is sweet, spicy, and full of flavor. Set it aside for later. Cooking the shrimp to perfection Heat olive oil in a large skillet over medium-high heat. When the oil is hot, add the shrimp in a single layer. Cook each side for about 1-2 minutes. The shrimp will become pink and opaque when done. Remove them from the skillet and keep them warm. Reducing the sauce for the ideal texture Pour the honey garlic sauce into the same skillet. Bring it to a simmer and let it cook for about 2-3 minutes. This step thickens the sauce and enhances the flavors. After reducing, add the shrimp back to the skillet. Toss them well in the sauce for about one minute. How to plate the dish beautifully Transfer the shrimp to a serving plate. Drizzle any remaining sauce over the shrimp. For a nice touch, garnish with sliced green onions and a sprinkle of sesame seeds. This adds color and makes the dish pop. Recommended side dishes for the meal Serve your spicy honey garlic shrimp over a warm bed of rice. You can also pair it with stir-fried vegetables for a full meal. These sides balance the flavors and add more nutrition. For the full recipe, check the earlier section. To avoid overcooking shrimp, cook them until they turn pink and opaque. This usually takes 1 to 2 minutes on each side. If you see them curl up tightly, they are done. Overcooked shrimp can become rubbery and tough, so watch them closely. For the best sear, use a hot skillet with enough oil. Make sure the shrimp are dry before adding them to the pan. It helps create a nice golden crust. Do not overcrowd the pan; this can lower the heat and steam the shrimp instead of searing them. You can adjust the spice level by adding more or less sriracha. If you like it hot, add an extra tablespoon. For a milder taste, use less. You can also try other spices, like chili flakes or paprika, to change the flavor. For extra flavor, consider adding ingredients like bell peppers or snap peas. These add color and crunch. You can also toss in some fresh herbs, like cilantro or basil, to brighten the dish. Experimenting with flavors keeps every bite exciting. Try these tips to make your spicy honey garlic shrimp even better. For the full recipe, check out the instructions above. {{image_2}} You can switch up the shrimp in this dish. Try chicken or tofu for a tasty twist. - Chicken: Use boneless, skinless chicken breasts cut into bite-sized pieces. - Tofu: For a plant-based option, use firm tofu. Press it to remove extra moisture. These swaps maintain the core flavors while offering new textures. You can get creative with different sauces or adjust the heat. - Sauce Options: Try teriyaki or sweet chili sauce for a different taste. - Heat Level: If you want it spicier, add more sriracha or fresh chili peppers. Sweeten it up by adding more honey or maple syrup. Experimenting with these ideas keeps your meals exciting and fun! For a full recipe, check out the Spicy Honey Garlic Shrimp recipe. After enjoying your spicy honey garlic shrimp, store any leftovers right away. Place the shrimp in a shallow container. This helps them cool quickly. Cover the container tightly with a lid or plastic wrap. Store it in the fridge for up to three days. If you want to keep the shrimp longer, freezing is a great option. First, make sure the shrimp are completely cool. Then, place them in a freezer-safe bag. Squeeze out as much air as possible before sealing. You can freeze the shrimp for up to three months. Label the bag with the date so you know when you put it in. To reheat your shrimp, the best method is on the stove. Heat a small amount of oil in a skillet over medium heat. Add the shrimp and cook for about 2-3 minutes. Stir them gently until they're heated through. This keeps them juicy and flavorful. You can also use a microwave if you're in a hurry. Place the shrimp on a microwave-safe plate. Cover it loosely with a damp paper towel. Heat in 30-second intervals until warm. Be careful not to overcook the shrimp, as they can become tough. Enjoy your leftovers just like the first time! For the full recipe, check the earlier section. What can I serve with Spicy Honey Garlic Shrimp? You can serve this shrimp with rice or noodles. They soak up the sauce well. Stir-fried veggies also pair nicely. A fresh salad adds a crisp bite. How can I make this recipe in advance? You can prep the sauce ahead. Store it in the fridge for up to three days. You can also peel and devein the shrimp ahead of time. Just keep them in the fridge until you are ready to cook. What temperature should shrimp be cooked to? Shrimp should reach a safe internal temperature of 120°F (49°C). When cooked, they turn pink and opaque. Use a meat thermometer for best results. Is it safe to freeze cooked shrimp? Yes, it is safe to freeze cooked shrimp. Place them in an airtight container. They can last in the freezer for about three months. Thaw them in the fridge before reheating. Feel free to explore the full recipe to get started on this tasty dish! Spicy Honey Garlic Shrimp is a fun and tasty dish to make. You learned about the main ingredients and how to prepare them. I shared tips for cooking shrimp perfectly and suggested ways to serve the dish. I also covered variations and storage tips for leftovers. With just a few easy steps, you can enjoy this flavorful meal at home. Feel free to try different flavors to make it your own. Enjoy making and sharing this delicious recipe!

Spicy Honey Garlic Shrimp Tasty and Easy Recipe

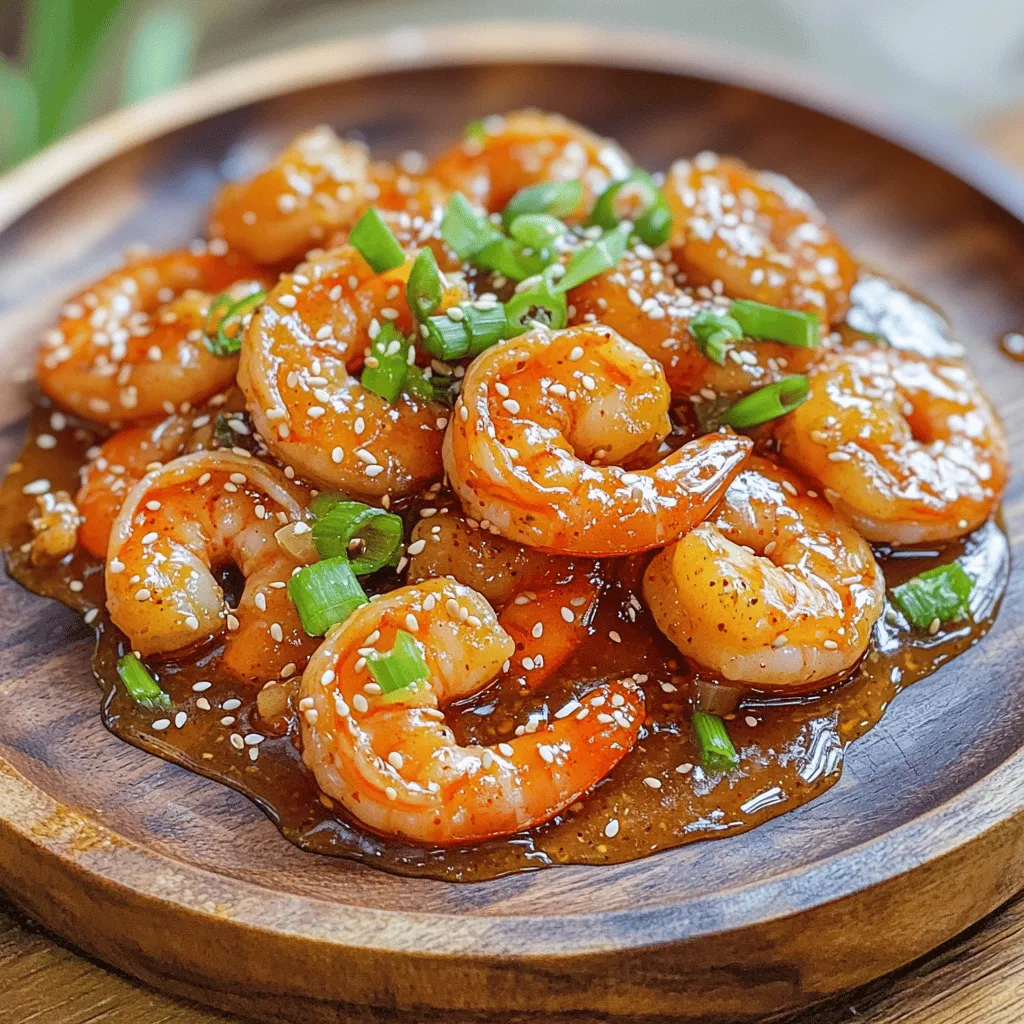
Are you ready to spice up your dinner routine? This Spicy Honey Garlic Shrimp recipe is not just tasty but

Older posts
Newer posts
← Previous Page1 … Page80 Page81 Page82 Page83 Next →

dsad

© 2026 Southern Dishes • Built with GeneratePress

Our Policies

  • Copyright Policy
  • Cookie Policy
  • GDPR Policy
  • Privacy Policy
  • Disclaimer
  • Terms Of Use

More Information

  • Home
  • About
  • Contact
  • Appetizers
  • Dessert
  • Dinner
  • Drinks
©2026, Southern Dishes About Back To Top