Skip to content
DisclaimerTerms Of UseGDPR PolicyCookie Policy

Southern Dishes

  • Home
  • Drinks
  • Appetizers
  • Dinner
  • Dessert
  • About
  • Contact
  • Privacy Policy
DisclaimerTerms Of UseGDPR PolicyCookie Policy

NO-ING-IMG

To make a tasty BLT chicken salad, gather these main ingredients: - 2 cups cooked chicken breast, shredded - 4 strips of turkey bacon, cooked and crumbled - 2 cups romaine lettuce, chopped - 1 cup cherry tomatoes, halved - 1/2 cup cucumber, diced - 1/4 cup red onion, finely chopped - 1/3 cup Greek yogurt - 1 tablespoon mayonnaise - 1 tablespoon Dijon mustard - 1 teaspoon garlic powder - Salt and pepper to taste - Fresh basil leaves, for garnish Using the right amounts helps the salad taste great. Here are the key quantities: - Chicken: Use 2 cups of cooked chicken. This gives a hearty base. - Bacon: Four strips of turkey bacon add crunch and flavor. - Lettuce: Two cups of romaine for freshness. - Tomatoes: One cup of cherry tomatoes for sweetness. - Cucumber: Half a cup keeps it crisp. - Onion: A quarter cup adds a nice bite. You can change up some ingredients for added flavor. Here are some ideas: - Lettuce: Swap romaine for arugula or spinach for a different taste. - Tomatoes: Use grape tomatoes or even diced heirloom tomatoes for variety. - Cucumber: Try zucchini or bell peppers for a unique twist. - Herbs: Add parsley or dill for extra freshness. These options keep your salad exciting and fresh. Experiment with what you like best! Start by shredding your cooked chicken breast. Place it in a large mixing bowl. Shredding makes it mix well with other ingredients. You can use rotisserie chicken for quick prep. It saves time and adds great flavor. Next, take four strips of turkey bacon. Heat a skillet over medium heat. Cook the bacon until it’s crispy, which takes about 5 to 7 minutes. Once done, let it cool. Crumble the bacon into small pieces. This adds a nice crunch to your salad. Now, it’s time to mix the main salad ingredients. Add 2 cups of chopped romaine lettuce to the bowl with chicken. Then, toss in 1 cup of halved cherry tomatoes, 1/2 cup of diced cucumber, and 1/4 cup of finely chopped red onion. These veggies bring color and freshness to your meal. In a small bowl, combine the dressing ingredients. Mix 1/3 cup of Greek yogurt with 1 tablespoon of mayonnaise and 1 tablespoon of Dijon mustard. Add 1 teaspoon of garlic powder, salt, and pepper to taste. Stir until it’s smooth and creamy. This dressing makes the salad rich and delicious. Pour the dressing over the salad ingredients. Gently fold everything together. Ensure all components are coated with the dressing. Once mixed, divide the chicken salad into meal prep containers. You can layer extra romaine on the bottom if you want. This keeps the salad fresh and crisp. Finally, add a touch of fresh basil leaves on top of each container. This adds a pop of color and a lovely aroma. Your BLT Chicken Salad is now ready for the week! Enjoy this tasty, healthy meal anytime. Meal prepping keeps your week easy and fun. Here are some tips to help you: - Choose Fresh Ingredients: Use fresh chicken and crisp veggies for the best taste. - Cook in Batches: Make more than one serving at a time. It saves time later. - Keep it Cold: Store your meal prep containers in the fridge right away. This keeps the salad fresh. - Use Airtight Containers: They help keep flavors in and moisture out. You can make this salad your own! Here are some ideas: - Add More Veggies: Try bell peppers or avocado for extra crunch and flavor. - Switch the Protein: Feel free to use grilled shrimp or chickpeas for variety. - Change the Dressing: Swap Greek yogurt for ranch or add a splash of lemon juice for zing. - Herb Options: Fresh parsley or cilantro can add a unique taste to your salad. Make your meal prep look great! Here are some easy tips: - Layer Ingredients: Start with lettuce on the bottom, then add chicken and veggies. This keeps it fresh. - Use Clear Containers: They show off the colors of your salad. It's more inviting! - Garnish: Add fresh basil leaves on top. They look nice and smell great. - Serve with Sides: Include some pita chips or whole-grain crackers for crunch. These simple tips will make your BLT Chicken Salad Meal Prep easy, tasty, and fun to enjoy! {{image_2}} You can switch out the chicken for other meats. Try turkey or shrimp for a fun twist. If you prefer plant-based options, use chickpeas or tofu. Both add protein and texture. These changes keep the salad fresh and exciting. Experiment with various dressings to change the flavor. Instead of Greek yogurt, use ranch or Caesar dressing. For a zesty kick, try adding some salsa or a splash of lemon juice. You can even mix in avocado for creaminess. These choices let you create your favorite taste. Seasonal ingredients can boost your salad's taste. In summer, add sweet corn or bell peppers for crunch. Fall brings roasted squash or apples, adding warmth. In winter, try pomegranate seeds or shredded carrots for color and sweetness. These seasonal add-ins make your salad unique each time. To keep your BLT chicken salad fresh, store it in airtight containers. Glass or plastic containers work well. Make sure to seal them tightly. This helps keep out air and moisture. If you want extra freshness, layer some romaine lettuce at the bottom. This adds a nice crunch when you eat it later. Your chicken salad lasts about 3 to 4 days in the fridge. Use it up within this time for best taste and safety. To reheat, avoid microwaving the salad. It can make the lettuce wilt. Instead, enjoy it cold or at room temperature. If you must heat it, try just warming the chicken separately. You can freeze BLT chicken salad, but it changes texture. The veggies may lose their crunch when thawed. If you want to freeze it, store just the chicken and dressing. Leave out the fresh veggies. When ready to eat, let it thaw overnight in the fridge. Add fresh veggies just before serving for the best taste. Yes, you can use regular bacon. Just cook it until crispy. The flavor will be richer. Turkey bacon is lower in fat. It gives a lighter taste. Choose what you like best! It takes about 15 minutes. This recipe is quick and easy. You can have a tasty meal ready in no time. Perfect for busy days! Yes, this recipe is gluten-free. All the ingredients are safe for gluten-free diets. Just make sure to check your brands. Some may have hidden gluten. You can serve it with crispy pita chips. Fresh fruit makes a nice side too. Enjoy it with whole grain bread for a sandwich. Each option adds a nice touch! You now have a simple guide to making BLT Chicken Salad. We covered the main ingredients, cooking steps, and tips to customize your dish. You also learned how to store it and answered common questions. Remember, this salad is not just tasty; it’s also easy to make and meal prep friendly. Experiment with different proteins and dressings for fun flavors. Enjoy your fresh, delicious BLT Chicken Salad!

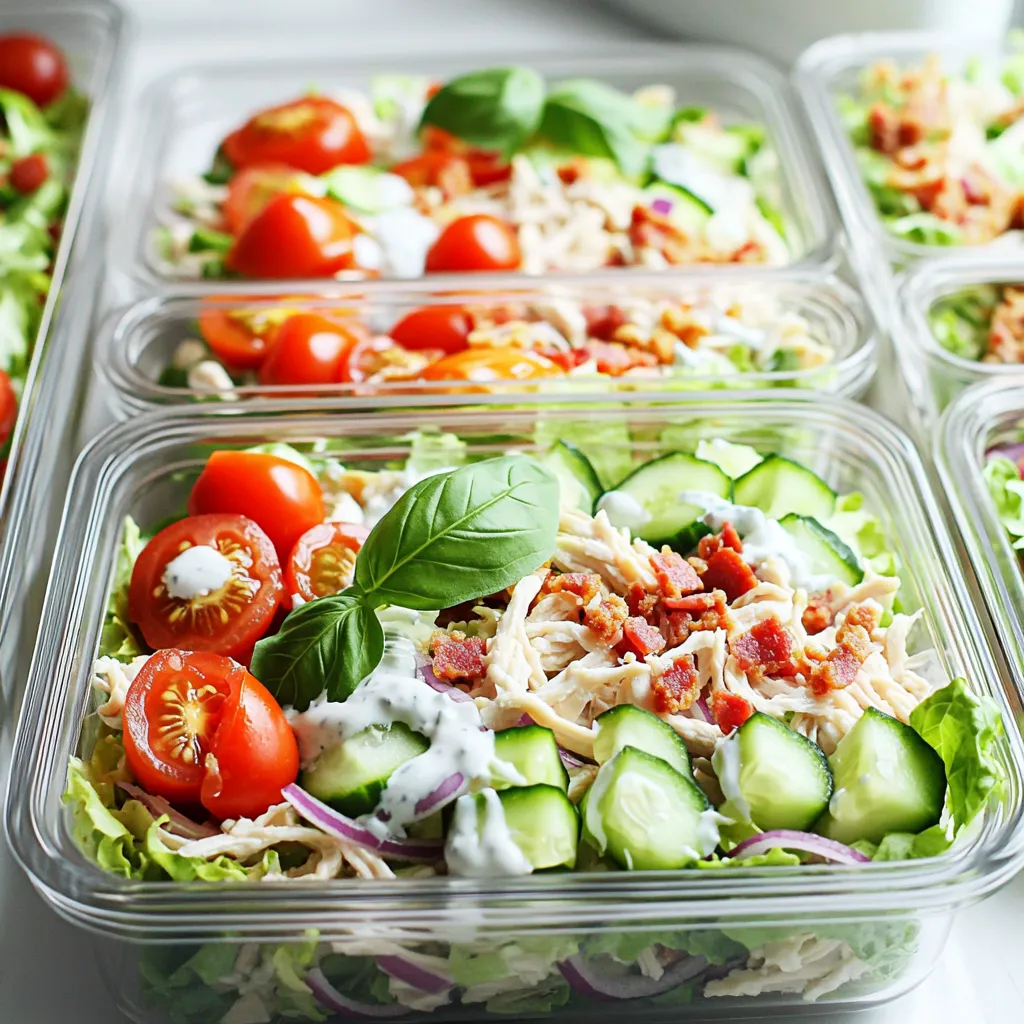
BLT Chicken Salad Meal Prep Easy and Tasty Recipe

Looking for a quick, delicious meal prep idea? This BLT Chicken Salad is your answer! With juicy chicken, crispy turkey

- 2 boneless, skinless chicken breasts - 8 oz fettuccine pasta - 1 cup heavy cream - 1 cup grated Parmesan cheese The chicken breasts serve as the star of this dish. They add protein and flavor. Fettuccine pasta gives a nice base with its flat shape. Heavy cream makes the sauce rich and smooth. Parmesan cheese adds a salty, nutty taste that is key to Alfredo. - 2 tablespoons olive oil - 2 cloves garlic, minced - ½ teaspoon Italian seasoning - Salt and pepper to taste Olive oil helps cook the chicken and adds flavor. Garlic brings a warm aroma that makes the dish inviting. Italian seasoning gives a mix of herbs that enhance every bite. Salt and pepper balance out the flavors, making them pop. - ½ cup sun-dried tomatoes, sliced - Zest of one lemon Sun-dried tomatoes add a sweet and tangy twist. They also provide color and texture. Lemon zest brightens the dish, offering a fresh taste that contrasts well with the cream. You can use these for extra flavor or skip them for a classic dish. How to Grill Chicken Breasts Perfectly To grill chicken breasts, start by preheating your grill to medium-high heat. This helps the chicken cook evenly. Brush both sides of the chicken breasts with 1 tablespoon of olive oil. This adds flavor and keeps the meat juicy. Season them with salt, pepper, and Italian seasoning. Place the chicken on the grill. Cook for 6 to 7 minutes on each side. Use a meat thermometer to check the internal temperature. It should reach 165°F. Once cooked, take the chicken off the grill and let it rest for a few minutes. This resting time helps the juices stay inside the chicken. Tips for Achieving Al Dente Fettuccine For the pasta, fill a large pot with water and add a good amount of salt. Bring it to a boil. Once boiling, add 8 oz of fettuccine pasta. Cook the pasta according to the package instructions. You want it to be al dente, meaning it should be firm to the bite. After cooking, drain the pasta but save ½ cup of the pasta water. This water can help adjust the sauce later. Set the pasta aside while you make the sauce. Step-by-Step Guide to Creamy Alfredo To make the Alfredo sauce, heat a large skillet over medium heat. Add the remaining tablespoon of olive oil. Sauté 2 cloves of minced garlic for about 1 minute until it smells good. Next, pour in 1 cup of heavy cream and let it simmer gently. Stir in 1 cup of grated Parmesan cheese. Keep stirring until the cheese melts and the sauce becomes smooth. For a unique twist, add the zest of one lemon. This will brighten the flavor. Now, add the cooked fettuccine to the skillet. Toss the pasta until it is well coated in the creamy sauce. If the sauce feels too thick, use the reserved pasta water to reach your desired consistency. Finally, slice the grilled chicken into strips. Serve the fettuccine Alfredo topped with the chicken. Optionally, sprinkle some sliced sun-dried tomatoes and chopped parsley for extra flavor and color. Enjoy your delicious meal! To grill chicken perfectly, start with good prep. Brush the chicken with olive oil. Season it well with salt, pepper, and Italian seasoning. This adds flavor. Grill the chicken on medium-high heat. Cook it for 6-7 minutes on each side. Use a meat thermometer to check for doneness. The safe internal temperature is 165°F. This ensures juicy and safe chicken. After grilling, let the chicken rest. This keeps it moist. To make a creamy Alfredo sauce, avoid a grainy texture. Start by heating olive oil in a skillet. Sauté minced garlic for about one minute. Then, add heavy cream and simmer gently. Stir in grated Parmesan cheese slowly. This helps it melt smoothly. If the sauce feels thick, add a bit of reserved pasta water. This keeps it creamy and easy to mix. For serving, plate the fettuccine Alfredo first. Lay the sliced grilled chicken on top. If you want extra flavor, add sun-dried tomatoes. They add a nice touch. Garnish with fresh parsley and lemon zest. This makes the dish bright and colorful. Serve with a side salad or garlic bread for a full meal. Enjoy your delicious creation! {{image_2}} You can change things up by using different types of pasta. Fettuccine is classic, but you can try penne or linguine. These shapes hold the sauce well too. If you want something gluten-free, consider using rice or chickpea pasta. It tastes great with the creamy sauce. Adding seasonal veggies boosts nutrition and flavor. Think about sautéing spinach, zucchini, or bell peppers. You can add them right before mixing in the pasta. This way, they stay fresh and vibrant. For a pop of color, add cherry tomatoes. They bring sweetness and a nice bite to your dish. If you love heat, spice it up! You can add red pepper flakes to the Alfredo sauce. Start with a small pinch, then taste it. If you want more heat, add more. Another idea is to mix in jalapeños or hot sauce. This adds a kick and makes your meal exciting. To keep your Grilled Chicken Alfredo Pasta fresh, store leftovers in an airtight container. Make sure to let it cool to room temperature before sealing. Place the container in the fridge. This helps keep the pasta and chicken tasty for up to three days. When you reheat your pasta, use low heat to keep it creamy. Add a splash of milk or reserved pasta water to help with the texture. Stir gently as it warms up. This method helps avoid a dry or clumpy sauce. You want it to taste just as good as when it was fresh! If you want to freeze your pasta, do it right away. Divide it into single servings and place in freezer-safe bags. Try to remove as much air as possible to prevent freezer burn. To thaw, place it in the fridge overnight. When ready to eat, reheat gently on the stove, adding a bit of cream if needed. To thicken your Alfredo sauce, you can use a few methods. First, cook the sauce longer over low heat. This helps it reduce and become thicker. Second, add more cheese, such as Parmesan. The cheese will melt and give your sauce a creamy texture. Lastly, you can mix in a little cornstarch with water. Stir it into the sauce for a quick thickening boost. Yes, you can use different cheeses in your Alfredo sauce. While Parmesan is classic, you can try Pecorino Romano for a sharper taste. For a creamier sauce, use mozzarella or cream cheese. If you want a nutty flavor, add some Gruyère. Each cheese will change the flavor a bit, so experiment to find your favorite mix! Grilled Chicken Alfredo Pasta lasts about 3 to 4 days in the fridge. Store it in an airtight container to keep it fresh. Make sure to cool it down before putting it in the fridge. If you want to keep it longer, consider freezing it. Just remember to defrost it in the fridge when you're ready to eat! Grilled Chicken Alfredo Pasta involves simple ingredients and clear steps. You start with chicken, fettuccine, and creamy sauce. Flavor with olive oil and garlic, and feel free to add optional items like sun-dried tomatoes. Follow easy steps to grill chicken, cook pasta, and make Alfredo sauce. I shared tips for perfecting your dish and creative variations. In the end, enjoy making this dish your own. With simple changes, you can make it new every time. Dive into this recipe and impress friends and family!

Grilled Chicken Alfredo Pasta Simple and Satisfying Dish

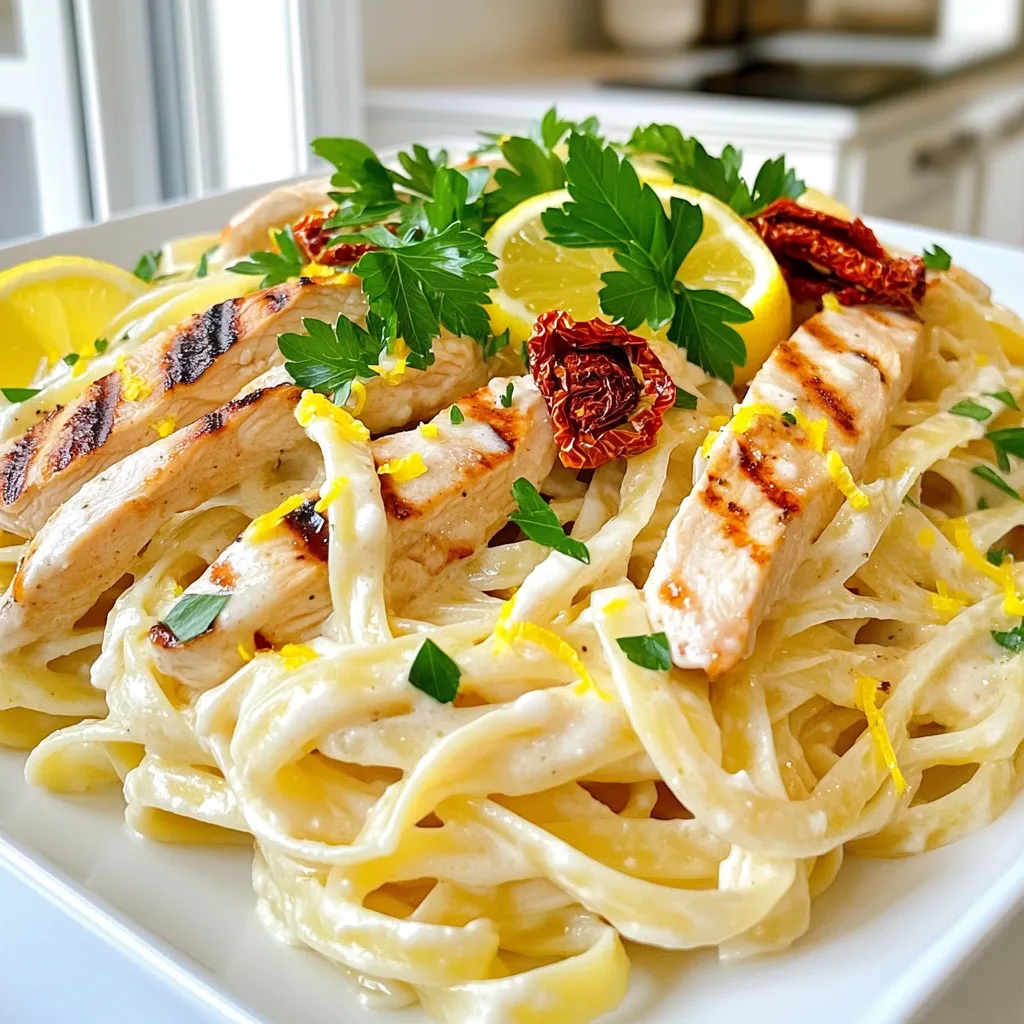
Looking for a quick and tasty dinner? You’ve come to the right place! This Grilled Chicken Alfredo Pasta is not

To make Blueberry Cheesecake Swirl Cookies, you need the following: - 1 cup all-purpose flour - 1/2 teaspoon baking powder - 1/4 teaspoon baking soda - 1/4 teaspoon salt - 1/2 cup unsalted butter, softened - 1/2 cup granulated sugar - 1/4 cup brown sugar - 1 large egg - 1 teaspoon vanilla extract - 1/2 cup cream cheese, softened - 1/3 cup fresh blueberries (or frozen, if not in season) - 2 tablespoons powdered sugar (for the cream cheese mixture) - Zest of 1 lemon If you don't have an ingredient, don't worry! Here are some good swaps: - Use coconut oil instead of unsalted butter for a dairy-free version. - Swap out the all-purpose flour for gluten-free flour if needed. - You can use a plant-based cream cheese for a vegan option. - For the sugars, you can use brown sugar alone for a deeper flavor. Fresh blueberries give a great taste and texture. They burst nicely when baked. If it’s off-season, frozen blueberries work well too. Just let them thaw and drain excess liquid. This helps avoid soggy cookies. Both options create delicious cookies! First, gather all your ingredients. You need flour, baking powder, baking soda, salt, butter, and sugars. Also, have an egg, vanilla, cream cheese, blueberries, powdered sugar, and lemon zest ready. Preheat your oven to 350°F (175°C). Line two baking sheets with parchment paper. This keeps the cookies from sticking. 1. Mix Dry Ingredients: In a medium bowl, whisk flour, baking powder, baking soda, and salt. Set this bowl aside. 2. Cream the Butters and Sugars: In a large bowl, beat the softened butter, granulated sugar, and brown sugar. Use an electric mixer until the mix is light and fluffy, about 2-3 minutes. 3. Add Egg and Vanilla: Crack the egg into the butter mix. Add vanilla extract and mix until smooth. 4. Combine Mixtures: Gradually mix in the dry ingredients. Stop when just combined. 5. Prepare Cheesecake Mixture: In another bowl, beat softened cream cheese with powdered sugar and lemon zest. Add the blueberries and mash them gently. Leave some chunks for texture. 6. Swirling: Take a tablespoon of cookie dough. Make a small dent in the center. Spoon a teaspoon of the cheesecake mix into the dent. Cover with another small piece of dough. Leave some cheesecake mix showing. Use a toothpick to swirl the top gently. - Keep the blueberry cheesecake mix chunky. This gives nice bites. - Don’t overmix the dough. This keeps the cookies soft. - Use a light touch when swirling. You want to see the cheesecake mix. It should look pretty. - Space the cookies 2 inches apart on the baking sheet. They need room to spread. - Bake for 10-12 minutes. Look for lightly golden edges. This means they are done. Now, you’re ready to bake these delightful cookies! Enjoy the sweet and tangy flavor in every bite. When making blueberry cheesecake swirl cookies, watch out for a few common mistakes. First, don't skip softening the butter and cream cheese. If they are cold, your cookies may not mix well. Second, be careful not to overmix the dough. Overmixing can lead to tough cookies. Lastly, avoid overcrowding the baking sheet. Give each cookie space to spread and rise. To get the best texture, follow these tips. Start with room-temperature ingredients. This helps the dough blend smoothly. Use a light hand when mixing. Aim for cookie dough that is thick yet soft. For a chewy bite, bake just until the edges turn golden. Remember, cookies continue to firm up as they cool. Having the right tools makes baking easier. Here’s what I recommend: - Mixing bowls: Use both medium and large bowls for mixing. - Electric mixer: This helps beat the butter and sugars quickly. - Measuring cups and spoons: Accurate measurements are key to success. - Parchment paper: Line your baking sheets to avoid sticking. - Toothpick or knife: Use this for swirling the cheesecake mixture. - Cooling rack: This allows cookies to cool evenly after baking. These tools will help you create perfect blueberry cheesecake swirl cookies every time! {{image_2}} You can play with flavors in these cookies. Try swapping blueberries for raspberries or cherries. Both fruits add a bright taste. You can also mix in white chocolate chips for a sweet twist. Or, add a sprinkle of cinnamon for warmth. These swaps keep the cookies exciting and fresh. Want gluten-free cookies? Use a gluten-free flour blend instead of all-purpose flour. This change keeps the texture similar. For vegan cookies, replace the egg with a flax egg. Just mix one tablespoon of ground flaxseed with three tablespoons of water. Use vegan butter and cream cheese for a dairy-free option. These swaps let everyone enjoy the treat! You can create themed cookies for special occasions. For fall, add pumpkin spice to the dough. This spice gives a cozy flavor. For Christmas, try peppermint extract in the cream cheese mix. Top with crushed candy canes for a fun look. These variations make your cookies festive and fun for any holiday! To keep your blueberry cheesecake swirl cookies fresh, store them in an airtight container. Make sure the cookies are completely cool before putting them away. This step helps prevent moisture buildup. You can layer the cookies with parchment paper to avoid sticking. If you want to keep them soft, add a slice of bread to the container. The bread will help maintain moisture. You can freeze these cookies for later enjoyment. First, let the cookies cool completely. Then, place them in a single layer on a baking sheet. Freeze them for about an hour. Once frozen, transfer the cookies to a freezer-safe bag or container. Be sure to remove as much air as possible. You can freeze them for up to three months. When ready to eat, just thaw them at room temperature. These cookies last about a week at room temperature in an airtight container. If you refrigerate them, they can stay fresh for up to two weeks. To serve, warm the cookies for a few seconds in the microwave or enjoy them cold. Pairing them with a glass of milk or a cup of tea makes for a delightful treat. You can also sprinkle some extra powdered sugar on top for a sweet touch. Yes, you can use many fruits. Strawberries, raspberries, or cherries work well. Just chop them into small pieces. This gives you a chance to mix flavors and colors. You can even try a fruit combo for added fun! Look for the edges of the cookies. They should be slightly golden brown. The center will look soft but not wet. If you gently touch the top, it should feel firm. This means they are done baking. You can use mascarpone cheese or Greek yogurt as a substitute. Both give a nice creamy texture. If you use yogurt, make sure it is thick. You can also mix in a little sour cream for extra creaminess. In this blog post, we covered key ingredients and tasty options for your cookies. You learned how to prepare, mix, and bake cookies like a pro. I shared tips to avoid common mistakes and maximize texture. We also explored fun variations, storage tips, and answered popular questions. Remember, baking is about creativity. Don't be afraid to try new flavors or substitutions. With practice, your cookies will impress everyone!

Blueberry Cheesecake Swirl Cookies Delightful Treat

If you love cookies and cheesecake, then you’re in for a treat! Blueberry Cheesecake Swirl Cookies combine two delightful desserts

- 1 pound boneless, skinless chicken breasts, cut into 1-inch cubes - 4 cloves garlic, minced - 1/2 cup grated Parmesan cheese - 1/4 cup olive oil - 1 teaspoon paprika - 1 teaspoon dried oregano - 1 teaspoon salt - 1/2 teaspoon black pepper - Juice of 1 lemon - Skewers (wooden or metal) - Mixing bowl - Grill or grill pan To create Garlic Parmesan Chicken Skewers, start with fresh chicken breast. Cut it into 1-inch cubes. This size ensures even cooking. Next, gather your garlic. Minced garlic brings a burst of flavor. Use four cloves for a strong taste. Next, grab your Parmesan cheese. Grate it finely to help it mix well with the marinade. The cheese adds richness to the dish. For the marinade, olive oil is key. It helps blend the flavors and keeps the chicken juicy. Add a teaspoon of paprika for a touch of warmth. Dried oregano brings an earthy note. Don’t forget salt and black pepper! They enhance all the flavors. Squeeze in juice from one lemon. It adds brightness and balances the richness. Now for the tools. You need skewers, either wooden or metal. If you use wooden ones, soak them in water for 30 minutes. This step prevents burning on the grill. A mixing bowl is essential for combining all the marinade ingredients. Lastly, you’ll need a grill or grill pan to cook your skewers. With these ingredients and tools, you're ready to make delicious Garlic Parmesan Chicken Skewers! To start, gather your ingredients for the marinade. In a large mixing bowl, combine the minced garlic, grated Parmesan cheese, and olive oil. Stir these together until they blend well. Next, add paprika, dried oregano, salt, black pepper, and the juice of one lemon. Mix again until smooth. This marinade adds rich flavor to the chicken. Once your marinade is ready, it's time to work with the chicken. Cut the boneless, skinless chicken breasts into 1-inch cubes. Add these cubes to the bowl with the marinade. Use a spoon or your hands to coat each piece well. Make sure every chicken piece is covered in that tasty mix. Cover the bowl with plastic wrap and place it in the fridge. Let it marinate for at least 30 minutes. If you have time, let it sit for up to 2 hours. The longer you marinate, the better the flavor! Now, preheat your grill or grill pan to medium-high heat. If you are using wooden skewers, soak them in water for 30 minutes. This helps prevent burning. Next, take the marinated chicken from the fridge. Thread the chicken pieces onto the skewers, leaving a little space between them. This helps the heat cook the chicken evenly. Place the skewers on the hot grill. Cook them for about 10 to 12 minutes. Turn them occasionally until they turn golden brown. Make sure the internal temperature reaches 165°F to ensure they are cooked through. Enjoy the mouthwatering aroma as they cook! To keep your chicken juicy, marinate it well. Use the marinade for at least 30 minutes. For even more flavor, let it sit for up to 2 hours. Make sure each piece of chicken gets a good coat of the mixture. For cooking, use medium-high heat. This helps sear the chicken and lock in moisture. Turn the skewers often while grilling. Aim for a light golden brown on the outside. The chicken should reach 165°F inside for safety. When serving, think about how to make it look great. Use a wooden platter or a big serving plate. Place the skewers neatly and add a lemon wedge on the side. This adds color and flavor. For a pop of freshness, sprinkle chopped parsley on top. It looks nice and adds a bright taste. You can also arrange some mixed greens or a pasta salad on the side for balance. This recipe makes enough for four people. A good side dish is mixed greens; they add crunch and freshness. Pasta salad is also a nice choice; it pairs well with the garlic and cheese flavors. For drinks, try a light white wine or lemonade. These drinks complement the chicken without overpowering it. Enjoying these flavors together makes the meal even better! {{image_2}} You can swap chicken for other proteins. Shrimp works great and cooks fast. Tofu is a perfect choice for a plant-based option. Both options soak up the marinade well. If you want, try pork or beef too. Spice up the flavor with fresh herbs. Basil or thyme can add a nice twist. Try smoked paprika for a deeper flavor. You can also add red pepper flakes for some heat. For a tangy twist, mix in some honey or Dijon mustard with the marinade. If you can't grill, you can bake the skewers. Preheat your oven to 400°F. Place the skewers on a sheet pan lined with foil. Bake for about 15-20 minutes, flipping halfway through. Broiling is another option. Set your oven to broil and place the skewers on a broiler pan. Cook for about 10 minutes, watching closely to avoid burning. To keep your garlic Parmesan chicken skewers fresh, store them in the fridge. Place them in an airtight container to prevent drying out. Use a container that fits the skewers without bending them. This way, they stay intact and tasty. When it's time to enjoy leftovers, reheat your skewers carefully. The best method is to use the oven. Preheat it to 350°F. Place the skewers on a baking sheet. Heat for about 10-12 minutes. This keeps the chicken juicy. You can also use a microwave. If you do, cover the skewers with a damp paper towel. This helps to keep the moisture in. If you want to freeze the skewers, make sure they cool down first. Wrap each skewer tightly in plastic wrap. Then, place them in a freezer-safe bag. This way, they won't get freezer burn. To thaw, move them to the fridge overnight. You can also use the microwave on the defrost setting. Then, grill or bake them until hot. Enjoy even after storing! Marinate your chicken for at least 30 minutes. This time allows the chicken to soak up the garlic and Parmesan flavors. If you want more flavor, marinate it for up to 2 hours. The longer it sits, the more tasty it becomes. Just remember, don’t go overboard; too long can make the chicken mushy. Cook your chicken skewers until they reach an internal temperature of 165°F. This temperature is key for safety. It ensures that harmful bacteria are killed. Use a meat thermometer to check the doneness. This way, you can enjoy juicy and safe chicken skewers every time. Yes, you can use other cheeses! Try using mozzarella for a milder taste. Feta can add a tangy twist. Cheddar gives a rich flavor. Each cheese changes the taste a bit, so feel free to experiment. Just make sure the cheese you choose melts well if you plan to grill the skewers. In this post, I covered how to make delicious Garlic Parmesan Chicken Skewers. We discussed the key ingredients, including chicken, garlic, and Parmesan. The marinade brings in rich flavors with spices and olive oil. I shared step-by-step instructions on marinating and grilling for juicy results. Remember, you can customize the recipe with different proteins and flavors. Whether you grill or use an oven, enjoy these tasty skewers at your next meal. Now get cooking and treat yourself!

Garlic Parmesan Chicken Skewers Flavorful and Easy Recipe

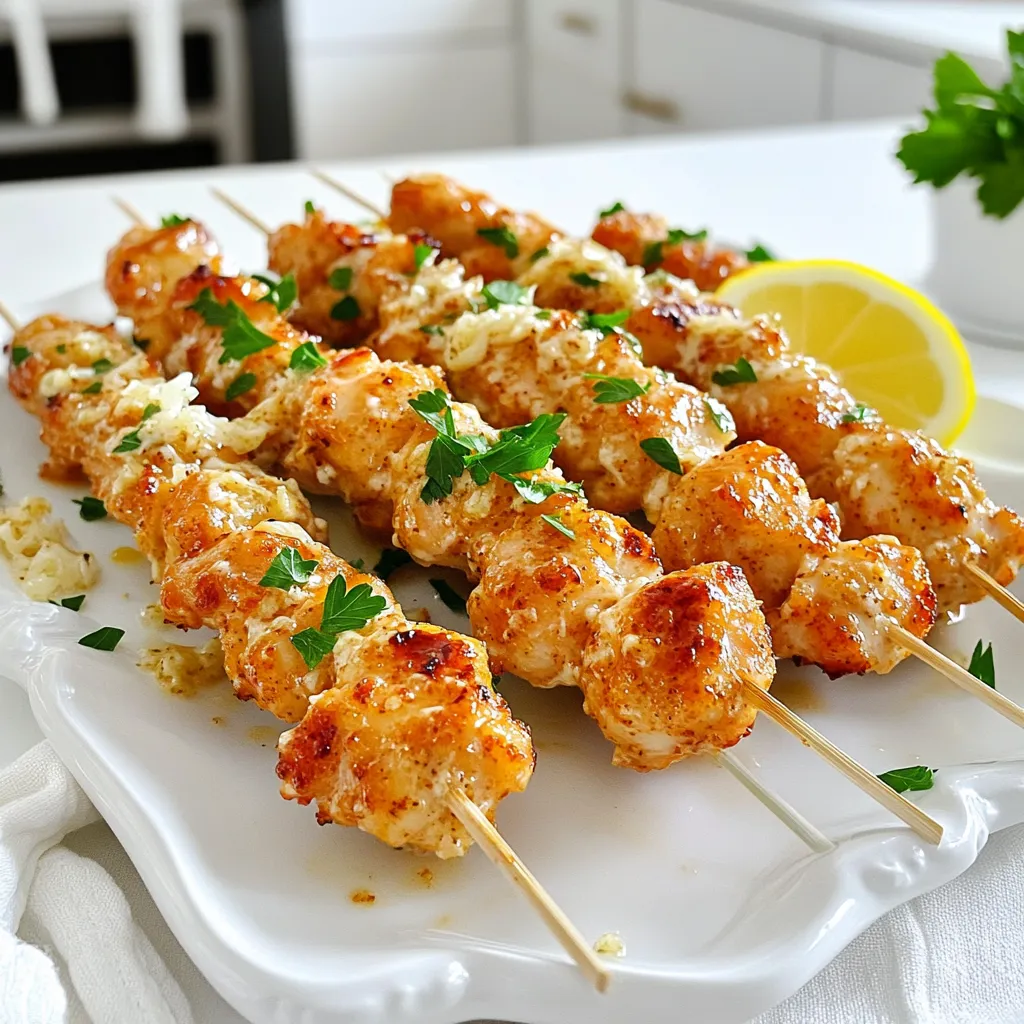
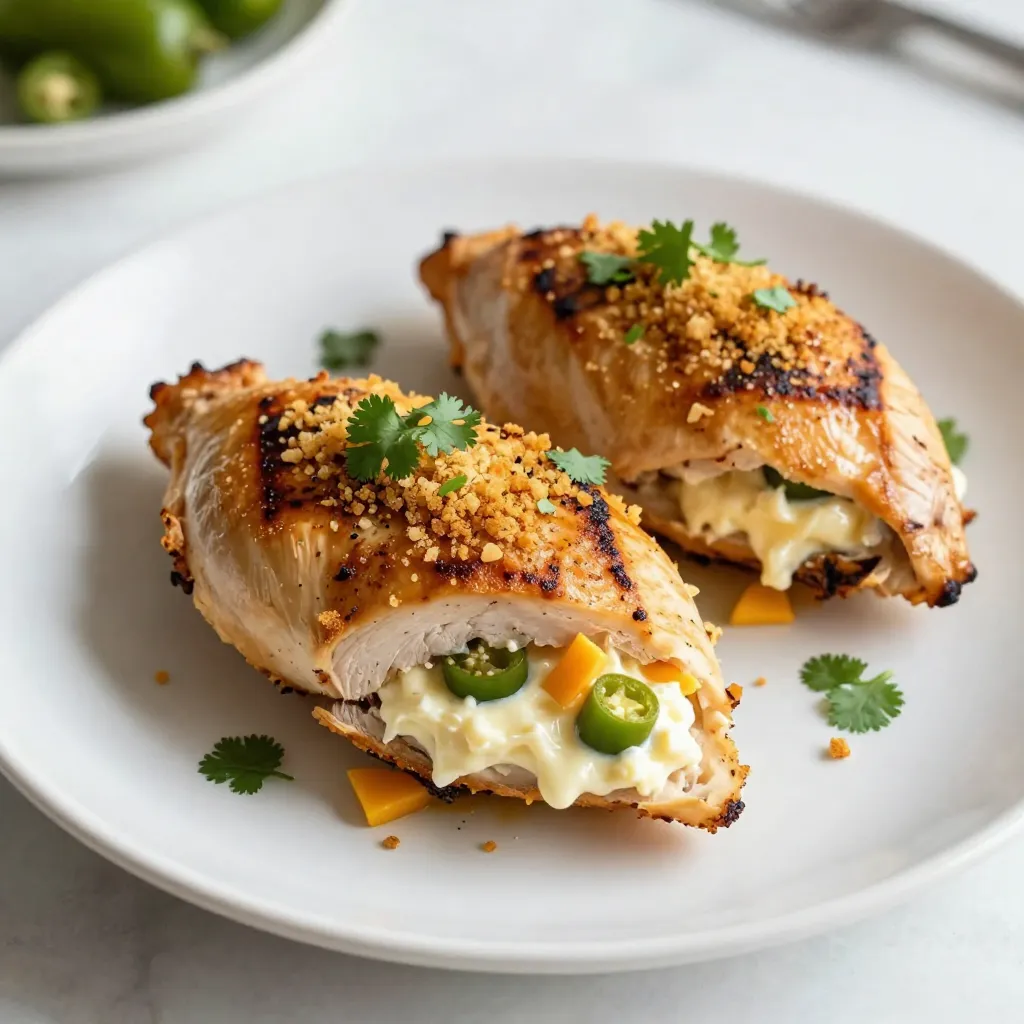
Looking for a quick and tasty dinner idea? You’re in the right place! This Garlic Parmesan Chicken Skewers recipe combines

To make a warm bowl of chicken noodle soup, gather these must-have ingredients: - 1 tablespoon olive oil - 1 medium onion, diced - 2 cloves garlic, minced - 3 carrots, sliced - 2 celery stalks, sliced - 1 teaspoon dried thyme - 1 teaspoon dried oregano - Salt and pepper to taste - 8 cups chicken broth - 2 cups shredded cooked chicken - 2 cups egg noodles - 2 bay leaves - Fresh parsley, chopped (for garnish) These ingredients form the base of your soup. Each one adds flavor and warmth to your dish. You can boost flavor with some optional additions: - A splash of lemon juice for brightness - A pinch of red pepper flakes for heat - Fresh herbs like dill or basil for a fresh touch These ingredients can make your soup unique. They add extra layers of taste. If you have specific dietary needs, you can still enjoy this soup. Here are some swaps: - Use vegetable broth instead of chicken broth for a vegetarian option. - Swap egg noodles with whole wheat or gluten-free noodles. - Replace chicken with chickpeas or tofu for a protein boost. These substitutions keep the spirit of chicken noodle soup while meeting your needs. Enjoy making it your own! First, gather all your ingredients. This makes cooking easy and fun. You’ll need: - 1 tablespoon olive oil - 1 medium onion, diced - 2 cloves garlic, minced - 3 carrots, sliced - 2 celery stalks, sliced - 1 teaspoon dried thyme - 1 teaspoon dried oregano - Salt and pepper to taste - 8 cups chicken broth - 2 cups shredded cooked chicken - 2 cups egg noodles - 2 bay leaves - Fresh parsley, chopped Wash and chop the veggies first. Dice the onion, mince the garlic, slice the carrots, and celery. This step makes the soup have a great texture. In a large pot, heat the olive oil over medium heat. Add the diced onion and cook for 4-5 minutes. You want it soft and clear. Then, stir in the minced garlic, carrots, and celery. Cook for another 3-4 minutes. The veggies should be slightly tender. Next, add the dried thyme, oregano, salt, and pepper. Mix well and let the spices bloom for about 1 minute. This helps release their flavors. Now, pour in the chicken broth and toss in the bay leaves. Bring the mixture to a boil. Once it boils, reduce the heat to low and let it simmer for about 15 minutes. This lets the flavors mix well. Stir in the shredded chicken and egg noodles. Cook for another 8-10 minutes until the noodles are tender. Remove the bay leaves from the soup. Taste it and adjust the seasoning if needed. Ladle the soup into bowls and garnish with fresh parsley. Serve hot in rustic bowls. Pair it with crusty bread for a cozy meal. Enjoy your classic chicken noodle soup! To boost your soup's taste, start with fresh ingredients. Use a good-quality chicken broth. You can add a splash of lemon juice for brightness. Consider tossing in a pinch of red pepper flakes for a bit of heat. Fresh herbs, like thyme or parsley, can also add great flavor. Always taste your soup as you cook. Adjust the seasoning to your liking. When cooking egg noodles, it’s key to follow the package instructions. Use a large pot with plenty of water. Add a bit of salt to the water before boiling. This helps flavor the noodles. Cook them just until al dente. This means they should still have a slight bite. If you cook them too long, they can get mushy when added to the soup. Store leftovers in an airtight container. Keep them in the fridge for up to three days. The noodles can absorb broth, so add extra broth when reheating. If you want to freeze your soup, leave out the noodles. They do not freeze well. Instead, add fresh noodles when you reheat the soup. This keeps everything tasting great. {{image_2}} You can add many vegetables to your chicken noodle soup. Carrots, celery, and onions are classic choices. You can also try green beans, peas, or spinach. These veggies boost nutrients and add colors. They make the soup more appealing. You can even use frozen veggies. Just add them in the last few minutes of cooking. This keeps them bright and crunchy. Herbs can change the taste of your soup. You can use fresh herbs or dried ones. Fresh dill or thyme adds a nice touch. Try adding rosemary for a warm flavor. If you like it spicy, a pinch of crushed red pepper works well. Mix and match herbs to find your favorite blend. Each herb brings its unique flavor, making your soup special. Want to make your soup gluten-free? Replace egg noodles with rice or gluten-free noodles. Zucchini noodles or spaghetti squash are great low-carb options. They add texture without the carbs. Always check labels on noodles to ensure they are gluten-free. You can enjoy a cozy bowl of soup that fits your diet. Classic Chicken Noodle Soup stays fresh for about 3 to 4 days in the fridge. Store it in an airtight container. This keeps the soup safe and tasty. Always check for changes in smell or color before eating. You can freeze Classic Chicken Noodle Soup for up to 3 months. Make sure to cool it first. Use freezer-safe containers or bags. Leave some space at the top for expansion. Label the container with the date. This helps you know when to use it. When you are ready to eat, reheat the soup on the stove. Use medium heat and stir often. This helps it warm evenly. If the soup is too thick, add a splash of broth or water. Heat until it is hot throughout. Enjoy your soup just like the first time! Yes, you can use raw chicken in this soup. Start by cooking the chicken pieces in the pot. Use the olive oil to brown the chicken first. Once the chicken is cooked, remove it and shred it. Then, add the broth and veggies as directed. This method adds great flavor. To make this soup vegetarian, swap the chicken broth for vegetable broth. You can also use plant-based chicken or skip the protein. Add more veggies like peas or green beans for extra nutrition. This way, you keep the cozy feel without the meat. Serve your chicken noodle soup with crusty bread or a simple salad. Crackers also work well for dipping. If you want something light, a side of steamed vegetables pairs nicely. These accompaniments enhance the meal and keep it comforting. Classic Chicken Noodle Soup is simple and comforting. We covered key ingredients, cooking steps, and helpful tips. You can tweak the recipe to fit your needs, adding veggies or herbs, and storing leftovers wisely. Remember, this soup adapts well, so feel free to get creative. Enjoy the warmth and nourishment it brings to your table. Dive in, stir up your own version, and make it your favorite!

Classic Chicken Noodle Soup Simple and Cozy Recipe

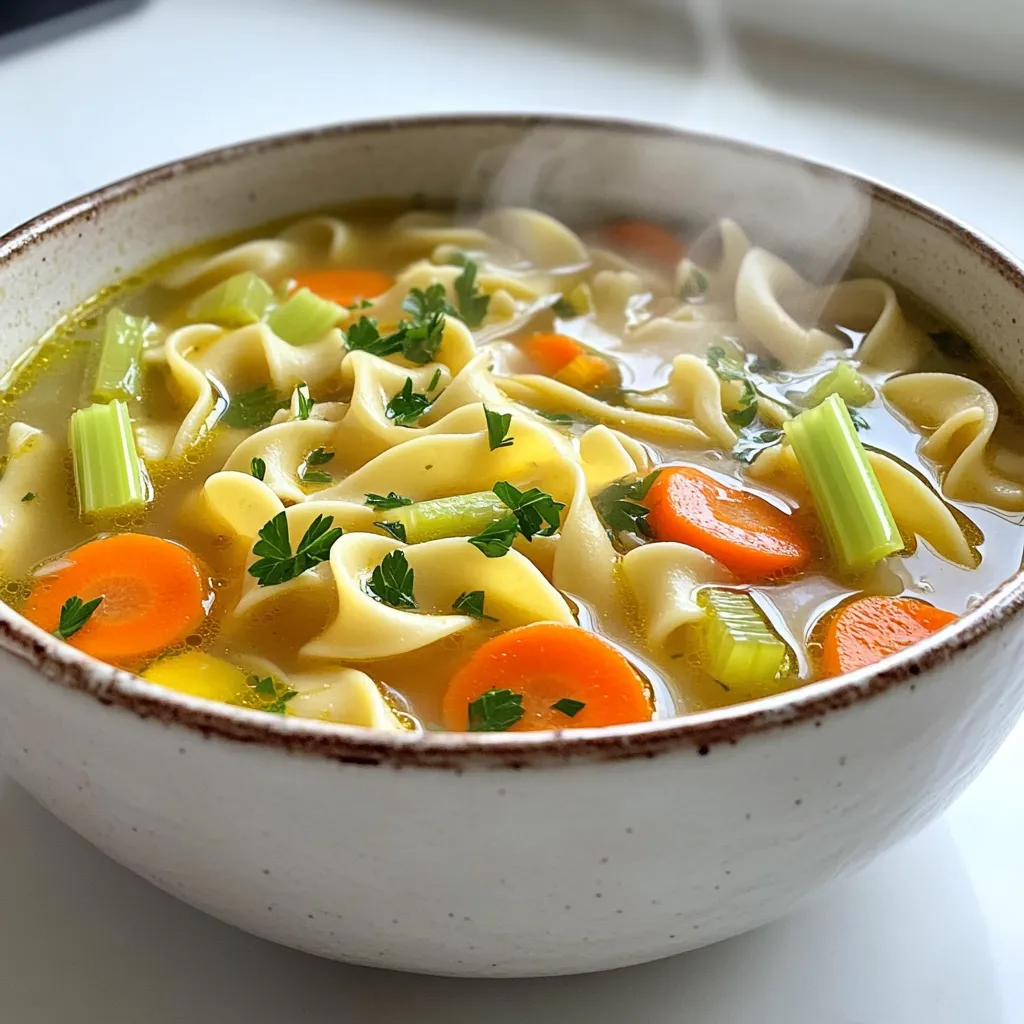
There’s nothing quite like a warm bowl of Classic Chicken Noodle Soup, especially on a chilly day. This simple and

- 1.5 lbs beef sirloin, cut into bite-sized pieces - 1/2 cup unsalted butter - 6 cloves garlic, minced - 2 tablespoons soy sauce - 1 tablespoon Worcestershire sauce - 1 teaspoon dried thyme - 1 teaspoon black pepper - 1 teaspoon smoked paprika - 1/2 teaspoon salt - 1 tablespoon fresh parsley, chopped (for garnish) To make these Crockpot Garlic Butter Beef Bites, you need fresh ingredients. Start with 1.5 pounds of beef sirloin. Cut it into small, bite-sized pieces. This helps the beef cook evenly and ensures every bite is tender. Next, grab half a cup of unsalted butter. Butter adds richness and flavor to the dish. We will melt it for our garlic mixture. You will need six cloves of garlic, minced. Garlic gives the beef its savory kick. The more fresh garlic, the better! Prepare two tablespoons of soy sauce and one tablespoon of Worcestershire sauce. These sauces add depth and umami to the beef. For seasoning, gather one teaspoon each of dried thyme, black pepper, and smoked paprika. These spices bring warmth and aroma to the dish. Lastly, use half a teaspoon of salt to enhance all the flavors. For garnish, chop one tablespoon of fresh parsley. This adds a pop of color and freshness to the final dish. This simple list of ingredients packs a lot of flavor. They work together to create a rich, mouthwatering meal. 1. Start by melting the butter in a skillet over medium heat. 2. Once melted, add the minced garlic. 3. Sauté the garlic for about one minute until it smells great but does not brown. 1. In a large mixing bowl, combine the beef sirloin pieces with soy sauce and Worcestershire sauce. 2. Add the dried thyme, black pepper, smoked paprika, and salt. 3. Mix well to ensure each piece of beef is coated evenly with the seasonings. 1. Transfer the beef mixture into the crockpot. 2. Pour the melted garlic butter over the beef. Make sure it covers all the pieces. 3. Set the crockpot to cook on low for six hours or on high for three hours. 4. The beef is ready when it pulls apart easily with a fork. Enjoy the rich flavor and tender texture of these garlic butter beef bites! To make sure your beef is tender, cook it low and slow. The best cooking time is 6 hours on low or 3 hours on high. Check for tenderness by using a fork. If it pulls apart easily, it’s done. For tough cuts, try cooking a bit longer. You can boost the flavor by adding spices. Consider red pepper flakes for heat or rosemary for a fresh taste. If you want to try different cuts of beef, flank steak or chuck roast works well. They are flavorful and tender when cooked right. Serve the beef bites on a big platter. Use toothpicks for easy eating. A small bowl of the cooking juices is great for dipping. For garnish, sprinkle chopped parsley on top. This adds color and a fresh touch to your dish. {{image_2}} You can swap the unsalted butter for olive oil or ghee. This change keeps the dish rich but adds a twist. For soy sauce, use tamari for a gluten-free option. Coconut aminos also make a tasty alternative. You can add veggies to the beef bites for more flavor. Try carrots, bell peppers, or mushrooms. These add color and nutrition to your meal. Just chop them into small pieces and add them to the crockpot with the beef. If you prefer, you can make this dish on the stove. Start by browning the beef in a skillet. Then, follow the same steps of adding garlic and sauces. Let it simmer until the beef is tender. For an Instant Pot, use the sauté function first. Brown the beef and add the garlic and sauces. Then, seal the lid and cook on high for about 20 minutes. Quick and easy! Herbs can change the taste of your beef bites. Try basil or oregano for a fresh twist. You can also mix in rosemary for a strong flavor. Want to spice things up? Add hot sauce or sriracha for heat. Experiment with different sauces too. Teriyaki or barbecue sauce can give a unique flavor. Enjoy creating your own version! To keep your leftovers fresh, use airtight containers. Glass containers work well. You can also use plastic containers, but ensure they seal tightly. Store the beef bites in the fridge. They stay good for about 3 to 4 days. For reheating, the best method is the microwave. Place the beef bites in a microwave-safe dish. Add a splash of water to keep them moist. Cover the dish with a lid or microwave-safe wrap. Heat in short bursts, checking often. This way, you avoid drying out the beef. If you have a skillet, you can reheat on low heat. Stir gently to keep the beef tender and juicy. To freeze, let the beef cool first. Then, place it in a freezer-safe container or bag. Make sure to remove as much air as possible. This helps prevent freezer burn. Properly stored, your beef bites can last up to 3 months in the freezer. When ready to eat, thaw in the fridge overnight before reheating. You should cook the beef on low for 6 hours or on high for 3 hours. This time lets the beef become tender and soak up all the flavors. Check the beef at these times. It should easily pull apart with a fork when done. Yes, you can use other cuts of beef. Some good options are chuck roast, flank steak, or brisket. These cuts also work well with slow cooking. They will become tender and flavorful just like sirloin. This dish pairs well with many sides. Try serving it with mashed potatoes or rice for a filling meal. Roasted vegetables or a fresh salad also make great options. You can even use toothpicks and serve them as appetizers at parties! This recipe for Crockpot Garlic Butter Beef Bites is easy and tasty. You learned about key ingredients like sirloin and butter, plus simple steps to prepare and cook. I shared tips to ensure tender beef and ways to enhance the flavor. You can even adapt this dish for different tastes and store leftovers effectively. Enjoying a delicious meal has never been simpler. Now, it’s your turn to try this recipe and impress your family or friends!

Crockpot Garlic Butter Beef Bites Savory and Simple

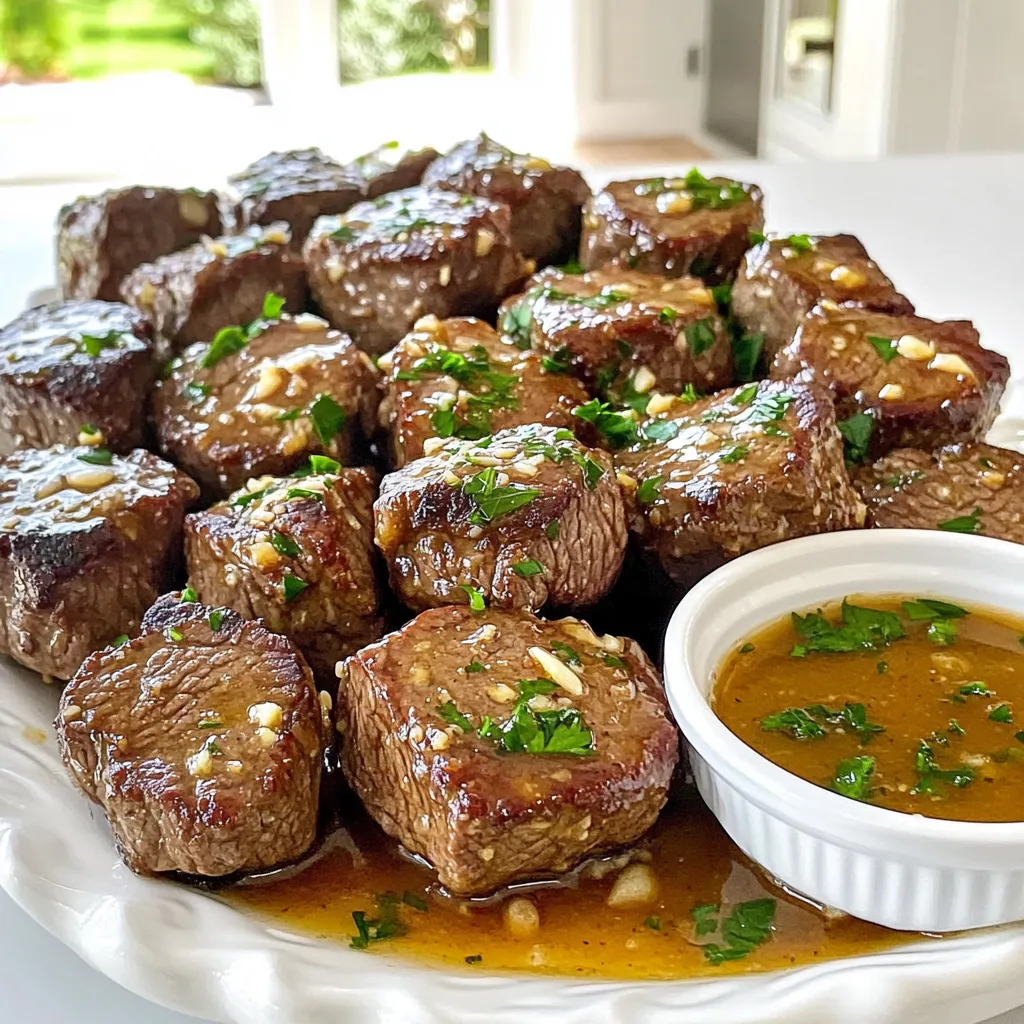
If you’re craving a warm, delicious meal that requires little effort, you’ll love my Crockpot Garlic Butter Beef Bites. This

To make Jalapeño Popper Stuffed Chicken, you need these tasty ingredients: - 4 boneless, skinless chicken breasts - 4 oz cream cheese, softened - 1 cup shredded sharp cheddar cheese - 1/2 cup jalapeños, seeded and diced - 1/4 cup breadcrumbs (preferably panko) - 2 tablespoons olive oil - 1 teaspoon garlic powder - 1 teaspoon onion powder - Salt and pepper to taste - Optional garnish: Fresh cilantro or parsley These ingredients blend perfectly. The cream cheese and cheddar create a rich filling. The jalapeños add a spicy kick. Using panko breadcrumbs gives a nice crunch. You can adjust the spice by choosing fresh or pickled jalapeños. Don't forget the salt and pepper for flavor! Gather these items before you start. Having everything ready will make cooking smooth and fun. {{ingredient_image_1}} - Preheat your oven to 375°F (190°C). - In a bowl, mix cream cheese, cheddar cheese, diced jalapeños, garlic powder, onion powder, salt, and pepper. Stir until smooth. - Carefully slice pockets into each chicken breast. Do not cut all the way through. - Generously stuff each chicken breast with the jalapeño mixture. - If needed, use toothpicks to secure the openings. This keeps the filling inside. - Place breadcrumbs in a shallow bowl. Roll each stuffed chicken breast in the breadcrumbs. Make sure they are fully coated. - Heat olive oil in a large skillet over medium heat. Sear each chicken breast for 3-4 minutes on each side. Look for a golden color. - Transfer the seared chicken breasts to a baking dish. Bake for 25-30 minutes until the chicken is fully cooked. The internal temperature should reach 165°F (74°C). - Use a meat thermometer to check the internal temperature. - Let the chicken rest for 5 minutes. This helps keep it juicy. - If you like, garnish with fresh cilantro or parsley before serving. - Sear the chicken well for a golden color. This adds flavor and texture. - Always test the chicken's doneness. The safe internal temperature is 165°F (74°C). - Pair the stuffed chicken with sides like rice or roasted vegetables. They complement the dish well. - Serve with sauces like ranch or a spicy dip for extra flavor. - Try adding smoked paprika for a deeper flavor. - You can swap in pepper jack cheese for an extra kick. - Fresh herbs like thyme or chives can add brightness to the filling. Pro Tips Choose the Right Jalapeños: Use fresh jalapeños for a vibrant flavor or pickled ones for a tangy twist. Adjust the amount based on your heat preference. Don’t Overstuff: Be careful not to overfill the chicken breasts to prevent the filling from spilling out during cooking. Perfectly Cooked Chicken: Use a meat thermometer to ensure the chicken reaches an internal temperature of 165°F (74°C) for safe consumption. Serving Suggestions: Serve with a side of rice or a fresh salad to balance the richness of the stuffed chicken. {{image_2}} You can customize the flavors of your jalapeño popper stuffed chicken. Try different cheeses for a unique taste. Here are some great options: - Pepper jack for a spicy kick - Mozzarella for a milder flavor - Feta for a tangy touch Feel free to add other vegetables or spices. Consider mixing in: - Spinach for added nutrition - Corn for sweetness - Smoked paprika for depth If you need gluten-free options, replace regular breadcrumbs with gluten-free ones. Almond flour works well too. For those avoiding dairy, try these tips: - Use vegan cream cheese for the filling. - Substitute the cheddar cheese with a dairy-free cheese option. You can change how you cook this dish too. Grilling the stuffed chicken adds a nice smoky flavor. Simply follow the same steps, but grill instead of baking. If you prefer using a slow cooker or Instant Pot, here’s what to do: - For the slow cooker, sear the chicken first, then place it in the cooker with a splash of broth. - In the Instant Pot, use the sauté function to sear, then cook on high pressure for about 10 minutes. These variations keep the dish fresh and exciting! To keep your jalapeño popper stuffed chicken fresh, follow these steps: - Refrigeration: Place leftovers in an airtight container. Store in the fridge for up to 3 days. - Freezing: For long-term storage, wrap each stuffed chicken breast in plastic wrap. Then, place them in a freezer-safe bag. They can stay frozen for up to 3 months. When reheating, you want to keep the chicken juicy. Here’s how to do it: - Oven Method: Preheat your oven to 350°F (175°C). Place chicken in a baking dish and cover with foil. Heat for about 20 minutes. - Microwave Method: Use a microwave-safe plate. Heat on medium power in 1-minute intervals. Check to avoid drying out. The best temperature for reheating is around 165°F (74°C) to ensure it’s safe to eat. Leftovers should be eaten within: - Refrigerator: Up to 3 days. - Freezer: Up to 3 months. After these timeframes, the chicken may lose taste and texture. Always check for signs of spoilage before eating. You can serve this dish with many sides. Here are some great options: - Rice or quinoa for a filling base - Steamed vegetables like broccoli or green beans - A fresh salad with a light dressing - Garlic bread for a comforting touch These sides balance the flavors and make your meal complete. Yes, you can prep this dish ahead of time. You can stuff the chicken and coat it with breadcrumbs. Keep it covered in the fridge for up to 24 hours. This way, it’s ready to bake when you are. Just remember to add a few extra minutes to the baking time if it’s cold from the fridge. Absolutely! You can adjust the spice level to your liking. Use more jalapeños or choose hotter peppers. You can also add red pepper flakes or hot sauce to the cheese mixture. Just remember to taste as you go to get your desired heat. The chicken should reach an internal temperature of 165°F (74°C). This ensures that it is safe to eat. Use a meat thermometer to check the temperature at the thickest part of the chicken. This step is key for juicy, tender chicken. Yes, you can use other meats. Turkey breasts are a great option and have a similar texture. You could also try pork chops or even large mushrooms for a vegetarian twist. Just adjust cooking times based on the meat you choose. This blog post covered all you need to make Jalapeño Popper Stuffed Chicken. We discussed ingredients, step-by-step cooking, and storage tips. You can try different cheeses or cooking methods to suit your taste. Remember, searing gives a nice color, and pairing with sides enhances the meal. This dish is versatile and can be adapted for various diets. Enjoy cooking and impressing your friends with this delicious meal!

Jalapeño Popper Stuffed Chicken Flavorful Dinner Delight

Do you crave bold flavors for dinner? You’ve come to the right place! In this post, I’ll share my easy

- 4 hard-boiled eggs, peeled and chopped - 1 ripe avocado, mashed - 2 tablespoons Greek yogurt - 1 tablespoon Dijon mustard - 1 tablespoon fresh lemon juice - 1 tablespoon fresh dill, chopped (or 1 teaspoon dried dill) - Salt and pepper to taste - 8 large lettuce leaves (such as romaine or butter lettuce) - Cherry tomatoes, halved (for garnish) You can add sliced radishes or cucumber for extra crunch. These add-ins provide a nice texture and taste. If you like more flavor, consider adding hot sauce or jalapeños. Chopped green onions also work well. Each serving contains about: - Calories: 220 - Protein: 10g - Fat: 15g - Carbohydrates: 10g - Fiber: 5g These wraps are not only tasty but also healthy. They are packed with protein and healthy fats. The lettuce leaves keep it low in carbs. Enjoying these wraps supports a balanced diet. {{ingredient_image_1}} To start, you need to boil your eggs. Place four eggs in a pot of water. Bring the water to a boil. Once boiling, let them cook for 9-12 minutes. After that, cool the eggs in cold water. Peel them and chop them into small pieces. Next, take one ripe avocado. Cut it in half and remove the pit. Scoop the flesh into a mixing bowl. Mash the avocado until smooth, but keep a few chunks for texture. Add the chopped eggs to the bowl. Now, it’s time to add flavor. Mix in two tablespoons of Greek yogurt. Then add one tablespoon of Dijon mustard. Squeeze in one tablespoon of fresh lemon juice. Toss in one tablespoon of chopped fresh dill. Season with salt and pepper to your taste. Gently combine all the ingredients until mixed, but don't over-mix. Grab eight large lettuce leaves, like romaine or butter lettuce. Rinse and dry them carefully. Take a generous spoonful of the egg and avocado mixture. Place it in the center of each lettuce leaf. For extra crunch, you can add sliced radishes or cucumber on top of the salad. This step is optional but adds great texture. Next, garnish each wrap with a halved cherry tomato. This adds a nice pop of color and flavor. To eat, fold the lettuce around the filling. Enjoy your fresh and healthy wraps right away! These avocado egg salad lettuce wraps are best served fresh. If you want a twist, serve them with a side of fresh fruit. You can also pair them with some whole-grain crackers for a crunchy bite. If you have leftovers, store the filling separately. This keeps the lettuce crisp and fresh. You can enjoy the salad mix in a sandwich or on its own later. For a great avocado egg salad, start with fresh eggs. Boil them until hard, then cool and peel. Use a ripe avocado for creaminess. Mash it well, but keep some texture. Mix in Greek yogurt and Dijon mustard for tang. Adding lemon juice brightens the flavor. Fresh dill makes it even better. Season with salt and pepper to taste. Mix gently to keep the eggs chunky and delightful. This balance of textures makes each bite fun. One common mistake is over-mixing the salad. This can turn your eggs mushy. Another mistake is using unripe avocados. They won't give you that creamy texture you want. Forgetting to season is also a misstep. Always taste and adjust the salt and pepper. Lastly, don’t skip the lemon juice. It helps keep your avocado from browning and adds freshness. Meal prepping this salad is easy and smart. Make a big batch on a Sunday. Store it in an airtight container in the fridge. Use lettuce leaves as your wrap when ready to eat. Keep the salad and lettuce separate until serving. This keeps the lettuce crisp. You can also prep your add-ins, like radishes or cucumbers, ahead of time. Just slice and store them in the fridge. This way, you’ll have a healthy meal ready in minutes! Pro Tips Perfectly Hard-Boiled Eggs: To achieve perfectly hard-boiled eggs, place them in a pot of cold water, bring it to a boil, then cover and turn off the heat. Let them sit for 9-12 minutes before transferring to an ice bath to cool. Choosing the Right Avocado: Select avocados that yield slightly to gentle pressure, indicating ripeness. If they're too firm, let them ripen at room temperature for a few days. Mixing Technique: When combining the ingredients, mix gently to keep the eggs chunky. This adds texture and makes the salad more appealing. Customizing Your Wraps: Feel free to add your favorite ingredients like diced bell peppers, red onion, or even a sprinkle of paprika for a different flavor profile. {{image_2}} You can easily change the flavor of your avocado egg salad. If you like heat, add chopped jalapeños. A dash of hot sauce also works well. For a fresh taste, mix in chopped herbs. Basil, cilantro, or parsley can brighten the dish. You could even use different mustards. Try spicy brown mustard for a kick or honey mustard for sweetness. While lettuce is great, other greens can work too. Collard greens make a sturdy wrap. They hold up well and add a nice crunch. Cabbage leaves are another option. They offer a crisp bite and a bit of sweetness. You can even use nori sheets for a twist. This adds a fun sushi vibe to your meal. Want to boost the protein? You can add cooked chicken or diced tofu to your salad. Chicken adds a hearty feel. It also makes the dish more filling. Tofu gives a light touch and absorbs flavors well. You could even mix in canned tuna or chickpeas. These options add taste and texture while keeping it healthy. To keep your avocado egg salad fresh, place it in an airtight container. Make sure to seal it tightly. Store it in the fridge for up to three days. If you see the salad turning brown, it’s still safe, but not as pretty. You can add a little lemon juice to slow browning. I do not recommend freezing this salad. Freezing can change the texture of the eggs and avocado. They may become mushy when thawed. It’s best to enjoy this dish fresh. You do not need to reheat this salad. It’s delicious served cold or at room temperature. Just scoop it into your lettuce wrap and enjoy right away! Yes, you can use mayonnaise. It will add creaminess. Greek yogurt gives a tangy taste. Mayonnaise is richer and less tangy. Choose what you like best for flavor. This salad lasts about three days in the fridge. Store it in a sealed container. Keep it cool to stay fresh. After three days, it may not taste good. Make small batches if you want it fresh. Yes, this recipe is great for meal prep. You can make it ahead of time. Just store the salad and lettuce wraps separately. This keeps the lettuce crisp. It’s a quick, healthy lunch or snack option all week! In this blog post, we explored the tasty Avocado Egg Salad. I shared the key ingredients and optional add-ins for more flavor. We covered step-by-step instructions for making wraps. Tips helped you avoid common mistakes and perfect your dish. We also discussed variations and how to store leftovers effectively. Remember, this salad is not just about taste; it's also healthy and flexible. Enjoy experimenting with flavors and wrap options as you make this recipe your own!

Avocado Egg Salad Lettuce Wraps Healthy and Fresh

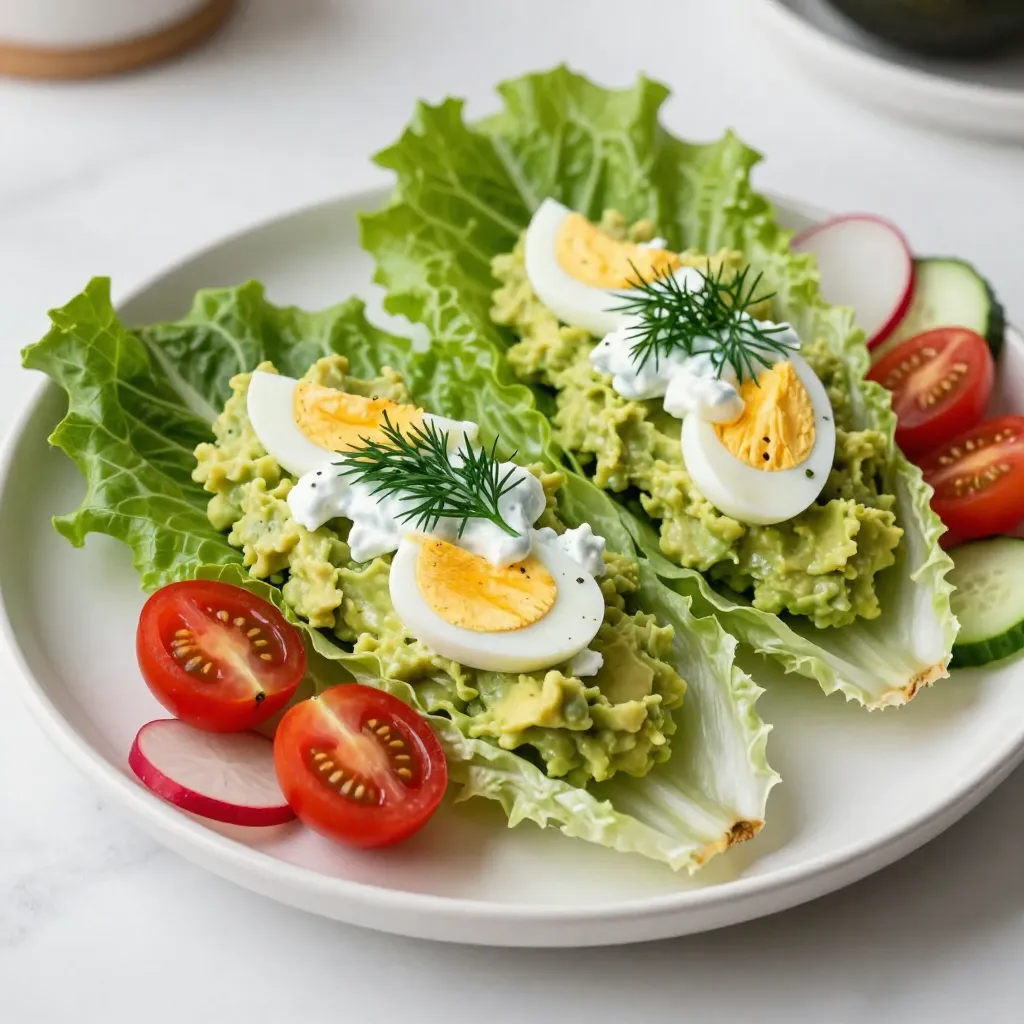
Are you looking for a fresh and healthy meal that’s easy to make? Avocado Egg Salad Lettuce Wraps are a

- 1 cup orzo pasta - 1 cup fresh spinach, packed - 4 cups vegetable broth The main ingredients create a tasty base. Orzo pasta is small and cooks quickly. Fresh spinach adds color and nutrition. Vegetable broth gives it a rich flavor. - 2 tablespoons olive oil - 2 cloves garlic, minced - 1 medium lemon (zested and juiced) Flavor enhancers make this dish special. Olive oil adds smoothness. Garlic gives a nice aroma. Lemon juice and zest bring bright, zesty notes. - 1 teaspoon dried oregano - Salt and pepper to taste - ¼ cup grated Parmesan cheese (optional) Seasonings make every bite better. Oregano adds an earthy taste. Salt and pepper balance the flavors. Grated Parmesan cheese gives a creamy finish, if you want it. This dish is simple but packs a punch with its flavors. Each ingredient plays a role in making this orzo shine. First, we heat 2 tablespoons of olive oil in a large pot over medium heat. Then, add 2 cloves of minced garlic. Sauté the garlic for about 1 minute. You want it fragrant, but not browned. Browning can make garlic bitter, so keep an eye on it. Next, it’s time to add 1 cup of orzo pasta. Stir the orzo for about 2 minutes. This toasting step adds a lovely nutty flavor to the orzo. Now, pour in 4 cups of vegetable broth. Bring the mix to a boil. Once boiling, reduce the heat to a simmer and cover the pot. Let it cook for about 10-12 minutes. Stir occasionally to prevent sticking. The orzo should be tender and most of the liquid absorbed. Once the orzo is cooked, stir in 1 cup of fresh spinach. Also, add the juice and zest of 1 medium lemon. Cook for an additional 2 minutes. You want the spinach to wilt nicely. Now, season the dish with 1 teaspoon of dried oregano, and sprinkle in salt and pepper to taste. If you want, you can add ¼ cup of grated Parmesan cheese. Stir until it melts and mixes well. For a pretty finish, let it sit for a couple of minutes to thicken. When serving, add fresh parsley on top for a burst of color. To avoid mushy pasta, follow these key tips. First, always use the right amount of liquid. For orzo, use about four cups of broth for one cup of pasta. This ratio helps the orzo absorb flavors without becoming too soft. Second, stir the orzo while it cooks. This action prevents it from sticking together. Stirring also helps the pasta cook evenly. Want to make your dish more hearty? Try adding proteins like cooked chicken or shrimp. These additions boost flavor and nutrition. You can also mix in other vegetables. Peas, bell peppers, or cherry tomatoes work well. They add color and texture, making the dish even more appealing. How you serve the dish can elevate its charm. Use a large bowl or individual plates for serving. Drizzle extra olive oil on top for a glossy finish. Garnish with fresh parsley and additional lemon zest. This not only adds flavor but also enhances the visual appeal. A beautiful plate makes every bite more enjoyable. {{image_2}} To make this dish vegan, simply swap the Parmesan cheese for a vegan alternative. Nutritional yeast adds a cheesy flavor without dairy. For a gluten-free version, use gluten-free orzo. Many brands make great options that taste just as good. If you like heat, add red pepper flakes or diced jalapeños. This spice really wakes up the dish. For herb variations, try using fresh basil or thyme instead of oregano. Each herb adds its own twist and brightens the taste. In summer, toss in fresh zucchini or cherry tomatoes. These veggies add color and sweetness. For winter, consider adding roasted butternut squash or kale. They make the dish heartier and perfect for colder days. You can keep One Pot Lemon Orzo with Spinach in the fridge for up to four days. Let it cool before storing. Use an airtight container to keep it fresh. This helps maintain its taste and texture. Yes, you can freeze cooked orzo. Place it in a freezer-safe bag or container. It can last for up to three months. When you’re ready to enjoy it, thaw it overnight in the fridge. Reheat on the stove or in the microwave. Add a splash of broth to keep it moist. To prepare ahead of time, cook the orzo and let it cool. Portion it into containers for quick meals. You can also chop spinach and zest the lemon before cooking. This saves time on busy days. Keep the ingredients separate until you are ready to combine them for the best flavor. To make this dish, start by heating olive oil in a large pot. Add minced garlic and cook for one minute. Next, stir in orzo pasta for about two minutes until it gets a light toast. Pour in vegetable broth and bring it to a boil. Lower the heat and cover, cooking for 10-12 minutes until the orzo is soft. After that, mix in fresh spinach, lemon juice, and lemon zest. Let it cook for two more minutes until the spinach wilts. Season with oregano, salt, and pepper. Optionally, add Parmesan cheese for creaminess. Finally, garnish with parsley before serving. Yes, you can use other pasta if you want. Some good alternatives are ditalini, farfalle, or even penne. Each pasta has a different shape and texture. This change can give your dish a new look and feel. Just remember to adjust the cooking time based on the pasta you choose. This orzo dish pairs well with many sides. A fresh green salad adds a nice crunch. You could also serve it with grilled chicken or fish for protein. A slice of crusty bread would make a great addition too. For something light, try serving it with roasted vegetables. This adds color and nutrition to your meal. This blog post guides you through making a tasty One Pot Lemon Orzo with Spinach. We covered ingredients like orzo, spinach, and garlic, as well as seasoning tips and variations. Remember to pay attention to cooking times to avoid mushy pasta. You can customize this dish with proteins or seasonal veggies. Storing leftovers is easy with our fridge and freezer tips. Enjoy this simple meal that suits any diet, and feel free to experiment with flavors and toppings. Cooking can be fun and fulfilling, so get creative with your kitchen adventures!

One Pot Lemon Orzo with Spinach Simple Delight

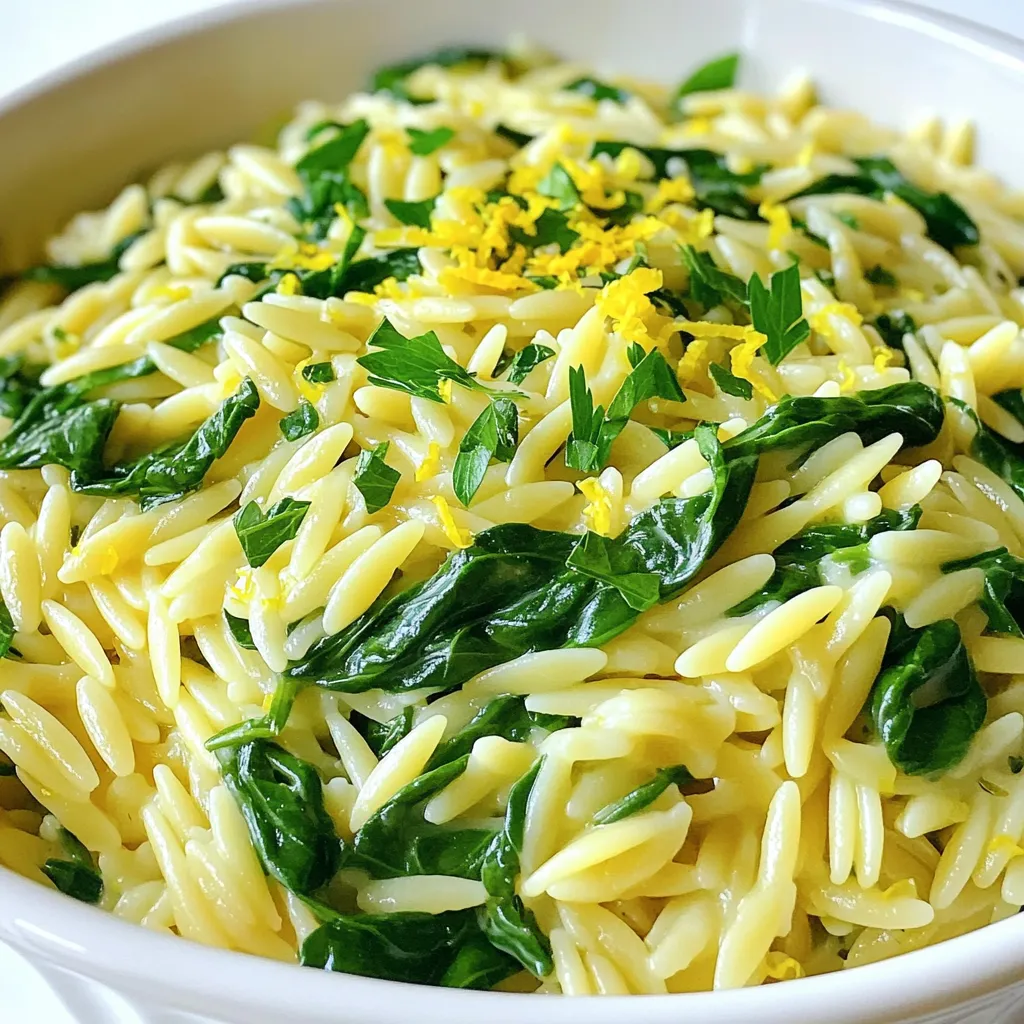
Looking for a simple, tasty meal? You’ll love this One Pot Lemon Orzo with Spinach! It’s fresh, bright, and full

- 24 Oreo cookies (regular or double stuffed) - 1/4 cup unsalted butter, melted - 1 cup pumpkin puree - 1/2 cup cream cheese, softened - 1/2 cup powdered sugar - 1 teaspoon vanilla extract - 1 teaspoon pumpkin pie spice - 1 cup whipped topping (like Cool Whip) - Additional crushed Oreos for topping Quality matters when making these bars. Fresh pumpkin puree gives a rich flavor. Look for pure pumpkin, not pie filling. Use full-fat cream cheese for a creamy texture. It makes mixing easier and tastes better. Always use unsalted butter. This way, you control the salt in your dessert. The Oreos should be fresh for the best texture and taste. For Oreos, go with the classic brand. They have the best flavor and texture. Any regular or double-stuffed Oreo works well. For pumpkin puree, Libby’s is a top choice. Their pumpkin is smooth and rich. For cream cheese, Philadelphia is reliable. It blends well and gives a nice taste. Use Cool Whip or any brand of whipped topping that you like. To start, grab 24 Oreo cookies. You can use regular or double stuffed, depending on your taste. Place the cookies in a food processor. Crush them until they turn into fine crumbs. Next, melt 1/4 cup of unsalted butter. In a mixing bowl, combine the cookie crumbs and melted butter. Stir until they blend well and look crumbly. Now, take a 9x9 inch square pan and press this mixture into the bottom. Use the back of a measuring cup to pack it tightly. This forms a solid crust and sets the stage for the filling. In a clean bowl, add 1 cup of pumpkin puree. Then, mix in 1/2 cup of softened cream cheese. Next, add 1/2 cup of powdered sugar and 1 teaspoon of vanilla extract. Sprinkle in 1 teaspoon of pumpkin pie spice. Beat these ingredients until they become smooth and well mixed. This step gives your bars that rich pumpkin flavor. Now, take 1 cup of whipped topping, like Cool Whip, and gently fold it into the pumpkin mix. This makes the filling light and fluffy. Carefully spread the pumpkin filling over the crust in the pan. Use a spatula to smooth the top. Ensure it is even for the best presentation. Next, cover the pan with plastic wrap. Place it in the refrigerator for at least 4 hours. Chilling helps the bars set firmly. Once they are chilled, cut the dessert into squares. For a nice touch, sprinkle some crushed Oreos on top before serving. Your No Bake Pumpkin Oreo Bars are now ready to enjoy! To crush Oreos well, use a food processor. This tool makes it quick and easy. If you don’t have one, place the cookies in a zip-top bag. Use a rolling pin to crush them. Aim for fine crumbs, not big chunks. This helps the crust hold together. Start with room temperature cream cheese. Cold cream cheese doesn’t mix well. Beat it alone first until it’s smooth. Then, add the pumpkin puree and sugar. Mix until everything is well combined. The mixture should be creamy and fluffy. Avoid over-mixing, as it can become too soft. Cut the bars into squares for easy serving. Use a sharp knife for clean edges. Place them on a decorative plate for a nice look. For extra flair, drizzle caramel sauce on top. Add crushed Oreos as a final touch. It makes the dessert pop and adds crunch. Enjoying it chilled makes each bite refreshing. {{image_2}} You can change up the spices in your bars for a new twist. Instead of pumpkin pie spice, try adding cinnamon or nutmeg. You can also mix in a splash of maple extract for sweetness. This will bring a warm flavor to your dessert. Experimenting with flavors makes each batch unique. Toppings can make your bars even better. You can add chopped nuts, like walnuts or pecans, for a crunchy texture. Drizzling melted chocolate or caramel sauce on top adds sweetness. You can also sprinkle some sea salt for a nice contrast. These toppings will make your dessert stand out. If you need gluten-free options, use gluten-free Oreos instead. For a vegan twist, swap the cream cheese for a vegan cream cheese. Use coconut whipped cream in place of the whipped topping. These adjustments let everyone enjoy the bars, no matter their diet. To keep your No Bake Pumpkin Oreo Bars fresh, store them in the fridge. Use an airtight container. This helps prevent the bars from drying out or picking up other odors. Make sure they are fully chilled before covering them. These bars can last in the fridge for up to 5 days. After that, they may lose some taste and texture. If you notice any changes in smell or appearance, it's best to toss them. You can freeze these bars for up to 3 months. Cut them into squares before freezing for easy serving. Wrap each square tightly in plastic wrap, then place them in a freezer-safe bag. When you're ready to eat, let them thaw in the fridge overnight. Enjoy your tasty treat! Yes, you can use sugar-free Oreos. They work just like regular Oreos. The taste might change a bit, but the texture stays the same. These bars will still be creamy and tasty. If you are cutting back on sugar, this is a good option. These bars need to chill for at least 4 hours. This time helps the filling set up well. If you want them firmer, you can chill them longer. Just be sure to cover the pan with plastic wrap. This keeps them fresh and ready to serve. Yes, you can make these bars ahead of time. They store well in the fridge. You can prepare them a day or two before your event. This makes it easy to enjoy your time with friends and family. Just remember to add the crushed Oreos on top right before serving for a nice crunch. This blog post covers how to make no-bake pumpkin Oreo bars. You learned about the best ingredients, preparation steps, and tips for great taste. I also shared how to store these treats. You can enjoy different flavors, toppings, and dietary options. Keep it simple and have fun creating your own version. No-bake pumpkin Oreo bars are perfect for any occasion. I hope you feel inspired to try them!

No Bake Pumpkin Oreo Bars Easy Fall Dessert Delight

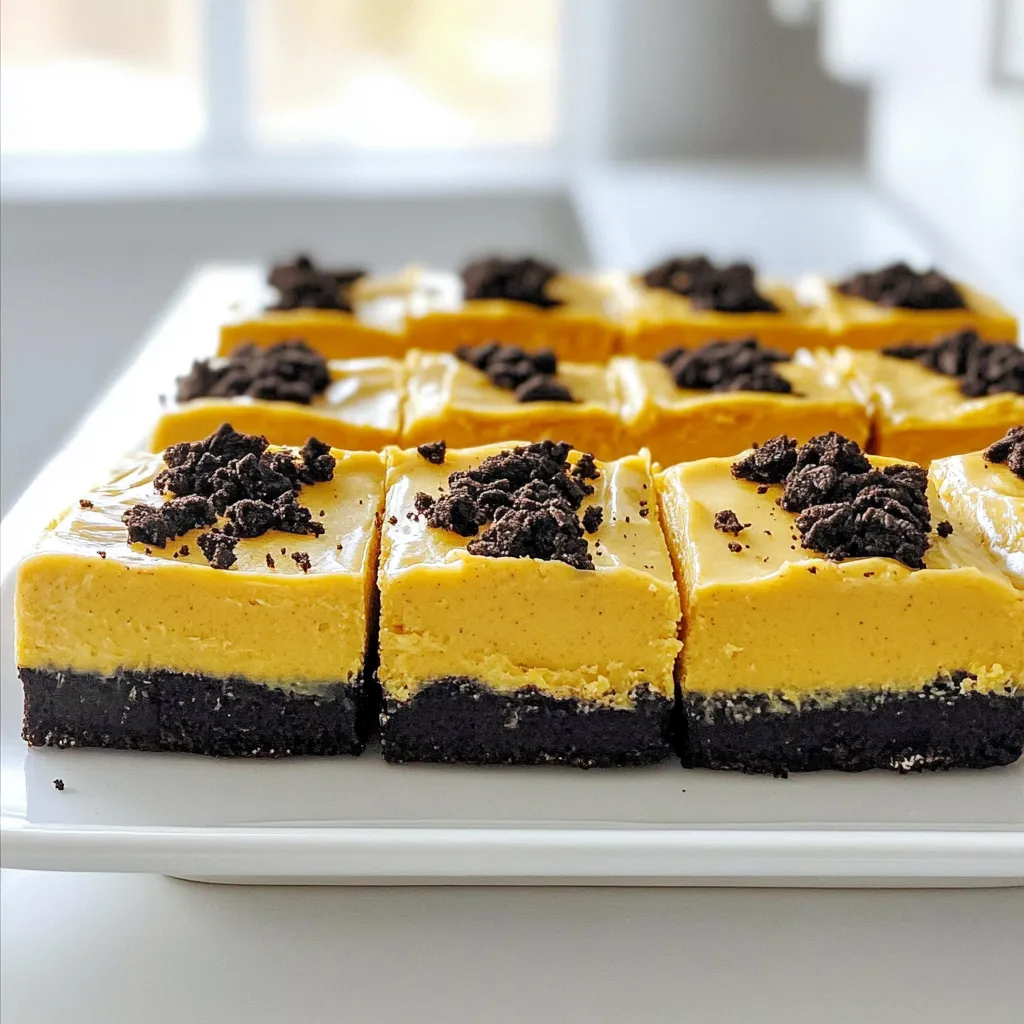
Fall is here, and nothing says autumn like No Bake Pumpkin Oreo Bars! If you crave a sweet treat without

Older posts
Newer posts
← Previous Page1 Page2 Page3 Page4 … Page83 Next →

dsad

© 2026 Southern Dishes • Built with GeneratePress

Our Policies

  • Copyright Policy
  • Cookie Policy
  • GDPR Policy
  • Privacy Policy
  • Disclaimer
  • Terms Of Use

More Information

  • Home
  • About
  • Contact
  • Appetizers
  • Dessert
  • Dinner
  • Drinks
©2026, Southern Dishes About Back To Top