Skip to content
DisclaimerTerms Of UseGDPR PolicyCookie Policy

Southern Dishes

  • Home
  • Drinks
  • Appetizers
  • Dinner
  • Dessert
  • About
  • Contact
  • Privacy Policy
DisclaimerTerms Of UseGDPR PolicyCookie Policy

NO-ING-IMG

- 2 ripe mangoes, diced - 1 small red onion, finely chopped - 1 jalapeño, deseeded and minced - 1 red bell pepper, diced - 1/4 cup fresh cilantro, chopped Fresh mango salsa shines with its vibrant colors and bold flavors. Each ingredient adds a unique touch. The ripe mangoes bring sweetness, while the red onion offers a sharp bite. The minced jalapeño adds heat, which you can adjust to your liking. Diced red bell pepper contributes crunch and sweetness, balancing out the mix. Finally, cilantro gives a fresh, herbal note that ties it all together. - Juice of 2 limes - 1 tablespoon honey - Salt and pepper to taste Lime juice brightens the salsa, adding a zesty kick. Honey is optional, but it can sweeten the salsa, balancing the heat from the jalapeño. Salt and pepper enhance the flavors, making your salsa pop. You can tweak these ingredients based on your taste. This recipe is forgiving and allows for creativity! {{ingredient_image_1}} - Step 1: In a bowl, combine the diced mangoes, red onion, jalapeño, and red bell pepper. - Step 2: Add the chopped cilantro and juice from two limes. - Step 3: If you like sweetness, drizzle in honey. - Step 4: Gently toss all the ingredients together. - Step 5: Season with salt and pepper to taste. - Step 6: Let the salsa sit for at least 15 minutes. This helps the flavors meld. - Step 7: Serve the salsa with tortilla chips, grilled chicken, or fish for a fresh kick! Making this mango salsa is quick and fun. Each step helps build bright flavors. The sweet mango pairs well with the spicy jalapeño. Together, they create a perfect blend. Enjoy your salsa on a sunny day! To pick the best mangoes, look for ones that feel soft but not mushy. Their skin should have a slight give when pressed. A ripe mango often shows some yellow or red color. You can also smell the stem end; a sweet scent means it's ripe. To dice mangoes with ease, first slice off both ends. Stand the mango on one end and slice down to remove the skin. Next, make vertical and horizontal cuts in the flesh, then scoop it out with a spoon. This method gives you perfect cubes without fuss. If you want a milder salsa, leave out the jalapeño or use less. You can also replace it with a sweet pepper for taste without the heat. To make it spicier, keep the seeds in the jalapeño or add chopped serrano peppers. For other heat options, try using crushed red pepper flakes or hot sauce. Both add a kick without changing the salsa's fresh flavor. To boost the flavor, consider adding fresh herbs like mint or basil. Chopped green onions also work well. A pinch of cumin can deepen the salsa's taste. For balance, taste as you mix. If it is too sweet, add a splash of lime juice. If it’s too sour, a bit of honey can help. Adjusting these flavors makes your salsa shine! Pro Tips Choose the Right Mangoes: Look for mangoes that are slightly soft to the touch and have a sweet aroma. This indicates ripeness and ensures maximum flavor in your salsa. Customize Heat Levels: If you prefer a milder salsa, you can reduce the amount of jalapeño or remove all the seeds. For extra heat, consider adding a pinch of cayenne pepper. Let It Marinate: Allowing the salsa to sit for at least 15 minutes helps the flavors blend beautifully, making each bite more delicious and refreshing. Serve with Variety: This salsa pairs well not only with tortilla chips but also as a topping for grilled fish, chicken, or even tacos, adding a tropical twist to your meal. {{image_2}} You can easily change up your mango salsa with other tropical fruits. Adding diced pineapple gives a sweet and tangy kick. Try kiwi for a bright color and fresh taste. You can also mix in fruits like papaya or passion fruit for more fun flavors. Each fruit adds its unique twist, making your salsa more exciting. Want more texture? Black beans add protein and fiber, making the salsa heartier. Corn brings a sweet crunch that pairs well with mango. You might also consider mixing in diced avocado. It adds creaminess and balances the salsa's acidity. These add-ins make your salsa not just tasty but also filling. You can switch up the dressing for a different taste. Using agave or maple syrup gives a sweet touch without refined sugar. If you crave a zesty kick, try adding juice from oranges or lemons. These citrus fruits brighten the flavors and make the salsa even more refreshing. To keep your fresh mango salsa tasty, use an airtight container. Glass jars work well, but plastic containers are also good. Make sure the lid seals tightly to keep air out. In the fridge, your salsa will stay fresh for up to 3 days. After that, the flavors may fade. If you want to store salsa for longer, you can freeze it. First, put the salsa in a freezer-safe bag. Squeeze out the air before sealing it. When you are ready to use it, thaw it in the fridge overnight. To keep the texture nice, avoid heating it in the microwave. Just let it sit at room temperature for a bit before serving. Always check your salsa before eating. If it smells sour or has a strange color, it’s time to toss it. Look for signs like mold or a watery layer on top. To stay safe, throw out any salsa that has been in the fridge for more than 3 days. This way, you can enjoy your fresh mango salsa without worry! Can I make this salsa ahead of time? Yes, you can prepare Fresh Mango Salsa ahead of time. Just mix the salsa and store it in the fridge. It tastes best if you let it sit for at least 15 minutes before serving. This helps the flavors blend nicely. If you make it a day early, it will still taste great! How long does Fresh Mango Salsa last in the fridge? Fresh Mango Salsa can last about 3 to 5 days in the fridge. Store it in an airtight container to keep it fresh. After a few days, check for any changes in smell or color. If it looks or smells off, it’s best to toss it. Is Fresh Mango Salsa healthy? Yes, Fresh Mango Salsa is healthy! It is low in calories and packed with vitamins. Mangoes are rich in vitamin C and fiber. The fresh veggies add more nutrients, making this salsa a great choice for snacking. What are the health benefits of mangoes? Mangoes are great for your health. They help boost your immune system. They also support digestion due to their high fiber content. Plus, mangoes contain antioxidants, which can help protect your body from damage. Can I use different kinds of peppers? Absolutely! You can use different peppers to change the flavor. If you like it spicy, try a habanero. For a milder taste, use a sweet bell pepper. Just remember to adjust the amount based on your spice level preference. What are the best ways to serve Fresh Mango Salsa? You can serve Fresh Mango Salsa in many fun ways. It pairs well with tortilla chips for a tasty snack. You can also top grilled chicken or fish with it for a fresh kick. Try it as a topping for tacos or salads too! Fresh Mango Salsa combines ripe mangoes, onions, and peppers for a tasty snack. You learned how to pick the best mangoes and adjust the spice level to your taste. Adding unique fruits or textures can enhance your salsa. Remember to store it correctly and watch for signs of spoilage. Overall, Fresh Mango Salsa is a fun, fresh dish to share at any gathering. Enjoy making it your own and savor the flavors!

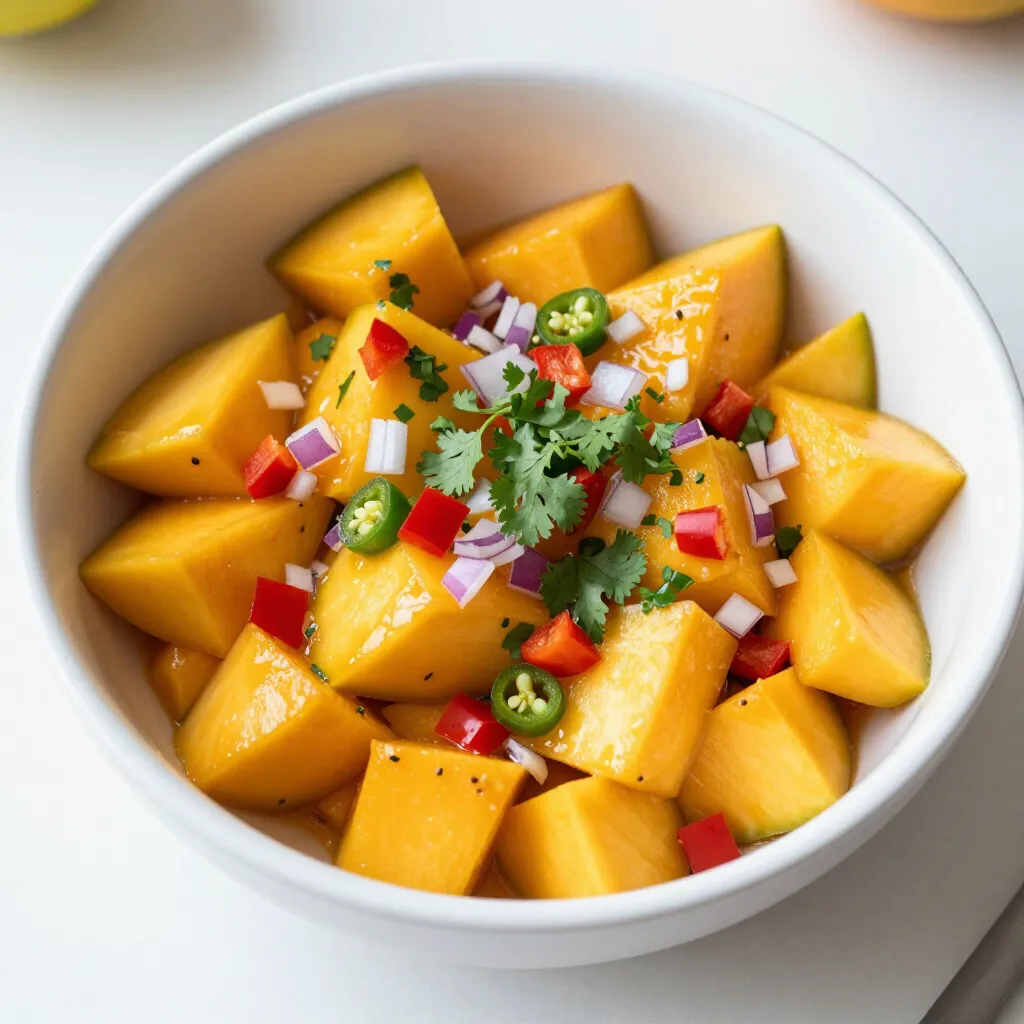
Fresh Mango Salsa Flavorful and Easy to Prepare

Looking for a delicious and easy way to spice up your meals? Fresh Mango Salsa is your answer! With just

- 4 large russet potatoes, scrubbed and diced - 1 cup sour cream - 1 cup cheddar cheese, shredded - 1/2 cup cream cheese, softened - 1/4 cup green onions, chopped - 1/2 cup cooked and crumbled turkey bacon - 1 teaspoon garlic powder - 1 teaspoon onion powder - Salt and pepper to taste - 1/2 cup milk - 1 tablespoon olive oil - Additional cheddar cheese for topping - Extra green onions for garnish The heart of this Loaded Baked Potato Casserole lies in its simple yet rich ingredients. Start with four large russet potatoes. These potatoes are perfect for a fluffy, hearty base. Scrub them well, then dice them into even pieces. This ensures they cook evenly. Next, the creamy blend of sour cream and cream cheese adds a delightful tang. The sour cream gives it a nice zesty flavor, while the cream cheese brings in creaminess. You’ll want one cup of each. Cheddar cheese is a must-have for that classic baked potato taste. Use one cup of shredded cheddar and save some for topping. This cheese melts beautifully and makes the casserole ooey-gooey. For a touch of freshness and crunch, add a quarter cup of chopped green onions. They add a nice burst of flavor. Don't forget about the bacon! Half a cup of cooked and crumbled turkey bacon gives a savory twist. If you prefer a vegetarian option, substitute it with vegetable bacon. Now, let's spice it up! One teaspoon of garlic powder and one teaspoon of onion powder enhance the flavors. Salt and pepper will help to balance everything out. For added creaminess, include half a cup of milk. And a tablespoon of olive oil will keep things moist and flavorful. Finally, a sprinkle of extra cheddar cheese and more green onions on top turns this dish into a feast for the eyes. {{ingredient_image_1}} - Preheat your oven to 400°F (200°C). - In a large pot, boil salted water. Cook the diced potatoes for about 10-15 minutes, or until they are fork-tender. Then, drain the potatoes and set them aside. - In a large bowl, combine 1 cup of sour cream, 1/2 cup of softened cream cheese, and 1/2 cup of milk. Mix well until smooth. - Next, add 1 cup of shredded cheddar cheese, 1 teaspoon of garlic powder, 1 teaspoon of onion powder, salt, and pepper. Stir in most of the chopped green onions, saving some for later. - Carefully fold the cooked potatoes and crumbled turkey bacon into the mixture, coating them evenly. - Lightly grease a baking dish with 1 tablespoon of olive oil. Spoon the potato mixture into the dish and spread it out evenly. - Sprinkle additional cheddar cheese on top of the mixture. - Cover the dish with aluminum foil and bake for 25 minutes. - After that, uncover the dish and bake for another 15-20 minutes, until the top is bubbly and golden brown. - Once done, let it cool for a few minutes before serving. Garnish with the reserved green onions. - Ensure potatoes are fork-tender before mixing. This step helps them blend well with the other ingredients. If they are not tender, the casserole may end up chunky instead of creamy. - Use a mix of cheeses for added flavor. Cheddar is great, but adding mozzarella or pepper jack can make it even better. Mixing cheeses creates a richer taste. - Serve hot with a dollop of sour cream. This adds a cool and creamy contrast to the warm casserole. - Garnish plates with green onions. They add a nice crunch and a burst of color to the dish. - Allow to cool slightly before serving. This helps the casserole set and makes it easier to serve. - Bake until bubbly for best results. A golden top shows that your casserole is ready and adds a tasty crunch. Pro Tips Choose the Right Potatoes: Use russet potatoes for a fluffy texture, but Yukon Golds can also work well for creaminess. Mix Cheeses: For an extra cheesy flavor, consider blending different types of cheese such as Monterey Jack or Gouda with the cheddar. Customize Your Toppings: Feel free to add your favorite toppings like jalapeños, olives, or even a drizzle of ranch dressing before serving. Make It Ahead: Prepare the casserole a day in advance and refrigerate. Just add a few extra minutes to the baking time when you're ready to serve. {{image_2}} You can make this dish vegetarian-friendly. Instead of using turkey bacon, you can try vegetable bacon. It tastes great and still gives that smoky flavor. You can also add some veggies like broccoli or bell peppers. These add color, texture, and nutrients to your casserole. Feel free to play around with toppings. You can use other cheeses, like mozzarella, for a different taste. Mozzarella melts nicely and adds a gooey texture. Another fun idea is to add a layer of breadcrumbs on top. This gives your casserole a nice crunch. If you like heat, you can add jalapeños or spicy cheese. This will give your dish a kick! You can also mix in spices like paprika or cayenne. These spices can enhance the flavor and make your casserole more exciting. After enjoying your loaded baked potato casserole, store any leftovers in an airtight container. This keeps the flavors fresh. You can keep it in the fridge for up to 3-5 days. It’s best to let it cool before sealing. This way, you avoid extra moisture in the container. You can freeze your casserole for later. Freeze it before baking for best results. You can also freeze it after it’s fully cooked. Use freezer-safe containers to keep it fresh. Make sure to label the containers with the date. This helps you keep track of how long it's been frozen. To enjoy that crispy texture, reheat the casserole in the oven. Set the oven to 350°F (175°C) and heat until warm throughout. This method keeps the top nice and crunchy. If you need a quick option, use a microwave. Just heat it in short bursts, checking often to avoid overheating. It takes about 60 minutes to make this dish. You need 15 minutes to prep and 45 minutes to cook. The prep includes washing and chopping potatoes and mixing ingredients. The cooking part involves baking until golden brown and bubbly. Yes, you can prepare this casserole ahead of time. Make it up to a day in advance. Just follow the recipe until the baking step. Cover it tightly and store it in the fridge. When ready to bake, take it out and let it sit for a bit. Then, bake it as directed. This casserole pairs well with many dishes. You can serve it with a fresh salad or steamed veggies. Grilled chicken or steak also makes a great side. Don't forget some bread rolls for a complete meal! Adjusting the recipe is simple. If you need more servings, double the ingredients. If you want fewer servings, cut the amounts in half. Keep the cooking time the same, but check for doneness. You want that top to be golden and bubbly. This Loaded Baked Potato Casserole is simple and tasty. We started with russet potatoes, sour cream, and cheese, mixing them well. I shared extra tips to make your dish perfect, like letting it cool a bit before serving. You can customize it with different toppings and flavors too. Store leftovers easily, and reheat for a quick meal. Enjoy this dish at your next gathering; it’s sure to be a hit!

Loaded Baked Potato Casserole Easy and Comforting Dish

Looking for a dish that brings warmth and joy to your table? This Loaded Baked Potato Casserole is easy to

To make this tasty dip, gather these simple ingredients: - 1 cup frozen spinach, thawed and drained - 1 cup canned artichoke hearts, drained and chopped - 1 cup cream cheese, softened - ½ cup sour cream - ½ cup mayonnaise - 1 cup shredded mozzarella cheese - ½ cup grated Parmesan cheese - 2 cloves garlic, minced - ¼ teaspoon red pepper flakes (optional) - Salt and pepper to taste - Tortilla chips or sliced baguette, for serving These ingredients combine to create a creamy and cheesy delight. The artichokes offer a subtle tang, while the spinach adds color and nutrition. You can customize your dip by adding a few extras. Try: - Cooked and crumbled bacon for added crunch - Chopped jalapeños for some heat - Fresh herbs like parsley or basil for brightness For toppings, consider: - Extra cheese on top for a bubbly finish - A sprinkle of paprika for color - Fresh herbs as a garnish These add-ins can enhance the flavor and make your dip special. Each serving of this dip packs in a lot of flavor. Here’s a quick look at the nutrition: - Calories: 250 - Protein: 10g - Fat: 20g - Carbohydrates: 10g - Fiber: 1g This dip is rich and satisfying. Enjoy it in moderation as a treat. {{ingredient_image_1}} Start by preheating your oven to 375°F (190°C). In a medium mixing bowl, combine the softened cream cheese, sour cream, and mayonnaise. Mix these ingredients until they are smooth. This forms the creamy base for our dip. Next, add the thawed spinach and chopped artichokes to your bowl. Make sure they are well-drained to avoid a watery dip. Then, stir in the minced garlic and optional red pepper flakes for a bit of heat. Finally, fold in half of the shredded mozzarella and grated Parmesan cheese. Combine everything until it is evenly mixed. Season with salt and pepper to suit your taste. Now, transfer the mixture into a baking dish. Spread it out evenly with a spatula. Top the dip with the remaining mozzarella and Parmesan cheeses. Place the dish in the preheated oven and bake for 25 to 30 minutes. Look for a bubbly and golden top. Once done, take it out of the oven. Let it cool slightly before serving. Enjoy with tortilla chips or sliced baguette! To get a creamy texture, always use softened cream cheese. This makes mixing easy. Mix cream cheese, sour cream, and mayonnaise well. This base should be smooth. Add thawed spinach and chopped artichokes next. Stir everything gently. Don't overmix; you want some chunky bits. Top with mozzarella and Parmesan before baking. This gives a nice, bubbly crust. One common mistake is not draining the spinach and artichokes well. Excess water can make your dip too runny. Another mistake is baking for too long. Keep an eye on it. You want a golden top, not burnt edges. Also, don't skip the garlic. It adds a lot of flavor. Lastly, taste for salt and pepper before baking. This lets you adjust the seasoning just right. Serve this dip warm for the best flavor. I like to use tortilla chips or sliced baguette. They are perfect for scooping. For extra flair, garnish with fresh parsley or artichoke hearts. This adds color and makes it look fancy. You can also serve it with veggie sticks for a healthier option. Enjoy the dip with friends at any gathering! Pro Tips Use Fresh Spinach: If possible, substitute frozen spinach with fresh spinach for a brighter flavor and more vibrant color. Adjust the Creaminess: Feel free to add more sour cream or cream cheese for a creamier dip, depending on your taste preference. Experiment with Cheeses: Try using different types of cheese, like cheddar or pepper jack, for unique flavor variations. Make Ahead: Prepare the dip a day in advance and store it in the fridge. Just bake it right before serving for a quick appetizer. {{image_2}} You can make this dip vegan or dairy-free. Use vegan cream cheese instead of regular cream cheese. You can swap sour cream for cashew cream or coconut yogurt. For the cheese, try using a dairy-free mozzarella. This way, everyone can enjoy the dip! To boost the flavor, add spices or herbs. A pinch of garlic powder gives it a nice kick. Try fresh herbs like basil or thyme for brightness. You can also mix in a bit of lemon juice for a zesty touch. Red pepper flakes add a little heat if you like spice. Get creative with ingredient swaps! Use fresh spinach instead of frozen for a brighter taste. Swap artichokes for roasted red peppers for a different flavor. You can add a splash of Worcestershire sauce for a savory depth. Experiment and find what makes your taste buds dance! To store your leftover creamy spinach artichoke dip, let it cool first. Then, transfer it to an airtight container. Keep the dip in the fridge for up to three days. Make sure to cover it well, so it stays fresh. When you are ready to enjoy your dip again, reheat it in the oven. Preheat your oven to 350°F (175°C). Place the dip in an oven-safe dish. Cover it with foil to keep it moist. Bake for about 15-20 minutes or until hot. You can also reheat it in the microwave. Use a microwave-safe bowl and heat in 30-second intervals, stirring in between. You can freeze creamy spinach artichoke dip for later use. To do this, pack the dip into a freezer-safe container. Leave some space at the top for expansion. It can stay in the freezer for up to two months. When ready to use, thaw it in the fridge overnight. Reheat it before serving for the best taste. Yes, you can make this dip ahead of time. Prepare the dip and place it in a baking dish. Cover it well and store it in the fridge. You can keep it there for up to two days. When ready to serve, just bake it as directed. This saves time and allows the flavors to meld together. You have many great options to serve with this dip. Here are some ideas: - Tortilla chips - Sliced baguette - Fresh veggies like carrots and celery - Pita chips - Crackers These pair well and help scoop up the dip. You can choose what you like best. Yes, fresh spinach works well too. You need to cook it first. Sauté the fresh spinach until it wilts. Drain it to remove extra water. Then, chop it before mixing it in. This way, you get a fresh taste in your dip. You've learned how to make a tasty Creamy Spinach Artichoke Dip. We covered the ingredients, mixing, and baking. I shared tips for a perfect texture and ways to store leftovers. You can even explore fun variations to suit your taste. Remember, it’s great for parties or relaxing nights at home. Enjoy making this dip and impressing your friends and family!

Creamy Spinach Artichoke Dip Flavorful and Easy Recipe

If you crave a warm, cheesy dip bursting with flavor, you’re in for a treat! My Creamy Spinach Artichoke Dip

- 12 lasagna noodles - 2 cups ricotta cheese - 1 egg - 2 cups shredded mozzarella cheese - 1 cup grated Parmesan cheese - 2 cups marinara sauce - 1 teaspoon garlic powder - 1 teaspoon Italian seasoning Cheesy lasagna rolls start with lasagna noodles. I prefer using 12 noodles for four servings. Cook them according to the package directions. You want them al dente for the best texture. Next, I mix the cheese filling. For this, I use ricotta cheese, one egg, mozzarella, and Parmesan. This mix gives a creamy and rich taste. I add garlic powder and Italian seasoning for flavor. This blend makes the rolls truly special. - Salt and pepper - Fresh basil (optional) I always add salt and pepper to taste. This simple step makes a big difference. If you want a fresh touch, consider adding basil as a garnish. It adds color and a burst of flavor that enhances the dish. {{ingredient_image_1}} Preheat your oven to 375°F (190°C). This will help cook the rolls evenly. While the oven heats, cook the lasagna noodles. Follow the package directions until they are al dente. Drain them well and set them aside. Next, grab a mixing bowl. In this bowl, combine the ricotta cheese, egg, 1 cup of mozzarella cheese, and 1/2 cup of Parmesan cheese. Add the garlic powder, Italian seasoning, and some salt and pepper. Mix everything together until it is smooth and well blended. This cheese mixture brings flavor and creaminess to your rolls. Now it’s time to fill and roll the lasagna noodles. Take a noodle and spoon a generous amount of the cheese mixture onto it. Spread it evenly, covering most of the noodle. This step is key for flavor. Carefully roll the noodle up from one end to the other. Place each roll seam-side down in a baking dish. Repeat until all the noodles are filled and rolled. Once all the rolls are in the dish, pour half of the marinara sauce over them. Make sure they are well coated. Sprinkle the remaining mozzarella and Parmesan cheese on top. Finally, pour the rest of the marinara sauce over the cheese. This adds a nice layer of flavor. Cover the baking dish with aluminum foil. This will help the rolls cook through. Bake them in the preheated oven for 20 minutes. After that, remove the foil. This lets the cheese get bubbly and golden. Bake for another 15 minutes, or until you see that delicious golden color. After baking, allow the dish to cool for 5 minutes. If you want, you can garnish with fresh basil before serving. Enjoy your cheesy lasagna rolls! To make a great cheese mixture, start with the ricotta cheese. It should be creamy but not too runny. Mix in the egg to help it bind. Add garlic powder and Italian seasoning for extra flavor. You can also use fresh herbs like basil or parsley if you have them. This will bring freshness to your dish. Cook the lasagna noodles just until al dente. This means they should still have a little bite to them. If they are too soft, they will fall apart. When baking, cover your dish with foil first. This helps heat the cheese evenly. Remove the foil to let the cheese brown nicely at the end. Garnish your cheesy lasagna rolls with fresh basil for a pop of color. You can also sprinkle some extra Parmesan on top before serving. Serve them with a side salad or garlic bread. This adds balance to the meal and makes it feel special. Enjoy your beautiful dish! Pro Tips Use Fresh Ingredients: Always opt for fresh basil and high-quality cheeses for a richer flavor in your lasagna rolls. Don’t Overcook Noodles: Cook the lasagna noodles just until al dente, as they will continue to cook in the oven and absorb sauce. Customize Your Fillings: Feel free to add cooked spinach, mushrooms, or other vegetables to the cheese mixture for added nutrition and flavor. Let it Rest: Allow the lasagna rolls to cool for a few minutes before serving; this helps the filling set and makes them easier to slice. {{image_2}} You can use many types of cheese in cheesy lasagna rolls. The classic choice is ricotta, but why stop there? You can mix in cottage cheese for a lighter option. Cream cheese adds a rich and smooth texture. Each cheese brings a unique taste and feel to the rolls. If you follow a vegan diet, you still have great choices. Vegan ricotta made from nuts or tofu works well. You can also find vegan mozzarella at many stores. These options let everyone enjoy this dish. When it comes to sauce, you have two main paths: marinara or Alfredo. Marinara gives a classic Italian flavor. It’s tomato-based and pairs well with cheese. Alfredo, on the other hand, is creamy and rich. This sauce can make your rolls feel extra indulgent. You can also decide between homemade or store-bought sauces. Making your own sauce can be fun and lets you control the flavors. If you’re short on time, a good quality store-bought sauce works just fine. To make your cheesy lasagna rolls even better, try adding veggies. Spinach, mushrooms, or zucchini all fit well. They bring color and nutrition to the dish. You can also add cooked ground beef or sausage for a heartier meal. If you like spice, consider adding red pepper flakes or jalapeños. These can give your rolls a kick that many will love. Just a little heat can elevate the flavors and make your meal memorable. After enjoying your cheesy lasagna rolls, store any leftovers in the fridge. Place them in an airtight container. This keeps them fresh and tasty. They will last about three to five days. When you are ready to reheat, preheat your oven to 350°F (175°C). Cover the rolls with foil to keep them moist. Bake for about 20 minutes. You can also use the microwave. Heat them on a plate for about 2-3 minutes or until hot. You can also freeze cheesy lasagna rolls if you want to save some for later. First, let them cool completely. Then, wrap each roll tightly in plastic wrap. Place the wrapped rolls in a freezer-safe bag. They can last up to three months in the freezer. When you are ready to eat them, take the rolls out of the freezer. Thaw them in the fridge overnight. To reheat, follow the same steps as when you refrigerate. Bake at 350°F (175°C) for about 20 minutes, covered with foil. Enjoy your delicious meal anytime! Cheesy lasagna rolls can last up to four days in the fridge. Store them in an airtight container for best results. If they sit longer, the noodles may become too soft. Always check for any signs of spoilage before eating. Yes, you can make cheesy lasagna rolls ahead of time. Prepare the rolls and place them in a baking dish with marinara sauce. Cover tightly and store them in the fridge. You can bake them the next day. Just add a few extra minutes to the baking time if they are cold. Cheesy lasagna rolls pair well with many side dishes. Here are some great options: - Garlic bread - Caesar salad - Steamed broccoli - Roasted vegetables - A light garden salad These sides add freshness and balance to the rich flavors of the rolls. Enjoy experimenting with your favorites! Cheesy lasagna rolls are simple and tasty. We covered the main ingredients, preparation, and baking steps. Perfect your cheese mix and keep the noodles from overcooking for the best dish. Feel free to explore variations with different cheeses and sauces. Lastly, remember how to store your leftovers for later enjoyment. Enjoy your delicious creation, and share it with family and friends.

Cheesy Lasagna Rolls Easy and Flavorful Dinner Dish

Craving a comforting dinner tonight? Cheesy lasagna rolls are the answer! This easy and flavorful dish combines tender pasta, creamy

- 1 can (15 oz) chickpeas - 1/4 cup hot sauce - 1 tablespoon olive oil - 1 teaspoon garlic powder - 1 teaspoon onion powder - 1/2 teaspoon smoked paprika - Salt and pepper to taste - 4 large whole grain tortillas or wraps - 1 cup shredded lettuce - 1 cup diced tomatoes - 1/2 cup sliced cucumbers - 1/4 cup vegan ranch dressing - Fresh cilantro or parsley - Extra hot sauce The main ingredients are simple yet packed with flavor. The chickpeas are the star. They give this dish a hearty feel. Hot sauce brings the heat, while olive oil adds richness. Garlic powder and onion powder enhance the taste. Smoked paprika adds a nice touch of smokiness. Don't forget salt and pepper for balance. Now, the additional ingredients make this meal fresh and crunchy. The tortillas or wraps hold everything together. Fresh veggies like lettuce, tomatoes, and cucumbers add crunch and color. Vegan ranch dressing ties it all together with a creamy touch. For optional garnishes, fresh herbs like cilantro or parsley brighten up the dish. If you want more heat, drizzle on extra hot sauce. This combination of ingredients makes your Vegan Buffalo Chickpea Wraps a satisfying and tasty meal! {{ingredient_image_1}} - Preheat your oven to 400°F (200°C). This heat will help make the chickpeas crispy. - In a medium bowl, mash the drained chickpeas with a fork. Leave some chunks for texture. - Add hot sauce, olive oil, garlic powder, onion powder, smoked paprika, salt, and pepper to the mashed chickpeas. Stir well until combined. - Spread the chickpea mixture evenly on a lined baking sheet. Bake for 15-20 minutes, until slightly crispy. - While the chickpeas bake, lay out the tortillas on a clean surface. - Spread a tablespoon of vegan ranch dressing on each tortilla. - Once the chickpeas are done, divide the mixture among the wraps. - Top with shredded lettuce, diced tomatoes, and sliced cucumbers. - Roll the wraps tightly, folding in the ends to secure the filling. - Slice the wraps in half diagonally and garnish with fresh cilantro or parsley. To ensure the chickpeas are crispy, start by spreading them evenly on the baking sheet. Bake at 400°F for 15 to 20 minutes. Keep an eye on them to avoid burning. Let them cool slightly so they maintain their crunch. To prevent wraps from getting soggy, always use fresh tortillas. Spread the vegan ranch dressing just before serving. This keeps the tortillas firm and tasty. Consider using a layer of lettuce directly on the tortilla. It acts as a barrier against moisture. For a great presentation, slice the wraps in half and arrange them on a platter. Drizzle some vegan ranch dressing on the side for dipping. A sprinkle of extra hot sauce adds a nice touch for spice lovers. Use fresh herbs like cilantro or parsley as a garnish. It brightens up the dish and adds color. To add different spices or sauces, consider smoked paprika or cayenne pepper for heat. You can also mix in a bit of lime juice for a zesty kick. Experiment with other sauces like BBQ or teriyaki for unique flavors. For customizing vegetables in the wraps, try adding avocado slices or bell peppers. You can also swap lettuce for kale or spinach for added nutrients. This way, you can make the wraps your own! Pro Tips Adjust the Heat: If you prefer milder flavors, reduce the amount of hot sauce or opt for a less spicy variety. Chickpea Texture: For a creamier texture, blend the chickpeas instead of mashing them. This creates a smoother filling. Wrap Variations: Experiment with different veggies or add avocado slices for extra creaminess and flavor. Meal Prep Friendly: The chickpea mixture can be made ahead of time and stored in the fridge for quick assembly during the week. {{image_2}} You can change the chickpeas to other beans. Black beans or lentils work well. You can also use pinto beans for a different taste. If you want a gluten-free option, try corn tortillas. They add a nice flavor, too. Whole grain wraps are great, but corn tortillas can make it even lighter. Want a sweet twist? Add a bit of maple syrup to the hot sauce mix. This will balance the heat nicely. You can also top your wrap with sliced avocado. It adds creaminess and healthy fats. If you like cheese, try using vegan cheese shreds for a bit of richness. For a gluten-free option, use corn tortillas. They taste great and hold the filling well. If you need a low-carb choice, use lettuce wraps instead. They keep it fresh and crunchy without the carbs. Both options let you enjoy the wrap in a way that fits your diet. After making these wraps, store any leftovers in an airtight container. This helps keep them fresh. They will last in the fridge for about 3 days. Check for any signs of spoilage before eating. You can freeze the wraps for later. Wrap each one tightly in plastic wrap, then place them in a freezer bag. This keeps them safe from freezer burns. To reheat, thaw in the fridge overnight. Then, heat in the oven or microwave until warm. Prepping ingredients ahead of time makes life easier. You can mash the chickpeas and mix in the spices a day in advance. Store the mixture in the fridge. When you’re ready to eat, just assemble the wraps. This way, you have quick meals ready in no time! You can make simple vegan ranch dressing at home. Here is a quick recipe: - 1/2 cup vegan mayo - 1/4 cup almond milk - 1 teaspoon garlic powder - 1 teaspoon onion powder - 1 tablespoon lemon juice - Salt and pepper to taste Mix all these ingredients in a bowl. Adjust the spices as you like. This dressing is creamy and tasty. It goes great with many dishes. Yes, you can prepare the wraps ahead of time. Here are some tips: - Make the chickpea filling and store it in the fridge. - Prepare the vegetables and keep them in separate containers. - Assemble the wraps just before serving. This way, they stay fresh and crunchy. You can eat them for lunch or dinner easily. These wraps taste great with several sides. Here are some suggestions: - Sweet potato fries for a crispy treat. - A fresh green salad for a light side. - Veggie sticks with hummus for a crunchy snack. These sides complement the spicy wraps well. They add more flavor and fun to your meal. These buffalo chickpea wraps are packed with flavor and easy to make. You learned about the main and optional ingredients, step-by-step preparation, and creative ways to serve and store them. Feel free to customize the wrap to fit your taste. Experiment with different spices or ingredients to make it your own. Enjoy a tasty and healthy meal that fits your needs. Try these wraps today, and you’ll love the results.

Vegan Buffalo Chickpea Wraps Satisfying and Tasty Meal

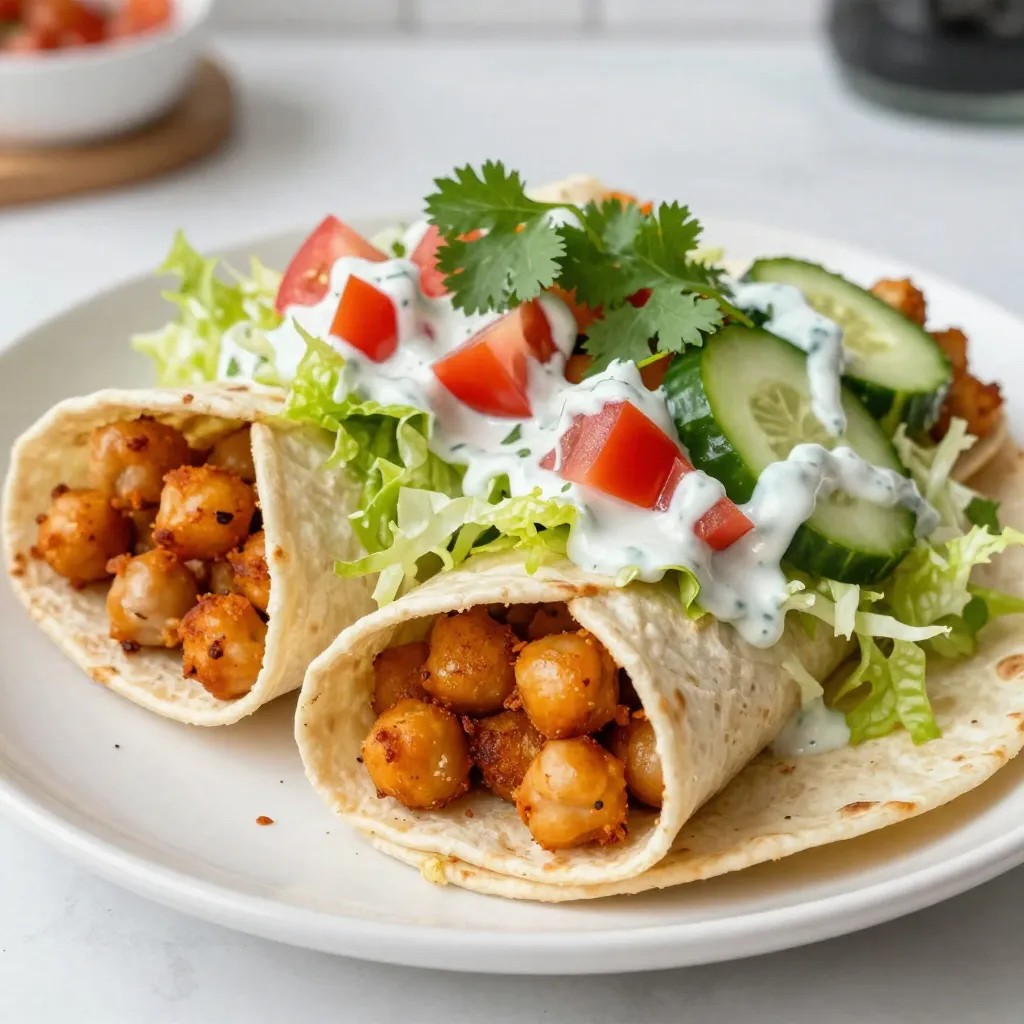
Are you ready to spice up your lunch routine? These Vegan Buffalo Chickpea Wraps are not only tasty but also

For this tasty dish, you need: - 1.5 lbs boneless, skinless chicken breasts, sliced into strips - 2 red bell peppers, sliced - 2 yellow bell peppers, sliced - 1 red onion, sliced These ingredients bring color and flavor to your meal. The spices make this dish special. You will need: - 3 tablespoons olive oil - 2 teaspoons ground cumin - 2 teaspoons smoked paprika - 1 teaspoon chili powder - 1 teaspoon garlic powder - 1 teaspoon onion powder - Salt and pepper, to taste - Juice of 2 limes These spices add depth and a smoky kick. To finish your fajitas, consider these toppings: - Fresh cilantro, chopped - Avocado - Sour cream - Salsa - Tortillas These toppings add freshness and creaminess. Warm tortillas hold everything together nicely. Enjoy your meal! {{ingredient_image_1}} 1. Start by preheating your oven to 425°F (220°C). This helps the chicken cook evenly and quickly. 2. Slice the chicken breasts into strips. Aim for even sizes so they cook well. 3. Slice the red and yellow bell peppers and the red onion. You want colorful veggies for a nice look. 4. In a large bowl, mix the chicken, bell peppers, and onion. Make sure to blend them well. 1. In a small bowl, whisk together the olive oil, cumin, smoked paprika, chili powder, garlic powder, onion powder, salt, and pepper. Add the juice of two limes for a zesty kick. 2. Pour this spice mix over the chicken and veggies. Toss everything until it’s well-coated. 3. Spread the mixture evenly on a large sheet pan. This helps them roast nicely. 4. Bake in the preheated oven for about 20 to 25 minutes. Stir halfway for even cooking. Look for the chicken to be fully cooked and the veggies to be slightly charred. 5. When done, take the pan out and let it cool for a few minutes. 6. Garnish with fresh cilantro before you serve. This adds a nice touch and flavor. - Always use fresh ingredients for the best taste. - Cut veggies and chicken into similar sizes for even cooking. - Stir the mixture halfway through baking for better results. - Let the fajitas sit for a few minutes after baking. This helps the flavors blend. - Serve on warm tortillas with toppings like avocado or salsa to enhance the meal. To boost flavor in fajita chicken, use fresh lime juice. It adds a zesty kick. Try marinating your chicken for an hour or more. The longer it sits, the better it tastes. You can also mix in fresh herbs like cilantro or parsley. Adding a pinch of cayenne pepper brings heat. Feel free to experiment with different spices, too. Baking is easy, but you can also grill your fajita chicken. Grilling gives it a smoky taste that many love. You can use a stovetop skillet, too. Just heat oil in the pan, then cook the chicken and veggies until done. If you have an air fryer, it works well for this dish. It cooks fast and keeps things crispy. Cook chicken until it reaches 165°F for safety. For even cooking, cut chicken into thin strips. This helps it cook faster and more evenly. Stir the pan halfway through cooking. This way, veggies get a nice char, and the chicken stays juicy. Keep an eye on the timer; around 20-25 minutes should be perfect. Enjoy your meal! Pro Tips Marinate for Flavor: For an even deeper flavor, consider marinating the chicken in the spice mixture for at least 30 minutes or overnight in the refrigerator before cooking. Veggie Variations: Feel free to mix and match your favorite vegetables! Zucchini, mushrooms, or corn can be great additions to this dish. Charred Perfection: If you prefer extra char on your veggies, broil them for the last 2-3 minutes of cooking. Keep an eye on them to prevent burning! Serving Suggestions: Serve with a variety of toppings like guacamole, jalapeños, or shredded cheese to cater to different tastes. {{image_2}} You can make this dish vegetarian or vegan. Swap out the chicken for firm tofu or tempeh. Slice them into strips and marinate just like the chicken. You can also use black beans or chickpeas for protein. Add extra veggies, like zucchini or mushrooms, to boost flavor. Serve it on tortillas with avocado and fresh salsa. This gives you a tasty, plant-based meal. While chicken is a classic, you can try other proteins. Shrimp cooks fast and adds seafood flavor. Sliced steak works well too; use flank or skirt steak for best results. For a lighter option, turkey breast is great. You can use any protein you enjoy. Just adjust the cooking time to ensure everything cooks perfectly. You can change the spices to match different flavors. For a Mexican twist, add more chili powder and fresh cilantro. If you want a hint of Asian flavor, try soy sauce and ginger. For a Mediterranean flair, use oregano and lemon juice. Adjust the spices to fit your taste. These simple changes keep the dish exciting and new. To store leftover fajita chicken, let it cool first. Place it in an airtight container. Make sure to add any leftover veggies too. You can keep it in the fridge for up to three days. If you want it to last longer, consider freezing it. When you’re ready to eat, you can reheat the fajita chicken. For the best taste, use the oven. Preheat the oven to 350°F (175°C). Spread the chicken and veggies on a baking sheet. Heat for about 10-15 minutes, until it’s warm. You can also use the microwave. Place the chicken in a bowl, cover it, and heat for 1-2 minutes. Stir halfway to heat evenly. If you want to freeze fajita chicken, do it within two days. Place the chicken and veggies in a freezer-safe bag. Squeeze out extra air before sealing. You can freeze it for up to three months. When you’re ready to eat, thaw it in the fridge overnight. Then, reheat as mentioned above. Enjoy your easy meal anytime! You can serve your fajita chicken with warm tortillas. They make a great base for your meal. Add toppings like avocado, sour cream, or salsa for extra flavor. You might also enjoy a side of rice or beans. A fresh salad can add crunch and is a healthy choice too. The chicken is fully cooked at 165°F (75°C). Use a meat thermometer to check this. Cut into a piece of chicken; the meat should be white with no pink inside. If the juices run clear, it is done. Cooking for 20-25 minutes usually ensures it's cooked. Yes, you can customize the veggies! Feel free to swap in your favorites. Zucchini, mushrooms, or corn all work well. Just make sure to cut them into bite-sized pieces. This adds color and flavor to your dish. Enjoy experimenting with different combinations! In this article, we covered how to make delicious sheet pan fajita chicken. You learned about the main ingredients, spices, and toppings. I shared step-by-step prep and cooking instructions, plus tips for the best results. We also explored variations to fit different diets and how to store and reheat leftovers. Fajita chicken is easy to customize and share. Enjoy your meal with friends and family!

Sheet Pan Fajita Chicken Quick and Tasty Recipe

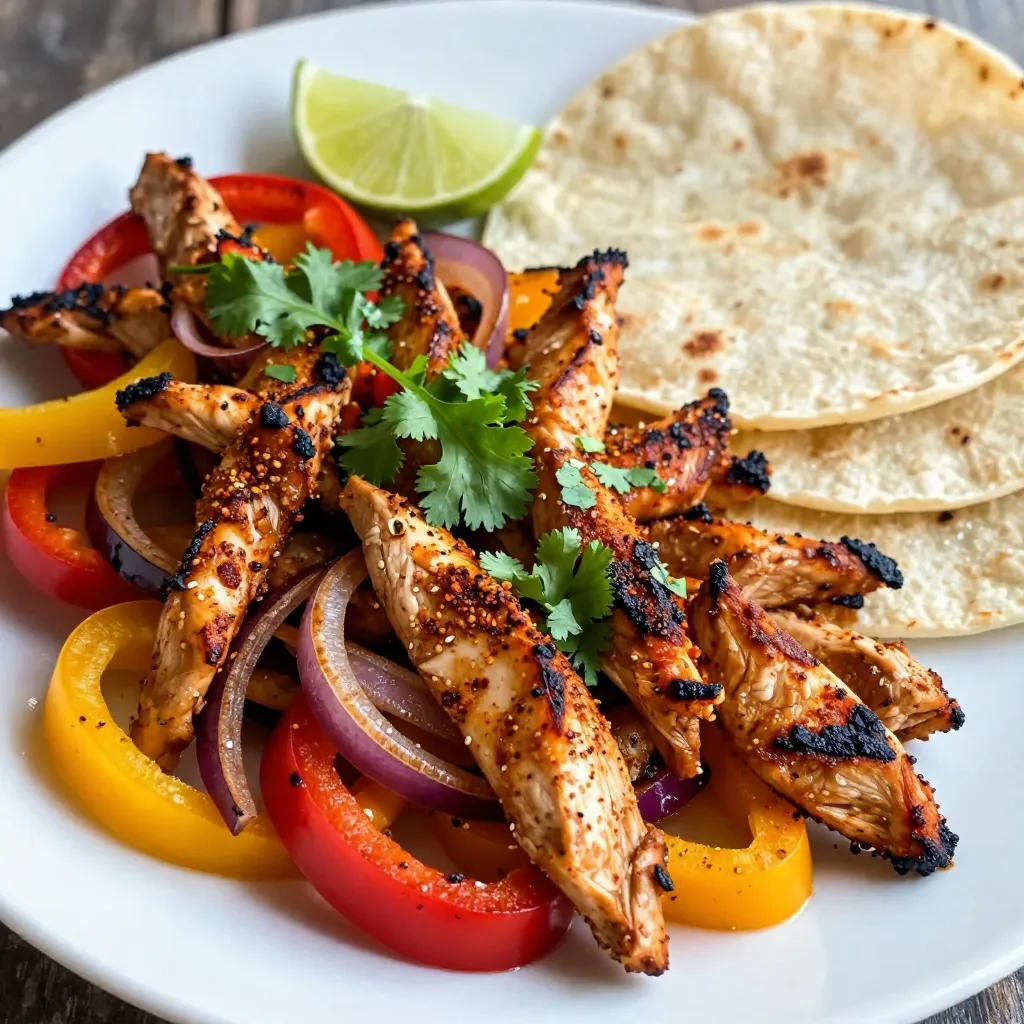
Looking for a quick and tasty dinner idea? This Sheet Pan Fajita Chicken recipe is just what you need! It’s

To make Bang Bang Shrimp Tacos, you need fresh shrimp and a few key items. Here’s a quick list of what you will need: - 1 lb shrimp, peeled and deveined - 3/4 cup all-purpose flour - 1/4 cup cornstarch - 1 teaspoon paprika - 1/2 teaspoon garlic powder - 1/2 teaspoon salt - 1/2 teaspoon black pepper - 1 cup buttermilk (or milk with lemon juice) - Vegetable oil for frying - 8 small corn tortillas These ingredients create a crispy and flavorful shrimp that pairs well with the sauce and toppings. The Bang Bang Sauce adds a sweet and spicy kick to the tacos. For the sauce, gather these items: - 1/2 cup mayonnaise - 2 tablespoons sweet chili sauce - 1 tablespoon sriracha (adjust to taste) - 1 teaspoon lime juice Mix these together to create a creamy sauce that elevates the dish. Toppings can make your tacos even better. Here are some great options: - Shredded cabbage - Sliced jalapeños - Chopped cilantro - Lime wedges These toppings add crunch, spice, and freshness. Feel free to mix and match based on your taste! {{ingredient_image_1}} To make the Bang Bang sauce, grab a small bowl. Add 1/2 cup mayonnaise. Then, mix in 2 tablespoons of sweet chili sauce. Next, add 1 tablespoon of sriracha. You can adjust this to make it milder or spicier. Finally, squeeze in 1 teaspoon of lime juice. Stir it all together until smooth. Set this delicious sauce aside for later. Now let’s prepare the shrimp. In a medium bowl, whisk together 3/4 cup all-purpose flour and 1/4 cup cornstarch. Add 1 teaspoon of paprika, 1/2 teaspoon of garlic powder, 1/2 teaspoon of salt, and 1/2 teaspoon of black pepper. This mix will give the shrimp a tasty crust. Next, take your shrimp. Dip each one into 1 cup of buttermilk. Let the excess buttermilk drip off. Then, dredge the shrimp in the flour mixture. Make sure each shrimp is well-coated. Heat about 1 inch of vegetable oil in a large skillet over medium-high heat. Wait until the oil shimmers, about 350°F. Carefully add the shrimp to the hot oil in batches. Fry them for about 2 to 3 minutes on each side. Look for a golden-brown color and a crispy texture. Use a slotted spoon to take the shrimp out. Place them on a plate lined with paper towels to absorb any extra oil. Warm your 8 small corn tortillas in a skillet or microwave. This makes them easy to fold. On each tortilla, place a few shrimp. Drizzle on that tasty Bang Bang sauce. Top with shredded cabbage, sliced jalapeños, and chopped cilantro. Serve with lime wedges on the side for some zesty flavor. Enjoy your Bang Bang shrimp tacos! To get the best shrimp, use fresh, peeled, and deveined shrimp. Make sure the oil is hot before frying. I heat the oil to about 350°F. This gives a crispy outside and juicy inside. Fry in small batches. This keeps the oil temperature steady. Fry each shrimp for 2-3 minutes on each side. Watch for a golden color. Use a slotted spoon to lift the shrimp out. Place them on a paper towel to absorb extra oil. To adjust the Bang Bang sauce, start with the basic recipe. If you want more heat, add more sriracha. You can also mix in some cayenne pepper for extra spice. If you prefer a milder sauce, reduce the sriracha. You can even skip it altogether. The sweet chili sauce adds a nice sweetness, balancing the flavor. Lime juice gives it a fresh touch, so keep that in any version. Warm tortillas can make your tacos even better. After warming them, cover them with a clean towel. This keeps the heat in. You can also place them in a low oven, around 200°F, to stay warm. Just be careful not to dry them out. If you have leftover tacos, wrap them tightly in foil. This helps maintain warmth and keeps them fresh. Pro Tips Use Fresh Shrimp: For the best flavor and texture, opt for fresh or high-quality frozen shrimp that has been properly thawed. Control the Oil Temperature: Maintaining the oil temperature around 350°F is crucial for achieving crispy shrimp without excessive oil absorption. Customize the Bang Bang Sauce: Feel free to adjust the levels of sriracha and sweet chili sauce to cater to your heat preference. Warm Tortillas Properly: Warm the tortillas just before serving to keep them pliable and improve the overall taco experience. {{image_2}} You can swap shrimp for other proteins. Chicken works great in this recipe. Use boneless thighs for juicy bites. Firm fish like mahi-mahi or tilapia also suits this dish well. For a twist, try tofu. It absorbs flavors well and adds a nice texture. While the Bang Bang sauce is tasty, feel free to get creative. A garlic aioli adds a creamy touch. A spicy chipotle sauce can give it a smoky flavor. You could also use a simple lime crema with yogurt, lime juice, and a pinch of salt. Experiment and find your favorite! You can easily make this dish plant-based. Use cauliflower instead of shrimp. Roast or fry the florets for a crunchy bite. For vegan sauce, mix vegan mayo with sweet chili sauce and sriracha. This keeps the flavor while making it suitable for everyone. Enjoy the fun of cooking! To store leftover shrimp tacos, first, remove the shrimp from the tortillas. Place the shrimp in an airtight container. Wrap the tortillas in foil or plastic wrap to keep them fresh. Store both in the fridge for up to two days. This way, you keep the shrimp and tortillas safe from drying out. When you reheat the shrimp, aim to keep them crispy. Preheat your oven to 400°F (204°C). Spread the shrimp on a baking sheet in a single layer. Bake for about 10 minutes, or until heated through and crispy again. Avoid using the microwave, as it can make the shrimp soggy. For the tortillas, warm them in a skillet over medium heat for a few seconds on each side. Store any leftover Bang Bang sauce in a clean jar or container with a lid. Keep it in the fridge for up to one week. If you want to extend its life, avoid mixing in fresh ingredients. Just add those when you serve the tacos. This way, your sauce stays fresh and tasty longer. For Bang Bang Shrimp Tacos, I recommend using medium to large shrimp. They offer a good bite and great flavor. Fresh shrimp is best, but frozen shrimp works too. Just make sure to thaw them properly. Look for shrimp that is peeled and deveined to save time. The less prep work, the better! Yes, you can use store-bought sauce if you're short on time. Many brands offer tasty sauces that mimic the homemade version. Just check the ingredients to find one that fits your taste. However, making your own sauce is easy and lets you control the flavor. It can be as spicy or mild as you like! I love serving Bang Bang Shrimp Tacos with fresh sides. Here are some great options: - Mexican rice: It adds a nice texture and flavor. - Black beans: They are hearty and nutritious. - Guacamole: Creamy and full of flavor. - Corn salad: A refreshing crunch to balance the tacos. These sides round out the meal and add color to your plate! Bang Bang Shrimp Tacos are a fun way to enjoy shrimp. You learned about the key ingredients, like shrimp and sauce, and how to cook them just right. We covered tips for getting the shrimp crispy and adding spicy sauce. You can even swap proteins or make vegan versions. Remember to store any leftovers properly to keep them tasty. These tacos are easy to make and a sure hit at any meal. Enjoy your cooking adventure!

Bang Bang Shrimp Tacos Flavorful and Easy Recipe

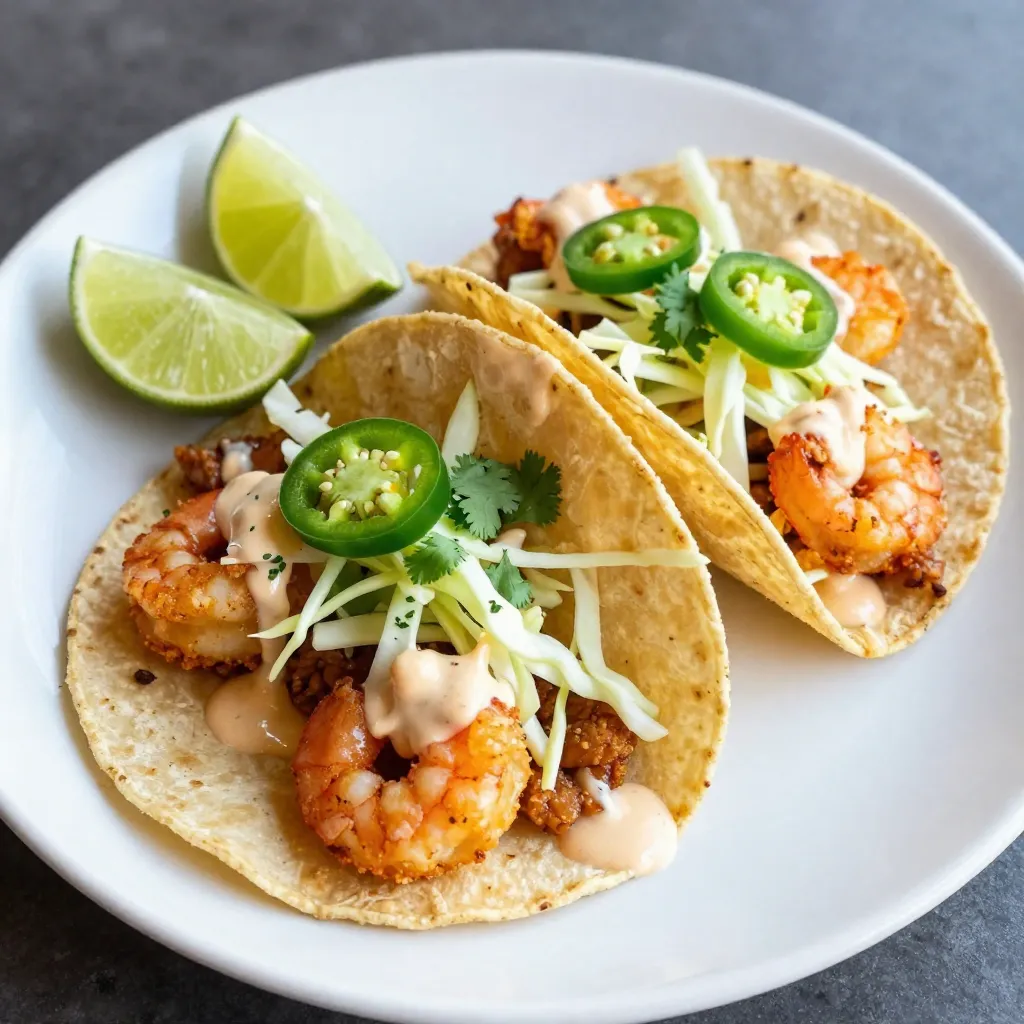
Are you ready to bring some excitement to your dinner table? Bang Bang Shrimp Tacos offer bold flavor and crispy

- 1 lb shrimp, peeled and deveined - 1 cup coconut milk - 2 tablespoons lime juice - 1 teaspoon lime zest - 1 teaspoon garlic powder - 1 teaspoon cumin - Salt and pepper to taste - 8 small corn tortillas - 1 cup red cabbage, shredded - 1 avocado, sliced - Fresh cilantro for garnish - Lime wedges for serving For this recipe, I use one pound of shrimp, which serves four people. You will need one cup of coconut milk to create a rich base. Two tablespoons of lime juice add brightness, while one teaspoon each of lime zest, garlic powder, and cumin provide depth of flavor. Adjust salt and pepper to your taste. For the tacos, I recommend eight small corn tortillas. Top them with one cup of shredded red cabbage and one sliced avocado. Fresh cilantro adds a nice touch, and lime wedges give extra zing. If you cannot find shrimp, chicken or tofu can work well. Use coconut cream for a thicker sauce. If you want less dairy, opt for almond or soy milk. You can swap lime juice with lemon juice if needed. For a crunchier topping, use green cabbage instead of red. If you don’t have tortillas, lettuce wraps make a great low-carb option. {{ingredient_image_1}} To start, grab a bowl. In this bowl, mix the coconut milk, lime juice, and lime zest well. Add the garlic powder, cumin, salt, and pepper. Stir everything until it blends. This marinade gives the shrimp a zesty flavor. The coconut milk adds creaminess and richness. Now, add 1 pound of peeled and deveined shrimp to the marinade. Make sure each shrimp gets coated well. Cover the bowl and let it sit for 20 minutes. This step is key. It allows the shrimp to soak up all those lovely flavors. You can set a timer so you don’t forget! Next, heat a large skillet over medium heat. Once it’s warm, add the marinated shrimp. Cook for 2-3 minutes on each side. You’ll know they’re done when they turn pink and opaque. This quick cooking keeps the shrimp tender and juicy. Remove them from the heat when finished. To cook shrimp just right, focus on timing. Cook the shrimp for about 2-3 minutes on each side. They should turn pink and opaque. Overcooking makes them tough. Use medium heat for even cooking. If you see them curling tightly, they are done. This method keeps them juicy and tender. Warming tortillas makes them soft and tasty. You can use a skillet or microwave. If using a skillet, heat it over medium heat. Place the tortillas in for about 30 seconds on each side. For the microwave, stack them and cover with a damp paper towel. Heat for 30 seconds. Warm tortillas make your tacos much better. Make your tacos look amazing! Use colorful toppings. Shredded red cabbage adds a nice crunch and color. Sliced avocado gives a creamy touch. Fresh cilantro adds a pop of green. Arrange the toppings in a line on the taco. Serve with lime wedges for a bright finish. This makes the dish inviting and fun to eat. Pro Tips Marinate for Maximum Flavor: Allow the shrimp to marinate for at least 20 minutes to fully absorb the coconut and lime flavors, enhancing the overall taste of your tacos. Perfectly Cooked Shrimp: Cook shrimp just until they turn pink and opaque, about 2-3 minutes per side. Overcooking can make them tough, so keep an eye on them! Warm Tortillas: Warm your corn tortillas in a dry skillet or microwave before assembling the tacos. This makes them more pliable and prevents them from cracking when folded. Fresh Garnishes: Don't skip the fresh cilantro and lime wedges! They add a burst of freshness and bright acidity that perfectly complements the rich coconut shrimp. {{image_2}} If you want a gluten-free meal, you can easily adapt this recipe. Corn tortillas are naturally gluten-free. Just check the package to be sure. For the marinade, all ingredients are gluten-free, so you can keep the flavor. This way, you can enjoy tasty tacos without worry. To make this dish vegetarian, swap shrimp for firm tofu or jackfruit. Cube the tofu and marinate it in the same coconut mix. Cook it until golden brown. Jackfruit can be shredded after cooking and tossed in the marinade. Both options offer a great texture and flavor. Want to boost the taste? Here are some ideas: - Add chopped jalapeños for heat. - Mix in fresh mango for sweetness. - Use fresh herbs like mint or basil for a twist. These simple changes can make your tacos even more exciting. You can experiment with flavors until you find your perfect combination. To store leftover tacos, keep the shrimp and toppings separate. Use airtight containers. Place the shrimp in one container and the tortillas, cabbage, and avocado in another. This keeps everything fresh and tasty. Store it in the fridge for up to two days. When you are ready to eat, reheat the shrimp in a skillet over medium heat. Cook it for about 2-3 minutes until it warms through. You can also warm the tortillas quickly in a dry skillet or microwave. This helps keep them soft and pliable. If you want to freeze the tacos, only freeze the shrimp. Place it in a freezer-safe bag. Remove as much air as possible. You can freeze it for up to three months. When you are ready to use it, thaw it overnight in the fridge. Cook as normal when thawed. Do not freeze the tortillas or toppings, as they do not hold up well. The best way to cook shrimp for tacos is to sauté them. Heat a skillet over medium heat. Add the marinated shrimp and cook them for about 2-3 minutes on each side. They should turn pink and opaque. This method keeps the shrimp juicy and flavorful. You can also grill them for a smoky taste. Grilling gives shrimp a nice char that adds depth. Yes, you can use frozen shrimp for this recipe. Just remember to thaw them first. Place the shrimp in cold water for about 15-20 minutes. Once thawed, peel and devein them if needed. Make sure to dry them well before marinating. This helps the shrimp absorb the flavors better. Using frozen shrimp can be a great time-saver. To make the tacos spicier, add some diced jalapeños or a pinch of cayenne pepper to the marinade. You can also top the tacos with a spicy sauce or salsa. Fresh chopped chilies can add heat too. For an extra kick, serve them with a side of hot sauce. Adjust the spice level to fit your taste. In this post, I covered the key steps to make tasty shrimp tacos. We explored the right ingredients, how to marinate and cook shrimp, and tips for the perfect finish. You learned about gluten-free and vegetarian options, plus how to store leftovers. To sum it up, with the right ingredients and careful cooking, you can make delicious tacos at home. Enjoy experimenting with flavors and sharing them with friends!

Coconut Lime Shrimp Tacos Flavorful and Fresh Meal

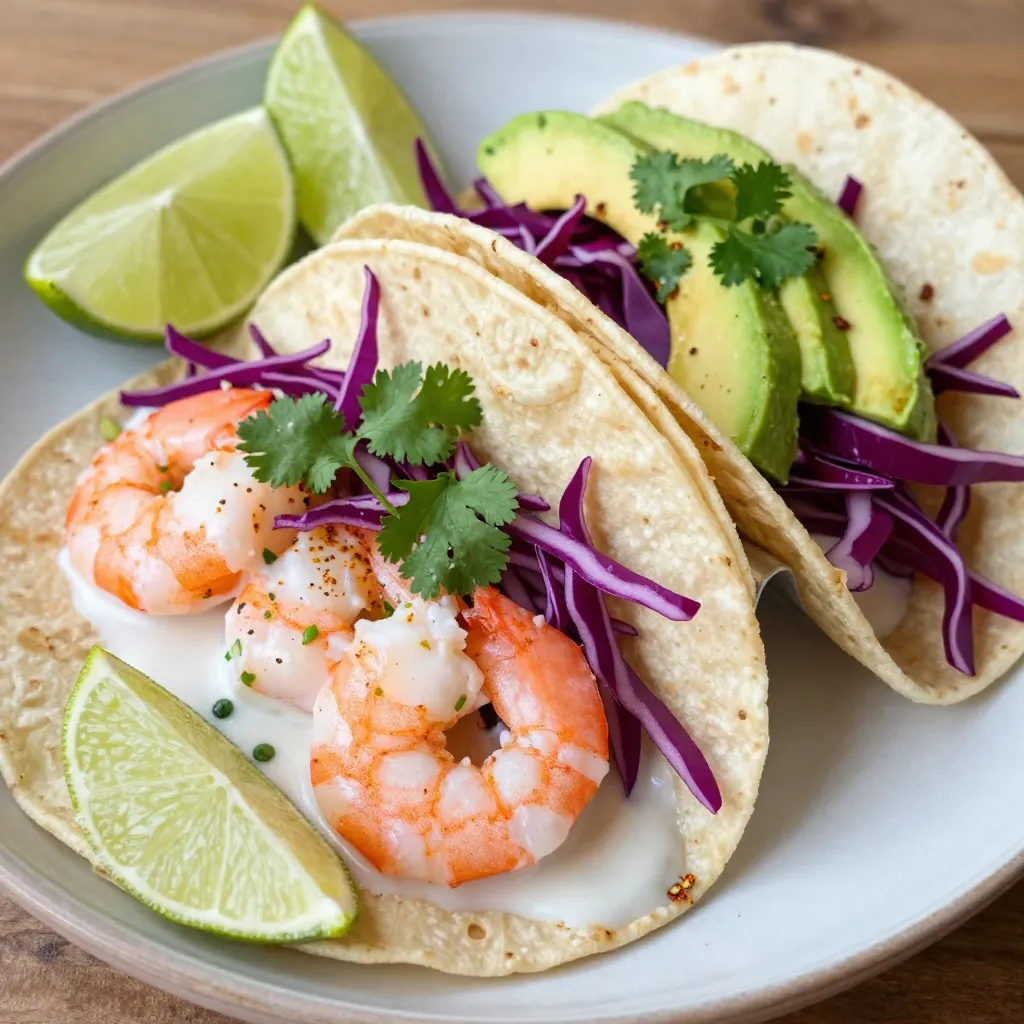
Get ready to enjoy a burst of flavor with Coconut Lime Shrimp Tacos! This dish combines sweet coconut, zesty lime,

To make a great strawberry shortcake poke cake, you need these main ingredients: - 1 box of vanilla cake mix - 3 large eggs - 1 cup water - 1 cup heavy cream - 1 cup sweetened condensed milk - 1 teaspoon vanilla extract - 2 cups fresh strawberries, sliced - 1 ½ cups whipped cream (store-bought or homemade) These ingredients create a moist cake that is perfect for soaking up the creamy mixture. You will need a few tools to make this cake. Here’s what I recommend: - Large mixing bowl - Electric mixer - 9x13 inch baking dish - Wooden spoon or skewer - Whisk - Wire rack These tools help you mix, bake, and prepare the cake easily. To make your cake extra special, consider these optional garnishes: - Fresh mint leaves - Extra strawberries for decoration - A drizzle of strawberry syrup Garnishes add color and flavor, making your cake look and taste amazing. {{ingredient_image_1}} Start by preheating your oven to 350°F (175°C). Grease and flour a 9x13-inch baking dish. In a large bowl, mix the vanilla cake mix, eggs, and water. Beat the mixture with an electric mixer on medium speed for two minutes. You want the batter to be smooth and well combined. Pour the batter into the greased dish. Bake for 25-30 minutes. Check if it's done by inserting a toothpick in the center. If it comes out clean, the cake is ready. Let it cool in the pan for 10 minutes. Then, move it to a wire rack to cool completely. This step is important so your cake can soak up the flavors later. Once the cake is cool, take a wooden spoon handle or a skewer. Poke holes all over the cake, about 1 inch apart. This allows the cream mixture to soak in. In a separate bowl, whisk together the heavy cream, sweetened condensed milk, and vanilla extract. Slowly pour this mixture over the poked cake. Make sure to fill all the holes. Let the cake soak for at least 30 minutes. For best results, let it soak overnight in the fridge. This will make your cake super moist and flavorful. To start, always use fresh ingredients. This step matters a lot. Use a good-quality vanilla cake mix for the best taste. Follow the instructions on the box. Mix the batter well for a fluffy cake. I recommend using an electric mixer. It saves time and ensures even mixing. Make sure your oven is preheated. This way, your cake will bake evenly. Grease and flour your baking dish well. This will help the cake come out clean. After baking, let your cake cool. Use a wooden spoon to poke holes in the cake. Space the holes about one inch apart. Pour the cream mixture slowly over the cake. This allows the cake to soak up all the flavor. For best results, let it soak for at least 30 minutes. If you can, let it soak overnight. The longer it sits, the better the flavor. When it's time to serve, keep it simple and pretty. Cut the cake into squares. Place each piece on a plate. Add a drizzle of strawberry syrup for extra sweetness. Top with whipped cream and fresh strawberries. For a nice touch, add mint leaves on top. This adds a pop of color and flavor. Enjoy your cake chilled; it tastes best that way! Pro Tips Use Fresh Strawberries: For the best flavor and texture, always opt for fresh, ripe strawberries. They enhance the overall taste of your poke cake. Soaking Time Matters: Allow the cake to soak in the cream mixture for at least 30 minutes, but overnight soaking yields a more flavorful result. Make It a Day Ahead: This cake tastes even better the next day. Preparing it a day in advance allows the flavors to meld perfectly. Whipped Cream Alternatives: If you're short on time, store-bought whipped cream works well, but homemade whipped cream adds a special touch. {{image_2}} You can switch up the cake flavor for your poke cake. Instead of vanilla, try a lemon or chocolate cake mix. Lemon adds a bright twist, while chocolate gives a rich taste. Both options work well with the creamy filling and fresh fruit. When you change the cake flavor, remember to adjust your toppings. A lemon cake pairs nicely with blueberries, while chocolate goes great with raspberries. Strawberries are sweet and delicious, but other fruits can shine, too! You can use blueberries, blackberries, or peaches. Mix and match your favorites for a fun treat. If you want a tropical vibe, consider adding pineapple or mango. Just make sure the fruit is fresh for the best flavor. You can even create a fruit medley for a colorful finish. Making a vegan or gluten-free poke cake is easy! For a vegan version, use a plant-based cake mix. Replace eggs with applesauce or flaxseed. For gluten-free, choose a gluten-free cake mix. Both options taste great and keep the cake moist. The filling can be made with coconut cream instead of heavy cream for a vegan delight. Enjoy all the flavors without the guilt! To keep your strawberry shortcake poke cake fresh, use an airtight container. Place the cake in the fridge to prevent it from drying out. If you have whipped cream on top, cover it loosely with plastic wrap. This keeps the cream fluffy and prevents it from sticking. You can freeze the cake for later use. First, cut it into squares. Wrap each piece tightly in plastic wrap, then place it in a freezer bag. This helps keep out air and moisture. You can freeze it for up to three months. When you're ready to eat it, thaw it in the fridge overnight. The cake lasts about three to four days in the fridge. To ensure the best taste, eat it within this time. If you notice any off smells or changes in texture, it’s best to discard it. Always check for freshness before serving. Enjoy your cake while it’s still at its best! A poke cake is a fun dessert. You bake a cake, then poke holes in it. You pour a sweet mixture over the cake. This lets the flavors soak in. It makes the cake moist and tasty. Yes, you can use frozen strawberries. Just make sure to thaw them first. Drain any extra juice to keep the cake from getting soggy. Fresh strawberries are great, but frozen ones work well too. You can keep the cake in the fridge for about 3 to 5 days. Make sure to cover it well to keep it fresh. If you want it to last longer, consider freezing it. You now have all the steps to make a delicious strawberry shortcake poke cake. We covered the main ingredients, tools, and optional garnishes. I shared easy instructions for baking and soaking the cake. Plus, I provided tips to help you get it just right and fun variations to try. Don't forget how to store leftovers or tips on freezing. Enjoy experimenting with flavors and toppings. This cake is tasty and simple for all occasions. You’re set to impress your friends and family with your new dessert skills!

Strawberry Shortcake Poke Cake Easy and Delicious Treat

Are you ready to make a dessert that will wow your friends and family? This Strawberry Shortcake Poke Cake is

- 1 pound Italian sausage (mild or spicy, based on preference), casings removed - 1 pound potato gnocchi (store-bought or homemade) - Fresh vegetables: - 1 medium onion, diced - 3 medium carrots, diced - 2 celery stalks, diced For this soup, the main ingredients create a rich and hearty base. The Italian sausage gives flavor and a nice kick. I suggest using mild sausage for a gentle taste or spicy for more heat. Potato gnocchi adds a wonderful texture, making each bite satisfying. The fresh vegetables, like onions, carrots, and celery, not only add color but also bring sweetness and depth to the dish. - 1 teaspoon Italian seasoning - 2 tablespoons olive oil - Grated Parmesan cheese for serving The seasonings are vital for bringing the soup to life. Italian seasoning provides a blend of herbs that pairs well with the sausage. Olive oil is crucial for sautéing the vegetables and adds richness. Grated Parmesan cheese is a must for serving. It melts slightly and adds a creamy touch to each bowl. - Fresh basil leaves - Additional spices Garnishes elevate the soup's presentation. Fresh basil leaves add a pop of color and a fresh fragrance. You can also sprinkle in some extra spices to adjust the flavor to your liking. These optional garnishes make your soup feel special and inviting. - Preparing the ingredients: Start by gathering all your ingredients. You will need one pound of Italian sausage, a medium onion, two cloves of garlic, three medium carrots, and two celery stalks. Dice the onion, carrots, and celery into small pieces. Mince the garlic. This makes cooking quicker and easier. - Cooking the Italian sausage: In a large pot, heat two tablespoons of olive oil over medium heat. Once hot, add the Italian sausage. Use a spoon to break it up as it cooks. Brown the sausage for about 5 to 7 minutes until it is fully cooked. If there is too much fat, remove the excess fat from the pot. - Sautéing vegetables: Add the diced onion, carrots, and celery to the pot. Sauté them for about 5 to 7 minutes. You want the vegetables to become soft. Next, add the minced garlic and cook for one more minute until you can smell its strong aroma. - Combining soup ingredients: Pour in four cups of chicken broth and add a can of diced tomatoes. Be sure to include the juice from the tomatoes. Stir in one teaspoon of Italian seasoning, and add salt and pepper to taste. Bring the mixture to a boil. - Adding gnocchi and spinach: Once the soup reaches a boil, add one pound of potato gnocchi. Cook according to the package instructions, usually about 3 to 5 minutes, until the gnocchi are soft. Stir in one cup of chopped fresh spinach and take the pot off the heat. Let it rest for a few minutes. This helps the flavors blend well. - Adjusting seasoning: Before serving, taste the soup. Adjust the seasoning if needed. You can add more salt, pepper, or Italian seasoning to suit your taste. Serve hot, and top each bowl with fresh basil leaves and a sprinkle of grated Parmesan cheese for an extra touch. Choosing the right Italian sausage Pick between mild or spicy sausage. Mild adds warmth, while spicy gives a kick. Look for high-quality sausage with fresh herbs. This makes the soup tastier and more balanced. Tips for cooking gnocchi If using store-bought gnocchi, follow the package instructions. Usually, they cook in boiling water for 3-5 minutes. Once they float, they are ready. For homemade gnocchi, ensure they are soft and light. This keeps the soup creamy and smooth. Best herbs to add Basil and parsley are great choices. They add freshness and aroma. You can also use thyme or oregano for depth. Add herbs near the end of cooking to keep their taste bright. Alternatives to chicken broth You can swap chicken broth for vegetable broth. This works well if you want a lighter soup. Bone broth adds extra richness, making the soup heartier. Always taste before serving to adjust the flavor. {{image_2}} You can swap the Italian sausage for turkey sausage if you want a leaner option. Vegetarian sausage is also a great choice for a meatless meal. Both choices work well in this soup. They keep the flavor rich and satisfying. You can change the broth too. Use vegetable broth instead of chicken broth for a lighter taste. This switch adds a different flavor profile but still keeps the soup hearty. Adding beans or potatoes can enhance the soup's texture. White beans like cannellini add creaminess and protein. You can also dice up some potatoes for a thicker soup. They soak up the flavors and make each bite filling. Incorporating other vegetables can boost nutrition and flavor. Try adding bell peppers, zucchini, or even kale. These veggies bring color and freshness to your bowl. Feel free to play around with what you have on hand. Each addition can make this dish uniquely yours. To store Italian sausage gnocchi soup, use airtight containers. Glass or BPA-free plastic work well. Let the soup cool before sealing. This keeps it fresh longer. In the fridge, the soup lasts about 3 to 5 days. Check for any signs of spoilage before eating. If it smells off or has a strange color, it’s best to toss it. Freezing soup is simple. First, let the soup cool completely. Then, pour it into freezer-safe bags or containers. Leave some room at the top for expansion. Label the bags with the date. The soup can last up to 3 months in the freezer. To reheat, take the soup out of the freezer and thaw it overnight in the fridge. You can also use the microwave on low power. Heat the soup in a pot over medium heat. Stir it often until it’s hot throughout. Add a splash of broth if it seems too thick. Enjoy your delicious soup! Can I use homemade gnocchi? Yes, you can use homemade gnocchi. Fresh gnocchi adds a nice touch to this soup. Just ensure they cook for about 3-5 minutes once added to the pot. This will keep them fluffy and soft. How can I make this soup dairy-free? To make this soup dairy-free, skip the Parmesan cheese. You can use nutritional yeast for a cheesy flavor. Also, ensure any broth you use is dairy-free. What to serve with Italian sausage gnocchi soup? This soup pairs well with crusty bread or a fresh salad. A light green salad with vinaigrette balances the meal. You can also serve it with garlic bread for a cozy night in. Can it be made ahead of time? Yes, you can make this soup ahead of time. Store it in the fridge for up to three days. When you reheat, add fresh spinach to keep it bright. This soup tastes even better the next day! This blog post covered how to make a delicious Italian sausage gnocchi soup. We explored key ingredients, like sausage, gnocchi, and fresh veggies. You learned the best seasonings and how to enhance flavors. We provided easy steps for preparation and cooking, along with tips for perfect results. Remember, you can customize this soup with your favorite proteins and veggies. Enjoy this recipe for a warm, comforting meal any time. Happy cooking!

Italian Sausage Gnocchi Soup Comforting and Hearty Dish

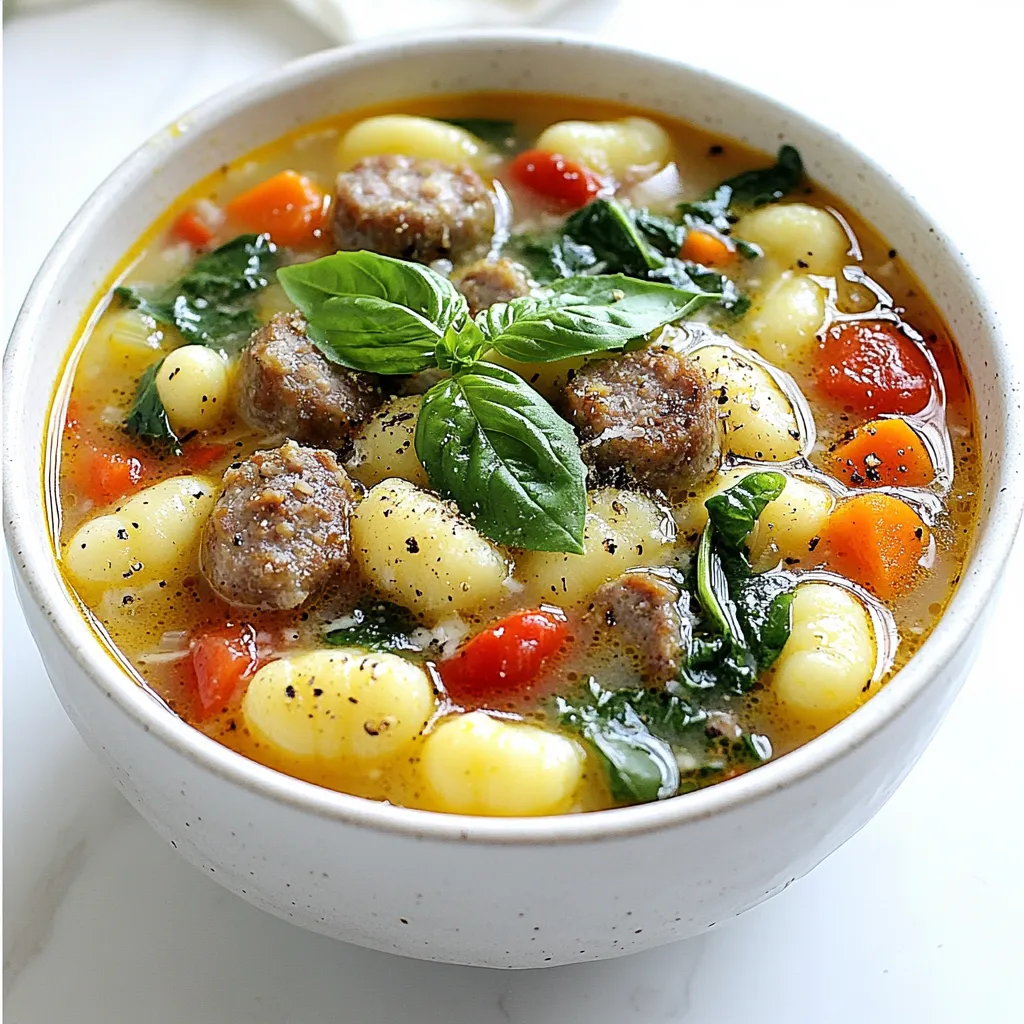
Warm up your evenings with a bowl of Italian Sausage Gnocchi Soup. This hearty dish combines savory sausage with tender

Older posts
Newer posts
← Previous Page1 Page2 Page3 … Page83 Next →

dsad

© 2026 Southern Dishes • Built with GeneratePress

Our Policies

  • Copyright Policy
  • Cookie Policy
  • GDPR Policy
  • Privacy Policy
  • Disclaimer
  • Terms Of Use

More Information

  • Home
  • About
  • Contact
  • Appetizers
  • Dessert
  • Dinner
  • Drinks
©2026, Southern Dishes About Back To Top