
Latest & Greatest
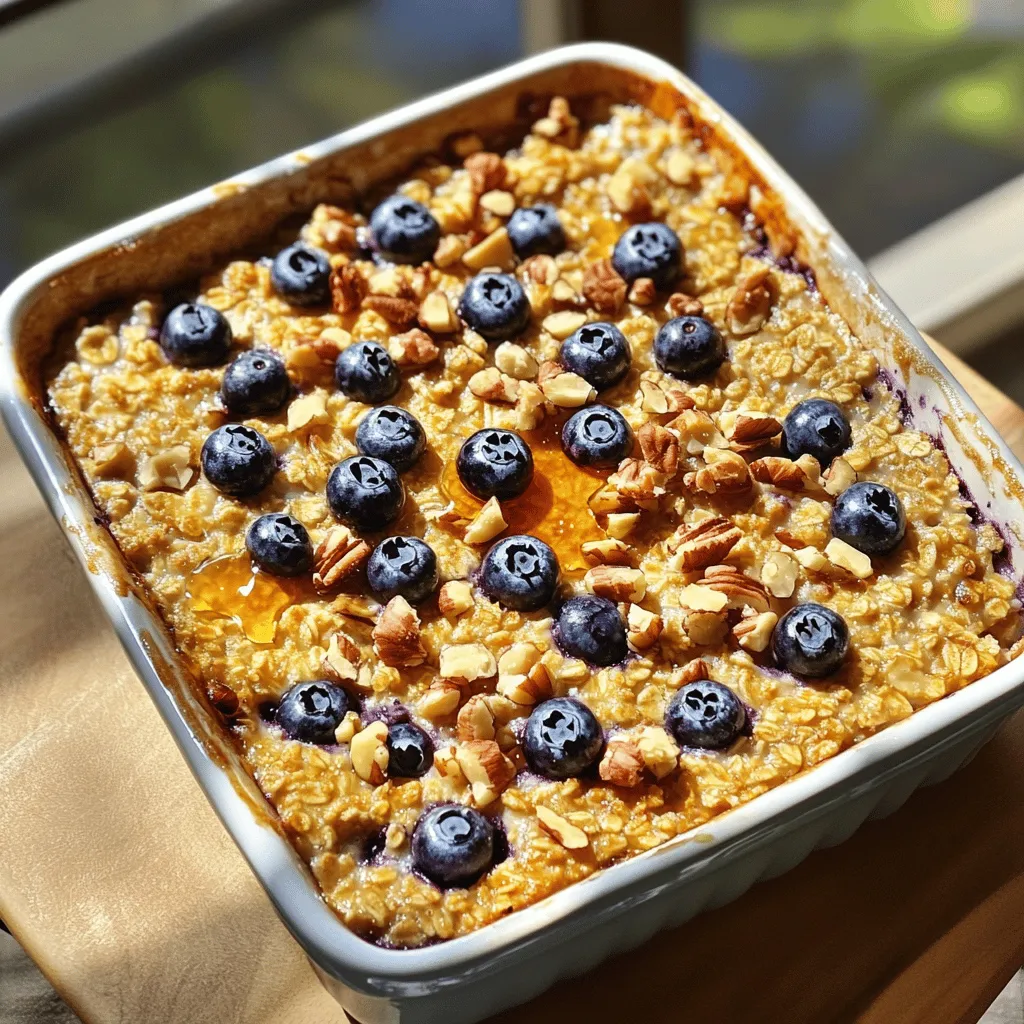
Blueberry Oatmeal Bake Healthy Breakfast Delight
Looking for a delicious and healthy breakfast? You’ll love this Blueberry Oatmeal Bake! It’s sweet, easy to make, and packed
Read more…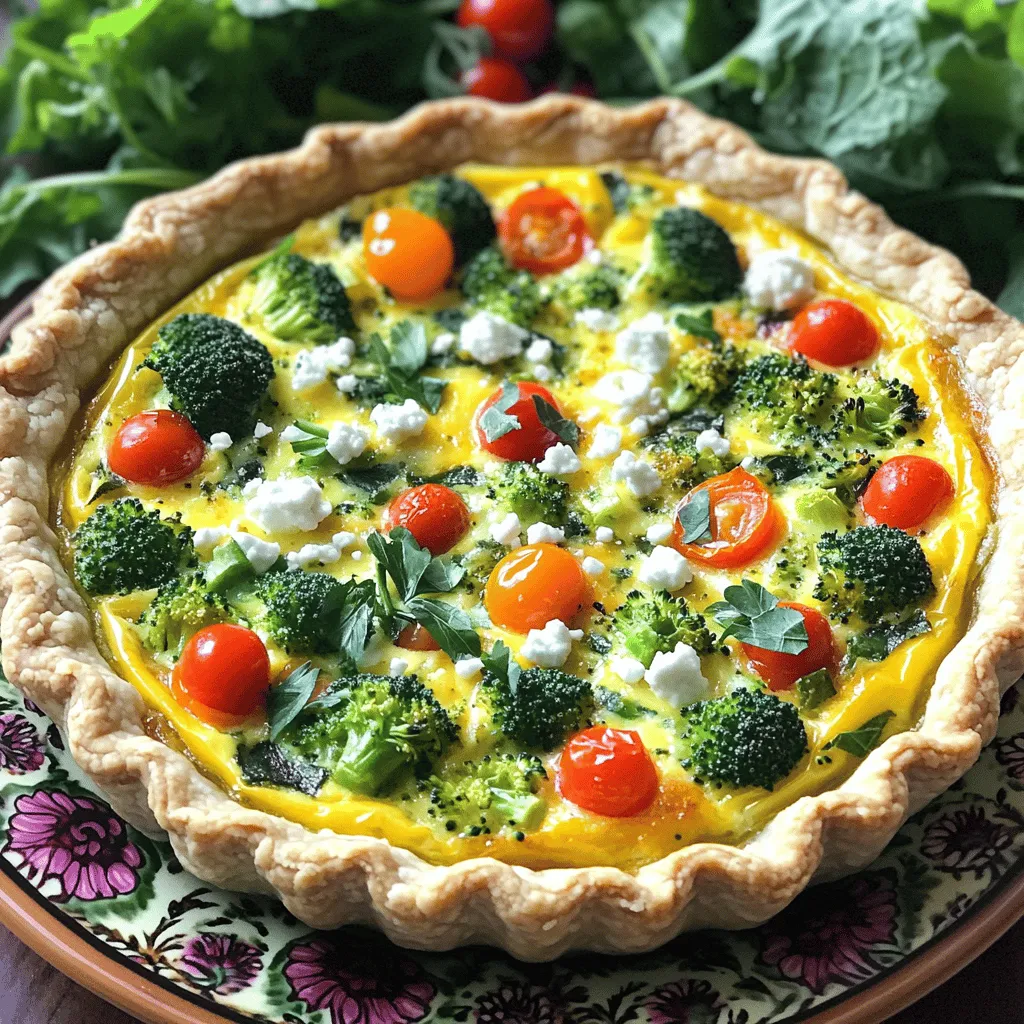
Veggie Loaded Quiche Delicious and Easy Recipe
Craving a delicious and healthy meal? You’ll love this Veggie Loaded Quiche recipe! Packed with fresh veggies and protein, it’s
Read more…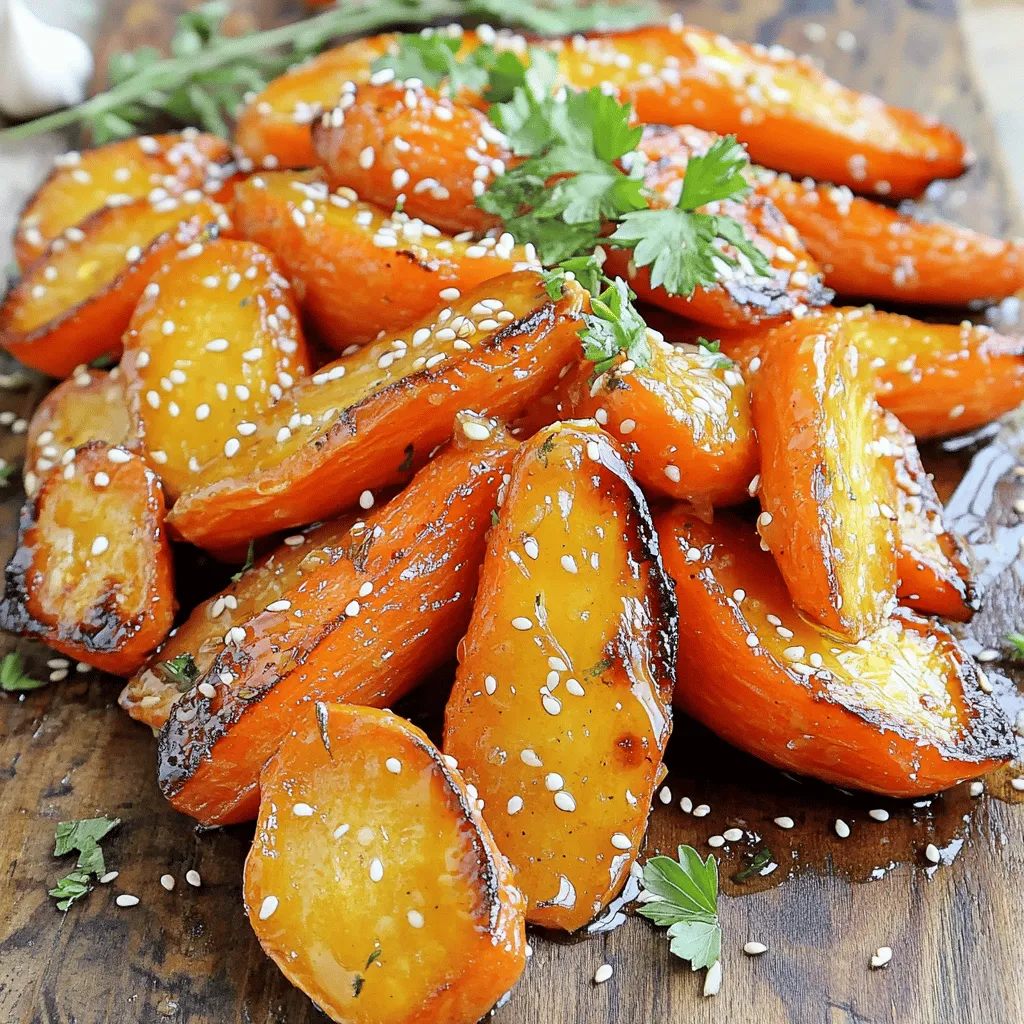
Honey Garlic Roasted Carrots Simple and Flavorful Dish
Looking for a simple and tasty side dish? Honey Garlic Roasted Carrots are the answer! These sweet and savory carrots
Read more…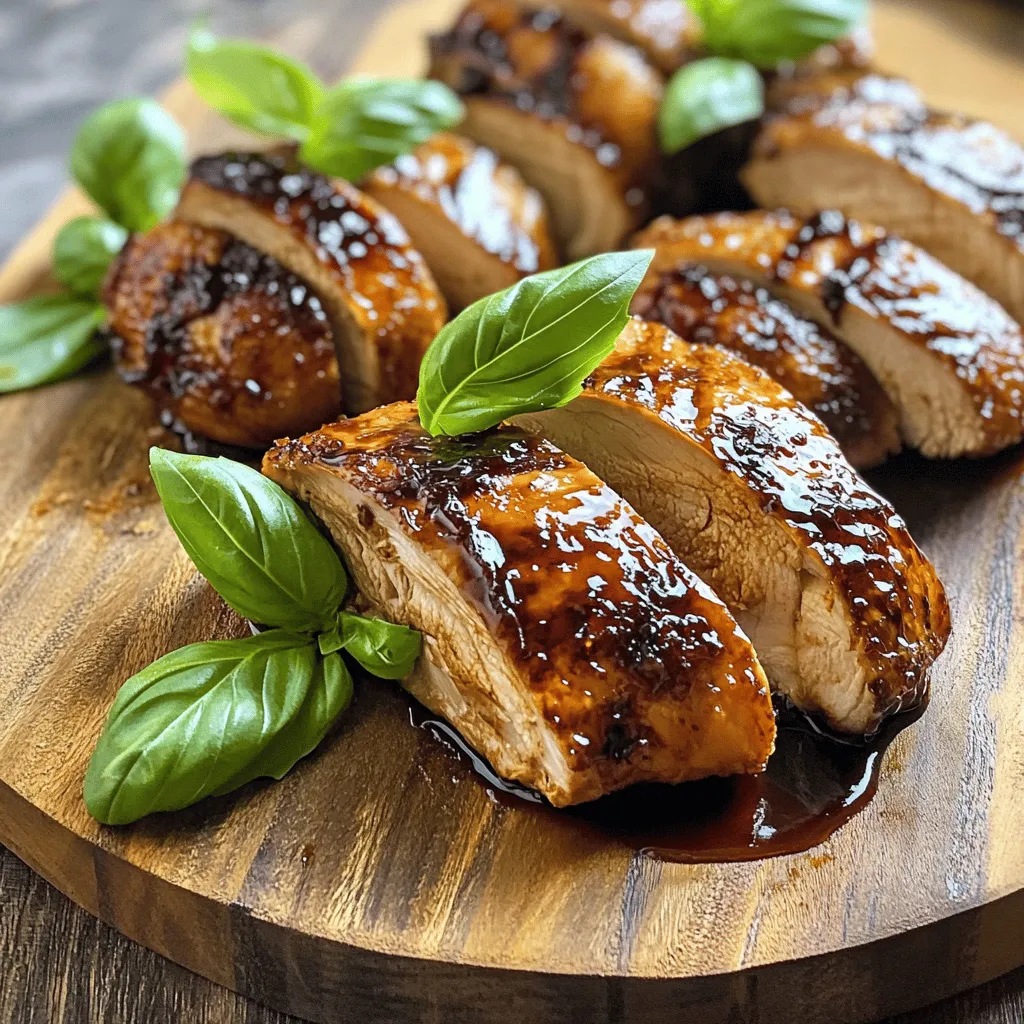
Balsamic Glazed Chicken Flavorful and Simple Recipe
Looking for a quick and tasty chicken dish? You’ve found it! Balsamic Glazed Chicken is simple, flavorful, and perfect for
Read more…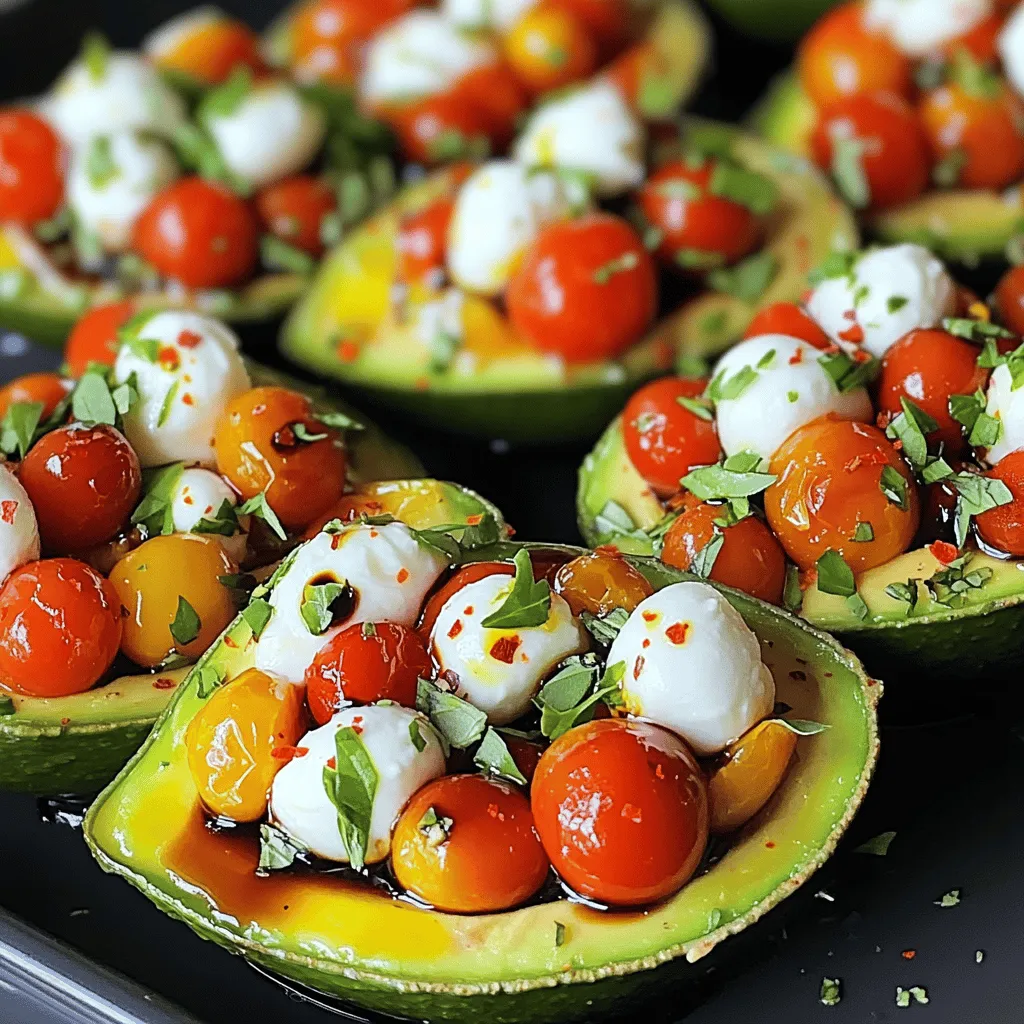
Caprese Stuffed Avocados Flavorful and Fresh Dish
Get ready to enjoy a burst of flavors with Caprese Stuffed Avocados! This fresh dish combines ripe avocados, juicy tomatoes,
Read more…
Coconut Curry Lentil Soup Easy and Flavorful Recipe
Craving something warm and comforting? This Coconut Curry Lentil Soup blends rich flavors with fresh ingredients for a delicious and
Read more…
Spicy Chickpea Tacos Flavorful and Simple Recipe
Tired of the same old taco night? Let’s spice things up! In this blog post, I’ll show you how to
Read more…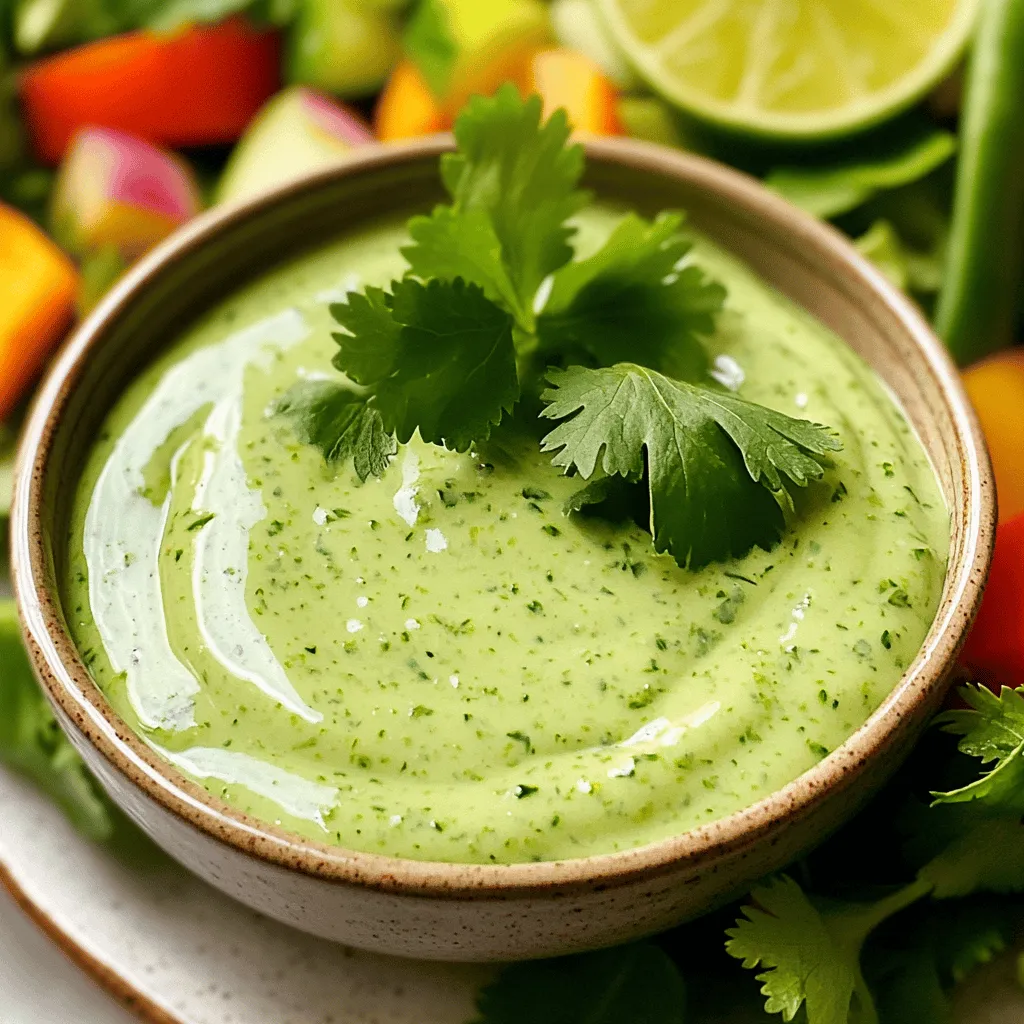
Creamy Cilantro Lime Dressing Fresh and Zesty Recipe
Looking for a fresh and zesty way to upgrade your meals? This creamy cilantro lime dressing will brighten any dish!
Read more…browse recipes


![- 1 cup frozen spinach, thawed and drained - 1 cup canned artichoke hearts, drained and chopped - 1 cup cream cheese, softened - ½ cup sour cream - ½ cup mayonnaise - 1 cup shredded mozzarella cheese - ½ cup grated Parmesan cheese - 2 cloves garlic, minced - 1 teaspoon garlic powder - Salt and pepper to taste - ½ teaspoon red pepper flakes (optional) For cream cheese, you can use Greek yogurt or cashew cream. These will give you a nice creamy texture. If you want to swap out sour cream, try using plain yogurt or silken tofu. Both options work well and keep it smooth. For a vegan dip, use vegan cream cheese and yogurt. You can easily make this dip fit your needs! I love using these substitutions to keep my dip tasty for everyone. You can still enjoy the rich flavors without missing out. Don't forget to check the [Full Recipe] for all the details! First, you need to preheat your oven to 375°F (190°C). This step is key for a nice bake. While the oven heats up, grab a baking dish. A 9-inch dish works best. Grease it lightly with oil or butter to prevent sticking. It helps the dip come out easily. In a large mixing bowl, combine the cream cheese, sour cream, and mayonnaise. Use a hand mixer or a spatula to mix until smooth and creamy. This is where the magic starts. Next, add the chopped artichoke hearts and the spinach. Make sure it’s well-drained to avoid a watery dip. Then, toss in the minced garlic, shredded mozzarella, and grated Parmesan. These cheeses add a rich flavor. Finally, season the mixture with garlic powder, salt, pepper, and red pepper flakes if you want some heat. Stir everything until well mixed. Now, it's time to transfer your mixture into the prepared baking dish. Spread it out evenly with a spatula. Place the dish in your oven and bake for 25 to 30 minutes. Watch for the top to turn golden brown and bubbly. This means your dip is ready. Once done, take it out of the oven and let it cool for a few minutes. This gives the dip time to set and makes it safer to eat. Enjoy your Easy Spinach Artichoke Dip with chips or veggies! For the complete instructions, check the Full Recipe. To make your spinach artichoke dip truly creamy, start with softened cream cheese. This helps mix easily and gives a smooth texture. Use a hand mixer or a sturdy spoon to blend your ingredients well. When measuring, be precise. Too much or too little can change the dip's taste. Use dry measuring cups for solids and liquid measuring cups for liquids to ensure accuracy. This dip shines when served warm. Pair it with tortilla chips, sliced baguette, or fresh veggies. Arrange the chips around the dip for a nice look. You can also serve it in a bread bowl. This adds flair and gives your guests an extra treat. Want to boost the taste? Add spices like cumin or smoked paprika. Fresh herbs like parsley or basil can add brightness too. For some heat, sprinkle in red pepper flakes. Start with a little and taste as you go. This way, you control the spice level and keep your dip enjoyable for everyone. {{image_2}} You can add fun flavors to your spinach artichoke dip. One great option is to mix in a variety of cheeses. The creaminess from the mozzarella and the punch from Parmesan makes a perfect match. You might also want to try adding sun-dried tomatoes for a burst of tangy flavor. If you like a bit of spice, jalapeños can add some heat. Just chop them up and stir them in! If you need gluten-free options, most ingredients work well! Just make sure your mayonnaise and other products are labeled gluten-free. For those who want a dairy-free or vegan dip, you can swap cream cheese with cashew cream or a store-bought vegan cream cheese. Use plant-based sour cream and vegan cheese too. The flavors stay rich and tasty! You can serve this dip in many fun ways. For a cold dip, mix all the ingredients, chill it, and serve with chips. It’s fresh and bright! Another tasty idea is to use a bread bowl. Hollow out a loaf of bread, fill it with the dip, and bake it. The bread absorbs the flavors, making every bite special! After you enjoy this dip, store any leftovers in an airtight container. This keeps it fresh. You can put it in the fridge right away. It will last for about 3 to 5 days. Make sure it cools down before sealing it. If you plan to keep it longer, consider freezing it. When you're ready to eat the dip again, reheating is key. The best method is to use an oven or toaster oven. Preheat to 350°F (175°C). Place the dip in an oven-safe dish. Heat it for about 15 minutes, or until warm. This method keeps the dip creamy and tasty. You can also microwave it, but be careful. Heat it in short bursts, stirring in between. This helps keep the texture nice. Yes, you can freeze spinach artichoke dip! Just place it in a freezer-safe container. It can last for about 2 months in the freezer. When you want to eat it, thaw it overnight in the fridge. After thawing, reheat using the oven or microwave as mentioned before. This way, you maintain its great flavor and texture. For the best results, do not refreeze it after reheating. Enjoy your dip anytime! Yes, you can make this dip ahead of time. Here are some key points: - Prepare the dip and place it in a baking dish. - Cover it tightly with plastic wrap or foil. - Store it in the fridge for up to 24 hours. - When ready to bake, remove the cover and bake as directed. To check if your dip is done, look for these signs: - The top should be golden brown and bubbly. - You can also insert a fork in the center. - If it’s hot all the way through, it’s ready! Yes, fresh spinach is a great option! Here are some tips: - Use about 2 cups of fresh spinach for this recipe. - Rinse and chop the spinach before cooking. - Sauté it in a pan until wilted, then drain excess water. You can easily spice up your dip with these options: - Add more red pepper flakes to the mix. - Stir in some diced jalapeños for extra heat. - Consider using spicy cheeses or hot sauce for flavor. For the complete recipe, check out the Full Recipe link. This blog post covered ingredients, instructions, and tips for making Easy Spinach Artichoke Dip. You learned about what to use and how to mix and bake the dip. I shared ways to change up the recipe based on your taste and diet. Remember, this dip is fun and easy to make. Enjoy it with chips, veggies, or bread. Whether you are hosting a party or having a snack, this dip will impress everyone. Now, get cooking and share this tasty treat with friends!](https://southerndishes.com/wp-content/uploads/2025/05/d7e08ec6-a76f-44f5-a047-7638c80b6ef8.webp)
Easy Spinach Artichoke Dip Simple and Delicious Recipe
Craving a delicious dip that’s simple to make? Look no further! This Easy Spinach Artichoke Dip hits the spot with its creamy texture and…
My Latest Desserts
-
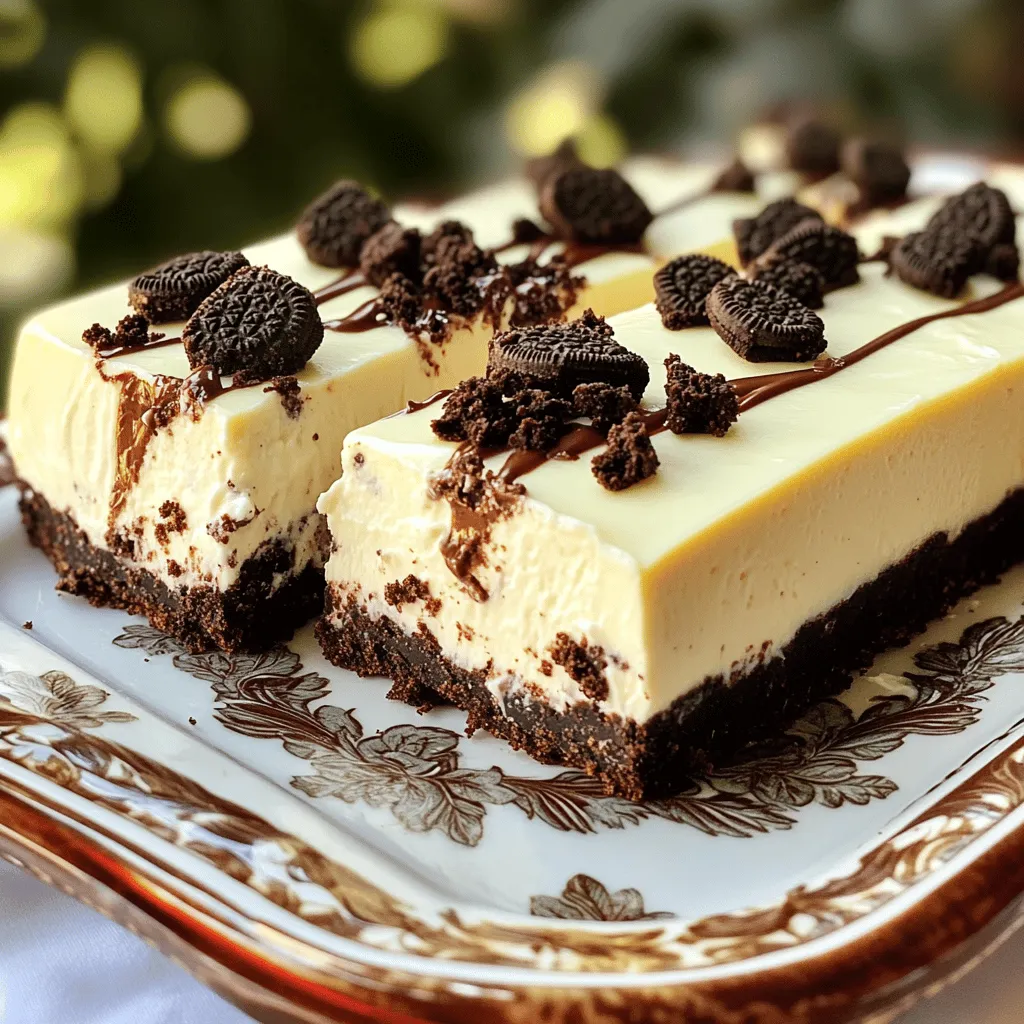
No Bake Oreo Cheesecake Bars Simple and Tasty Treat
Craving a sweet treat that’s simple to make? Look no further than these No Bake Oreo Cheesecake Bars! You’ll love Read Full Recipe -
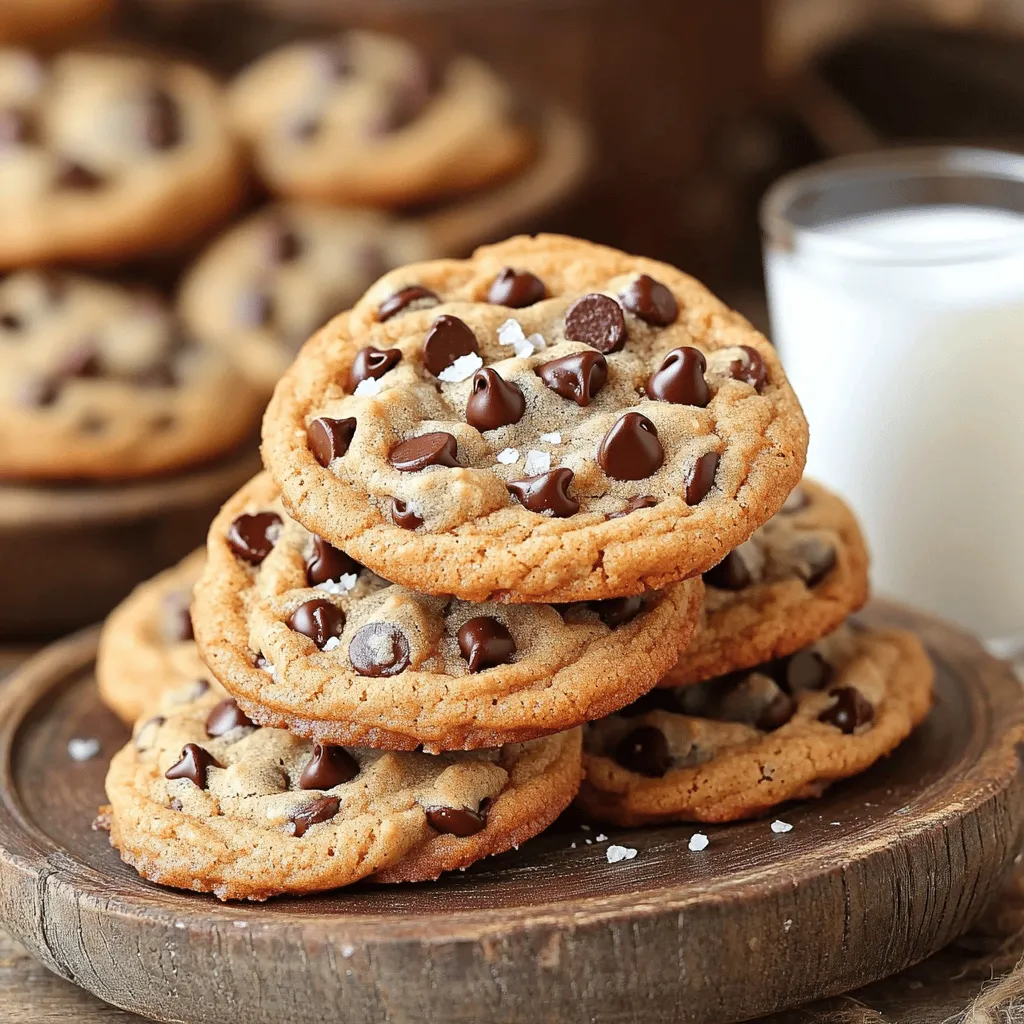
Chewy Brown Butter Chocolate Chip Cookies Delight
Are you ready for the best cookies ever? These Chewy Brown Butter Chocolate Chip Cookies are a game changer! With Read Full Recipe -
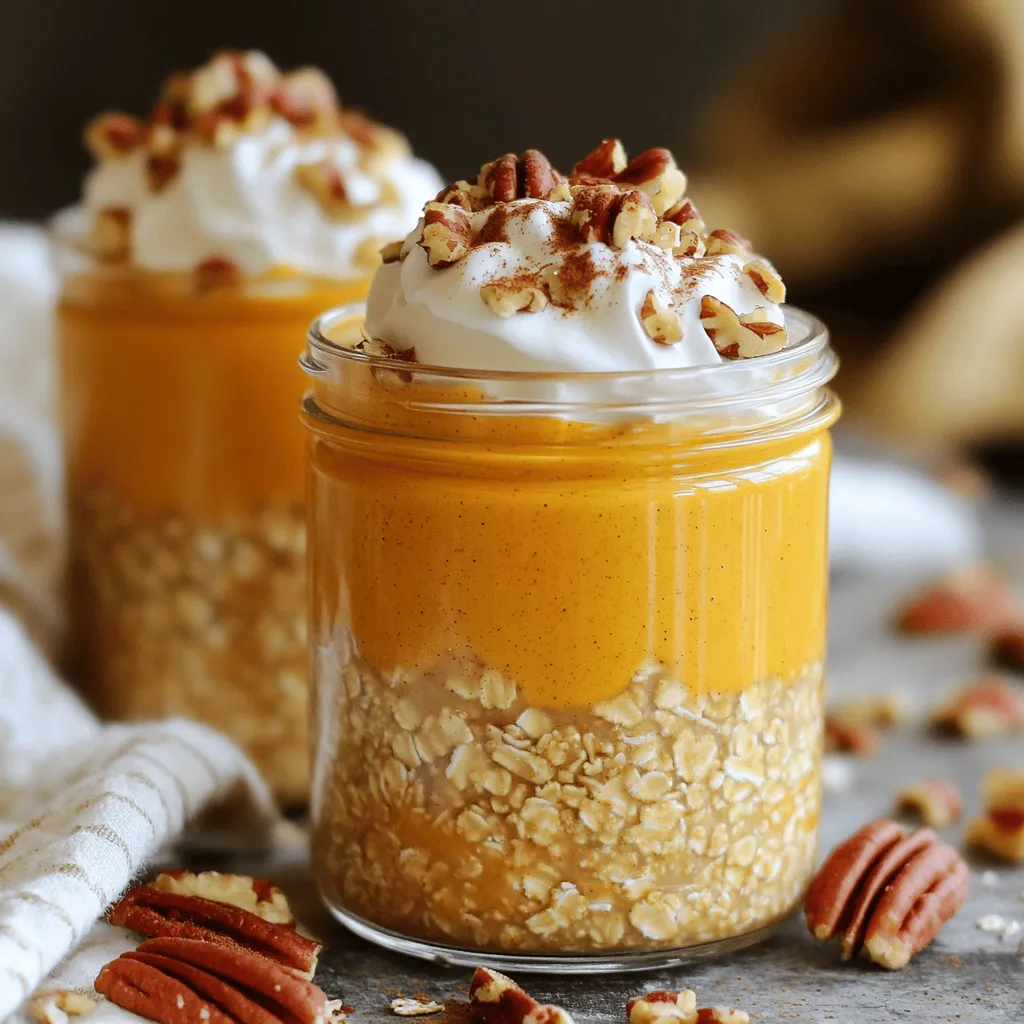
Easy Pumpkin Pie Overnight Oats Creamy and Delicious
If you’re looking for a quick, tasty breakfast that captures the essence of fall, you’re in for a treat! My Read Full Recipe -
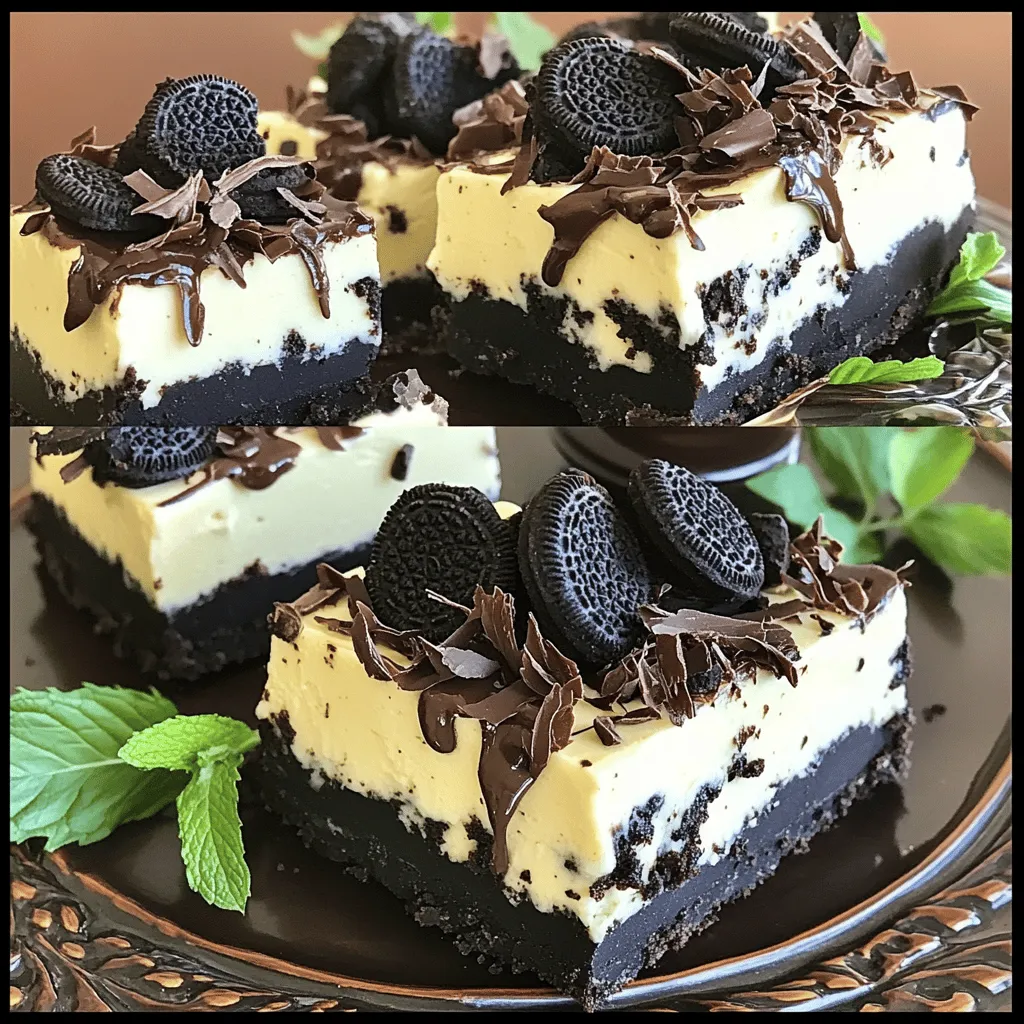
Irresistible No Bake Oreo Cheesecake Bars Recipe
Are you craving a dessert that’s simple yet delicious? Look no further! My Irresistible No Bake Oreo Cheesecake Bars are Read Full Recipe -
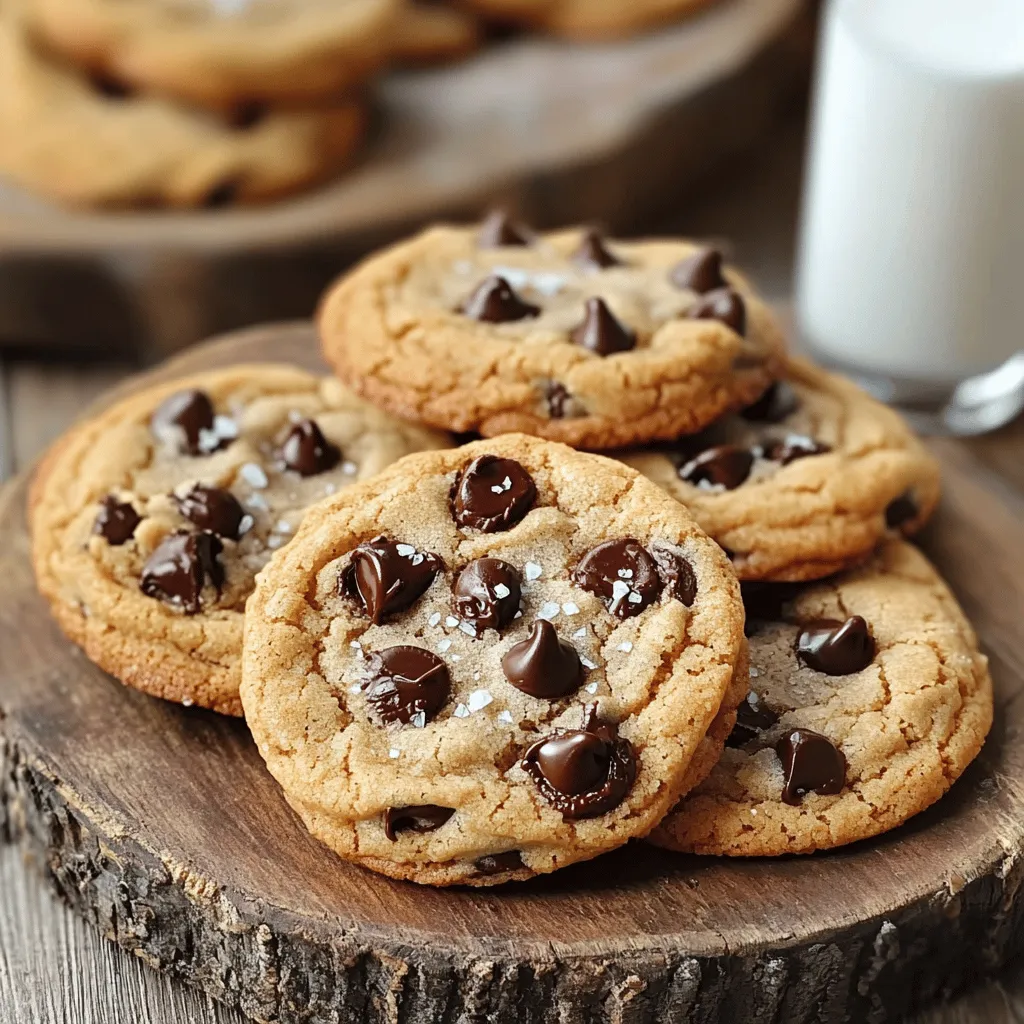
Chewy Brown Butter Chocolate Chip Cookies Recipe
Are you ready for the best cookie recipe ever? These Chewy Brown Butter Chocolate Chip Cookies are rich, warm, and Read Full Recipe -
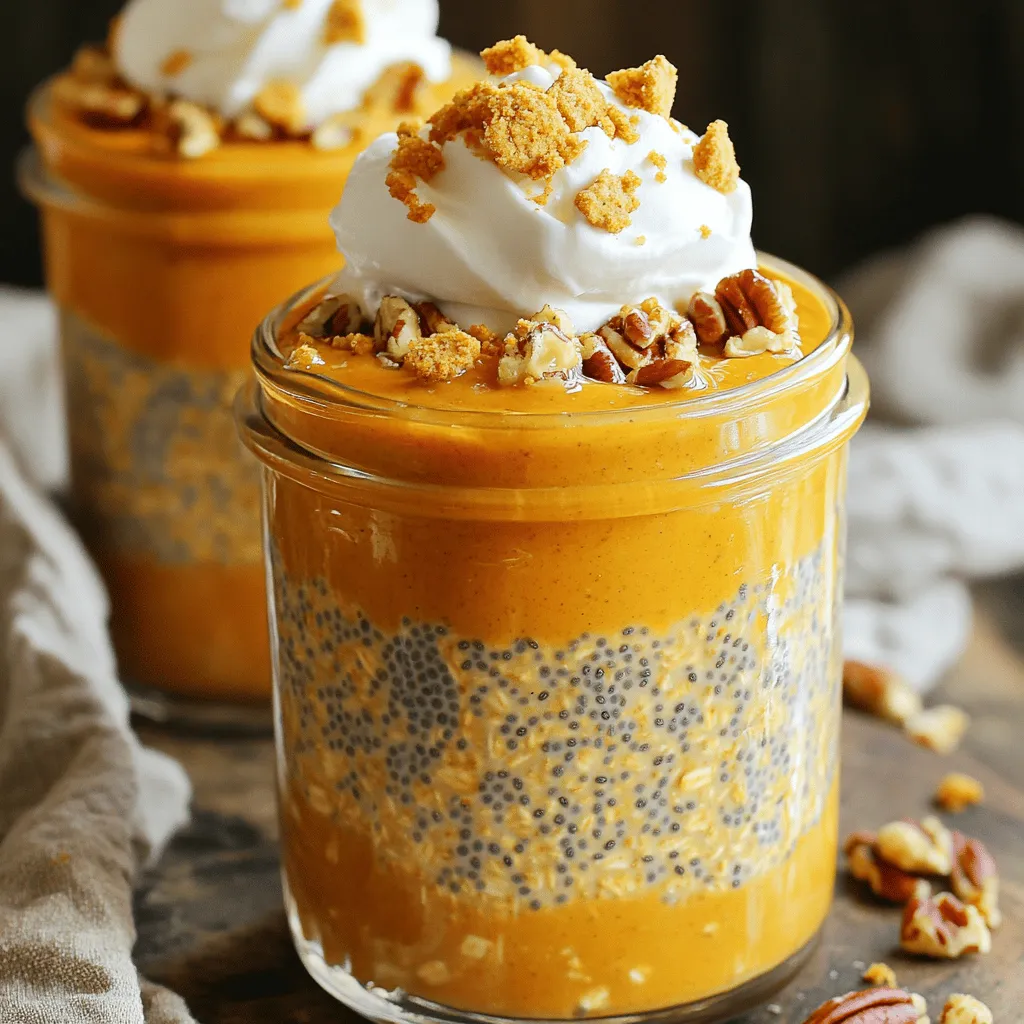
Easy Pumpkin Pie Overnight Oats Tasty and Simple Recipe
Ready to enjoy a warm slice of fall in a bowl? My Easy Pumpkin Pie Overnight Oats recipe brings the Read Full Recipe -
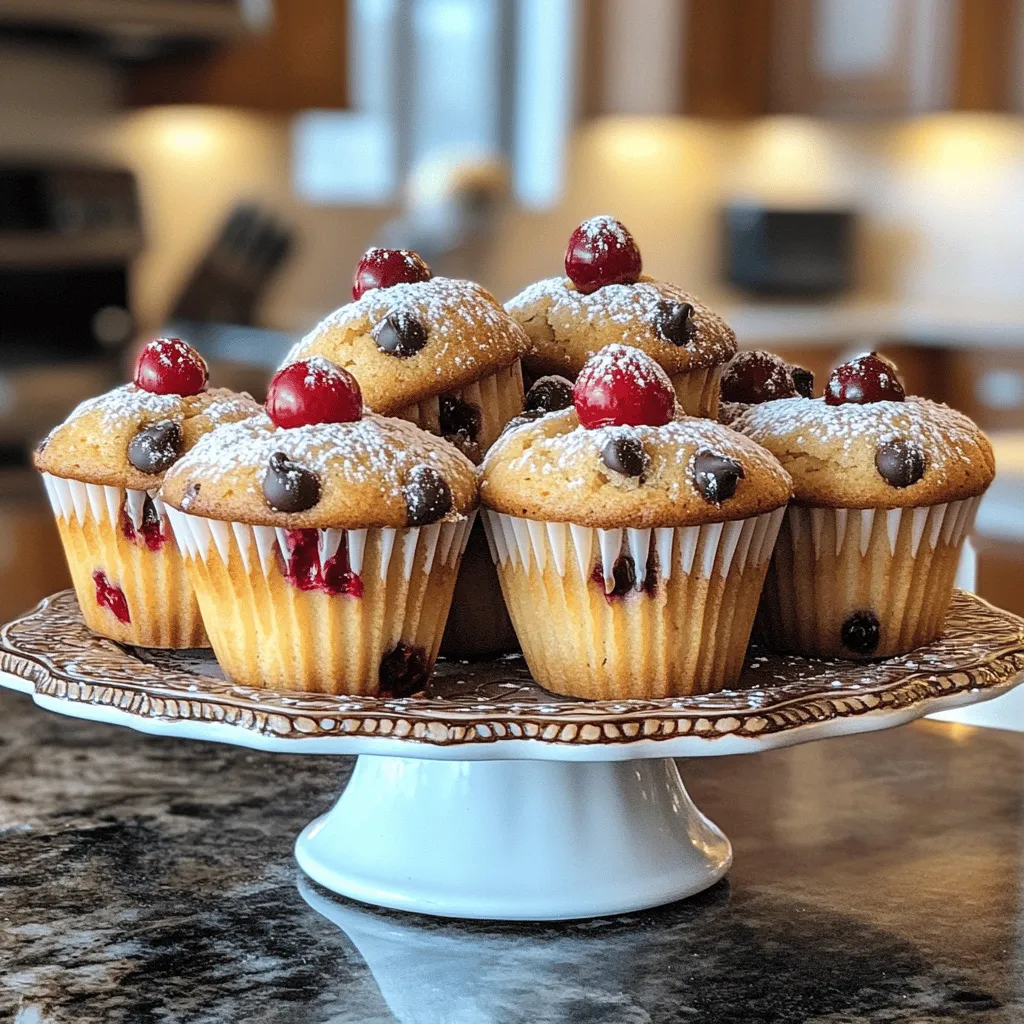
Cherry Chocolate Chip Muffins Irresistible and Easy Recipe
Get ready to bake some magic with my Cherry Chocolate Chip Muffins! This easy recipe combines tart cherries and rich Read Full Recipe -

Cherry Lemonade Popsicles Refreshing Summer Treat
Looking for a cool treat this summer? Try my Cherry Lemonade Popsicles! They combine tart lemon and sweet cherries, making Read Full Recipe -
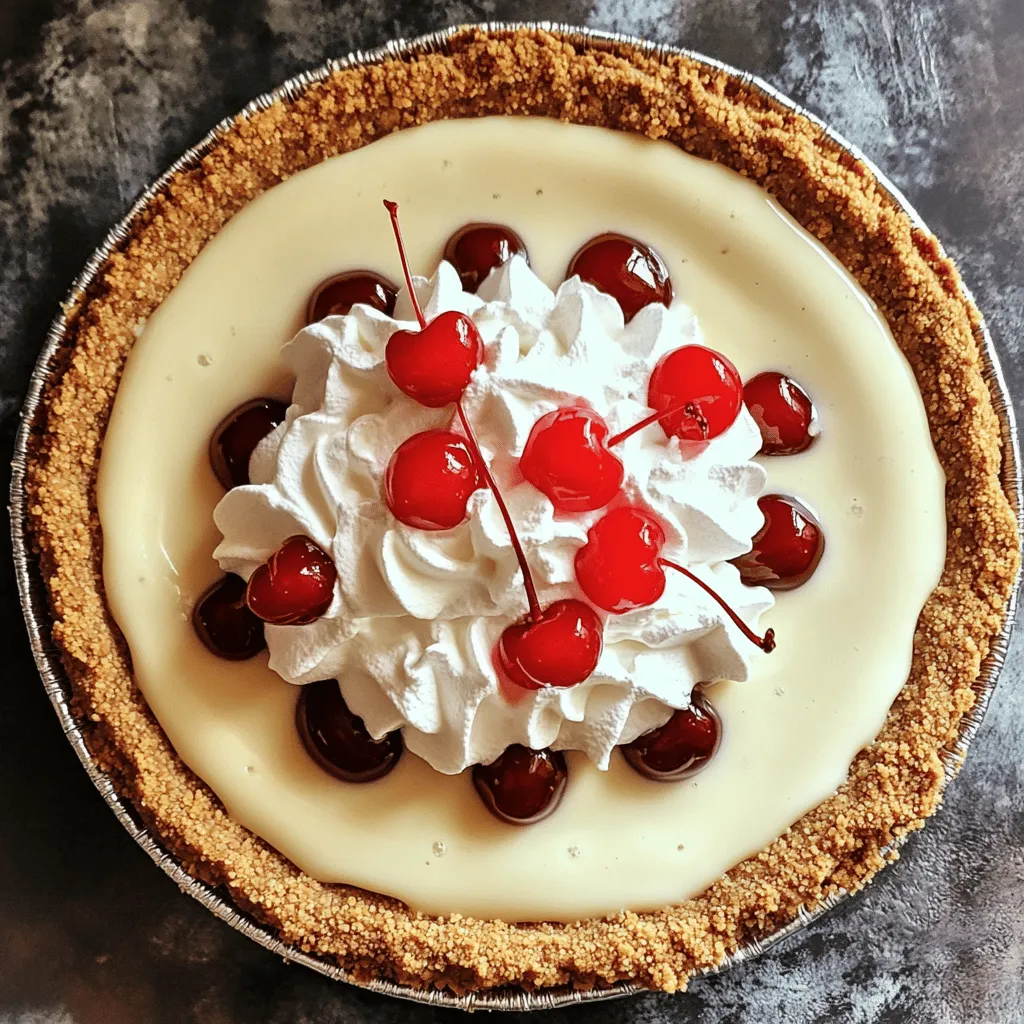
Cream Soda Milkshake Pie Tasty and Simple Recipe
Are you ready to impress your friends with a sweet treat? This Cream Soda Milkshake Pie is not just tasty; Read Full Recipe -

Cherry Swirl Frozen Yogurt Bark Easy and Delicious Treat
Craving a sweet yet healthy treat? You’ll love this Cherry Swirl Frozen Yogurt Bark! It’s easy to make and packed Read Full Recipe
My Latest Recipes

hey,
i’m !
I’m so happy you’re here!
My kitchen is filled with stories, flavors, and love and I’m so happy to share them with you. Here’s to dishes that feel like home.

![- 1 cup all-purpose flour - 1/2 cup powdered sugar - 1/4 cup unsalted butter, melted - 1/2 teaspoon salt - 2 large eggs - 1 cup granulated sugar - 1/4 cup fresh lemon juice - Zest of 1 lemon - 1/2 teaspoon baking powder These ingredients are the heart of my classic lemon bars. Each one plays a big role. The all-purpose flour gives structure. Powdered sugar makes the crust sweet and soft. Unsalted butter adds rich flavor. Fresh lemon juice brings the tartness we love. The zest gives a bright, fragrant note. - Additional lemon zest for garnish - Fresh berries for serving These optional ingredients can take your lemon bars to the next level. Extra lemon zest adds a pop of color and flavor on top. Fresh berries like raspberries or blueberries can provide a nice contrast. They look pretty and taste great with the tangy bars. For the full recipe and step-by-step instructions, refer to the [Full Recipe]. 1. First, preheat your oven to 350°F (175°C). This step warms the oven for even baking. 2. In a medium bowl, combine the following ingredients: - 1 cup all-purpose flour - 1/2 cup powdered sugar - 1/4 cup unsalted butter, melted - 1/2 teaspoon salt Mix until it looks like coarse crumbs. 3. Press this mixture into the bottom of an 8x8-inch baking dish. Make sure it covers the whole bottom. 4. Bake the crust for about 15-18 minutes. You want it to be lightly golden. 5. Once baked, remove the crust from the oven and let it cool slightly. 1. In a separate bowl, whisk together: - 2 large eggs - 1 cup granulated sugar - 1/4 cup fresh lemon juice - Zest of 1 lemon - 1/2 teaspoon baking powder Whisk until smooth and combined. 1. Pour the lemon filling over the slightly cooled crust. Spread it evenly. 2. Return the dish to the oven. Bake for another 20-25 minutes. Look for a light golden color to know it’s done. 3. After baking, let the lemon bars cool completely in the pan. 4. Lift the bars out using the parchment paper. Dust with powdered sugar before slicing. You can find the full recipe details for these tangy treats in the recipe section. Enjoy your lemon bars! To get the perfect crust, start with cold butter. Cut it into small cubes, then mix with flour and sugar. This keeps the crust flaky. Press the mixture firmly, but not too hard. You want it to hold together without being dense. Bake until it turns light golden. This takes about 15 to 18 minutes. Let the crust cool for a bit before adding the filling. Cooling helps the crust stay crisp. If you skip this step, the filling may make the crust soggy. When measuring lemon juice, use fresh lemons for the best taste. Roll the lemons on the counter before cutting. This helps release more juice. Strain the juice to remove seeds or pulp. Make sure to whisk the eggs and sugar until smooth. This ensures a creamy filling. When pouring the filling over the crust, do it gently. This helps keep the layers separate. Bake until the filling is set, about 20 to 25 minutes. The edges should look firm, while the center can still have a little jiggle. Dusting with powdered sugar should be light and even. Use a fine sieve for the best results. Hold it high above the bars to create an even layer. Lemon bars pair well with beverages like tea or lemonade. The tartness of the bars complements sweet drinks well. You can also serve them with fresh berries for a nice touch. For the full recipe, check out the complete details. {{image_2}} For a gluten-free version, swap the all-purpose flour for a gluten-free blend. Look for blends that include xanthan gum for better texture. You can also use almond flour or coconut flour, but adjust the amounts. These flours may need more liquid. For the filling, ensure the granulated sugar and eggs are gluten-free. Most lemon juice is gluten-free, but check the label. This will keep the lemon bars safe for all to enjoy. To add a twist, try herbs like basil. Basil pairs well with lemon's tang. Simply chop fresh basil finely and mix it into the filling. This will give a fresh, unique flavor. You can also use other citrus juices. Lime or orange juice can replace some lemon juice. This gives the bars a new taste. Mix and match for your favorite flavor! If you want bite-sized treats, use a mini muffin tin. Grease the tin well to prevent sticking. Pour the filling into each cup, filling them halfway. Adjust the baking time to around 15-18 minutes. Check for doneness by inserting a toothpick. If it comes out clean, they are ready! Mini lemon bars are perfect for parties or snacks. For the full recipe and to discover more about classic lemon bars, check out the [Full Recipe]. To keep your classic lemon bars fresh at room temperature, let them cool completely. Once cool, cover them with plastic wrap or place them in an airtight container. This keeps them moist and tasty. Avoid stacking them to prevent sticking. If you dust them with powdered sugar, do this just before serving to keep it pretty. If you want to save lemon bars for later, freezing is a great option. First, let them cool completely. Then, wrap each bar in plastic wrap and place them in a freezer bag. This helps prevent freezer burn. When you are ready to eat, take out the number of bars you want. Let them thaw in the fridge overnight. For a quick treat, you can also thaw them at room temperature. Lemon bars last about a week in the fridge. Keep them covered to stay fresh. If you see any mold or notice an off smell, it’s best to throw them away. Enjoy your lemon bars while they are still bright and zesty! Yes, you can make lemon bars ahead of time. To do this, bake and cool them fully. Then, cover them tightly in plastic wrap or store in an airtight container. They can stay fresh in the fridge for up to a week. If you want to store them longer, freeze them. Just remember to thaw them slowly in the fridge before serving. Look for a light golden top and a firm filling. The edges should look set. If you gently shake the pan, the filling should have a slight jiggle but not be liquid. This means the bars are done. Keep an eye on them, as overbaking can lead to dry lemon bars. Yes, you can use lime, orange, or grapefruit juice. Each citrus brings a unique flavor. Lime gives a more tropical taste, while orange adds sweetness. Adjust the sugar as needed, as some citrus can be sweeter than lemon. If your lemon bars taste too tart, you can add more sugar next time. If they are too sweet, cut back on the sugar or use less lemon juice. Finding the right balance is key for a perfect flavor. Taste as you mix to get it just right. To cut lemon bars cleanly, use a sharp knife. Dip the knife in hot water, then wipe it dry before cutting. This helps reduce sticking. Cut the bars while they are chilled for cleaner edges. Dust with powdered sugar after cutting for a beautiful finish. For a detailed recipe, check out the [Full Recipe]. Classic lemon bars are a sweet and tangy treat. They have a buttery crust and a smooth lemon filling. You can make them with just a few simple ingredients. The magic lies in the balance of flavors. The tartness of lemons pairs perfectly with the sweet sugar. - 1 cup all-purpose flour - 1/2 cup powdered sugar, plus extra for dusting - 1/4 cup unsalted butter, melted - 1/2 teaspoon salt - 2 large eggs - 1 cup granulated sugar - 1/4 cup fresh lemon juice - Zest of 1 lemon - 1/2 teaspoon baking powder Each ingredient plays a key role. The all-purpose flour forms the crust. Powdered sugar adds sweetness and a soft texture. Unsalted butter makes the crust rich. Salt enhances the flavors. The eggs bind the filling together. Granulated sugar sweetens the tart lemon juice. Fresh lemon juice gives a bright flavor. Lemon zest adds extra citrus aroma. Baking powder helps the filling rise slightly. The filling is the star of the show. Start with whisking the eggs and sugars until smooth. This step is important for a creamy texture. Next, add the fresh lemon juice and zest. They bring a burst of flavor. Finally, mix in the baking powder. This ensures your filling sets well. Once your crust is ready, pour the lemon filling over it. Bake it until the filling is set. You want it to be a light golden color. This usually takes about 20 to 25 minutes. After baking, let the bars cool in the pan. This helps them firm up. When cool, lift them out using the parchment paper. Dust with powdered sugar for a lovely finish. You can find the Full Recipe for this delicious treat. Enjoy every bite of this tangy delight! Lemon bars are easy to make with simple ingredients like flour, butter, and fresh lemons. We covered step-by-step instructions to help you achieve the perfect crust and filling. Plus, I shared tips for variations, storage, and serving suggestions. With this guide, you can enjoy classic lemon bars or explore new flavors. Remember, practice makes perfect. Enjoy your baking journey, and savor every bite of your delicious lemon bars!](https://southerndishes.com/wp-content/uploads/2025/06/876badc6-c4a7-41ec-9b1b-73cfd844858e-300x300.webp)
![- Spinach - Bell Peppers - Cherry Tomatoes For your egg muffins, fresh vegetables add color and nutrition. I love using spinach for its rich vitamins. Bell peppers, in any color, give a sweet crunch. Cherry tomatoes bring juicy bursts of flavor. You can mix and match veggies based on what you have. - Eggs - Milk - Cheese The base of our muffins starts with eggs. They provide protein and help bind everything. Add milk to make the mixture smooth. You can use dairy or plant-based milk, depending on your needs. Cheese adds creaminess and a tasty finish. I suggest cheddar for a sharp flavor or feta for a tangy kick. - Salt and Pepper - Olive Oil - Fresh Herbs (optional) Seasoning is key to flavor. Use salt and pepper to taste. A little olive oil greases the muffin tin and adds healthy fats. Fresh herbs, like parsley or basil, give a nice touch. They can brighten up the dish and add extra flavor. You can skip them if you want a simpler taste. For the complete recipe, check out the [Full Recipe]. Preheating the Oven Start by preheating your oven to 350°F (175°C). This helps the egg muffins cook evenly. A hot oven makes a big difference in how they rise and set. Preparing the Muffin Tin Next, grease a muffin tin with olive oil. This makes it easier to remove the muffins later. You can also use silicone muffin liners if you have them. They work great and save you some cleanup time. Whisking Eggs and Milk In a large mixing bowl, crack six large eggs. Add half a cup of milk to the bowl. Whisk them together until they are fully mixed and frothy. Don't forget to season with salt and pepper to taste. This step adds flavor to your muffins. Incorporating Vegetables and Cheese Now it’s time to mix in your veggies. Add in one cup of chopped spinach, half a cup of diced bell pepper, half a cup of halved cherry tomatoes, and a quarter cup of finely chopped red onion. Stir gently so all vegetables are spread out. Then, add half a cup of shredded cheese. Mix it lightly until everything is combined. Pouring Mixture into Muffin Tin Carefully pour your egg and veggie mixture into the prepared muffin tin. Fill each cup about three-quarters full. This gives the muffins room to rise without spilling over. Baking Time and Temperature Place the muffin tin in the preheated oven. Bake the muffins for 18 to 20 minutes. They should puff up and be set in the center when done. Once baked, take them out and let them cool for a few minutes. Use a knife to run around the edges to release them from the tin. Enjoy your delicious egg muffins! For the full recipe, click here. To make your egg muffins fluffier, whisk the eggs and milk thoroughly. Aim for a frothy texture. This extra air will help them rise nicely while baking. You can also try using an electric mixer for speed and ease. If you need to switch ingredients, don’t worry! You can use different veggies based on what you have. Zucchini, mushrooms, or kale are great options. For a dairy-free version, swap the cheese with nutritional yeast. This keeps it tasty and nutritious. Garnish your egg muffins for a lovely touch. A sprinkle of fresh herbs like parsley or basil adds color and flavor. You can also top them with slices of avocado for creaminess. Pair your muffins with a side of salsa or yogurt. This adds a zesty kick and makes your meal even better. They work great as a quick breakfast or a healthy snack anytime. Using the right muffin tin is key. Silicone muffin pans are excellent since they allow easy removal. If you prefer metal, choose a non-stick version and grease it well. For easy cleanup, have a spatula and a whisk handy. A mixing bowl with a pour spout helps with filling the muffin cups neatly. These tools make the whole process smoother and more fun. For the full recipe, be sure to check out the detailed instructions provided! {{image_2}} Alternative Veggies to Consider You can swap out the veggies in this recipe for a fresh twist. Try zucchini, mushrooms, or broccoli. Each veggie brings its own flavor and texture. You can also mix in carrots or kale for added nutrition. Seasonal Veggie Mixes Use seasonal vegetables for the best taste. In spring, add asparagus or peas. Summer can bring in fresh corn or colorful squash. In fall, think about using sweet potatoes or Brussels sprouts. Winter gives you the chance to use hearty greens like collards or Swiss chard. Options for Adding Meat Want to make your egg muffins heartier? Add cooked bacon, sausage, or ham. Just chop it into small pieces and mix it in. This will give your muffins a savory kick. Vegan Protein Alternatives For a vegan option, try adding black beans or chickpeas. These will boost protein without using eggs. You can also add tofu or tempeh for a different texture and flavor. Using Different Cheese Varieties Cheese can make a big impact. You can use cheddar, feta, or goat cheese. Each type will change the flavor profile. Soft cheeses can add creaminess, while hard cheeses can add a nice bite. Spicing It Up with Herbs and Spices Don’t forget to add spices! You can sprinkle in paprika, cumin, or garlic powder. Fresh herbs like basil or cilantro can brighten up your muffins. Experiment to find your perfect mix. For the complete recipe, check out the Full Recipe. How Long They Last You can store your egg muffins in the fridge for up to a week. They stay fresh if you keep them in an airtight container. Best Practices for Storing Before storing, let the muffins cool completely. This helps prevent moisture buildup. Place a paper towel in the container to absorb any excess moisture. This simple step keeps them nice and fluffy. Freezing Instructions To freeze your egg muffins, first, let them cool completely. Then, wrap each muffin tightly in plastic wrap. Place them in a freezer-safe bag or container. They will stay good in the freezer for about three months. Reheating Tips When you're ready to eat, you can reheat them straight from the freezer. Microwave on high for about 1-2 minutes. For a crispier muffin, use an oven set to 350°F (175°C) for about 10-15 minutes. Making Muffins in Batches I love making egg muffins in batches. This saves time during busy mornings. You can mix and match your favorite veggies and cheese. Storing for On-the-Go Meals These muffins are perfect for on-the-go meals. Just pack them in a small container. They make a great snack or breakfast option. Enjoy them warm or cold! For the full recipe, click here. Can I use egg whites instead of whole eggs? Yes, you can use egg whites. This choice makes the muffins lower in fat. You can mix two egg whites for every whole egg. Just remember, the texture may change. The muffins may not be as fluffy or rich. What can I use instead of milk? You can use plant-based milk like almond or oat milk. Water is also a good option if you want fewer calories. If you're okay with a creamier taste, try using yogurt. This choice adds a nice tang. What to do if muffins are soggy? If your muffins are soggy, they might have too much liquid. Try reducing the amount of milk. Also, you can bake them a bit longer. Keep an eye on them to avoid burning. How to fix overflow in muffin tins? To fix overflow, fill the muffin cups less. Only fill each cup about three-quarters full. If they still overflow, try using a larger muffin tin. You can also place a baking sheet under the muffin tin to catch drips. Calorie Count and Macronutrients Each muffin contains about 100 calories. They have around 7 grams of protein and 5 grams of fat. This makes them a great snack or breakfast option. Health benefits of the ingredients Eggs are a great source of protein. They help build muscles and keep you full. Spinach provides iron, which is good for your blood. Bell peppers add vitamin C, boosting your immune system. Tomatoes are packed with antioxidants for healthy skin. In this blog post, we explored how to make delicious egg muffins using fresh veggies, eggs, and seasonings. You learned the steps for mixing, baking, and serving these tasty options. Tips include whipping techniques and meal prep ideas for busy days. Remember, you can customize flavors and store muffins for later. Enjoy experimenting with different ingredients and variations to make your egg muffins unique! You have many ways to create a healthy, quick meal that fits your taste. Happy cooking!](https://southerndishes.com/wp-content/uploads/2025/04/2a3530c6-f3cf-4570-a570-e10367170c0e-300x300.webp)
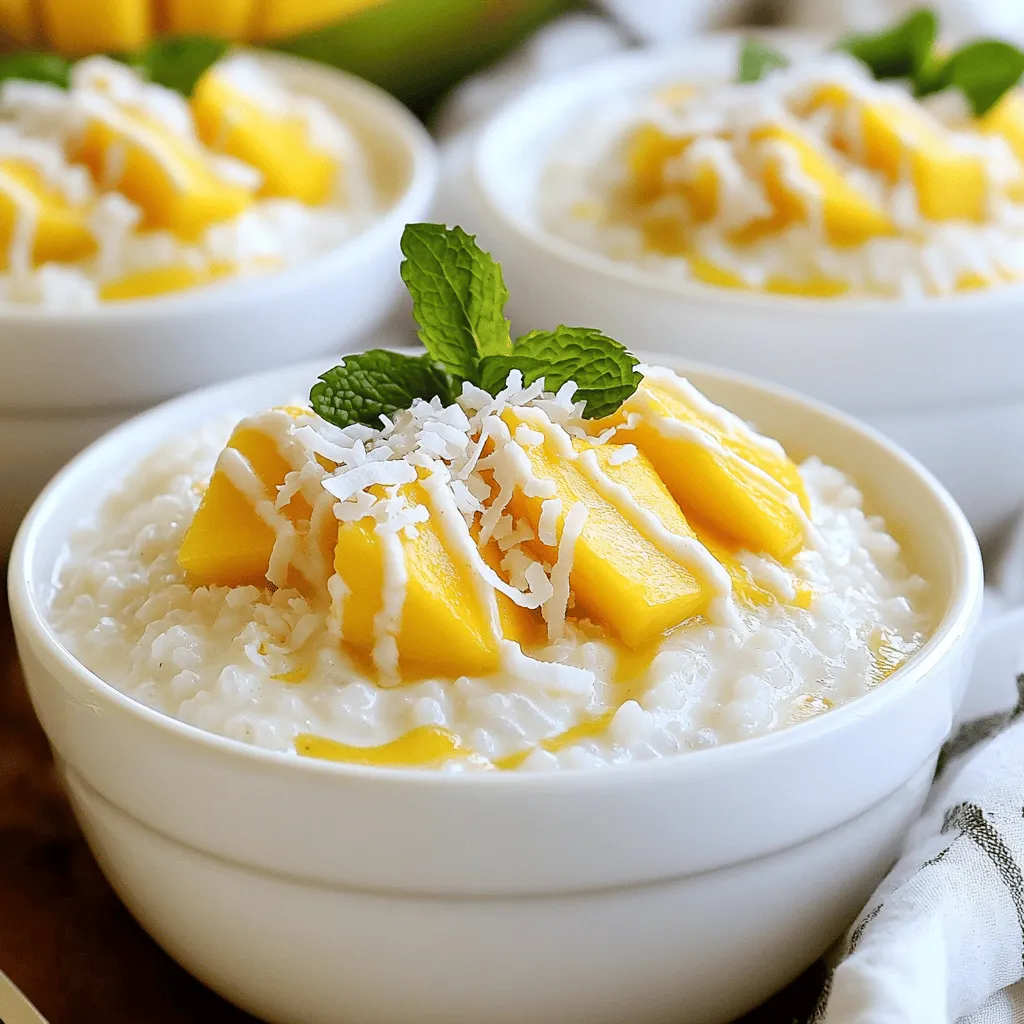
Coconut Milk Rice Pudding Creamy and Simple Treat
If you’re craving a sweet, creamy treat, coconut milk rice pudding is the perfect choice! This dish is simple to make and incredibly satisfying.…