


Latest & Greatest

Tender Crockpot Beef Stew Recipe for Cozy Meals
Imagine walking into your kitchen and being greeted by the warm, savory aroma of tender beef stew. This Tender Crockpot
Read more…
Crockpot Taco Casserole Easy Family Dinner Recipe
Looking for an easy family dinner that everyone will love? My Crockpot Taco Casserole is the answer! Packed with flavorful
Read more…
Old School Pizza Burgers Flavorful and Easy Recipe
If you love pizza and burgers, this recipe is for you! Old School Pizza Burgers blend the best of both
Read more…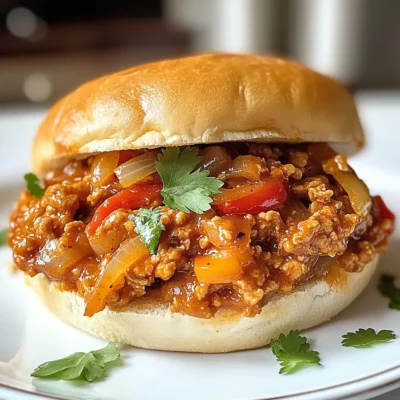
Ground Chicken Sloppy Joes Quick and Easy Recipe
Looking for a quick and tasty meal? Ground Chicken Sloppy Joes are the answer! This easy recipe combines juicy ground
Read more…
Easy Shepherd’s Pie Quick and Tasty Dinner Recipe
Looking for a quick dinner that pleases everyone? My Easy Shepherd’s Pie recipe is just what you need! This dish
Read more…
Ravioli Lasagna Crockpot Easy and Savory Dish
If you crave a warm, cheesy dish that’s quick to make, try my Ravioli Lasagna Crockpot! This recipe blends the
Read more…
Fiery Chicken Ramen Bold and Flavorful Recipe Guide
Are you ready to spice up your dinner? This Fiery Chicken Ramen recipe is here to bring bold flavors to
Read more…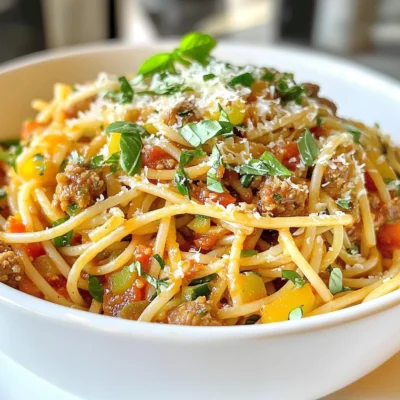
Minute Italian Sausage Pasta Quick and Flavorful Meal
Looking for a quick and tasty dinner? This Minute Italian Sausage Pasta is your answer! Packed with flavor, it’s easy
Read more…browse recipes


Coconut Cream Pie Bars Delicious Chilled Dessert Treat
If you love sweet and creamy treats, you’ll adore these Coconut Cream Pie Bars! They are a cool, tasty dessert perfect for warm days.…
My Latest Desserts
My Latest Recipes

hey,
i’m !
I’m so happy you’re here!
My kitchen is filled with stories, flavors, and love and I’m so happy to share them with you. Here’s to dishes that feel like home.

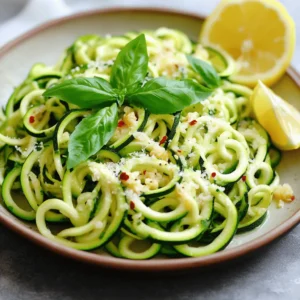
![To make a tasty Vegetable Lo Mein, gather these items: - 8 oz lo mein noodles - 2 tablespoons sesame oil - 1 cup broccoli florets - 1 bell pepper, thinly sliced (any color) - 1 carrot, julienned - 1 cup snap peas - 4 green onions, chopped - 3 cloves garlic, minced - 1-inch piece ginger, grated - 3 tablespoons soy sauce - 1 tablespoon oyster sauce (vegetarian version) - 1 tablespoon hoisin sauce - Salt and pepper to taste - Sesame seeds for garnish Using fresh vegetables makes your lo mein colorful and full of flavor. I love adding: - Broccoli for crunch and nutrients. - Bell peppers add sweetness and color. - Carrots provide a nice texture. - Snap peas bring a lovely snap. - Green onions give a great bite. Feel free to mix and match your favorites. Use seasonal veggies for the best taste. You need some basic tools to make your Vegetable Lo Mein. Here’s what I recommend: - A large skillet or wok for even cooking. - A pot for boiling noodles. - A sharp knife for slicing veggies. - A cutting board for safe prep. With these tools and ingredients, you can create a dish that shines. For the full recipe, check out the details above. Enjoy your cooking! First, gather your lo mein noodles. Measure out 8 ounces for this dish. Bring a pot of water to a boil. Add the noodles, cooking them according to the package instructions. This usually takes about 3 to 5 minutes. Taste them to see if they are just right. Drain the noodles and set them aside. Toss them in 1 tablespoon of sesame oil. This helps to keep them from sticking. Next, get your large skillet or wok. Heat the remaining 1 tablespoon of sesame oil over medium-high heat. Add 3 cloves of minced garlic and 1-inch grated ginger. Cook these for about 1 minute until you smell their nice aroma. Now, add your vegetables: 1 cup of broccoli florets, 1 thinly sliced bell pepper, 1 julienned carrot, and 1 cup of snap peas. Stir-fry these for about 5 to 7 minutes. You want them to be tender but still a bit crisp. Once your vegetables are ready, add the cooked lo mein noodles to the skillet. Toss in 4 chopped green onions as well. Now it's time for flavor! Pour in 3 tablespoons of soy sauce, 1 tablespoon of vegetarian oyster sauce, and 1 tablespoon of hoisin sauce. Stir-fry everything together for another 3 to 4 minutes. Make sure all the noodles and veggies are well coated in sauce. Finally, season with salt and pepper to taste. Serve your delicious Vegetable Lo Mein hot, garnished with sesame seeds. For full details, check the Full Recipe. To get the best lo mein noodles, start with boiling water. Use plenty of water to keep the noodles from sticking. Cook them for about 3-4 minutes until they are al dente. Drain the noodles and toss them with a bit of sesame oil. This step keeps them from clumping together. Flavoring your lo mein is all about the sauce. Use soy sauce, oyster sauce, and hoisin sauce to create a rich taste. You can adjust these sauces based on your liking. Add fresh garlic and ginger for an aromatic kick. If you want more heat, toss in some red pepper flakes. Serve your Vegetable Lo Mein hot and fresh. Garnish with sesame seeds and green onions for a nice touch. You can add a side of spring rolls or dumplings for extra flavor. This meal pairs well with a light salad or steamed vegetables. Check the Full Recipe for more details on preparation and serving. {{image_2}} You can boost your Vegetable Lo Mein by adding protein. Chicken, shrimp, or tofu work well. Cook your chosen protein in the skillet before adding vegetables. This step gives the dish extra flavor. For a vegan option, use firm tofu. Just cube it and sauté until golden. If you need a gluten-free meal, use rice noodles instead of lo mein noodles. They have a similar texture and taste great. Be sure to check your sauces for gluten. Tamari is a great gluten-free soy sauce option. This way, everyone can enjoy the dish. To make a low-carb version, skip the noodles and use zucchini noodles or cauliflower rice. Spiralize zucchini for a fun twist. Cauliflower rice adds volume and keeps the dish light. Toss in vegetables like bell peppers and snap peas for crunch. This keeps the meal satisfying without the carbs. For the complete recipe, check out the [Full Recipe]. To keep your Vegetable Lo Mein fresh, store it in an airtight container. Make sure it cools down first. This way, you prevent moisture buildup. Place it in the fridge if you plan to eat it within three days. If you want it to last longer, consider freezing. When you're ready to enjoy leftovers, reheat them gently. Use a skillet over medium heat for the best results. Add a splash of water or soy sauce to keep it moist. Stir often to heat evenly. You can also use a microwave, but cover the bowl to keep the steam in. If you choose to freeze your Vegetable Lo Mein, let it cool completely first. Portion it into freezer-safe bags or containers. Remove as much air as possible to prevent freezer burn. It can last up to three months in the freezer. Just thaw it overnight in the fridge before reheating. Enjoy your delicious meal whenever you want with these simple storage tips! To make Vegetable Lo Mein vegetarian, use plant-based sauces. In this dish, we already use vegetarian oyster sauce and soy sauce. If you want a deeper flavor, add more hoisin sauce. All the veggies, like broccoli and bell pepper, are naturally vegetarian. You can enjoy a colorful and tasty meal without meat. If you can't find lo mein noodles, you have options. You can use spaghetti or thin rice noodles. These substitutes cook quickly and still taste great. You can also try zoodles, made from zucchini, for a low-carb option. The key is to cook them until they are just right. Yes, you can prepare Vegetable Lo Mein in advance. Cook the noodles and veggies, then store them separately. When you're ready to eat, just mix them together and heat. This helps keep the noodles from getting mushy. You can also enjoy leftovers. They will still taste great the next day. For the full recipe, check out the Veggie Delight Lo Mein. You learned about making delicious Vegetable Lo Mein. We covered all the key ingredients needed. I explained how to cook the noodles and veggies step by step. You got great tips for perfecting your dish and ideas for fun variations. Lastly, I shared how to store and reheat your Lo Mein. With this guide, you can create a tasty meal that fits your needs. Enjoy your cooking adventure!](https://southerndishes.com/wp-content/uploads/2025/05/cbe49cf4-1444-4d9d-a134-0053912c4ce8-300x300.webp)
Savory Pumpkin Sage Cheese Scones Perfect for Fall
As the leaves turn and the air cools, there’s nothing better than warm, flaky scones. These Savory Pumpkin Sage Cheese Scones offer a tasty…