
Latest & Greatest
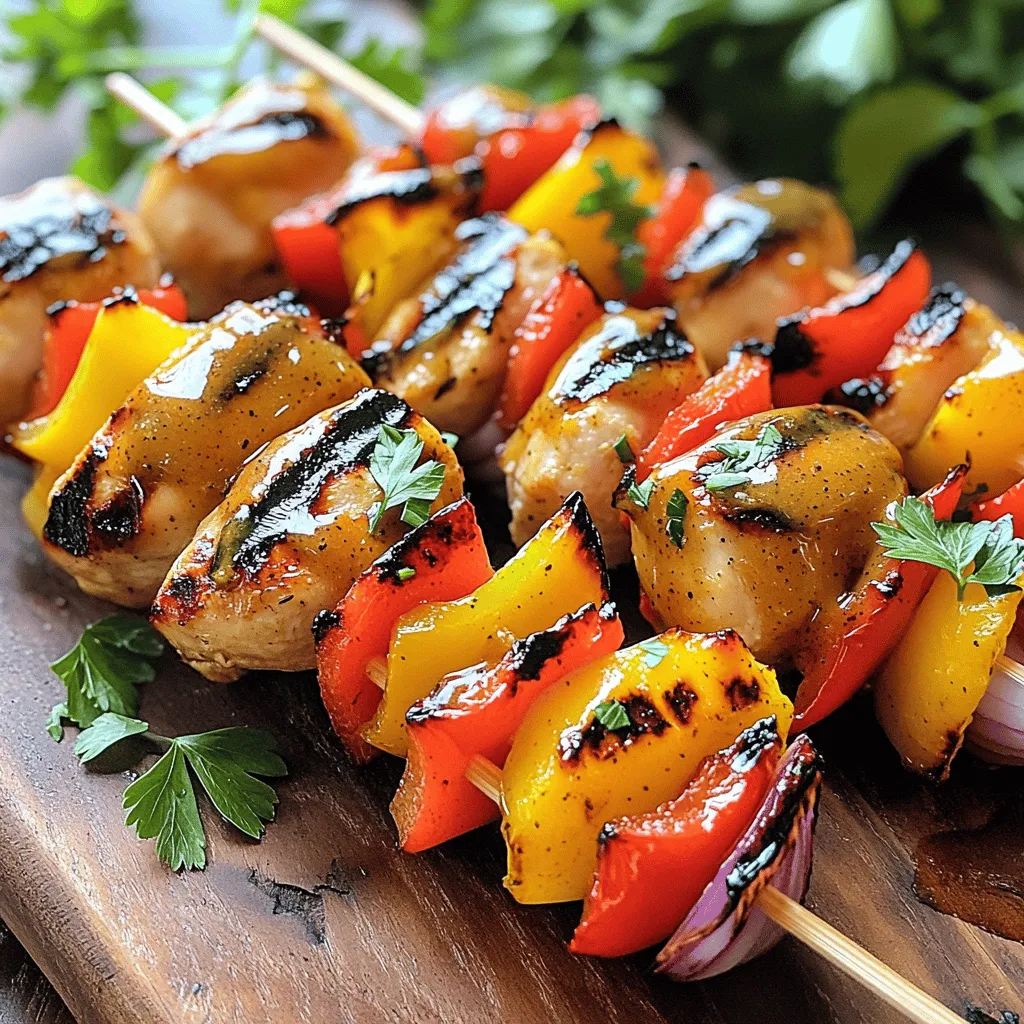
Honey Mustard Chicken Skewers Flavorful Grilling Recipe
Are you ready to elevate your grill game? My Honey Mustard Chicken Skewers are a must-try! This simple recipe features
Read more…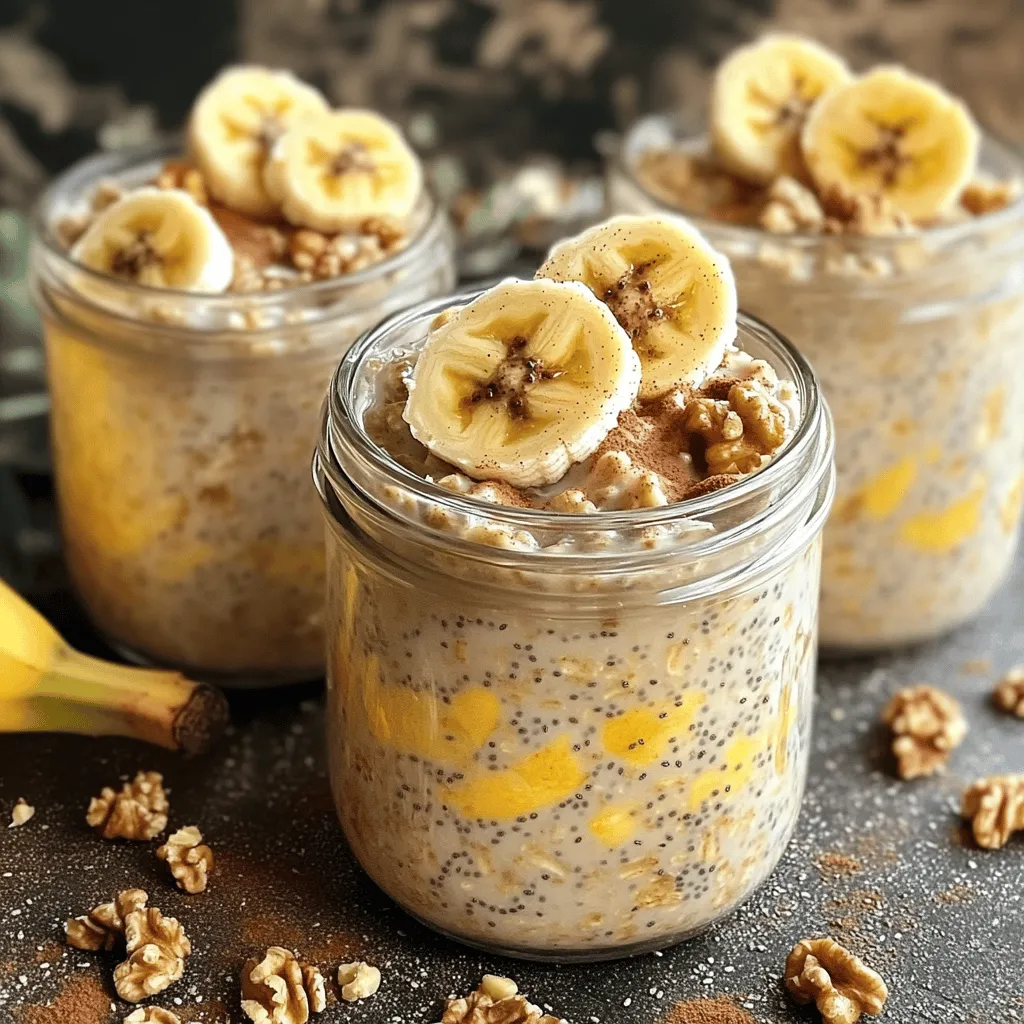
Banana Bread Overnight Oats Easy and Healthy Recipe
Are you ready to kickstart your mornings with a delicious twist? My Banana Bread Overnight Oats recipe combines the sweet
Read more…
Cheesy Spinach Artichoke Dip Irresistible Party Snack
If you’re searching for the perfect party snack, look no further! My Cheesy Spinach Artichoke Dip is creamy, tangy, and
Read more…
Savory Oatmeal with Fried Egg Quick Flavor Boost
Are you ready to elevate your breakfast game? This Savory Oatmeal with Fried Egg will do just that! Packed with
Read more…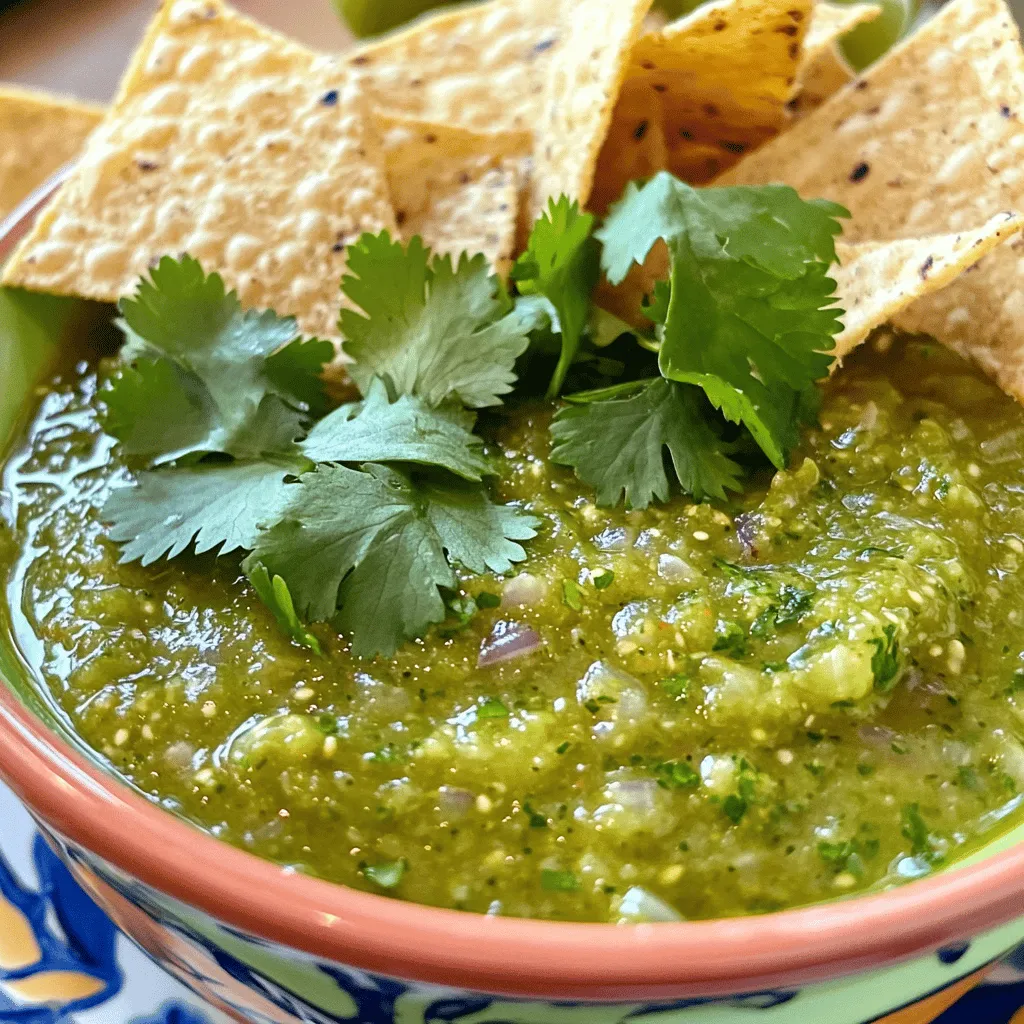
Homemade Salsa Verde Fresh and Flavorful Recipe
Ready to add a burst of flavor to your meals? Homemade Salsa Verde is fresh, vibrant, and easy to make!
Read more…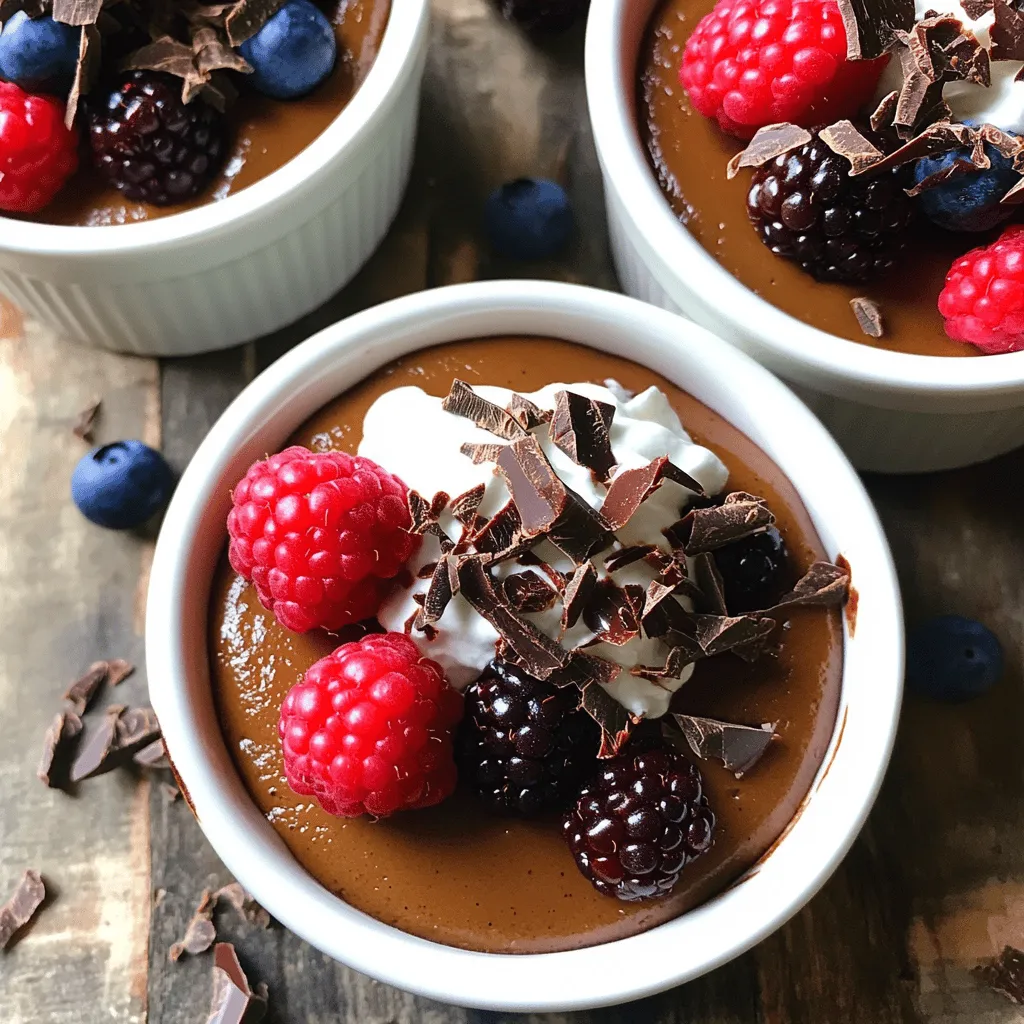
Chocolate Avocado Mousse Rich and Creamy Delight
Dive into the rich and creamy world of Chocolate Avocado Mousse! This dessert is not only delicious but also incredibly
Read more…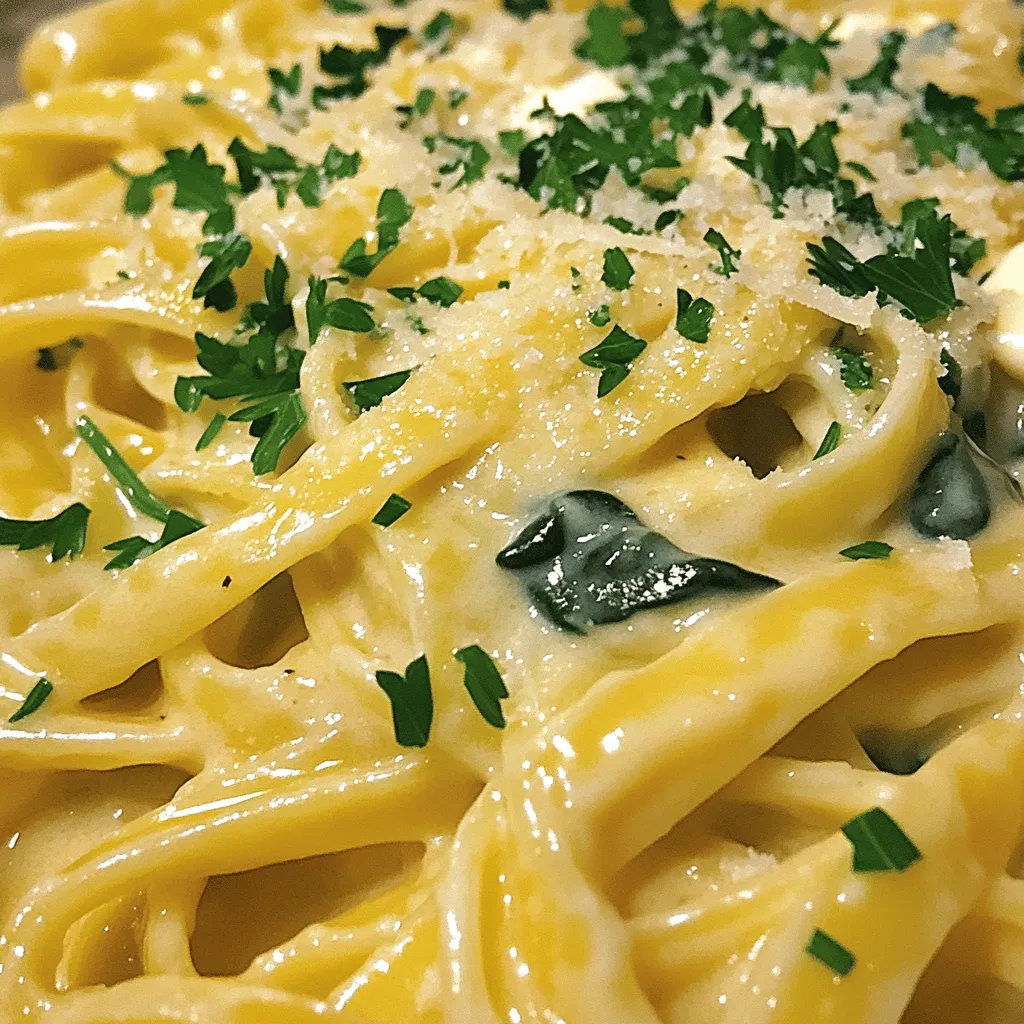
Creamy Garlic Parmesan Pasta Rich and Flavorful Dish
Craving a cozy dish that bursts with savory flavor? You’ve found it! My Creamy Garlic Parmesan Pasta is your new
Read more…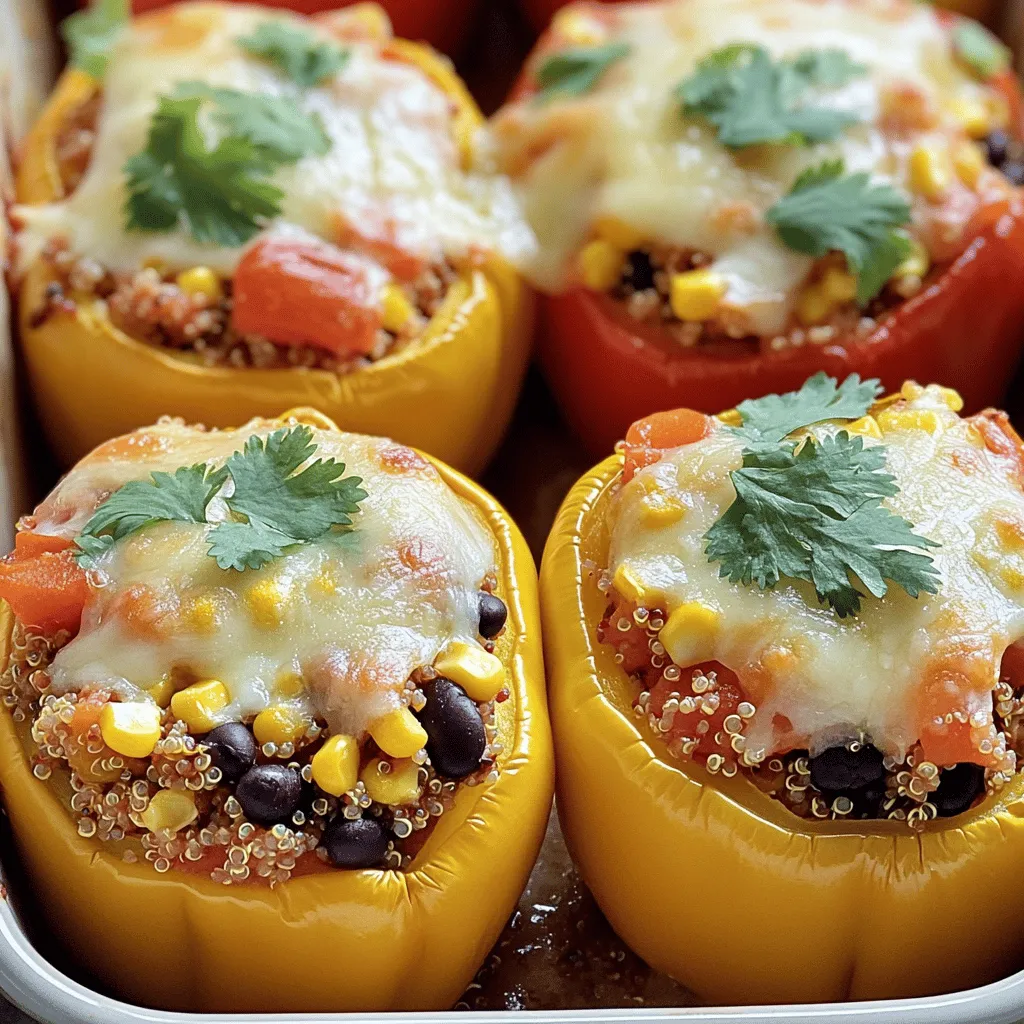
Nutritious Stuffed Bell Peppers with Quinoa Recipe
Looking for a healthy, tasty meal? My Nutritious Stuffed Bell Peppers with Quinoa recipe is perfect for you! Packed with
Read more…browse recipes


Honey Garlic Chicken Stir-Fry Quick and Tasty Meal
Looking for a quick and tasty meal? Honey Garlic Chicken Stir-Fry is your answer! This dish is packed with sweet and savory flavors that…
My Latest Desserts
My Latest Recipes

hey,
i’m !
I’m so happy you’re here!
My kitchen is filled with stories, flavors, and love and I’m so happy to share them with you. Here’s to dishes that feel like home.
![- 2 ripe bananas, frozen - 1 tablespoon cocoa powder - 1 cup almond milk (or any milk of your choice) - 1 tablespoon almond butter - 1 teaspoon honey or maple syrup (optional) - 1/2 teaspoon vanilla extract - A pinch of cinnamon - Ice cubes (optional, for added thickness) Gather these ingredients to create a tasty chocolate banana smoothie. Each one plays a key role in making this drink both yummy and healthy. Frozen bananas give your smoothie a nice creamy texture. They also add natural sweetness. Cocoa powder brings that rich chocolate flavor without added sugar. Almond milk keeps it light and refreshing. Almond butter adds healthy fat and protein, making you feel full. You can sweeten it with honey or maple syrup, but it's not always needed. Vanilla extract gives depth, while cinnamon adds a warm, cozy touch. If you want a thicker smoothie, ice cubes are a great choice. This list covers everything you need for the Full Recipe of this delightful drink. Get ready to blend a delicious and energizing treat! Start by peeling the frozen bananas. Break them into small chunks. This makes blending easier. If your bananas are not frozen, freeze them for a few hours before use. Frozen bananas give the smoothie a creamy texture. Now, it's time to blend! In your blender, add the banana chunks. Then, add the cocoa powder, almond milk, and almond butter. If you like, add honey or maple syrup. Next, put in the vanilla extract and a pinch of cinnamon. Blend all ingredients on high speed. Keep blending until the mixture is smooth and creamy. After blending, check the texture. If you want it thicker, add a few ice cubes. Blend again until mixed smoothly. Taste your smoothie. If you want it sweeter, add more honey or syrup. Blend once more to mix in the sweetness. Your smoothie is ready to pour into glasses. Enjoy this delicious and healthy drink! For the full recipe, check the details above. To get the right texture, you can adjust the thickness of your smoothie. If you want a thicker smoothie, use frozen bananas. They add creaminess and chill. You can also add ice cubes. Blend well to mix them in. If your smoothie is too thick, add more almond milk. Pour in small amounts until you reach your desired thickness. Blend again to mix everything evenly. Presentation is key when serving your smoothie. Use chilled glasses to keep it cool. For a fun look, sprinkle cocoa powder on top. You can also slice fresh bananas and place them on the smoothie. A drizzle of almond butter adds flavor and beauty. This makes your drink look gourmet and inviting. Enjoy it as a quick breakfast or a snack! This smoothie is not just tasty; it is also healthy. Bananas are rich in potassium. They help with heart health and keep you energized. They also provide fiber for good digestion. Cocoa powder is packed with antioxidants. It can boost your mood and improve heart health. Together, these ingredients make a great snack that is both delicious and nutritious. You can find the full recipe [here]. {{image_2}} You can boost your smoothie with fun add-ins. Protein powder adds a healthy kick. It can help you feel full longer. Spinach is another great choice. It blends well, and you won’t taste it. Nutmeg brings a warm spice that pairs nicely with chocolate. Try one or all of these options to play with flavors. You don’t have to stick with almond milk. Soy milk is a great option too. It has a rich taste and adds protein. Oat milk is creamy and sweet, perfect for this smoothie. Coconut milk can add a tropical twist. Each milk brings its own flavor, so choose what you like best. If you want to switch up sweeteners, there are many choices. Agave nectar is a nice swap for honey. It has a light taste and is vegan-friendly. Stevia is another option. This natural sweetener has no calories and is very sweet. Try different sweeteners to find your favorite balance in this drink. For the complete recipe, check out the [Full Recipe]. If you have leftover smoothie, store it in the fridge. Pour it into a clean jar or a sealed container. This helps keep it fresh and tasty. Make sure to consume it within one day. Stir it well before drinking, as some ingredients might separate. You can freeze your smoothie for later. Pour the mixture into ice cube trays or freezer-safe containers. Leave some space at the top, as the smoothie will expand when frozen. Use within one month for the best taste. When you want to enjoy it again, just blend the frozen cubes with a little milk. In the fridge, your smoothie lasts about 24 hours. In the freezer, it can stay fresh for up to one month. After that, it might lose some flavor and texture. Always check for any odd smells or changes before consuming. Having the Full Recipe on hand makes it easy to whip up another batch! To make a dairy-free Chocolate Banana Smoothie, use almond milk or coconut milk. These options keep the taste creamy without dairy. You can also try oat milk or soy milk for a different flavor. For added richness, use nut butter, like almond or peanut butter. Yes, you can use fresh bananas. However, the texture will be different. Fresh bananas make the smoothie thinner and less creamy. Frozen bananas give you a thicker, frostier drink. If you use fresh bananas, add ice cubes for thickness. This smoothie can work as a meal replacement. It contains healthy carbs from bananas, fats from nut butter, and protein from milk. However, check your hunger needs. If you find the smoothie lacks fullness, consider adding oats or protein powder for extra nutrition. To make the smoothie more filling, add protein and fiber. Here are some ideas: - 1 scoop protein powder - 1/4 cup rolled oats - 1 tablespoon chia seeds - A handful of spinach These additions increase the smoothie’s nutritional value and keep you satisfied longer. For the full recipe, refer to the [Full Recipe]. This blog post shared a simple recipe for a delicious chocolate banana smoothie. I covered the ingredients and easy steps to blend a creamy drink. You learned tips for the perfect texture, serving ideas, and the health benefits of each ingredient. I also suggested fun variations and storage tips for leftovers. In conclusion, this smoothie is tasty, healthy, and quick to make. You can enjoy it any time. Personalize it with extra flavors or alternate ingredients. Happy blending!](https://southerndishes.com/wp-content/uploads/2025/05/240e12ac-a001-4ec9-b6a6-53ec2fc8e13d-300x300.webp)
. To keep your zucchini noodles from getting soggy, salt them. After spiralizing, sprinkle salt over the noodles and let them sit for 10 minutes. This draws out moisture. Pat the noodles dry with a clean towel before cooking. For a perfect al dente texture, cook them only for a few minutes. Add them last to the stir fry. This way, they heat up without becoming mushy. To boost flavor, consider adding spices like garlic powder or onion powder. A splash of rice vinegar can add a nice tang. You can also use sauces like teriyaki or hoisin for a different twist. For a complete meal, add protein like chicken, shrimp, or tofu. Cook the protein first, then set aside. Add it back to the stir fry before serving. A good skillet or wok makes a big difference. I recommend using a non-stick skillet for easy cooking. A wok helps with even heat and quick cooking. You’ll also need a spiralizer for your zucchini noodles. If you don’t have one, a vegetable peeler works well too. A sturdy cutting board and sharp knife are must-haves for all your chopping needs. For the full recipe, check out the Zesty Zucchini Noodle Stir Fry. {{image_2}} You can add protein to your zucchini noodle stir fry. Options include chicken, shrimp, or tofu. For chicken, cut it into small pieces. Cook it for 5-7 minutes before adding veggies. Shrimp cooks fast, needing only 3-4 minutes. If using tofu, press it to remove water. Cook it until golden, about 5-6 minutes. Feel free to swap or add veggies. Carrots, bell peppers, and snap peas work well. You can try mushrooms, zucchini, or spinach too. In summer, use fresh corn or tomatoes. In winter, choose root vegetables like squash or sweet potatoes. The key is to keep the colors bright and flavors fresh. To make this dish gluten-free, use tamari instead of soy sauce. This simple swap keeps the flavor intact. For a vegan version, replace honey with maple syrup. You can also skip any animal products altogether. Enjoy this dish while keeping it healthy and tasty! To keep your Zucchini Noodle Stir Fry fresh, store leftovers in an airtight container. Place it in the fridge right away. This dish stays good for about 3 days. After that, the zucchini may get too soft. You can freeze this stir fry, but it needs care. First, let it cool completely. Then, pack it in a freezer-safe container. Make sure to remove as much air as you can. It will last for about 2 months in the freezer. When you’re ready to eat, thaw it overnight in the fridge. Reheat in a skillet over low heat. This helps keep the texture nice. For quick meals, you can prep this dish ahead of time. Spiralize the zucchinis and chop the veggies a day before. Store them in separate containers. Keep the sauce in another container. This way, everything stays fresh. When you’re ready to cook, just combine and stir-fry! This method saves you time and keeps flavors bright. If you don’t have a spiralizer, you can still make zucchini noodles. Use a vegetable peeler to create thin strips. You can also use a box grater to shred the zucchini. Both methods work well and give you a fun noodle shape. Yes, you can use frozen vegetables. However, they may make the dish a bit soggy. Frozen veggies often lose some crunch and flavor. If you use them, cook them less than fresh vegetables. This helps keep a nice texture in your stir fry. Zucchini noodles are low in carbs and calories. They are high in vitamins and fiber. This makes them a great choice for a healthy meal. They also help you feel full without adding extra calories. Zucchini noodles are a perfect swap for traditional pasta. To boost flavor, add fresh herbs like basil or cilantro. You can also use soy sauce or tamari for saltiness. Try adding a splash of rice vinegar for tang. For heat, sprinkle in crushed red pepper flakes. These simple tips will take your stir fry to the next level. You now have everything you need to create a delicious zucchini noodle stir fry. We covered main ingredients, step-by-step cooking, and helpful tips. Remember to balance the flavors with sauces and consider adding proteins to boost nutrition. You can easily adapt the recipe to fit your taste. Keep leftovers fresh and enjoy meal prep for quick meals later. With this guide, you can impress anyone with your cooking skills and enjoy healthy eating. Dive into your stir fry adventure today!](https://southerndishes.com/wp-content/uploads/2025/06/15039ce6-94a4-42ce-85db-f411afe534ba-300x300.webp)
![- Medium head of cauliflower - All-purpose flour - Almond milk (or other plant-based milk) For Vegan Buffalo Cauliflower Tacos, the main stars are simple yet flavorful. You need a medium head of cauliflower. This adds a great texture and taste. Combine it with one cup of all-purpose flour. This flour helps create a crispy coating. Next, grab one cup of almond milk or any plant-based milk. This milk makes the batter creamy and smooth. - Garlic powder - Onion powder - Smoked paprika - Buffalo sauce (vegan) Now, it's time to amp up the flavor. Use garlic powder and onion powder for that savory kick. A bit of smoked paprika adds a warm, smoky taste. Finally, don't forget the star of the dish: buffalo sauce. Ensure it’s vegan so everyone can enjoy. - Corn tortillas - Avocado - Red cabbage - Fresh cilantro - Lime wedges For the perfect taco, use soft corn tortillas. They hold all the goodness well. Slice up an avocado for creaminess. Shredded red cabbage adds crunch. Fresh cilantro brings a burst of fresh flavor. Lastly, serve with lime wedges. A squeeze of lime enhances all the tastes. You can find the full recipe above to create these exciting tacos. Enjoy each step and savor the flavors! 1. Preheat the oven and prepare the baking sheet. Start by preheating your oven to 450°F (230°C). Line a baking sheet with parchment paper. This step makes cleanup easier and helps the cauliflower not to stick. 2. Make the batter using flour, almond milk, and seasonings. In a bowl, whisk together 1 cup of all-purpose flour, 1 cup of almond milk, 1 teaspoon of garlic powder, 1 teaspoon of onion powder, 1 teaspoon of smoked paprika, and 1/2 teaspoon of salt. Mix until you have a smooth batter. This batter will give the cauliflower a tasty coat. 1. Coat cauliflower florets in the batter. Dip each cauliflower floret in the batter. Make sure each piece is fully covered. Place them on the baking sheet in a single layer. 2. Bake until crispy and golden. Bake the cauliflower in the preheated oven for 20-25 minutes. Flip them halfway through. You want them crispy and golden brown. This texture is key for a great taco. 1. Toss baked cauliflower in buffalo sauce. Once your cauliflower is done baking, toss it in a bowl with 1/2 cup of buffalo sauce. Make sure every floret is well coated for that spicy kick. 2. Warm tortillas and assemble with toppings. Warm 8 corn tortillas in a dry skillet for about 30 seconds on each side. Place a few pieces of buffalo cauliflower on each tortilla. Top with shredded red cabbage, sliced avocado, and fresh cilantro. Don't forget to serve with lime wedges for a fresh burst of flavor. For the complete recipe, check out the [Full Recipe]. To get that perfect crispy cauliflower, start by preheating your oven to 450°F (230°C). This high temperature helps the cauliflower florets turn golden brown. Bake them for 20 to 25 minutes. Flip them halfway through to ensure even crispiness. The key is in the batter. Make sure each floret gets fully coated. This coating locks in moisture while creating a crunchy outer layer. You can easily amp up the flavor of your buffalo sauce. Try adding more spices like cayenne pepper for extra heat, or smoked paprika for a deeper flavor. If you want a milder sauce, mix in a little maple syrup or vegan butter. This will balance the heat and add a sweet touch. Serving your tacos in a fun way makes them more enjoyable. Try stacking the tacos in a tall holder or arrange them on a colorful plate. Add bright garnishes like fresh cilantro or lime wedges. You can also serve them with a side of vegan ranch dressing for dipping. For a complete meal, pair these tacos with a light salad or roasted veggies. For the full recipe, check out the earlier section. {{image_2}} You can switch up the protein in your tacos. Adding lentils or chickpeas boosts the nutrition and flavor. They are full of protein and fiber. Just cook them until tender and use them as a filling. You can also add other vegetables. Roasted bell peppers or zucchini work great. They add color and taste. Feel free to mix and match veggies based on what you like. Buffalo sauce is a classic choice, but you can try other sauces too. A creamy avocado dressing or tangy barbecue sauce adds a fun twist. You can even make your own buffalo sauce. Just mix hot sauce with melted vegan butter and a touch of garlic. This gives you control over the heat and flavor. Play around to find what you enjoy most. If you want a gluten-free meal, it’s easy to adapt. Swap all-purpose flour with gluten-free flour. This works well in the batter. For the tortillas, choose gluten-free corn tortillas. They are widely available and taste great. Always check the label to make sure they are gluten-free. These changes make the tacos safe and tasty for everyone. Try these variations to create a meal that fits your taste and needs. Enjoy exploring flavors and textures in your Vegan Buffalo Cauliflower Tacos! For the full recipe, check out the complete guide above. To keep your Vegan Buffalo Cauliflower Tacos fresh, store the components separately. Place the leftover cauliflower in an airtight container. Keep the tortillas and toppings, like cabbage and avocado, in separate containers. This prevents sogginess. For the best taste, eat the leftovers within three days. If you want to freeze some parts, freeze the baked cauliflower in a single layer on a baking sheet. Once frozen, transfer it to a freezer-safe bag. This way, you can enjoy it later. To reheat the baked cauliflower, use an oven. Preheat it to 350°F (175°C). Place the cauliflower on a baking sheet and heat for about 10 minutes. This keeps it crispy. For the tacos, warm the tortillas in a skillet for about 30 seconds on each side. You can also heat the cauliflower in the microwave, but it may become soft. Stored tacos last about three days in the fridge. After that, they may spoil. Check for any signs of spoilage. Look for changes in color or a bad smell. If you notice these signs, it’s best to throw them away. For more details, check out the Full Recipe for Vegan Buffalo Cauliflower Tacos. Vegan Buffalo Cauliflower Tacos are tasty and fun to eat. They feature crispy cauliflower florets coated in spicy buffalo sauce. Each taco uses corn tortillas as a base. You can add toppings like avocado and red cabbage for crunch. Fresh cilantro adds a nice touch, and lime wedges give a burst of flavor. This dish is perfect for anyone who loves bold flavors and a plant-based twist. Yes, you can prepare these tacos ahead of time. You can bake the cauliflower and toss it in buffalo sauce. Store the baked cauliflower in the fridge for up to three days. When you're ready to eat, warm the cauliflower and tortillas. You can also chop and store the toppings in separate containers. This way, you can enjoy fresh tacos in no time. Yes, these tacos have a spicy kick from the buffalo sauce. If you want less heat, you can adjust the spice level. Try using a milder buffalo sauce or mix it with a bit of plant-based yogurt. This way, you keep the flavor while making it more mild. It's all about finding that perfect balance for your taste buds. You can easily make this recipe gluten-free. Substitute all-purpose flour with a gluten-free flour blend. Make sure to choose gluten-free corn tortillas as well. This way, you can enjoy the tacos without worrying about gluten. Always check the labels to ensure all ingredients are safe for your diet. These tacos pair well with many side dishes. Consider serving them with a fresh salad or roasted vegetables. You might enjoy a side of rice or quinoa for added texture. For drinks, try a light beer or a refreshing soda. You can also serve a cool drink like iced tea for a nice balance. This blog post explored how to make delicious vegan buffalo cauliflower tacos. We covered the main ingredients, seasonings, and garnish options. You learned step-by-step instructions for preparation, baking, and assembling the tacos. Tips for achieving the best flavors and presentation ideas were highlighted. These tacos are fun to make and offer tasty variations. Store leftovers properly, and enjoy them later with simple reheating tips. Explore this dish, and enjoy great flavors today!](https://southerndishes.com/wp-content/uploads/2025/07/a54db73a-bcf9-4e7b-a43f-20f45eb2624a-300x300.webp)
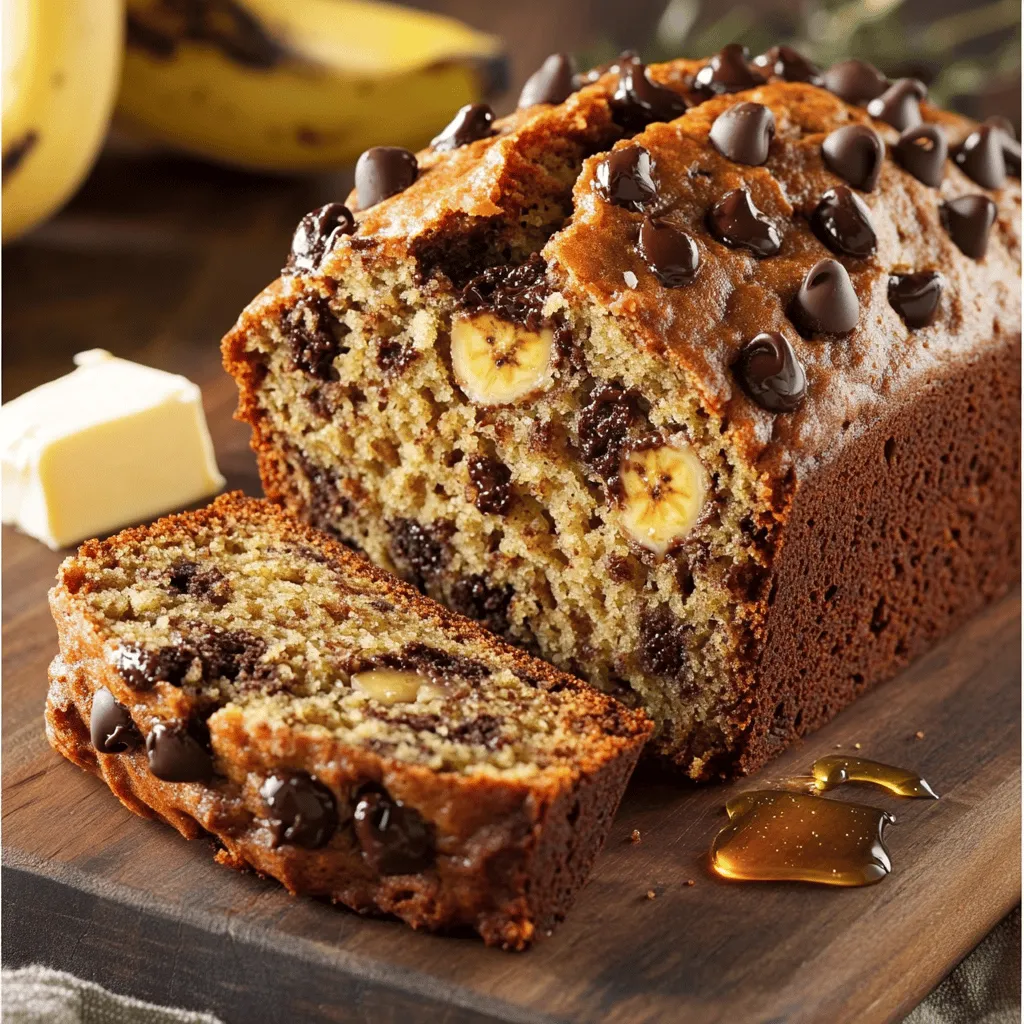
Chocolate Chip Banana Bread Simple and Delicious Recipe
If you love the sweet smell of fresh-baked bread, you’re in the right place! This Chocolate Chip Banana Bread is easy to make and…