


Latest & Greatest

Banana Bread Overnight Oats Easy and Healthy Recipe
Are you ready to kickstart your mornings with a delicious twist? My Banana Bread Overnight Oats recipe combines the sweet
Read more…
Cheesy Spinach Artichoke Dip Irresistible Party Snack
If you’re searching for the perfect party snack, look no further! My Cheesy Spinach Artichoke Dip is creamy, tangy, and
Read more…
Savory Oatmeal with Fried Egg Quick Flavor Boost
Are you ready to elevate your breakfast game? This Savory Oatmeal with Fried Egg will do just that! Packed with
Read more…
Homemade Salsa Verde Fresh and Flavorful Recipe
Ready to add a burst of flavor to your meals? Homemade Salsa Verde is fresh, vibrant, and easy to make!
Read more…
Chocolate Avocado Mousse Rich and Creamy Delight
Dive into the rich and creamy world of Chocolate Avocado Mousse! This dessert is not only delicious but also incredibly
Read more…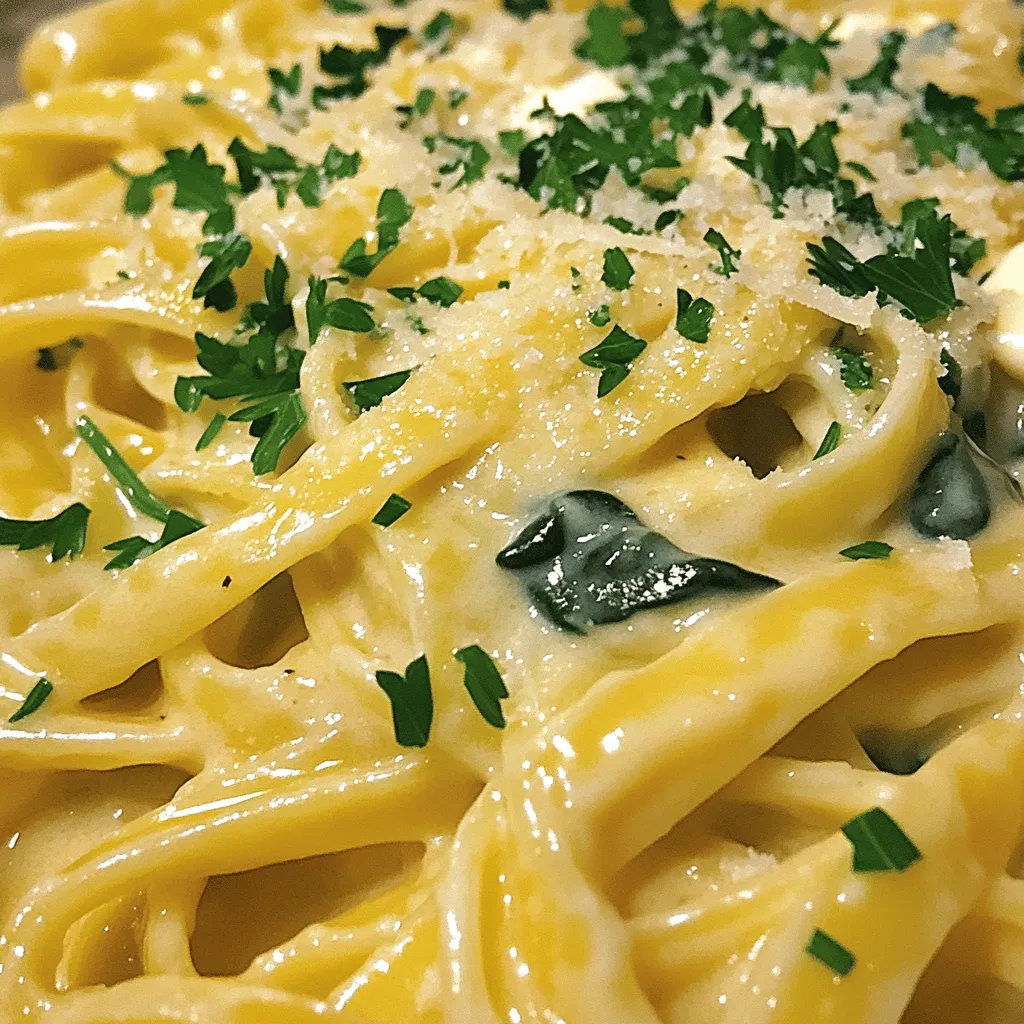
Creamy Garlic Parmesan Pasta Rich and Flavorful Dish
Craving a cozy dish that bursts with savory flavor? You’ve found it! My Creamy Garlic Parmesan Pasta is your new
Read more…
Nutritious Stuffed Bell Peppers with Quinoa Recipe
Looking for a healthy, tasty meal? My Nutritious Stuffed Bell Peppers with Quinoa recipe is perfect for you! Packed with
Read more…
Lemon Blueberry Muffins Irresistible Breakfast Treat
Looking for the perfect breakfast treat? These Lemon Blueberry Muffins are a must-try! Bright lemon flavor meets sweet, juicy blueberries
Read more…browse recipes


![For a great creamy tomato basil soup, you need key ingredients. Each one adds flavor and texture. Here’s what you’ll need: - 2 tablespoons olive oil - 1 medium onion, chopped - 3 cloves garlic, minced - 1 carrot, diced - 2 cans (14 oz each) fire-roasted diced tomatoes - 4 cups vegetable broth - 1 tablespoon sugar (optional, to balance acidity) - 1 teaspoon dried basil - 1 cup heavy cream (or coconut cream for a vegan option) - 1/4 cup fresh basil leaves, chopped - Salt and pepper to taste - Croutons and fresh basil leaves for garnish These ingredients work together to create a rich and comforting soup. The fire-roasted tomatoes add a smoky depth that brightens the dish. You can customize your soup with extra ingredients. Consider these add-ins for a twist: - A pinch of red pepper flakes for heat - A splash of balsamic vinegar for tang - Cooked pasta for heartiness - Spinach or kale for added nutrition These additions can make your soup uniquely yours. They can enhance the flavor and even add some fun textures. Don’t worry if you lack some items. You can swap them for other ingredients easily. Here are some ideas: - Use canola oil or butter instead of olive oil. - If you don’t have onion, try shallots or leeks. - For vegetable broth, use chicken broth for a different taste. - Heavy cream can be replaced with milk or a non-dairy milk for a lighter option. These substitutes can help you make this soup without any stress. You can still enjoy a tasty bowl of creamy tomato basil soup! If you want the complete recipe, check out the Full Recipe. Start by gathering all your ingredients. Use fresh produce to boost flavor. Heat the olive oil in a large pot over medium heat. Add the chopped onion and sauté for about 5 minutes. The onion should become soft and clear. Next, stir in the minced garlic and diced carrot. Cook these for another 3 minutes to bring out their taste. Now, add the fire-roasted diced tomatoes and vegetable broth. If you like, toss in the sugar to balance the acidity. Sprinkle in the dried basil and bring the mix to a boil. Once boiling, lower the heat and let it simmer for 20 minutes. This allows the flavors to blend well. After simmering, take the pot off the heat. Now, it’s time to blend the soup. You can use an immersion blender right in the pot. If you don’t have one, pour the soup into a regular blender in batches. Blend until the soup is smooth and creamy. This step makes the soup feel rich and comforting. Put the pot back on low heat. Stir in the heavy cream and let it warm for about 5 minutes. Do not let it boil again. This keeps the cream rich and silky. Next, fold in the fresh basil leaves. Taste the soup and add salt and pepper as needed. When ready, ladle the soup into bowls. Top each bowl with croutons and more fresh basil leaves. This adds a nice crunch and fresh flavor. For the full recipe, check the link above. Enjoy your creamy tomato basil soup! To make your creamy tomato basil soup really sing, start by using fire-roasted tomatoes. They add a deep, rich flavor. Sauté the onion and garlic well. This step brings out their natural sweetness. Don't rush this; let them soften and caramelize a bit. Adding a touch of sugar can help balance the acidity from the tomatoes. Fresh basil is key, too. Add it at the end for a bright, fresh taste. If you want a hint of spice, consider a pinch of red pepper flakes. Let your soup cool down before storing it. This prevents extra steam and keeps it fresh. Store it in an airtight container in the fridge. It will last about three to four days. When reheating, do so gently over low heat. Stir often to avoid burning. If the soup seems too thick, add a splash of vegetable broth or cream to bring it back. Serve your creamy tomato basil soup with crusty bread or grilled cheese sandwiches. This combo makes for a comforting meal. You can also top the soup with croutons for a crunchy texture. A sprinkle of extra basil adds a nice touch. For a gourmet twist, drizzle some balsamic glaze over the top. Each bite will be flavorful and satisfying. For the full recipe, check out the link provided. {{image_2}} To make a vegan and gluten-free version of creamy tomato basil soup, swap the heavy cream for coconut cream. This keeps the soup rich and creamy while being plant-based. Use vegetable broth to ensure it is gluten-free. Check your canned tomatoes to confirm they are gluten-free, as some brands may add gluten-containing ingredients. You can also add blended cashews for extra creaminess. Just soak them in water for a few hours, then blend them into the soup. If you like a kick, add some heat! You can mix in red pepper flakes or a diced jalapeño when cooking the onion and carrot. This brings a nice warmth to the soup. Another option is to stir in a bit of sriracha or hot sauce just before serving. Adjust the heat level to your taste. This spicy twist makes the soup exciting and vibrant. Kids may prefer a milder flavor. To make it kid-friendly, cut back on the garlic and basil. You can also blend the soup until it is super smooth. This helps with any texture issues. If you want to add sweetness, a little sugar can balance the acidity of the tomatoes. Serve it with fun-shaped croutons to make it more appealing. This way, even the pickiest eaters may enjoy it! For the complete recipe, check out the [Full Recipe]. After enjoying your creamy tomato basil soup, you may have some left. To keep it fresh, let the soup cool at room temperature first. Then, transfer it to an airtight container. Be sure to seal it well. Store it in the fridge for up to four days. If you want it to last longer, freeze it instead. Freezing is a great way to keep your soup tasty. Pour the cooled soup into freezer-safe containers or bags. Leave some space at the top since the soup will expand when frozen. Label each container with the date. You can freeze it for up to three months. When you want to use it, just take it out of the freezer and let it thaw in the fridge overnight. To reheat your soup, pour it into a pot. Warm it on low heat, stirring often. This way, it heats evenly and does not stick to the pot. If the soup seems too thick, add a splash of broth or water. You can also reheat it in the microwave. Use a microwave-safe bowl and heat in short bursts, stirring in between. This keeps the soup creamy and delicious. For the best taste, always serve it warm and fresh. For the full recipe, check the section above. Canned tomatoes are often fire-roasted and seasoned. They add depth to the soup. Fresh tomatoes can taste bright and lively but may need more time to cook. If you use fresh tomatoes, blend them well to avoid lumps. Canned tomatoes save time and give a rich flavor. I recommend using canned for ease and taste. Yes, you can use almond milk as a lighter option. It will change the flavor slightly. Almond milk is not as rich as cream, but it still works well. For a creamier texture, try coconut cream instead. It adds flavor and keeps it rich and thick. Just add it in the same way as cream. To lower calories, reduce or skip the cream. Use vegetable broth instead of cream. You can also cut back on the oil. Add more veggies like zucchini or spinach. They will add volume without many calories. This way, you keep the soup filling and tasty while cutting calories. In this blog post, we covered how to make creamy tomato basil soup. We discussed key ingredients, cooking steps, and tips for the best flavor. You can even explore variations like vegan or spicy options. Remember to store leftovers safely and follow reheating tips for great taste. With these guidelines, you can craft a delicious soup everyone will love. Enjoy experimenting and making this recipe your own!](https://southerndishes.com/wp-content/uploads/2025/06/819dbc63-f451-47bc-8f8a-0925955b7929.webp)
Creamy Tomato Basil Soup Flavorful and Easy Recipe
Craving a warm bowl of comfort? My Creamy Tomato Basil Soup recipe is simple, tasty, and perfect for any meal. Packed with fresh flavors…
My Latest Desserts
My Latest Recipes

hey,
i’m !
I’m so happy you’re here!
My kitchen is filled with stories, flavors, and love and I’m so happy to share them with you. Here’s to dishes that feel like home.


![To make a tasty Vegetable Lo Mein, gather these items: - 8 oz lo mein noodles - 2 tablespoons sesame oil - 1 cup broccoli florets - 1 bell pepper, thinly sliced (any color) - 1 carrot, julienned - 1 cup snap peas - 4 green onions, chopped - 3 cloves garlic, minced - 1-inch piece ginger, grated - 3 tablespoons soy sauce - 1 tablespoon oyster sauce (vegetarian version) - 1 tablespoon hoisin sauce - Salt and pepper to taste - Sesame seeds for garnish Using fresh vegetables makes your lo mein colorful and full of flavor. I love adding: - Broccoli for crunch and nutrients. - Bell peppers add sweetness and color. - Carrots provide a nice texture. - Snap peas bring a lovely snap. - Green onions give a great bite. Feel free to mix and match your favorites. Use seasonal veggies for the best taste. You need some basic tools to make your Vegetable Lo Mein. Here’s what I recommend: - A large skillet or wok for even cooking. - A pot for boiling noodles. - A sharp knife for slicing veggies. - A cutting board for safe prep. With these tools and ingredients, you can create a dish that shines. For the full recipe, check out the details above. Enjoy your cooking! First, gather your lo mein noodles. Measure out 8 ounces for this dish. Bring a pot of water to a boil. Add the noodles, cooking them according to the package instructions. This usually takes about 3 to 5 minutes. Taste them to see if they are just right. Drain the noodles and set them aside. Toss them in 1 tablespoon of sesame oil. This helps to keep them from sticking. Next, get your large skillet or wok. Heat the remaining 1 tablespoon of sesame oil over medium-high heat. Add 3 cloves of minced garlic and 1-inch grated ginger. Cook these for about 1 minute until you smell their nice aroma. Now, add your vegetables: 1 cup of broccoli florets, 1 thinly sliced bell pepper, 1 julienned carrot, and 1 cup of snap peas. Stir-fry these for about 5 to 7 minutes. You want them to be tender but still a bit crisp. Once your vegetables are ready, add the cooked lo mein noodles to the skillet. Toss in 4 chopped green onions as well. Now it's time for flavor! Pour in 3 tablespoons of soy sauce, 1 tablespoon of vegetarian oyster sauce, and 1 tablespoon of hoisin sauce. Stir-fry everything together for another 3 to 4 minutes. Make sure all the noodles and veggies are well coated in sauce. Finally, season with salt and pepper to taste. Serve your delicious Vegetable Lo Mein hot, garnished with sesame seeds. For full details, check the Full Recipe. To get the best lo mein noodles, start with boiling water. Use plenty of water to keep the noodles from sticking. Cook them for about 3-4 minutes until they are al dente. Drain the noodles and toss them with a bit of sesame oil. This step keeps them from clumping together. Flavoring your lo mein is all about the sauce. Use soy sauce, oyster sauce, and hoisin sauce to create a rich taste. You can adjust these sauces based on your liking. Add fresh garlic and ginger for an aromatic kick. If you want more heat, toss in some red pepper flakes. Serve your Vegetable Lo Mein hot and fresh. Garnish with sesame seeds and green onions for a nice touch. You can add a side of spring rolls or dumplings for extra flavor. This meal pairs well with a light salad or steamed vegetables. Check the Full Recipe for more details on preparation and serving. {{image_2}} You can boost your Vegetable Lo Mein by adding protein. Chicken, shrimp, or tofu work well. Cook your chosen protein in the skillet before adding vegetables. This step gives the dish extra flavor. For a vegan option, use firm tofu. Just cube it and sauté until golden. If you need a gluten-free meal, use rice noodles instead of lo mein noodles. They have a similar texture and taste great. Be sure to check your sauces for gluten. Tamari is a great gluten-free soy sauce option. This way, everyone can enjoy the dish. To make a low-carb version, skip the noodles and use zucchini noodles or cauliflower rice. Spiralize zucchini for a fun twist. Cauliflower rice adds volume and keeps the dish light. Toss in vegetables like bell peppers and snap peas for crunch. This keeps the meal satisfying without the carbs. For the complete recipe, check out the [Full Recipe]. To keep your Vegetable Lo Mein fresh, store it in an airtight container. Make sure it cools down first. This way, you prevent moisture buildup. Place it in the fridge if you plan to eat it within three days. If you want it to last longer, consider freezing. When you're ready to enjoy leftovers, reheat them gently. Use a skillet over medium heat for the best results. Add a splash of water or soy sauce to keep it moist. Stir often to heat evenly. You can also use a microwave, but cover the bowl to keep the steam in. If you choose to freeze your Vegetable Lo Mein, let it cool completely first. Portion it into freezer-safe bags or containers. Remove as much air as possible to prevent freezer burn. It can last up to three months in the freezer. Just thaw it overnight in the fridge before reheating. Enjoy your delicious meal whenever you want with these simple storage tips! To make Vegetable Lo Mein vegetarian, use plant-based sauces. In this dish, we already use vegetarian oyster sauce and soy sauce. If you want a deeper flavor, add more hoisin sauce. All the veggies, like broccoli and bell pepper, are naturally vegetarian. You can enjoy a colorful and tasty meal without meat. If you can't find lo mein noodles, you have options. You can use spaghetti or thin rice noodles. These substitutes cook quickly and still taste great. You can also try zoodles, made from zucchini, for a low-carb option. The key is to cook them until they are just right. Yes, you can prepare Vegetable Lo Mein in advance. Cook the noodles and veggies, then store them separately. When you're ready to eat, just mix them together and heat. This helps keep the noodles from getting mushy. You can also enjoy leftovers. They will still taste great the next day. For the full recipe, check out the Veggie Delight Lo Mein. You learned about making delicious Vegetable Lo Mein. We covered all the key ingredients needed. I explained how to cook the noodles and veggies step by step. You got great tips for perfecting your dish and ideas for fun variations. Lastly, I shared how to store and reheat your Lo Mein. With this guide, you can create a tasty meal that fits your needs. Enjoy your cooking adventure!](https://southerndishes.com/wp-content/uploads/2025/05/cbe49cf4-1444-4d9d-a134-0053912c4ce8-300x300.webp)
Honey Butter Skillet Cornbread Warm and Tasty Treat
If you love warm, tasty treats, you will adore my Honey Butter Skillet Cornbread! This easy recipe combines sweet honey, fresh corn, and buttery…