


Latest & Greatest

Spicy Buffalo Cauliflower Bites Flavorful Game Changer
Are you ready to spice up your snack game? These Spicy Buffalo Cauliflower Bites are a crispy, flavor-packed treat perfect
Read more…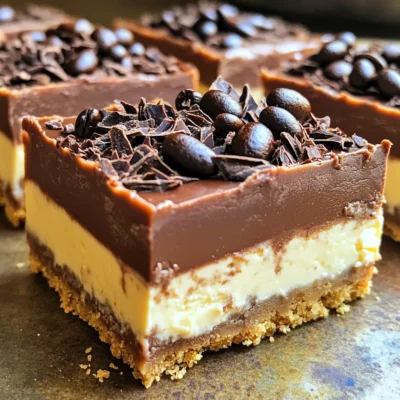
No-Bake Mocha Espresso Cheesecake Bars Delight
Are you ready to treat yourself to something decadent and delicious? No-Bake Mocha Espresso Cheesecake Bars are the perfect mix
Read more…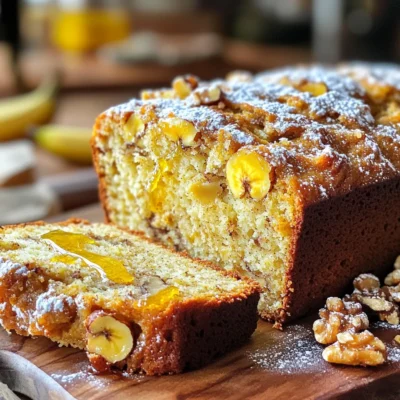
High-Protein Cottage Cheese Banana Bread Delight
If you love banana bread but want a protein boost, you’re in for a treat! This High-Protein Cottage Cheese Banana
Read more…
One-Pot Creamy Cajun Chicken Alfredo Delightful Meal
Craving a tasty meal that’s easy to make? Dive into my One-Pot Creamy Cajun Chicken Alfredo. This dish blends creamy
Read more…
Cinnamon Swirl Coffee Cake Muffins Delightful Recipe
Welcome to the world of delicious baking with my Cinnamon Swirl Coffee Cake Muffins! You’ll learn how to create warm,
Read more…
Slow Cooker Sweet Potato Black Bean Chili Recipe
If you’re craving a warm, filling dish, try my slow cooker sweet potato black bean chili! This recipe is easy,
Read more…
No Bake Salted Caramel Energy Bites Delightful Snack
Craving a tasty snack that fuels your day? Look no further than these No Bake Salted Caramel Energy Bites! Packed
Read more…
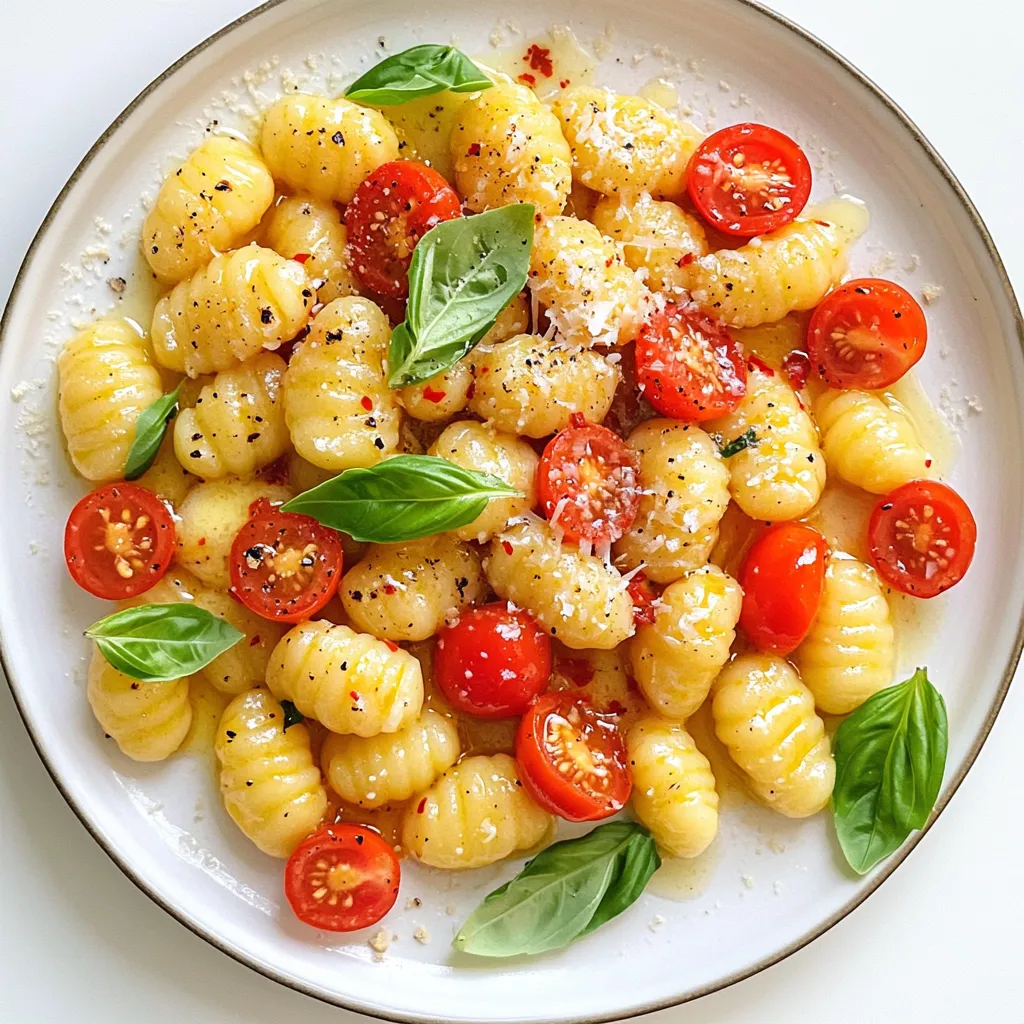
Sheet Pan Crispy Gnocchi Fall Veggies Delight
Get ready to delight your taste buds with my Sheet Pan Crispy Gnocchi Fall Veggies Delight! This easy recipe combines
Read more…browse recipes


Minute Garlic Butter Gnocchi Simple and Quick Recipe
Are you craving a quick, delicious meal? Look no further than this Minute Garlic Butter Gnocchi recipe! In just a few simple steps, you…
My Latest Desserts
My Latest Recipes

hey,
i’m !
I’m so happy you’re here!
My kitchen is filled with stories, flavors, and love and I’m so happy to share them with you. Here’s to dishes that feel like home.

![- 2 ripe avocados - 4 slices of whole grain bread - 4 large eggs To make tasty avocado toast, you need ripe avocados. Ripe avocados are soft and ready to mash. Whole grain bread adds fiber and crunch. It’s best to use a good-quality bread. Large eggs will become the star of the dish. They will poach nicely and add protein. - 1 tablespoon white vinegar - 1 teaspoon red pepper flakes - Juice of 1 lemon White vinegar helps the eggs hold their shape while poaching. It makes a big difference! Red pepper flakes add heat and flavor. You can adjust the amount based on your taste. Fresh lemon juice brightens the avocado mix. It adds a zesty kick you will love. - Feta cheese - Microgreens - Fresh herbs Optional toppings can elevate your avocado toast. Feta cheese adds a creamy and salty touch. Microgreens bring a fresh crunch and color. Fresh herbs, like cilantro or parsley, will add extra flavor. You can mix and match to find your favorite combination. For the full recipe, check out the [Full Recipe]. To start, take four slices of whole grain bread. Place the slices in a toaster or on a baking sheet. Toast until the bread is golden and crisp, which usually takes about 3 to 5 minutes. Keep an eye on it. You want it just right—not too dark. Next, grab two ripe avocados. Cut them in half and scoop out the flesh into a bowl. Use a fork to mash the avocado until it’s creamy but still a bit chunky. This adds texture. Squeeze in the juice of one lemon. Add salt and pepper to taste. For a kick, mix in one teaspoon of red pepper flakes. This will make your avocado mix flavorful. Now, let’s poach the eggs. Fill a medium saucepan with water and add one tablespoon of white vinegar. Bring the water to a gentle simmer over medium heat. Crack each egg into a small bowl. Stir the water to create a gentle whirlpool. Carefully slide each egg into the water one at a time. Poach for about 3 to 4 minutes. The whites should be set, but the yolk should remain runny. Once done, use a slotted spoon to lift the eggs out. Place them on a plate lined with paper towels. This helps soak up the extra water and keeps them from getting soggy. Now, spread the creamy avocado mixture generously on each slice of toasted bread. Top each avocado toast with a poached egg. For extra flavor, sprinkle some red pepper flakes on top. You can also garnish with fresh cilantro or parsley. If you like, crumble some feta cheese or add microgreens for a tasty touch. Enjoy your delicious creation! For a complete guide, check out the Full Recipe. To make great avocado toast, you need ripe avocados. Here are some signs to look for: - They should feel slightly soft when you squeeze them gently. - The skin color can vary from green to dark purple, depending on the type. - Check the stem; if it comes off easily and is green underneath, the avocado is ripe. When it comes to storage, keep unripe avocados at room temperature. Once ripe, store them in the fridge to slow down the ripening process. Use them within a few days for the best taste. Poaching an egg can be tricky. Here are some common mistakes to avoid: - Don't let the water boil too hard. It should be a gentle simmer. - Avoid adding too many eggs at once; it can crowd the pot. For perfect poached eggs, follow these steps: 1. Add a tablespoon of white vinegar to the simmering water. This helps the egg whites stay together. 2. Crack the egg into a small bowl first. This makes it easier to slide into the water. 3. Create a gentle whirlpool in the water before adding the egg. This helps shape the egg as it cooks. Cook for about 3-4 minutes. The whites should be firm, but the yolk should still be runny. Make your avocado toast look beautiful. Here’s how: - Spread mashed avocado evenly on the toast, leaving some edges visible. - Carefully place the poached egg on top, making sure it’s centered. - Sprinkle red pepper flakes and fresh herbs for color and flavor. For a brunch spread, pair your toast with: - Fresh fruit like berries or melon. - A light salad with mixed greens and a simple vinaigrette. For the full recipe, check out the [Full Recipe]. Enjoy your meal! {{image_2}} You can choose different types of bread for your avocado toast. Sourdough is chewy and has a tangy taste. Whole grain bread adds a nutty flavor and more fiber. Both options work well with avocado. If you need gluten-free bread, many brands offer tasty choices. Look for gluten-free whole grain or sourdough options. They can still give you that perfect crunch. Adding spices or herbs can make your avocado mix exciting. Try mixing in garlic powder, cumin, or paprika for a kick. Fresh herbs like basil or dill also add freshness. Cheese can take your toast to the next level. Feta cheese adds a salty flavor. You can also try goat cheese or ricotta for creaminess. Each cheese brings its own unique taste. Seasonal ingredients can brighten up your avocado toast. In spring, add fresh radishes or peas for crunch. In summer, try diced tomatoes or peaches for sweetness. For a cozy winter twist, sprinkle roasted squash or sautéed kale on top. During the fall, add apple slices or pomegranate seeds for a festive flair. This approach makes your avocado toast not just a meal, but a celebration of flavors. You can find the Full Recipe to experiment with all these variations. To keep your leftover avocado fresh, prevent browning. First, squeeze lemon juice on it. The acid slows down the browning process. Next, store it in an airtight container. You can also cover it tightly with plastic wrap. Press the wrap directly onto the flesh. This keeps air out and helps maintain freshness. It is best to eat assembled toast right away. The bread can get soggy if stored. If you must store it, keep the avocado and toast separate. Wrap each slice of bread in foil or plastic. For the avocado, use the lemon juice method mentioned earlier. When you are ready to eat, assemble the toast for the best taste. To reheat toast, use a toaster or an oven. Avoid microwaving, as it makes the bread chewy. For the oven, preheat it to 350°F (175°C). Place the toast on a baking sheet. Heat for about 5-7 minutes until warm. This keeps the texture nice and crisp. If you have leftover poached eggs, reheat them gently in warm water. This method helps maintain their delicate texture. Enjoy your flavorful avocado toast with poached egg! For the full recipe, check out the earlier section. To poach an egg well, start with fresh eggs. Use a pot with water. Add a splash of white vinegar to help the egg hold its shape. Heat the water until it simmers, not boils. Create a whirlpool with a spoon. Crack the egg into a small bowl, then gently slide it into the water. Poach the egg for about 3-4 minutes. The white should be firm, and the yolk should be soft. Using a slotted spoon, take it out and let it drain on a paper towel. You can make your avocado toast healthier by using whole grain bread. Whole grain has more fiber and nutrients. Add extra veggies like spinach or tomatoes for vitamins. You can also skip the feta cheese or use a smaller amount. Try using less oil or butter when toasting your bread. Squeeze more lemon juice into your avocado for flavor without many calories. Yes, you can prepare parts of your avocado toast ahead of time. You can mash the avocado a few hours before, but it may turn brown. To stop this, add extra lemon juice. You can also toast the bread in advance and store it in an airtight container. Just put it in the toaster again to warm it up. Poach the eggs right before serving for the best taste and texture. Many toppings can enhance your avocado toast. Some popular options include: - Feta cheese - Microgreens - Sliced radishes - Cherry tomatoes - Smoked salmon - Sriracha sauce - Fresh herbs like cilantro or parsley These add flavor and make your dish look amazing! For the full recipe, check out the details above. Avocado toast is simple and amazing. You need ripe avocados, whole grain bread, and eggs. Adding lemon juice and red pepper flakes brings flavor to life. Don't forget to try toppings like feta cheese or microgreens. Remember to choose ripe avocados for the best taste. Poaching eggs can be tricky, but with practice, you'll master it. You can make many variations too! Store leftovers wisely to enjoy later. Get creative and enjoy every bite of your avocado toast!](https://southerndishes.com/wp-content/uploads/2025/06/f6103c06-328c-4f20-9757-2b75894c094f-300x300.webp)

![To make this delicious treat, gather these simple ingredients: - 24 Oreo cookies (plus extra for garnish) - 1/4 cup unsalted butter, melted - 16 oz cream cheese, softened - 1/2 cup powdered sugar - 1 teaspoon vanilla extract - 1 1/2 cups heavy whipping cream - 1/2 cup crushed Oreo cookies (for the filling) These ingredients work together to give you a rich and creamy cheesecake. The Oreo cookies add a wonderful crunch and flavor. The cream cheese creates that smooth texture we all love. You can add some fun garnishes to make your cheesecake shine: - Whole Oreo cookies - Whipped cream - Chocolate sauce - Crushed Oreos These add-ons make your dessert look fancy. They also enhance the taste. I love using whole Oreos on top. It makes each slice feel special. Here’s what you need to make your cheesecake: - 9-inch springform pan - Food processor or plastic bag and rolling pin - Mixing bowls - Electric mixer - Spatula - Plastic wrap Having the right tools makes the process easy. A springform pan helps you remove the cheesecake easily. A food processor saves time when crushing the cookies. You’ll be amazed at how simple it is to whip this up with the right gear. For the full recipe, check out the details above. Start with 24 Oreo cookies. Crush them in a food processor. Aim for fine crumbs. Add 1/4 cup of melted unsalted butter to the crumbs. Mix until it looks like wet sand. Grab a 9-inch springform pan. Press this mixture into the bottom of the pan firmly. Make sure it's even. Pop it in the fridge while you work on the filling. In a large bowl, beat 16 oz of softened cream cheese. Use an electric mixer at medium speed. Mix until it’s creamy and smooth. Slowly add 1/2 cup of powdered sugar. Add 1 teaspoon of vanilla extract too. Keep mixing until it’s all combined. In a separate bowl, whip 1 1/2 cups of heavy cream. You want stiff peaks, so don’t overwhip. Now, fold this whipped cream into the cream cheese mixture. Do this gently until no streaks remain. Finally, fold in 1/2 cup of crushed Oreo cookies to add a nice crunch. Take the crust out of the fridge. Spoon the cream cheese filling over the crust. Use a spatula to smooth the top. Cover the pan with plastic wrap. Let it chill in the fridge for at least 4 hours. For best results, let it rest overnight. When it's set, take it out of the springform pan. Decorate the top with whole Oreos and more crushed Oreos for a fun look. Now, you’re ready to slice and serve! Whipping cream is key for a light cheesecake. Start with very cold heavy cream. Use a clean bowl and beaters to help it whip better. Beat on medium speed until soft peaks form. Watch closely; stop once you see stiff peaks. Overwhipping can turn it into butter. A well-set cheesecake is creamy and firm. Make sure to chill it for at least four hours. Overnight is even better. The cold helps it set nicely. Avoid opening the fridge often; it can change the temperature. Use a springform pan for easy removal, too. Presentation makes your cheesecake shine. Cut clean slices with a hot knife for neat edges. Serve on individual plates for a gourmet feel. Drizzle with chocolate sauce or add whipped cream on top. Garnish with whole Oreo cookies or crushed Oreos for a fun touch. For more ideas, check the Full Recipe. {{image_2}} You can easily change the flavor of your no-bake Oreo cheesecake. Try adding mint extract for a fresh twist. Use just a tiny amount, about 1/4 teaspoon. Chocolate lovers can mix in cocoa powder for a richer taste. You can also fold in peanut butter for a nutty surprise. Each of these options will give your dessert a fun new flavor. If you want to mix things up, use other cookies for the crust. Chocolate sandwich cookies work well if you want a similar taste. You could try vanilla wafers for a lighter flavor. Graham crackers also make a great base. Each choice will create a different taste and texture for your cheesecake. You can turn your cheesecake into parfaits for a fun twist. Layer the cheesecake filling in cups with crushed Oreos. Start with a layer of filling, then add cookies, and repeat. This makes a great dessert for parties or gatherings. Each person can have their own cup, which is easy to serve. You can even top it with whipped cream for extra flair. For the full recipe, check the [Full Recipe] link. To keep your No-Bake Oreo Cheesecake fresh, cover it tightly with plastic wrap. This keeps air out and prevents it from drying. Store it in the fridge. It stays good for about 4-5 days. If you want to save some for later, you can freeze the cheesecake. First, let it set in the fridge. Then, slice it into pieces. Wrap each slice in plastic wrap. Place the wrapped slices in a freezer-safe bag or container. It can last for about 1-2 months in the freezer. To thaw, just move it to the fridge for a few hours or overnight before serving. The best containers for storing your cheesecake are airtight ones. A glass container with a lid works great. You can also use a plastic food storage container. Make sure the lid closes tightly to keep your cheesecake safe and fresh. For the best taste, try to eat it within a week or two. This easy and delicious dessert is perfect for sharing or enjoying all by yourself! For the full recipe, click here: [Full Recipe]. Yes, you can make this cheesecake ahead of time. In fact, it tastes better when chilled overnight. Prepare it a day before your event for the best flavor. Just cover it in plastic wrap and keep it in the fridge. This will let all the flavors blend well. Plus, it saves you time on the day of your party. If you need a cream cheese substitute, try Greek yogurt. It gives a nice tang and creamy texture. You can also use mascarpone cheese for a richer taste. Just keep in mind that the flavor might change a little. Each option can make your cheesecake unique, so choose what you like best. To stop your cheesecake from cracking, beat the cream cheese well. Make sure it is smooth and free of lumps. Also, avoid overmixing once you add the whipped cream. This keeps air out. Lastly, let it chill slowly in the fridge. A sudden temperature change can cause cracks. Follow these tips for a perfect, smooth cheesecake. You learned how to make a no-bake Oreo cheesecake using simple steps. From the crust to the filling, each part adds great taste. I shared tips for perfecting your whip and serving. You can try fun flavors and easy storage ideas to keep your cheesecake fresh. Remember, this treat is simple and fun to make. With these steps, you can impress friends and family. Enjoy your cheesecake journey; each bite will be worth it!](https://southerndishes.com/wp-content/uploads/2025/06/fa3f156b-a0db-4e75-b27f-f7062925fcaa-300x300.webp)
Caramel Apple Monkey Bread Irresistible and Easy Treat
Are you craving a sweet and sticky treat that’s as fun to make as it is to eat? Look no further! Caramel Apple Monkey…
. Caramel Apple Monkey Bread is a fun and tasty treat. We dove into the key ingredients, tools, and detailed steps to make this delightful dish. I shared tips to enhance your baking, and variations to keep things fresh. Remember, you can swap ingredients for dietary needs or seasonal flavors. Store your leftovers well and enjoy them later. Whether you serve it warm with ice cream or at holiday gatherings, this recipe is sure to please. Now, it’s time to get baking and make some delicious memories!](https://southerndishes.com/wp-content/uploads/2025/05/0c135fee-9d51-4ad5-98f2-35f175b50ee6.webp)
