Latest & Greatest
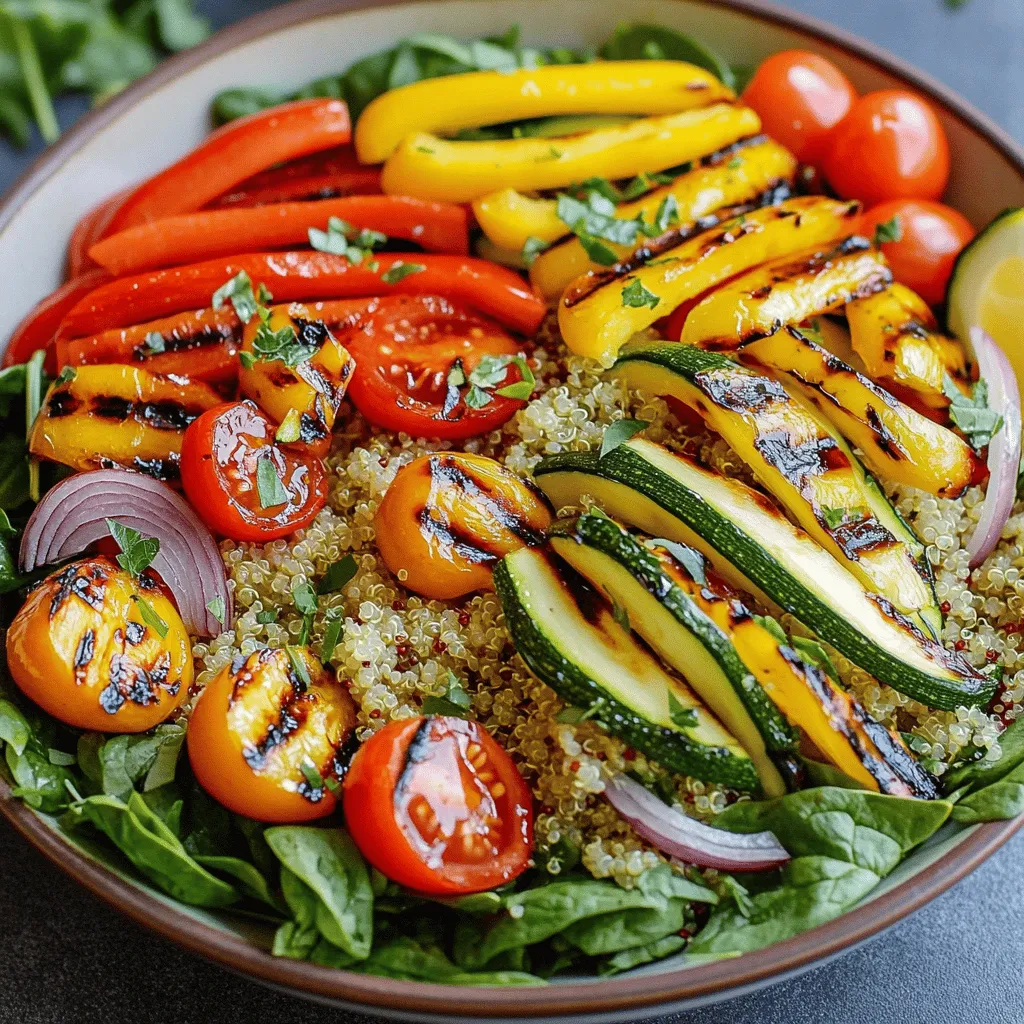
Grilled Vegetable and Quinoa Salad Fresh and Zesty Dish
If you’re looking for a fresh, healthy dish that bursts with flavor, you’ve found it! This Grilled Vegetable and Quinoa
Read more…
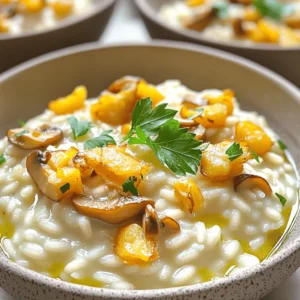
Instant Pot Creamy Mushroom Risotto Simple Delight
Are you ready to whip up a hearty dish that is both easy and tasty? My Instant Pot Creamy Mushroom
Read more…
Teriyaki Chicken Bowls with Rice Delicious Dinner Idea
Looking for a quick and tasty dinner idea? Teriyaki chicken bowls with rice could be your new favorite! This dish
Read more…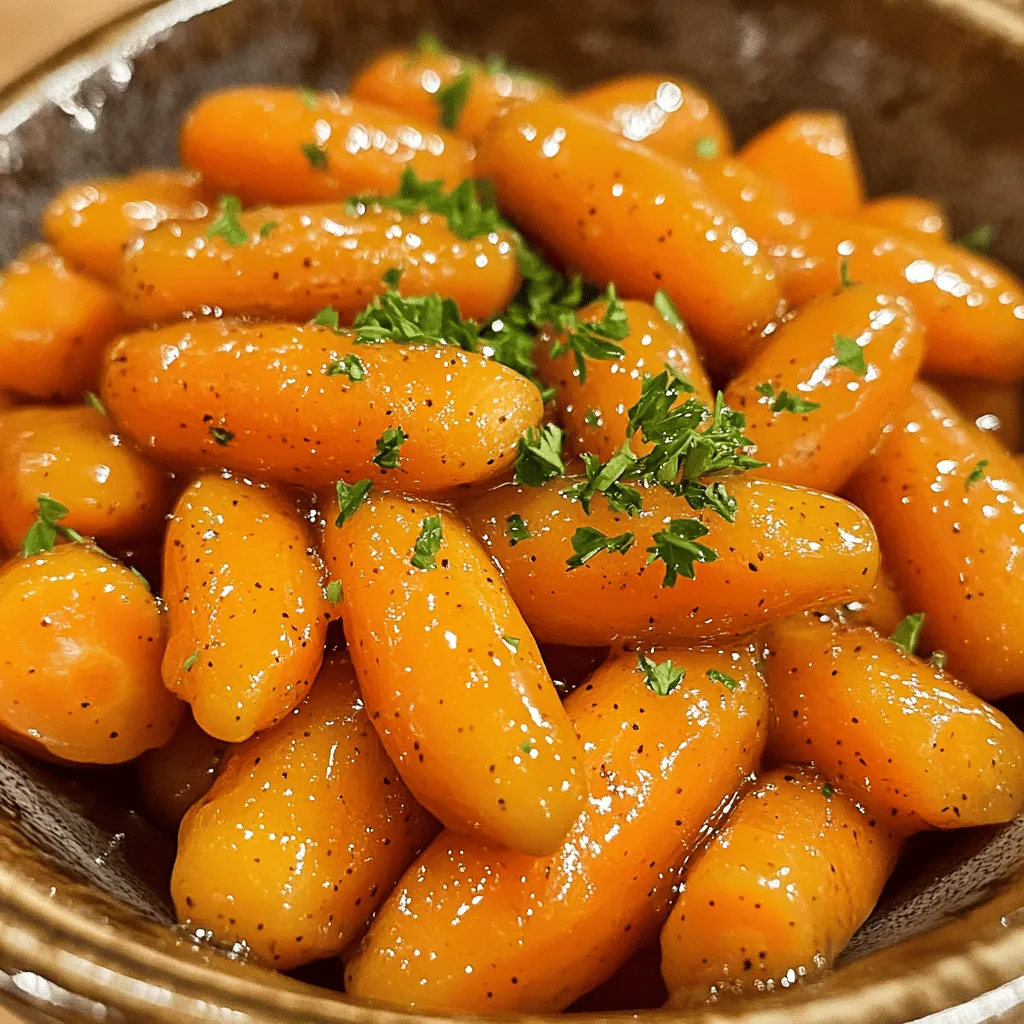
Honey Mustard Glazed Carrots Tasty Side Dish Recipe
Looking for a new side dish that adds flavor to your meal? Honey mustard glazed carrots are your answer! This
Read more…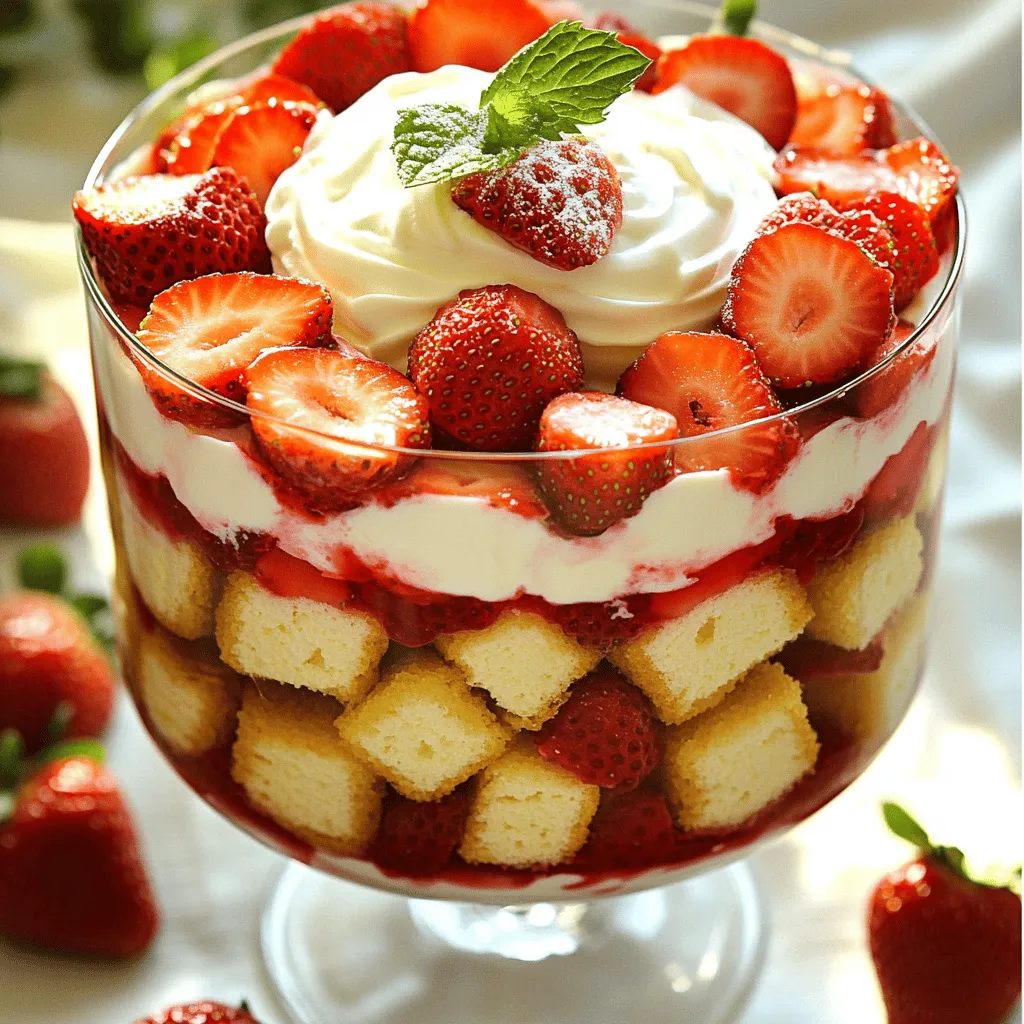
Strawberry Shortcake Trifle Delightful Layered Dessert
Are you ready to make a dessert that will leave everyone wanting more? Strawberry Shortcake Trifle combines fresh strawberries, soft
Read more…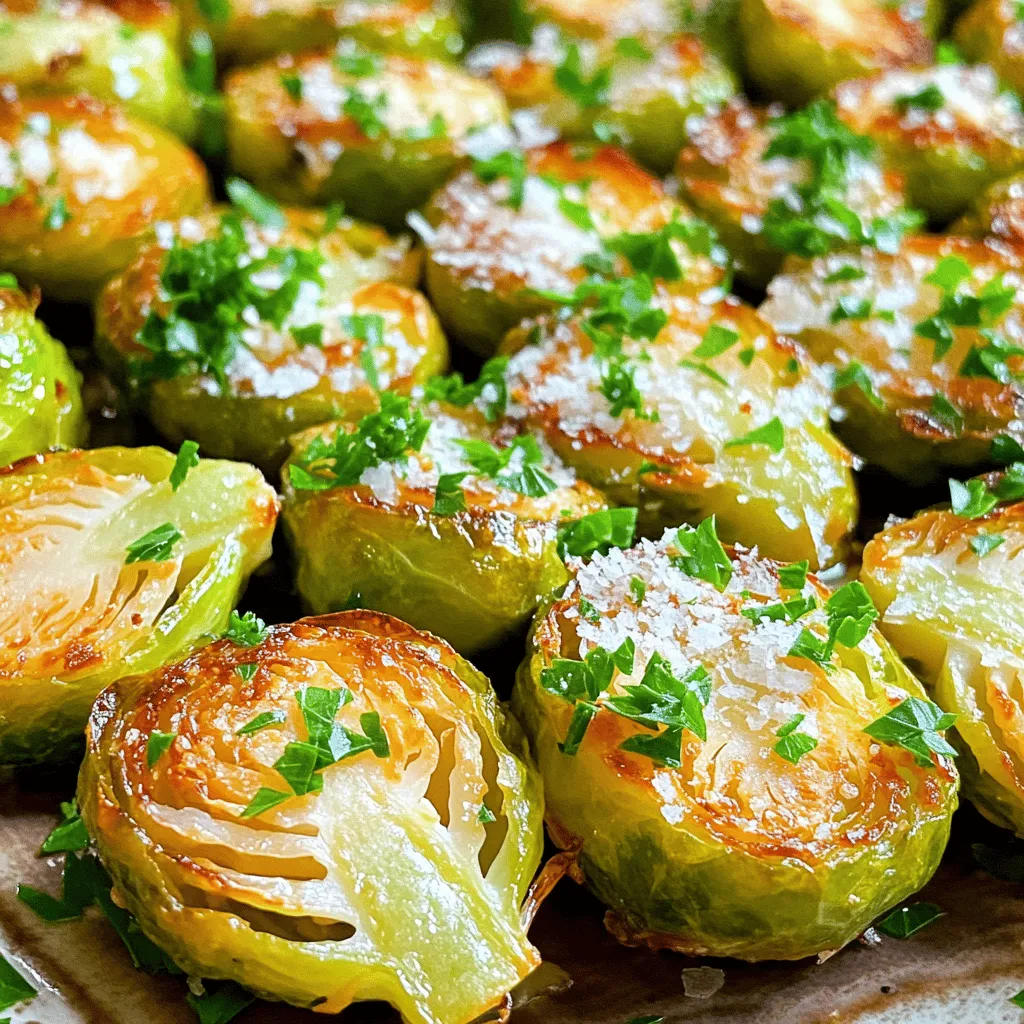
Garlic Parmesan Roasted Brussels Sprouts Savory Treat
Get ready to fall in love with a new side dish! These Garlic Parmesan Roasted Brussels Sprouts will change how
Read more…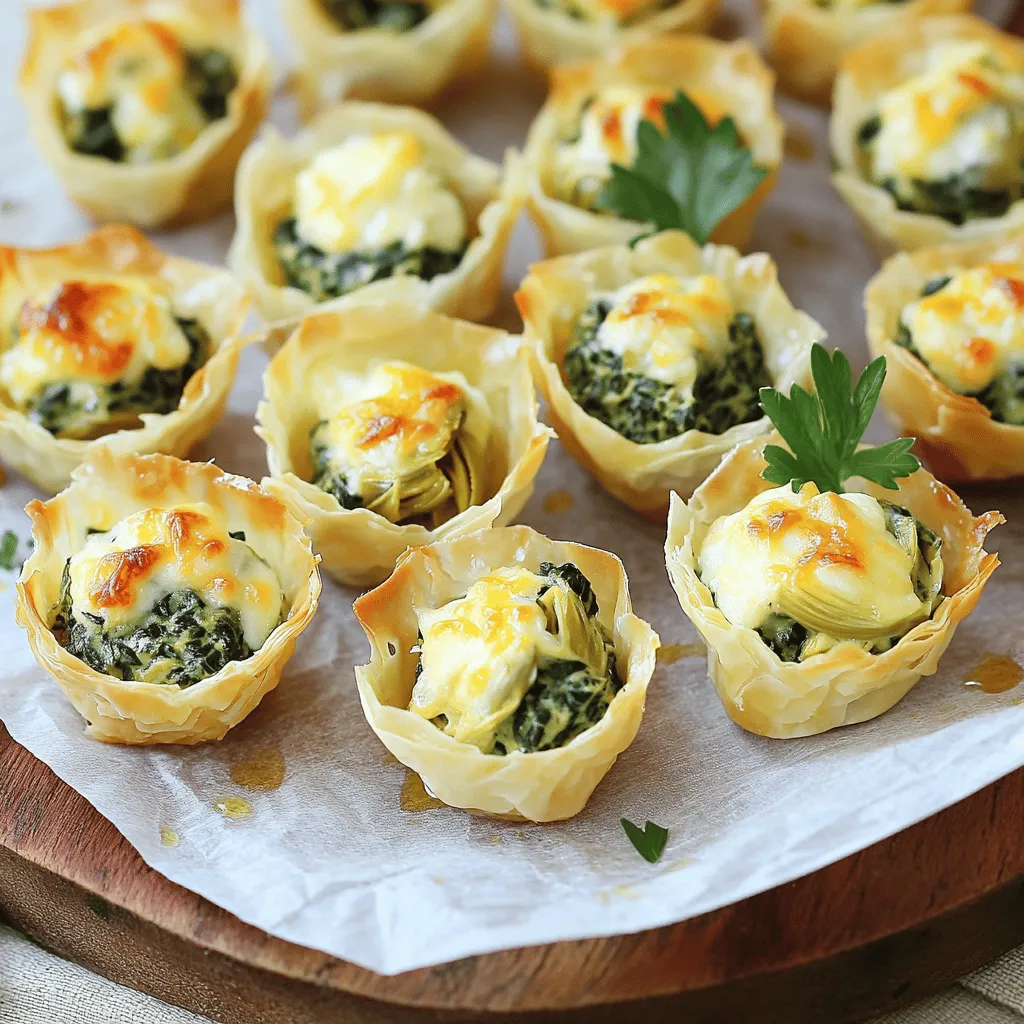
Spinach Artichoke Dip Bites Tasty and Simple Appetizer
Looking for a crowd-pleasing appetizer that is both tasty and simple? These Spinach Artichoke Dip Bites are just what you
Read more…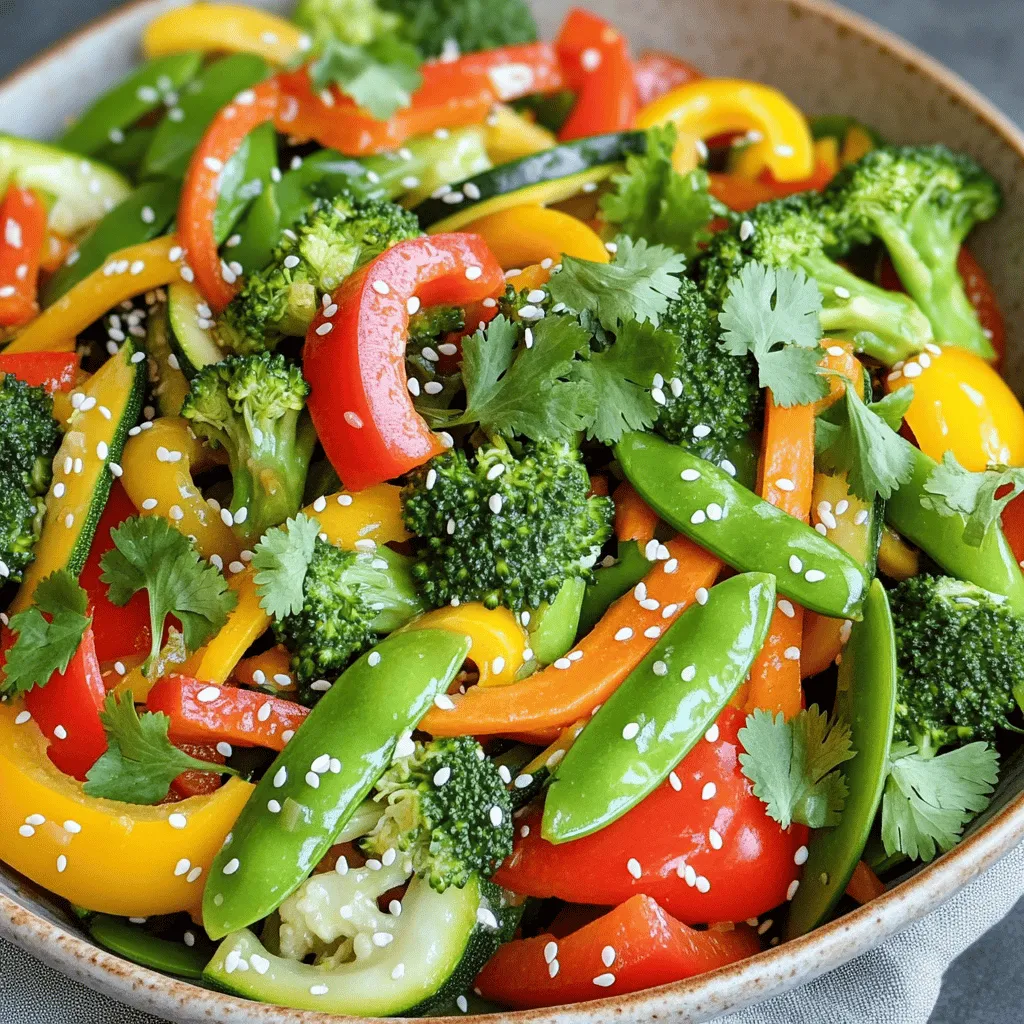
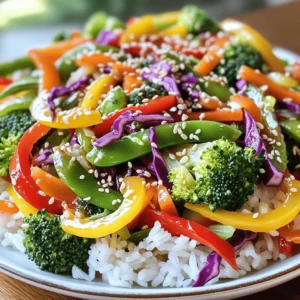
Quick and Easy Vegetable Stir Fry Tasty and Healthy Meal
Looking for a quick and tasty meal? You’re in the right place! My Quick and Easy Vegetable Stir Fry is
Read more…browse recipes


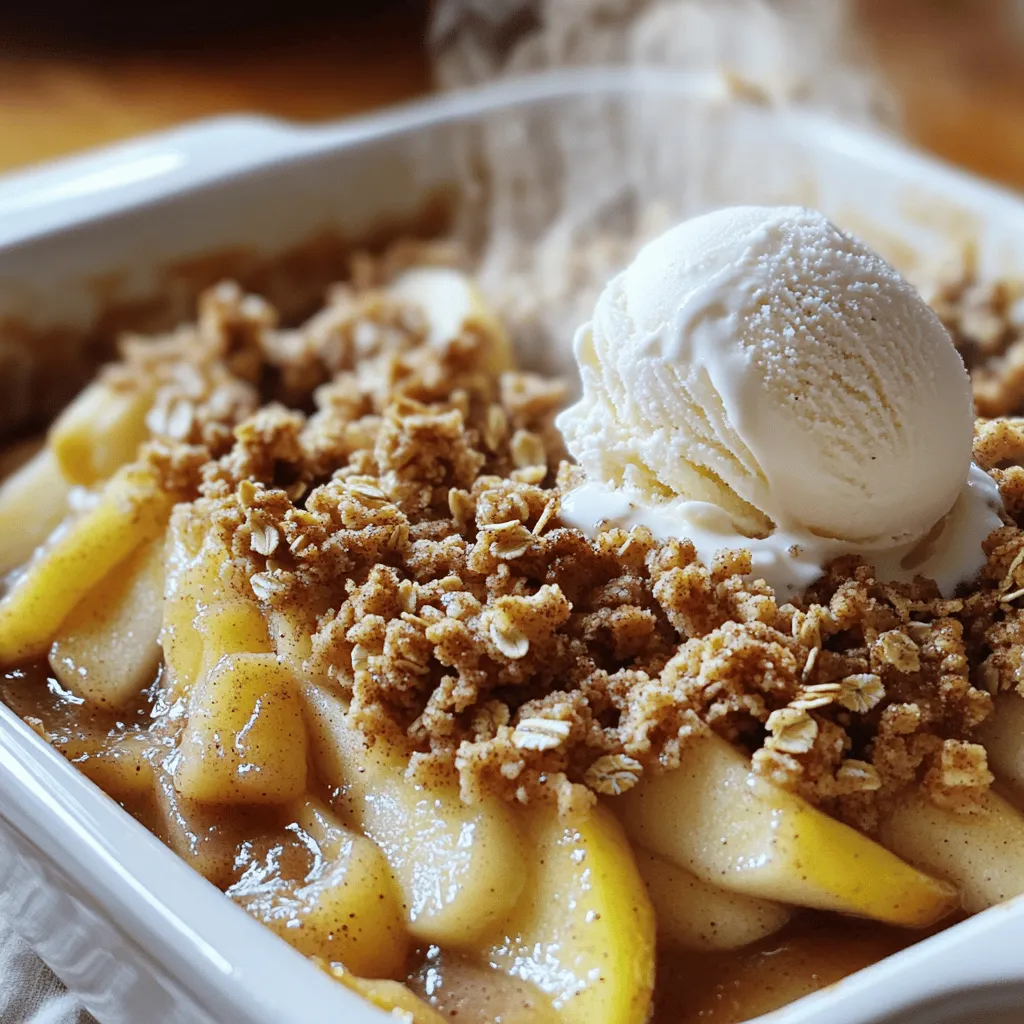
Apple Crisp with Oat Topping Irresistible Dessert Idea
Craving a warm, sweet treat? Let’s dive into the world of Apple Crisp with Oat Topping. This classic dessert combines tart apples, cozy spices,…
My Latest Desserts
My Latest Recipes

hey,
i’m !
I’m so happy you’re here!
My kitchen is filled with stories, flavors, and love and I’m so happy to share them with you. Here’s to dishes that feel like home.
![- 1 cup silken tofu, drained - 1/2 cup dairy-free dark chocolate chips - 1/4 cup maple syrup - 1 tablespoon vanilla extract - 1 pinch of sea salt - 1 tablespoon cocoa powder (optional) - Fresh berries and mint leaves for garnishing 1. Silken Tofu: This soft tofu is rich in protein and low in calories. It helps create a smooth texture. 2. Dairy-Free Dark Chocolate Chips: These chips add antioxidants and healthy fats. They also provide a rich chocolate flavor. 3. Maple Syrup: A natural sweetener that contains minerals like manganese and zinc. It gives the mousse a nice sweetness. 4. Vanilla Extract: Adds flavor and may have antioxidant properties. It enhances the taste of chocolate. 5. Sea Salt: A pinch of salt helps balance sweetness and brings out the chocolate flavor. 6. Cocoa Powder: This optional ingredient boosts chocolate flavor and adds fiber. It may also provide antioxidants. 7. Fresh Berries and Mint: These toppings add vitamins, minerals, and freshness to your dessert. - Tofu: Use avocado for a creamy texture if you cannot have soy. - Chocolate Chips: Look for carob chips if you have a chocolate allergy. - Maple Syrup: Agave syrup or brown rice syrup can replace maple syrup. - Vanilla Extract: If allergic, try using an equal amount of almond extract. - Cocoa Powder: Unsweetened carob powder can be a good substitute for cocoa. For the full recipe, check out the [Full Recipe]. To make vegan chocolate mousse, start with melting the dairy-free dark chocolate chips. You can use a microwave or a double boiler. If using the microwave, heat the chips in short bursts of 30 seconds. Stir between heats to prevent burning. For the double boiler, fill a pot with water and place a bowl on top. Heat until the chocolate melts slowly. Once the chocolate is melted, let it cool a bit. In a blender, add the drained silken tofu, melted chocolate, maple syrup, vanilla extract, sea salt, and cocoa powder if you want more depth. Blend on high for 1-2 minutes. Scrape the sides of the bowl to mix well. The goal is a smooth, creamy texture. After blending, taste the mousse. If you want it sweeter, add more maple syrup, then blend briefly to mix. Spoon the mousse into serving glasses. Chill these in the fridge for at least 30 minutes. It will set better the longer it chills. When melting chocolate, the key is low heat. Too much heat can burn the chocolate. If using the microwave, stir often. This helps distribute the heat evenly. If you see any lumps, keep stirring. For the double boiler, keep the water simmering, not boiling. Boiling can splash water into the chocolate, which ruins its texture. For the best mousse, blend until smooth. If your blender struggles, add a splash of plant milk to help it along. This will make it easier to blend. Scrape down the sides often to ensure even mixing. The mousse should be light and fluffy at the end. If you want to make it extra creamy, blend a little longer. To get that perfect, creamy texture, start with silken tofu. It blends smoothly and gives the mousse a rich mouthfeel. After melting the chocolate, let it cool slightly before adding it to the blender. If the chocolate is too hot, it can cook the tofu, leading to a grainy texture. Blend the mixture until it is silky and lump-free. If it seems too thick, add a splash of plant milk for a lighter mousse. One common mistake is not draining the tofu well. Extra water can make the mousse runny. Always press the tofu gently to remove excess liquid. Another mistake is overheating the chocolate. If you melt it too quickly, it can burn and lose flavor. Stir often during melting to keep it smooth. Lastly, remember to taste your mousse before chilling it. You can adjust the sweetness with more maple syrup if needed. You can make this mousse even more exciting! Try adding a spoonful of espresso or a dash of cinnamon for depth. Want more chocolate flavor? Add cocoa powder to the mix. Fresh fruit like raspberries or strawberries can brighten the taste. Use vanilla bean for a richer aroma. Don't forget to top your mousse with berries or mint for a beautiful finish. For the full recipe, check the earlier section. {{image_2}} You can swap maple syrup with other sweeteners. Agave syrup works well and is light. Coconut sugar offers a caramel-like taste. Both options blend in easily for sweetness. Get creative with flavors in your mousse. Adding a shot of espresso boosts the chocolate taste. Vanilla bean brings a warm, rich flavor. You can also try a hint of almond extract for a nutty twist. The type of chocolate changes your mousse. Dairy-free dark chocolate gives a rich taste. White chocolate offers a sweeter, creamier option. You can even mix dark and milk chocolate for balance. For the full recipe, check out the complete guide to Vegan Chocolate Mousse. To keep your vegan chocolate mousse fresh, store it in an airtight container. This helps prevent any odors from the fridge from affecting the taste. Make sure to chill it right after you prepare it. Avoid leaving it out at room temperature for too long. Your mousse will last about 3 to 5 days in the fridge. The longer it sits, the firmer it may get. I recommend checking the texture each day. If it seems too firm, you can give it a quick stir before serving. You can freeze vegan chocolate mousse for up to 2 months. Use a freezer-safe container for storage. When you want to eat it, thaw it in the fridge overnight. Avoid using a microwave, as it can change the texture. For best results, enjoy the mousse fresh! For the full recipe, check out the section above. Vegan chocolate mousse is made from simple, plant-based ingredients. The main ingredient is silken tofu, which gives the mousse its creamy texture. You will also need dairy-free dark chocolate chips for rich flavor. Maple syrup adds sweetness, while vanilla extract enhances the taste. A pinch of sea salt balances the flavors, and cocoa powder adds extra richness if you like. Yes, vegan chocolate mousse can be a healthy dessert option. It uses whole ingredients, which provide nutrients. Silken tofu is high in protein and low in calories. Dark chocolate contains antioxidants, which are good for your heart. Maple syrup has some vitamins and minerals, making it a better option than refined sugar. While it's still a treat, it offers some health benefits compared to traditional mousse. You can make vegan chocolate mousse without tofu by using avocados instead. Avocados provide creaminess and healthy fats. Simply blend ripe avocados with melted dark chocolate, maple syrup, and vanilla extract. Adjust the sweetness to your taste. This version is rich and creamy, just like the original. Yes, you can definitely make vegan chocolate mousse ahead of time. It needs to chill for at least 30 minutes to set properly. You can prepare it the day before and store it in the fridge. Just cover the serving glasses or bowls with plastic wrap to keep them fresh. You can serve vegan chocolate mousse with a variety of toppings. Fresh berries like raspberries or strawberries add a nice burst of flavor. Mint leaves also provide a refreshing touch. Whipped coconut cream can add extra creaminess. You can even add crushed nuts for a bit of crunch. Check the Full Recipe for more ideas! This blog post covers everything you need for vegan chocolate mousse. You learned about the key ingredients and their health benefits. You also found tips for cooking, blending, and avoiding common mistakes. We explored variations with sweeteners and flavors, plus how to store your mousse properly. In the end, enjoy experimenting with this creamy treat. Its flexibility allows you to tailor it to your taste. Get ready to impress with your delicious and healthy dessert!](https://southerndishes.com/wp-content/uploads/2025/07/bb18acba-6e4f-433b-b214-bb060cb9d9c6-300x300.webp)

![To make this dish, you will need: - 4 large sweet potatoes, peeled and diced - 1/2 cup maple syrup - 1/4 cup unsalted butter, melted - 1/2 cup milk (or almond milk for a dairy-free option) - 1 teaspoon vanilla extract - 1/2 teaspoon cinnamon - 1/4 teaspoon nutmeg - 1/2 teaspoon salt - 1 cup chopped pecans - 1/2 cup brown sugar - 1/4 cup all-purpose flour - 1/2 cup mini marshmallows (optional) You can easily swap some ingredients for dietary needs. Use almond milk or oat milk to make it dairy-free. If you need a nut-free version, skip the pecans and try sunflower seeds instead. For extra flavor, consider adding: - A handful of cranberries for a tart twist - A sprinkle of ginger for warmth - Chopped apples for a fruity crunch You can also use coconut sugar instead of brown sugar for a different sweetness. These options let you customize the casserole to suit your taste! For the full recipe, check out the complete cooking guide. 1. Prepping the sweet potatoes: Start by peeling and dicing four large sweet potatoes. This step is key. Diced potatoes cook faster and mash easier. Place them in a large pot and cover them with salted water. Boil for about 15-20 minutes. You want them tender but not mushy. Drain and set them aside to cool slightly. 2. Combining wet and dry ingredients: In a big mixing bowl, mash the sweet potatoes until smooth. Then, add the following: - 1/2 cup melted butter - 1/2 cup milk (or almond milk) - 1/2 cup maple syrup - 1 teaspoon vanilla extract - 1/2 teaspoon cinnamon - 1/4 teaspoon nutmeg - 1/2 teaspoon salt Mix everything well. You want a creamy, delicious mixture. 1. Layering the casserole: Spread the sweet potato mix evenly in a greased 9x13 inch baking dish. This ensures even cooking. 2. Tips for achieving the perfect bake: In a separate bowl, mix the following for the topping: - 1 cup chopped pecans - 1/2 cup brown sugar - 1/4 cup all-purpose flour - A pinch of salt Stir this together until it's well mixed. Sprinkle this topping over the sweet potatoes. If you like, add 1/2 cup mini marshmallows on top for extra sweetness. Bake in a preheated oven at 350°F (175°C) for 25-30 minutes. Look for a golden brown topping and toasted marshmallows. Let the casserole cool for a few minutes before serving. This dish is sure to impress! For a complete guide, check the Full Recipe. To make your Maple Pecan Sweet Potato Casserole shine, follow these tips. - Preventing Watery Casserole: To avoid excess liquid, drain your sweet potatoes well after boiling. Do not skip this step. If you want, you can mash them and let them sit for a few minutes. This extra time helps any water escape. - Even Cooking: Ensure your sweet potatoes are cut into uniform pieces. This helps them cook evenly. A consistent size means no hard or mushy spots. When prepping this dish, keep these mistakes in mind. - Prep Mistakes: Always peel your sweet potatoes. Unpeeled potatoes can lead to a tough texture. Also, measure your ingredients carefully. Too much sugar or flour can change the taste. - Best Practices for Measurements: Use dry measuring cups for flour and sugar. Level off the top with a knife. For liquids, use a liquid measuring cup. This ensures you get the right amount every time. These simple tips can make a big difference in your casserole. Happy cooking! {{image_2}} You can easily switch up this dish to fit your needs. If you want a nut-free version, simply skip the pecans. You can replace them with crispy breadcrumbs. This adds a nice crunch without the nuts. For a vegan twist, use almond milk instead of regular milk. You can also swap out the butter for coconut oil. This keeps the same creamy texture while making it plant-based. Adding seasonal fruits can make this dish even better. Try mixing in some fresh cranberries for a tart kick. Their bright color also looks great in the casserole. You could also include diced apples. They add sweetness and a nice crunch. If you want to spice things up for fall, add a bit more cinnamon and nutmeg. You can even throw in some ginger for an extra zing. These flavors really shine in the cooler months. For more details, check out the Full Recipe. To keep your Maple Pecan Sweet Potato Casserole fresh, follow these simple steps: - Refrigerating: Place leftovers in an airtight container. They stay fresh for about three to four days in the fridge. - Freezing: For longer storage, freeze it. Use a freezer-safe container. It can last up to three months in the freezer. When ready to eat, you can thaw it in the fridge overnight. Reheating your casserole is easy. Here’s how to do it: - Oven Method: Preheat your oven to 350°F (175°C). Place the casserole in the oven for about 20-25 minutes, or until heated through. Cover it with foil to keep the top from burning. - Microwave Method: If you’re in a hurry, use the microwave. Heat in short bursts, about 1-2 minutes at a time. Stir between heating to ensure even warmth. To keep the texture and flavor, avoid overheating. Make sure it’s warm, not hot. Enjoy the rich taste just like the first time! What can I serve with this casserole? You can serve this casserole with roast turkey or glazed ham. It pairs well with green beans or a fresh salad, too. The sweet flavor of the casserole complements savory dishes nicely. Can I make this dish ahead of time? Yes, you can prepare the casserole a day in advance. Just store it in the fridge after assembling. When ready, bake it straight from the fridge, adding a few extra minutes to the baking time. How do I fix a runny casserole? If your casserole is runny, try adding more flour or pecans to the topping. This will help absorb excess liquid. You can also bake it longer to let some moisture evaporate. Can I substitute sweet potatoes with yams? You can use yams instead of sweet potatoes. However, yams are starchier and may change the texture slightly. The flavor will still be delicious, so don’t worry! For the full recipe for Maple Pecan Sweet Potato Casserole, check out the [Full Recipe]. This blog post covered everything you need for Maple Pecan Sweet Potato Casserole. You learned the essential and optional ingredients, plus helpful preparation and baking tips. I shared common pitfalls to watch for and ways to store and reheat leftovers. You can make this dish in many ways, so anyone can enjoy it, no matter their diet. With these insights, you can create a delicious casserole that satisfies everyone. Now, it’s time to gather your ingredients and get cooking!](https://southerndishes.com/wp-content/uploads/2025/07/1b37208a-e46f-4bd8-a90f-61a269cd5fb4-300x300.webp)
Easy Peach Crisp Simple and Delicious Dessert Recipe
Looking for a quick and tasty dessert? This Easy Peach Crisp recipe is your answer! With fresh peaches, a crunchy topping, and simple ingredients,…
![- Fresh peaches: 4 cups, peeled and sliced - Lemon juice: 1 tablespoon - Rolled oats: 1 cup - All-purpose flour: ½ cup - Brown sugar: ½ cup - Cinnamon: ½ teaspoon - Nutmeg: ¼ teaspoon - Salt: ½ teaspoon - Unsalted butter: ⅓ cup, melted - Chopped pecans (optional): ¼ cup For this recipe, ripe peaches are key. They should be sweet and juicy. The lemon juice brightens the flavor and helps the peaches shine. The topping combines oats, flour, and spices for that perfect crunch. This recipe contains common allergens like gluten and dairy. If you need gluten-free options, use gluten-free oats and flour. For vegan substitutions, replace the butter with coconut oil or vegan butter. This makes the dish suitable for many diets. You can switch the sweetener if you like. Coconut sugar or maple syrup works well instead of brown sugar. For nut lovers, try walnuts or almonds as a tasty alternative to pecans. Each change can give the dish a unique twist. For the full recipe, check the [Full Recipe]. 1. Preheat your oven to 350°F (175°C). This step is key for a tasty crisp. 2. Grab a medium bowl and mix the sliced peaches with lemon juice. This keeps the peaches bright and adds flavor. Toss them well and set aside. 1. In a large bowl, combine rolled oats, flour, brown sugar, cinnamon, nutmeg, and salt. Mix these dry ingredients well. 2. Pour in the melted butter and stir until the mix becomes crumbly. This is crucial for that crunchy topping. 3. If you want some extra crunch, fold in chopped pecans. They add a nice texture and flavor. 1. Spread the peaches evenly in a greased 9x9 inch baking dish. Make sure they cover the bottom well. 2. Carefully top the peaches with the crumble mixture. Ensure even coverage for the best bake. 3. Bake for 30-35 minutes. Look for a golden brown top and bubbly peaches. This means it’s ready! You can find the detailed instructions in the Full Recipe. To find ripe peaches, look for a vibrant color. They should feel slightly soft when you press them gently. A sweet aroma is also a good sign. At the store, choose peaches that are free from bruises. Avoid any with dark spots or wrinkles. If they are hard, let them ripen at room temperature for a few days. For a golden crispy topping, use cold butter. Cut it into the dry mix until it resembles crumbs. This helps create that nice crunch. Baking times can vary. If your oven runs hot, check your peach crisp a bit earlier. If it runs cool, add a few extra minutes. Always look for a golden top and bubbling peaches. Serve your peach crisp warm. A scoop of vanilla ice cream adds creaminess. Whipped cream can also enhance the taste. For a fun twist, drizzle caramel sauce on top. This adds sweetness and makes it look fancy. You can serve it in a lovely dish to impress your guests. {{image_2}} You can enhance your peach crisp by adding spices. Try ginger for warmth or vanilla for sweetness. Almond extract also adds a nice touch. For a fun twist, mix in seasonal fruits with your peaches. Berries like blueberries or raspberries work well. You can also add sliced apples for a different flavor. To make your peach crisp healthier, reduce the sugar. Use less brown sugar or try a natural sweetener like honey or maple syrup. You can also swap all-purpose flour with whole-grain flour. This change boosts fiber and nutrients. Using whole-grain oats adds more health benefits too. For a fun serving style, make mini peach crisps. Use ramekins to create individual portions. This way, each person gets their own dessert. You can also bake the crisp in muffin tins. This method helps with portion control and makes for a cute presentation. For the full recipe details, check out the Full Recipe. After you enjoy your peach crisp, store leftovers in the fridge. Use an airtight container to keep it fresh. Peach crisp stays good for up to three days in the fridge. It’s best to cover it well to prevent it from drying out. If you want to save some for later, freezing peach crisp works great. First, let it cool completely. Then, wrap it tightly in plastic wrap or aluminum foil. Place it in a freezer-safe container. Frozen peach crisp lasts about three months. When you’re ready to eat it, thaw it in the fridge overnight. Reheat it in the oven at 350°F until warm, about 20 minutes. You might have leftover crumble topping after making your peach crisp. You can use it for other desserts like muffins or as a topping for yogurt. If you have extra peaches, slice them for smoothies or add them to salads. They can also be baked into other treats. This way, nothing goes to waste, and you can enjoy peach goodness in different meals! You can tell the peach crisp is done by looking for two signs. First, check the color of the top. It should be golden brown. Second, watch for bubbling around the edges. This means the peaches are soft and cooked through. If you see both signs, it’s time to take it out! Yes, you can use canned or frozen peaches in this recipe! If using canned peaches, drain them well to avoid excess liquid. For frozen peaches, thaw and drain them before use. Remember, both options may change the cooking time slightly. Keep an eye on your crisp as it bakes. To reheat peach crisp, you can use an oven or microwave. For the oven, preheat it to 350°F (175°C). Place the crisp in a baking dish and cover it with foil. Heat for about 15 minutes or until warm. If using a microwave, warm a single serving for about 30 seconds. Enjoy it warm! Yes, you can prepare the peach crisp ahead of time. Mix the peach filling and topping separately, then store them in the fridge. When you’re ready, layer the peaches and topping in a dish, then bake. This way, you save time and still enjoy fresh peach crisp! In this blog post, we explored how to make a delicious peach crisp. I shared easy steps, ingredient tips, and variations to try. You can use fresh peaches or substitute with canned, and even make it healthier. Remember, selecting ripe peaches enhances the flavor. You can serve it warm with ice cream or save leftovers by refrigerating or freezing. Enjoy this treat with friends and family. With these tips, your peach crisp will delight anyone who tries it. Happy baking!](https://southerndishes.com/wp-content/uploads/2025/07/5f116bb3-c95e-4b50-acbc-077d0064cd3a.webp)
