


Latest & Greatest

Red Velvet Cake Delight Simple and Tasty Recipe
Red Velvet Cake is a timeless favorite that never fails to impress. This deep red treat is not just beautiful;
Read more…
Apple Pie Delight Simple Steps for Perfect Recipe
Are you ready to bake the perfect apple pie? In “Apple Pie Delight: Simple Steps for Perfect Recipe,” I will
Read more…
Crockpot Mexican Chicken Flavorful and Simple Recipe
Looking for a simple, tasty meal? You’re in the right place! This Crockpot Mexican Chicken is packed with bold flavors
Read more…
Spring Hash Brown Crust Quiche Delightful and Easy Recipe
Looking for a quick, tasty dish for spring? Try my Spring Hash Brown Crust Quiche! This recipe combines crispy hash
Read more…browse recipes


No Bake Oreo Cheesecake Cups Easy and Delicious Treat
Love desserts but short on time? You’re in for a treat! This No Bake Oreo Cheesecake Cups recipe is simple, quick, and tastes amazing!…
My Latest Desserts
My Latest Recipes

hey,
i’m !
I’m so happy you’re here!
My kitchen is filled with stories, flavors, and love and I’m so happy to share them with you. Here’s to dishes that feel like home.


![When making apple cinnamon overnight oats, you need simple and fresh ingredients. Here’s what you will need: - 1 cup rolled oats - 1 ½ cups almond milk (or any milk of choice) - 1 medium apple, diced - 1 teaspoon ground cinnamon - 2 tablespoons maple syrup (or honey) - ¼ cup Greek yogurt (optional) - 2 tablespoons chopped walnuts or pecans - A pinch of salt - Toppings: Additional apple slices, cinnamon Each ingredient plays a key role in flavor and texture. The rolled oats are the base. They soak up the milk and soften overnight. Almond milk adds a nutty flavor, but you can use any milk you like. Diced apples bring sweetness and freshness. I suggest using Fuji or Honeycrisp apples for the best taste. Ground cinnamon adds warmth. It pairs perfectly with apples. Maple syrup or honey sweetens the mix naturally. Greek yogurt is optional. It makes the oats creamier. Chopped walnuts or pecans add crunch and healthy fats. Don't forget a pinch of salt. It enhances all the flavors. For toppings, I love adding extra apple slices and a sprinkle of cinnamon. They make the dish look pretty and taste even better. You can find the full recipe at [Full Recipe]. Start by gathering your ingredients. You will need rolled oats, almond milk, a diced apple, and more. Take a moment to measure everything out. This makes mixing easier. In a mixing bowl or a mason jar, add all your ingredients. Use 1 cup of rolled oats and 1 ½ cups of almond milk. Then, add 1 medium diced apple. Sprinkle in 1 teaspoon of ground cinnamon and 2 tablespoons of maple syrup. If you like, mix in ¼ cup of Greek yogurt for creaminess. Don't forget a pinch of salt! Stir well until everything is mixed. This ensures the oats soak up the flavors. Cover your bowl or seal the jar tightly. Place it in the refrigerator overnight. If you rush, let it sit for at least 6 hours. This soaking time is key. It allows the oats to soften and blend with the flavors. In the morning, give your oats a good stir. If they are too thick, add a splash of milk. Enjoy your tasty creation! For the full recipe, check out the details above. To get creamy oats, choose the right milk. Almond milk works well, but you can also try oat milk or regular milk. Use more yogurt for a thicker texture. I suggest adding ¼ cup of Greek yogurt. It gives a rich taste and smooth feel. Mix well to coat all oats evenly. Let them soak fully overnight. This helps them absorb all the flavors. Maple syrup and honey both taste great in these oats. Maple syrup adds a warm, rich flavor. Honey gives a nice, floral sweetness. You can use either, based on your choice or what you have at home. If you want a healthier option, try agave nectar or stevia. Just remember to adjust the amount to match your taste. To make your oats more exciting, add a splash of vanilla extract. It pairs well with apple and cinnamon. Nutmeg is another great addition. Just a pinch will add a warm spice that enhances the flavor. Feel free to get creative! You can also mix in dried fruits or other spices to make this dish your own. For the full recipe, check out the link above. {{image_2}} You can easily make this recipe dairy-free. Simply swap regular milk for almond milk, coconut milk, or oat milk. Each option adds its own flavor. Almond milk adds a nutty taste, while coconut milk gives a creamy texture. You still get a rich taste without dairy. If you need a nut-free version, leave out the nuts. You can replace them with seeds, like pumpkin or sunflower seeds. They add crunch and healthy fats without nuts. You can also use a little extra fruit for texture. Change up the fruit based on the season. In fall, add pears or cranberries. In summer, try peaches or berries. Each fruit gives a unique twist. These changes keep breakfast exciting and fresh. Use your favorite fruits for a personal touch. For the full recipe, check out the Apple Cinnamon Overnight Oats section. You can store leftover apple cinnamon overnight oats in the fridge. Use a sealed container. They stay fresh for up to five days. Just give them a stir before eating. If they look thick, add a splash of milk. You can freeze overnight oats if you want to save them longer. Use freezer-safe containers or jars. They last for up to three months. To eat, let them thaw in the fridge overnight. Then, stir well and enjoy. For the best taste, eat your oats within five days. Check for any off odors or changes in texture. If you see or smell something strange, toss them out. Always label your containers with the date. This helps you track freshness. Follow these tips to ensure you get a tasty meal every time. For the complete recipe, check out the Full Recipe. You can store Apple Cinnamon Overnight Oats in the fridge for up to five days. Just keep them in a sealed container. The flavors get better as they sit. If you notice any change in texture, just stir in a little more milk before eating. Yes, you can make overnight oats without yogurt. The oats will still taste great! You can simply skip it or replace it with more milk. This will keep the oats creamy. If you want a thicker texture, try adding mashed banana or nut butter instead. Overnight oats are great for you! They are full of fiber, which helps digestion. They also keep you full longer, which can help with weight control. Plus, oats are rich in vitamins and minerals. Adding fruit boosts the nutrition even more! For the full recipe, please refer to the details above. This blog post showed you how easy it is to make Apple Cinnamon Overnight Oats. You learned about the simple ingredients, like oats, almond milk, and apples. I shared step-by-step instructions and helpful tips to make them creamy and tasty. You can store leftovers or even freeze them for later. Remember, you can adjust the recipe to fit your taste, using different fruits or sweeteners. This healthy breakfast is fun to make and enjoy. So start creating your own delicious version today!](https://southerndishes.com/wp-content/uploads/2025/05/a7824514-eaa6-46a7-b321-009ef74dd621-300x300.webp)

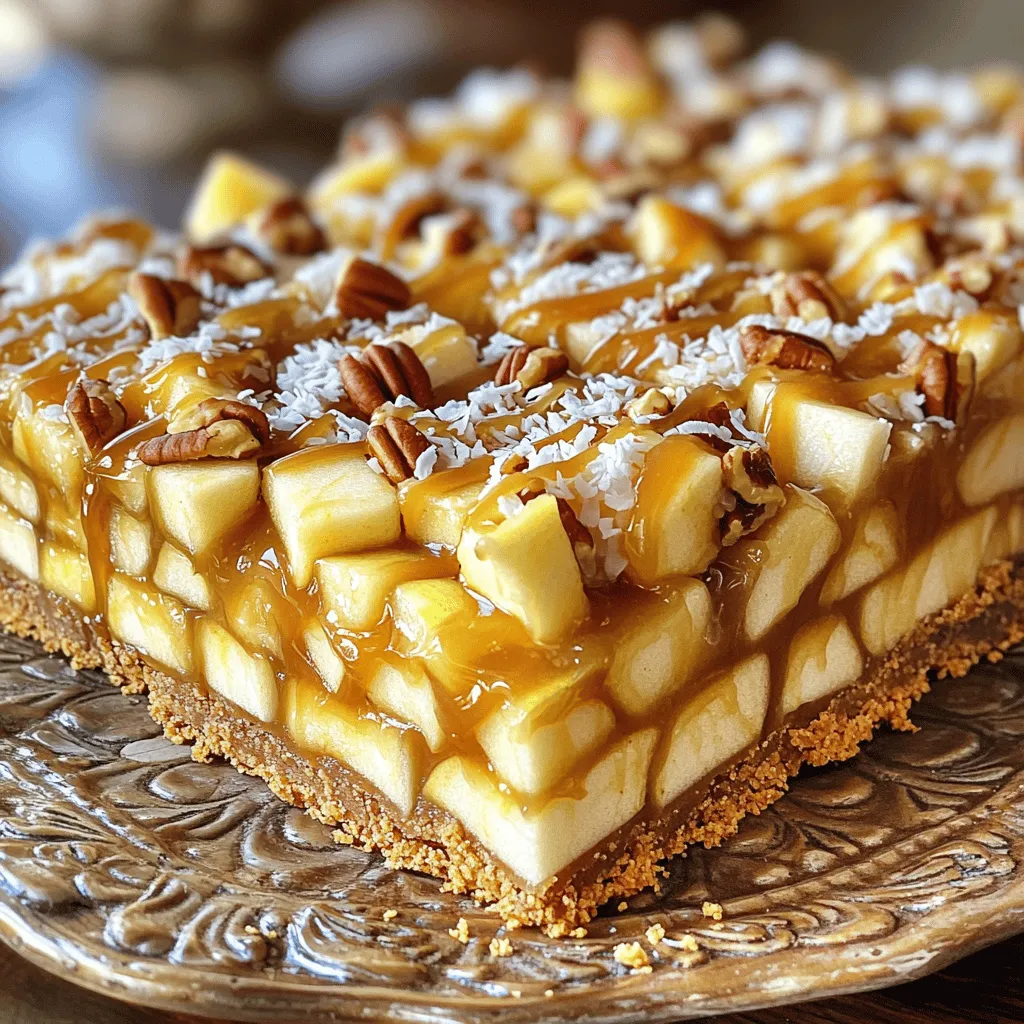
No-Bake Caramel Apple Pie Bars Easy and Tasty Treat
Craving a sweet, easy treat that requires no baking? Let’s make No-Bake Caramel Apple Pie Bars! These bars blend the flavors of caramel and…