
Latest & Greatest

Red Velvet Cake Delight Simple and Tasty Recipe
Red Velvet Cake is a timeless favorite that never fails to impress. This deep red treat is not just beautiful;
Read more…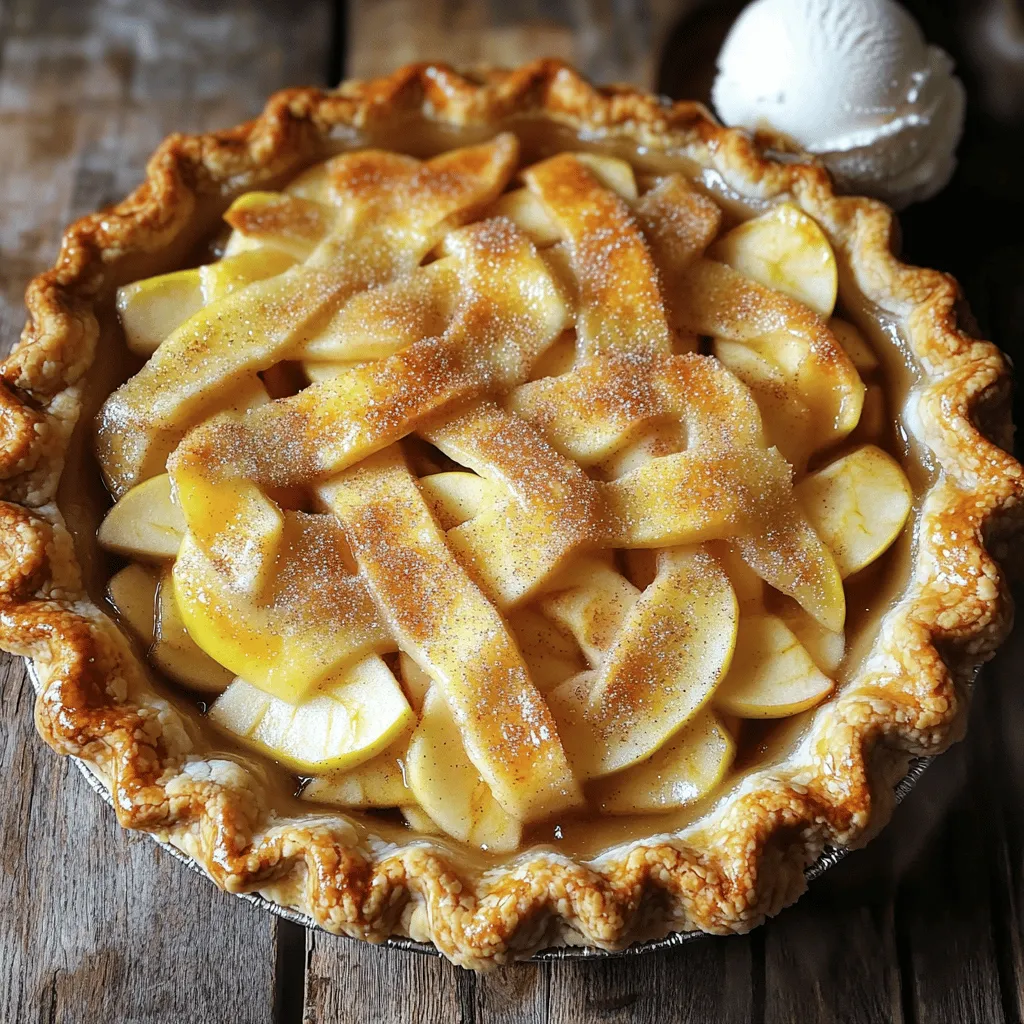
Apple Pie Delight Simple Steps for Perfect Recipe
Are you ready to bake the perfect apple pie? In “Apple Pie Delight: Simple Steps for Perfect Recipe,” I will
Read more…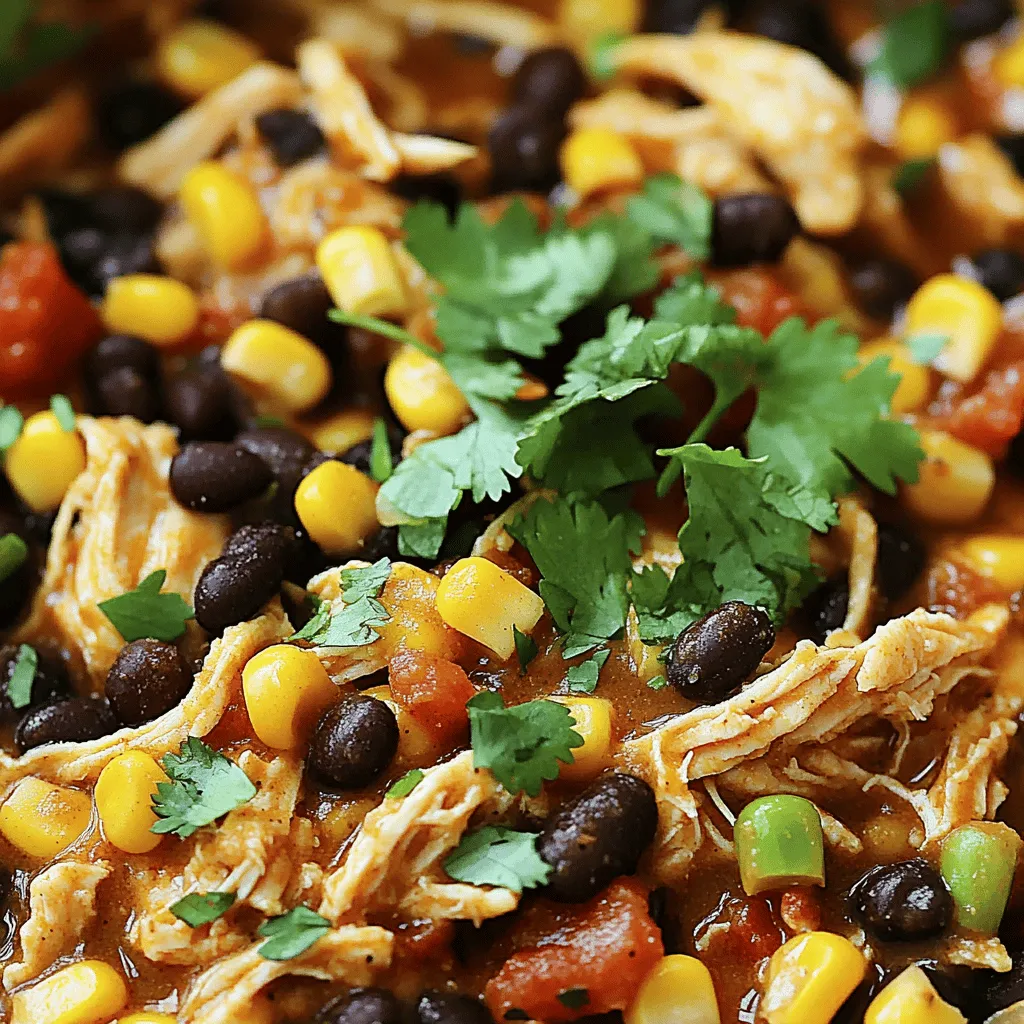
Crockpot Mexican Chicken Flavorful and Simple Recipe
Looking for a simple, tasty meal? You’re in the right place! This Crockpot Mexican Chicken is packed with bold flavors
Read more…
Spring Hash Brown Crust Quiche Delightful and Easy Recipe
Looking for a quick, tasty dish for spring? Try my Spring Hash Brown Crust Quiche! This recipe combines crispy hash
Read more…browse recipes


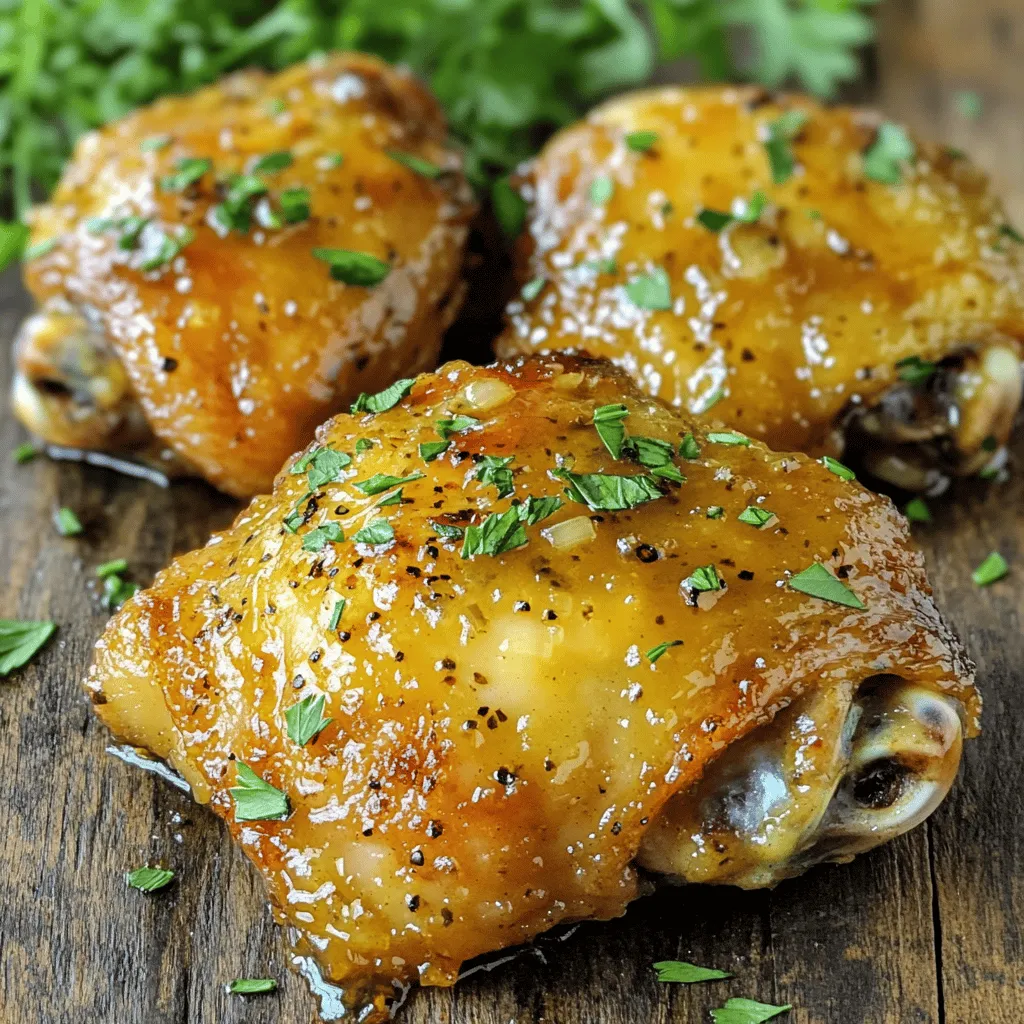
Honey Mustard Chicken Thighs Flavorful Dinner Recipe
Looking to spice up your dinner routine? This Honey Mustard Chicken Thighs recipe is your answer! Juicy chicken thighs coated in a sweet and…
My Latest Desserts
-

Pumpkin Chocolate Chip Bread Delightful Moist Treat
Are you ready to bake the most delightful treat of the season? Pumpkin chocolate chip bread is a moist, flavorful Read Full Recipe -

Strawberry Cream Cheese Quesadillas Delightful Treat
Get ready to delight your taste buds with Strawberry Cream Cheese Quesadillas! This sweet twist on a savory favorite will Read Full Recipe -
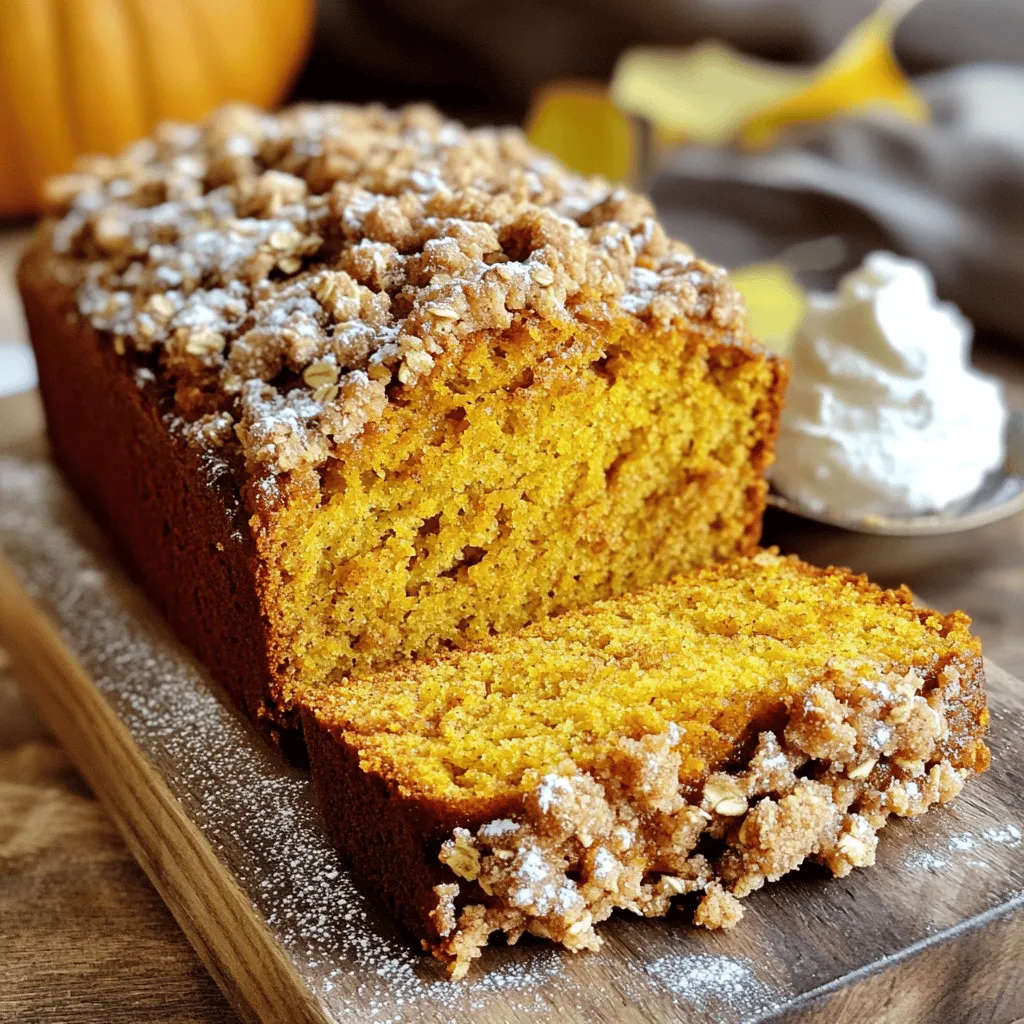
Pumpkin Bread With Streusel Topping Easy Recipe
Do you love the warm, spicy flavors of pumpkin bread? With my easy recipe for Pumpkin Bread With Streusel Topping, Read Full Recipe -
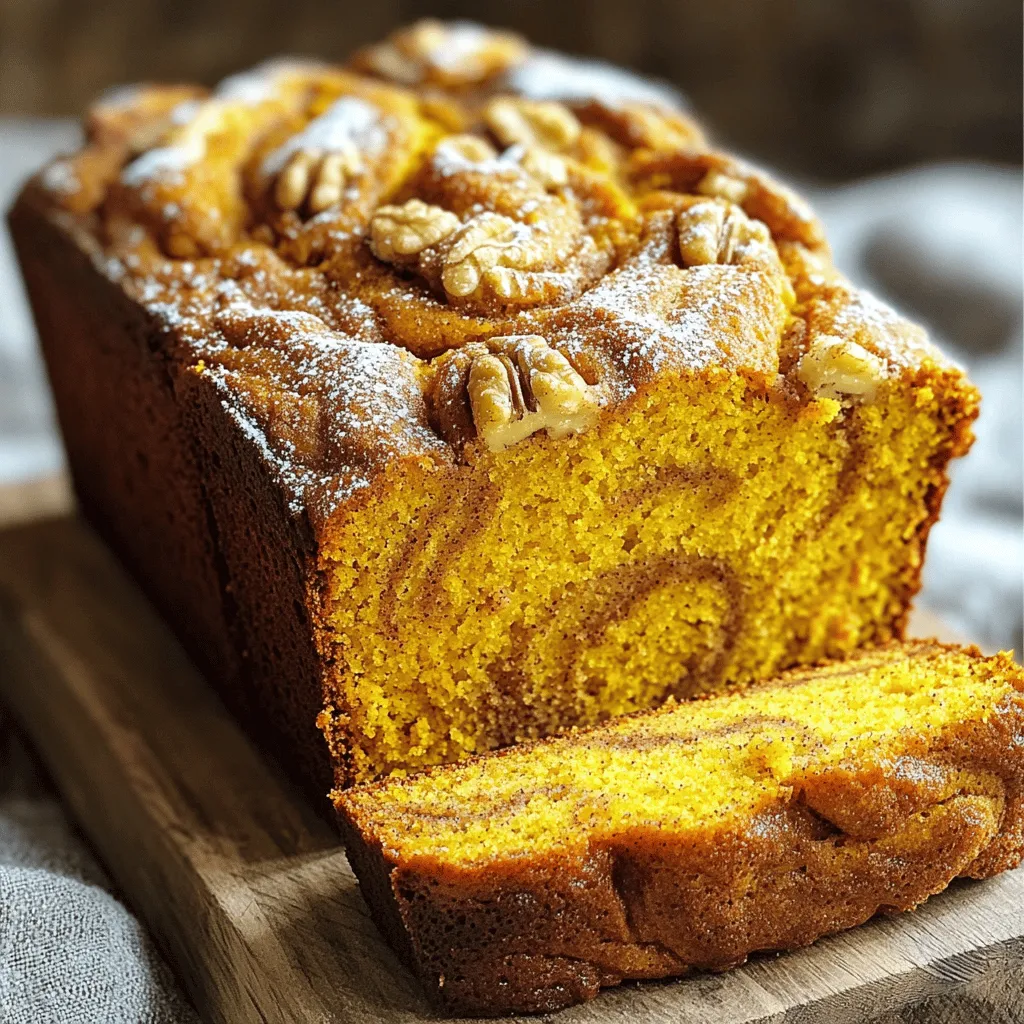
Cinnamon Swirl Pumpkin Bread Irresistible Recipe Guide
Craving a cozy, fall-inspired treat? You’ll love my Cinnamon Swirl Pumpkin Bread! This guide gives you everything you need to Read Full Recipe -

Pumpkin Chocolate Chip Muffins Delicious and Easy Recipe
If you’re looking for a simple and delicious treat, these Pumpkin Chocolate Chip Muffins are calling your name! With warm Read Full Recipe -
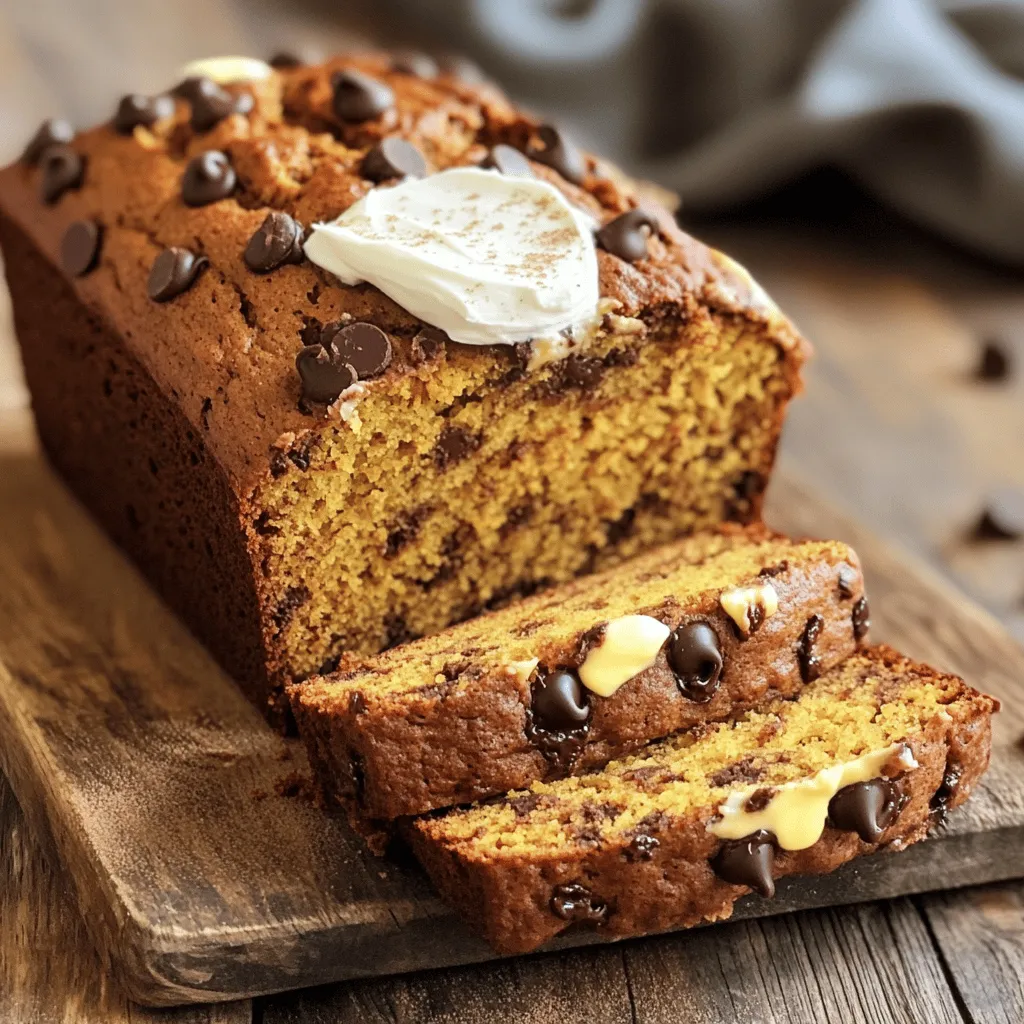
Chocolate Chip Pumpkin Bread Irresistible Treat
Are you ready to bake an irresistible treat that combines the cozy flavors of fall? This Chocolate Chip Pumpkin Bread Read Full Recipe -

No Bake Peanut Butter Bars Simple and Tasty Treat
Craving a sweet treat that’s easy to whip up? You’ll love these no bake peanut butter bars! With just a Read Full Recipe -

Apple Pie Cups Delightful Dessert for Any Occasion
Are you ready to enjoy a delightful dessert that fits any occasion? Apple Pie Cups bring the classic flavors of Read Full Recipe -

No-Bake Summer Berry Lasagna Delightful and Easy Recipe
Imagine serving a cool, tasty dessert on a hot summer day! This No-Bake Summer Berry Lasagna is the answer. It’s Read Full Recipe -

Soft Pumpkin Cookies with Cream Cheese Icing Delight
If you love soft, tender cookies bursting with fall flavors, you’re in for a treat! My Soft Pumpkin Cookies with Read Full Recipe
My Latest Recipes

hey,
i’m !
I’m so happy you’re here!
My kitchen is filled with stories, flavors, and love and I’m so happy to share them with you. Here’s to dishes that feel like home.
![- Zucchini and Yellow Squash Essentials - 2 medium zucchinis, thinly sliced - 2 medium yellow squashes, thinly sliced - Dairy and Seasoning Components - 1 cup grated Gruyère cheese - 1 cup heavy cream - 2 cloves garlic, minced - 1 teaspoon fresh thyme leaves - 1/2 teaspoon salt - 1/4 teaspoon black pepper - Topping Ingredients for Gratin - 1/2 cup breadcrumbs - 2 tablespoons olive oil - Fresh parsley, chopped (for garnish) Gathering these ingredients sets the stage for a great dish. Fresh zucchini and yellow squash bring color and flavor. Gruyère cheese adds a rich taste. Heavy cream gives the gratin its creamy texture. Using fresh herbs like thyme enhances the dish. Don't skip the garlic; it adds depth. The breadcrumbs on top create a crunchy finish that contrasts with the soft veggies. This combination makes every bite a delight. I recommend picking the freshest veggies for the best taste. You can find the full recipe [here]. Slicing Zucchini and Yellow Squash Start by washing your zucchinis and yellow squashes. Grab a sharp knife and slice them into thin rounds, about 1/4 inch thick. Thin slices cook well and absorb flavors nicely. You want to create a beautiful mix of colors for your dish. Aim for even slices to ensure they cook evenly. Seasoning the Mixture In a large bowl, combine your sliced zucchinis and yellow squashes. Add minced garlic, fresh thyme, salt, and black pepper. Toss everything together gently. The salt brings out the moisture and flavor in the veggies. Make sure each piece is well coated with the seasoning for a tasty outcome. Layering Techniques for Optimal Flavor Grease your baking dish with olive oil to prevent sticking. Start layering half of your seasoned zucchini and squash mixture evenly across the bottom. This base will soak up all the flavors. Then, pour half of the cheese and cream mixture over the first layer. Sprinkle half of the grated Gruyère cheese on top. Repeat the process with the remaining vegetables, cheese, and cream. Finish with the rest of the Gruyère cheese. This layered approach creates rich, deep flavors in every bite. Adding Cheese and Cream In a separate bowl, mix your heavy cream with half of the grated Gruyère cheese. This blend adds a creamy texture and cheesy goodness to your gratin. Pour this mixture over each layer to ensure an even distribution. Setting the Oven Temperature Preheat your oven to 375°F (190°C). A hot oven is key to a perfectly baked gratin. It helps the dish cook evenly while achieving a lovely golden crust on top. Baking Time and Doneness Indicators Place your assembled gratin in the oven and bake for 35-40 minutes. You know it’s done when the top is golden and bubbly. Let it cool for about 5 minutes before serving. This brief cooling time helps set the layers, making it easier to serve. For a delightful finish, garnish with fresh parsley right before you serve. Enjoy your Zucchini Gratin with Yellow Squash! For the full recipe, see the section above. Achieving the Right Creaminess To get that perfect creaminess, use heavy cream. It makes the dish rich. Mix it well with your cheese. This helps it melt evenly. You want every bite to be smooth. If you find it too thick, add a splash of milk. This will balance the texture. Ensuring a Golden Top A golden top makes your gratin look great. To achieve this, sprinkle breadcrumbs evenly on top. Drizzle a bit of olive oil over the breadcrumbs. This will help them brown nicely. Bake until the top is golden and bubbly. The oven's heat should create a crunchy layer. Presentation Ideas for Zucchini Gratin For a rustic look, serve it in the baking dish. It adds charm to your table. You can also portion it onto individual plates. Garnish each plate with chopped parsley. This adds color and freshness. Pairing with Main Dishes Zucchini gratin pairs well with many main dishes. Try it with grilled chicken or fish. It also complements roasted meats nicely. For a vegetarian option, serve it with a hearty salad. This balance makes your meal satisfying. {{image_2}} Alternative Cheeses to Use You can switch the Gruyère cheese for other types. Cheddar gives a sharp taste. Mozzarella melts well and adds creaminess. Feta adds a nice tang. Try a mix for unique flavors. Adding Proteins or Other Vegetables To boost protein, add cooked chicken or turkey. Cooked bacon adds a smoky flavor. For veggies, consider spinach or bell peppers. They add color and nutrition. Mixing in these extras makes the dish your own. Gluten-Free Breadcrumb Options If you need gluten-free crumbs, use crushed rice crackers. Ground nuts work too, like almonds. These keep the crunch without gluten. Make sure to check labels for safety. Making it Vegan-Friendly To make this dish vegan, use plant-based cheese. Coconut cream can replace heavy cream. Use nutritional yeast for a cheesy flavor. Swap breadcrumbs for a gluten-free option if needed. This way, everyone can enjoy it! For the full recipe, check the details above. To keep your zucchini gratin fresh, store leftovers in the fridge. Use an airtight container. It stays good for about three days. When you store it, let it cool first. This helps avoid extra moisture, which can make it soggy. If you want to keep it longer, freezing is an option. Cut the gratin into portions. Wrap each piece in plastic wrap. Then place the wrapped portions in a freezer bag. They can last up to three months in the freezer. When you're ready to eat, just thaw it in the fridge overnight. Reheat your zucchini gratin gently to keep it tasty. The best way is to use an oven. Preheat your oven to 350°F (175°C). Place the gratin in a baking dish and cover it with foil. This helps it heat evenly. Bake for about 20-25 minutes. Check that it's hot throughout. You can also use a microwave for quick reheating. Put a portion in a microwave-safe dish. Heat it for about 1-2 minutes. Stir halfway through to ensure even heating. But be careful; it might lose some texture compared to the oven method. For perfect serving, let it rest for a minute before enjoying. You want to savor every bite of this delicious zucchini gratin with yellow squash. For the full recipe, you can refer back to the earlier sections. Can I make this dish ahead of time? Yes, you can prepare the gratin a day in advance. Just layer the veggies and cream mix, then cover and refrigerate. Bake it just before serving. This saves time and allows flavors to meld. What can I substitute for heavy cream? If you want a lighter option, use half-and-half or whole milk. For a dairy-free choice, try coconut cream or cashew cream. Both can give you a creamy texture without heavy cream. How do I know when the gratin is done? The gratin is done when it’s golden on top and bubbly around the edges. A knife should slide easily through the layers. If it’s still firm, bake it a bit longer. What dishes pair well with zucchini gratin? This dish goes great with roasted chicken or grilled fish. You can also serve it with a fresh salad or crusty bread for a full meal. The flavors complement each other nicely. Can I use frozen zucchini and squash for this recipe? You can use frozen zucchini and squash, but make sure to thaw and drain them first. Excess water can make the gratin soggy. Fresh veggies give the best texture and flavor. How many calories are in zucchini gratin? One serving of zucchini gratin has about 300 calories. This can vary based on the cheese and cream you use. It's a tasty way to enjoy veggies while keeping calories in check. Is zucchini gratin healthy? Zucchini gratin can be healthy if you use less cream and cheese. Zucchini and squash are low in calories and high in vitamins. This dish is a nice way to eat more vegetables. For the full recipe, check out the Zucchini & Yellow Squash Gratin. This blog post covers making a tasty zucchini and yellow squash gratin. You learned about essential ingredients, preparation steps, and baking tips. I shared ways to enhance texture and flavor while offering serving and storage advice. You even found answers to common questions. In my view, this dish is fun and flexible. You can easily adapt it to fit your needs. Enjoy your cooking journey and don't hesitate to try new flavors and ingredients!](https://southerndishes.com/wp-content/uploads/2025/06/3f63e3fa-56ac-445f-ac53-c157ca3968fc-300x300.webp)
![- 1 lb chicken breast - Fresh Thai basil leaves - Vegetable oil - Garlic and Thai bird's eye chilies - Soy sauce - Oyster sauce - Fish sauce - Sugar, salt, and pepper - Cooked jasmine rice - Optional garnishes Spicy Thai Basil Chicken is a delight to make. You need simple, fresh ingredients. Start with tender chicken breast, about 1 pound. Cut it into thin slices. Next, fresh Thai basil leaves add a fragrant twist. You will want to use a good amount, so grab a couple of cups. The more, the better! Garlic and Thai bird's eye chilies bring heat and bold flavor. Use about three cloves of garlic, minced. For the chilies, two to three will do. Adjust these based on your spice level. For cooking, use vegetable oil. It helps the chicken brown nicely. Next, gather your sauces and seasonings. You'll need soy sauce and oyster sauce for depth. Fish sauce adds a unique umami punch. A tablespoon of sugar balances the flavors, along with a sprinkle of salt and pepper. To serve, you will want cooked jasmine rice. It makes a perfect base for the savory chicken. You can also add some garnishes like lime wedges or extra basil leaves for color. For the full recipe, check out the [Full Recipe]. - Slice the chicken breast into thin strips. - Mince the garlic and chop the chilies finely. Getting these ready makes cooking quick and easy. The chicken should be thin so it cooks fast. The garlic and chilies add great flavor and spice. - Heat oil in a large skillet over medium-high heat. - Sauté the minced garlic and chopped chilies for about 30 seconds. - Stir-fry the sliced chicken until cooked through, about 5-7 minutes. - Add the sliced red bell pepper and cook for 2-3 minutes. This process is key for a delicious meal. The oil helps the garlic and chilies release their oils and aroma. Next, cook the chicken until it turns white and is no longer pink. The bell peppers add color and crunch. - Pour a mix of soy sauce, oyster sauce, fish sauce, and sugar over the chicken. - Stir well and let it cook for another 2 minutes. - Remove from heat and gently fold in the fresh Thai basil until it wilts. - Season with salt and pepper to taste. These final touches bring everything together. The sauces create a tasty glaze that coats the chicken. Adding basil at the end keeps its fresh flavor. You can serve this over jasmine rice for a complete meal. For the full recipe, check out the main article. To make tender chicken, start with thin slices. This helps the meat cook evenly. Cook it fast over high heat. This keeps the chicken juicy and soft. For spice levels, taste as you go. If you want it hot, add more chilies. If you prefer mild, use fewer. You can always add more later. Adding lime juice brightens the dish. Squeeze some over the chicken before serving. Fresh herbs like cilantro or mint can also boost flavor. Balancing sweetness and heat is key. The sugar in the sauce helps. Adjust it based on your taste. If it's too sweet, add a bit more soy sauce. For eye appeal, serve Spicy Thai Basil Chicken over fluffy jasmine rice. The white rice contrasts nicely with the colorful dish. Use garnishes like fresh basil leaves. They add color and freshness. Slices of chili can spice up the look. Lime wedges on the side add a zesty touch. For the full recipe, check out the link. {{image_2}} You can switch out chicken for tofu or beef. Tofu absorbs flavors well. It's a great choice for a vegetarian meal. If you like beef, use thin slices of flank steak. Both options keep the dish tasty and satisfying. You can also try shrimp for a seafood twist. Shrimp cooks fast and adds a nice flavor. Just toss them in after the garlic and chilies. Add more veggies for extra nutrition. Good options are snap peas, broccoli, or carrots. These veggies add color and crunch. You can also use seasonal ingredients. In summer, zucchini or bell peppers work great. In winter, try bok choy or spinach. Mixing in these veggies makes the dish even better. You can play with different sauces for new flavors. Try adding hoisin sauce for a sweet touch. Or, use sriracha for more heat. If gluten is a concern, make it gluten-free. Just switch soy sauce for tamari or coconut aminos. These small changes can make a big difference in taste. To store leftover Spicy Thai Basil Chicken, place it in an airtight container. Make sure it cools down before sealing. You can keep it in the fridge for up to three days. The chicken stays tasty, but you may notice the basil wilts a bit. When reheating, use a skillet on medium heat. Add a splash of water to keep it moist. Stir often to ensure it heats evenly. This method helps keep the flavors bright and the chicken tender. Avoid using the microwave, as it may make the chicken tough. Yes, you can freeze Spicy Thai Basil Chicken! Just make sure it cools down. Place it in a freezer-safe container or bag. It lasts up to three months in the freezer. To thaw, move it to the fridge overnight. Reheat it in a skillet, adding a bit of water for moisture. This keeps the dish flavorful and delicious. For the complete cooking process, check out the Full Recipe. This dish takes about 25 minutes to make. You will spend about 15 minutes prepping the ingredients. Cooking takes around 10 minutes. You can have dinner ready quickly! Yes, you can make this dish in advance. Cook the chicken and sauces, then store them in the fridge. Reheat when you are ready to eat. To keep it fresh, store it for only 2-3 days. This dish pairs well with jasmine rice. You can also serve it with fresh vegetables like cucumber or a simple salad. For extra flavor, add lime wedges on the side. Enjoy the mix of tastes and textures! For the full recipe, you can refer to the detailed steps above. In this blog post, we covered how to make Spicy Thai Basil Chicken. I shared the main ingredients, sauces, and serving ideas. You learned step-by-step instructions to prepare and cook the dish. Tips on cooking techniques and variations helped you get creative. Finally, I explained storage methods for leftovers and answered common questions. Now, you have everything you need to enjoy this tasty meal. Dive in and start cooking!](https://southerndishes.com/wp-content/uploads/2025/05/a5d0289a-3022-488d-ab7b-53552126e8b7-300x300.webp)

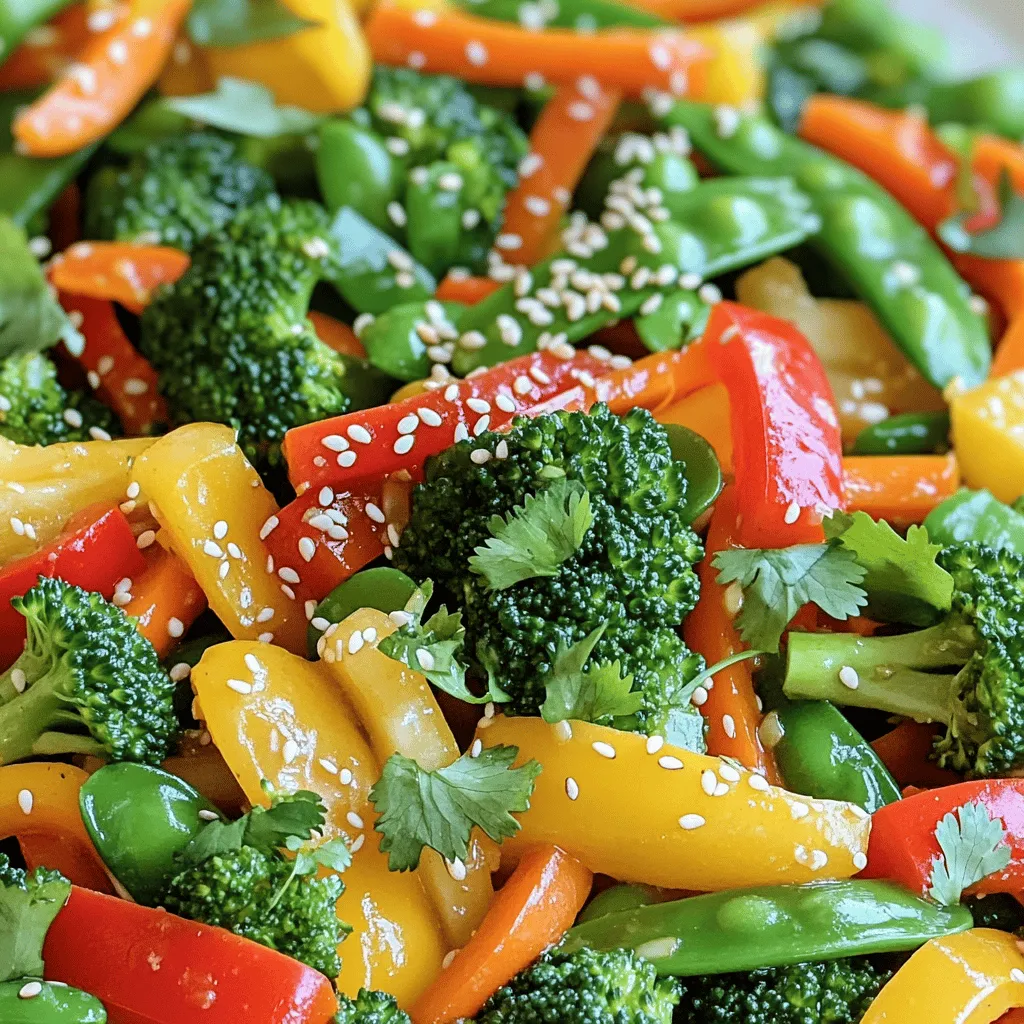
Easy Veggie Stir Fry Quick and Flavorful Recipe
Looking for a quick and tasty meal? My Easy Veggie Stir Fry is just what you need! Packed with fresh vegetables and rich flavors,…