No-Bake Peanut Butter Bars Simple and Tasty Treat

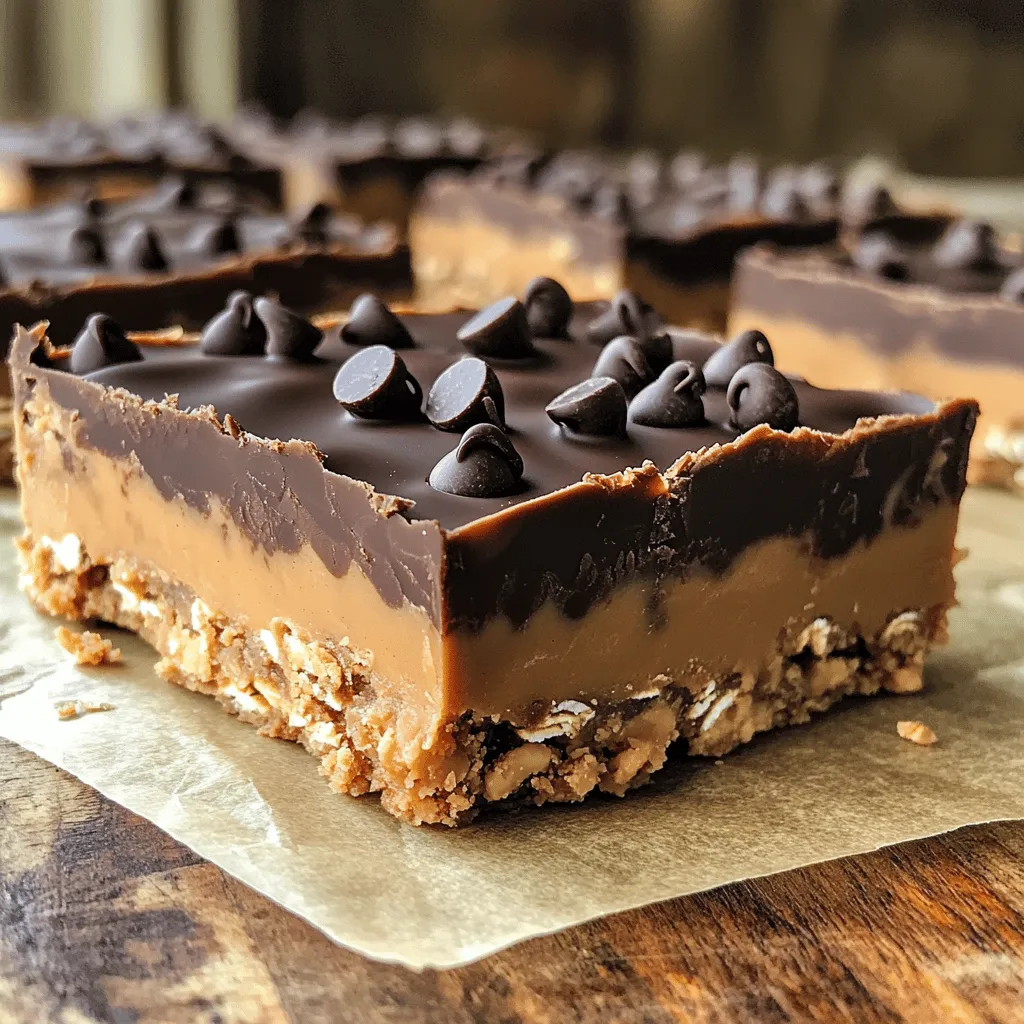
Craving a sweet treat without turning on the oven? You’re in the right place! These No-Bake Peanut Butter Bars are simple to make, full of flavor, and perfect for any snack. With just a few easy steps, you can whip up a delicious batch using pantry staples like oats, peanut butter, and honey. Let’s dive in and create a tasty delight that your friends and family will love!

Ingredients

Key Ingredients

– 1 cup rolled oats

– 1 cup natural peanut butter (smooth or crunchy)

– 1/2 cup honey or maple syrup

These key ingredients form the tasty base of the no-bake peanut butter bars. The oats provide a nice texture. The peanut butter adds creaminess and flavor. Honey or maple syrup brings sweetness and binds everything together.

Optional Ingredients

– 1/2 cup chocolate chips (milk or dark)

– 1/4 cup unsweetened cocoa powder

– Extra chocolate chips for topping (optional)

You can enhance these bars with optional ingredients. Chocolate chips add indulgence, while cocoa powder gives a rich taste. Topping with extra chocolate chips makes them look pretty and even tastier.

Ingredient Substitutions

– Alternative sweeteners

– Gluten-free options

– Nut-free variations

You can easily change some ingredients. Use agave or coconut sugar for sweeteners. If you need gluten-free bars, choose gluten-free oats. For nut-free options, you can substitute sunflower seed butter. These swaps help everyone enjoy this treat!

Step-by-Step Instructions

Preparation Steps

1. Mixing the dry ingredients: Start by placing rolled oats, cocoa powder, and a pinch of salt in a large mixing bowl. Stir them together until they blend well. This step helps create a solid base for your bars.

2. Combining wet ingredients with dry: Next, add natural peanut butter and honey (or maple syrup) to the bowl. Use a spatula or your hands to mix everything until it forms a sticky dough. Ensure all dry ingredients are coated well.

3. Preparing the pan: Line an 8×8 inch pan with parchment paper. Leave some paper hanging over the edges. This helps you lift the bars out easily later.

Assembly and Setting

1. Transferring the mixture to the pan: Scoop the mixture into the lined pan. Use your hands or a spatula to press it down firmly. Make sure it is even and compact.

2. Adding toppings: If you want extra flavor, sprinkle some chocolate chips on top. Gently press them into the mixture to keep them in place.

3. Refrigeration process: Place the pan in the fridge for at least 2 hours. This helps the bars set and become firm enough to cut.

Cutting and Serving

1. How to cut bars evenly: Once set, lift the bars out of the pan using the parchment paper. Use a sharp knife to cut them into even squares. This makes serving easier.

2. Presentation ideas: Arrange the bars on a nice plate. You can add some fresh fruit or a drizzle of chocolate on top for a pop of color.

3. Serving suggestions: Serve these bars chilled. They make a great snack or dessert. You can also pack them for lunch or take them on the go. For the full recipe, check out the No-Bake Peanut Butter Chocolate Dream Bars.

Tips & Tricks

Recipe Tips for Best Results

Achieving the perfect consistency: The key is to mix well. When you combine the rolled oats and peanut butter with the sweetener, aim for a sticky dough. It should hold together without being too dry or too wet.

How to avoid stickiness: Lightly grease your hands or use a spatula when pressing the mixture into the pan. This helps keep everything from sticking to you.

Timing for refrigeration: Allow the bars to chill for at least two hours. This gives them time to set properly and makes them easier to cut.

Common Mistakes to Avoid

Overmixing the ingredients: Mix just until the oats and peanut butter blend well. Overmixing can make the bars tough.

Using the wrong type of nut butter: Stick to natural peanut butter. Avoid brands with added sugars or oils, as they change the texture and flavor.

Not packing the mixture firmly enough: Press down firmly when spreading the mixture in the pan. This helps create a dense bar that holds its shape.

Enhancing Flavor

Adding spices like cinnamon or sea salt: A pinch of these can elevate the taste. Cinnamon adds warmth, and sea salt enhances the sweetness.

Using flavored nut butters: Try almond or cashew butter for a fun twist. These can add unique flavors to your bars.

Mixing in fruits or seeds: Dried fruits like cranberries or seeds like chia can add texture and extra nutrition. Just make sure to chop them small to mix well.

For the full recipe, check the details above.

Variations

Flavor Variations

You can add a fun twist to your no-bake peanut butter bars. Here are some ideas:

Chocolate-peanut butter twist: Mix in more cocoa powder or chocolate chips for a rich flavor.

Nut and seed additions: Add chopped nuts or seeds like sunflower or chia for crunch and health.

Swapping different nut butters: Try almond or cashew butter instead of peanut butter for a new taste.

Dietary Variations

These bars can fit many diets. Here are some options:

Vegan adaptations: Use maple syrup instead of honey and ensure your chocolate chips are dairy-free.

Keto-friendly options: Swap honey for a low-carb sweetener like erythritol or stevia.

Allergy-friendly substitutions: Use seed butter if you need a nut-free option.

Presentation Variations

How you serve these bars can make them even better. Consider these ideas:

Layering with yogurt: Serve the bars with a layer of yogurt on top for creaminess.

Drizzles or sauces: Top them with melted chocolate or caramel for extra flavor.

Serving styles (bars vs. bites): Cut them into bite-sized pieces for a fun snack or keep them as larger bars for a filling treat.

For the full recipe, refer to the previous section. Enjoy making these tasty treats!

Storage Info

Proper Storage Techniques

To keep your no-bake peanut butter bars fresh, store them in an airtight container. This prevents moisture and air from getting in. If you don’t have a container, wrap the bars tightly in plastic wrap. Storing them in the fridge keeps them firm and tasty. You can also freeze them for longer storage. Just make sure to use freezer-safe containers.

Shelf Life

How long do these bars last? If stored in the fridge, they can last up to one week. In the freezer, they can stay good for about three months. Check for signs of spoilage like an off smell or a change in texture. If they feel too soft or sticky, it’s best to toss them.

Reheating and Refreezing Tips

Can you refreeze these bars? Yes, but it’s best to avoid refreezing if possible. Each time you thaw and refreeze, the texture can change. To maintain quality, let the bars thaw in the fridge rather than at room temperature. This helps keep them firm and fresh. Always check for any signs of spoilage before eating. For the best taste, enjoy them fresh!

FAQs

How to make No-Bake Peanut Butter Bars?

To make No-Bake Peanut Butter Bars, follow these steps:

1. Mix the dry ingredients: In a bowl, combine rolled oats and cocoa powder.

2. Combine wet ingredients: Add peanut butter, honey, and vanilla to the dry mix. Stir well.

3. Fold in chocolate chips: Gently mix in chocolate chips until evenly spread.

4. Prepare the pan: Line an 8×8 inch pan with parchment paper.

5. Transfer and press: Put the mixture into the pan and press down firmly.

6. Refrigerate: Chill the bars for at least 2 hours until firm.

7. Cut and serve: Use the parchment paper to lift out the bars and cut into squares.

This simple process creates a tasty treat. You can find the Full Recipe [here](#).

Can I use crunchy peanut butter?

Yes, you can use crunchy peanut butter. It adds a nice texture. The bars will have bits of peanuts, making them even more enjoyable. Just make sure to mix it well so all ingredients blend nicely. If you prefer a smooth texture, stick with creamy peanut butter.

Are these bars healthy?

These bars can be a healthy snack. They contain:

– Rolled oats: Great source of fiber.

– Peanut butter: Packed with protein and healthy fats.

– Honey or maple syrup: Natural sweeteners with some nutrients.

However, keep in mind that they are still a treat. Moderation is key. They provide energy, but watch portion sizes if you’re counting calories.

How do I customize the recipe?

You can customize these bars in many ways:

Add nuts or seeds: Mix in almonds or chia seeds for extra crunch.

Use different sweeteners: Try agave syrup or stevia for a lower-calorie option.

Experiment with flavors: Add a pinch of cinnamon or chocolate protein powder for a twist.

Feel free to get creative!

What is the best way to cut the bars?

For clean cuts, follow these tips:

Use a sharp knife: A sharp knife makes smooth cuts without tearing the bars.

Warm the knife: Dip the knife in hot water before cutting. Wipe it dry and cut through.

Cut when chilled: Make sure the bars are firm from refrigeration. This helps with clean edges.

These techniques will give you neat, beautiful bars for serving.

This blog post shared a simple recipe for no-bake peanut butter bars. We covered key ingredients, optional additions, and substitutions. The step-by-step instructions make it easy to follow, ensuring great results. I shared tips to avoid common mistakes and enhance flavors. You can also explore variations for different diets. Finally, I provided storage tips to keep your bars fresh.

Enjoy making this treat and customizing it to your taste!

- 1 cup rolled oats - 1 cup natural peanut butter (smooth or crunchy) - 1/2 cup honey or maple syrup These key ingredients form the tasty base of the no-bake peanut butter bars. The oats provide a nice texture. The peanut butter adds creaminess and flavor. Honey or maple syrup brings sweetness and binds everything together. - 1/2 cup chocolate chips (milk or dark) - 1/4 cup unsweetened cocoa powder - Extra chocolate chips for topping (optional) You can enhance these bars with optional ingredients. Chocolate chips add indulgence, while cocoa powder gives a rich taste. Topping with extra chocolate chips makes them look pretty and even tastier. - Alternative sweeteners - Gluten-free options - Nut-free variations You can easily change some ingredients. Use agave or coconut sugar for sweeteners. If you need gluten-free bars, choose gluten-free oats. For nut-free options, you can substitute sunflower seed butter. These swaps help everyone enjoy this treat! 1. Mixing the dry ingredients: Start by placing rolled oats, cocoa powder, and a pinch of salt in a large mixing bowl. Stir them together until they blend well. This step helps create a solid base for your bars. 2. Combining wet ingredients with dry: Next, add natural peanut butter and honey (or maple syrup) to the bowl. Use a spatula or your hands to mix everything until it forms a sticky dough. Ensure all dry ingredients are coated well. 3. Preparing the pan: Line an 8x8 inch pan with parchment paper. Leave some paper hanging over the edges. This helps you lift the bars out easily later. 1. Transferring the mixture to the pan: Scoop the mixture into the lined pan. Use your hands or a spatula to press it down firmly. Make sure it is even and compact. 2. Adding toppings: If you want extra flavor, sprinkle some chocolate chips on top. Gently press them into the mixture to keep them in place. 3. Refrigeration process: Place the pan in the fridge for at least 2 hours. This helps the bars set and become firm enough to cut. 1. How to cut bars evenly: Once set, lift the bars out of the pan using the parchment paper. Use a sharp knife to cut them into even squares. This makes serving easier. 2. Presentation ideas: Arrange the bars on a nice plate. You can add some fresh fruit or a drizzle of chocolate on top for a pop of color. 3. Serving suggestions: Serve these bars chilled. They make a great snack or dessert. You can also pack them for lunch or take them on the go. For the full recipe, check out the No-Bake Peanut Butter Chocolate Dream Bars. - Achieving the perfect consistency: The key is to mix well. When you combine the rolled oats and peanut butter with the sweetener, aim for a sticky dough. It should hold together without being too dry or too wet. - How to avoid stickiness: Lightly grease your hands or use a spatula when pressing the mixture into the pan. This helps keep everything from sticking to you. - Timing for refrigeration: Allow the bars to chill for at least two hours. This gives them time to set properly and makes them easier to cut. - Overmixing the ingredients: Mix just until the oats and peanut butter blend well. Overmixing can make the bars tough. - Using the wrong type of nut butter: Stick to natural peanut butter. Avoid brands with added sugars or oils, as they change the texture and flavor. - Not packing the mixture firmly enough: Press down firmly when spreading the mixture in the pan. This helps create a dense bar that holds its shape. - Adding spices like cinnamon or sea salt: A pinch of these can elevate the taste. Cinnamon adds warmth, and sea salt enhances the sweetness. - Using flavored nut butters: Try almond or cashew butter for a fun twist. These can add unique flavors to your bars. - Mixing in fruits or seeds: Dried fruits like cranberries or seeds like chia can add texture and extra nutrition. Just make sure to chop them small to mix well. For the full recipe, check the details above. {{image_2}} You can add a fun twist to your no-bake peanut butter bars. Here are some ideas: - Chocolate-peanut butter twist: Mix in more cocoa powder or chocolate chips for a rich flavor. - Nut and seed additions: Add chopped nuts or seeds like sunflower or chia for crunch and health. - Swapping different nut butters: Try almond or cashew butter instead of peanut butter for a new taste. These bars can fit many diets. Here are some options: - Vegan adaptations: Use maple syrup instead of honey and ensure your chocolate chips are dairy-free. - Keto-friendly options: Swap honey for a low-carb sweetener like erythritol or stevia. - Allergy-friendly substitutions: Use seed butter if you need a nut-free option. How you serve these bars can make them even better. Consider these ideas: - Layering with yogurt: Serve the bars with a layer of yogurt on top for creaminess. - Drizzles or sauces: Top them with melted chocolate or caramel for extra flavor. - Serving styles (bars vs. bites): Cut them into bite-sized pieces for a fun snack or keep them as larger bars for a filling treat. For the full recipe, refer to the previous section. Enjoy making these tasty treats! To keep your no-bake peanut butter bars fresh, store them in an airtight container. This prevents moisture and air from getting in. If you don't have a container, wrap the bars tightly in plastic wrap. Storing them in the fridge keeps them firm and tasty. You can also freeze them for longer storage. Just make sure to use freezer-safe containers. How long do these bars last? If stored in the fridge, they can last up to one week. In the freezer, they can stay good for about three months. Check for signs of spoilage like an off smell or a change in texture. If they feel too soft or sticky, it’s best to toss them. Can you refreeze these bars? Yes, but it's best to avoid refreezing if possible. Each time you thaw and refreeze, the texture can change. To maintain quality, let the bars thaw in the fridge rather than at room temperature. This helps keep them firm and fresh. Always check for any signs of spoilage before eating. For the best taste, enjoy them fresh! To make No-Bake Peanut Butter Bars, follow these steps: 1. Mix the dry ingredients: In a bowl, combine rolled oats and cocoa powder. 2. Combine wet ingredients: Add peanut butter, honey, and vanilla to the dry mix. Stir well. 3. Fold in chocolate chips: Gently mix in chocolate chips until evenly spread. 4. Prepare the pan: Line an 8x8 inch pan with parchment paper. 5. Transfer and press: Put the mixture into the pan and press down firmly. 6. Refrigerate: Chill the bars for at least 2 hours until firm. 7. Cut and serve: Use the parchment paper to lift out the bars and cut into squares. This simple process creates a tasty treat. You can find the Full Recipe [here](#). Yes, you can use crunchy peanut butter. It adds a nice texture. The bars will have bits of peanuts, making them even more enjoyable. Just make sure to mix it well so all ingredients blend nicely. If you prefer a smooth texture, stick with creamy peanut butter. These bars can be a healthy snack. They contain: - Rolled oats: Great source of fiber. - Peanut butter: Packed with protein and healthy fats. - Honey or maple syrup: Natural sweeteners with some nutrients. However, keep in mind that they are still a treat. Moderation is key. They provide energy, but watch portion sizes if you're counting calories. You can customize these bars in many ways: - Add nuts or seeds: Mix in almonds or chia seeds for extra crunch. - Use different sweeteners: Try agave syrup or stevia for a lower-calorie option. - Experiment with flavors: Add a pinch of cinnamon or chocolate protein powder for a twist. Feel free to get creative! For clean cuts, follow these tips: - Use a sharp knife: A sharp knife makes smooth cuts without tearing the bars. - Warm the knife: Dip the knife in hot water before cutting. Wipe it dry and cut through. - Cut when chilled: Make sure the bars are firm from refrigeration. This helps with clean edges. These techniques will give you neat, beautiful bars for serving. This blog post shared a simple recipe for no-bake peanut butter bars. We covered key ingredients, optional additions, and substitutions. The step-by-step instructions make it easy to follow, ensuring great results. I shared tips to avoid common mistakes and enhance flavors. You can also explore variations for different diets. Finally, I provided storage tips to keep your bars fresh. Enjoy making this treat and customizing it to your taste!

No-Bake Peanut Butter Bars

Indulge in the deliciousness of No-Bake Peanut Butter Chocolate Dream Bars, the perfect treat for any chocolate lover! This easy recipe combines rolled oats, creamy peanut butter, and rich chocolate for a satisfying dessert that requires no baking. In just 10 minutes of prep time, you can create these tasty bars that are perfect for snacking. Click through to discover the full recipe and satisfy your sweet cravings today!

Ingredients
  

1 cup rolled oats

1 cup natural peanut butter (smooth or crunchy)

1/2 cup honey or maple syrup

1/2 cup chocolate chips (milk or dark)

1/4 cup unsweetened cocoa powder

1 teaspoon vanilla extract

A pinch of salt

Extra chocolate chips for topping (optional)

Instructions
 

In a large mixing bowl, combine rolled oats, peanut butter, honey (or maple syrup), cocoa powder, vanilla extract, and a pinch of salt. Mix until the ingredients are well combined and form a sticky dough.

    Fold in the 1/2 cup of chocolate chips until evenly distributed.

      Line an 8x8 inch pan with parchment paper, leaving some overhang to make removing the bars easier later.

        Transfer the mixture to the lined pan and press it down firmly with your hands or a spatula until it is evenly spread out and compact.

          If desired, sprinkle extra chocolate chips on top and gently press them into the mixture.

            Refrigerate for at least 2 hours or until firm.

              Once set, remove from the pan using the parchment overhang and cut into bars.

                Store leftovers in an airtight container in the refrigerator.

                  Prep Time: 10 minutes | Total Time: 2 hours 10 minutes | Servings: 12 bars

                    Leave a Comment

                    Recipe Rating