If you love desserts that are simple and delicious, you need to try my No-Bake Oreo Cheesecake Bars. With just a few easy ingredients, this recipe lets you create a sweet treat that everyone will adore. No baking required means more time for you to enjoy! Dive into this quick guide where I’ll share every step to make these creamy, dreamy bars. Let’s get started on your next favorite dessert!
Ingredients
List of Ingredients for No-Bake Oreo Cheesecake Bars
– 24 Oreo cookies, crushed
– 1/4 cup unsalted butter, melted
– 16 oz cream cheese, softened
– 1 cup powdered sugar
– 2 teaspoons vanilla extract
– 1 cup whipped cream (store-bought or homemade)
– 8 Oreo cookies, roughly chopped (for topping)
Gathering these ingredients is the first step to your no-bake Oreo cheesecake bars. Each ingredient plays a key role in making this dessert creamy and delicious. The crushed Oreos form the base, giving a rich, chocolatey flavor. The melted butter helps bind the crust together. Cream cheese adds that creamy texture, while powdered sugar sweetens the filling.
Vanilla extract enhances the flavor, and whipped cream adds lightness. Finally, the chopped Oreos on top give a nice crunch and extra taste. Make sure to use high-quality cream cheese for the best results. If you want a fluffier texture in your bars, whip the cream cheese until smooth before mixing in the sugar and vanilla.Enjoy gathering your ingredients!
Step-by-Step Instructions
Preparing the Crust
To start, take 24 crushed Oreo cookies and mix them with 1/4 cup of melted butter. Stir until the crumbs soak up the butter. This mixture will hold together nicely. Next, press the cookie mix into the bottom of a 9×9 inch baking dish. Make sure it is even and compact. Chill it in the fridge for about 10 minutes. This helps the crust set well.
Making the Cheesecake Filling
Now, let’s make the cheesecake filling. In a large bowl, beat 16 ounces of softened cream cheese until it becomes smooth and creamy. Then, slowly add 1 cup of powdered sugar and 2 teaspoons of vanilla extract. Keep mixing until everything is well blended. The mixture should be thick and sweet. After that, gently fold in 1 cup of whipped cream. Be careful not to mix too hard; you want it to stay light and fluffy.
Assembling the Bars
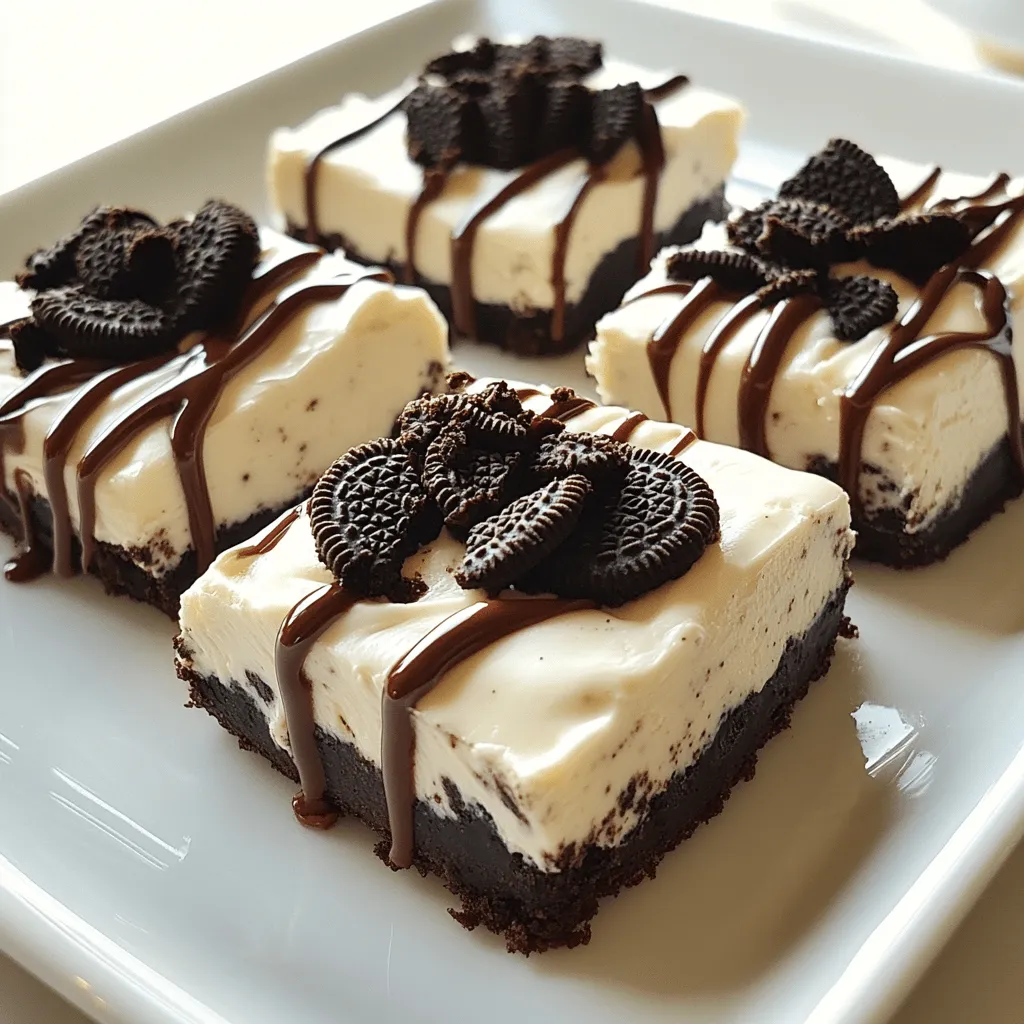
Once the filling is ready, pour it over the chilled crust. Use a spatula to smooth out the top. Next, take 8 roughly chopped Oreo cookies and sprinkle them over the cheesecake layer. This adds a nice crunch. After that, cover the dish with plastic wrap and pop it in the fridge. Let it chill for at least 4 hours. This step is key for the cheesecake to set properly. When it’s ready, cut into bars and serve. Enjoy your delicious creation!
Tips & Tricks
Perfecting the Texture
To make the best cheesecake bars, focus on beating the cream cheese well. Start with softened cream cheese to avoid lumps. Use an electric mixer for smoothness. Mix until it looks creamy and fluffy. This step is key for a rich filling.
For the whipped cream, you want it light and airy. If you use store-bought, make sure it’s chilled. If you make it at home, whip until stiff peaks form. Gently fold the whipped cream into the cream cheese mixture. This keeps the filling light and gives it a nice texture.
Serving Suggestions
Cutting the bars can be tricky. Use a sharp knife dipped in hot water for clean cuts. Wipe the knife after each cut to keep edges neat. This way, your bars look great on a plate.
For presentation, serve them on a white platter. This contrast highlights the dark Oreo crust. Drizzle chocolate sauce on top for a touch of flair. A sprig of mint adds color and freshness. These small details impress your guests.
Common Mistakes to Avoid
One common mistake is overmixing the filling. This can make it dense and heavy. Mix just enough to combine ingredients.
Another mistake is not chilling the bars long enough. They need at least four hours in the fridge to set. If you cut them too soon, they won’t hold their shape. Be patient for the best results.

Variations
Flavor Twist Ideas
You can change the flavor of your no-bake Oreo cheesecake bars easily. Here are some fun ideas:
– Chocolate Oreo cheesecake variation: Use chocolate Oreo cookies for the crust. This adds a rich, deep chocolate taste to every bite. You can even mix chocolate chips into the filling for a double chocolate treat.
– Adding fruit flavors like raspberry or lemon: For a fruity twist, add raspberry or lemon puree into the filling. Replace part of the cream cheese with the puree. This gives a fresh taste and bright color to your bars.
Dietary Adjustments
If you need to make these bars fit a specific diet, here are some tips:
– How to make it gluten-free: Use gluten-free Oreo cookies for the crust. Most brands offer gluten-free options that taste great. This way, you keep the yummy Oreo flavor without the gluten.
– Vegan alternatives for cream cheese and whipped cream: To make a vegan version, use cashew cream or coconut cream in place of cream cheese. For whipped cream, try coconut whipped cream. This keeps the bars creamy and delicious, even without dairy.
Explore these variations to make your no-bake Oreo cheesecake bars unique and fit your tastes or dietary needs.
Storage Info
Proper Storage Techniques
To keep your no-bake Oreo cheesecake bars fresh, use an airtight container. Glass or plastic containers work well. Line the container with parchment paper for easy removal. Place the bars in a single layer if possible. This helps prevent them from sticking together.
Store your cheesecake bars in the fridge. They need a cool environment to stay firm. Avoid leaving them at room temperature for long. This will keep them safe and tasty.
Shelf Life
You can store the bars in the fridge for up to five days. They will taste best within the first three days. After that, the texture may change.
Look for signs that the bars may no longer be good. Check for a change in smell or color. If they feel slimy or hard, it’s time to toss them. Always trust your senses; they know best!
FAQs
How do I make No-Bake Oreo Cheesecake Bars without cream cheese?
You can use Greek yogurt or silken tofu instead of cream cheese. Both options give you a creamy texture. If you choose yogurt, use plain for the best taste. For tofu, blend it until smooth to avoid lumps. You can also add a bit of lemon juice for tanginess. This keeps the bars light and tasty.
Can I freeze No-Bake Oreo Cheesecake Bars?
Yes, you can freeze these bars! First, cut them into slices. Wrap each slice in plastic wrap. Then, place them in an airtight container. They can last up to three months in the freezer. To thaw, move them to the fridge overnight. This keeps them fresh and ready to enjoy anytime.
What can I use instead of Oreos?
You can use any chocolate cookie for the crust. Try chocolate graham crackers or even peanut butter cookies. For a different flavor, use vanilla wafers. If you want a gluten-free option, use gluten-free chocolate cookies. Each choice adds a fun twist to your cheesecake bars.
No-Bake Oreo Cheesecake Bars are easy, tasty, and fun to make. You learned how to prepare the crust and the filling. I shared tips for great texture and serving ideas. Remember to chill them well to avoid common mistakes. You can even mix up flavors or try dietary changes. These bars are simple to store and have a long shelf life. Enjoy making and sharing these delicious treats. They are sure to impress at any gathering!