Are you ready to make a salad that’s both crispy and healthy? In this blog post, I’ll share my favorite recipe for Crispy Chickpea Salad. Packed with fresh veggies and bursting with flavor, this dish is perfect for any occasion. You’ll learn about key ingredients, step-by-step instructions, and tips for customizing it just the way you like. Let’s dive into this fresh and delightful meal!
Ingredients
Key Ingredients for Crispy Chickpea Salad
To make a great crispy chickpea salad, you need some key ingredients:
– 1 can (15 oz) chickpeas, drained and rinsed
– 2 tablespoons olive oil
– 1 teaspoon smoked paprika
– 1 teaspoon garlic powder
– Salt and black pepper to taste
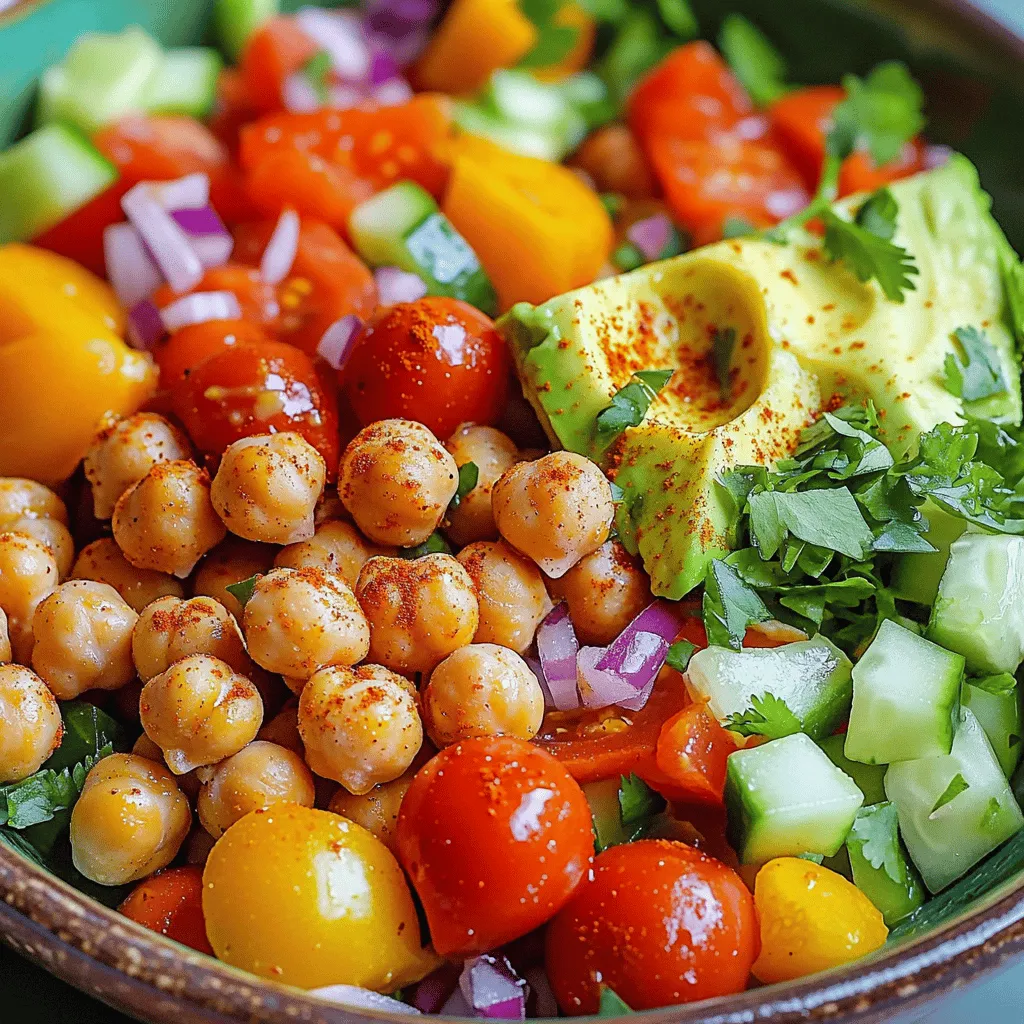
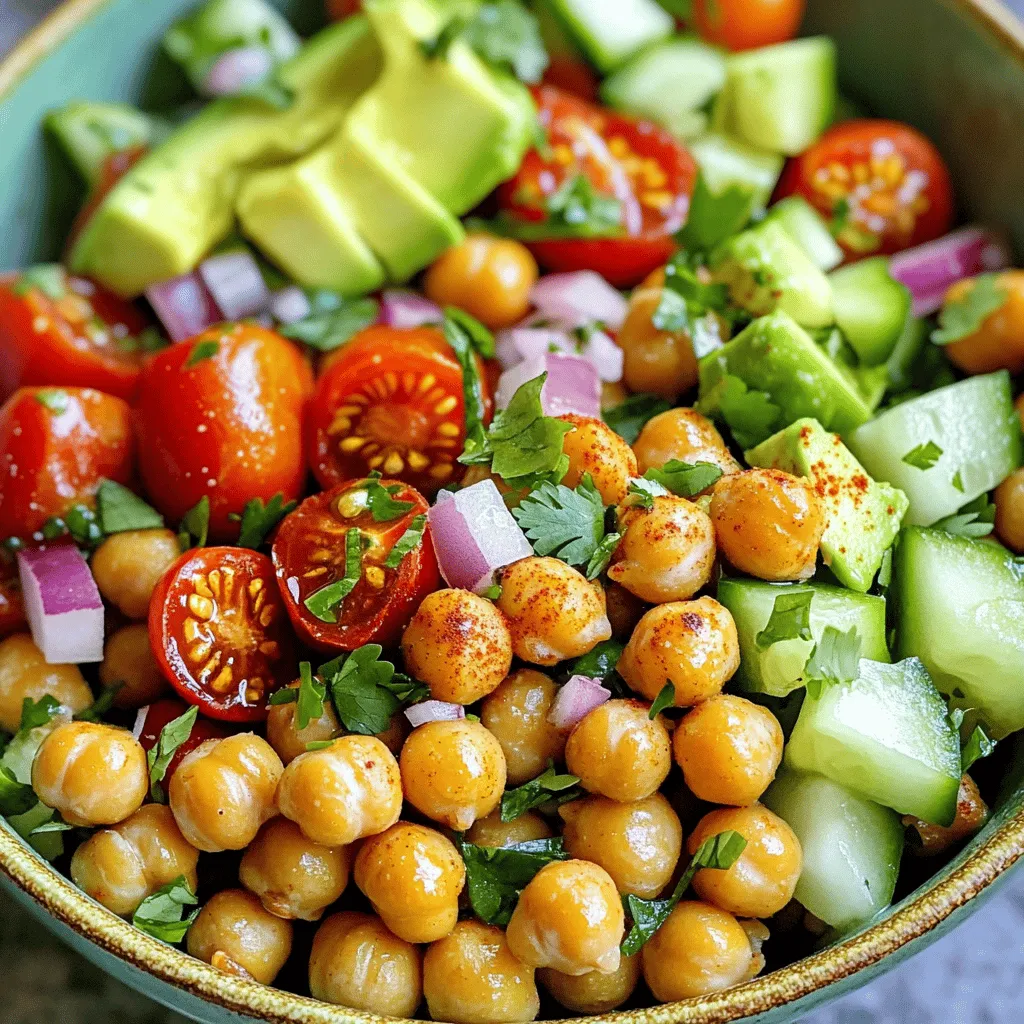
– 1 cup cherry tomatoes, halved
– 1 cucumber, diced
– 1 bell pepper (any color), diced
– ¼ red onion, finely chopped
– 1 avocado, diced
– ¼ cup fresh cilantro or parsley, chopped
– Juice of 1 lime
These ingredients bring the salad to life. The chickpeas give it crunch. The veggies add freshness. The lime juice gives it a zesty kick.
Optional Ingredients for Customization
You can change the salad to fit your taste. Here are some optional ingredients you might like:
– Feta cheese for creaminess
– Spinach or kale for extra greens
– Nuts or seeds for added crunch
– Spices like cumin or chili powder for a kick
Feel free to mix and match. It’s your salad, so make it your own!
Nutritional Highlights
This salad is not just tasty; it’s also good for you. Here are some highlights:
– Chickpeas pack protein and fiber.
– Fresh veggies provide vitamins and minerals.
– Healthy fats from avocado and olive oil support heart health.
This salad is great for a light meal or a side dish. You get nutrition and flavor in every bite.
Step-by-Step Instructions
Preparing the Crispy Chickpeas
First, preheat your oven to 400°F (200°C). This step is key for crispy chickpeas. Next, take a can of chickpeas, drain, and rinse them. Pat them dry with a paper towel. This keeps them from getting soggy. Spread the chickpeas on a baking sheet. Drizzle two tablespoons of olive oil over them. Sprinkle one teaspoon of smoked paprika and one teaspoon of garlic powder on top. Add salt and black pepper to taste. Toss the chickpeas to coat them evenly. Spread them out in a single layer. Roast in the oven for 25 to 30 minutes. Shake the pan halfway through to ensure they cook evenly. They should be golden brown and crispy when done.
Assembling the Salad
While the chickpeas roast, it’s time to make the salad. In a large bowl, combine one cup of halved cherry tomatoes, one diced cucumber, and one diced bell pepper. Add ¼ of a finely chopped red onion and one diced avocado. Mix these fresh ingredients well. They add crunch and flavor to your salad. Once the chickpeas are crispy, let them cool for a few minutes. Then, add them to the bowl with the veggies.
Final Touches
Now it’s time for the dressing. Squeeze the juice of one lime over the salad. This adds a zesty kick. Add ¼ cup of chopped fresh cilantro or parsley to brighten the dish. Toss everything together gently. Make sure each bite has a bit of everything. Taste your salad and adjust the seasoning if needed. You may want more salt, pepper, or lime juice. Serve right away for the best crunch.Enjoy your fresh and flavorful crispy chickpea salad!
Tips & Tricks
Achieving the Perfect Crispiness
To get the best crispiness from your chickpeas, start by drying them well. Use a paper towel to pat them until they are dry. Wet chickpeas will not crisp up in the oven. Next, spread them out in a single layer on the baking sheet. This allows them to roast evenly. Don’t forget to shake the pan halfway through cooking. This helps them brown all over.
Flavor Enhancements
To elevate the flavor, try adding different spices. Cayenne pepper gives a nice kick. You can also mix in some cumin for a warm taste. If you like tanginess, a splash of vinegar can work wonders. Don’t be shy about seasoning! A bit of salt and pepper is key, but taste as you go. It helps to balance the flavors just right.
Serving Suggestions
Serve this salad fresh for the best crunch. You can add it to a bed of greens for more texture. Pair it with a simple dressing, like olive oil and lemon juice. If you want a heartier meal, add some cooked quinoa or grains. This makes it perfect for lunch or dinner. For added freshness, top with extra herbs just before serving.
Variations
Ingredient Substitutions
You can swap chickpeas for other beans like black beans or kidney beans. If you want a different crunch, try roasted nuts or seeds. For a low-carb option, use diced cauliflower instead of chickpeas. Use different oils, like avocado oil or sesame oil, to change the flavor. You can also use lemon juice instead of lime for a zesty twist.
Seasonal Variations
In spring, toss in fresh peas or asparagus for a bright touch. Summer is perfect for adding corn or diced zucchini. In fall, roasted butternut squash adds warmth and sweetness. Winter brings hearty greens like kale or spinach. Each season offers fresh flavors to keep this salad exciting.
Dressing Options
While lime juice is great, you can also make a creamy dressing. Mix yogurt with lemon juice and a pinch of salt. For a tangy option, try balsamic vinegar with olive oil. A spicy dressing made with sriracha and honey can add a kick. Experiment with herbs like dill or basil to create your own unique blend.
Storage Info
How to Store Leftovers
To store leftover crispy chickpea salad, place it in an airtight container. Make sure to cool the salad to room temperature first. This keeps the flavors fresh and prevents sogginess. If you want to keep the chickpeas crispy, store them separately.
Reheating Crispy Chickpeas
If you want to enjoy crispy chickpeas again, reheat them in the oven. Preheat your oven to 400°F (200°C). Spread the chickpeas on a baking sheet. Heat for about 10 minutes, or until they feel warm and crispy again. Avoid using a microwave, as it makes them soft.
Shelf Life of the Salad
The salad stays good in the fridge for up to three days. After that, the chickpeas may lose their crunch and the veggies can wilt. For the best flavor and texture, eat the salad within two days.
FAQs
Can I make this salad ahead of time?
Yes, you can make this salad ahead of time. I suggest preparing the chickpeas and salad separately. Store the crispy chickpeas in an airtight container. They stay crunchy this way. You can mix the salad ingredients and keep them in the fridge. Just add the chickpeas right before serving. This keeps everything fresh and crisp.
How can I make the chickpeas crispy without an oven?
You can make crispy chickpeas on the stovetop. First, drain and rinse the chickpeas. Pat them dry well. Heat a pan over medium heat and add olive oil. Once hot, add the chickpeas. Stir them often, letting them cook for about 10-15 minutes. They should turn golden brown and crispy. Season them while they cook for extra flavor.
What are some common toppings for Crispy Chickpea Salad?
You can add many toppings to this salad. Here are some ideas:
– Feta cheese for a salty kick
– Sliced olives for a briny flavor
– Nuts, like almonds or walnuts, for crunch
– Seeds, such as pumpkin or sunflower, for added texture
– A drizzle of tahini or yogurt dressing for creaminess
Feel free to mix and match to fit your taste!
This blog post shared how to make a tasty Crispy Chickpea Salad. I covered key ingredients, step-by-step instructions, tips for perfecting it, and variations to try. You can customize it to your taste and make it your own.
Remember, you can store leftovers for later. Enjoy your salad anytime with these simple tips. Explore fun options. Find what tastes best for you, and share it with friends!