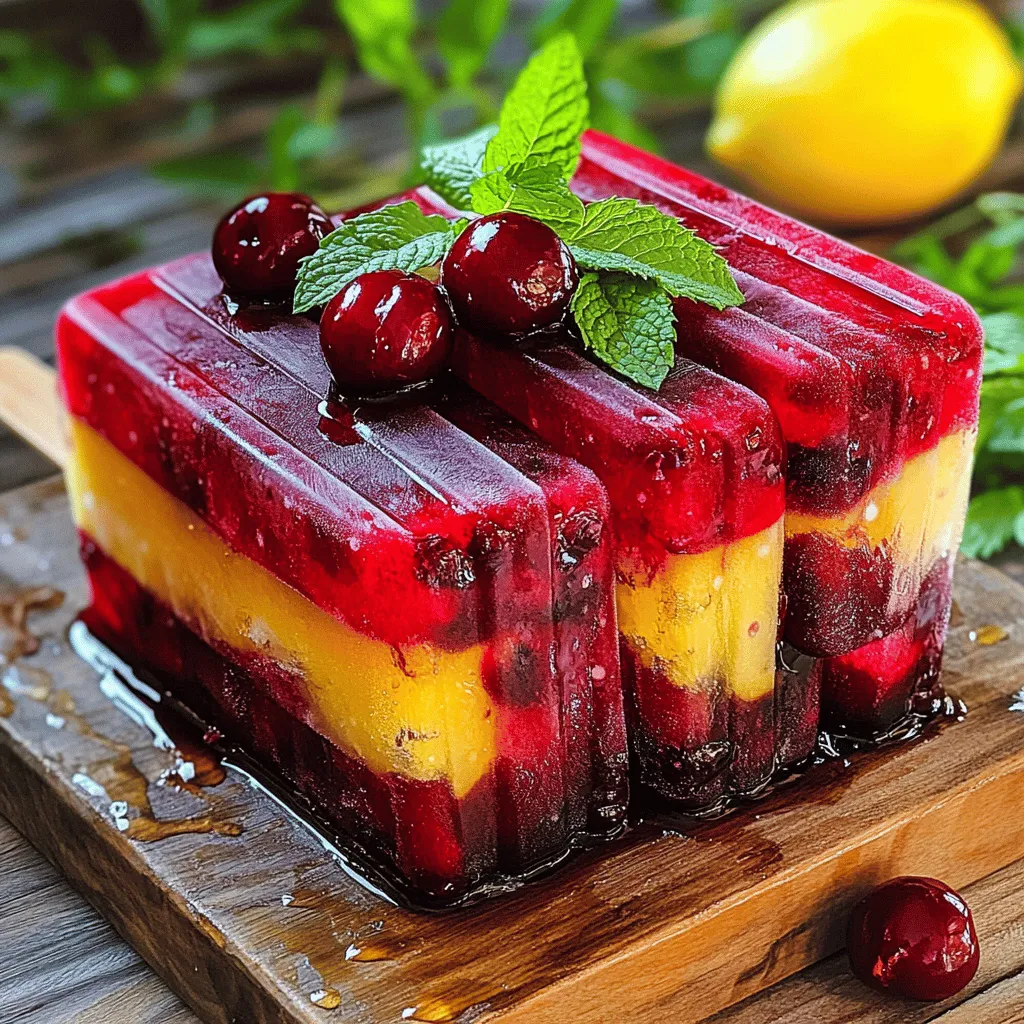
Looking for a cool treat this summer? Try my Cherry Lemonade Popsicles! They combine tart lemon and sweet cherries, making them extra refreshing. With just a few simple ingredients, these popsicles are easy to make and perfect for beating the heat. Plus, I’ll share tips, variations, and storage hacks to ensure your popsicles are a hit. Let’s dive into this delightful treat that will brighten your sunny days!
Ingredients
When making Cherry Lemonade Popsicles, the right ingredients make all the difference. Here’s what you need:
– 2 cups fresh cherries, pitted and halved
– 1 cup freshly squeezed lemon juice
– 1/2 cup granulated sugar
– 1 cup water
– Zest of 1 lemon
– Optional: Fresh mint leaves for garnish
Each ingredient plays a key role in flavor and texture. Fresh cherries provide a sweet and tart taste. Lemon juice adds the right amount of zing and brightness. Sugar balances the tartness, making each bite delightful. Water helps blend everything smoothly. The lemon zest gives a punch of citrus aroma that elevates the popsicles.
You can use fresh mint leaves as a cute garnish. They add a pop of color and a fresh taste. This simple list creates a refreshing summer treat that everyone will love.
Step-by-Step Instructions
Preparing the Simple Syrup
– Combine 1 cup of water and 1/2 cup of granulated sugar in a medium saucepan.
– Stir the mixture over medium heat until the sugar dissolves completely. This takes about 2-3 minutes.
– Once dissolved, remove the saucepan from heat and let the syrup cool.
Blending the Cherries
– Take 2 cups of fresh cherries, pitting and halving them first.
– Place the cherries in a blender. Blend them using a pulse action. You want a smooth blend but still some texture. Set the cherry puree aside.
Mixing the Popsicle Base
– In a large mixing bowl, combine the cooled simple syrup, 1 cup of freshly squeezed lemon juice, and the zest of 1 lemon.
– Add half of the blended cherries into the bowl. Stir well to mix everything together.
– Pour the mixture into popsicle molds and fill them halfway.
– Layer the reserved cherry puree on top. Then, fill the molds with the lemonade mixture, leaving a little space at the top for expansion.
– Insert popsicle sticks into the molds and place them in the freezer. Let the popsicles freeze for at least 4-6 hours, or until solid.
Tips & Tricks
Achieving the Perfect Popsicle Texture
To make smooth cherry lemonade popsicles, start with the cherries. Use fresh cherries whenever you can. Cut them in half and remove the pits. This helps in blending them smoothly. When blending, pulse the cherries rather than blending them continuously. This keeps some tiny pieces, adding nice texture.
For the lemonade base, mix the cooled simple syrup, lemon juice, and zest well. This ensures even flavor in every bite. When pouring the mixture into molds, fill them halfway first. Then, add a layer of cherry puree. Make sure to leave some space at the top for the popsicles to expand while freezing. This layering makes each popsicle look pretty and adds depth of flavor.
Serving Suggestions
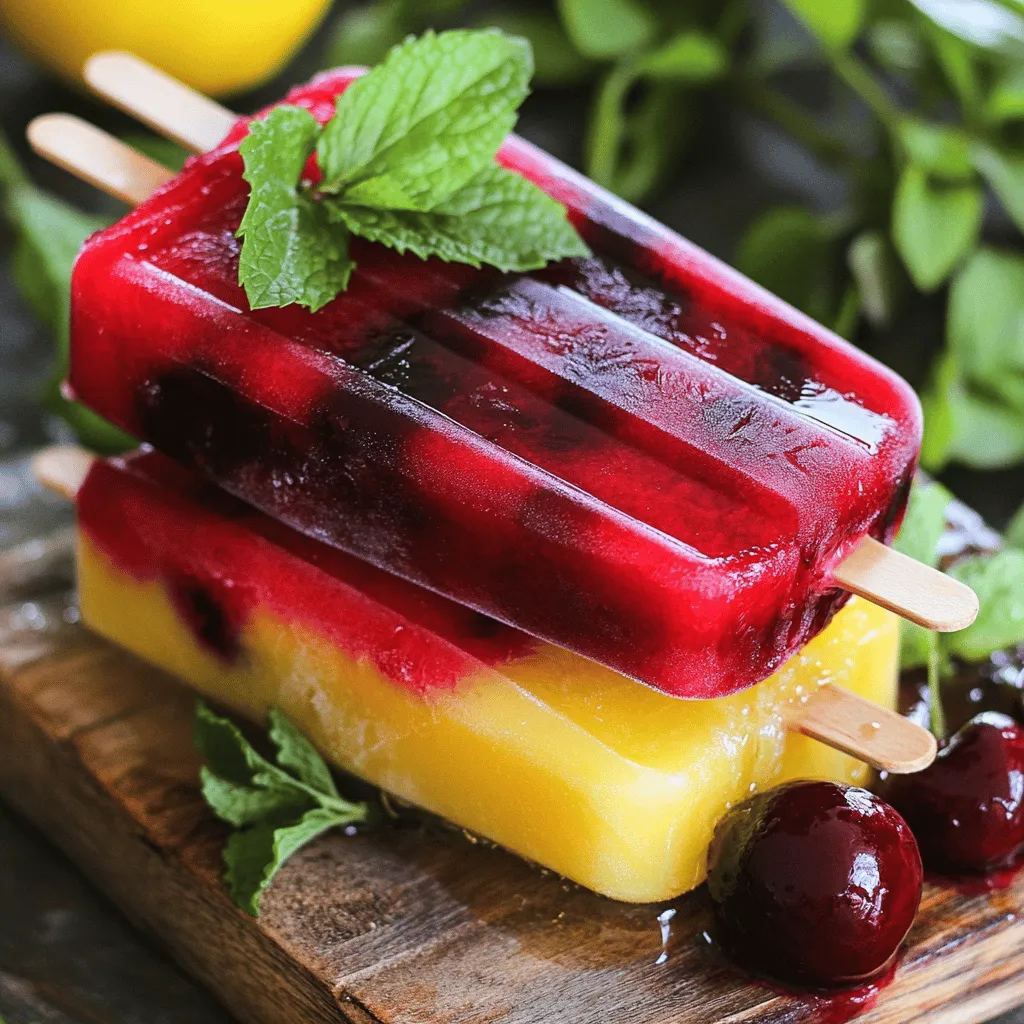
Serving your cherry lemonade popsicles can be fun! I like to place them on a wooden board for a rustic look. Add fresh mint leaves around the popsicles for a pop of color. You can also drizzle a little extra cherry puree on top for a fancy touch.
These popsicles pair well with other summer treats. Try serving them with a scoop of vanilla ice cream or alongside fresh fruit salad. You can even create a fun popsicle bar. Set out toppings like crushed nuts, coconut flakes, or sprinkles for everyone to enjoy. This adds a personal touch to your summer gatherings.
Variations
Flavor Additions
You can play with flavors in these popsicles. Adding other fruits can make them even better. Try mixing in fresh strawberries or raspberries. These fruits pair well with cherries and add a nice twist. You can mash or blend them before adding to the mix. This way, you get a tasty blend of flavors in every bite.
Another cool idea is to use herb-infused syrups. For example, mint or basil syrups can add a refreshing touch. Simply infuse your syrup with your favorite herb while it cools. Strain out the herbs before mixing it into the popsicle base. This adds a unique flavor that surprises your taste buds.
Dietary Adjustments
If you want to make these popsicles sugar-free, it’s easy! Use natural sweeteners like honey or agave syrup. These options add sweetness without the sugar rush. You can also use stevia or monk fruit sweeteners for a low-calorie treat. Just adjust the amount to suit your taste.
For those who need gluten-free options, you’re in luck! The recipe is already gluten-free. There are no flours or grains in the ingredients. Just make sure your sweeteners are also gluten-free. This way, everyone can enjoy a refreshing popsicle on a hot day.
Storage Info
How to Store Homemade Popsicles
To keep your cherry lemonade popsicles fresh, proper storage is key. The best method is to use airtight containers or freezer bags. This prevents ice crystals from forming and keeps flavors intact.
– Freezing Tips:
– Allow popsicles to freeze fully for at least 4-6 hours.
– Once frozen, remove them from molds and wrap each popsicle in plastic wrap.
– Place wrapped popsicles in a container or a freezer bag.
– Maintaining Flavor and Texture:
– Store popsicles away from strong-smelling foods. They can absorb those odors.
– Keep popsicles at a consistent freezing temperature. Avoid frequent opening of the freezer.
Shelf Life
Homemade cherry lemonade popsicles taste best when eaten fresh. For the best flavor, enjoy them within 2 months of making them.
– Recommended Consumption Timeline:
– For best taste, consume within 1 month.
– If stored well, they can last up to 2 months.
– Signs of Spoilage:
– Watch for ice crystals forming on the popsicles.
– If they appear discolored or have an off smell, it’s best to discard them.
FAQs
How long do cherry lemonade popsicles take to freeze?
Cherry lemonade popsicles usually take about 4 to 6 hours to freeze. Several factors can affect this time. First, your freezer’s temperature plays a big role. A colder freezer will freeze them faster. Second, the size of your popsicle molds matters. Larger molds take longer to freeze than smaller ones. Lastly, if the mixture is warmer when poured, it will take longer to solidify. To be safe, check them after 4 hours. If they are still soft, let them freeze for another hour.
Can I use frozen cherries for this recipe?
Yes, you can use frozen cherries in this recipe. Using frozen cherries can save time and provide a chilled treat. They are often picked at peak ripeness, meaning they still have great flavor. However, frozen cherries can be a bit mushy when thawed. This might change the texture of the popsicles. If you use frozen cherries, let them thaw slightly before blending. This way, you can blend them smoothly without extra ice.
What can I substitute for lemon juice?
If you need a substitute for lemon juice, you have a few options. Lime juice works well and adds a similar tangy flavor. You can also use vinegar for a different taste, but use it sparingly. If you want a sweeter option, try orange juice. Keep in mind that each substitute will slightly change the flavor profile of your popsicles. Adjust the sugar to balance the sweetness and tartness when using these alternatives.
You learned how to make refreshing cherry lemonade popsicles. We covered the ingredients, from fresh cherries to lemon juice. I walked you through step-by-step instructions, from making simple syrup to blending your mixture. We also explored tips for perfect texture and fun serving ideas. Lastly, I shared variations and storage methods for your popsicles.
Enjoy your homemade treats and get creative with flavors. You’ll impress everyone with your popsicle skills this summer. Happy blending!