Skip to content
DisclaimerTerms Of UseGDPR PolicyCookie Policy

Southern Dishes

  • Home
  • Drinks
  • Appetizers
  • Dinner
  • Dessert
  • About
  • Contact
  • Privacy Policy
DisclaimerTerms Of UseGDPR PolicyCookie Policy

Isabella

To make Lemon Herb Grilled Salmon, you need fresh and simple ingredients. Here’s the list: - 4 salmon fillets (6 ounces each) - 2 tablespoons olive oil - Zest and juice of 1 large lemon - 2 cloves garlic, minced - 1 tablespoon fresh dill, chopped - 1 tablespoon fresh parsley, chopped - 1 teaspoon salt - ½ teaspoon black pepper - Lemon slices for garnish - Fresh dill sprigs for garnish These ingredients work together to create a bright and tasty dish. The salmon fillets should be fresh, as they hold flavor well. Olive oil adds richness and helps in cooking. The lemon zest and juice give a zesty kick. Garlic adds depth, while the herbs bring freshness. Salt and pepper enhance all the flavors. When you prepare your ingredients, make sure they are ready to go. This makes the cooking process smoother. You can find the Full Recipe in the cooking section for detailed steps. Enjoy your cooking! To start, gather all your ingredients for the marinade. In a small bowl, mix: - 2 tablespoons olive oil - Zest and juice of 1 large lemon - 2 cloves garlic, minced - 1 tablespoon fresh dill, chopped - 1 tablespoon fresh parsley, chopped - 1 teaspoon salt - ½ teaspoon black pepper Whisk these together until they blend well. The lemon juice brightens the flavor, while the herbs add depth. This marinade is key to making your salmon burst with taste. Next, prepare your salmon. Rinse the fillets under cold water and pat them dry with paper towels. Place the salmon in a shallow dish or a resealable bag. Pour the marinade over the salmon, ensuring it coats every piece. Cover the dish or seal the bag and place it in the fridge for at least 30 minutes. This allows the flavors to seep into the salmon, making it more delicious. Once the marinating time is up, it's time to grill. Preheat your grill to medium-high heat. Lightly oil the grill grates to keep the salmon from sticking. Place the salmon skin-side down on the grill. Cook for 4 to 5 minutes. Then, gently flip the fillets and grill for another 4 to 5 minutes. You know the salmon is done when it flakes easily with a fork and reaches an internal temperature of 145°F (63°C). After grilling, take the salmon off the grill and let it rest for a few minutes. This helps keep the fish juicy. For a lovely touch, garnish with fresh lemon slices and sprigs of dill. This dish looks as good as it tastes. For the full recipe, check out the complete details in the earlier section. Grilling salmon is fun and easy. Start with good quality salmon. Fresh fish makes a big difference. Always preheat your grill. This helps the salmon cook evenly. Lightly oil the grill grates to prevent sticking. Cook the salmon skin-side down. This keeps the fish moist. Avoid flipping too soon. Let it develop nice grill marks. To check if the salmon is done, look for its color. It should change from bright pink to a pale, opaque color. Use a fork to test it. If the fish flakes easily, it is ready. You can also check the internal temperature. It should reach 145°F (63°C). A simple food thermometer can help you with this task. You can boost the flavors in your salmon dish. Try adding different herbs like thyme or basil. A dash of smoked paprika can give it a nice twist. Lemon zest brightens the taste, so don't skip it! Consider adding a bit of honey for a sweet contrast. Serve the grilled salmon with a fresh salad for extra crunch. For the full recipe, check out the Lemon Herb Grilled Salmon section. {{image_2}} You can switch up the herbs in this dish. If you don’t have dill or parsley, try basil or tarragon. Cilantro can also add a fresh taste. Each herb brings a unique flavor to the salmon. Feel free to mix and match to find what you love! If you don’t have a grill, you can use an oven or pan-sear the salmon. For the oven, set it to 400°F (200°C). Bake the salmon for about 12-15 minutes. For pan-searing, heat oil in a skillet over medium heat. Cook the salmon for 4-5 minutes on each side. Both methods work well and still give you delicious salmon. Pair your lemon herb grilled salmon with fresh veggies. Grilled asparagus or a crisp salad complements the dish nicely. You can also serve it over rice or quinoa for a hearty meal. Don’t forget to drizzle extra lemon juice for a bright finish. For more ideas, check out the Full Recipe for inspiration! After cooking, you can store Lemon Herb Grilled Salmon in the fridge. Place the salmon in an airtight container or wrap it tightly with plastic wrap. It stays fresh for up to three days. Make sure it cools down before you put it away. This helps keep the salmon from getting soggy. Always label the container with the date. This way, you’ll know how long it’s been stored. If you want to save your grilled salmon for later, freezing is a great option. First, let the salmon cool completely. Then, wrap each fillet in plastic wrap. Next, place the wrapped fillets in a freezer-safe bag. Remove as much air as you can before sealing. This helps prevent freezer burn. The salmon can last up to three months in the freezer. When you're ready to eat it, just thaw it in the fridge overnight. To reheat your salmon, avoid using the microwave if possible. It can make the fish dry. Instead, preheat your oven to 350°F (175°C). Place the salmon on a baking sheet and cover it loosely with foil. Heat for about 10-15 minutes or until warmed through. You can also reheat it on the grill for a few minutes on low heat. This keeps the salmon moist and tasty. If you want, you can add a splash of lemon juice to enhance the flavor. For more details, check out the Full Recipe. You can pair this dish with many sides. Consider serving it with: - Steamed broccoli - Garlic mashed potatoes - Quinoa salad - A fresh garden salad - Roasted asparagus These sides balance the salmon's rich flavor and bring freshness to your meal. Yes, you can use frozen salmon. Just make sure to thaw it first. Place it in the fridge overnight or submerge it in cold water for a quick thaw. Using thawed salmon ensures even cooking and better flavor. Marinate the salmon for at least 30 minutes. This time lets the flavors soak into the fish. For even better taste, you can marinate it for up to 2 hours. Just don’t go longer, or the citrus can change the texture. To store leftover salmon, place it in an airtight container. Keep it in the fridge for up to three days. If you want to save it longer, freeze it. Wrap it well in plastic wrap and then in foil. Absolutely! You can make the marinade ahead of time. Store it in the fridge for up to three days. This makes meal prep easier. Just remember to whisk it again before using, as the ingredients may settle. For the full recipe, check out the details above! This blog post covered everything you need for Lemon Herb Grilled Salmon. We discussed ingredients, marinating, and grilling steps. You learned tips for the best results and fun variations. We also explored storage and answered common questions. Cooking salmon can be easy and tasty. Use fresh herbs and follow the steps for great flavor. Remember, trying different methods or herbs can make the dish fun and unique. Enjoy this recipe and share it with others!

Lemon Herb Grilled Salmon Fresh and Flavorful Dish

Are you ready to bring vibrant flavors to your table? My Lemon Herb Grilled Salmon recipe is fresh, simple, and

To create delicious maple glazed carrots, gather these simple ingredients: - 1 pound baby carrots (or sliced regular carrots) - 3 tablespoons pure maple syrup - 2 tablespoons unsalted butter - 1 teaspoon cinnamon - 1/4 teaspoon nutmeg - Salt and black pepper to taste - 1 tablespoon chopped fresh parsley (for garnish) These ingredients blend to make a sweet, savory mix. Maple syrup adds a rich flavor. The butter gives a smooth texture. Cinnamon and nutmeg add warmth and spice. Feel free to adjust the salt and pepper to suit your taste. This mix will create a side dish everyone loves. For the full recipe, check out the steps provided. 1. Rinse and prepare the carrots First, rinse the baby carrots under cool water. If you use regular carrots, peel them and slice into 1/4-inch thick rounds. This helps them cook evenly and soak up the glaze. 2. Melt butter in a skillet Next, take a medium-sized skillet and melt the butter over medium heat. You want it to melt completely but not brown. This will give the carrots a rich flavor. 1. Sauté carrots and add seasonings Once the butter melts, add the baby carrots. Sauté them for about 3 to 5 minutes. Stir occasionally until they start to soften. Then, drizzle the maple syrup over the carrots. Add the cinnamon and nutmeg, stirring well to coat them evenly. 2. Simmer until fork-tender Now, reduce the heat to low and cover the skillet. Let the carrots simmer for about 10 to 12 minutes. They should become fork-tender. Stir them occasionally to stop sticking. 3. Thicken the glaze and season to taste Uncover the skillet and cook for an additional 2 to 3 minutes. This thickens the glaze. Stir gently to ensure all the carrots are coated. Finally, season with salt and black pepper to taste. You can find the Full Recipe for more details on this delicious dish! To get the best glaze on your carrots, timing and heat matter. Start with medium heat when you sauté the carrots. This helps them soften without burning. Stir often to keep them cooking evenly. Once you add the maple syrup and spices, lower the heat. This allows the flavors to meld and the glaze to thicken. Adjusting sweetness and spice can elevate your dish. If you like it sweeter, add more syrup. If you enjoy a spicy kick, increase the cinnamon or add a hint of cayenne. Just a bit can change the whole dish. Taste as you go, and find the balance that makes you smile. Maple glazed carrots pair well with many main dishes. They complement roasted chicken, grilled pork, or a hearty beef stew. The sweet flavor can contrast nicely with savory meats. For a great presentation, use a large, shallow dish. Layer the carrots for a beautiful look. Don’t forget to sprinkle fresh parsley on top. This adds color and freshness. Serve warm for the best taste. For more ideas, check the Full Recipe for variations and tips. {{image_2}} You can change the sweet taste of maple glazed carrots by using other sweeteners. Honey works great if you want a floral note. Agave syrup is a lighter option that adds sweetness without too much flavor. Both can replace maple syrup in equal amounts. Just remember, each sweetener brings its own taste, so choose what you like best. You can easily spice up your maple glazed carrots with more flavors. Adding minced garlic gives a nice savory touch. Fresh ginger can add warmth and a little zing. If you want a bright twist, try adding orange zest. Just a little can make the dish pop! Mix and match these options to find your favorite flavor combo. Enjoy creating your perfect dish! For the full recipe, check out the details above. To store leftover maple glazed carrots, let them cool first. Place them in an airtight container. This helps keep them fresh. Make sure to store them in the fridge. They are best eaten within three to four days. If you want to keep them longer, consider freezing them. To reheat your glazed carrots, use the stovetop for best results. Heat them in a skillet over low heat. Add a splash of water or a little butter to help them reheat evenly. Stir gently to avoid burning. You can also use the microwave. Place the carrots in a microwave-safe dish. Cover them with a damp paper towel to keep moisture in. Heat in short bursts, stirring in between, until warm. This way, you keep the flavor and texture intact. To make maple glazed carrots, start with fresh carrots. Rinse them well. If you use regular carrots, peel and slice them into rounds. Next, melt butter in a skillet over medium heat. Add the carrots and sauté them for about 3-5 minutes. When they soften, drizzle in pure maple syrup. Sprinkle in cinnamon and nutmeg. Stir everything well to coat. Lower the heat and cover the skillet. Let the carrots simmer for about 10-12 minutes. They should become fork-tender. Finally, uncover and cook for 2-3 more minutes. This thickens the glaze. Season with salt and black pepper to taste. Serve warm, and enjoy this tasty dish! You can find the complete method in the Full Recipe. Yes, you can use frozen carrots for this recipe. However, they may need a bit longer to cook. Make sure to thaw them first for even cooking. Add them directly to the skillet after melting the butter. Sauté them until they are heated through. Then, follow the same steps as with fresh carrots. The flavor will still shine through, but the texture may differ slightly. You can add many spices to enhance the flavor of maple glazed carrots. Here are some options: - Ginger adds warmth and a slight zing. - Garlic gives a savory touch. - Orange zest brings a bright citrus note. - Allspice or cloves can add depth. Each of these spices can make your dish unique. Experiment with them to find your favorite blend! In this post, I shared how to make flavorful maple glazed carrots. We covered key ingredients like baby carrots, maple syrup, and spices. I explained easy steps to achieve the perfect glaze. Remember, adjust sweetness and spice to suit your taste. Also, think about adding options like garlic or ginger for extra flavor. Store any leftovers properly and reheat them for the best taste. With these tips, you can impress anyone at your next meal. Enjoy your cooking!

Maple Glazed Carrots Flavorful and Simple Side Dish

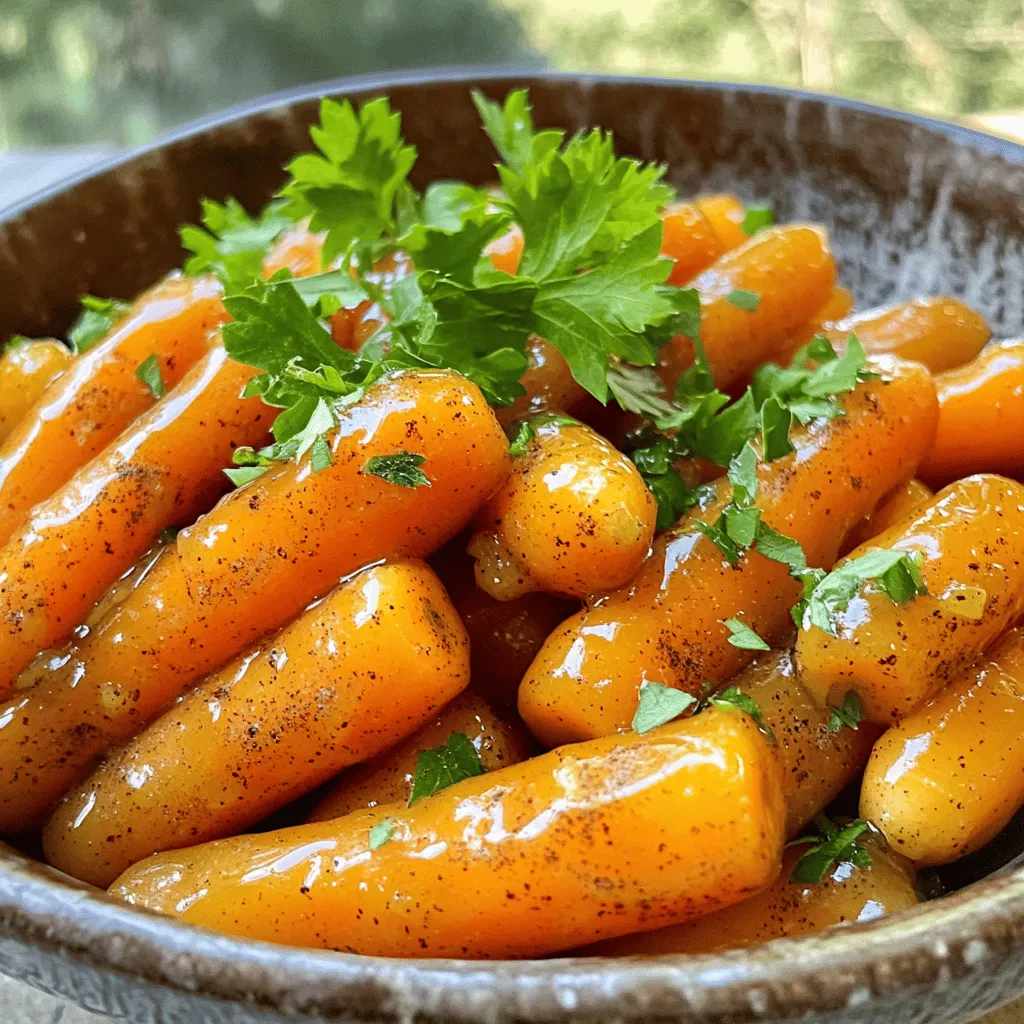
Maple glazed carrots are a tasty and simple side dish that you will love. With just a few easy ingredients,

To make delicious cinnamon sugar churros, you need a few key ingredients: - 1 cup water - 1/2 cup unsalted butter - 1 tablespoon granulated sugar - 1/4 teaspoon salt - 1 cup all-purpose flour - 2 large eggs - 1 cup granulated sugar (for coating) - 2 teaspoons ground cinnamon - Oil for frying (such as vegetable or canola) These ingredients form the base of your churro dough. The water, butter, and sugar create a rich mixture that brings everything together. The flour gives the churros their structure, and the eggs add moisture and richness. Finally, the cinnamon sugar coating makes them irresistible. While the basic recipe is delightful, you can enhance your churros with a few optional ingredients: - 1 teaspoon vanilla extract - Dipping sauces (like chocolate or caramel) Adding vanilla extract gives your churros a sweet aroma. Dipping sauces make for an extra fun experience. You can try chocolate or caramel for a rich flavor. For the full recipe, check out the detailed instructions. Enjoy making these sweet treats! Boiling the Base Mixture Start by grabbing a medium saucepan. Add 1 cup of water, 1/2 cup of unsalted butter, 1 tablespoon of granulated sugar, and 1/4 teaspoon of salt. Place the saucepan over medium heat. Stir until the mixture begins to boil. This step is key because the hot liquid helps to create a fluffy dough. Incorporating Flour and Eggs Once boiling, remove the saucepan from the heat. Quickly stir in 1 cup of all-purpose flour using a wooden spoon. Mix until a dough forms. Let it rest for about 5 minutes to cool slightly. Add 2 large eggs one at a time, mixing well after each. The dough should look smooth and glossy. Finally, add 1 teaspoon of vanilla extract and stir until combined. Heating the Oil Grab a deep skillet or fryer and fill it with about 2 inches of oil. Heat the oil to 350°F (175°C). This temperature is perfect for frying and will help the churros become golden and crispy. Piping and Frying Techniques Transfer the churro dough into a piping bag fitted with a star tip. Pipe 6-inch long strips of dough directly into the hot oil. Use scissors to cut each strip. Fry the churros for about 2-3 minutes on each side. They should turn a beautiful golden brown. Use a slotted spoon to take them out, letting excess oil drip off. Cinnamon Sugar Coating Technique In a shallow bowl, mix together 1 cup of granulated sugar and 2 teaspoons of ground cinnamon. Roll each churro in the cinnamon sugar while they are still warm. This coating gives them that sweet and spicy flavor everyone loves. Presentation Ideas Serve the churros in a tall glass or on a plate. Add a small bowl of chocolate sauce or caramel for dipping. For an extra touch, sprinkle more cinnamon sugar on top. This makes your churros look as great as they taste. To make perfect churros, focus on the dough's consistency. The dough should be thick but still pipeable. It should not be runny or too dry. If it feels too sticky, add a touch more flour. Next, frying temperature is key. Heat your oil to 350°F (175°C). If the oil is too hot, the churros burn outside and stay raw inside. If too cool, they soak up oil and become greasy. Use a thermometer for best results. Avoid oily churros by not overcrowding the pan. Fry only a few at a time to keep the oil hot. Also, let excess oil drip off after frying. For even cooking, make sure to turn the churros halfway through frying. This helps them brown nicely on all sides. Keep an eye on the time, frying for about 2-3 minutes per side is ideal. {{image_2}} You can have fun with churros by adding flavors. Two popular options are chocolate and pumpkin spice. - Chocolate or Caramel Infused Churros: To make these, melt chocolate or caramel into the dough. You can also dip cooked churros in warm chocolate or caramel sauce. This adds a rich taste and makes each bite special. - Pumpkin Spice Churros: Add pumpkin puree and pumpkin spice to the dough. This twist is perfect for fall. The warm spices mix well with the cinnamon sugar coating. You can serve them with a cream cheese dip for a treat. If you need special diets, you can still enjoy churros. Here are two easy ways to modify the recipe. - Gluten-Free Churros: Use gluten-free flour instead of all-purpose flour. Look for a blend that works well for frying. This allows everyone to enjoy churros without worry. - Vegan Churro Adaptations: To make churros vegan, replace eggs with flaxseed meal or applesauce. Also, use a plant-based butter. The texture may change slightly, but the flavor will still be delicious. For more details on making churros, check the Full Recipe. After making your delicious cinnamon sugar churros, you may have some left over. To keep them fresh, store them properly. - Room Temperature Storage: Place the churros in an airtight container. They will stay good for about one day. Avoid stacking them to keep them from getting mushy. - Refrigerating or Freezing Churros: For longer storage, put churros in the fridge. They can last up to three days in the fridge. If you want to keep them for a month, freeze them. Wrap each churro in plastic wrap to protect them from freezer burn. When you're ready to enjoy your churros again, reheating them right is key. Here are two methods to bring back that crispy goodness. - Oven Method: Preheat your oven to 350°F (175°C). Place the churros on a baking sheet. Heat them for about 10 minutes. This method will keep them crispy and warm. - Microwave Method for Quick Reheat: If you need a quick fix, use the microwave. Place churros on a microwave-safe plate. Heat them for about 15 to 20 seconds. Be careful not to overheat, as they may become soggy. Now you can enjoy your churros just like when they were fresh! For the full recipe, check out the Full Recipe section. To make cinnamon sugar churros, you need basic ingredients. Here’s what you will need: - 1 cup water - 1/2 cup unsalted butter - 1 tablespoon granulated sugar - 1/4 teaspoon salt - 1 cup all-purpose flour - 2 large eggs - 1 teaspoon vanilla extract - Oil for frying (like vegetable or canola) - 1 cup granulated sugar (for coating) - 2 teaspoons ground cinnamon To make churros, follow these steps: 1. Cook water, butter, sugar, and salt in a saucepan until boiling. 2. Remove from heat and stir in flour until a dough forms. 3. Let the dough cool for 5 minutes. 4. Mix in eggs, one at a time, until smooth. Add vanilla and mix. 5. Heat oil in a deep skillet to 350°F (175°C). 6. Pipe 6-inch strips of dough into hot oil and cut with scissors. 7. Fry until golden brown, about 2-3 minutes per side. 8. Drain churros and roll in cinnamon sugar while warm. This recipe makes about 6-8 churros. For the full recipe, check the section above. Churros have a rich history. They likely started in Spain. Shepherds made them for easy travel. They would fry dough over an open fire. Churros spread to Latin America over time. Each region adds its twist. For example, in Mexico, you might find them served with hot chocolate. In Spain, they are often enjoyed for breakfast. Yes, you can bake churros, but the texture changes. Fried churros are crisp outside and soft inside. Baked churros are less crunchy and more cake-like. To bake churros, preheat your oven to 400°F (200°C). Pipe the churros onto a baking sheet. Bake for about 20 minutes or until golden brown. You can find churros at many local bakeries. Look for dessert shops or food trucks that specialize in sweets. They often serve fresh churros with warm chocolate sauce. If you prefer to make your churros at home, consider online options. You can find churro kits or churro-making supplies on various websites. These kits include all the ingredients you need to make delicious churros. Making cinnamon sugar churros is simple and fun. You need key ingredients like water, butter, flour, and eggs. Start by boiling the base mix, then fry your churros to perfection. Don't forget the cinnamon sugar coating for that classic taste. Try adding flavors or making vegan options to fit your needs. Store leftovers properly and reheating is easy too. With these tips, you can enjoy churros anytime. Get ready to impress with your homemade treats!

Cinnamon Sugar Churros Irresistible and Easy Recipe

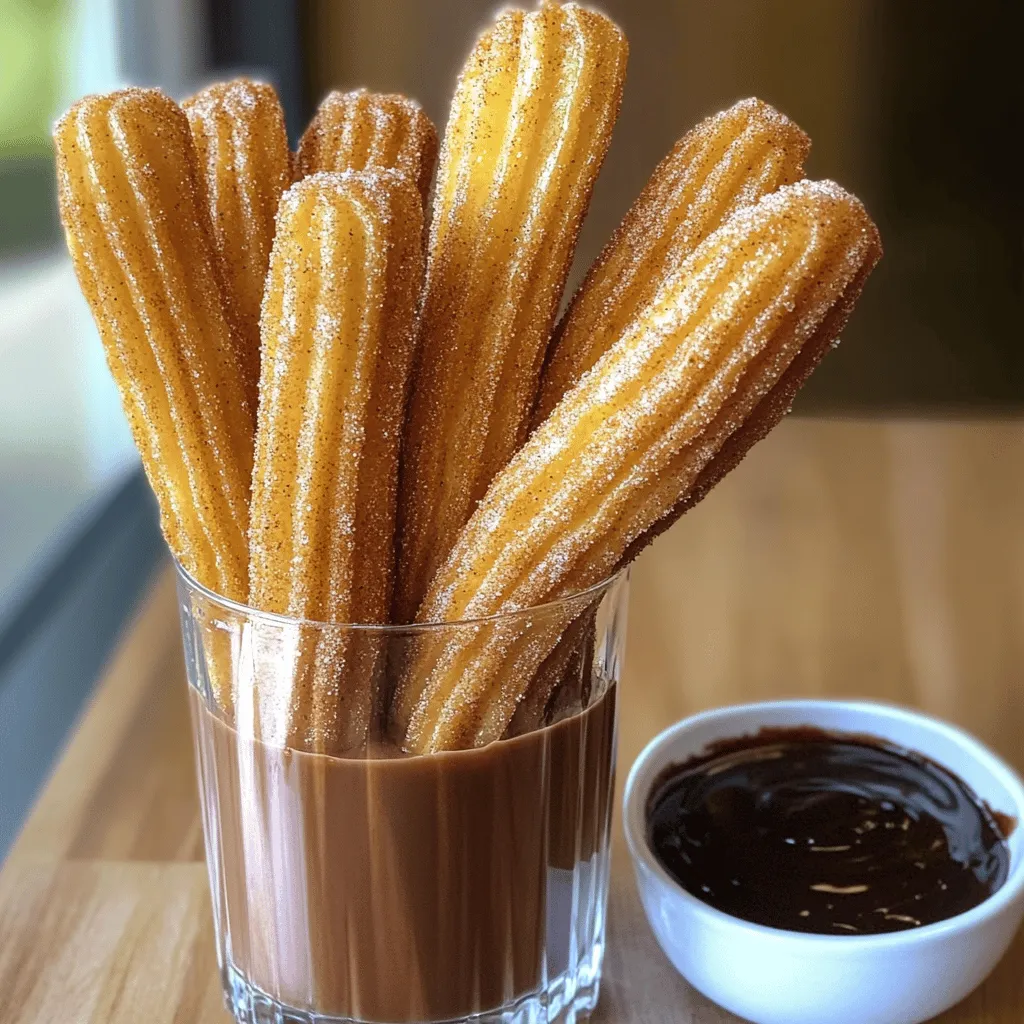
Are you craving something sweet and warm? Cinnamon sugar churros are the answer! This easy recipe will guide you through

- 1 cup rolled oats - 1/2 cup almond flour - 1/2 cup protein powder The rolled oats add a chewy texture. They also give fiber to help you feel full. Almond flour keeps the bars moist and adds a nutty flavor. Protein powder boosts the protein content, making these bars great for post-workout snacks. - 1/4 cup cocoa powder - 1 tablespoon instant coffee granules - 1/2 teaspoon vanilla extract Cocoa powder gives a rich chocolate taste. It pairs well with coffee granules, which add a nice kick. Vanilla extract rounds out the flavor, making each bite delightful. - 1/4 cup maple syrup - 1/4 cup almond butter - 1/2 cup coconut milk Maple syrup is a natural sweetener that adds a hint of flavor. Almond butter binds everything together while adding healthy fats. Coconut milk keeps the bars creamy without dairy. You can find the full recipe for Mocha Chip Protein Bars at the beginning of this article. These bars are not just tasty; they pack a nutritious punch too! - Preheat your oven to 350°F (175°C). This step is key for even baking. - Prepare an 8x8 inch baking dish. Line it with parchment paper for easy removal. - In a large bowl, combine rolled oats, almond flour, protein powder, cocoa powder, and salt. Mix well to blend all the dry ingredients. - In a separate bowl, whisk together maple syrup, almond butter, coconut milk, instant coffee granules, and vanilla extract. Make sure it is smooth. - Pour the wet ingredients into the dry mix. Stir until just combined. The mixture is thick, and that is perfect! - Fold in dark chocolate chips and nuts if you choose to add them. Ensure they are mixed in evenly. - Transfer the mixture to your prepared baking dish. Press it down firmly with a spatula or your hands. - Bake for 20-25 minutes. Look for firm edges and a set center. Let it cool for about 10 minutes in the pan. - Lift the bars out using the parchment paper. Cool completely on a wire rack. - Once cool, cut into bars or squares. Store them in an airtight container in the fridge for a week. For the full recipe, check out the earlier section. - Mixing consistency: When mixing your ingredients, aim for a thick and sticky texture. This helps the bars hold together well. If it seems too dry, add a splash of coconut milk. If too wet, add a few oats. - Proper baking time: Bake the bars for 20-25 minutes. Keep an eye on them. They should be firm at the edges but soft in the center. Overbaking can make them hard. - Adding toppings or drizzles: To make your bars pop, try drizzling melted dark chocolate on top. You can also sprinkle extra coffee granules for a rich look and taste. - Using flavored protein powder: Flavored protein powder can add a fun twist. Try vanilla or mocha for an extra flavor boost. This small change can make a big difference in taste. - Best ways to cut and serve: Use a sharp knife to cut the bars. A warm knife cuts cleanly. For a neat look, cut into squares or rectangles. - Pairing ideas with beverages: Enjoy these bars with coffee or almond milk for a perfect snack. They also pair well with a smoothie for a quick breakfast or post-workout boost. {{image_2}} You can easily make these bars nut-free. To do this, replace almond flour with oat flour. You can also swap almond butter for sunflower seed butter. Both changes still keep the bars tasty and nutritious. Think about changing up the protein powder. You can use vanilla or even a plant-based option. Each choice adds a unique taste. You can also add spices like cinnamon or nutmeg. These spices can give a warm flavor that mixes well with mocha. Feel free to get creative with add-ins. You can toss in nuts, seeds, or dried fruits. Chopped dates or cranberries add sweetness. If you love chocolate, try different chocolate chips. White chocolate or dark chocolate could change the flavor. These additions make each bite special and fun. For the full recipe, check out the recipe section above. To keep your mocha chip protein bars fresh, use airtight containers. Glass or plastic containers work well. They keep moisture out and keep the bars tasty. Store them in the fridge. This way, they stay firm and don’t get too soft. These protein bars last about a week in the fridge. Look for signs of spoilage, like a bad smell or mold. If they feel sticky or overly soft, it’s best to toss them out. Fresh bars are always the best choice for flavor and nutrition. If you want to save some for later, freezing is a great option. Wrap each bar tightly in plastic wrap, then place them in a freezer-safe bag. When you want to eat one, take it out and let it thaw in the fridge. You can also microwave it for about 15 seconds. Enjoy them fresh! For the full recipe, check out the recipe section. You can change the sweetness by using different sweeteners. If you want less sugar, try using agave nectar, honey, or stevia. Each option varies in sweetness, so adjust to your taste. Remember, less sweet may change the texture a bit. Yes, you can easily make these bars vegan. Replace the maple syrup with agave syrup or brown rice syrup. Use a plant-based protein powder and switch almond butter for a nut-free option like sunflower seed butter. Coconut milk can stay, or you can swap it for any plant milk you like. For neat cuts, use a sharp knife or a pizza cutter. First, chill the bars in the fridge for a bit. This helps them set and makes cutting easier. Cut them into squares or rectangles, depending on your preference. You can find the full recipe for these delicious Mocha Chip Protein Bars in the recipe section above. Enjoy making them! These protein bars are simple and tasty. We covered the best ingredients and steps to make them. You can also add your own flavors or adjust sweetness. Store them right to keep them fresh longer. With ideas for variations and how to serve, you can create a snack you'll love. Whether you need something quick or want a boost, these bars fit the bill. Try making them your own and enjoy!

Mocha Chip Protein Bars Tasty and Nutritious Snack

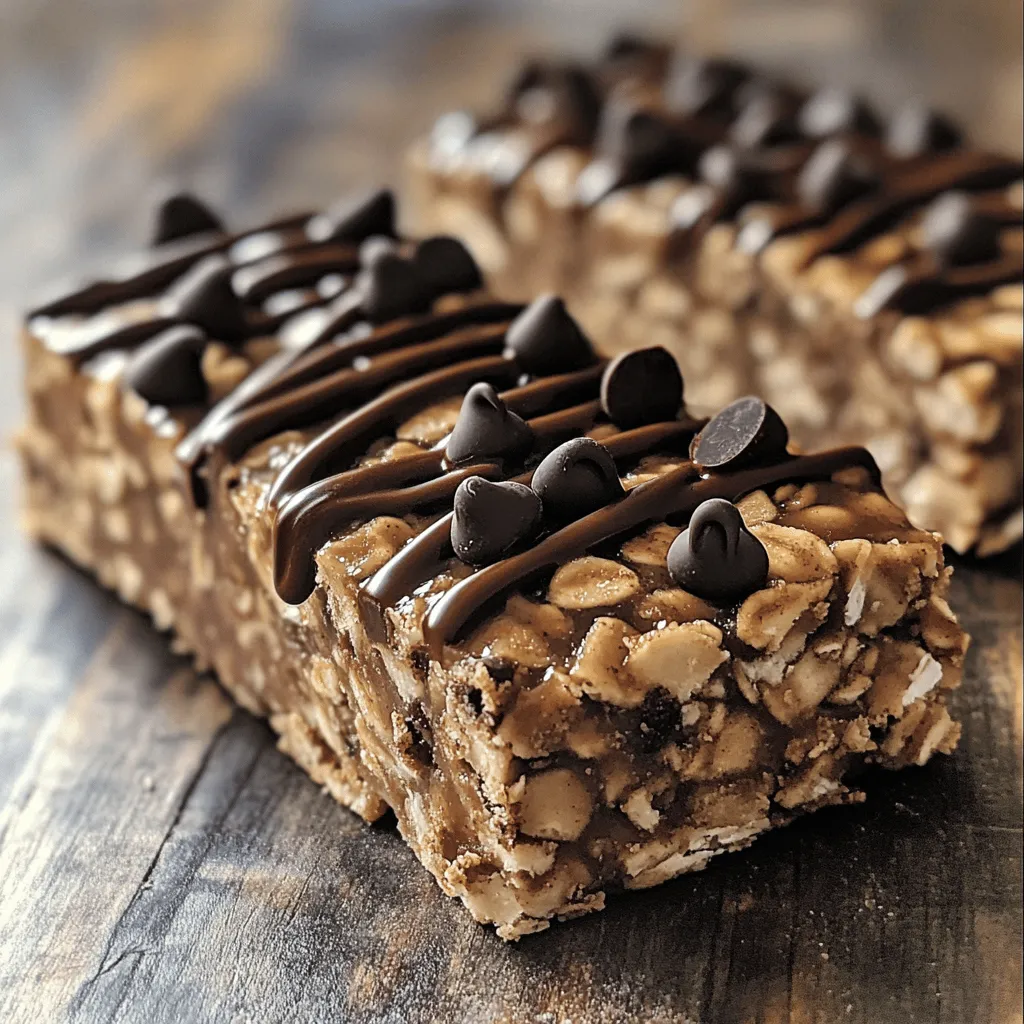
Looking for a snack that gives you energy and tastes amazing? Try my Mocha Chip Protein Bars! These bars mix

To make Garlic Parmesan Roasted Potatoes, you need key ingredients. These include: - 2 lbs baby potatoes, halved - 4 tablespoons olive oil - 4 cloves garlic, minced - 1 teaspoon dried rosemary - 1 teaspoon dried thyme - 1 cup grated Parmesan cheese - Salt and pepper to taste - Fresh parsley, chopped (for garnish) These ingredients create a tasty and simple dish. The baby potatoes give a nice texture. Olive oil helps the potatoes crisp up well in the oven. Garlic adds flavor, while herbs like rosemary and thyme bring warmth. Using the right amounts ensures great taste. Stick to the measurements above for best results. Choose fresh garlic for a stronger flavor. When picking potatoes, look for firm ones without spots. Good quality Parmesan cheese makes a big difference. Use finely grated cheese for easier melting. You can add more to make these potatoes even better. Try adding: - 1 teaspoon paprika for a smoky flavor - 1 tablespoon lemon juice for a zesty kick - Chopped green onions or chives for freshness These options let you customize the dish. Feel free to mix and match to suit your taste. The Full Recipe can guide you through making this delicious side dish! Start by washing the baby potatoes well. This removes any dirt or grit. Halve each potato to help them cook faster. Larger pieces take longer, so keep them small. Place the halved potatoes in a large mixing bowl. This makes it easy to toss them with oil and seasonings. Next, add olive oil to the bowl. Use four tablespoons for good coverage. Then, add minced garlic, dried rosemary, and dried thyme. These flavors blend well together. Don’t forget to sprinkle salt and pepper. Toss the mixture well. Make sure every potato is coated in oil and spices. This step is key for tasty, flavorful potatoes. Preheat your oven to 400°F (200°C). Spread the seasoned potatoes in a single layer on a baking sheet. This helps them roast evenly. Bake in the oven for about 25 minutes. After that, sprinkle the grated Parmesan cheese on top. Return the potatoes to the oven for another 10-15 minutes. Look for the cheese to get golden and bubbly. When they’re fork-tender, they’re ready. Let them cool for a few minutes before serving. Finally, add fresh parsley for color and flavor. Enjoy your Garlic Parmesan Roasted Potatoes! For the Full Recipe, you can refer back to the main article. To get those crispy, golden potatoes, start with baby potatoes. Their small size helps them cook evenly. Cut them in half to expose more surface area. This way, they soak up the oil and seasonings better. Toss them in olive oil before roasting. This keeps them moist and enhances flavor. Make sure to spread them out on the baking sheet. Crowded potatoes can steam instead of roast. One common mistake is not preheating your oven. A hot oven helps create a nice crust. Another mistake is using too much oil. You want enough to coat the potatoes, but not drown them. It can make them soggy. Also, be careful with the salt. Too much can overpower the dish, so add it gradually. Finally, don’t skip the cheese at the end. It adds a rich flavor and crispy texture. To boost the flavor, add herbs. Rosemary and thyme work well in this recipe. For a twist, try adding paprika or chili flakes for heat. Fresh herbs like parsley add brightness. You can also mix in grated lemon zest for a zing. Don’t be afraid to experiment! Each herb brings its own unique taste, so find your favorite combo. These tips help you create the best garlic Parmesan roasted potatoes. For the full recipe, check the section above. {{image_2}} You can swap regular potatoes for sweet potatoes. Sweet potatoes add a nice twist. Their natural sweetness pairs well with garlic and cheese. Just peel and cube them. Follow the same steps as in the full recipe. Roast until they are tender and caramelized. You will love the flavor! You can mix it up with different cheeses. Instead of Parmesan, try cheddar or gouda. Both add a rich taste. Feta or goat cheese can add a tangy flavor. Sprinkle the cheese on top during the last few minutes of roasting. This gives the cheese time to melt and brown. If you want a vegan version, swap Parmesan for nutritional yeast. It adds a cheesy flavor without dairy. You can also use vegan cheese. Look for brands that melt well. Mix it with the garlic and herbs for a tasty twist. Your dish will still be full of flavor! To keep your leftover Garlic Parmesan Roasted Potatoes, place them in an airtight container. This helps retain their flavor and texture. Let them cool first to avoid steam buildup. Store them in the fridge for up to four days. If you want them to last longer, consider freezing. When you're ready to enjoy leftovers, reheat them in the oven. Preheat the oven to 350°F (175°C). Spread the potatoes on a baking sheet. Heat them for about 10 to 15 minutes. This method keeps them crispy. You can also use a microwave, but they may not stay as crunchy. If you want to freeze Garlic Parmesan Roasted Potatoes, do it right after cooking. Allow them to cool completely, then place them in a freezer-safe bag. Remove as much air as possible before sealing. They can last up to three months in the freezer. When you're ready to eat, thaw them in the fridge overnight before reheating. I love using baby potatoes for this recipe. They are small, tender, and cook evenly. You can also use Yukon Gold or red potatoes. These types have creamy textures and rich flavors. Cut them into halves or quarters to ensure even cooking. Yes, you can! An air fryer cooks potatoes quickly and gives them a crisp texture. Prepare the potatoes as you would for the oven. Place them in the air fryer basket in a single layer. Cook at 400°F for about 15 to 20 minutes. Shake the basket halfway through for even cooking. This recipe is naturally gluten-free! Just use gluten-free ingredients. The main components are potatoes, garlic, and cheese. Always check the labels on your cheese and seasonings to ensure they are gluten-free. You can find the full recipe for Garlic Parmesan Roasted Potatoes right here. This recipe includes all the ingredients and steps needed to make this delicious dish. Enjoy cooking! Garlic Parmesan roasted potatoes are simple and delicious. We covered essential ingredients, quality tips, and how to add extra flavors. You learned easy steps for prepping, seasoning, and roasting. Tips helped you avoid common mistakes and find great ways to enhance taste. We also explored tasty variations and storage methods. By following these guidelines, you'll enjoy perfect roasted potatoes every time. Happy cooking!

Garlic Parmesan Roasted Potatoes Simple and Tasty

Garlic Parmesan Roasted Potatoes are simple and full of flavor. If you want a tasty side dish that impresses, this

When making Pesto Caprese Pasta Salad, you need a few key ingredients. Each one brings its own flavor and texture. Here’s what you will need: - 8 oz bowtie pasta (or your preferred pasta shape) - 1 cup cherry tomatoes, halved - 1 cup fresh mozzarella balls (bocconcini) - 1 cup fresh basil leaves, torn - 1/2 cup homemade or store-bought pesto - 1/4 cup extra virgin olive oil - 2 tablespoons balsamic glaze - Salt and pepper to taste - Optional: 1/4 cup pine nuts, toasted for garnish Each ingredient plays a special role in creating a fresh and tasty dish. The pasta serves as a base, while the cherry tomatoes add sweetness. Fresh mozzarella gives a creamy touch. Basil brings a bright flavor that pairs well with pesto. Olive oil adds richness, while balsamic glaze gives a sweet tang. Salt and pepper boost all the flavors. If you want to add more crunch, toasted pine nuts are a great option. They add a nice texture and nutty taste. You can find all these ingredients at your local store or farmers market. You might even consider using fresh herbs from your garden for an extra touch of flavor. For the full details on how to combine these ingredients, check the Full Recipe. Enjoy making this simple and flavorful dish! - Bring a large pot of salted water to a boil. This makes the pasta tasty. - Add the bowtie pasta. Cook according to package instructions until al dente. This usually takes about 8 to 10 minutes. - Drain the pasta and rinse it under cold water. This stops cooking and cools it down quickly. - In a large bowl, combine halved cherry tomatoes, fresh mozzarella balls, and torn basil leaves. These bright colors look great together. - Add the cooled pasta to the bowl with the tomatoes, mozzarella, and basil. This makes it a complete dish. - Drizzle the olive oil and pesto over the salad. Toss gently to combine. You want every piece to be coated. - Season with salt and pepper to taste. This enhances the flavors. - Drizzle balsamic glaze over the salad. Stir lightly to mix. It adds a sweet touch. - Allow the salad to sit for 15 minutes. This lets the flavors meld together. You can also refrigerate it for up to 2 hours before serving. Enjoy this colorful and fresh Pesto Caprese Pasta Salad! For the Full Recipe, check the details above. Best types of pasta to use Choose pasta shapes that hold sauce well. I recommend bowtie or rotini. These shapes catch the pesto and fresh ingredients nicely. Balancing flavors with spices Use salt and pepper to enhance taste. A pinch of red pepper flakes adds a fun kick. Always taste as you go to find your perfect balance. Importance of fresh ingredients Fresh ingredients make a big difference. Use ripe cherry tomatoes for sweetness and creamy mozzarella for richness. Fresh basil adds a vibrant flavor that brightens the dish. Serving in a large, shallow bowl A large, shallow bowl makes serving easy. It allows everyone to see the colorful layers. Plus, it gives guests space to help themselves. Garnishing techniques with basil and pesto Garnish with whole basil leaves for color. Drizzle extra pesto on top for a burst of flavor. This adds a restaurant-style touch to your dish. Ideal serving temperature for best taste Serve your salad chilled or at room temperature. This keeps the flavors fresh and bright. Let it sit for 15 minutes after mixing to let the flavors blend perfectly. {{image_2}} You can switch up the pasta shape for fun. Try fusilli, penne, or rotini. Each shape holds the sauce in a unique way. This adds a twist to every bite. Adding protein can make this dish more filling. Grilled chicken or shrimp works great. Simply cook the meat, chop it, and toss it in. It boosts flavor and nutrition. If you're dairy-free, don’t worry! You can substitute regular mozzarella with dairy-free mozzarella. Many brands offer great options that melt and taste delicious. Roasted vegetables can make your salad even better. Try adding zucchini, bell peppers, or asparagus. Roast them until they're tender, then mix them in. This adds a lovely depth of flavor. Olives or artichokes also bring a unique taste. They add a salty touch that pairs well with the pesto. Toss in some Kalamata olives or marinated artichokes for a tasty surprise. Using different pesto varieties can change the whole dish. Sun-dried tomato pesto is a fun choice. It gives a sweet and tangy flavor that your taste buds will love. Feel free to experiment with flavors to find your favorite! For the Full Recipe, check the detailed instructions above. To keep your Pesto Caprese Pasta Salad fresh, use airtight containers. Glass containers work best for this. They do not absorb odors and keep the salad tasting great. You can also use plastic containers, but ensure they seal well. Store your salad in the fridge. It will stay fresh for about three days. Make sure to cover it tightly. This helps to keep moisture in and air out. If you notice any brown spots on the basil, remove them before storing. You can serve this salad cold or at room temperature. It tastes wonderful either way. The flavors blend nicely when chilled. If you prefer it warm, gently reheat it on the stove. Use low heat and stir often to avoid burning. To keep the flavors strong, avoid microwaving. The microwave can change the texture of the salad. If you do use the microwave, heat it in short bursts. This way, you can check it often to prevent overcooking. You can keep Pesto Caprese Pasta Salad in the fridge for about 3 days. Store it in an airtight container. This keeps it fresh and safe to eat. If you notice any odd smells or changes in color, it’s best to toss it. Always check for freshness before serving. Yes, you can make this pasta salad ahead of time. Prepare it up to 2 hours in advance and store it in the fridge. This helps the flavors blend well. Just remember to add the balsamic glaze right before serving for the best taste. This salad pairs well with grilled chicken or shrimp. It also goes great with crusty bread or a light soup. For a full meal, serve it alongside a fresh green salad. These options complement the flavors of the pasta salad perfectly. To make this dish gluten-free, use gluten-free pasta. Many good options are available in stores. Always check the labels to ensure they meet your needs. This way, everyone can enjoy the dish. Absolutely! You can swap the pasta shape for any you like. Add grilled veggies or even some olives for extra flavor. If you’re dairy-free, try using a dairy-free mozzarella option. The recipe is flexible to suit your taste. You can view the complete recipe details for Pesto Caprese Pasta Salad [here](#). This will provide you with all the steps and tips needed to create this delightful dish. This blog post covered how to make a delicious Pesto Caprese Pasta Salad. We explored the key ingredients, step-by-step cooking instructions, and helpful tips. I shared ways to personalize your salad and storage advice. You can enjoy this dish cold or at room temp, making it great for any occasion. Remember, fresh ingredients are key for the best flavor. With these tips and recipes, you are ready to impress anyone at your next meal!

Pesto Caprese Pasta Salad Flavorful and Simple Dish

If you’re craving a dish that strikes the perfect balance between fresh flavors and ease, look no further! My Pesto

- 1 pound boneless, skinless chicken thighs, cut into 1-inch pieces - 1/4 cup soy sauce (low sodium recommended) - 2 tablespoons brown sugar - 1 tablespoon rice vinegar - 1 tablespoon sesame oil - 2 cloves garlic, minced - 1 teaspoon ginger, grated - 1 bell pepper, cut into 1-inch pieces - 1 red onion, cut into 1-inch chunks - Bamboo skewers (soaked in water for 30 minutes to prevent burning) - Garnishes: sesame seeds and chopped green onions To make teriyaki chicken skewers, you need fresh ingredients. Start with boneless, skinless chicken thighs. These give great flavor and stay moist. Use low sodium soy sauce to keep it healthier. Brown sugar adds a nice sweetness. For the marinade, rice vinegar adds tang. Sesame oil gives a rich, nutty taste. Garlic and ginger bring in depth and aroma. You'll also need colorful veggies like bell pepper and red onion. They add crunch and flavor. Don’t forget the bamboo skewers! Soaking them helps prevent burning on the grill. Finally, sesame seeds and green onions make perfect garnishes. For the full recipe, check out the complete directions to guide you through each step. Enjoy the process of making these delicious skewers! To start, gather your ingredients. In a medium bowl, whisk together: - 1/4 cup soy sauce - 2 tablespoons brown sugar - 1 tablespoon rice vinegar - 1 tablespoon sesame oil - 2 cloves garlic, minced - 1 teaspoon ginger, grated Mix until smooth. Next, add 1 pound of chicken thighs cut into 1-inch pieces. Ensure each piece gets coated well in the marinade. Cover your bowl and refrigerate it for at least 30 minutes. For a richer taste, let it marinate for up to 2 hours. While your chicken marinates, preheat your grill or grill pan over medium-high heat. Soak your bamboo skewers in water for 30 minutes. This step prevents them from burning. After marinating, take the chicken out and start threading it onto the soaked skewers. Alternate chicken pieces with 1-inch chunks of bell pepper and red onion. This adds color and flavor to each skewer. Now it's time to grill! Place the skewers on the hot grill. Cook them for about 10-12 minutes. Turn them occasionally to ensure even cooking. The chicken should no longer be pink inside. While they cook, take the leftover marinade and boil it in a small saucepan. Add 1 tablespoon of cornstarch mixed with 2 tablespoons of water. Let it simmer for 2-3 minutes until it thickens. This will be your glaze. In the last 2 minutes of cooking, brush the thickened teriyaki sauce on the skewers. Remove them from the grill and let them rest for a couple of minutes. For a nice finish, garnish with sesame seeds and chopped green onions. Enjoy your tasty teriyaki chicken skewers! Don't forget to check the Full Recipe for more details. To get the best flavor, marinate your chicken for at least 30 minutes. If you have time, go for up to 2 hours. This gives the chicken a chance to soak in the tasty teriyaki sauce. The longer you marinate, the better the taste. Make sure every piece is well coated in the marinade. This helps each bite burst with flavor. When grilling, set your grill to medium-high heat. This is the sweet spot for juicy chicken. If the grill is too hot, the outside cooks too fast, and the inside stays raw. To prevent dry chicken, brush some of the thickened teriyaki sauce on the skewers during the last few minutes of grilling. This adds moisture and a lovely glaze. For serving, arrange the skewers on a wooden board or a large platter. You can drizzle any extra teriyaki sauce over them for a nice touch. Pair your skewers with steamed jasmine rice and some stir-fried vegetables. This not only looks great but also adds more color and flavor to your meal. Experiment with different sides to find what you love best. For the full recipe, check out the complete guide. {{image_2}} You can mix up your skewers with lots of veggies. Try using: - Zucchini, cut into thick slices - Mushrooms, whole or halved - Cherry tomatoes, for a burst of flavor - Pineapple, for a sweet twist Using different color peppers adds both flavor and fun. Red, green, or yellow peppers each bring a unique taste. This variety not only looks great but also makes each bite exciting. If you want to change the protein, there are great options. You can use: - Pork, cut into 1-inch cubes - Shrimp, peeled and deveined - Beef, cubed and marinated Cooking times differ for each meat. For pork and beef, grill for about 12-15 minutes. Shrimp cooks faster, about 6-8 minutes until pink. Always check that your meat is fully cooked before serving. You can modify the teriyaki sauce to fit your taste. Try adding: - Honey for extra sweetness - Orange juice for a citrus twist - Soy sauce alternatives like coconut aminos Want some heat? Add red pepper flakes or sriracha to the marinade. This will give your skewers a spicy kick that balances well with the sweet sauce. For the full recipe, check out the full recipe section! To store leftover teriyaki chicken skewers, follow these steps: - Allow the skewers to cool to room temperature. - Place them in an airtight container. - Store the container in the fridge for up to 3 days. If you want to freeze the skewers: - Wrap them tightly in plastic wrap. - Place the wrapped skewers in a freezer bag. - They can last up to 3 months in the freezer. To reheat your teriyaki chicken skewers without drying them out, use this method: - Preheat your oven to 350°F (175°C). - Place the skewers on a baking sheet. - Cover the skewers with foil to retain moisture. - Heat for about 10-15 minutes until warm. You can also use a microwave: - Place the skewers on a microwave-safe plate. - Cover with a damp paper towel. - Heat in 30-second intervals until warmed through. In the fridge, your teriyaki chicken skewers will stay fresh for about 3 days. If frozen, they can last up to 3 months. Make sure to label your containers with the date to track freshness. You can prepare teriyaki chicken skewers in advance with these steps: - Marinate the chicken: Mix the marinade and coat the chicken. Let it sit in the fridge for up to 2 hours. - Assemble the skewers: Thread the chicken and veggies onto skewers. Cover and keep in the fridge. - Cook later: When ready to cook, grill the skewers. This keeps the flavors fresh and tasty. Yes, you can use store-bought teriyaki sauce. Here are some pros and cons: - Pros: It's quick, easy, and saves time in the kitchen. You can find many flavors. - Cons: Some sauces may have added sugars or preservatives. Homemade sauce can taste fresher and better. Here are some great side dishes to enjoy: - Steamed jasmine rice: It soaks up the sauce well. - Stir-fried vegetables: Offers a colorful and healthy balance to your meal. - Cucumber salad: Refreshing crunch that pairs well with the skewers. Traditional teriyaki sauce usually contains soy sauce, which has gluten. However, many brands offer gluten-free soy sauce. Always check the label to be sure. You can also make gluten-free teriyaki sauce at home by using tamari instead of regular soy sauce. This post highlights how to make delicious teriyaki chicken skewers. We covered main and marinade ingredients, grilling tips, and storage methods. You can use various veggies and proteins to mix things up. With these steps, you will create tasty skewers everyone will enjoy. Keep experimenting for your perfect recipe. Now, you’re ready to grill! Enjoy your cooking adventure and share your skewers with friends!

Teriyaki Chicken Skewers Easy Grill Recipe

If you’re craving a sweet and savory treat, you’ve stumbled upon the perfect recipe! My Teriyaki Chicken Skewers are easy

- 1 cup frozen strawberries - 1 ripe banana - 1/2 cup Greek yogurt (plain or vanilla) - 1/2 cup almond milk (or any milk of choice) - 1 tablespoon honey - 1 tablespoon maple syrup - Granola - Sliced fresh banana - Halved strawberries - Shredded coconut - Nuts or seeds For a tasty Strawberry Banana Smoothie Bowl, you need fresh and frozen ingredients. The main ingredients are simple and easy to find. You start with one cup of frozen strawberries. These berries give a cold and creamy base. Next, grab one ripe banana. The banana adds natural sweetness and creaminess. Greek yogurt makes the bowl rich and filling. You can use plain or vanilla yogurt for extra flavor. Adding half a cup of almond milk helps blend everything smoothly. You can also use any milk you prefer. If you like your smoothie bowl sweeter, try adding one tablespoon of honey or maple syrup. They enhance the natural flavors of the fruits. Now, let's talk toppings! Toppings are what make this bowl fun and unique. You can sprinkle on some crunchy granola for texture. Sliced fresh banana and halved strawberries add bright colors. Shredded coconut gives a tropical twist. Lastly, nuts or seeds boost nutrition and crunch. This recipe lets you mix and match, so feel free to get creative! For the full recipe, check the details outlined above. - Combine the main ingredients in a blender - Add 1 cup frozen strawberries, 1 ripe banana, 1/2 cup Greek yogurt, and 1/2 cup almond milk. - If you like it sweeter, add 1 tablespoon honey or maple syrup. - Blend on high until smooth and creamy. - If it’s too thick, add a little more almond milk. - Stir in 1 tablespoon chia seeds. - This gives your smoothie bowl a nice texture and boosts nutrition. - Pour the smoothie mixture into a bowl. - Now, it's time to arrange your toppings! - Start with a layer of granola for crunch. - Add sliced fresh banana and halved strawberries on top. - Finish with a sprinkle of shredded coconut and nuts or seeds. Enjoy your delicious Strawberry Banana Smoothie Bowl! For the full recipe, check out the sections above. To make your smoothie bowl just right, focus on the thickness. If you find the mix too thick, simply add a splash of almond milk. Blend again until smooth. This small change makes a big difference in texture. A great-looking bowl can be fun to make. Start by adding the smoothie to the bowl first. Then, layer your toppings. Use fresh banana slices, halved strawberries, and a sprinkle of granola. Arrange them artfully to create a feast for the eyes. This not only looks good, but also makes eating more enjoyable. Frozen strawberries and chia seeds are key to this bowl. Frozen strawberries pack nutrients and taste great. They give a refreshing flavor while being low in calories. Chia seeds bring extra fiber, protein, and omega-3s. These tiny seeds help you feel full longer. Together, they make your smoothie bowl not just tasty but also healthy. For the full recipe, check out the Strawberry Banana Bliss Smoothie Bowl. {{image_2}} You can change the fruits in your smoothie bowl. Swap strawberries for blueberries, raspberries, or blackberries. Each berry has a unique taste and adds color. You can also mix in spinach or kale. These greens add nutrients without changing the flavor much. They sneak in vitamins and minerals, making your bowl even healthier. If you want a dairy-free option, use plant-based yogurt. Almond, coconut, or soy yogurt works well. They all give a creamy texture. Plus, they add their own flavors to the smoothie bowl. This makes it a great choice for those who are lactose intolerant or vegan. To boost the flavor, try adding a splash of vanilla extract. It gives sweetness without sugar. You can also sprinkle in a bit of nutmeg for warmth. Just a pinch can change the whole taste. These simple tweaks make your smoothie bowl extra special. Feel free to explore these variations to make your smoothie bowl your own! You can find the full recipe to get started. Store any leftovers in the fridge. Use an airtight container for best results. The smoothie bowl can last up to two days. However, the taste and texture may change over time. You can freeze smoothie bowl mixture for later use. Pour the mixture into ice cube trays. Once frozen, pop out the cubes and store them in a freezer bag. This way, you can enjoy a quick breakfast anytime! Enjoy your smoothie bowl immediately for the best taste. Fresh fruits and creamy yogurt offer great flavor when served right away. If you must store it, remember that toppings should be added just before eating. Yes, you can make this smoothie bowl ahead of time. Just blend the ingredients and store them in the fridge. It stays fresh for about a day. When ready to eat, stir well and add your toppings. This makes mornings easy and quick! You can use fresh strawberries and bananas. However, frozen fruits give a creamier texture. If you use fresh fruit, add ice to chill the bowl. This way, you still get that cold smoothie vibe! You have many healthy topping options! Here are some ideas: - Granola for crunch - Sliced fresh banana for sweetness - Halved strawberries for freshness - Shredded coconut for a tropical touch - Nuts or seeds for protein Feel free to mix and match these toppings! They add flavor, texture, and nutrients to your bowl. For the full recipe, check the instructions above. Enjoy! This blog post showed how to make a delicious smoothie bowl. We covered key ingredients like strawberries and bananas, plus yogurt and milk. I shared tips for adding texture and flavor. You learned fun ways to top your bowl and variations for different tastes. In the end, enjoy this smoothie bowl fresh or save some for later. Healthy food can taste great and be fun to make. Give it a try!

Strawberry Banana Smoothie Bowl Energizing Breakfast Idea

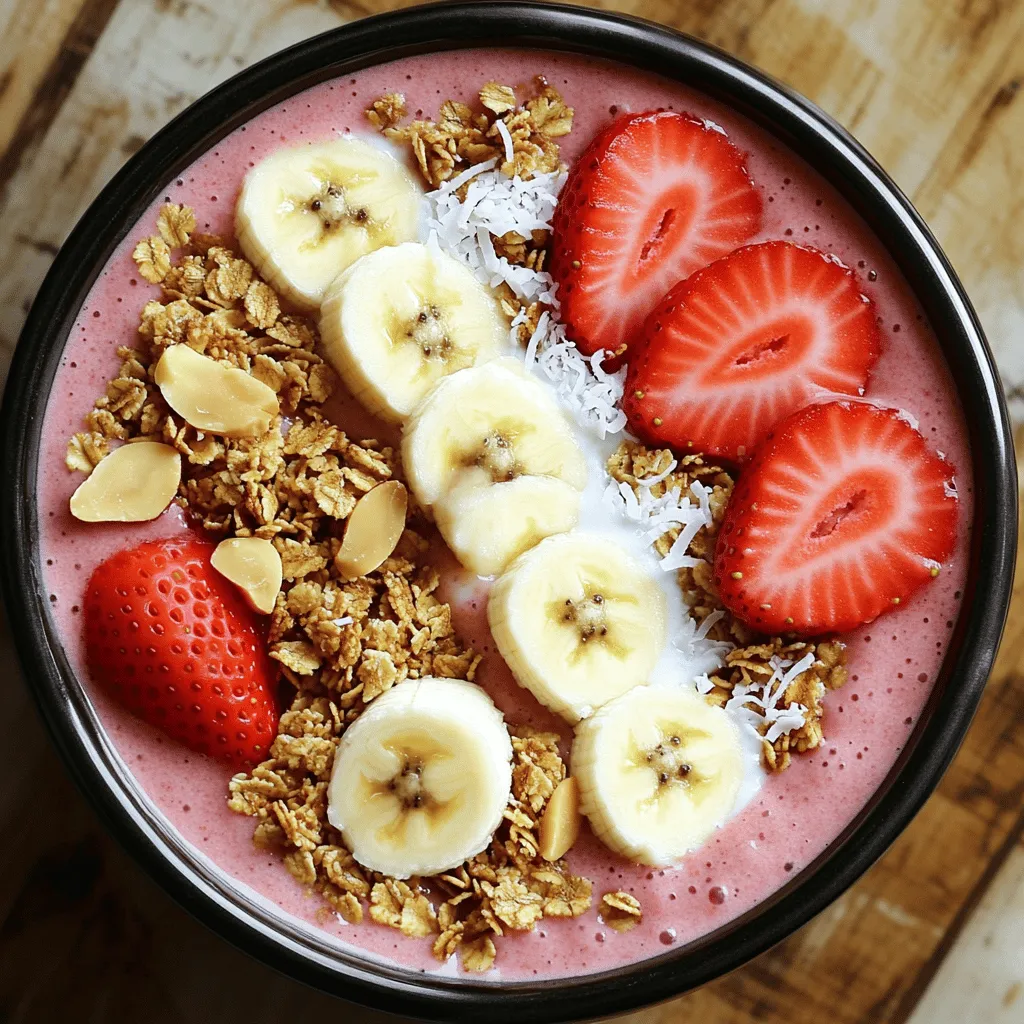
Start your day right with a Strawberry Banana Smoothie Bowl! This energizing breakfast is quick to make and packed with

- 2 ripe avocados - 2 cloves garlic, minced - 1 cup fresh basil leaves - 1 tablespoon lemon juice - 1/4 cup olive oil - Salt and pepper to taste - 12 oz spaghetti or pasta of your choice - 1/2 teaspoon red pepper flakes (optional) - Grated Parmesan cheese (for serving) To make creamy avocado pasta, you need fresh and ripe ingredients. Start with two ripe avocados. These should feel soft but not mushy. Next, use two cloves of garlic, finely minced. The garlic adds a nice punch to the sauce. Fresh basil leaves bring a lovely aroma and flavor. You will need about one cup. Lemon juice adds brightness to the dish. Use one tablespoon for the perfect zing. Olive oil is key to a smooth sauce. You’ll need a quarter cup. Don’t forget salt and pepper to taste! They enhance all the flavors in this dish. For the pasta, I recommend twelve ounces of spaghetti or any pasta you love. If you like a bit of heat, add a half teaspoon of red pepper flakes. Lastly, don’t skip the grated Parmesan cheese for serving. It adds a savory finish you’ll enjoy. You can find the full recipe for a detailed guide. Begin by cooking the spaghetti according to the package instructions. I love using al dente pasta, as it holds the sauce well. While the pasta cooks, be sure to reserve 1/2 cup of pasta water. Once the pasta is ready, drain it in a colander and set it aside. Next, I create the creamy avocado sauce. In a food processor, combine the ripe avocados, minced garlic, fresh basil leaves, lemon juice, and olive oil. Blend everything until it’s smooth and creamy. If the sauce feels too thick, you can add a bit of the reserved pasta water. Just add one tablespoon at a time until it reaches your desired creaminess. Now for the fun part! In a large mixing bowl, mix the drained pasta with the creamy avocado sauce. Toss gently until the pasta is well coated. This is where the magic happens. Taste your dish and adjust the seasoning if needed. If you want a little heat, sprinkle in some red pepper flakes. Serve your creamy avocado pasta right away, and don’t forget to garnish it with grated Parmesan cheese for that extra touch. Enjoy every bite! For the complete recipe, check out the Full Recipe. To make your sauce just right, use pasta water. This water has starch, which helps thicken your sauce. If your sauce is too thick, slowly add pasta water. Start with one tablespoon at a time, blending well after each addition. You want a smooth and creamy texture. For blending, use a food processor. It makes the avocados creamy and mixes all the flavors well. If you want a little texture, blend less. To boost flavor, add spices and herbs. Try adding a pinch of dried oregano or thyme. Fresh herbs, like parsley or cilantro, work great too. Adjust with salt and pepper to taste. Always taste your sauce before serving. If it feels bland, add a bit more salt or lemon juice. This gives the sauce a fresh kick! For a nice finish, garnish with grated cheese. Parmesan cheese adds a rich flavor. You can also sprinkle fresh herbs on top. For a heartier meal, add protein like grilled chicken or shrimp. Roasted vegetables like cherry tomatoes or spinach pair well too. Mix them in for extra color and taste! {{image_2}} You can easily make this creamy avocado pasta vegan. Just skip the Parmesan cheese. You can use nutritional yeast instead. It adds a cheesy flavor without dairy. If you need gluten-free options, choose gluten-free pasta. Many brands offer great textures that work well with the creamy sauce. Try different herbs to change the flavor. Fresh cilantro or parsley can add a nice twist. You can even add spinach for extra greens. For cheese lovers, swap Parmesan with feta or goat cheese. These options will give you a tangy finish that’s delicious. Seasonal vegetables can brighten this dish. In summer, add cherry tomatoes or zucchini. In fall, roasted butternut squash works well. You can modify this pasta for different cuisines. Add soy sauce and sesame oil for an Asian flair. Experiment with spices to create your own unique dish. For the full recipe, check out the link provided! To keep your creamy avocado pasta fresh, store it in an airtight container. Place it in the fridge right after serving. This dish stays good for about 2 days. The avocado may turn brown, but it is still safe to eat. To reheat, use a skillet over low heat. Add a splash of olive oil or reserved pasta water to keep it creamy. Stir gently until warm. Avoid using the microwave, as it can make the pasta dry. Can creamy avocado pasta be frozen? Yes, but it’s best to freeze only the sauce. Cooked pasta does not freeze well with the sauce. To freeze, place the creamy avocado sauce in a freezer-safe container. Leave some space at the top for expansion. Seal tightly and store in the freezer for up to 3 months. When ready to use, thaw it in the fridge overnight. Reheat gently in a skillet, adding cooked pasta and a bit of reserved pasta water for a creamy finish. Creamy avocado pasta lasts about 2 days in the fridge. Store it in an airtight container to keep it fresh. The avocado sauce may darken, but it is still safe to eat. Yes, you can make the sauce ahead of time. Just blend the ingredients and store in the fridge. It stays good for 1 day. Absolutely! You can skip the garlic if you prefer. The dish will still taste great and be creamy. If you need a substitute for Parmesan cheese, try nutritional yeast for a vegan option. You can also use Pecorino or Grana Padano for a similar taste. Yes, this pasta recipe is great for meal prep. Just keep the sauce and pasta separate until you're ready to eat. This way, the pasta stays fresh and tasty. For the full recipe, refer back to the ingredients and instructions mentioned. Enjoy your cooking! Creamy avocado pasta is quick and easy to make with simple ingredients. You need ripe avocados, garlic, and fresh basil. Cooking the pasta and blending the sauce takes just minutes. This dish also allows for many tasty variations and dietary swaps. In summary, you can enjoy a healthy meal that fits your needs. Take these tips and share your own twists. You now have all you need to create a delicious, creamy delight. Enjoy each bite!

Creamy Avocado Pasta Flavorful and Easy Recipe

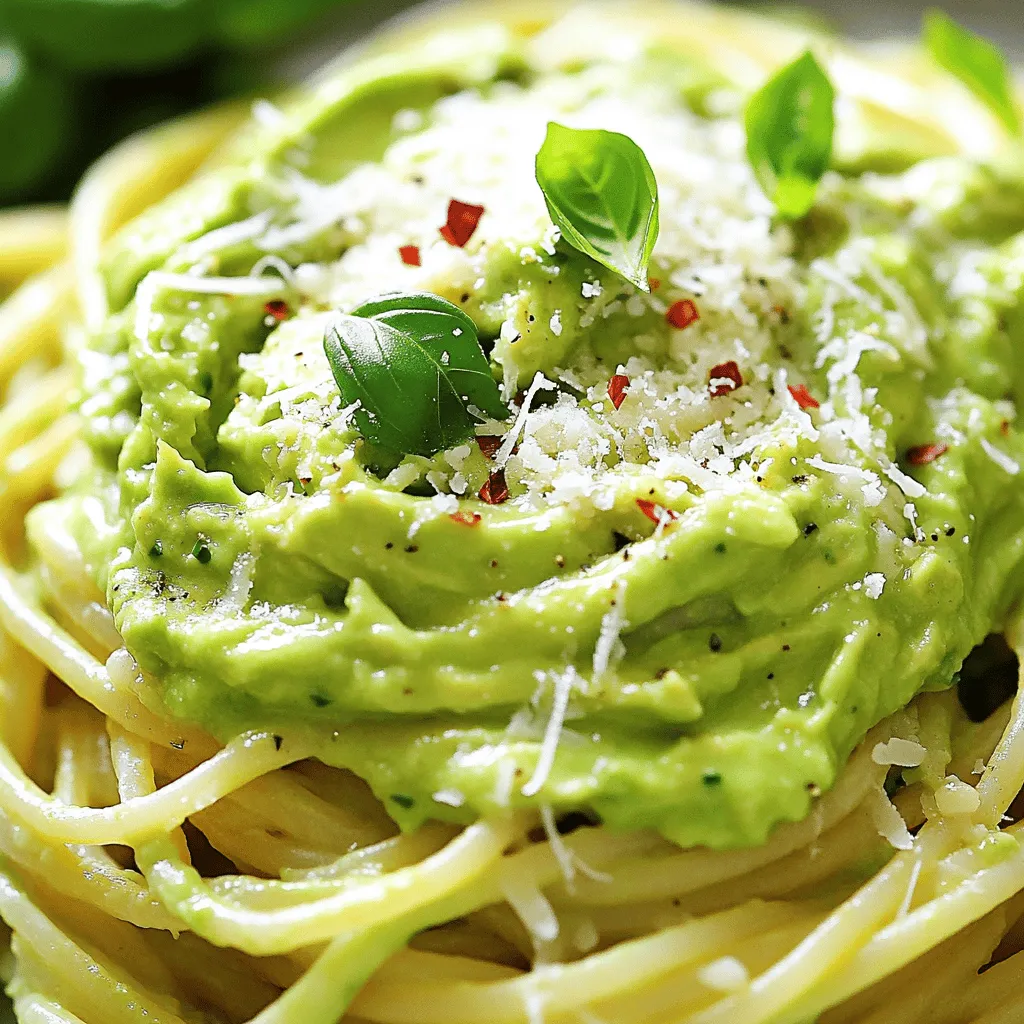
Are you ready to whip up something delicious? This Creamy Avocado Pasta is not only flavorful but also super easy

To make these no-bake chocolate oatmeal cookies, you will need: - 1 cup rolled oats - 1/2 cup creamy peanut butter - 1/4 cup unsweetened cocoa powder - 1/2 cup honey or maple syrup - 1/2 cup brown sugar - 1/4 cup milk (or dairy-free alternative) - 1 teaspoon vanilla extract - 1/2 cup dark chocolate chips (dairy-free if preferred) - A pinch of salt If you need to convert measurements, here are some quick tips: - 1 cup = 8 fluid ounces - 1/2 cup = 4 fluid ounces - 1/4 cup = 2 fluid ounces - 1 teaspoon = 5 milliliters These conversions help ensure your cookies turn out just right. You can easily adjust this recipe for dietary needs: - Use almond or sunflower butter instead of peanut butter for nut-free options. - Maple syrup can replace honey for a vegan choice. - Swap regular milk for almond or oat milk for a dairy-free version. These substitutions keep the flavor and texture delicious while catering to different diets. To make no-bake chocolate oatmeal cookies, start by gathering your ingredients. You will need rolled oats, peanut butter, cocoa powder, honey (or maple syrup), brown sugar, milk, vanilla extract, dark chocolate chips, and a pinch of salt. 1. First, take a medium saucepan. Over low heat, mix honey, brown sugar, cocoa powder, and milk. Stir it well until it melts and becomes smooth. This should take about 2-3 minutes. 2. Once melted, remove the pan from the heat. Add peanut butter and vanilla extract into the pan. Stir until the peanut butter melts and combines well with the chocolate mix. 3. In a large bowl, put the rolled oats and a pinch of salt. Pour the warm chocolate mixture over the oats. Mix well until every oat is coated. 4. Next, fold in the dark chocolate chips. Make sure they spread evenly through the mixture. 5. Now, line a baking sheet with parchment paper. Use a tablespoon to scoop the mixture and drop it onto the sheet. Flatten each scoop slightly with the back of the spoon. 6. Place the baking sheet in the fridge for at least 30 minutes. This helps the cookies set and become firm. 7. After they are set, take the cookies out and serve! Store any extras in an airtight container in the fridge. When melting chocolate or peanut butter, keep the heat low. High heat can burn them, leading to a gritty texture. Stir slowly to ensure everything melts evenly. If using natural peanut butter, it may be thicker. You can warm it slightly in the microwave for easier mixing. Avoid using quick oats in this recipe; they don’t hold up as well. Always measure ingredients accurately for the best results. If the mix feels too dry, add a splash more milk to reach the right consistency. Lastly, don’t skip the chilling step. This helps the cookies firm up nicely. For the full recipe, check out the [Full Recipe]. To get the best texture in your no-bake chocolate oatmeal cookies, use rolled oats. They give a chewier bite than quick oats. If you want a creamier feel, add more peanut butter. This adds richness and a smooth texture. Balance is key. Too much cocoa can make them dry. Adjust the cocoa powder to suit your taste. For uniform cookies, use a cookie scoop. This tool helps you portion out the dough evenly. If you don’t have a scoop, use a tablespoon. Make sure to flatten each cookie slightly. This helps them set evenly in the fridge. A consistent size ensures they all taste great and look good too! To boost the chocolate flavor, add a splash of espresso. It makes chocolate taste richer without adding a coffee flavor. You can also try different chocolate chips. Use dark, milk, or even white chocolate for fun twists. Another option is to sprinkle some sea salt on top. This contrast makes the chocolate stand out even more. For the full recipe, check out the complete guide. {{image_2}} You can change these cookies with fun add-ins. Try adding: - Chopped nuts (like almonds or walnuts) - Dried fruit (like raisins or cranberries) - Seeds (like chia or flaxseeds) - Coconut flakes These options add flavor and texture. You can mix and match to find your favorite. Want to change the taste? You can swap the peanut butter for other nut butters. Almond butter or cashew butter works well. For sweeteners, use agave syrup or coconut sugar instead of honey or brown sugar. These swaps can give the cookies a new twist. You can make your cookies chewy or crunchy. For chewy cookies, use more oats and let them set less time in the fridge. For crunchier cookies, add more oats or let them sit longer. You can even bake them for a few minutes if you want a different texture. Experiment with these variations to create the perfect no-bake chocolate oatmeal cookies that suit your taste! To keep your no-bake chocolate oatmeal cookies fresh, store them in an airtight container. Place parchment paper between layers if stacking. This prevents sticking and keeps the cookies intact. Store the container in the fridge for the best flavor and texture. Avoid leaving them at room temperature for too long. When stored properly, these cookies last about one week in the fridge. You may notice the texture change slightly over time, but they remain tasty. If you want to enjoy them longer, consider freezing them. Freezing cookies is simple. First, let them cool completely. Then, place them in a freezer-safe bag or container. They can last for up to three months in the freezer. When you want to eat some, take them out and let them thaw in the fridge. For a quick treat, you can also enjoy them straight from the freezer! Yes, you can use quick oats. They will change the texture. Quick oats create a softer, chewier cookie. For more bite, stick with rolled oats. Rolled oats give cookies a heartier feel. To make these cookies vegan, swap honey for maple syrup. Use dairy-free chocolate chips and nut milk. This way, you enjoy a tasty treat that fits a vegan diet. To soften hardened peanut butter, microwave it for a few seconds. Stir it well to mix the heat. You can also add a splash of warm water. This helps smooth it out for easier mixing. Yes! Almond or cashew butter works great. Each nut butter gives a unique taste. Choose one that you like best for your cookies. These cookies take about 30 minutes to set in the fridge. Make sure they are firm before serving. This helps them hold their shape and adds to the texture. Absolutely! Chopped nuts or seeds add crunch and flavor. Walnuts or sunflower seeds are great options. Just mix them in with the oats for an extra boost. Store your cookies in an airtight container. Keep them in the fridge for freshness. They will last up to a week if stored properly. Yes, you can freeze them! Place cookies in a single layer in a freezer bag. They last up to three months in the freezer. Just thaw before enjoying again! If you prefer a sweeter cookie, add more honey or maple syrup. You can also sprinkle some sugar on top before chilling. This gives a nice touch of sweetness. Yes! Use gluten-free oats to make them gluten-free. Check the label to ensure they are certified gluten-free. This way, everyone can enjoy your cookies! We covered the key ingredients, cooking steps, and helpful tips for making cookies. Knowing the right measurements and substitutions helps everyone enjoy baking, no matter their needs. Use my tips to avoid common mistakes and create perfect cookies. Explore variations to keep your recipes fresh and exciting. Finally, remember the best ways to store your treats for later enjoyment. With these insights, you can confidently bake delicious cookies every time. Enjoy your baking journey!

No-Bake Chocolate Oatmeal Cookies Simple Treat

Are you on the hunt for a quick and easy dessert? Look no further! My No-Bake Chocolate Oatmeal Cookies are

Older posts
Newer posts
← Previous Page1 … Page63 Page64 Page65 … Page67 Next →

dsad

© 2025 Southern Dishes • Built with GeneratePress

Our Policies

  • Copyright Policy
  • Cookie Policy
  • GDPR Policy
  • Privacy Policy
  • Disclaimer
  • Terms Of Use

More Information

  • Home
  • About
  • Contact
  • Appetizers
  • Dessert
  • Dinner
  • Drinks
©2025, Southern Dishes About Back To Top