Skip to content
DisclaimerTerms Of UseGDPR PolicyCookie Policy

Southern Dishes

  • Home
  • Drinks
  • Appetizers
  • Dinner
  • Dessert
  • About
  • Contact
  • Privacy Policy
DisclaimerTerms Of UseGDPR PolicyCookie Policy

Isabella

- 6 large eggs - 1 cup fresh spinach, chopped - 1/2 cup cherry tomatoes, halved - 1/4 cup onion, finely chopped - 1/2 cup bell pepper, diced - 1/4 cup feta cheese, crumbled - 2 tablespoons olive oil - Salt and pepper to taste - Fresh basil leaves for garnish (optional) The main ingredients in a spinach frittata are simple yet full of flavor. Eggs serve as the base, giving the frittata its fluffy texture. Fresh spinach adds vibrant color and nutrition. Cherry tomatoes bring sweetness and a burst of juicy flavor. Onions and bell peppers add depth to every bite. Feta cheese crumbles add a salty, creamy touch. Olive oil helps sauté your veggies and adds healthy fats. Salt and pepper help to enhance all the tastes. Lastly, fresh basil leaves can add a lovely aroma and extra flavor when you serve your dish. - Cooked bacon or sausage - Different cheese varieties (cheddar, goat cheese) - Additional vegetables (zucchini, mushrooms) You can customize your frittata by adding extra ingredients. Cooked bacon or sausage gives it a hearty twist. Try different cheeses like cheddar or goat cheese for a new taste. Adding more vegetables, like zucchini or mushrooms, can boost nutrition and flavor. Mix and match to create your perfect breakfast delight! For the full recipe, check the complete guide and get cooking! To start, preheat your oven to 350°F (175°C). This step is vital for even cooking. Next, gather all your ingredients and equipment. You will need a large oven-safe skillet, mixing bowl, and whisk. First, heat two tablespoons of olive oil in the skillet over medium heat. Add 1/4 cup of finely chopped onion and 1/2 cup of diced bell pepper. Sauté these for about 3-4 minutes until they soften. Then, stir in 1 cup of chopped spinach and 1/2 cup of halved cherry tomatoes. Cook this mix for another 2-3 minutes until the spinach wilts. While the veggies cook, whisk together 6 large eggs, salt, and pepper in a large bowl until blended. Once the vegetables are ready, pour the egg mixture over them in the skillet. Gently stir to combine everything. Finally, sprinkle 1/4 cup of crumbled feta cheese evenly on top. Cook the frittata on the stovetop for about 2 minutes. You will see the edges begin to set. Now, transfer the skillet to your preheated oven. Bake for 15-20 minutes until the center is set and lightly golden on top. After baking, remove the skillet from the oven and let it cool for a few minutes. This helps with cutting. Garnish with fresh basil leaves if you like. Serve warm or let it sit at room temperature. Enjoy your tasty spinach frittata full of flavor and nutrition! You can find the full recipe in the earlier section. To make a great spinach frittata, whisk the eggs well. This helps mix the yolks and whites. Aim for a smooth, frothy texture. This adds air and makes your frittata fluffy. To avoid a soggy frittata, remove excess water from your veggies. You can do this by cooking them longer or patting them dry with a paper towel. This step is key! For even cooking, make sure your skillet is the right size. A 10-inch skillet works best. Pour your egg mixture evenly over the veggies. Stir gently for a uniform mix. A spinach frittata pairs well with toast or a fresh salad. Add some sliced avocado on the side for creaminess. This combination makes your breakfast feel complete. For drinks, enjoy your frittata with coffee or fresh juice. Herbal tea also works nicely. These drinks will brighten your morning. You can customize your frittata with seasonal ingredients. Try adding fresh herbs like dill or parsley. Seasonal veggies like zucchini or asparagus also work great. Adjust the seasoning to match your taste. If you like spice, add a pinch of red pepper flakes. Feel free to play with flavors! For the full recipe, check out the Spinach Frittata Sunrise. You'll love how simple it is to make! {{image_2}} You can change up your spinach frittata with many fun flavors. A Mediterranean Spinach Frittata brings in olives, sun-dried tomatoes, and fresh herbs like oregano and thyme. This mix gives a bright and zesty kick. You can also try a Southwest Spinach Frittata. Just add diced bell peppers and a spoonful of salsa. This combo adds a nice spicy twist to your meal. You can cook your frittata in different ways. A skillet method is quick and easy. It gives a nice crispy edge. To make it oven-baked, follow the same recipe but let it cook longer. An Instant Pot Spinach Frittata is perfect if you want a fast option. Just set it to cook for a few minutes under pressure. You'll have a fluffy frittata in no time! If you need gluten-free options, you can enjoy this dish with no worries. The main ingredients are naturally gluten-free. For those avoiding dairy, swap the feta cheese with tofu or nutritional yeast. This keeps the flavors while making it suitable for everyone. You can enjoy your spinach frittata without missing out! For the Full Recipe of the Spinach Frittata Sunrise, check out the main section. To keep your frittata fresh, let it cool down first. Then, place it in the fridge. The best way to store it is in an airtight container. This helps prevent moisture loss and keeps flavors intact. You can store it for about three to four days. When you want to eat your frittata again, you can choose to use the microwave or the oven. If you use the microwave, heat it in short bursts. This helps it warm evenly without getting rubbery. If you want a crispier texture, the oven works best. Preheat it to 350°F (175°C) and heat for about 10 minutes. If you want to save some for later, you can freeze the frittata. Start by cutting it into slices. Wrap each slice tightly in plastic wrap. Then, place them in a freezer-safe bag. This way, you can enjoy it later. When you’re ready to eat, take out a slice and let it thaw overnight in the fridge. Reheat it in the oven or microwave as mentioned above. A spinach frittata lasts about 3 to 4 days in the fridge. To store it, let it cool first. Then, place it in an airtight container. This keeps it fresh. When you want to eat it, check for any off smells or colors. If it looks and smells good, you are good to go! Yes, you can add many veggies to your frittata! Here are some great options: - Zucchini - Mushrooms - Broccoli - Asparagus - Kale These veggies add more flavor and nutrients. Cut them into small pieces for even cooking. Feel free to mix and match based on what you have. The main difference is in how they are cooked. A frittata cooks slowly and finishes in the oven. An omelet cooks quickly on the stovetop. Frittatas usually have more filling and are thicker. Omelets are often folded and filled. Both are tasty, but a frittata is great for sharing! In this article, we explored how to make a delicious spinach frittata. From the key ingredients to optional add-ins, every step counts. We discussed cooking methods, variations, storage, and reheating tips. A frittata can easily fit into your meal plan, whether for breakfast or brunch. Remember, you can always customize it to suit your taste. With a few simple tricks, you can create a tasty dish that uses up ingredients you already have. Enjoy experimenting with flavors and make this frittata your own!

Spinach Frittata Breakfast Full of Flavor and Nutrition

Are you ready to whip up a breakfast that’s both tasty and packed with nutrition? This Spinach Frittata is the

- 1 pound fresh figs - 1 cup granulated sugar - 1/3 cup balsamic vinegar - 1 tablespoon lemon juice - 1 teaspoon vanilla extract - 1/2 teaspoon cinnamon - 1/4 teaspoon salt - Medium-sized pot - Sterilized jars for storage Gathering the right ingredients is key. First, pick ripe figs. They should be soft but not mushy. This will give your jam a rich taste. Next, you need granulated sugar. It helps to sweeten the figs. Balsamic vinegar adds a nice tang and depth. Lemon juice brightens the flavor. Vanilla extract adds warmth. The cinnamon brings a hint of spice. Salt balances everything out. For equipment, a medium-sized pot works best. You will also need sterilized jars to store your jam. This keeps it fresh and safe to eat. You can find the full recipe details in the recipe section. Enjoy the process of making this fig jam! To start, you need to prepare the figs. First, remove the stems and then quarter the figs. I recommend doing this gently to keep them intact. Next, place the quartered figs in a bowl. Sprinkle the granulated sugar over the figs. Let them sit for about 30 minutes. The sugar will draw out the moisture from the figs. This step enhances the flavor and helps create a rich jam. Now, it’s time to cook. Take a medium-sized pot and add the figs along with the sugar. Place the pot over medium heat. Stir gently until the sugar fully dissolves. This usually takes a few minutes. Once dissolved, add the balsamic vinegar, lemon juice, vanilla extract, and cinnamon. Stir everything together well. This mixture will start to smell amazing. Bring the mixture to a gentle boil. Then, reduce the heat to low. Let it simmer for about 30 to 40 minutes. Stir occasionally to prevent sticking. You’ll know it’s done when the figs are soft and the jam thickens. After cooking, remove the pot from heat. Allow the jam to cool slightly. Then, transfer it to sterilized jars. Let the jars cool completely at room temperature before sealing. Enjoy this fig jam with balsamic vinegar on toast or as a topping for cheese. For the full recipe, refer to the earlier section! To get the perfect consistency for your fig jam, keep these tips in mind: - Use ripe figs: Ripe figs have more natural sugars. This helps the jam thicken. - Watch the simmer: A gentle simmer is key. Too much heat can burn the jam. Stir often to avoid sticking. If you notice the jam is too thick, add a little water or more balsamic vinegar. This keeps the texture just right. You can boost the flavor of your fig jam in easy ways: - Explore spices: Instead of cinnamon, try ginger or nutmeg for a different taste. - Adjust sweetness: If you like it sweeter, add more sugar. For less sweetness, add more balsamic vinegar or lemon juice. Taste as you go. This way, you can find your perfect balance of flavor. Fig jam pairs well with many foods: - Cheese and meats: Serve it with creamy cheeses like goat cheese or sharp cheeses like cheddar. It also goes great with prosciutto. - Desserts: Use fig jam in cakes, tarts, or even as a topping on ice cream. It adds a bold flavor that’s hard to resist. For more ideas, check out the Full Recipe. Enjoy your cooking journey! {{image_2}} You can change the flavor of your fig jam in fun ways. One idea is to add herbs. Rosemary or thyme can bring a fresh taste. Just chop a small amount and stir it in while cooking. Citrus flavors also work well. You can add zest or juice from oranges or lemons. This will brighten the jam and give it a zesty twist. Experiment with these flavors to find your favorite! If you want a diabetes-friendly version, try sugar substitutes. Options like stevia or erythritol can be used. These sweeteners keep the taste while lowering calories. For those who prefer vegan options, ensure your balsamic vinegar is vegan. Most brands are, but check the label to be sure. You can still enjoy the rich taste without any animal products. You can make fig preserves instead of jam. This just means you leave bigger pieces of figs. To do this, cook your mix for less time. It gives a chunkier texture that some people love. Also, think about how chunky you want your jam. For a smoother texture, blend the mixture before cooling. If you like it chunky, skip the blending. Adjust this to match your taste! For the full recipe, check out the details above. To keep your fig jam fresh, store it in the fridge. Use a clean jar with a tight lid. This method works well for about two weeks. If you want longer storage, consider water bath canning. First, fill sterilized jars with hot jam. Seal the lids and process in a boiling water bath for ten minutes. This kills bacteria and helps the jam last longer. For best freshness, always check the date you made it. Homemade fig jam can last for up to two weeks in the fridge. If you canned it, it can last for a year or more. Watch for signs of spoilage. If you see mold or the jam smells off, it’s time to toss it. Trust your senses; they guide you well. Freezing fig jam is also a great option. Use freezer-safe jars, but leave some space at the top. The jam expands when frozen. To thaw, move the jar to the fridge a day before you need it. This method keeps the texture nice. You can also microwave it for quick thawing, but do it in short bursts. Avoid high heat to keep the jam smooth. Fig jam with balsamic vinegar adds sweetness and tang. You can spread it on toast or scones. It pairs well with cheeses, especially creamy ones like goat cheese. Try it with meats, too. It goes great with roasted chicken or pork. Yes, you can use dried figs to make fig jam. Just soak them in water for a few hours. This softens the figs and helps them blend well. You may need to adjust the sugar since dried figs are sweeter. This fig jam stands out for its bold flavors. The balsamic vinegar adds a rich, tangy note. Combined with the sweetness of figs, it strikes a perfect balance. The hint of cinnamon and vanilla brings warmth and depth to each bite. You can find fig jam with balsamic vinegar at most grocery stores. Look in the specialty or gourmet section. Brands like Bonne Maman offer great options. You can also check local farmers' markets for homemade varieties. Homemade fig jam lasts about two weeks in the fridge. Store it in a clean, airtight jar. If you can it using a water bath, it can last up to a year. Always check for signs of spoilage before using. Making fig jam with balsamic vinegar is a fun project. You need fresh figs, sugar, and some great extras. Follow the step-by-step guide for great taste. Use spices and herbs to make it your own. Proper storage is key to keeping it fresh. I hope this helps you create delicious fig jam. Enjoy sharing it with friends and family!

Fig Jam with Balsamic Vinegar Bold and Flavorful Recipe

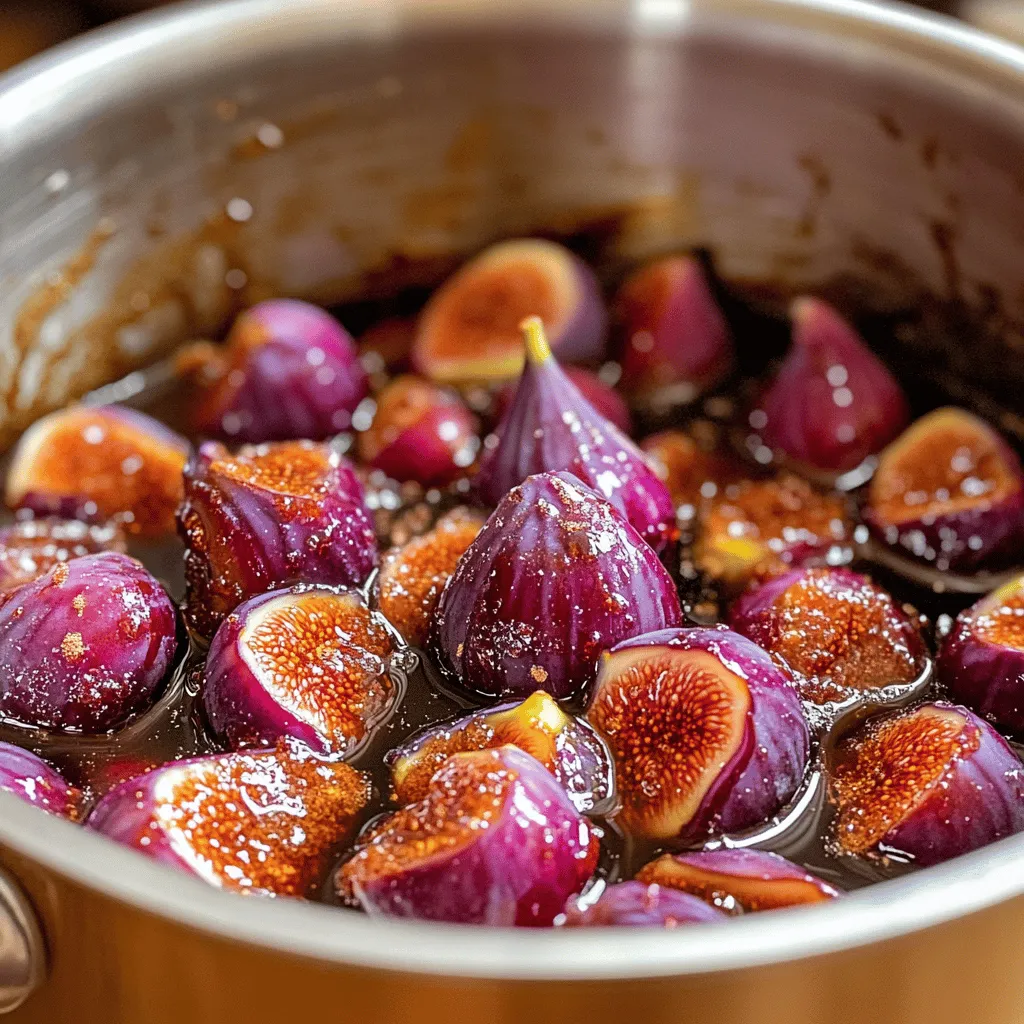
Are you ready to elevate your culinary game? This Fig Jam with Balsamic Vinegar recipe packs a bold punch of

To make a great Vegan Caesar Salad, you'll need the following main ingredients: - 1 large head of romaine lettuce, chopped - 1 cup cherry tomatoes, halved - 1 avocado, sliced - 1 cup chickpeas, roasted until crispy - ½ cup whole grain croutons - ¼ cup nutritional yeast These ingredients give the salad its crunch and flavor. The romaine lettuce adds a fresh base. Cherry tomatoes give a sweet pop, while avocado brings creaminess. Crispy chickpeas and croutons add a nice crunch. The dressing is key to a Vegan Caesar Salad. Here are some alternatives you can use: - 2 tablespoons tahini - 2 tablespoons lemon juice - 1 tablespoon Dijon mustard - 1 garlic clove, minced - Salt and pepper to taste Tahini offers a nutty taste. Lemon juice brightens the flavor. You can add more garlic for extra zing. If you need it creamier, mix in a bit of plant-based yogurt. To take your salad to the next level, consider these toppings: - Fresh parsley, chopped (for garnish) Parsley adds a burst of color. You can also sprinkle more nutritional yeast for a cheesy flavor. Try adding some toasted nuts or seeds for extra crunch. If you love spice, a pinch of red pepper flakes works well. For the full recipe, check out the Chic Vegan Caesar Salad section! To start, make the dressing. In a small bowl, add tahini, lemon juice, mustard, and minced garlic. Whisk these ingredients together until smooth. If it feels too thick, you can add a little water. This will help you get the right texture. Finally, season with salt and pepper to match your taste. This creamy dressing adds a rich flavor to your salad. Next, let's roast the chickpeas. Preheat your oven to 400°F (200°C). Drain and rinse one cup of chickpeas. Then, spread them evenly on a baking sheet. Drizzle a little olive oil over them and sprinkle with salt and pepper. Roast for about 20-25 minutes. Make sure to shake the pan halfway through. This helps them cook evenly and turn crispy. Crispy chickpeas add a great crunch to the salad. Now it’s time to put your salad together. In a large bowl, add the chopped romaine lettuce. Then, toss in halved cherry tomatoes and sliced avocado. Drizzle the dressing over the top and gently mix everything. Be careful not to mush the avocado. After mixing, add the roasted chickpeas and croutons for extra crunch. Finally, sprinkle chopped parsley on top for a fresh touch. Your salad is now ready to enjoy! For more detailed steps, check the Full Recipe. To get crispy chickpeas, start with dried chickpeas. Soak them overnight. Drain and rinse them well. Place them on a baking sheet. Drizzle with olive oil and sprinkle with salt and pepper. Roast them at 400°F for about 20-25 minutes. Shake the pan halfway through to cook evenly. They should be golden and crunchy when done. This adds great texture to your salad. When making the dressing, whisk the tahini and lemon juice first. This helps create a smooth base. Add Dijon mustard and minced garlic next. Stir well until fully blended. If the dressing is thick, add a little water. Keep whisking until it reaches your desired consistency. Season with salt and pepper. This method ensures every bite is flavorful. To serve, use a large bowl or individual plates. Layer the romaine, tomatoes, and avocado first. Drizzle the dressing over the top, then toss gently. Add the crispy chickpeas and croutons last. This keeps them crunchy. For a pop of color, sprinkle fresh parsley on top. You can also add more avocado slices if you like. Serve right away for the best taste. For the complete experience, check out the Full Recipe. {{image_2}} You can easily make this Vegan Caesar Salad gluten-free. Swap whole grain croutons for gluten-free ones. Look for croutons made from rice or gluten-free bread. You can also use baked chickpeas for that crunch. They add flavor and texture without gluten. To boost protein in your salad, add tofu or tempeh. Firm tofu works best when cubed and lightly pan-fried. It absorbs flavors well and adds creaminess. Tempeh is another great choice. Slice it thin, marinate it, and grill for a tasty twist. Both options give your salad a hearty feel. To add more flavor, try fresh herbs and spices. Basil, dill, or cilantro can brighten the dish. A sprinkle of smoked paprika gives a nice kick. You can even add a dash of cayenne pepper for heat. Experiment with flavors you love to make the salad your own. For the full recipe, check out the Chic Vegan Caesar Salad 🥗. If you have leftover salad, keep it fresh. Place the salad in an airtight container. Store it in the fridge. Use it within two days for the best taste. The lettuce may wilt if stored too long. To avoid this, keep the dressing separate. For the dressing, store it in a small jar or container. Make sure it’s tightly sealed. The dressing will last about one week in the fridge. If it thickens, add a bit of water and shake to mix. This keeps the flavors fresh and bright. To enjoy crispy chickpeas again, preheat your oven to 350°F (175°C). Spread the chickpeas on a baking sheet. Heat them for about 10 minutes. This brings back their crunch. You can also use an air fryer for a quicker option. Just toss them in for about 5 minutes. Enjoy them as a snack or on your salad! If you cannot find nutritional yeast, try using tahini or ground cashews. Both add creaminess. Another option is to blend some sunflower seeds with a bit of salt. This mix can mimic the cheesy taste. Nutritional yeast adds a unique flavor, so try to match it as closely as you can. Yes, you can prepare this salad ahead of time. Just keep the dressing separate until serving. This helps keep the greens fresh and crunchy. You can mix all the salad ingredients, but add the dressing later. Roasted chickpeas stay crispy if stored in an airtight container. Yes, this Vegan Caesar Salad is low in calories. It uses fresh vegetables and healthy fats from avocado. The chickpeas add protein and fiber without many calories. Each serving is light but filling, making it a great choice for a healthy meal. Enjoy this salad guilt-free! This Vegan Caesar Salad blends simple ingredients, tasty dressings, and fun toppings. You learned how to prepare a delicious dish step-by-step. Tips for perfect chickpeas and mixing help unlock great flavor. Explore variations for gluten-free options and protein additions. Lastly, proper storage keeps your salad fresh and tasty. Enjoy crafting your own unique salad. Each bite can offer a tasty adventure.

Vegan Caesar Salad Crunchy and Flavorful Delight

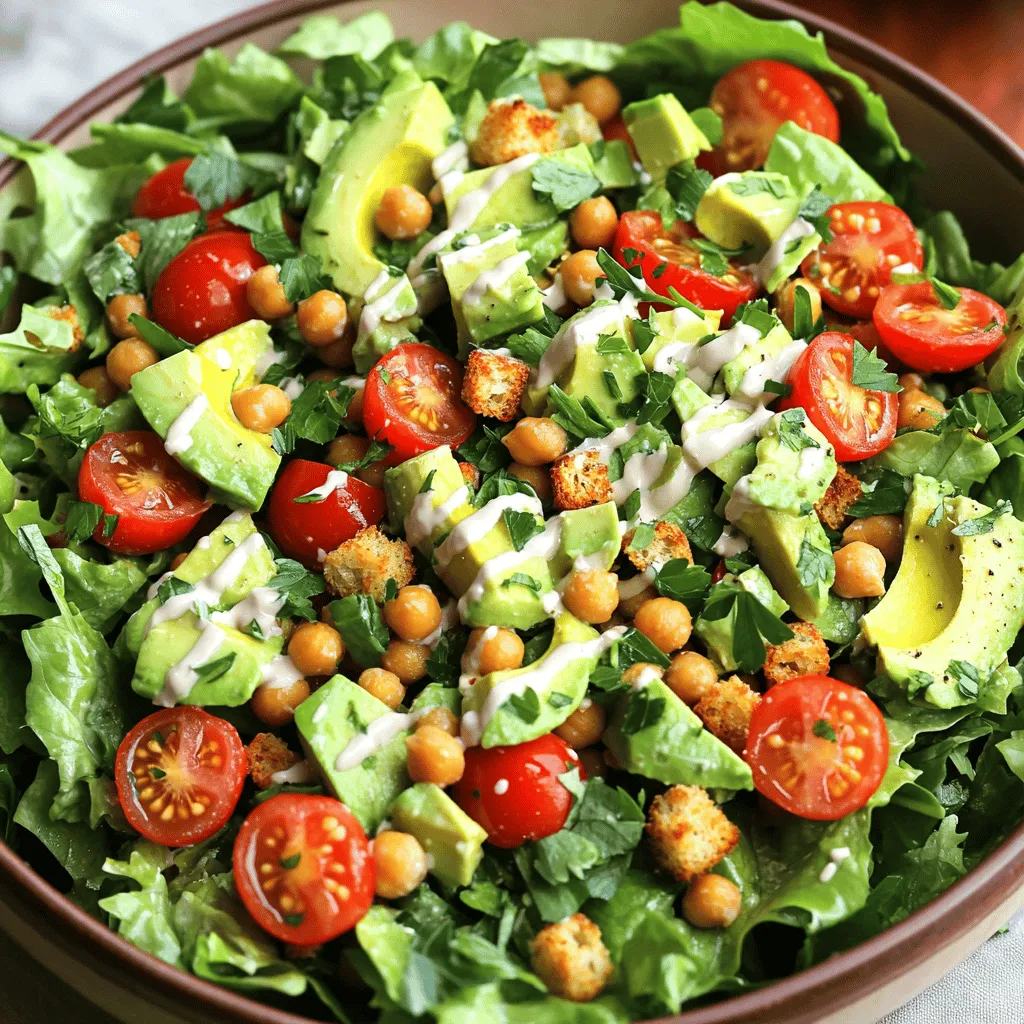
Are you ready to enjoy a Vegan Caesar Salad that’s both crunchy and packed with flavor? I’m excited to share

- 2 medium zucchinis - 1 cup breadcrumbs (panko recommended) - 1/2 cup grated Parmesan cheese - 1 teaspoon garlic powder - 1 teaspoon onion powder - 1 teaspoon dried Italian herbs (oregano, basil) - Salt and pepper to taste - 2 large eggs, beaten - Cooking spray Crispy air fryer zucchini fries start with fresh zucchinis. Choose firm, medium-sized ones for the best results. Panko breadcrumbs make these fries extra crunchy. Mixing in grated Parmesan adds a savory flavor. For seasoning, garlic and onion powders bring depth. Dried herbs like oregano and basil give a nice aroma. Adjust salt and pepper to your taste. You need two beaten eggs to help the breadcrumbs stick to the zucchini. A quick spray of cooking spray will stop the fries from sticking in the air fryer. For the full recipe, check out the complete details provided above. - Preheat the air fryer to 400°F (200°C). - Cut zucchinis into fry shapes. To start, set your air fryer to 400°F. This high heat gives us that crispy texture we all want. Next, grab your zucchinis and cut them into fry shapes. Aim for pieces that are about the same size. This helps them cook evenly. - Prepare the breadcrumb and seasoning mixture. - Coat zucchinis with beaten eggs and then breadcrumbs. Now, let’s make the coating. In a shallow bowl, mix breadcrumbs, Parmesan cheese, garlic powder, onion powder, and dried herbs. This blend adds great flavor. Set up a dredging station with a bowl of beaten eggs next to your breadcrumb mix. Dip each zucchini fry into the eggs first. Make sure it’s fully coated. Then, transfer it to the breadcrumb mix. Press down gently to ensure the crumbs stick well. - Arrange coated fries in the air fryer basket. - Air fry for 10-12 minutes, shaking halfway. Spray the air fryer basket lightly with cooking spray to prevent sticking. Place the coated fries in a single layer in the basket. Make sure they aren't crowded, as this helps them get crispy. Air fry the zucchini fries for 10-12 minutes. Remember to shake the basket halfway through cooking. This ensures they crisp up all around. When they turn golden brown, they are ready to enjoy. - Use panko breadcrumbs for extra crunch - Do not overcrowd the air fryer basket To get that perfect crispiness, I always reach for panko breadcrumbs. They give a light and crunchy texture that plain breadcrumbs can't match. When breading your zucchini fries, make sure they are not crammed together in the air fryer. If you pack them in too tightly, they won’t cook evenly or get that nice golden color. It's best to fry in smaller batches to keep them crispy. - Ensure even coating with the egg mixture - Press breadcrumbs firmly onto the zucchini For the best results, dip each zucchini fry in the egg mixture fully. This step helps the breadcrumbs stick well. After dipping, coat the fry with the breadcrumb mixture. Press down firmly to make sure the crumbs stick. This simple trick can make a huge difference in how crunchy your fries turn out. - Serve with marinara sauce or garlic aioli - Garnish with fresh parsley Once your crispy zucchini fries are done, pair them with a tasty dip. Marinara sauce and garlic aioli work great. They add flavor and make the fries even more fun to eat. Don’t forget to sprinkle some fresh parsley on top. It adds a nice touch and makes the dish look even better. These simple ideas will elevate your snacking experience! For the complete recipe, check out the Full Recipe. {{image_2}} You can easily change the flavor of your zucchini fries. Add cayenne pepper for a spicy kick. This small addition makes a big difference. Want a cheesy twist? Use different cheese options like cheddar or mozzarella. Both will give your fries a rich taste. If you want to try something new, substitute zucchini with eggplant or sweet potatoes. These veggies also fry up nice and crispy. You can even mix different vegetables for a colorful platter. Carrots and bell peppers will add great color and flavor. You don't have to stick to air frying. Baking in the oven is another great option. Just make sure to spread them out on a baking sheet. If you want a different texture, try pan-frying instead. This method gives a unique crunch to each fry. Keep leftover air fryer zucchini fries in an airtight container. They stay fresh for 2-3 days. If you let them sit too long, they will lose their crispiness. Reheat your zucchini fries in the air fryer. This restores their crispiness and makes them taste fresh. Do not use the microwave. It makes them soggy and less enjoyable. You can freeze uncooked coated zucchini fries for quick meals later. Place them in a freezer-safe bag. They will last up to 2 months in the freezer. When you're ready to cook, just pop them in the air fryer. This way, you have a tasty snack ready anytime! You can find the full recipe here to make these delicious snacks. To keep your zucchini fries crispy, make sure they are well-coated. This means the egg and breadcrumbs should stick well. It’s also key to avoid overcrowding in the air fryer. If fries are too close, steam can form and make them soft. Yes, you can prepare these zucchini fries ahead of time. Simply store the uncooked fries in the fridge or freezer. If you freeze them, just remember to separate them with parchment paper. This way, they won’t stick together. Zucchini fries taste great with several dips. I love marinara sauce for a classic touch. Ranch dressing adds a creamy flavor, while garlic aioli offers a nice kick. You can pick one or try them all! This blog post guides you to make tasty air fryer zucchini fries. You learned about the key ingredients, from zucchinis to panko breadcrumbs and seasoning. The step-by-step instructions make cooking easy. Tips for a crispy finish were also shared. Don’t forget to try variations like different veggies or spices. With proper storage, you can enjoy these fries later too. Now, it’s time to dive into making your own delicious zucchini fries!

Crispy Air Fryer Zucchini Fries Perfect for Snacking

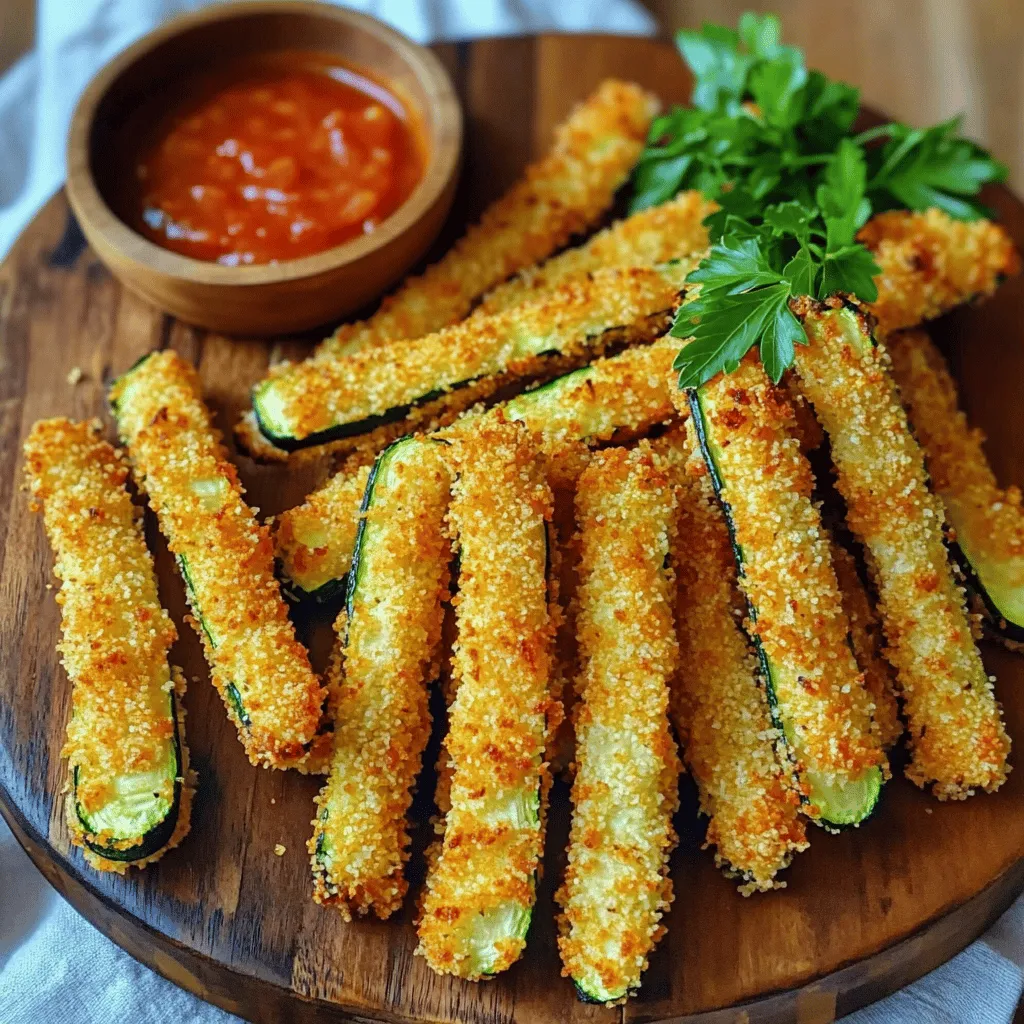
Looking for a tasty snack that’s both crunchy and healthy? You’re in the right place! These Crispy Air Fryer Zucchini

- Chicken and Vegetables - 1 pound chicken breast, sliced into thin strips - 1 tablespoon olive oil - 1 bell pepper (any color), sliced - 1 medium onion, sliced - 2 cloves garlic, minced - 1 tablespoon fajita seasoning (store-bought or homemade) - Rice and Beans - 2 cups cooked rice (brown or white) - 1 cup black beans, rinsed and drained - 1 cup corn (frozen or fresh) - ½ cup diced tomatoes (fresh or canned) - ¼ cup fresh cilantro, chopped - Juice of 1 lime - Salt and pepper to taste - Optional Toppings - Avocado slices - Shredded cheese - Sour cream - Lime wedges To make the Chicken Fajita Rice Bowl, gather these fresh ingredients. The chicken adds protein, while the veggies bring color and crunch. The rice and beans serve as a hearty base. You can customize the bowl with optional toppings for extra flavor and texture. For the full recipe, check the earlier sections. Enjoy the process of cooking! Cooking the Chicken Start by heating the olive oil in a skillet over medium-high heat. Once the oil shimmers, add the sliced chicken. Sprinkle salt, pepper, and fajita seasoning on it. Cook the chicken for 5 to 7 minutes. Stir it often to ensure even cooking. You want the chicken to turn golden brown and be fully cooked. Sautéing the Vegetables Next, add the sliced bell pepper, onion, and minced garlic to the skillet. Sauté these veggies for about 3 to 4 minutes. You want them to be tender but still crisp. This step adds great flavor and color to your dish. Combining Ingredients and Serving In a large bowl, mix the cooked rice, black beans, corn, diced tomatoes, and lime juice. Toss it well so all the flavors blend. Add salt and pepper to taste. To serve, divide the rice mixture into bowls. Top each bowl with the sizzling chicken and vegetables. For extra fun, add optional toppings like avocado slices, shredded cheese, or sour cream. You can find the full recipe [here](#). Enjoy your delicious Chicken Fajita Rice Bowl! Ensuring Tender Chicken To get tender chicken, start with thin strips. Marinate the chicken in lime juice for a few minutes before cooking. This adds flavor and keeps it juicy. When you cook it, don’t overdo it. Aim for just 5-7 minutes on medium-high heat. Perfect Rice Preparation Use good quality rice, either brown or white. Rinse it well before cooking to remove excess starch. This helps keep it fluffy. Follow the package's water ratio for perfect results. Let it rest for a few minutes after cooking to absorb moisture. Seasoning Adjustments Feel free to tweak the fajita seasoning. If you love heat, add more chili powder or cayenne pepper. For a milder taste, cut back on the spices. You can also mix in some cumin or smoked paprika for added depth. Garnishing Tips Garnish your bowl with fresh cilantro and a lime wedge. This adds bright color and enhances flavor. You can also sprinkle some shredded cheese or add avocado slices for creaminess. Pairing Ideas Serve your Chicken Fajita Rice Bowl with tortilla chips for a crunchy side. A fresh salad with lime vinaigrette also pairs well. For drinks, try serving with a cold soda or a refreshing iced tea. For a complete guide, check out the Full Recipe. {{image_2}} Chicken Alternatives You can swap chicken for many other proteins. Try beef strips for a heartier taste. Shrimp adds a nice twist too. For a lighter option, use turkey breast. Vegetarian Options If you want a meat-free meal, replace chicken with tofu or tempeh. Grilled portobello mushrooms also work great. They add a meaty bite and soak up flavors. Other Vegetable Choices Feel free to mix up the veggies. Zucchini, broccoli, or carrots can bring new textures. Spinach or kale adds greens and nutrients. Get creative with what you have on hand! Spice Level Adjustments Do you like heat? Add jalapeños or red pepper flakes for a spicy kick. If you prefer mild, skip the hot stuff. You can also use sweet peppers for a touch of sweetness. Additional Seasonings You can enhance the flavor with extra spices. Cumin and paprika add warmth. For a zesty twist, try lime zest or a dash of chipotle powder. Don't be afraid to experiment! Check out the Full Recipe for all the details to make your own savory Chicken Fajita Rice Bowl. To keep your Chicken Fajita Rice Bowl fresh, follow these steps: - Best Practices for Refrigeration - Allow the dish to cool to room temperature. - Store it in an airtight container. - Place it in the fridge within two hours of cooking. - Use the leftovers within 3 to 4 days for the best taste. - Freezing Tips - You can freeze the chicken fajita rice bowl for longer storage. - Use freezer-safe bags or containers. - Remove as much air as possible to prevent freezer burn. - Label the container with the date. It can last up to 3 months in the freezer. When it’s time to enjoy your leftovers, here’s how to reheat: - Best Methods for Texture Preservation - Use the microwave for quick reheating. Place in a microwave-safe dish, cover it, and heat for 2-3 minutes. Stir halfway through for even heating. - For the stovetop, warm in a skillet over medium heat. Add a splash of water or broth to maintain moisture. - Avoid reheating the dish more than once to keep the flavor fresh. By following these storage tips, your Chicken Fajita Rice Bowl remains delicious and ready for your next meal! How to make Chicken Fajita Rice Bowl healthier? You can make this dish healthier by using lean chicken breast. Swap out white rice for brown rice. You can also add more veggies like spinach or zucchini. Use less cheese and sour cream. Fresh ingredients boost flavor and nutrition. Can I use brown rice instead of white? Yes, you can use brown rice instead of white rice. Brown rice adds more fiber and nutrients. It may take a bit longer to cook, so adjust your cooking time. What other toppings can I add to Chicken Fajita Rice Bowl? You can add various toppings to enhance your bowl. Try avocado slices, black olives, or jalapeños. Shredded cheese, sour cream, and fresh salsa also work well. Get creative with your favorites! How long can I store Chicken Fajita Rice Bowl? You can store Chicken Fajita Rice Bowl in the fridge for up to four days. Make sure to keep it in an airtight container. What’s the best way to reheat the dish? The best way to reheat this dish is in the microwave. Heat it in short bursts, stirring in between. You can also use a skillet on low heat for a few minutes. Can I make Chicken Fajita Rice Bowl in advance? Yes, you can prepare the Chicken Fajita Rice Bowl in advance. Cook the chicken and veggies, then store them separately from the rice. Combine them just before serving for the best taste. For the full recipe, check out the detailed instructions above. In this blog post, I shared how to make a tasty Chicken Fajita Rice Bowl. We discussed key ingredients like chicken, veggies, rice, and beans. I provided step-by-step cooking instructions. You learned tips for tender chicken and perfect rice. We explored variations, including substitutes and flavor changes. I also covered storage and reheating methods. Now you can enjoy this dish in many ways. Try new toppings or adjust the spice to fit your taste. Enjoy your cooking adventure!

Savory Chicken Fajita Rice Bowl Quick and Easy Meal

Looking for a quick and tasty meal? You’re in the right place! My Savory Chicken Fajita Rice Bowl is simple

- 1 cup quinoa - 2 cups vegetable broth or water - 1 cup chickpeas, canned or cooked - 1 medium sweet potato, diced - 1 cup broccoli florets - 1 medium carrot, julienned - 1 avocado, sliced - 1/2 cup cherry tomatoes, halved - 1 tablespoon olive oil - Salt and pepper to taste - 1 teaspoon garlic powder - 1 teaspoon smoked paprika - 2 tablespoons tahini - 1 tablespoon lemon juice - Fresh cilantro or parsley for garnish The Vegan Buddha Bowl is a colorful dish full of taste. You can mix and match ingredients based on what you love. This bowl is not just pretty; it's also good for you. The main ingredients provide a great base. Quinoa is a super grain. It's packed with protein and fiber. Sweet potatoes add sweetness and color. Chickpeas bring protein and crunch. Avocado gives a creamy touch. For seasonings, use garlic powder and smoked paprika. These add depth to your bowl. The tahini dressing is creamy and tangy. It ties all the flavors together. Garnish with fresh herbs. They add a pop of color and freshness. You can find the full recipe to guide you through making this vibrant dish. Enjoy creating your Vegan Buddha Bowl! - Preheat the oven to 425°F (220°C). - Rinse quinoa thoroughly before cooking. - Toss sweet potatoes and broccoli in olive oil and seasonings. - Spread on a baking sheet and roast for 20-25 minutes. To roast, first, cut your sweet potato and broccoli into bite-sized pieces. This helps them cook evenly. Use a large bowl for tossing. Add 1 tablespoon of olive oil, salt, pepper, garlic powder, and smoked paprika. Mix well to coat all pieces. Place the veggies on a baking sheet in a single layer. This allows them to roast properly. Halfway through, shake the pan to turn the veggies. This step helps them brown evenly and adds great flavor. - Bring vegetable broth to boil, add quinoa, and simmer until cooked. Use a medium saucepan for cooking quinoa. Start by pouring in 2 cups of vegetable broth or water. Bring it to a boil. Once boiling, add 1 cup of rinsed quinoa. Stir it, cover the pot, and turn the heat down. Let it simmer for about 15 minutes. When the broth absorbs, turn off the heat. Allow it to sit for 5 minutes with the lid on. This makes the quinoa fluffy and light. - Whisk together tahini, lemon juice, and seasonings for a creamy texture. For the dressing, take a small bowl. Add 2 tablespoons of tahini and 1 tablespoon of lemon juice. Mix them well. If the dressing is too thick, add a splash of water. This helps it drizzle nicely over your bowl. Taste and adjust with salt if needed. - Layer cooked quinoa, roasted vegetables, chickpeas, and toppings in a bowl. Start with a base of the fluffy quinoa. Next, add the roasted sweet potatoes and broccoli evenly on top. Then, add 1 cup of chickpeas for protein. Lastly, layer in your favorite toppings like sliced avocado, julienned carrots, and cherry tomatoes. Drizzle the creamy tahini dressing over everything. Garnish with fresh cilantro or parsley. Enjoy your vibrant Vegan Buddha Bowl packed with flavorful goodness! For the full recipe, check out the complete instructions above. - Use 2 cups of water for 1 cup of quinoa. This ratio gives fluffy results. - After cooking, let it sit covered for 5 minutes. This step helps the texture. - Cut sweet potatoes and broccoli into even pieces. This ensures they cook uniformly. - Try different seasonings like cumin or thyme to add extra flavor. Fresh herbs work too. - Use bright bowls to make your dish stand out. Colorful food is more fun to eat! - Neatly arrange each ingredient in the bowl. This creates a beautiful presentation. These tips will help you create a Vegan Buddha Bowl that is not only tasty but also visually appealing. Don’t forget to check out the Full Recipe for more details on how to prepare this delicious meal! {{image_2}} To keep things interesting, you can swap out chickpeas for black beans or tofu. Both options add great flavor and texture. If you want some extra crunch, consider adding your favorite nuts or seeds. Almonds, sunflower seeds, or pumpkin seeds can make your bowl even more satisfying. You don’t have to stick with quinoa. Brown rice or couscous are wonderful substitutes. They bring a different taste and texture to your dish. If you’re feeling adventurous, try ancient grains like farro or barley. These grains add unique flavors and more nutrients. Use seasonal vegetables to keep your bowl fresh and exciting. You can mix in bell peppers, spinach, or zucchini for a fun twist. Don’t be afraid to get creative with your veggie choices. Each season brings new options, so feel free to explore what’s available. Store leftovers in airtight containers for up to 3 days. This keeps your meal fresh and tasty. Always keep the dressing separate. Doing this helps it stay creamy and bright. You can freeze the assembled bowls without dressing for up to 1 month. This is great for meal prep! Just thaw in the refrigerator overnight before you enjoy it. It makes for a quick lunch or dinner. Reheat your Buddha bowl in the microwave or on the stove. If it seems a bit dry, add a splash of water. This will help bring back the flavor and moisture. Yes, you can prep the bowl and store it for easy assembly later. I often make the quinoa and roast the veggies in advance. Storing them separately keeps everything fresh. When you are ready to eat, just mix and enjoy! A Vegan Buddha Bowl is rich in nutrients and fiber. It packs in plant-based proteins, which support muscle health. Eating a bowl can help boost your energy levels and keep you full. Plus, it includes a variety of vitamins and minerals. You can swap ingredients based on your taste or diet. If you don’t like chickpeas, try black beans or lentils. Want more crunch? Add some nuts or seeds. You can also mix in your favorite veggies or grains. Feel free to get creative! A creamy tahini dressing or a simple vinaigrette works great. I love to whisk tahini with lemon juice and a pinch of salt. If you want it thinner, just add a splash of water. Always taste and adjust to your liking! This blog post covered how to make a tasty Vegan Buddha Bowl. We explored the main ingredients, seasonings, and step-by-step instructions. I shared tips for cooking quinoa, roasting veggies, and various ways to customize the bowl. Remember, you can adapt the recipe to use your favorite proteins or grains. Whether for lunch or dinner, it’s an easy dish that is both nutritious and enjoyable. Enjoy creating your own Buddha bowl that fits your taste and lifestyle.

Vegan Buddha Bowl Packed with Flavorful Goodness

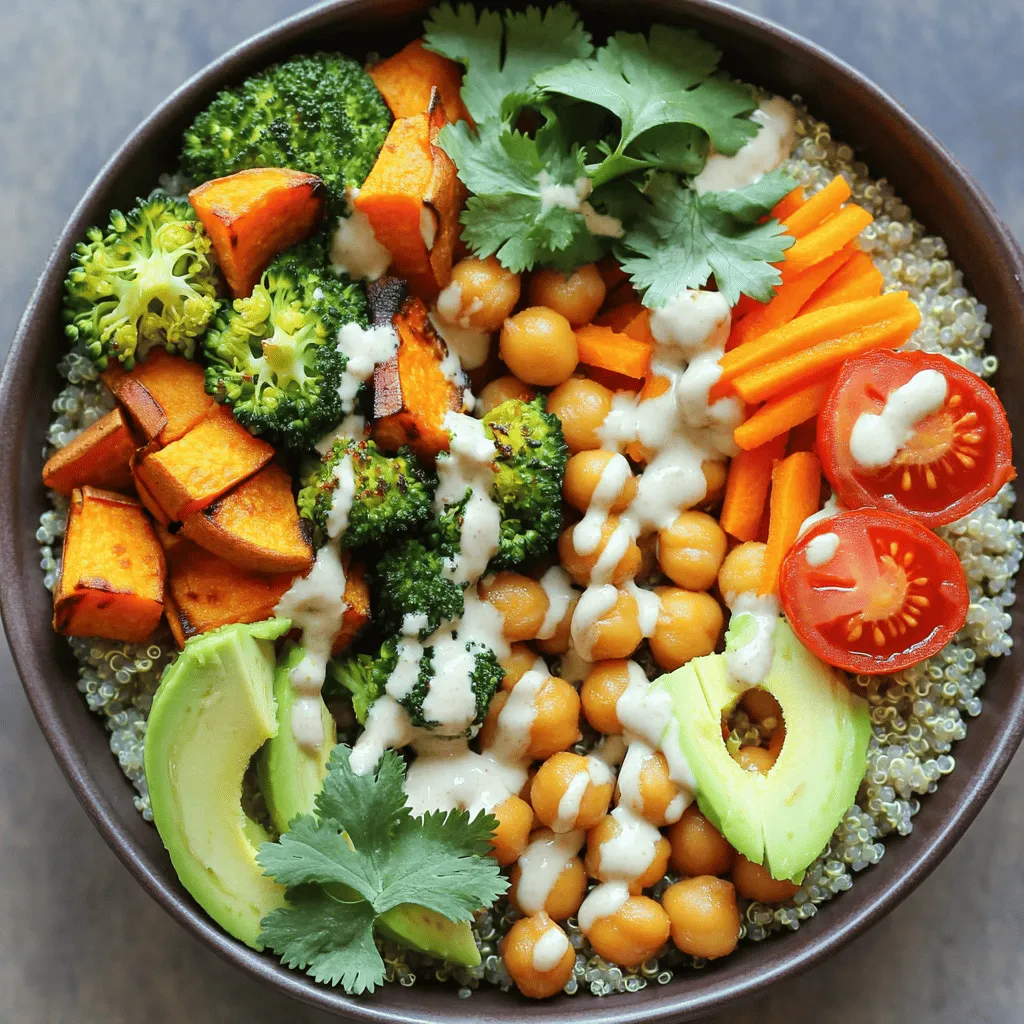
Are you ready to create a meal that’s not only delicious but also packed with nutrients? The Vegan Buddha Bowl

For Lemon Garlic Shrimp Pasta, you need a few key ingredients. Here's a quick list: - 8 oz spaghetti or linguine - 1 lb large shrimp, peeled and deveined - 4 cloves garlic, minced - 1/4 cup unsalted butter - 3 tablespoons olive oil - 1 lemon, zested and juiced - 1/2 teaspoon red pepper flakes - Salt and pepper to taste - 1/4 cup fresh parsley, chopped - Grated Parmesan cheese for serving (optional) These ingredients blend to create a bright and tasty dish. Each one has a role that adds flavor and texture. Using fresh ingredients makes a big difference in taste. Fresh shrimp brings a sweet flavor, while fresh garlic adds strong aroma. The lemon zest brightens up the dish. Pantry ingredients, like pasta and olive oil, are staples. They help create a satisfying meal without extra trips to the store. Always check your pantry first. Stocking up on red pepper flakes and salt ensures you can easily whip up this dish. If you have dietary needs, you can swap ingredients. For gluten-free options, use gluten-free pasta. You can also try zucchini noodles for a low-carb choice. Vegetarians can skip the shrimp. Replace it with mushrooms or firm tofu. These options still give you a nice texture and flavor. Always adjust seasonings to fit your taste. Start by boiling water in a large pot. Add a good amount of salt to the water for flavor. This step is key! Once the water is boiling, add 8 ounces of spaghetti or linguine. Cook it according to the package instructions until it's al dente. Al dente means it should be firm but not hard. This usually takes about 8-10 minutes. Reserve 1 cup of the pasta water before draining the pasta. This water is starchy and will help the sauce later. After that, drain the pasta and set it aside. While the pasta cooks, heat a large skillet over medium heat. Add 3 tablespoons of olive oil and 1/4 cup of unsalted butter. Once they melt, toss in 4 minced garlic cloves. Sauté the garlic for about 30 seconds. You want it fragrant but not burnt. Next, add 1 pound of large shrimp that are peeled and deveined. Sprinkle in 1/2 teaspoon of red pepper flakes, salt, and pepper. Cook the shrimp for 2-3 minutes. Turn them often until they turn pink and opaque. This means they are fully cooked and safe to eat. Now it’s time to bring everything together. Add the lemon juice and zest from 1 lemon to the skillet with the shrimp. Stir this mixture well. If it looks a bit dry, pour in a little of that reserved pasta water. This will create a light and tasty sauce. Once mixed, add the drained pasta to the skillet. Toss everything together to coat the pasta in the lemon garlic sauce. Finally, remove from heat and stir in 1/4 cup of chopped fresh parsley. Adjust the seasoning if needed. Serve your Lemon Garlic Shrimp Pasta hot, and top with grated Parmesan cheese if you like. For the complete recipe, check out the Full Recipe. To make your Lemon Garlic Shrimp Pasta shine, focus on fresh ingredients. Fresh garlic brings a strong taste. Use ripe lemons for the best juice and zest. You can also add herbs like basil or thyme for extra layers of flavor. A pinch of salt boosts the dish without overpowering it. If you like heat, increase the red pepper flakes. Remember, balance is key. One common mistake is overcooking the shrimp. They should be pink and firm, not rubbery. Another mistake is forgetting to reserve pasta water. This water helps create a rich sauce. Avoid using too much lemon juice; it can overpower the other flavors. Lastly, under-seasoning can leave your dish bland. Always taste and adjust. Using the right tools makes cooking easier. A large pot for boiling pasta is essential. A heavy skillet helps cook shrimp evenly. Use a microplane for zesting lemons quickly. Tongs are great for tossing the pasta and shrimp together. Don't forget a good knife for chopping garlic and parsley. These tools can make your cooking more fun and efficient. For the full recipe, check out the Lemon Garlic Shrimp Pasta. {{image_2}} You can boost this dish by adding vegetables. Fresh veggies add color and nutrition. Think about spinach, cherry tomatoes, or zucchini. Simply sauté them with the garlic before adding the shrimp. This step makes the meal more vibrant and tasty. You can change the sauce to fit your taste. Try a spicy marinara or a creamy Alfredo. For a lemon twist, consider adding a splash of white wine. Each sauce offers a new flavor. This keeps your meals exciting and fresh. For gluten-free pasta, use rice noodles or chickpea pasta. These options taste great with the shrimp. If you want low-carb, try zucchini noodles. They soak up the sauce well and stay light. Both choices make the dish suitable for different diets. For the full recipe, check out the Lemon Garlic Shrimp Pasta section above. You can store leftover Lemon Garlic Shrimp Pasta in the fridge. Use an airtight container to keep it fresh. This method protects the flavors and prevents spoilage. Make sure it cools down first before sealing it. It can last for up to three days in the fridge. You can freeze Lemon Garlic Shrimp Pasta for longer storage. First, let it cool completely. Then, pack it in a freezer-safe container. Remove as much air as possible to avoid freezer burn. It can last up to three months in the freezer. When you are ready to eat, thaw it in the fridge overnight before reheating. When reheating, add a splash of water or lemon juice. This keeps the pasta moist and flavorful. Heat it in a skillet over medium heat for the best taste. Stir frequently to heat it evenly. If you prefer, you can use the microwave. Just cover it to trap steam and heat in short bursts. Enjoy your meal as if it’s fresh from the pan! You can make this dish spicier by adding more red pepper flakes. Start with 1/2 teaspoon. If you want more heat, add an extra 1/4 teaspoon. You can also mix in fresh chopped chili peppers. Toss in jalapeños or serranos for a fresh kick. Adjust the spice according to your taste. Yes, you can use frozen shrimp. Just make sure to thaw them first. Place them in a bowl of cold water for 15-20 minutes. Drain them well before cooking. This helps the shrimp cook evenly. Frozen shrimp can save time and still taste great in this dish. Lemon Garlic Shrimp Pasta lasts for about 3 days in the fridge. Store it in an airtight container. When you're ready to eat, reheat it gently. Use a microwave or a skillet with a splash of water. This helps keep the pasta moist and tasty. In this blog post, we explored the world of Lemon Garlic Shrimp Pasta. We covered key ingredients, comparing fresh and pantry options, and suggested alternatives for dietary needs. I shared step-by-step instructions for perfect preparation and cooking. You learned tips to enhance flavors and avoid common mistakes. We also discussed variations and storage tips to keep your dish fresh. Cooking should be fun and easy. With these insights, you can whip up a delicious meal every time. Enjoy experimenting with this recipe in your kitchen!

Lemon Garlic Shrimp Pasta Quick and Flavorful Meal

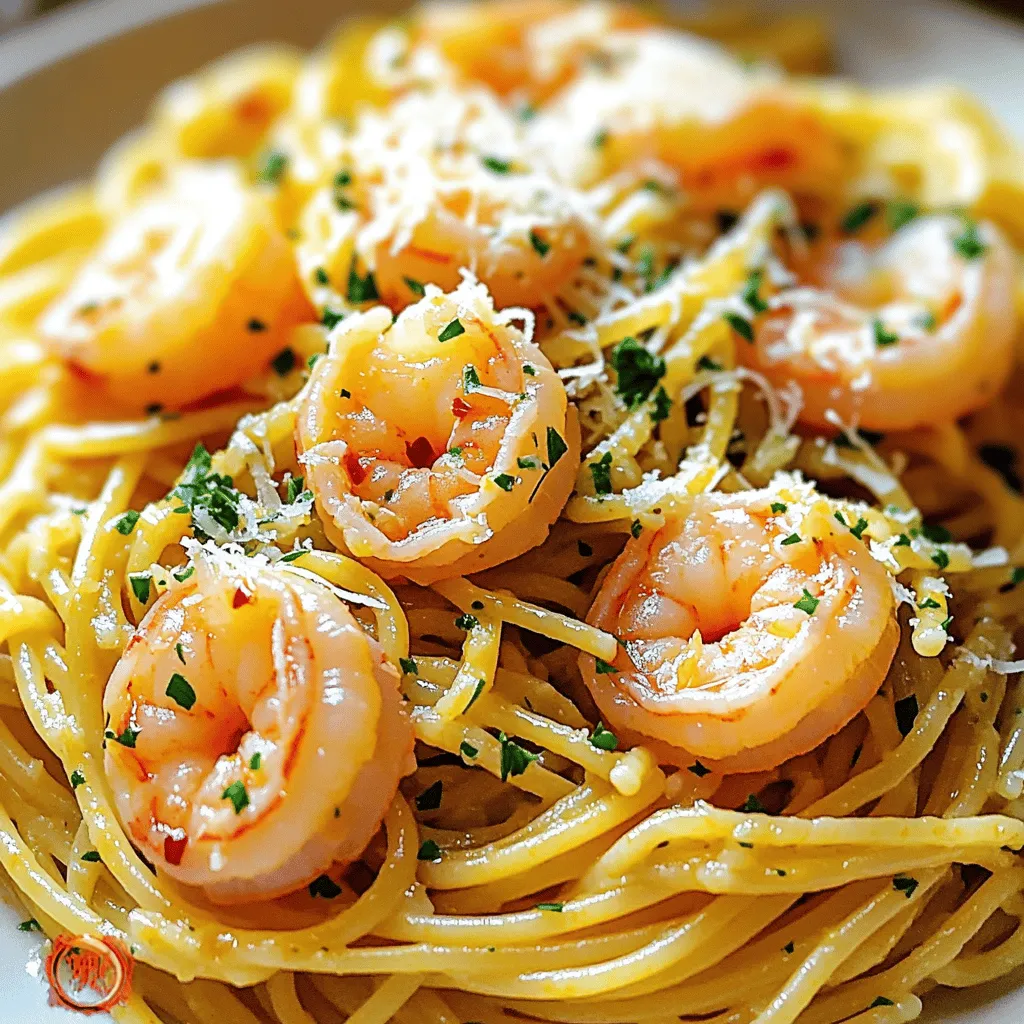
Looking for a quick and tasty meal? You can whip up Lemon Garlic Shrimp Pasta in no time! This dish

- 1 lb boneless, skinless chicken thighs - 2 tablespoons Sriracha sauce - 1 tablespoon olive oil - 2 cloves garlic, minced - 1 teaspoon cumin - 1 teaspoon paprika - 1 teaspoon lime juice - Salt and pepper to taste - 8 small corn tortillas - 1 cup shredded cabbage - 1 avocado, sliced - Fresh cilantro, for garnish - Lime wedges, for serving I love using boneless, skinless chicken thighs for this recipe. They stay juicy and tender. You can swap them for chicken breasts if you prefer. Just remember, breasts cook faster, so watch them closely. The key to flavor is the marinade. Sriracha sauce gives a spicy kick. You can adjust the amount based on your taste. Olive oil adds richness. Garlic brings depth, while cumin and paprika give warmth. Lime juice brightens the dish and balances the heat. For the tacos, I use small corn tortillas. They hold everything well. You can also try flour tortillas if you like. They are softer but may not hold up as well with juicy fillings. Don't forget the toppings! Shredded cabbage adds crunch. Sliced avocado brings creaminess. Fresh cilantro brightens every bite. Lime wedges are a must for that zesty finish. You can also add diced tomatoes, sour cream, or cheese like feta for extra flavor. - Diced tomatoes - Sour cream or Greek yogurt - Cheese (feta or cotija) - Chicken thighs vs. chicken breasts - Alternative heat sources (different hot sauces) - Tortilla options (flour vs. corn) Check out the Full Recipe for more details on how to make these amazing tacos! - Marinate Chicken Start by making the marinade. In a bowl, mix together the Sriracha sauce, olive oil, minced garlic, cumin, paprika, lime juice, salt, and pepper. Stir until combined. Cut the chicken thighs into pieces. Add them to the bowl and coat well with the marinade. Cover the bowl and place it in the fridge for at least 30 minutes. This helps the flavors soak in. For an even better taste, marinate for up to 2 hours. - Prepare Tortillas and Toppings While the chicken marinates, get the tortillas ready. Heat a skillet over medium heat. Warm the corn tortillas for about 30 seconds on each side. This makes them soft and easy to fold. Next, slice the avocado and chop the cabbage. Set these aside, along with fresh cilantro and lime wedges for serving. - Cooking methods (Grill vs. Skillet) You can cook the chicken on a grill or in a skillet. Both methods give great flavor. If you use a grill, it adds a nice smoky taste. For the skillet, you get a nice char without needing a grill. - Cooking duration and temperature Heat your grill or skillet to medium-high. Once hot, add the marinated chicken. Cook for about 6-7 minutes on each side. The chicken is done when it reaches an internal temperature of 165°F and has a nice char on both sides. After cooking, let it rest for a few minutes before slicing it into strips. - Layering the ingredients To assemble, take a warm tortilla and place a layer of shredded cabbage on it. Next, add the sliced chicken on top. Follow that with avocado slices and sprinkle fresh cilantro for added flavor. - Serving suggestions Serve the tacos with lime wedges on the side. A squeeze of lime juice enhances every bite. You can also offer extra toppings like diced tomatoes or cheese for those who want more flavor. Enjoy your Spicy Sriracha Chicken Tacos! For a detailed guide, check out the Full Recipe. For the best flavor, marinate the chicken for at least 30 minutes. If you have more time, try to marinate for up to 2 hours. This allows the spices to soak in well. To boost the flavor even more, add a bit of honey or brown sugar to the marinade. This gives a nice balance between sweet and spicy. To check if the chicken is done, use a meat thermometer. The inside should reach 165°F (75°C). If you don’t have a thermometer, cut the thickest part of the chicken. It should be white and juicy, not pink. For a nice char, sear the chicken on high heat for a few minutes on each side. This adds a smoky flavor and makes it look great. Keep your tortillas soft by warming them right before use. You can heat them on a grill or in a pan for about 30 seconds on each side. For wrapping, folding is best for tacos. This method keeps everything packed inside. If you prefer rolling, make sure not to overfill the tortilla. This helps prevent spills and keeps your meal neat. For the Full Recipe, visit the original recipe page. {{image_2}} You can easily make a vegetarian version of these tacos. Instead of chicken, use mushrooms or tofu. Both options absorb flavors well. For mushrooms, I recommend portobello or shiitake. If you choose tofu, press it first to remove excess water. Adjust the spices based on your protein choice. For instance, you might want to add more cumin for a richer flavor. Feel free to switch up the heat! Use different hot sauces or spices to change the taste. Try a smoky chipotle sauce for a deeper flavor. You can also add some sweetness. Pineapple chunks or mango slices bring a tropical twist. These fruits pair well with the spicy Sriracha and add a fun contrast. Think about how you want to serve these tacos. You can make taco bowls instead of traditional tacos. Use rice or quinoa as a base. Top it with your chicken and favorite toppings. Meal prep is also a great option. Cook the chicken ahead of time and store it. You can easily assemble tacos throughout the week. This makes dinner quick and easy! For the Full Recipe, check the main recipe section. To store leftovers safely, place the chicken in an airtight container. This keeps the chicken moist and tasty. You can store it in the fridge for up to three days. Make sure to let the chicken cool before sealing it. For the tortillas and toppings, keep them in separate containers. This helps them stay fresh and crunchy. You can freeze cooked chicken for longer storage. Place it in a freezer-safe bag or container. Be sure to remove as much air as possible to prevent freezer burn. You can freeze the chicken for up to three months. When you're ready to eat, thaw it in the fridge overnight. This keeps it juicy and safe. To maintain texture and flavor, reheat the chicken in a skillet. Heat it over medium heat for about five minutes. This warms the chicken without drying it out. For tortillas, warm them in a dry pan for about 30 seconds on each side. This keeps them soft and pliable. Avoid using the microwave, as it might make them chewy. Enjoy your leftovers with a squeeze of fresh lime! You can reduce the heat by using less Sriracha. Start with one tablespoon instead of two. Adding honey or sugar can also help balance the heat. Serve the tacos with sour cream or Greek yogurt. These toppings cool the spice. Yes, you can use chicken breasts, pork, or even shrimp. Chicken breasts will cook faster. Pork adds a nice flavor, while shrimp cooks quickly and absorbs the marinade well. Each option gives a different taste twist. Use gluten-free corn tortillas. Brands like Mission or La Banderita offer great options. To avoid cross-contamination, use clean utensils. Wash your hands after handling gluten products. Always read labels on sauces for hidden gluten. - Mexican street corn - Refried beans - Fresh salsa or guacamole - Cilantro lime rice These sides balance the spice and add different textures. They also enhance the taco experience. For more ideas, check out my Full Recipe for inspiration! This blog post covered how to make Spicy Sriracha Chicken Tacos. We discussed the main ingredients, preparation steps, and cooking methods. I also shared tips for marinating and cooking chicken to perfection. You learned about variations, gluten-free options, and storage tips for leftovers. Now, you can enjoy these tacos with any twist that excites your taste buds. Try new toppings and flavor profiles to keep this meal fresh. Happy cooking!

Spicy Sriracha Chicken Tacos Tasty and Easy Recipe

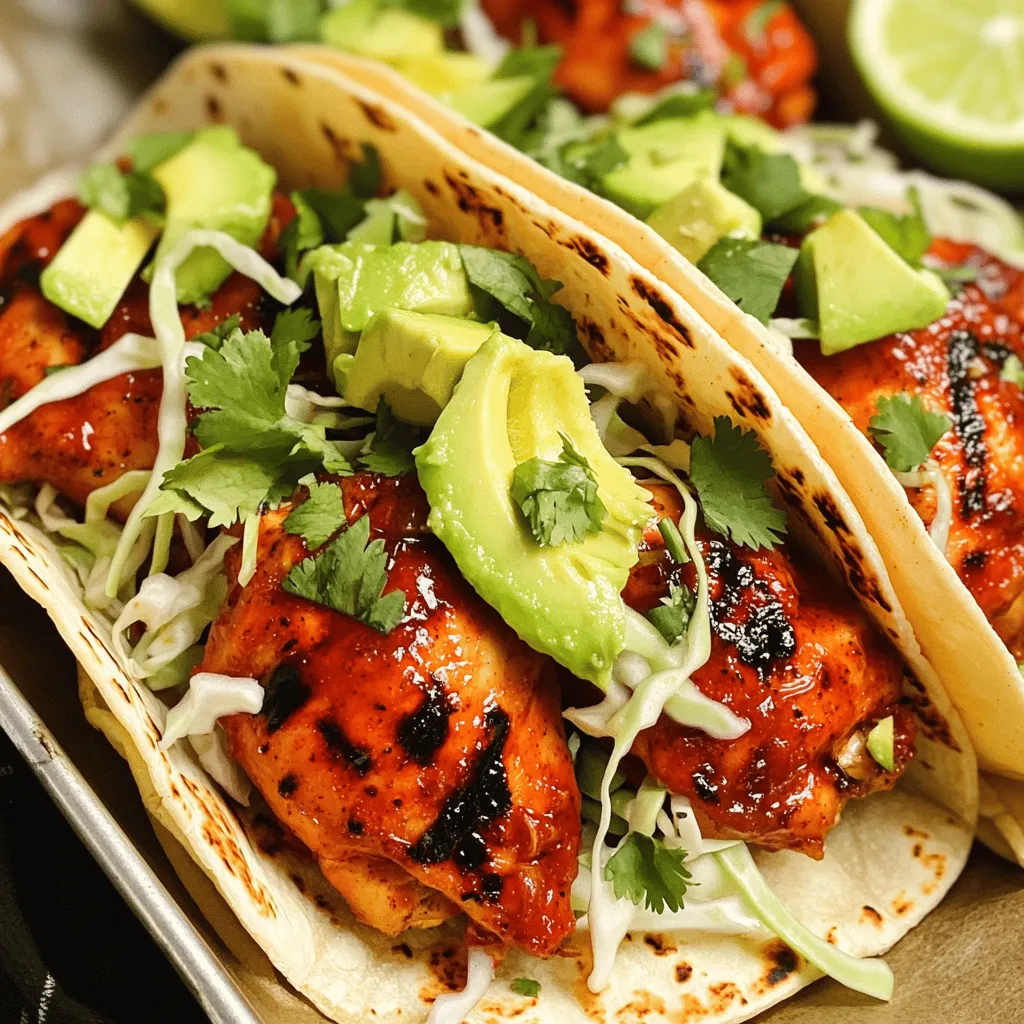
Get ready to spice up your dinner with my easy Spicy Sriracha Chicken Tacos! This tasty recipe combines juicy chicken

- Ripe mango - Ripe avocados - Small red onion - Jalapeño pepper - Fresh cilantro - Lime juice - Honey (optional) - Salt and pepper For four servings, use: - 1 ripe mango, diced - 2 ripe avocados, diced - 1 small red onion, finely chopped - 1 jalapeño, deseeded and minced - 1/4 cup fresh cilantro, chopped - Juice of 2 limes - 1 tablespoon honey (optional) - Salt and pepper to taste When you need to feed more or fewer people, adjust the amounts. For larger groups, double the recipe. If you want fewer servings, cut the amounts in half. This way, you can enjoy the fresh flavors without waste. Remember, it’s all about balance. Fresh ingredients boost the flavor and health of your dish. For the full recipe, check out the Tropical Mango Avocado Salsa section. First, we need to prep the fresh ingredients. Start by dicing the ripe mango into small cubes. Use a sharp knife for clean cuts. Then, do the same with the avocados. Make sure they are ripe but firm. This gives a nice texture. Next, finely chop the small red onion. The onion adds a sweet crunch. Then, take the jalapeño pepper. Remove the seeds if you want less heat. Mince it into tiny pieces. This step is key for flavor and spice. Now, grab a large mixing bowl. Combine the diced mango and avocado. Add the chopped red onion and minced jalapeño. Pour in the chopped cilantro for a fresh taste. When mixing, be gentle. I like to fold the ingredients rather than stir. This keeps the avocado pieces intact and gives a nice look. You want to see those colorful chunks! Next, squeeze the juice of two limes over the mixture. This adds brightness. If you like a bit of sweetness, now is the time to add honey. It balances the flavors well. Now, season the salsa with salt and pepper. Taste it and adjust as needed. Cover the bowl with plastic wrap. Let it rest for at least 15 minutes. This allows the flavors to blend beautifully. For the full recipe, check out the Tropical Mango Avocado Salsa. To make the best Mango Avocado Salsa, start with ripe mangoes. Look for ones that yield slightly to pressure. This softness shows they are sweet and juicy. For avocados, choose ones that are dark green and slightly soft. Press gently to check ripeness. Next, pick a small red onion. It should be firm and glossy. This onion adds a nice crunch and mild flavor. For the jalapeño, select one that is smooth and bright. If you want spice, choose a fresh one. You can always remove seeds for less heat. To boost the taste, consider adding spices or herbs. A pinch of cumin gives a warm depth. Chopped mint can add a fresh twist. You can also use garlic for a savory touch. Adjust sweetness and acidity to fit your taste. If the salsa is too tart, add a little honey. If it’s too sweet, squeeze more lime juice. Taste as you go to find the right balance. Mango Avocado Salsa is versatile. Serve it in a colorful bowl and garnish with cilantro. Use it as a dip with tortilla chips for a fun snack. You can also top grilled fish or chicken with it. This adds a fresh element to any main dish. For a unique twist, try it on tacos or as a side for rice dishes. The bright flavors will complement many meals. Enjoy making this fresh and flavorful delight from the [Full Recipe]. {{image_2}} You can make your mango avocado salsa even more fun. Try adding pineapple or kiwi for a sweet twist. Pineapple brings a juicy burst, while kiwi adds a tangy kick. Diced bell peppers also work well. They give a nice crunch and bright color. Mix and match these fruits to find your favorite flavor combo. If you love spice, adjust the heat in your salsa. Use different types of peppers to change the kick. For a mild salsa, try a sweet bell pepper. For more heat, jalapeños are great. You can also use serrano peppers for extra spice. Taste as you go to find the perfect balance between spicy and sweet. Making this salsa vegan or gluten-free is easy! All the main ingredients fit these diets. You can add more nutrients, too. Consider adding black beans or corn for extra fiber. These additions make the salsa heartier and add flavor. Enjoy this fresh dish while also keeping it healthy! For the full recipe, check out the Tropical Mango Avocado Salsa. To keep your Mango Avocado Salsa fresh, store leftovers in an airtight container. This method helps prevent air exposure, which causes browning. You should use a container that seals well. If you have extra lime juice, add a bit on top before sealing. This will slow down browning and keep flavors bright. Your salsa will last about 2 to 3 days in the fridge. After that, the avocados may turn brown, and the texture will change. Look for signs of spoilage, like a sour smell or mold. If you see any of these, it’s best to toss it out. Trust your senses; they will help you decide. Yes, you can freeze Mango Avocado Salsa, but the texture might change when thawed. If you want to freeze it, skip the avocado during prep. You can mix everything else, then add diced avocado after thawing. To thaw, place it in the fridge overnight. This will help preserve the salsa’s texture and flavor. Enjoy your fresh salsa! You can find the full recipe to try again later. To stop avocados from browning, use lime juice. The acid in lime slows down oxidation. Here are a few tips to keep your salsa fresh: - Use lime juice: Squeeze fresh lime juice over the diced avocados. - Cover tightly: Use plastic wrap to cover the salsa. Press it against the surface to remove air. - Store in the fridge: Keep it cool in an airtight container. Yes, you can make this salsa ahead! It tastes great when the flavors meld together. Here are best practices for prep and storage: - Prep the ingredients: Dice the mango and avocados just before serving. - Combine flavors: Mix everything except the avocado. Add the avocado right before serving. - Store properly: Keep it in an airtight container in the fridge for up to a day. Mango Avocado Salsa is healthy and tasty. It offers many nutritional perks: - Rich in vitamins: Mangoes are high in vitamin C. Avocados provide healthy fats. - Low in calories: This salsa is light and refreshing. - High in fiber: Both mangoes and avocados are great sources of fiber. Mango Avocado Salsa differs from traditional salsa in many ways: - Flavor: This salsa is sweet and creamy, unlike the spicy and tangy taste of classic salsas. - Ingredients: It uses mangoes and avocados, while traditional salsa often uses tomatoes. - Usages: You can pair this salsa with fish or chicken, while traditional salsa is great with chips. For the full recipe, check out the Tropical Mango Avocado Salsa section above! This blog post shared how to make Mango Avocado Salsa. We covered fresh ingredients like mangoes and avocados, along with tips for measuring and mixing. I also provided ways to enhance flavor and variations to try. Proper storage and FAQs helped round out your understanding. Enjoy making your salsa! Remember to get ripe produce for the best taste. With these tips, you can impress everyone at your next gathering. Whether you keep it simple or try new spins, delicious salsa awaits!

Mango Avocado Salsa Fresh and Flavorful Delight

Get ready to brighten up your meals with my Mango Avocado Salsa! This fresh and flavorful delight bursts with vibrant

To make Creamy Tuscan Salmon, gather the following fresh ingredients: - 4 salmon fillets - 2 tablespoons olive oil - 3 cloves garlic, minced - 1 cup cherry tomatoes, halved - 1 cup spinach leaves, fresh - 1 cup heavy cream - 1 cup shredded Parmesan cheese - 1 tablespoon Italian seasoning - Salt and pepper to taste - Fresh basil leaves for garnish These ingredients come together to create a rich and tasty dish. The salmon fillets provide a nice, flaky texture. The cherry tomatoes add a sweet burst of flavor. Fresh spinach brings a pop of color and nutrients. Heavy cream combined with Parmesan cheese creates a luscious sauce. Olive oil and garlic enhance the overall taste. Italian seasoning adds warmth and depth. Finally, garnish with fresh basil for a bright finish. You can find the full recipe in the article. It guides you step by step, ensuring your meal turns out perfect every time. - Start by seasoning the salmon fillets with salt, pepper, and Italian seasoning. - In a large skillet, heat the olive oil over medium-high heat. - Once the oil is hot, add the salmon fillets skin-side down. - Sear for 4 to 5 minutes until golden brown. Flip and cook for 3 to 4 more minutes. - In the same skillet, add minced garlic and sauté for about 30 seconds. - Then, add the halved cherry tomatoes and cook for 2 to 3 minutes until soft. - Stir in the fresh spinach leaves and cook until they wilt. - Lower the heat and pour in the heavy cream. Stir to mix well. Let it simmer for 2 to 3 minutes. - Gradually add the shredded Parmesan cheese, stirring until melted and creamy. - Return the salmon to the skillet, spooning the creamy sauce over it. - Cook for another minute to warm through. Taste and adjust seasoning if needed. For the full recipe, refer to the detailed instructions. Enjoy your cooking! To know when salmon is cooked, look for a few signs. First, the flesh should be opaque and flake easily with a fork. A safe internal temperature is 145°F. You can use a food thermometer to check this. For the best results, I recommend using a non-stick skillet or cast iron pan. These types heat evenly and help prevent sticking. This way, you can achieve that lovely golden crust without losing any salmon. To boost the flavor of your creamy sauce, consider adding lemon juice or zest. This will brighten the dish up a notch. Another great option is to mix in some red pepper flakes for a mild kick. If you want a thicker sauce, let it simmer longer. For a thinner texture, simply add a splash of broth or extra cream. Adjusting the sauce to your liking makes a big difference. Creamy Tuscan Salmon pairs beautifully with side dishes. I love serving it with garlic mashed potatoes or a simple green salad. You could also try it with roasted asparagus or steamed broccoli for a fresh touch. When plating, place the salmon in the center of the plate. Spoon the creamy sauce over the top. Add a few fresh basil leaves for color. This creates a stunning presentation that will impress your guests. For the full recipe, check out the instructions above. {{image_2}} You can switch up the heavy cream for a lighter option. Use half-and-half or coconut milk for a different taste. If you want a thicker sauce, blend silken tofu or cashew cream instead. For cheese, Parmesan is great, but you can try feta or goat cheese too. Each cheese brings its own flavor, so feel free to experiment! To make this dish dairy-free, replace the heavy cream with almond milk or oat cream. Use nutritional yeast instead of cheese for a cheesy flavor without the dairy. For a low-carb option, skip the cream and use cauliflower puree instead. This keeps the dish creamy without adding carbs. You can add fresh herbs like thyme or oregano for a twist. A pinch of red pepper flakes adds heat if you like spice. For a cultural twist, try adding olives or capers for a Mediterranean flair. Each change can make the dish feel new and exciting! To keep your Creamy Tuscan Salmon fresh, store leftovers in the fridge. Place the salmon in an airtight container. It will stay fresh for about three days. If you want to keep it longer, freeze it. Wrap each fillet in plastic wrap, then place it in a freezer bag. This helps prevent freezer burn. To reheat the salmon, use the oven or stovetop. For the oven, preheat it to 350°F. Place the salmon in a baking dish and cover it with foil. Heat for about 15 minutes. On the stovetop, add a little olive oil to a skillet. Cook over low heat for 5-7 minutes. This keeps the salmon moist and tasty. In the fridge, Creamy Tuscan Salmon lasts about three days. If it smells off or looks dull, throw it away. Signs of spoilage include a slimy texture or discoloration. Always check for these signs before eating leftovers. Proper storage keeps your meal safe and delicious. You can add heat to your dish easily. Here are some options: - Red pepper flakes - Fresh chopped jalapeños - A dash of hot sauce For spice blends, consider: - Cajun seasoning - Italian seasoning with extra chili powder - A sprinkle of smoked paprika These ingredients will give your salmon a nice kick without overpowering the creamy sauce. Yes, you can use frozen salmon! Just remember to thaw it first. Here’s how: - Place the salmon in the fridge overnight. - For a quick thaw, seal it in a bag and submerge it in cold water for about an hour. If you use frozen salmon, adjust the cooking time. It may take a few extra minutes to cook through. Always check for doneness with a fork. White wines work best with this dish. I suggest: - Sauvignon Blanc - Chardonnay - Pinot Grigio If you prefer red, try a light Pinot Noir. These wines will balance the creamy flavors and enhance your meal. Enjoy your dinner with a great drink! In this post, I shared how to make Creamy Tuscan Salmon, detailing ingredients, steps, and helpful tips. You learned about flavor boosts, cooking methods, and storage tips. You can easily adjust this dish to fit your needs, whether for dietary changes or personal tastes. Enjoy experimenting with ingredients and serving suggestions. With these easy steps, you can impress everyone at your table. Try it today, and make sure to savor each bite!

Creamy Tuscan Salmon Flavorful Dinner Delight

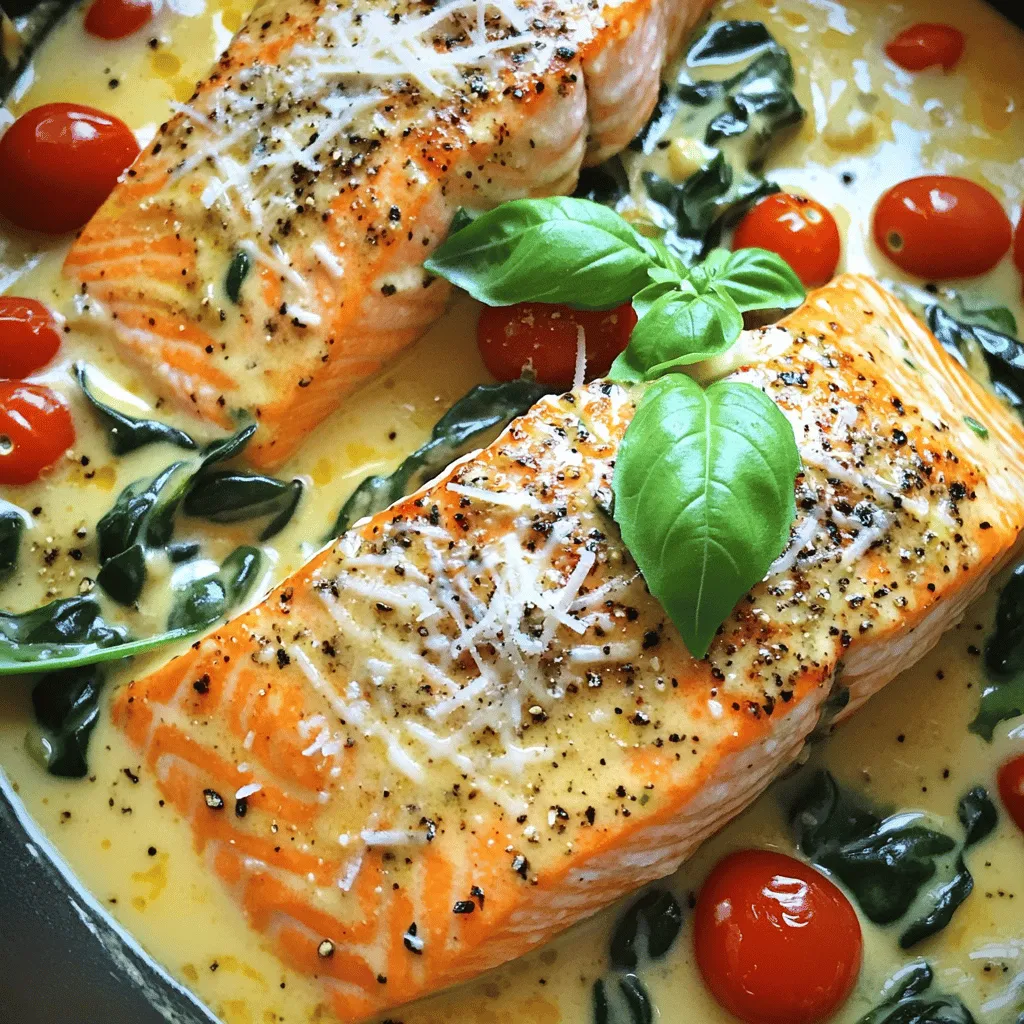
If you’re craving a rich and flavorful dinner, look no further than Creamy Tuscan Salmon. This dish combines juicy salmon

Older posts
Newer posts
← Previous Page1 … Page5 Page6 Page7 … Page67 Next →

dsad

© 2025 Southern Dishes • Built with GeneratePress

Our Policies

  • Copyright Policy
  • Cookie Policy
  • GDPR Policy
  • Privacy Policy
  • Disclaimer
  • Terms Of Use

More Information

  • Home
  • About
  • Contact
  • Appetizers
  • Dessert
  • Dinner
  • Drinks
©2025, Southern Dishes About Back To Top