Skip to content
DisclaimerTerms Of UseGDPR PolicyCookie Policy

Southern Dishes

  • Home
  • Drinks
  • Appetizers
  • Dinner
  • Dessert
  • About
  • Contact
  • Privacy Policy
DisclaimerTerms Of UseGDPR PolicyCookie Policy

Isabella

- 1 cup quinoa, rinsed - 2 cups vegetable broth - 1 cup cherry tomatoes, halved - 1 cucumber, diced - 1/2 red bell pepper, chopped - 1/2 red onion, finely chopped - 1/3 cup Kalamata olives, pitted and sliced - 1/2 cup feta cheese, crumbled - 1/4 cup fresh parsley, chopped - 3 tablespoons olive oil - 2 tablespoons lemon juice - 1 teaspoon dried oregano - Salt and black pepper to taste To make this savory quinoa salad, you need some key ingredients. First, quinoa is the star of the show. It is nutritious and gluten-free. You will also want fresh vegetables like cherry tomatoes, cucumber, and bell pepper. These add color and crunch. Feta cheese brings a creamy, salty flavor that ties it all together. Lastly, the dressing, made from olive oil and lemon juice, brightens up the dish. - Nuts and seeds - Additional herbs You can customize your salad with optional add-ins. Nuts and seeds add crunch and healthy fats. Sunflower seeds or walnuts work well. Fresh herbs like basil or mint can give extra flavor. Experiment with what you love! - Measuring cups and spoons - Mixing bowls - Cooking pot To prepare this salad, you will need some basic kitchen tools. Measuring cups and spoons help with accurate portions. Mixing bowls are essential for combining your ingredients. A cooking pot is needed to cook the quinoa. Having the right tools makes cooking easier and more fun. For the full recipe, be sure to check out the complete instructions. Boiling the Vegetable Broth Start by pouring 2 cups of vegetable broth into a medium saucepan. Heat it on high until it boils. Watch closely to avoid spills. Simmering the Quinoa Once the broth is boiling, add 1 cup of rinsed quinoa. Cover the pot and turn the heat down to low. Let it simmer for about 15 minutes. The liquid should absorb, and the quinoa will get fluffy. When done, remove it from heat and let it cool for a few minutes. Fluff the quinoa with a fork, then set it aside. Chopping and Dicing While your quinoa cooks, grab your fresh veggies. Chop 1 cucumber, halve 1 cup of cherry tomatoes, and chop 1/2 red bell pepper. Finely chop 1/2 red onion. Slice 1/3 cup of Kalamata olives. Combining Ingredients In a large bowl, mix all your chopped veggies. This bowl will soon hold all the vibrant flavors of your salad. Creating the Dressing In a small bowl, whisk together 3 tablespoons of olive oil, 2 tablespoons of lemon juice, and 1 teaspoon of dried oregano. Add salt and black pepper to taste. This dressing brings all the flavors together. Tossing Ingredients Pour your dressing over the quinoa and vegetable mixture. Gently toss everything until well combined. Add 1/2 cup of crumbled feta cheese and 1/4 cup of chopped parsley. Toss lightly again to mix them in. Enjoy the bright colors and fresh scents! For the complete steps, check the [Full Recipe]. Rinsing quinoa is key. It removes a bitter coating called saponin. To rinse, place the quinoa in a fine-mesh strainer. Run cold water over it for about a minute. This simple step makes a big difference in flavor. Fluffing quinoa is equally important. After cooking, let it sit for a few minutes. Then, use a fork to gently fluff it. This helps separate the grains and keeps the texture light. For the best pairings, consider adding grilled chicken or shrimp. Both add protein and flavor. You can also serve the salad alongside a warm pita. This adds a nice touch to your meal. Plating is vital for visual appeal. Serve the salad in a large, colorful bowl. You can also use individual plates. Garnish with extra parsley and a drizzle of olive oil. This makes the dish pop. You can play with sweet or savory additions. Try adding diced apples or dried cranberries for sweetness. For a savory touch, consider adding capers or extra olives. Explore different dressing alternatives. Instead of lemon juice, try balsamic vinegar. You can also mix in yogurt for a creamy texture. These changes can give your salad a new life. For the full recipe, check out the complete steps to make your Savory Quinoa Salad with Feta! {{image_2}} You can brighten up your salad with a Mediterranean twist. Adding roasted vegetables gives a fun texture. Just toss in some zucchini, bell peppers, or eggplant. Roast them until they are golden. This adds a warm, rich flavor to your dish. You can also include artichokes or sun-dried tomatoes. Both options boost taste and bring a tangy kick. Artichokes add a unique texture and flavor. Sun-dried tomatoes add sweetness and depth. These small changes can make your salad feel fresh and exciting. For a protein boost, consider adding grilled chicken. Just slice it and mix it in. This makes the salad more filling and hearty. Chickpeas or black beans are great plant-based options too. They provide protein and fiber. Simply rinse and add them to the salad. Either choice keeps the dish healthy and satisfying. If you want to keep it vegan, simply omit the feta cheese. The salad will still be delicious and full of flavor. You can substitute feta with plant-based alternatives. Look for vegan feta made from nuts or tofu. These swaps keep your meal tasty while meeting dietary needs. You can enjoy a vibrant salad without losing any flavor! To keep your savory quinoa salad fresh, store it in the fridge. Place the salad in an airtight container. This helps lock in moisture and flavor. I like using glass containers because they don’t stain and are easy to clean. If you want to save the salad for later, freezing is a great option. Scoop the salad into freezer-safe bags. Make sure to squeeze out as much air as you can before sealing. When you are ready to eat, thaw it in the fridge overnight. Reheat it in a pan on low heat, or enjoy it cold! How long will it last? In the fridge, your salad should be good for 3 to 5 days. If you freeze it, it can last up to 3 months. Signs of spoilage include a sour smell or change in color. If you see any mold, throw it away! Enjoy your salad fresh for the best taste. For the full recipe, check out the section above. You can try several cheeses in this salad. Here are some great options: - Goat cheese for a creamy texture. - Ricotta cheese for a mild flavor. - Cotija cheese for a crumbly bite. - Parmesan for a sharper taste. Each cheese adds its own twist to the salad, making it fun to experiment! Yes, you can prepare this salad ahead of time! It stays fresh in the fridge for up to three days. Just keep the dressing separate until you're ready to eat. This way, the salad stays crisp and tasty. Yes, quinoa is gluten-free. It comes from a seed, not a grain. Many people who have gluten sensitivities or celiac disease can enjoy quinoa safely. It’s also packed with protein and fiber, making it a healthy choice for everyone. In this blog post, we explored how to make a fresh quinoa salad. We covered main ingredients, optional add-ins, and the right tools. You learned how to cook quinoa and prepare vegetables. I shared tips for perfecting the dish and suggested variations for more flavors. Remember to store your salad properly for the best taste. With these steps and tips, you can enjoy a delicious, healthy meal. Try it out and customize it to fit your taste.

Savory Quinoa Salad with Feta Quick and Healthy Dish

Looking for a quick and healthy dish that packs big flavor? My Savory Quinoa Salad with Feta is the answer!

- 1 cup semi-sweet chocolate chips - 1 cup mini marshmallows - 1 tablespoon unsalted butter - 1 teaspoon vanilla extract - 1/2 cup graham cracker crumbs - Pinch of sea salt - Extra graham crackers and strawberries for dipping To make S'mores dip, gather these simple ingredients. The semi-sweet chocolate chips bring a rich flavor. Mini marshmallows add sweetness and chewiness. Unsalted butter creates a nice, smooth base. Vanilla extract gives a warm aroma. Graham cracker crumbs form the delicious crust. A pinch of sea salt enhances all the flavors. Finally, prepare extra graham crackers and strawberries for dipping. - Oven-safe skillet - Mixing bowl - Spatula Using the right tools makes cooking easier. An oven-safe skillet is key for baking. A mixing bowl helps you combine ingredients well. A spatula is perfect for spreading and mixing. These tools will help you create a S'mores dip that everyone will love. For the full recipe, check the detailed section above. - Preheat your oven to 350°F (175°C). - In a medium oven-safe skillet, melt 1 tablespoon of butter over low heat. This step sets the stage for a rich flavor. - In a mixing bowl, combine 1/2 cup of graham cracker crumbs and the melted butter. - Stir until the crumbs soak up the butter. - Press this mixture firmly into the bottom of the skillet to form a crust. This gives your dip a solid base. - Sprinkle 1 cup of semi-sweet chocolate chips evenly over the crust. - Then, add a layer of 1 cup of mini marshmallows on top of the chocolate chips. This creates that gooey, sweet goodness we all love. - Place the skillet in your preheated oven and bake for about 15 minutes. - Keep an eye on it. You want the marshmallows to turn golden brown and the chocolate to melt and bubble. - As soon as you see that golden color, it’s time to take it out! Now, you have a delicious S'mores Dip ready to serve. Check out the Full Recipe for more details! To get that perfect marshmallow top, watch the time closely. Bake until the marshmallows are golden brown. This gives them a nice toasty flavor. Use a broiler for a few seconds at the end if you want extra color. Just keep an eye on it! When serving, let the dip cool for a bit. This helps it set. Use a large spoon for easy dipping. Place extra graham crackers and strawberries nearby. They make great dippers and add a fresh taste. You can switch up chocolate chips if you want. Dark chocolate works well and gives a richer taste. You can also use white chocolate for a sweeter dip. For marshmallows, try mini or regular ones. If you want a fun twist, use flavored marshmallows. They add a unique taste to your dip. Graham crackers are the classic choice for dipping. But you can also use pretzels for a salty crunch. Sliced apples or bananas work great, too. For drinks, milk is a favorite. It pairs well with the sweetness. You can also try a cold brew coffee to balance the flavors. Enjoy your dip with these tasty snacks and drinks! {{image_2}} You can make S'mores Dip even better with fun flavors. One great idea is to incorporate peanut butter. Just mix in a half cup of creamy peanut butter with the chocolate chips before baking. The nutty taste gives a new twist and adds richness. You can also try using flavored chocolates. Think of dark chocolate or even mint chocolate. These change the taste and make your dip unique and exciting. If you want to enjoy this dessert while sticking to your diet, I have options for you. For a gluten-free version, use gluten-free graham cracker crumbs. They work just like regular crumbs and still taste great. If you are looking for a vegan S'mores Dip, swap the semi-sweet chocolate chips for dairy-free chocolate chips. Use vegan butter instead of regular butter for the crust. You still get the same gooey goodness without animal products. You can explore these variations while making the Full Recipe. These changes keep the spirit of S'mores alive and cater to different tastes and diets. To keep your S'mores Dip fresh, store any leftovers in the fridge. Use an airtight container for best results. This will help keep the dip moist and tasty. It can last up to three days in the refrigerator. When ready to enjoy, just reheat it in the oven or microwave. The dip will still be gooey and delicious! If you want to save S'mores Dip for later, freezing is a great option. Start by letting the dip cool completely. Then, transfer it to a freezer-safe container. Make sure to seal it tightly. You can freeze it for up to three months. When you want to eat it, thaw it in the fridge overnight. Reheat it in the oven until warm and bubbly. This way, you can enjoy a sweet treat anytime! For the full recipe, check out the complete guide above. You can prepare S'mores Dip a few hours before serving. Make the dip and layer it in your skillet. Cover it with plastic wrap and place it in the fridge. When it’s time to serve, take it out and bake it. Bake it at 350°F (175°C) for about 15 minutes. This way, you save time and still get that gooey, warm dip. Yes, you can make S'mores Dip without an oven! Use a microwave instead. Combine the chocolate chips, butter, and vanilla in a microwave-safe bowl. Heat it in short bursts until melted. Stir until smooth. Then, add the marshmallows on top. Microwave for about 30 seconds to 1 minute, until the marshmallows puff up. This method is quick and easy, perfect for a last-minute treat. You can mix in many fun ingredients! Here are some ideas: - Peanut butter adds a rich flavor. - Caramel sauce gives a sweet twist. - Nuts like almonds or pecans add crunch. - Use different chocolate types, like dark or white chocolate. - Try adding crushed candy bars for extra flavor. Feel free to get creative and make it your own! We explored how to make a simple S'mores Dip. You learned about the key ingredients, tools, and step-by-step instructions. Tips for perfecting the dip and variations offered new ideas. Plus, we discussed storage and answered common questions. S'mores Dip is easy, fun, and tasty. It’s a crowd-pleaser for any gathering. Enjoy making it your way!

S’mores Dip Irresistible Dessert for Any Occasion

Are you ready to indulge in a treat that blends nostalgia and ease? This S’mores Dip is the perfect dessert

- 4 chicken thighs, bone-in and skin-on - 1 can (14 oz) coconut milk - 2 limes (zest and juice) - 3 tablespoons honey - 2 garlic cloves, minced - 1 teaspoon ginger, freshly grated - 1 teaspoon turmeric powder - 1 teaspoon salt - ½ teaspoon black pepper - 1 tablespoon olive oil - Fresh cilantro, for garnish Using a kitchen scale helps with accuracy. It ensures you have the right amounts. You can also swap fresh ingredients for dried ones. Fresh ingredients bring better flavor and aroma. Using fresh herbs and spices is key for great taste. Fresh herbs brighten dishes and add color. I always choose organic over non-organic when possible. Organic ingredients often have fewer chemicals and better flavor. Marinating the chicken thighs Start by making the marinade. In a bowl, mix the coconut milk, lime zest, lime juice, honey, minced garlic, grated ginger, turmeric, salt, and black pepper. Whisk until smooth. Place the chicken thighs in the bowl, making sure they are well-coated. Cover it and marinate for at least 30 minutes. If you have time, marinate for up to 2 hours in the fridge for richer flavor. Preheating the oven While the chicken marinates, preheat your oven to 425°F (220°C). This ensures even cooking and a crispy skin on the chicken. Searing the chicken thighs After marinating, take the chicken out of the bowl. Let any extra marinade drip off. Heat olive oil in a large oven-safe skillet over medium-high heat. Place the chicken thighs skin-side down in the skillet. Sear them for about 5-7 minutes until the skin is crispy and golden brown. This step locks in flavors and adds texture. Baking process with time recommendations Once seared, flip the chicken thighs over. Pour the remaining marinade over them. Transfer the skillet to your preheated oven. Bake for 25-30 minutes. The chicken is done when it reaches an internal temperature of 165°F (75°C). You want the sauce bubbling, which adds to the dish's richness. Carefully remove the skillet from the oven and let it rest for about 5 minutes before serving. Presentation tips for the final dish Serve the chicken on a large platter. Drizzle a generous amount of sauce over the chicken. Garnish with fresh cilantro and lime wedges. This adds a pop of color and freshness. Pairing suggestions for sides and drinks Pair the chicken with steamed jasmine rice and grilled vegetables. These sides complement the dish's flavors well. For drinks, consider a light white wine or a refreshing mocktail. The citrus notes will enhance your meal. For more details, check the Full Recipe! How to check for doneness? You should check the chicken's internal temperature. Use a meat thermometer. The safe temperature is 165°F (75°C). Cut into the thickest part of the thigh. The juices should run clear, not pink. Tips for crispy chicken skin: Start with dry chicken skin. Pat it with paper towels before cooking. Sear the chicken skin-side down in a hot pan. This helps it crisp up nicely. Don’t move the chicken too much while it cooks. Adding additional spices for variation: You can try adding spices like paprika or cumin. They add depth to the flavor. A pinch of cayenne will add some heat. Mix and match to find what you love. Incorporating different herbs: You can swap cilantro for other herbs. Fresh basil or mint can brighten the dish. Try flat-leaf parsley if you want a milder taste. Add herbs at the end for the best flavor. Recommended pans for best results: I love using cast iron skillets. They hold heat well and give a nice sear. A heavy non-stick pan also works great. Just be sure it’s safe for your oven. Importance of oven-safe skillets: Using an oven-safe skillet is key. You can start cooking on the stove and finish in the oven. This method helps the chicken cook evenly and stay juicy. Plus, it makes cleanup easier. For a complete recipe, check out the [Full Recipe]. {{image_2}} You can easily swap ingredients to fit your taste. For sweeteners, try using maple syrup instead of honey. It gives a nice flavor and works well with the coconut. If you want a gluten-free dish, ensure your soy sauce is gluten-free or use coconut aminos. This keeps the dish tasty while meeting dietary needs. You can cook coconut lime chicken in different ways. Grilling adds a smoky flavor. Just marinate the chicken and place it on a hot grill. Flip it halfway through. Baking is simpler and great for juicy chicken. Follow the oven steps in the full recipe. For a slow cooker option, marinate the chicken and place it in the cooker. Cook on low for 4-6 hours. This makes the chicken very tender. You can adjust the flavor to your liking. If you want it spicier, add chopped chili peppers to the marinade. The heat will balance well with the sweetness of coconut. You can also change the acidity. Add a splash of vinegar or extra lime juice. This brightens the dish and enhances the taste. Experiment to find your favorite balance! To store leftover coconut lime chicken, let it cool first. Place it in an airtight container. This keeps the chicken fresh and tasty. You can safely store it in the fridge for up to four days. If you want to keep it longer, freezing is a great option. To freeze coconut lime chicken, wrap it tightly in plastic wrap. Then, place it in a freezer-safe bag. Make sure to remove as much air as possible. This helps prevent freezer burn. You can freeze the chicken for up to three months. When you’re ready to eat, thaw it in the fridge overnight. For reheating, warm it in the oven or on the stovetop. This keeps the chicken moist and flavorful. Leftover coconut lime chicken is very versatile. You can shred it for a tasty salad. Toss it with greens and a light dressing. Or, use it in wraps with fresh veggies and avocado. Another idea is to add it to rice bowls. It pairs well with grains and beans. The flavors from the chicken will make any dish pop! For more ideas, check the Full Recipe to explore tasty options. To check if chicken is fully cooked, use a meat thermometer. The internal temperature should reach 165°F (75°C). This ensures the chicken is safe to eat. You can also look for clear juices. If the juices run clear when you cut into the chicken, it is done. The meat should no longer be pink. Yes, you can use chicken breast, but there are pros and cons. Chicken thighs are juicier and have more flavor. They stay moist during cooking. Chicken breast is leaner but can dry out. If using breast, cook it for a shorter time. Start checking for doneness at 20 minutes. If you need a substitute for coconut milk, try almond milk or heavy cream. Almond milk is lighter but has a different taste. Heavy cream will make the dish richer. Keep in mind, these substitutes change the flavor and texture of the dish. Coconut milk gives a unique creaminess. Marinate the chicken for at least 30 minutes. This allows the flavors to soak in. For the best taste, marinate for up to 2 hours. Be careful not to over-marinate. If left too long, the chicken can become mushy. This recipe for coconut lime chicken blends fresh ingredients into a delicious dish. I emphasized the importance of preparation, cooking tips, and great ways to serve it. Remember to use fresh herbs and spices for the best taste. You can easily adapt the recipe by substituting ingredients or trying new cooking methods. Storage tips let you enjoy leftovers creatively. Cooking this dish is straightforward and fun. Now, gather your ingredients, follow the steps, and enjoy your tasty meal!

Coconut Lime Chicken Delightful Flavorful Recipe

Looking for a dish that bursts with flavor? Coconut Lime Chicken combines juicy chicken thighs with creamy coconut milk and

To make Peanut Butter Bliss Balls, you will need the following ingredients: - 1 cup natural peanut butter (creamy or crunchy) - 1/2 cup rolled oats - 1/4 cup honey or maple syrup - 1/4 cup ground flaxseed - 1/2 cup dark chocolate chips or cacao nibs - 1/4 teaspoon sea salt - 1 teaspoon vanilla extract - Optional: 1/4 cup shredded coconut for rolling These ingredients come together to create a snack that is not only tasty but also satisfying. You can add fun flavors to your bliss balls. Consider these options: - Chopped nuts: walnuts or almonds add crunch. - Dried fruits: raisins or cranberries bring sweetness. - Spices: a dash of cinnamon or nutmeg adds warmth. Feel free to mix and match these add-ins based on your taste. Each ingredient has its own health perks: - Peanut butter: Provides protein and healthy fats for energy. - Rolled oats: They add fiber, which helps digestion. - Flaxseed: This superfood is rich in omega-3 fatty acids. - Dark chocolate: It offers antioxidants and improves mood. Using these ingredients makes your bliss balls not only delicious but also nutritious. With the full recipe, you can easily whip up these delightful snacks at home! To make these tasty Peanut Butter Bliss Balls, start with simple steps. First, grab a large mixing bowl. Add 1 cup of natural peanut butter and 1/4 cup of honey or maple syrup. Mix these until they blend well. Next, add 1/2 cup of rolled oats, 1/4 cup of ground flaxseed, and 1/4 teaspoon of sea salt. Don't forget 1 teaspoon of vanilla extract! Stir everything until it forms a thick mix. Now, gently fold in 1/2 cup of dark chocolate chips or cacao nibs. Using your hands, scoop out about 1 tablespoon of this mix and roll it into a ball. Do this until you use all the mix. If you like, roll each ball in shredded coconut for extra flavor. Place them on a parchment-lined baking sheet or plate. Refrigerate these bliss balls for at least 30 minutes. This helps the flavors mix and the texture firm up. For the best texture, don’t rush the mixing. Make sure every ingredient blends well. If the mix feels too sticky, add a bit more rolled oats. If it's too dry, a splash of honey or maple syrup can help. Properly chilling the balls is key. This step helps them hold their shape when you serve them. Always roll the balls tightly to keep them from falling apart. I find that watching someone make these bliss balls can be very helpful. Look for videos online that show the process. Images can guide you, too. They help you see what each step should look like. Having these visuals can make cooking more fun and less stressful. Enjoy your cooking journey! Making Peanut Butter Bliss Balls is simple. Use a large bowl to mix all your ingredients. To save time, measure everything first. You can even use a cookie scoop to shape the balls. This tool helps keep them uniform in size. If the mixture feels sticky, wet your hands a bit. This makes rolling easier. For the best taste, choose natural peanut butter. The creaminess adds a rich texture. If you like a crunch, go for crunchy peanut butter. Adding a pinch of sea salt enhances the sweetness. Try different sweeteners too. Honey brings a floral note, while maple syrup adds a warm flavor. You can also add spices like cinnamon for a twist. Avoid using old ingredients. Fresh oats and nut butter make a big difference. Don’t skip the refrigeration step. Chilling helps the balls firm up and taste better. If they fall apart, your mix may be too dry. Add a bit more peanut butter or honey. Lastly, don’t rush the rolling process. Take your time to ensure each ball is well-formed. These tips will help you create Peanut Butter Bliss Balls that are easy to make and packed with flavor. For the complete recipe, refer to the Full Recipe section. {{image_2}} To make chocolate peanut butter bliss balls, simply add cocoa powder. Use 1/4 cup of cocoa powder in place of some oats. This gives a rich chocolate flavor. You can also mix in dark chocolate chips. They add sweetness and texture. Follow the same steps from the full recipe. Roll them into balls and enjoy a chocolate treat! For nut-free bliss balls, use sunbutter or soy nut butter. Both are great substitutes. You can keep the rest of the recipe the same. If you want vegan options, swap honey for maple syrup. This keeps it plant-based and sweet. Just make sure to check the chocolate chips. Some may not be dairy-free, so look for vegan options! You can change flavors based on the season. In fall, add pumpkin spice for a warm taste. Use 1 teaspoon of pumpkin spice in the mix. For summer, try adding dried fruit, like cranberries or apricots. They give a fruity burst and keep things fresh. Experiment with different spices and ingredients to fit your mood or holiday. To keep your Peanut Butter Bliss Balls fresh, store them in an airtight container. Place a piece of parchment paper between layers. This helps prevent them from sticking together. Store the container in the fridge. This keeps the bliss balls cool and tasty. They will stay fresh for about one week. You can also freeze these bliss balls for later. First, arrange them in a single layer on a baking sheet. Freeze them for an hour until they are firm. Then, transfer the frozen balls to an airtight container or freezer bag. Label the container with the date. Frozen bliss balls can last up to three months. When you want to enjoy them, just take out how many you need and let them thaw in the fridge. Peanut Butter Bliss Balls taste best when fresh, but they last a while. In the fridge, they stay good for about a week. If you see any signs of spoilage, like a strange smell or mold, throw them away. To enjoy them at their best, eat them within one week. You can also use the freezing method to keep them for longer. This way, you can have a tasty snack ready whenever you want! For the full recipe, check out the Peanut Butter Bliss Balls recipe. Yes, you can use other nut butters. Almond butter or cashew butter work well. Each nut butter brings its own flavor. Peanuts have a strong taste, while almonds are milder. Use what you like best! Just keep the same amount as the peanut butter in the recipe. This will help keep the texture right. To make these bliss balls gluten-free, choose gluten-free oats. Most rolled oats are fine, but check the label. This small change makes a big difference. Also, ensure that any sweeteners you use are gluten-free. Honey and maple syrup are good options. You can enjoy these treats without worry! These bliss balls are great for sharing. You can serve them on a colorful platter. Try adding a drizzle of melted chocolate for flair. They also make a perfect post-workout snack. You can enjoy them on the go or at home. For extra fun, place them in small cups or liners. Don't forget to enjoy them with friends! For the full recipe, check the section above. This post covered how to make delicious Peanut Butter Bliss Balls. You learned about the ingredients, including add-ins and their health benefits. I shared step-by-step instructions, tips for texture, and lots of variations for everyone. Remember to store your bliss balls properly for the best taste. Don't hesitate to experiment with different flavors or nut butters. Enjoy your tasty snacks and make them your own!

Peanut Butter Bliss Balls Simple and Tasty Snack

Looking for a quick, tasty snack that satisfies your sweet tooth? These Peanut Butter Bliss Balls are your answer! Packed

To make your spicy lentil soup, you need a few key ingredients: - 1 cup red lentils, rinsed - 1 medium onion, diced - 2 cloves garlic, minced - 1 carrot, diced - 1 celery stalk, diced - 1 red bell pepper, diced - 1 tablespoon olive oil - 1 teaspoon ground cumin - 1 teaspoon smoked paprika - 1/2 teaspoon cayenne pepper (adjust to taste) - 1 can (14 oz) diced tomatoes (with juices) - 4 cups vegetable broth - 1 tablespoon lemon juice - Salt and pepper to taste - Fresh cilantro, for garnish These ingredients work together to create a warm and filling soup. The red lentils provide protein and fiber. The veggies add texture and flavor. Spices like cumin and cayenne give it a kick. If you can't find an ingredient, no worries! Here are some easy swaps: - Use yellow lentils instead of red lentils. - Swap the diced tomatoes for crushed tomatoes. - No red bell pepper? Try green or yellow bell pepper instead. - Use chicken broth if you prefer not to use vegetable broth. These substitutions keep the soup tasty while fitting your needs. Feel free to experiment and make it your own. Lentils are tiny powerhouses of nutrition. Here’s a breakdown of what they bring: - Red Lentils: High in protein and fiber, low in fat. - Onion: Contains vitamins and antioxidants. - Garlic: Good for heart health and adds flavor. - Carrots and Celery: Provide vitamins and crunch. - Olive Oil: Healthy fat that adds richness. This soup is not just delicious; it’s also packed with nutrients. Enjoy a bowl knowing you’re nourishing your body! To make this soup, start by heating the olive oil in a large pot over medium heat. Add the diced onion, garlic, carrot, and celery. Sauté them for about 5-7 minutes, until the vegetables soften and the onion turns translucent. Next, stir in the red bell pepper and cook for another 2-3 minutes. Now, it's time to add some flavor. Sprinkle in the ground cumin, smoked paprika, and cayenne pepper. Stir these spices into the veggies and cook for 1-2 minutes. You want to release their lovely aroma. Then, pour in the canned diced tomatoes along with their juices. Add the rinsed lentils and mix everything well. Next, pour in the vegetable broth and bring it to a boil. Once it boils, reduce the heat to low and cover the pot. Let it simmer for 25-30 minutes until the lentils get soft. After that, stir in the lemon juice and season it with salt and pepper. If the soup looks too thick, add extra broth or water to get your desired texture. If you like a creamier soup, blend part of it with an immersion blender. Lentils are simple to cook, but here are some tips to get them just right: - Rinse your lentils before cooking to remove dust or debris. - Use fresh lentils for the best flavor. Old lentils may take longer to cook. - Soak lentils for a few hours to reduce cooking time, but it’s not necessary. - Ensure you have enough liquid in the pot. Lentils absorb water as they cook. Cooking times can change based on the type of lentils you use. For red lentils, 25-30 minutes is perfect. If you choose green or brown lentils, they may need 35-45 minutes to become tender. Check them often to avoid overcooking. You can also adjust the spice levels based on your taste. If you want more heat, add more cayenne pepper. For a milder soup, reduce it. For the full recipe, check out the details above. To find the right spice level, start with half a teaspoon of cayenne pepper. Taste the soup after cooking. If you want more heat, add a little more. Remember, you can always add more spice, but you can’t take it out. Balance is key. Pair the heat with the sweetness of carrots and bell peppers. This combo makes the soup rich and tasty. Herbs and spices can boost flavor. Try adding fresh herbs like cilantro or parsley. They add freshness and color. Dried herbs like thyme or oregano work well too. For a different twist, add a pinch of cinnamon. It brings warmth without being sweet. Adjust to your taste. Every added herb or spice can make the soup uniquely yours. Having the right tools makes cooking easier. Use a large pot to fit all the ingredients. A good knife helps with chopping veggies. An immersion blender is great for mixing the soup smooth. If you don’t have one, a regular blender works too. Just be careful when blending hot liquid. Lastly, keep measuring cups and spoons handy for accuracy. They ensure you add the right amounts for the best flavor. For the full recipe, check out the Fire & Spice Lentil Soup. {{image_2}} This soup is already vegan, making it a great choice. You can customize it easily. Try adding coconut milk for creaminess. This adds a nice sweetness too. You can also toss in some kale or spinach for extra greens. Adding these veggies boosts nutrition and flavor. You don’t need to worry about gluten here! All the main ingredients are gluten-free. Just check your vegetable broth to ensure it's gluten-free too. If you prefer a thicker soup, you can blend some lentils. This gives it a nice creamy texture without any gluten. You can mix in different ingredients to change the taste. Try adding sweet potatoes for a sweeter flavor. You can also use curry powder instead of smoked paprika for a different kick. Experiment with herbs like thyme or rosemary for added depth. Each change can transform the dish into something new and exciting. For more details, check the Full Recipe. After you enjoy your spicy lentil soup, let it cool. Use an airtight container for storage. Place the soup in the fridge. It will stay fresh for about 3 to 5 days. Label the container with the date. This helps you track its freshness. You can freeze your soup for longer storage. Use freezer-safe containers or bags. Leave some space at the top, as the soup will expand. It can last for up to 3 months in the freezer. When ready to eat, thaw it overnight in the fridge. To reheat, pour the soup into a pot. Warm it over low heat on the stove. Stir it often to avoid sticking. You can add water or broth if it’s too thick. If using a microwave, place it in a microwave-safe bowl. Heat in short bursts, stirring in between. This keeps the soup warm and tasty. For the full recipe, check out the details above. Lentils are packed with protein and fiber. They help keep you full and satisfied. They also contain iron, which is good for your blood. Lentils are low in fat and can help lower cholesterol. Plus, they have many vitamins and minerals. Eating lentils can support heart health and aid digestion. Yes, you can! Just follow these steps. Start by sautéing the onion, garlic, and veggies in a pan. Then, add them to your slow cooker. Next, add the lentils, spices, and broth. Cook on low for 6-8 hours or high for 3-4 hours. Stir in the lemon juice before serving. This method makes the lentils super tender and full of flavor. To make more soup, simply double or triple the ingredients. Use more lentils, broth, and veggies to fit your needs. Keep the spice levels to your taste. You can batch cook it and freeze leftovers for future meals. This way, you always have a hearty meal ready. This soup pairs well with many sides. Try crusty bread or warm pita for dipping. A fresh salad adds a nice crunch. You can also serve it with rice for a filling meal. For a special touch, add a dollop of yogurt on top. Enjoy the flavors together! For the full recipe, check out the Fire & Spice Lentil Soup above. This blog post detailed how to make spicy lentil soup. We covered essential ingredients and substitutions, along with the nutritional value of key items. I shared step-by-step instructions and tips for cooking lentils. You learned how to adjust spice levels and enhance flavor. We explored vegan and gluten-free options. Lastly, I explained how to store and reheat leftovers. Try this soup for a hearty meal. Enjoy experimenting with variations that fit your taste!

Spicy Lentil Soup Hearty and Flavorful Delight

Welcome to the world of Spicy Lentil Soup! This hearty dish packs a punch with robust flavors and fits any

- 1 pound large shrimp, peeled and deveined - 4 cloves garlic, minced - 1/4 cup fresh parsley, chopped - 1 tablespoon fresh rosemary, finely chopped - 1 tablespoon fresh thyme leaves - 1/4 cup olive oil - 2 tablespoons lemon juice - 1 teaspoon paprika - Salt and pepper to taste - Lemon wedges for serving - 1 pound = about 454 grams - 1/4 cup = about 60 milliliters - 1 tablespoon = about 15 milliliters - 1 teaspoon = about 5 milliliters To pick great shrimp, look for these signs: - Firm Texture: Fresh shrimp feel firm, not mushy. - Clear Color: Choose shrimp with a clear and shiny color. - Mild Smell: Fresh shrimp should smell like the sea, not fishy. - Shell Condition: The shells must be intact and not slimy. When you grill shrimp, use the best quality. Fresh shrimp give your dish great taste. If you can, buy from local markets. You’ll support local business and get fresh products. Enjoy your cooking! Check the Full Recipe for more details. To start, gather your ingredients. You will need garlic, herbs, olive oil, and seasoning. In a large mixing bowl, combine: - 4 cloves garlic, minced - 1/4 cup fresh parsley, chopped - 1 tablespoon fresh rosemary, finely chopped - 1 tablespoon fresh thyme leaves - 1/4 cup olive oil - 2 tablespoons lemon juice - 1 teaspoon paprika - Salt and pepper to taste Mix these well. This mixture will become the flavorful marinade for your shrimp. Now, it’s time to add the shrimp. You need 1 pound of large shrimp, peeled and deveined. Toss the shrimp into the marinade. Make sure each shrimp is well coated. Cover the bowl with plastic wrap. Let the shrimp marinate in the refrigerator for at least 30 minutes. If you have time, an hour is even better. This makes the shrimp really tasty. Before grilling, preheat your grill to medium-high heat. If you use wooden skewers, soak them in water for about 30 minutes. This helps to prevent burning. Next, thread the marinated shrimp onto the skewers. Leave some space between each shrimp for even cooking. Now, place the skewers on the grill. Cook for 2-3 minutes on each side. You want the shrimp to turn pink and opaque, which means they are done. Be careful not to overcook them. Once cooked, remove the skewers from the grill. Place them on a serving platter. Serve warm and enjoy! For an extra burst of flavor, add lemon wedges on the side. You can find the full recipe in the earlier section. To keep shrimp tender, watch the cooking time closely. Shrimp cook fast, usually 2-3 minutes on each side. Overcooking makes them rubbery and dry. You want them to turn pink and opaque. If you see them curl tightly, they are likely overcooked. Use a timer to help. Aim for a nice, juicy bite every time. Want to switch things up? You can add a kick to the marinade. Try adding red pepper flakes for some heat. You can also mix in some citrus zest for a fresh twist. A splash of soy sauce can deepen the flavor too. Fresh herbs like dill or cilantro can be fun additions. Play with what you like! For a beautiful presentation, arrange the skewers on a large platter. Sprinkle with fresh herbs for color. Pair the shrimp with grilled veggies or a light salad. Serve with lemon wedges to enhance the taste. You can also add a dipping sauce like garlic aioli for extra flavor. Enjoy these shrimp at your next BBQ or family dinner! {{image_2}} You can mix up the herbs for your shrimp skewers. While parsley, rosemary, and thyme are great, consider using basil or cilantro. Mint can add a fresh twist. You can even try dill for a unique flavor. Each herb brings its own taste, making the dish special. If you want some heat, add chili flakes or cayenne pepper. Start with a small amount. You can always add more if you like it spicier. Adjust the spice level to match your taste buds. This way, you can create a dish that suits you just right. Grilling is fun, but you can also bake or sauté the shrimp. If baking, preheat your oven to 400°F. Place the shrimp on a baking sheet and cook for about 8-10 minutes. For sautéing, heat oil in a pan over medium heat. Cook the shrimp for 2-3 minutes on each side. Both methods work well and give you tasty options. You can find the full recipe to guide you through these methods. Store leftover grilled shrimp in an airtight container. This keeps the shrimp fresh and prevents odors. If possible, eat them within two days for the best taste. Place the container in the fridge. You can also wrap the shrimp tightly in plastic wrap. This method works well for short-term storage. Freezing grilled shrimp is easy and smart. First, let the shrimp cool completely. This helps prevent ice crystals. Next, place the shrimp in a single layer on a baking sheet. Freeze them for about one hour. Once frozen, transfer the shrimp to a freezer bag. Remove as much air as you can before sealing. Label the bag with the date. Frozen shrimp can last up to three months. To reheat shrimp, use a gentle method. The stovetop is best for keeping the flavor. Heat a skillet over low heat. Add a splash of olive oil or a little water to prevent sticking. Place the shrimp in the pan. Heat for about three minutes, turning often. You can also use the microwave. Place shrimp on a plate, cover with a damp paper towel, and microwave in short bursts. This keeps them moist and tasty. Enjoy your garlic herb grilled shrimp! For the full recipe, check the main article. I recommend marinating shrimp for at least 30 minutes. This allows the flavors to soak in. If you have more time, an hour is even better. You want the garlic and herbs to really shine. Yes, you can use frozen shrimp. First, thaw them overnight in the fridge. If you need them faster, place the shrimp in a bowl of cold water for about 15-20 minutes. Drain them well before marinating. Serve garlic herb grilled shrimp with rice or a fresh salad. Grilled vegetables also make a great side. You can pair it with garlic bread for a tasty touch. Yes, this recipe is gluten-free. All the ingredients are safe for gluten-free diets. Just check for cross-contamination if you use packaged items. Enjoy your meal with peace of mind! In this post, we covered how to make delicious garlic herb grilled shrimp. We explored the key ingredients, step-by-step instructions, and tips for perfect grilling. You learned how to choose fresh shrimp, avoid overcooking, and enhance flavors. Remember, you can adjust herbs and spices to suit your taste. Whether you follow the recipe or make your own twists, enjoy grilling shrimp this season! With these simple tips, you will create a tasty dish that everyone will love. Happy grilling!

Garlic Herb Grilled Shrimp Flavorful Skewers Recipe

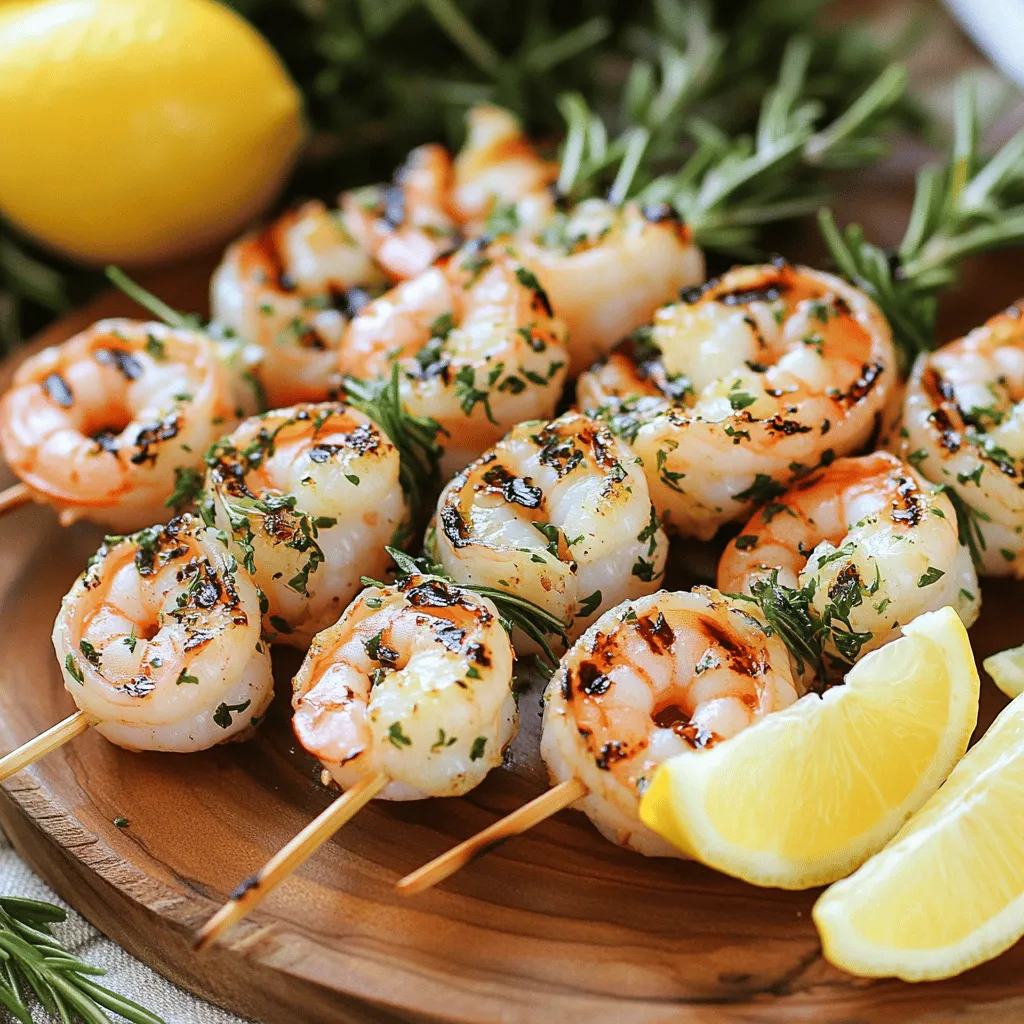
Welcome to your new favorite summer dish: Garlic Herb Grilled Shrimp! This easy recipe combines fresh shrimp with garlic, herbs,

To make delicious cranberry orange muffins, gather these ingredients: - 1 ½ cups all-purpose flour - ½ cup granulated sugar - 1 tablespoon baking powder - ½ teaspoon baking soda - ¼ teaspoon salt - 1 teaspoon ground cinnamon - ¼ cup unsalted butter, melted - 1 large egg - ¾ cup milk - Zest of 1 orange - 1 cup fresh or frozen cranberries (if using frozen, do not thaw) - 1 teaspoon vanilla extract - 2 tablespoons orange juice - Optional: ½ cup chopped walnuts or pecans These ingredients combine to create a sweet and tangy flavor that bursts with freshness. You might not have all the ingredients on hand. Here are some easy swaps: - Use whole wheat flour instead of all-purpose flour for a heartier muffin. - Substitute maple syrup or honey for granulated sugar for a natural sweetener. - If you run out of baking powder, mix 1 teaspoon of baking soda with ½ teaspoon of vinegar. - Almond milk works well in place of regular milk. - Use lemon zest if you can't find orange zest. These substitutions maintain the muffin's taste while catering to your needs. Using fresh ingredients makes a big difference. Here are some tips: - Choose bright, plump cranberries. They should feel firm and have a vibrant color. - For the best flavor, use fresh oranges for zest and juice. Avoid bottled juices. - Check the dates on your baking powder and baking soda. They should be fresh for the best rise. - If you can, buy organic ingredients. They often have better taste and quality. These tips ensure your muffins are as tasty and vibrant as possible. Start by preheating your oven to 375°F (190°C). Line a muffin tin with paper liners or grease it lightly. In a large bowl, mix the dry ingredients: flour, sugar, baking powder, baking soda, salt, and cinnamon. Whisk these together until smooth. In another bowl, whisk the wet ingredients: melted butter, egg, milk, orange zest, vanilla, and orange juice. Combine these well. Now, pour the wet mix into the dry ingredients. Gently stir until just combined. It’s okay if you see some lumps. Next, fold in the cranberries and nuts, if you’re using them. Be careful not to over-mix; a few lumps are just fine. Finally, fill each muffin cup about two-thirds full with the batter. Now that your batter is ready, place the muffin tin in the oven. Bake for 18 to 20 minutes. You want them to be golden brown. To check for doneness, insert a toothpick into the center of a muffin. If it comes out clean, they are done! After baking, let your muffins cool in the tin for about five minutes. Then, transfer them to a wire rack to cool completely. For serving, dust them with powdered sugar or drizzle a simple glaze made from powdered sugar and orange juice. Enjoy these muffins warm with tea or coffee. They make a tasty treat for any time of day! When making cranberry orange muffins, some mistakes can ruin your bake. First, don’t over-mix the batter. Lumps are okay; they help keep the muffins light. Second, avoid using thawed cranberries. They can make your muffins soggy. Third, check your baking powder for freshness. Old baking powder can lead to flat muffins. To help your muffins rise, make sure your oven is fully preheated. Adding a bit of extra baking powder can also help. Use room temperature ingredients, as cold ones can slow the rise. Lastly, fill the muffin cups about two-thirds full. This gives them room to grow without spilling over. These muffins shine when served warm. Try adding a dusting of powdered sugar for a sweet touch. They pair well with a cup of tea or coffee. For a fun twist, serve them with a simple glaze made of powdered sugar and orange juice. You can also add a side of yogurt for a tasty breakfast option. For the full recipe, check out our Cranberry Orange Bliss Muffins section! {{image_2}} For gluten-free muffins, swap the all-purpose flour with a gluten-free blend. Many brands work well. Ensure the mix contains xanthan gum. This helps the muffins hold together. Follow the same steps from the Full Recipe. You will still enjoy that tangy orange and tart cranberry flavor. To make these muffins vegan, replace the egg with a flaxseed egg. Mix one tablespoon of ground flaxseed with three tablespoons of water. Let it sit for five minutes. Also, use almond milk or another plant-based milk instead of regular milk. Substitute melted butter with coconut oil or a vegan butter. The muffins will be just as delicious without animal products. You can enhance the flavor of these muffins in many ways. Try adding a teaspoon of nutmeg for warmth. Or, mix in a teaspoon of ginger for a spicier kick. If you like nuts, fold in some walnuts or pecans for crunch. Dried cranberries or cherries can add a nice touch too. Feel free to experiment with your favorite flavors! To keep your cranberry orange muffins fresh, place them in an airtight container. You can also wrap each muffin in plastic wrap. Store them at room temperature for up to three days. If you want to keep them longer, refrigerate them. Just know that the fridge can dry them out a bit. When you want to enjoy a muffin again, reheating is easy. Place the muffin in the microwave for about 10 to 15 seconds. This warms it up nicely. For a crispier texture, use an oven. Preheat it to 350°F (175°C). Heat the muffin for about 5 minutes. This will bring back its fresh-baked taste. If you have leftover muffins, freezing them is a great option. Wrap each muffin tightly in plastic wrap, then place them in a freezer bag. They can last up to three months in the freezer. When you’re ready to eat one, simply thaw it overnight in the fridge. You can also reheat it straight from the freezer. Just give it a few extra seconds in the microwave or oven. Enjoy your cranberry orange muffins anytime! For the full recipe, check out Cranberry Orange Bliss Muffins. The best cranberries for muffins are fresh or frozen ones. Fresh cranberries have a bright taste. They bring a burst of flavor to each bite. If you use frozen cranberries, do not thaw them. This keeps the muffins moist and fluffy. You can often find both types at your local grocery store. Yes, you can use dried cranberries! They add a sweet touch to your muffins. However, they won’t give the same tartness as fresh ones. If using dried cranberries, reduce the sugar in your recipe. This helps balance the sweetness. Soak the dried cranberries in warm water for about 10 minutes for best results. This makes them plump and juicy. Baking at high altitudes can be tricky. You may need to make some changes to your recipe. First, reduce sugar by 1 to 2 tablespoons. This helps to prevent the muffins from being too sweet. Increase the liquid by 1 to 2 tablespoons to keep moisture. Finally, add an extra tablespoon of flour to help with rising. These simple adjustments can lead to great results. For the complete recipe, check out Cranberry Orange Bliss Muffins . In this post, we explored all aspects of making delicious Cranberry Orange Bliss Muffins. You learned about key ingredients, helpful tips, and even creative variations. Knowing how to store muffins and reheat them keeps them fresh longer. Remember to avoid common mistakes for perfect muffins every time. With these steps and insights, you can bake with confidence. Your muffins will impress everyone, and you’ll enjoy every bite. Happy baking!

Cranberry Orange Muffins Fresh and Tasty Delight

Welcome to a delicious adventure with my Cranberry Orange Muffins! These muffins burst with fresh flavors that brighten any day.

To make zesty lemon bars, gather these items: - 1 cup all-purpose flour - 1/4 cup powdered sugar - 1/2 cup unsalted butter, softened - 2 large eggs - 1 cup granulated sugar - 1/4 cup fresh lemon juice (about 2 lemons) - Zest of 2 lemons - 1/2 teaspoon baking powder - Pinch of salt - Additional powdered sugar for dusting You can change your lemon bars with these fun options: - Add a teaspoon of vanilla extract for extra flavor. - Use lime juice and zest for a twist. - Fold in blueberries or raspberries for a fruity kick. You will find these tools helpful: - 8x8-inch baking pan - Parchment paper - Mixing bowls - Whisk or fork - Wire rack for cooling - Measuring cups and spoons These ingredients and tools will set you up for success in making delicious zesty lemon bars. For the full recipe, refer to the section above. Enjoy the tangy and refreshing taste! First, preheat your oven to 350°F (175°C). This step is key for even baking. Next, grab an 8x8-inch baking pan. Line it with parchment paper. Let the paper hang over the edges. This helps you lift the bars out later. In a medium bowl, mix 1 cup of all-purpose flour and 1/4 cup of powdered sugar. Then, add 1/2 cup of softened unsalted butter. Use a fork or your fingers to mix until it looks like coarse crumbs. Now, press this mixture evenly into the bottom of the pan. It should be smooth and flat. While the crust is baking, let's focus on the lemon filling. In a separate bowl, whisk together 2 large eggs, 1 cup of granulated sugar, 1/4 cup of fresh lemon juice, and the zest of 2 lemons. Add 1/2 teaspoon of baking powder and a pinch of salt. Mix until everything is smooth and well combined. Once the crust is lightly brown, pour the lemon filling over it. Bake again for 20-25 minutes. The filling should be set and not jiggle when you shake it. When done, remove it from the oven. Let the lemon bars cool completely in the pan on a wire rack. After cooling, use the parchment paper to lift them out. Dust the top with extra powdered sugar. Finally, cut into squares and enjoy your zesty lemon bars! To get that perfect sweet-tart balance, use fresh lemons. Fresh juice and zest give the best flavor. I personally squeeze the lemons right before use. This way, you get all the tanginess. If it tastes too sweet, add a bit more lemon juice. This small change makes a big difference. Many bakers overmix the filling. This can lead to dense bars. Mix just until combined for a light texture. Another mistake is not pre-baking the crust. A warm crust helps the filling set better. Also, check your oven temperature. Use an oven thermometer to ensure accuracy. This simple tool can improve your results. To keep your lemon bars fresh, store them in the fridge. Use an airtight container for the best results. They can last up to a week this way. For longer storage, freeze them. Wrap each bar in plastic wrap, then place in a freezer bag. This keeps them tasty for up to three months. Enjoy your zesty lemon bars anytime! Check the [Full Recipe] for more details. {{image_2}} You can make gluten-free lemon bars easily. Just swap the all-purpose flour for a gluten-free blend. Look for a mix that works well in baking. I recommend using a 1:1 gluten-free flour blend for best results. This change keeps your bars zesty and delicious for everyone. To make vegan lemon bars, replace the eggs with flaxseed meal. Mix 1 tablespoon of flaxseed meal with 2.5 tablespoons of water. Let it sit for five minutes. This mixture works like an egg. Use plant-based butter instead of regular butter. These small swaps give you tasty vegan lemon bars. Want to add a twist? Try infused flavors like lavender or coconut. For lavender, add 1 teaspoon of culinary lavender to the filling mix. This adds a floral note. If you prefer coconut, mix in 1/2 cup of shredded coconut. This change adds texture and a tropical flavor. You can find these ideas in the Full Recipe as well. To keep your zesty lemon bars fresh, store them in an airtight container. Place parchment paper between layers to prevent sticking. You can keep them in the fridge for up to a week. The cool air enhances their tangy flavor and keeps them firm. If you want to save lemon bars for later, freezing works great! First, let them cool completely. Cut them into squares, then wrap each piece in plastic wrap. Place the wrapped bars in a freezer-safe container. They can last up to three months in the freezer. When you’re ready to enjoy, just thaw them in the fridge overnight. Reheating lemon bars is simple. You can warm them in the microwave for about 10-15 seconds. This step softens the texture and brings back their fresh taste. You can also enjoy them cold right from the fridge. Either way, they remain a delightful treat. For the best experience, dust with powdered sugar just before serving. If you're interested in the complete process, check out the Full Recipe! Yes, you can use bottled lemon juice. However, fresh juice tastes better. Fresh lemons give your bars a bright flavor. Bottled juice often has added preservatives. For the best results, always choose fresh when you can. Lemon bars last about four to five days. Store them in the fridge for the best taste. Keep them covered to avoid drying out. You can freeze them for up to three months. Just cut them into squares before freezing for easy serving. You can use flaxseed meal as an egg substitute. Mix one tablespoon of flaxseed meal with three tablespoons of water. Let it sit for five minutes to thicken. This mixture works well in lemon bars. You can also try silken tofu or applesauce. To cut lemon bars, use a sharp knife. First, chill the bars in the fridge for a bit. This helps them set well. Dip the knife in hot water and wipe it dry before each cut. This method gives you clean, neat squares. For added flair, dust with powdered sugar after cutting. For the full recipe, check out the recipe section above. You learned how to make zesty lemon bars step-by-step. We covered ingredients, tools, and key techniques. I shared tips to avoid common mistakes and keep your bars fresh. You also discovered fun variations, like gluten-free and vegan options. Finally, I explained how to store and reheat your lemon treats. Baking lemon bars is simple and rewarding. Enjoy sharing them with friends and family!

Zesty Lemon Bars Tangy and Refreshing Dessert Treat

Are you ready to brighten your day with a sweet and tangy treat? Zesty Lemon Bars are the perfect dessert

To make matcha green tea muffins, gather these ingredients: - 1 cup all-purpose flour - 1/2 cup almond flour - 2 tablespoons matcha green tea powder - 1 teaspoon baking powder - 1/2 teaspoon baking soda - 1/4 teaspoon salt - 1/2 cup granulated sugar - 1/4 cup honey or maple syrup - 1/2 cup unsweetened applesauce - 1/4 cup vegetable oil or melted coconut oil - 2 large eggs - 1 teaspoon vanilla extract - 1/2 cup white chocolate chips or dark chocolate chips (optional) For this recipe, I use standard measurement units. It’s important to measure accurately. This ensures each muffin has the right texture and flavor. - Use cups for dry ingredients like flour and sugar. - Use tablespoons for smaller amounts like matcha powder and baking powder. - Use teaspoons for baking soda and vanilla extract. - Use cups for wet ingredients like applesauce and oil. Matcha green tea powder is the star of this recipe. It has many health benefits: - Rich in Antioxidants: Matcha contains catechins. These help fight free radicals in your body. - Boosts Metabolism: Matcha may help increase your metabolism, aiding weight management. - Enhances Mood: It can improve focus and calmness due to L-theanine. Almond flour is another key ingredient: - Low in Carbs: Almond flour is lower in carbs than regular flour. - High in Protein: It provides more protein and healthy fats. Using applesauce instead of oil adds moisture and fiber. It also cuts down on calories. These ingredients together make a tasty, nourishing treat. For the full recipe, check the detailed instructions. Start by gathering all your ingredients. You will need flour, matcha powder, sugar, and eggs. Preheat your oven to 350°F (175°C). Line your muffin tin with paper liners or grease it lightly. In a medium bowl, mix the all-purpose flour, almond flour, matcha green tea powder, baking powder, baking soda, and salt. Whisk these dry ingredients until they are well combined. In a large bowl, mix the granulated sugar, honey or maple syrup, applesauce, vegetable oil, eggs, and vanilla extract. Stir until smooth. Now, slowly add the dry mix to the wet mix. Use a spatula to fold them together gently. It is important not to overmix. If you want some sweetness, fold in chocolate chips at this point. Once your batter is ready, divide it evenly into the muffin cups. Fill each cup about two-thirds full. This allows room for the muffins to rise. Place the muffin tin in the preheated oven. Bake for 18 to 20 minutes. To check if they are done, insert a toothpick into the center of a muffin. If it comes out clean, your muffins are ready. If not, give them a few more minutes. After baking, remove the muffins from the oven. Let them cool in the pan for about five minutes. Then, transfer them to a wire rack to cool completely. For a fun touch, serve them warm or at room temperature. You can dust them with powdered sugar for a sweet look. Adding fresh mint leaves or edible flowers can make the presentation pop. You can find the full recipe for these delightful muffins and impress your friends and family with your baking skills! If your muffins are too dry, you may have overbaked them. Always check for doneness with a toothpick. If it comes out clean, they are ready. If your muffins are too dense, try not to overmix the batter. Gentle folding is key to keeping them light and fluffy. For a soft and moist texture, use applesauce. It adds moisture without extra fat. Mixing the dry and wet ingredients separately helps maintain the right texture. Make sure to fold the batter just until combined. This keeps air in and gives you that perfect rise. To boost the flavor, add extra matcha or a splash of vanilla. You can also mix in nuts or fruits for added texture. For a lovely look, dust the muffins with powdered sugar. Fresh mint leaves or edible flowers will make them pop. Serve them warm for the best taste experience. For the complete recipe, check the [Full Recipe]. {{image_2}} You can swap flours easily in this recipe. If you want a nutty taste, use whole wheat flour instead of all-purpose flour. If you prefer gluten-free options, try almond flour or coconut flour. Each flour brings its flavor and texture, so test different combinations. This adds a fun twist to your muffins. Feel free to get creative with mix-ins! You can add chopped nuts, like walnuts or pecans, for a crunchy bite. Dried fruits, such as cranberries or blueberries, bring sweetness and chew. For chocolate lovers, toss in chocolate chips. You can add spices, like cinnamon or ginger, for extra warmth. Each add-in helps personalize your muffins. Making your muffins gluten-free is simple. Just use only gluten-free flour blends. For a vegan version, replace eggs with flaxseed meal or chia seeds mixed with water. Use plant-based milk instead of regular milk. Swap honey for maple syrup to keep it vegan-friendly. These modifications keep the muffins tasty while meeting dietary needs. Enjoy making them your way! To keep your matcha green tea muffins fresh, store them in an airtight container. This helps prevent moisture loss. Place the muffins at room temperature for up to three days. If you want them to last longer, consider refrigeration. Just remember, refrigeration can change their texture. Freezing muffins is a great way to enjoy them later. First, let the muffins cool completely. Then, wrap each muffin tightly in plastic wrap. Place the wrapped muffins in a freezer-safe bag or container. Label and date the bag. These muffins can stay fresh in the freezer for up to three months. When you're ready to enjoy a muffin, take one out of the freezer. Unwrap it and place it on a microwave-safe plate. Heat it for about 20-30 seconds. If you want a warm muffin without the microwave, preheat your oven to 350°F (175°C). Place the muffin on a baking sheet for about 5-7 minutes. This keeps the muffin soft and tasty! Enjoy your matcha muffins as a delightful treat any time of day! For the complete recipe, check out the Full Recipe section. Yes, you can use different sweeteners. Instead of granulated sugar, try coconut sugar. It has a nice flavor. You can also use agave syrup in place of honey or maple syrup. Each sweetener gives a unique taste. Adjust the amount to match your taste. To check if the muffins are done, use a toothpick. Insert it into the center of a muffin. If it comes out clean, the muffins are ready. If there’s batter on the toothpick, bake them a few more minutes. Keep an eye on them to avoid overbaking. You can easily replace eggs. Use 1/4 cup of unsweetened applesauce for each egg. This works well in most recipes. You can also use flaxseed meal mixed with water. Combine one tablespoon of flaxseed meal with two and a half tablespoons of water. Let it sit for a few minutes until it thickens. These substitutes keep your muffins moist and fluffy. You learned how to make matcha green tea muffins with healthful ingredients. We discussed step-by-step instructions for perfect muffins. I shared tips to avoid common problems and enhance flavor. You can even try different flours or dietary swaps. With proper storage, your muffins will stay fresh longer. Enjoy your baking journey and explore the world of matcha. Each bite can boost your day with taste and health!

Matcha Green Tea Muffins Nourishing and Flavorful Treat

Are you ready to brighten your mornings? These Matcha Green Tea Muffins are not only nourishing but also packed with

Gathering the right ingredients is key to making tasty Teriyaki Salmon Bowls. Here’s what you need: Salmon and Marinade Ingredients - 2 salmon fillets (about 6 oz each) - 1/4 cup soy sauce (or tamari for gluten-free) - 2 tablespoons honey or maple syrup - 1 tablespoon rice vinegar - 1 tablespoon sesame oil - 2 cloves garlic, minced - 1 inch ginger, grated Rice and Vegetable Ingredients - 1 cup jasmine rice (or brown rice) - 2 cups water - 1 cup broccoli florets - 1 carrot, julienned - 1/2 red bell pepper, sliced - 1 avocado, sliced Optional Garnishes - 2 green onions, chopped - Sesame seeds for garnish - Salt and pepper to taste These ingredients come together to create a meal that is both fun and vibrant. The salmon packs a flavorful punch with its teriyaki glaze. The rice and veggies provide a fresh balance. You can mix and match the vegetables based on your taste. For example, snap peas or cabbage also work well. When you gather these ingredients, think about where they come from. Choosing fresh and sustainable options can make your meal even better. Enjoy the process of cooking and feel proud of the delicious bowl you’ll create. For the complete recipe, check out the Full Recipe section. To start, you need to make the marinade. In a small bowl, whisk together the soy sauce, honey (or maple syrup), rice vinegar, sesame oil, minced garlic, and grated ginger. Mix until smooth. This marinade will give the salmon its sweet and savory flavor. Save half of the marinade for later. You can use it to brush on the salmon while it cooks. Now it’s time to marinate the salmon. Place the salmon fillets in a shallow dish and pour the marinade over them. Cover the dish and let the salmon marinate for at least 15 to 30 minutes. For even flavor, turn the fillets halfway through. This helps the salmon soak up all the tasty goodness. While the salmon marinates, you’ll want to cook the rice. Rinse the jasmine rice under cold water until the water runs clear. This step removes extra starch. In a medium saucepan, combine the rice with 2 cups of water. Bring the mixture to a boil. Then, reduce the heat to low, cover, and simmer for 15 to 18 minutes. The rice is done when the water is absorbed and it is fluffy. Next, steam the vegetables. While the rice cooks, add the broccoli florets to a steaming basket. Steam them for about 5 minutes until they are tender-crisp. For added flavor, you can throw in the julienned carrot and sliced bell pepper for the last 2 minutes. This method keeps the veggies bright and tasty while allowing them to retain their crunch. Now, let’s cook the salmon. Preheat a non-stick skillet over medium-high heat. Once hot, remove the salmon from the marinade and discard the used marinade. Place the fillets skin-side down in the skillet. Cook for 4 to 5 minutes on each side. The salmon is ready when it is opaque and flakes easily with a fork. For extra flavor, brush the reserved marinade on the salmon during the last minute of cooking. Finally, it’s time to assemble the bowls. Fluff the rice with a fork and divide it among your bowls. Top each bowl with a salmon fillet, some steamed vegetables, and a few slices of avocado. Drizzle any remaining marinade over the bowls for more flavor. Finish your bowls by sprinkling chopped green onions and sesame seeds on top. Season with salt and pepper to taste. Presentation matters, so serve the bowls in deep dishes. Layer the rice on the bottom and artfully arrange the salmon, vegetables, and avocado on top. Enjoy your meal! For the complete recipe, check out the Full Recipe. Adjusting Sweetness and Saltiness To make the marinade just right, taste it first. If you want it sweeter, add more honey or maple syrup. For more saltiness, add a touch more soy sauce. Finding your balance will make your salmon shine. Adding Heat Options If you like a kick, add some red pepper flakes or sriracha to the marinade. Start with a little, then taste and add more if you want it spicier. This adds a fun twist to your teriyaki salmon bowls. Avoiding Overcooking Watch the salmon closely while cooking. It cooks fast, usually in about 4-5 minutes per side. When it’s opaque and flakes easily, it’s done. Overcooking can make it dry, which isn't tasty. Techniques for Crispy Skin To get crispy skin, make sure your skillet is hot before adding the salmon. Press down gently with a spatula for the first minute. This helps the skin crisp up nicely, giving you that extra crunch. Using a Rice Cooker A rice cooker makes cooking rice super easy. Just add the rinsed rice and water, then let it do its magic. You’ll get fluffy rice every time, with no fuss. Substitutes for Jasmine Rice If you can’t find jasmine rice, don't worry! You can use brown rice or even quinoa. Both options bring different flavors and textures, keeping your meal fresh and exciting. {{image_2}} You can change the protein in this dish. Try using chicken or tofu instead of salmon. Chicken thighs work great, and they stay juicy. Tofu is an excellent choice for a plant-based meal. Just make sure to press it to remove excess water. You can also mix up the veggies. Instead of broccoli, use snap peas or zucchini. Carrots can be swapped for bell peppers or green beans. This adds color and crunch to your bowls. For those who need gluten-free meals, tamari is your friend. It tastes just like soy sauce but is safe for gluten-free diets. Always check labels to ensure your sauces are gluten-free. If you want a vegan option, use tofu or tempeh instead of salmon. Replace honey with maple syrup for a fully plant-based meal. This keeps all the flavors while meeting dietary needs. Want to kick up the flavor? Add some red pepper flakes for heat. A little sriracha can also spice things up. Try adding a splash of lime juice for a zesty twist. Fresh herbs can boost flavor too. Chopped cilantro or basil adds a fresh taste. You could also use green onions for a mild onion flavor. Experiment with these options to find your favorite combinations. You can find the full recipe [here](#). Refrigeration Guidelines After enjoying your teriyaki salmon bowls, let them cool first. Store leftovers in the fridge within two hours. Use airtight containers to keep them fresh. The salmon and veggies stay good for about three days. Best Containers for Storage Choose glass or BPA-free plastic containers. They help keep the food safe and fresh. Plus, you can see what’s inside easily. Methods for Keeping Salmon Moist To reheat salmon, use a microwave on medium power. Cover it with a damp paper towel. This keeps the salmon moist and tasty. You can also warm it in a skillet on low heat. Add a splash of water to help it steam. Reheating Rice and Vegetables Reheat rice in the microwave with a little water. This adds moisture and avoids dryness. For veggies, use the microwave or a skillet. Heat them until they're warm but not mushy. How to Freeze Bowls Effectively To freeze your teriyaki salmon bowls, let them cool completely. Use freezer-safe containers or bags. Separate the salmon, rice, and veggies for better taste. Label them with the date to track freshness. Thawing and Cooking Frozen Bowls Thaw the bowls in the fridge overnight. If you are in a hurry, use the microwave on the defrost setting. Cook until heated through. Make sure the salmon reaches an internal temp of 145°F for safety. To know if your salmon is cooked, look for a few signs. Perfectly cooked salmon should be opaque and flake easily with a fork. Use a fork to gently pull apart the flesh. If it separates easily, it’s ready. The internal temperature should reach 145°F (63°C). This means it is safe to eat and still juicy. Yes, you can prepare Teriyaki Salmon Bowls ahead of time! You can marinate the salmon the night before. Just store it in the fridge until you are ready to cook. Cook and store the rice and veggies in separate containers. This way, you can easily heat them up when it’s time to eat. Leftovers will stay fresh in the fridge for about three days. You have many options! Try serving your Teriyaki Salmon Bowls with: - Steamed edamame - Cucumber salad - Seaweed salad - Miso soup These sides add extra flavor and texture to your meal. Not all Teriyaki sauces are gluten-free. Traditional soy sauce contains gluten. However, you can use tamari, which is a gluten-free soy sauce. Always check the label to ensure the sauce works for your diet. To serve more people, just multiply the ingredients. For example, if you want to serve four people, double the amount of each ingredient. Use four salmon fillets instead of two. This keeps the flavors balanced while making a larger batch. Remember to adjust cooking times for rice and veggies as needed! For the full recipe, check the Teriyaki Salmon Bowls section above. In this article, we covered the essential components for making Teriyaki Salmon Bowls. You learned about ingredients, step-by-step cooking instructions, and helpful tips. We also explored variations for different diets and storage options. These bowls are easy to customize and perfect for any meal. Enjoy experimenting with flavors, and don’t hesitate to make it your own. With practice, you’ll create a dish that’s not just tasty but also healthy. Keep these tips in mind, and dive into your kitchen with confidence. Happy cooking!

Teriyaki Salmon Bowls Scrumptious and Easy Meal Prep

If you crave a quick, tasty meal that’s healthy and satisfying, teriyaki salmon bowls are your answer. You can whip

Older posts
Newer posts
← Previous Page1 … Page57 Page58 Page59 … Page68 Next →

dsad

© 2025 Southern Dishes • Built with GeneratePress

Our Policies

  • Copyright Policy
  • Cookie Policy
  • GDPR Policy
  • Privacy Policy
  • Disclaimer
  • Terms Of Use

More Information

  • Home
  • About
  • Contact
  • Appetizers
  • Dessert
  • Dinner
  • Drinks
©2025, Southern Dishes About Back To Top