Skip to content
DisclaimerTerms Of UseGDPR PolicyCookie Policy

Southern Dishes

  • Home
  • Drinks
  • Appetizers
  • Dinner
  • Dessert
  • About
  • Contact
  • Privacy Policy
DisclaimerTerms Of UseGDPR PolicyCookie Policy

Isabella

To create a delicious Peach Caprese Salad, you need fresh and quality ingredients. Here’s a simple list: - 2 ripe peaches, sliced - 8 oz fresh mozzarella cheese, sliced - 1 cup fresh basil leaves - 2 tablespoons balsamic glaze - 1 tablespoon extra virgin olive oil - Salt and freshly cracked black pepper to taste Using ripe peaches gives your salad a sweet and juicy flavor. Fresh mozzarella adds a creamy texture. Basil leaves bring a fragrant note that ties everything together. Balsamic glaze adds a tangy-sweet finish, while olive oil enhances the richness of the dish. For extra flair, you can add garnishes. Consider these options: - Extra basil leaves for color - A sprinkle of crushed red pepper for heat - Chopped nuts, like pistachios or walnuts, for crunch These garnishes can make your salad more visually appealing and enjoyable. Peach Caprese Salad is not just tasty; it’s healthy too! Here’s what you gain: - Peaches are high in vitamins A and C. - Mozzarella provides calcium and protein. - Basil offers antioxidants and anti-inflammatory benefits. - Olive oil is a healthy fat that supports heart health. This salad balances flavors and nutrients. It’s a wonderful choice for a light meal or side dish. Start by washing the peaches well. Rinse them under cool water to remove any dirt. Use a sharp knife to cut the peaches. Slice them into wedges about 1/2 inch thick. Make sure the peaches are ripe for the best taste. They should feel soft but not squishy. Now it's time to put it all together. On a large serving platter, arrange the peach slices. Alternate them with slices of fresh mozzarella cheese. This mix of colors looks beautiful. Next, tuck fresh basil leaves between the peach and mozzarella slices. This adds flavor and a nice touch. Drizzle extra virgin olive oil and balsamic glaze over the salad. This adds a rich taste. Then sprinkle salt and freshly cracked black pepper on top. Let the salad sit for a few minutes. This helps the flavors mix well. Enjoy your Peach Caprese Salad as a fresh treat. For the complete recipe, check out the Full Recipe section. When picking peaches, look for fruit that feels slightly soft. The color should be a vibrant yellow or orange. Avoid any peaches with dark spots or wrinkles. Ripe peaches taste sweet and juicy, which is perfect for this salad. Freshness makes a big difference in flavor. Buy peaches that are in season for the best taste. You can ask your local farmer for the best picks. You can prepare this salad a few hours ahead. Slice the peaches and mozzarella, then layer them as directed. Keep the salad in the fridge, covered with plastic wrap. Wait to add the balsamic glaze and oil until just before serving. This keeps the flavors fresh and the textures nice. If you do this, the salad will still taste great later. Serve the Peach Caprese Salad on a large platter for a beautiful display. You can also use rustic wooden boards for a charming look. Add extra basil leaves on top for color and aroma. This salad pairs well with grilled meats or fish. It makes a perfect side dish for summer barbecues. Feel free to enjoy it as a light lunch too! For the complete recipe, check out the Full Recipe section. {{image_2}} You can swap mozzarella for other cheeses. Burrata gives a creamy touch. Goat cheese adds a tangy bite. For a sharper taste, try feta. You can also use mixed cheeses for a fun twist. Mix seasonal fruits to enhance the salad. In summer, add juicy berries. In fall, thin apple slices pair well. You can even sprinkle pomegranate seeds for a pop of color and crunch. To make this salad vegan, replace mozzarella with cashew cheese. This keeps the creaminess while being plant-based. For gluten-free options, this salad is already safe. Just check your balsamic glaze for any hidden gluten. Feel free to explore these variations to make your Peach Caprese Salad your own. Check the full recipe for more details. To keep your Peach Caprese Salad fresh, store it in an airtight container. This method prevents air from spoiling the ingredients. If you add salt, it can draw out moisture. So, avoid salting until just before serving. Place a paper towel inside the container to absorb extra moisture. This helps keep everything crisp. For best results, store each ingredient separately. Keep sliced peaches in one container and mozzarella in another. Basil should stay in a cool, dry spot, wrapped in a damp paper towel. Store the balsamic glaze and olive oil in their original containers. This way, you keep all flavors fresh and bright. Prepared Peach Caprese Salad lasts about 1 to 2 days in the fridge. After that, the peaches may become mushy, and the basil wilts. For optimal taste, enjoy your salad soon after making it. If you need to make it ahead, try storing the ingredients separately. That way, you can assemble the salad fresh before serving. For the full recipe, check out the Peachy Caprese Delight. If you can't find mozzarella, try burrata or feta. Burrata adds a creamy touch. Feta gives a salty bite and works well too. You could also use goat cheese for a tangy flavor. Each option changes the taste but keeps the salad fresh. Yes, you can prep the salad ahead. Slice the peaches and cheese, then store them in the fridge. Keep the basil leaves separate to prevent wilting. Drizzle the balsamic glaze and olive oil just before serving. This keeps the flavors bright and fresh. Look for a thick, syrupy balsamic glaze. A high-quality glaze gives a rich flavor. You can find it in stores or make your own by reducing balsamic vinegar. Use a glaze that has no added sugars for the best taste. For more details on the ingredients and preparation, check the Full Recipe. In this post, we explored the elements of Peach Caprese Salad. We discussed using fresh peaches, tasty garnishes, and important nutrition facts. You learned how to prepare peaches and assemble the salad step-by-step. I shared tips on picking peaches and serving the salad. We also covered fun ways to change up the recipe and how to store leftovers. Remember, you can enjoy this salad fresh or with your own twist. Make it fun and delicious!

Peach Caprese Salad Fresh and Flavorful Delight

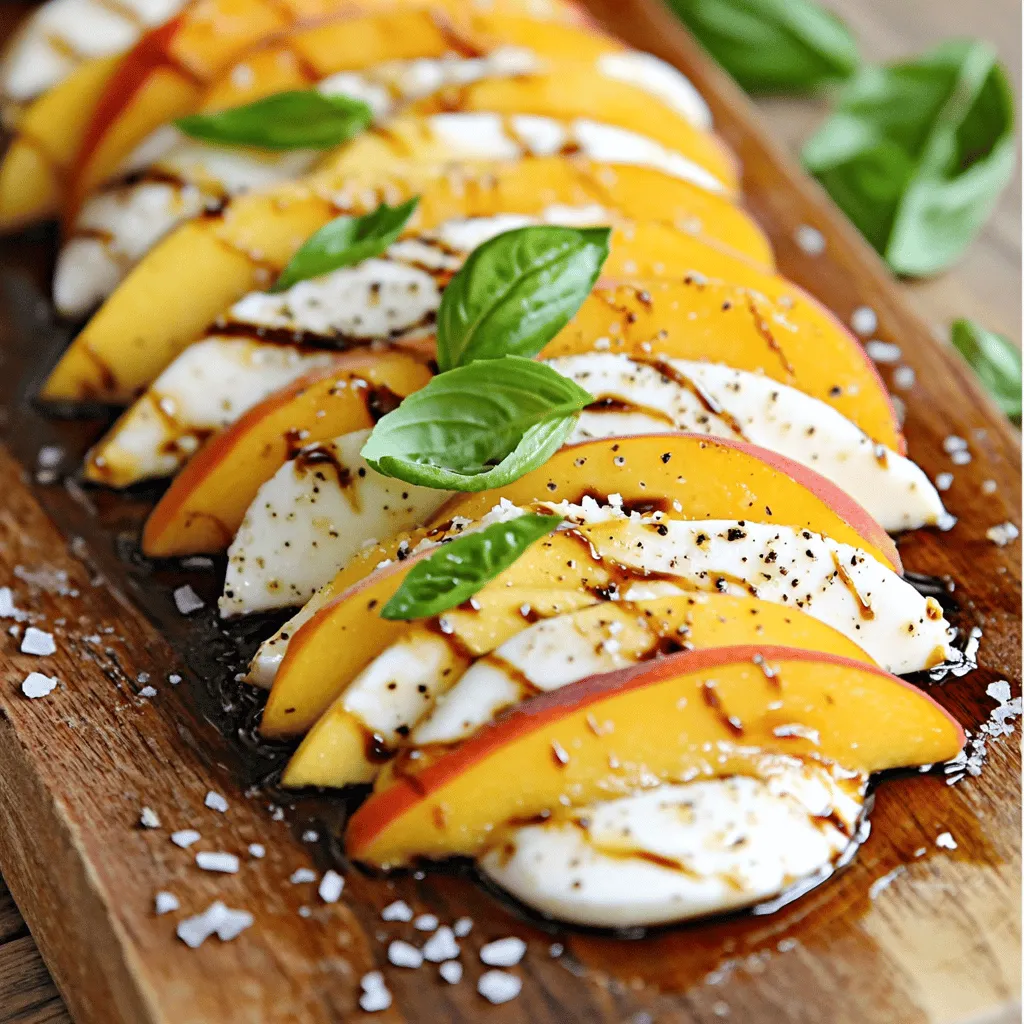
Looking for a fresh twist on a classic salad? This Peach Caprese Salad combines juicy peaches, creamy mozzarella, and fragrant

To make garlic butter shrimp and asparagus, you need the following ingredients: - 1 pound large shrimp, peeled and deveined - 1 bunch asparagus, trimmed and cut into 2-inch pieces - 4 tablespoons unsalted butter - 4 cloves garlic, minced - 1 teaspoon red pepper flakes - 2 tablespoons lemon juice - Zest of 1 lemon - Salt and pepper to taste - Fresh parsley, chopped (for garnish) These ingredients create a dish full of flavor and color. The shrimp provide protein and a sweet, briny taste. Asparagus adds a nice crunch and bright green color. Butter and garlic mix to form a rich sauce, while red pepper flakes bring a hint of heat. Lemon juice and zest brighten the dish, making it fresh and lively. I love using fresh parsley to finish the dish, adding a burst of color. Each ingredient plays a role in crafting a delightful plate that is sure to impress. For the full recipe, check the notes above. Start by patting the shrimp dry with paper towels. This step helps the shrimp sear well. Next, season them with salt and pepper. Set the shrimp aside while you prepare the garlic butter. In a large skillet, melt 2 tablespoons of butter over medium heat. When the butter is melted, add the minced garlic and red pepper flakes. Sauté the garlic for about 1 minute. Watch carefully to avoid burning it. Now, increase the heat to medium-high. Add the shrimp to the skillet. Cook the shrimp for 2-3 minutes on one side. They should turn pink and curl. Flip the shrimp with a spatula and cook for another 2 minutes. Once done, remove the shrimp from the skillet and set them aside. In the same skillet, add the remaining 2 tablespoons of butter. Once melted, add the asparagus pieces. Sauté the asparagus for about 5-6 minutes. You want them tender but still bright green. This step adds a nice crunch to your dish. Now it's time to bring everything together. Return the cooked shrimp to the skillet. Squeeze in 2 tablespoons of lemon juice and add the lemon zest. Toss all the ingredients together. Make sure everything is well combined and heated through. Taste your dish and adjust the seasoning if needed. Add more salt or pepper to make it perfect for you. Once done, remove the skillet from the heat. Sprinkle some chopped parsley on top for a fresh touch. For the full recipe, check out the detailed instructions provided. Enjoy your delicious Garlic Butter Shrimp and Asparagus! To avoid overcooked shrimp, follow these steps: - Pat shrimp dry: This helps them sear well. - Cook quickly: Shrimp cook fast. Watch them closely. - Pink color: When they turn pink and start to curl, they are done. For sautéing asparagus perfectly: - Cut evenly: Cut asparagus into 2-inch pieces for even cooking. - High heat: Use medium-high heat to keep them crisp. - Bright green: Cook until bright green but still tender, about 5-6 minutes. For a beautiful presentation: - Large platter: Serve on a big plate for a nice look. - Drizzle sauce: Pour any leftover garlic butter sauce over the top. - Garnish colors: Add lemon wedges and parsley for color. For side dishes that complement the flavors: - Rice or quinoa: These grains soak up the sauce well. - Salad: A light salad adds freshness. - Crusty bread: Great for dipping in the garlic sauce. Check the Full Recipe for more details on making this delightful dish. {{image_2}} You can easily swap ingredients in this dish. If you prefer chicken or scallops, use those instead of shrimp. For a vegetarian twist, try firm tofu or mushrooms. You will still get a great flavor. Instead of asparagus, use green beans or zucchini. They add crunch and taste great. You can also mix in bell peppers or cherry tomatoes for color and flavor. For spices, feel free to switch things up. Instead of red pepper flakes, try smoked paprika or cayenne pepper for a kick. You can also add fresh herbs like thyme or basil for a unique twist. You can cook shrimp in different ways. Grilling gives a smoky flavor. Just marinate the shrimp in garlic butter before grilling. Sear them on high heat for a few minutes. Pan-searing is another option. It’s quick and easy. Just follow the steps in the full recipe for great results. If you want a healthier choice, try baking. Place shrimp and asparagus on a baking sheet. Drizzle with garlic butter and lemon juice. Bake at 400°F for about 12-15 minutes. This method keeps it light but just as tasty. After you enjoy Garlic Butter Shrimp and Asparagus, store any leftovers in the fridge. Use an airtight container to keep them fresh. The shrimp and asparagus will stay good for up to two days. Make sure to cool the dish to room temperature before sealing it. This helps prevent moisture build-up. When you're ready to eat those tasty leftovers, reheating them right is key. I recommend using a skillet over low heat. Add a splash of water or broth to keep the shrimp moist. Stir gently to warm everything through. You can also use the microwave, but be careful. Heat in short bursts, stirring in between, to avoid rubbery shrimp. This way, your Garlic Butter Shrimp and Asparagus will still taste fresh and delicious. For the full recipe, check the earlier sections! How can I make Garlic Butter Shrimp and Asparagus spicy? You can add more red pepper flakes for heat. Start with one teaspoon. Taste as you go. You can also add hot sauce or diced jalapeños for extra spice. Adjust to your liking! Can I use frozen shrimp for this recipe? Yes, you can use frozen shrimp. Just thaw them first. Place them in cold water for about 15 minutes. Pat them dry before cooking. This helps them cook evenly. What can I serve with Garlic Butter Shrimp and Asparagus? This dish pairs well with rice or pasta. You can also serve it with crusty bread to soak up the garlic butter. A fresh salad or steamed vegetables work nicely, too. Explore the full recipe for more ideas! You now have a clear guide to making Garlic Butter Shrimp and Asparagus. This dish combines fresh shrimp and crunchy asparagus, creating a tasty meal. Remember to follow the steps for perfect cooking and flavor. Use the tips for presentation and side dishes to impress. Finally, don’t hesitate to try out variations and keep leftovers fresh. Enjoy making this simple yet delicious dish anytime you want!

Garlic Butter Shrimp and Asparagus Flavorful Delight

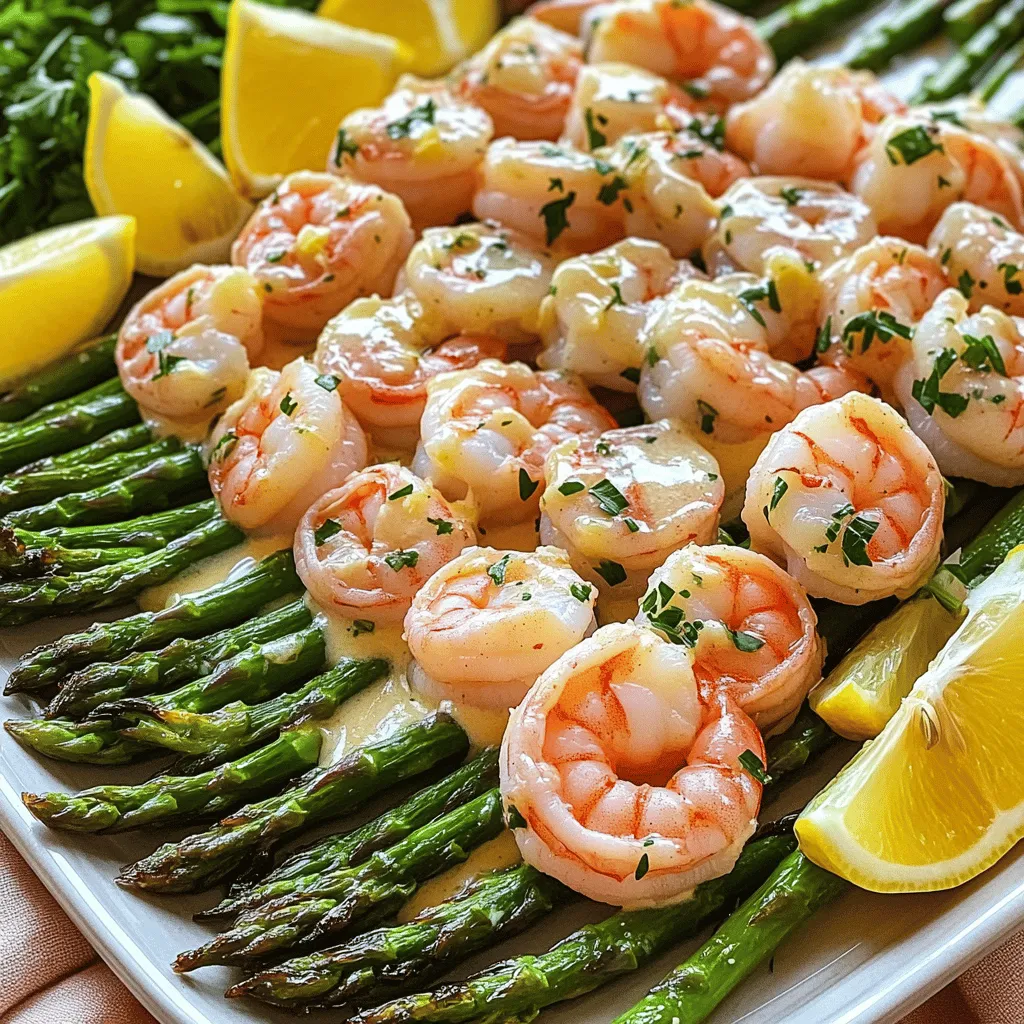
Are you ready to wow your taste buds? Garlic Butter Shrimp and Asparagus is a quick and tasty dish that

To make Lemon Herb Grilled Salmon, you need fresh and simple ingredients. Here’s what you’ll need: - 4 salmon fillets (about 6 oz each) - 2 tablespoons olive oil - Zest and juice of 2 lemons - 3 cloves garlic, minced - 1 tablespoon fresh dill, chopped - 1 tablespoon fresh parsley, chopped - 1 teaspoon salt - 1/2 teaspoon black pepper - Lemon slices for garnish - Fresh herbs for garnish (additional dill and parsley) These ingredients work together to create a bright and tasty dish. The salmon shines with flavors from the lemon and herbs. I love using fresh herbs in my cooking. They add flavor and freshness. For this recipe, I recommend: - Dill: It has a light, grassy taste. - Parsley: It adds a fresh, earthy flavor. You can use other herbs too! Basil or cilantro can give a fun twist. Mix and match to find your favorite! The marinade is key for flavor. Here are fresh ingredients you should use: - Olive oil: This adds richness. - Garlic: This gives a nice punch. - Lemon zest and juice: These bring brightness and acidity. Make sure to let the salmon soak in this marinade. It helps the flavors blend beautifully. For the full recipe, check out the detailed steps. To start, grab a medium bowl. You will need to mix your marinade. Add 2 tablespoons of olive oil. Then, zest and juice 2 lemons. The zest gives a nice kick. Next, add 3 minced garlic cloves. They add a great flavor. Now, chop 1 tablespoon of fresh dill and parsley. Toss these in too. Finally, add 1 teaspoon of salt and 1/2 teaspoon of black pepper. Whisk everything together until smooth. This simple marinade will make your salmon shine. Now, let’s prep the salmon. Take 4 salmon fillets and place them skin-side down in a shallow dish or resealable bag. Pour the marinade over the salmon. Make sure each piece is covered well. Cover the dish or seal the bag. You’ll want to refrigerate it for at least 30 minutes. If you can wait an hour, the flavors will deepen even more. This step is key to a tasty salmon. Time to fire up the grill! Preheat your grill to medium-high heat. If using a grill pan, heat it on the stove. While it warms up, take the salmon out of the marinade. Let the excess marinade drip off. Discard the leftover marinade to keep things safe. Now, place the salmon fillets on the grill, skin-side down. Grill them for 4-6 minutes. Look for the edges to turn opaque. This shows they are cooking well. Carefully flip the salmon with a spatula. Grill for another 3-5 minutes. The salmon should flake easily when done. When it’s ready, take it off the grill and let it rest for a couple of minutes. Serve your beautiful grilled salmon on a plate. Add fresh lemon slices and herbs for a lovely touch. This dish is bright, fresh, and full of flavor. For the full recipe, check the earlier section. Enjoy your meal! When picking salmon, look for bright color and firm texture. Fresh salmon should smell like the ocean, not fishy. If you can, buy wild-caught salmon. It tastes better and is healthier. Ask your fishmonger for advice. They can guide you to the best catch of the day. Get your grill hot before cooking. Aim for medium-high heat, around 375°F to 400°F. You can test this by holding your hand above the grill. If you can only hold it there for 2-3 seconds, it’s ready. A properly heated grill gives the salmon nice grill marks and keeps it juicy. Serve your grilled salmon with a fresh salad. A mix of greens, cherry tomatoes, and cucumber pairs well. You can also add a side of quinoa or brown rice for a healthy touch. Drizzle some extra lemon juice over the top for added flavor. Don’t forget to garnish with lemon slices and herbs for a beautiful plate. For the full recipe, check the earlier section. {{image_2}} You can change the flavor of your Lemon Herb Grilled Salmon by using different herbs. Try using basil or cilantro for a fresh twist. You can also add a pinch of red pepper flakes for heat. Experiment with tarragon or thyme to give your dish a unique taste. Each herb brings its own charm to the salmon, so feel free to mix and match. If you don’t have a grill, you can use your oven or air fryer. Preheat your oven to 400°F (200°C). Place the marinated salmon on a baking sheet lined with parchment paper. Bake for 12-15 minutes or until the salmon flakes easily. For the air fryer, set it to 375°F (190°C) and cook for about 8-10 minutes. Both methods provide a lovely, tender salmon. If you want to switch things up, you can use other proteins. Chicken breast works well with the same marinade. Just adjust cooking times. You can also use shrimp; they cook quickly and soak up the flavors nicely. For a plant-based option, try firm tofu. The marinade will give it a zing that pairs well with any side dish. For the full recipe, check out the complete guide. You can store leftover salmon in an airtight container. Let the salmon cool first. Place it in the fridge within two hours of cooking. If you have more than one piece, stack them with parchment paper between layers. This keeps them from sticking together. To reheat grilled salmon, use the oven for the best taste. Preheat your oven to 275°F (135°C). Place salmon on a baking sheet. Cover it loosely with foil to keep it moist. Heat for about 15 minutes, or until warm. You can also use a microwave. Heat it on low for about 30 seconds. Check often to avoid overcooking. Grilled salmon stays fresh for about 3 to 4 days in the fridge. Make sure to check for any signs of spoilage. If you want to keep it longer, freeze it. Wrap the salmon tightly in plastic wrap and then in foil. Frozen grilled salmon lasts up to 3 months. When you're ready to eat it, thaw it in the fridge overnight. This helps keep the texture nice. For the full recipe, click here. Yes, you can use frozen salmon. Just make sure to thaw it first. Place the salmon in the fridge overnight for best results. If you're short on time, you can run it under cold water for about 30 minutes. Once thawed, pat the salmon dry with paper towels. This helps the marinade stick better. To check if your salmon is cooked, look for color. The salmon should turn from a bright pink to a pale, opaque color. You can also use a fork to test it. Gently poke it, and if it flakes easily, it's done. The internal temperature should reach 145°F. A meat thermometer can help you with this. Lemon Herb Grilled Salmon goes well with many sides. Here are some great options: - Steamed broccoli or asparagus - Garlic mashed potatoes - Quinoa salad with veggies - Mixed green salad with vinaigrette - Rice pilaf with herbs These sides enhance the flavors of the salmon and make a complete meal. For full details on this recipe, check the Full Recipe. In this post, we explored how to make Lemon Herb Grilled Salmon. You learned about key ingredients, fresh herb choices, and great marinade ideas. I shared step-by-step instructions for preparing, marinating, and grilling the salmon to perfection. Tips on selecting the best salmon and serving ideas added value. We also discussed variations and important storage information. Finally, I answered common questions about cooking and pairing. Enjoy your cooking and impress your guests with this fresh and tasty dish!

Lemon Herb Grilled Salmon Easy and Flavorful Recipe

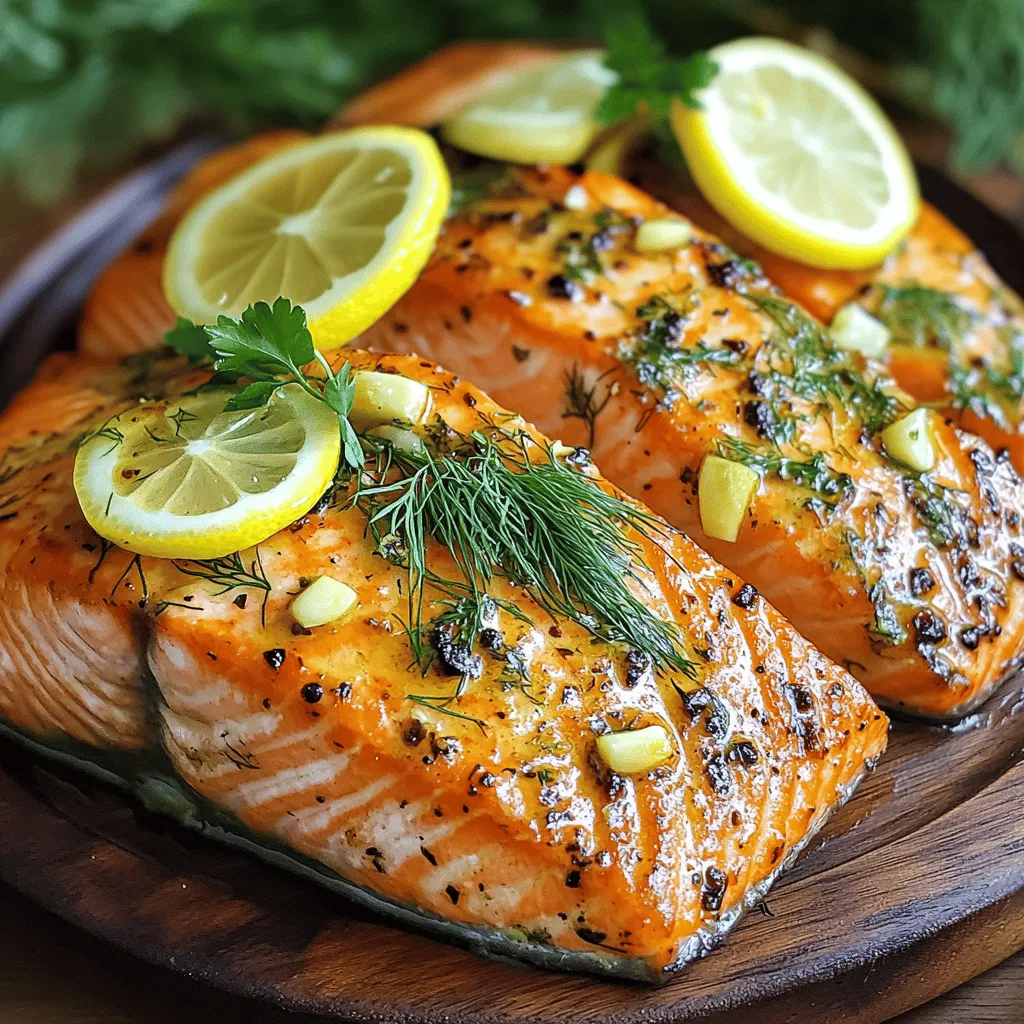
Ready for a burst of flavor? This Lemon Herb Grilled Salmon recipe is easy and perfect for any meal. I’ll

To make this tasty side dish, gather these key ingredients: - 1 pound Brussels sprouts, halved - 3 tablespoons balsamic vinegar - 2 tablespoons honey or maple syrup - 2 tablespoons olive oil - 1 teaspoon garlic powder - Salt and pepper to taste These ingredients work together to create rich flavors. The balsamic vinegar adds sweetness and depth. Honey or maple syrup balances the tanginess. Olive oil helps the sprouts roast nicely. Garlic powder boosts the overall taste. You can also add extra ingredients to make your dish even better. Consider these options: - 1/4 cup chopped walnuts (for crunch) - 1/4 cup crumbled feta cheese (for tang) - Fresh parsley, chopped (for garnish) These add-ins provide texture and flavor. Walnuts give a nice crunch, while feta adds a creamy tang. Fresh parsley brightens up the dish with color and taste. Balsamic Glazed Brussels Sprouts are not only delicious but also healthy. Here’s a quick look at their benefits: - Low in calories and high in fiber - Packed with vitamins C and K - Contains antioxidants that support health This dish fits well into many diets. It can be a great addition to meals. If you want to know the full recipe, check out the [Full Recipe]. Enjoy cooking! To start, choose fresh Brussels sprouts. Look for bright green ones with tight leaves. Cut off the ends and remove any yellow leaves. Next, slice each sprout in half. This helps them cook evenly and soak up the flavor. In a large bowl, mix the halved sprouts with olive oil, garlic powder, salt, and pepper. Make sure every piece is coated well. This will give your sprouts a tasty base. Preheat your oven to 400°F (200°C). This temperature helps create a nice caramelization. Line a baking sheet with parchment paper for easy cleanup. Spread the Brussels sprouts on the baking sheet in a single layer. Avoid stacking them. This allows hot air to circulate and cook them evenly. Roast for 20 minutes, shaking the pan halfway through. This step helps them brown well on all sides. While the sprouts roast, combine balsamic vinegar and honey (or maple syrup) in a small bowl. This mix will become your glaze. After the first 20 minutes, take the sprouts out of the oven. Drizzle the balsamic mixture over them. Toss to coat every sprout well. Return them to the oven for another 10-15 minutes. They should be caramelized and tender when done. If you want extra crunch, add chopped walnuts during the last 5 minutes of roasting. Once out of the oven, let them cool a bit. For a special touch, sprinkle crumbled feta cheese and chopped parsley on top. Enjoy your Balsamic Glazed Brussels Sprouts! For the complete recipe, check the [Full Recipe]. When picking Brussels sprouts, look for small, firm ones. They should be bright green and tightly closed. Avoid any that are yellowing or have brown spots. Fresh sprouts should feel heavy for their size. If you can, choose sprouts that still have their stems. This keeps them fresh longer. Many people overcook Brussels sprouts. This makes them mushy and bitter. Aim for a nice caramelization without burning. Always coat them evenly with oil and seasonings. Forgetting to toss them halfway through roasting can lead to uneven cooking. Lastly, don’t skip the balsamic glaze; it adds great flavor. These Brussels sprouts taste great on their own or as a side dish. Serve them with grilled chicken or fish for a tasty meal. You can also add them to a salad for crunch and flavor. Try them with quinoa or rice for a hearty, healthy dish. For extra flair, top them with crumbled feta or walnuts. These options create a delightful mix of tastes and textures. Check out the Full Recipe for more tips! {{image_2}} If you want to try a different sweetener, there are great options. You can use maple syrup for a rich taste. Agave nectar is another choice for a lighter flavor. Brown sugar brings a nice caramel note too. Each sweetener adds its own twist to the glaze. Choose one that you like best! You can add more fun to your Brussels sprouts. Try adding bacon bits for a savory crunch. You might also like adding apples for a sweet touch. If you prefer, substitute walnuts with pecans or almonds for a different nutty flavor. Crumbled blue cheese can also replace feta for a tangy kick. Mix and match to find your favorite combo! Balsamic glazed Brussels sprouts are versatile. They pair well with chicken, beef, or fish. You can also serve them with grains like quinoa or brown rice. This adds more fiber and makes the meal heartier. Experiment with different proteins or grains to create a balanced dish. The sprouts will shine no matter what you choose! For the full recipe, check the detailed instructions and tips to make this side dish a delight! To keep your Balsamic Glazed Brussels Sprouts fresh, place them in an airtight container. Make sure the sprouts cool down before sealing. This step helps prevent moisture buildup. Store them in the fridge for up to three days. If you want to keep them longer, freezing is a great option. When you're ready to enjoy your leftovers, reheat them in the oven. Preheat your oven to 350°F (175°C). Spread the Brussels sprouts on a baking sheet. Heat for about 10-15 minutes until they are warm and crispy again. If you prefer, you can also use a microwave, but the oven gives better results. If you want to freeze your Balsamic Glazed Brussels Sprouts, first cool them completely. Place them on a baking sheet in a single layer and freeze for about two hours. This step stops them from clumping together. After they are frozen, transfer the sprouts to a freezer bag or container. They can last up to three months in the freezer. When you are ready to eat them, thaw in the fridge overnight before reheating. For full details on making this dish, check the Full Recipe. To make Balsamic Glazed Brussels Sprouts vegan, simply swap honey for maple syrup. Use olive oil as your base, which is already vegan. This change keeps the dish sweet and tasty without any animal products. Yes, you can prepare Brussels sprouts ahead of time. Wash and halve them, then store them in the fridge. You can also mix the oil and spices in advance. Just keep the balsamic glaze separate until you are ready to roast. This way, your dish stays fresh and flavorful. Balsamic Glazed Brussels Sprouts pair well with many dishes. Try them with roasted chicken or grilled fish for a balanced meal. They also complement pasta dishes or quinoa bowls nicely. For a vegetarian option, serve with a hearty grain salad. You can find the full recipe and more tips to enhance your meal! This blog post covered the essentials for making balsamic glazed Brussels sprouts. We explored key ingredients, followed step-by-step instructions, and shared tips for success. I also discussed variations and how to store leftovers properly. In summary, you now have the tools to create a tasty dish that fits your needs. Enjoy your cooking and feel free to customize the recipe! Your perfect Brussels sprouts await.

Balsamic Glazed Brussels Sprouts Tasty Side Dish Delight

Looking for a side dish that bursts with flavor? Balsamic glazed Brussels sprouts are the answer! This recipe combines sweet

For this tasty dish, you will need: - 4 medium bell peppers (any color) - 1 cup quinoa, rinsed - 2 cups vegetable broth - 1 cup black beans, drained and rinsed - 1 cup corn kernels (fresh or frozen) - 1 small red onion, finely chopped - 2 cloves garlic, minced - 1 teaspoon cumin - 1 teaspoon smoked paprika - ½ teaspoon chili powder - Salt and pepper to taste - ½ cup shredded cheese (cheddar or pepper jack) - Fresh cilantro or parsley for garnish You will need these tools to make the recipe easier: - A medium saucepan for cooking quinoa - A skillet for sautéing veggies - A baking dish for the stuffed peppers - A fork to fluff the quinoa - A knife and cutting board for chopping If you don’t have some ingredients, here are good swaps: - Use brown rice instead of quinoa for a different grain. - Swap black beans for kidney beans or lentils. - Try diced tomatoes instead of corn for extra moisture. - Use any cheese you like; feta or mozzarella can work well. - Fresh herbs like basil or dill can replace cilantro or parsley. Try these substitutes to make the dish your own! First, preheat your oven to 375°F (190°C). This step helps cook the peppers evenly. While the oven heats up, grab four medium bell peppers. You can choose any color you like. Cut the tops off each pepper and remove the seeds and membranes. This makes them ready to stuff. Place the peppers upright in a lightly greased baking dish. This will keep them stable while they cook. Next, it's time to cook the quinoa. In a medium saucepan, bring two cups of vegetable broth to a boil. Once boiling, add one cup of rinsed quinoa. This helps remove any bitterness. Reduce the heat to low, cover the pot, and let it simmer for about 15 minutes. You will know it's done when all the liquid is absorbed. After cooking, remove it from the heat and fluff the quinoa with a fork. While the quinoa cooks, heat a skillet over medium heat. Add a drizzle of olive oil. Then, sauté one small chopped red onion and two minced cloves of garlic for 2-3 minutes. They should soften and become fragrant. Next, add one cup of black beans, one cup of corn, and your cooked quinoa to the skillet. Sprinkle in one teaspoon each of cumin, smoked paprika, and half a teaspoon of chili powder. Mix everything well and let it cook for another 2-3 minutes. Season the mixture with salt and pepper to taste. Now, remove the skillet from the heat and fold in half a cup of shredded cheese. This makes the filling creamy and delicious. Stuff each bell pepper with the quinoa mixture, pressing down gently. Top each pepper with the remaining cheese. Cover the baking dish with foil to avoid burning. Bake for 25 minutes. After that, remove the foil and bake for another 10-15 minutes until the peppers are tender, and the cheese is bubbly. For the full recipe, you can check the initial ingredient list provided above. To make your stuffed bell peppers perfect, start by preheating your oven to 375°F (190°C). This temperature helps cook the peppers evenly. Use a baking dish that fits all the peppers snugly. This keeps them upright and prevents them from tipping over. Cover the dish with foil for the first part of baking. This step traps steam and helps cook the peppers faster. When you stuff the peppers, pack the filling tightly. This ensures every bite is full of flavor. Use a spoon to press down gently. If you have leftover filling, you can bake it in a small dish alongside the peppers. This way, nothing goes to waste. Choose peppers that are firm and have no soft spots. This helps them hold their shape during baking. For gooey, melted cheese on top, use a mix of cheeses. Cheddar and pepper jack work great together. Add half of the cheese to the filling and sprinkle the rest on top before baking. If you like a crispy top, broil the peppers for a few minutes after baking. Watch them closely to avoid burning. For extra flavor, sprinkle some herbs on the cheese before broiling. For the full recipe, refer to the earlier sections. {{image_2}} You can change the quinoa filling to suit your taste. Try mixing in cooked rice or farro. You can also use different beans like pinto or kidney beans. Add some diced tomatoes or spinach for more color and flavor. The key is to keep it tasty and fun! To boost protein, add cooked chicken, turkey, or tofu. Ground meat works well too. You can also toss in chopped zucchini, mushrooms, or carrots. These add texture and nutrients. Just make sure to chop them small so they cook evenly. You’ll have a hearty meal that everyone will love! For extra flavor, try adding fresh herbs like basil or oregano. A splash of lime juice gives a nice zing. You can also use different spices, like curry powder or Italian seasoning. If you like heat, add diced jalapeños or crushed red pepper. Experiment with flavors to find your perfect mix. For the full recipe, check out the details above! After enjoying your stuffed bell peppers, you will want to store any leftovers. Let them cool to room temperature first. Place them in an airtight container. This helps keep them fresh longer. You can store them in the fridge for up to four days. If you want to keep them longer, freezing is a great option. To reheat your stuffed bell peppers, preheat your oven to 350°F (175°C). Place the peppers in a baking dish. Add a splash of vegetable broth or water to keep them moist. Cover the dish with foil to trap steam. Heat for about 20 minutes or until warmed through. You can also use a microwave for quick reheating. Just cover the peppers loosely and heat for 2-3 minutes. Freezing stuffed bell peppers is easy and effective for meal prep. After cooking, let them cool completely. Wrap each pepper in plastic wrap or aluminum foil. Place them in a freezer-safe bag or container. They can last up to three months in the freezer. When you're ready to eat, thaw them in the fridge overnight. Then, reheat as mentioned above. Enjoy a tasty meal anytime! For the complete recipe, check out the Full Recipe section. To make stuffed bell peppers vegetarian-friendly, choose vegetable broth. This recipe already uses quinoa, black beans, and corn, which are all plant-based. You can skip the cheese or use a vegan cheese for a dairy-free option. You can also add more vegetables like spinach or zucchini for extra flavor and nutrients. Yes, you can make stuffed bell peppers in advance. Prepare the filling and stuff the peppers a day before. Keep them in the fridge until you are ready to bake. You can also bake them ahead of time. Just store leftovers in an airtight container in the fridge for up to three days. Stuffed bell peppers pair well with many sides. A fresh green salad adds crunch and color. You can also serve rice or quinoa for extra carbs. Roasted vegetables make a great option, too. For a heartier meal, consider garlic bread or a light soup. Try to keep the sides light, so they complement the stuffed peppers well. For the full recipe, check out the Full Recipe section above. In this blog post, we explored how to make stuffed bell peppers with quinoa. We covered the ingredients needed, cooking steps, and useful tips. You learned how to choose the right fillings and adapt the recipe to your taste. Storing and reheating leftovers was also highlighted for your convenience. Stuffed bell peppers are healthy and easy to customize. Whether you prefer them spicy or mild, you can create a dish that fits your needs. Enjoy the cooking and make it your own!

Savory Stuffed Bell Peppers with Quinoa Recipe

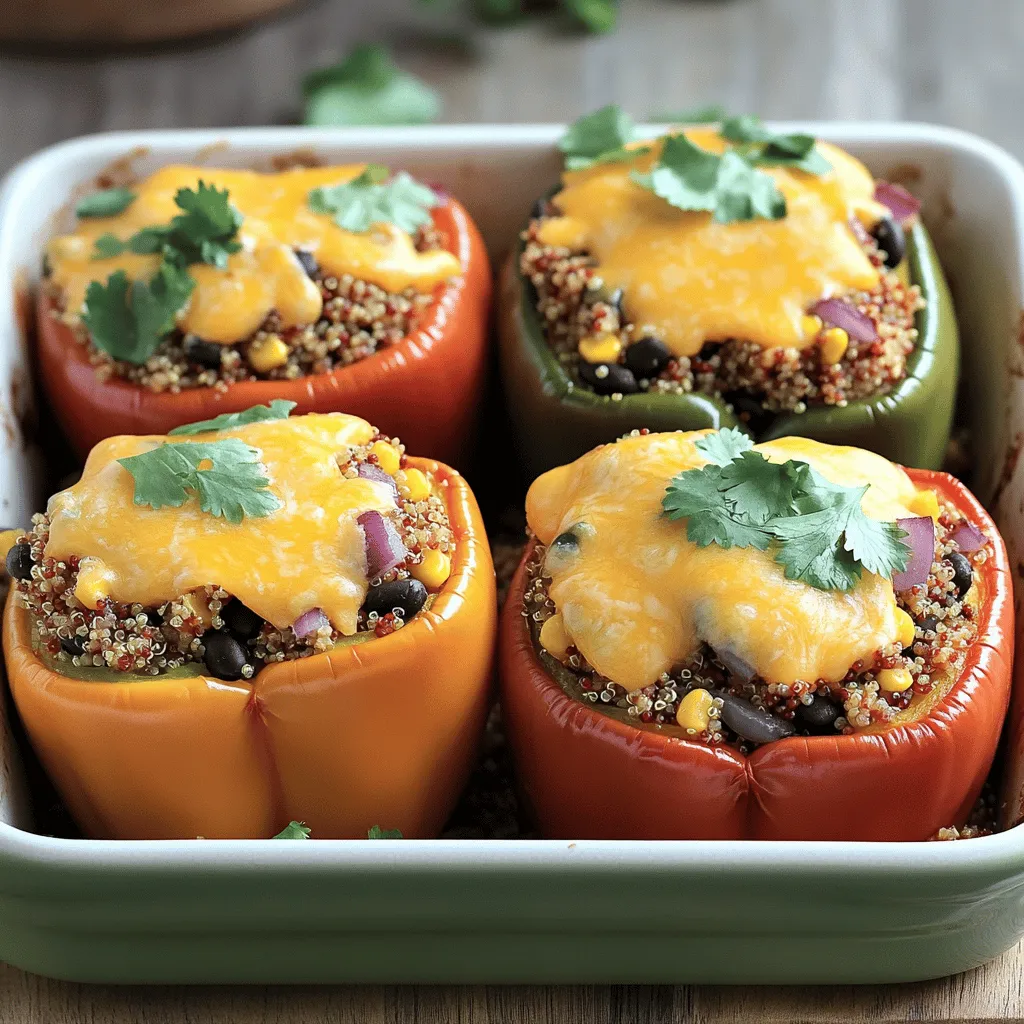
Looking for a tasty and healthy meal? You’re in the right place! My savory stuffed bell peppers with quinoa are

- 1 pound boneless, skinless chicken breasts, cut into 1-inch cubes - 1/4 cup honey - 1/4 cup Dijon mustard - 2 tablespoons soy sauce - 1 tablespoon olive oil - 1 teaspoon garlic powder - 1 teaspoon onion powder - 1/2 teaspoon paprika - Salt and pepper to taste - 1 red bell pepper, cut into 1-inch pieces - 1 yellow bell pepper, cut into 1-inch pieces - 1 small red onion, cut into wedges - Skewers (wooden or metal) When I make honey mustard chicken skewers, I start with fresh ingredients. The chicken is the star of this dish. I like to use boneless, skinless chicken breasts. They cook evenly and stay juicy. The marinade brings all the magic. I mix honey and Dijon mustard for sweetness and tang. Adding soy sauce adds depth. Olive oil keeps everything moist. For spice, I toss in garlic powder, onion powder, and paprika. Salt and pepper finish the blend. This marinade is quick to make but packs a punch. Don’t forget the veggies! Red and yellow bell peppers add color and crunch. I also use red onion for a bit of zing. Make sure your skewers are ready. Wooden ones need soaking. This step keeps them from burning. You can also use metal skewers if you have them. For the full recipe, check the link provided. Enjoy gathering your ingredients! Start by gathering your ingredients. In a large bowl, whisk together: - 1/4 cup honey - 1/4 cup Dijon mustard - 2 tablespoons soy sauce - 1 tablespoon olive oil - 1 teaspoon garlic powder - 1 teaspoon onion powder - 1/2 teaspoon paprika - Salt and pepper to taste Mix these until they blend into a smooth marinade. This sweet and tangy mix will coat your chicken perfectly. Next, take your chicken. Cut it into 1-inch cubes. Place these cubes into the marinade. Ensure that each piece is fully coated. Cover the bowl and refrigerate. Let it marinate for at least 30 minutes. For a deeper flavor, you can let it sit for up to 2 hours. Now, it’s time to grill! Preheat your grill or grill pan to medium-high heat. If you use wooden skewers, soak them in water for 30 minutes. This step keeps them from burning. Once your chicken has marinated, thread it onto the skewers. Alternate with pieces of: - 1 red bell pepper, cut into 1-inch pieces - 1 yellow bell pepper, cut into 1-inch pieces - 1 small red onion, cut into wedges This not only adds flavor but also makes the skewers look nice. Place the skewers on the grill. Grill for about 10-12 minutes. Turn them occasionally. You want the chicken to reach an internal temperature of 165°F (75°C). Look for those lovely grill marks! After grilling, let the skewers rest for a few minutes. This helps keep them juicy before serving. For the full recipe, check out the detailed instructions. To make the best honey mustard chicken skewers, marinate longer. I suggest letting the chicken sit in the marinade for at least two hours. This extra time helps the flavors seep in. You can even marinate overnight if you like. The chicken will absorb all that tasty honey mustard goodness, making each bite amazing. Grilling needs some care. First, don’t overcrowd the grill. Leave space between skewers for heat to flow. This way, the chicken cooks evenly. Turn the skewers every few minutes for nice grill marks. Keep an eye on the chicken, making sure it reaches 165°F (75°C). This ensures juicy, safe-to-eat skewers. Make your skewers look great on the table. Serve them on a wooden board. You can garnish with fresh herbs like parsley. Drizzling extra honey mustard sauce on top adds a nice touch. This not only boosts flavor but also makes the dish pop with color. For a fun twist, serve with a side of crunchy veggies or a light salad. For the full recipe, see above. {{image_2}} You can swap chicken for tofu. Tofu gives a tasty vegetarian choice. It soaks up the honey mustard flavor well. You can also try different veggies. Zucchini and mushrooms work great on the grill. They add more taste and color to your skewers. Switching up your mustard can change the flavor. Whole grain mustard adds a crunchy texture. Spicy mustard gives a nice kick to your dish. Feel free to mix and match sauces for a new taste. You might find a new favorite! Using fresh, seasonal veggies makes your skewers pop. Bell peppers shine in summer while root vegetables are great in fall. Search for local produce to keep flavors bright and fresh. This choice not only tastes good but also supports local farms. Store leftover skewers in an airtight container for up to 3 days. This keeps them fresh and tasty for your next meal. Make sure the container seals well to avoid air getting in. Freezing the uncooked marinated chicken skewers can last for up to 2 months. This is perfect for meal prep. Just remember to thaw them in the fridge before grilling. This helps the chicken cook evenly and get that nice char. Reheat skewers in the oven at low heat or in the microwave until warm. If using the oven, place them on a baking sheet. This method helps retain their juiciness. In the microwave, cover them with a damp paper towel to keep moisture in. Enjoy the flavors again without losing quality! For the full recipe, check the earlier section. Yes, chicken thighs will provide more moisture and flavor. They stay juicy during cooking. Thighs have a richer taste, making your skewers even better. If you prefer dark meat, go for thighs. Soak wooden skewers for at least 30 minutes to prevent burning while grilling. This keeps them from catching fire on the grill. Just place them in water while you prep your other ingredients. Pair with rice, salad, or grilled vegetables for a complete meal. Rice adds a nice base, while a fresh salad can brighten the plate. Grilled veggies offer more flavor and color, making your meal stand out. Use a meat thermometer to ensure an internal temperature of 165°F (75°C). This is the safest way to check for doneness. You can also cut into a piece; the juice should run clear, not pink. For more tips, check the Full Recipe. You now have the tools to make delicious honey mustard chicken skewers. Start with fresh ingredients, simple marinades, and vibrant veggies. Follow the steps to marinate and grill, ensuring even cooking for juicy chicken. Remember to try different veggies and sauces for your own twist. Store any leftovers properly to enjoy another day. Cooking is fun and rewarding, so grab your skewers and get started!

Honey Mustard Chicken Skewers Flavorful Grilling Recipe

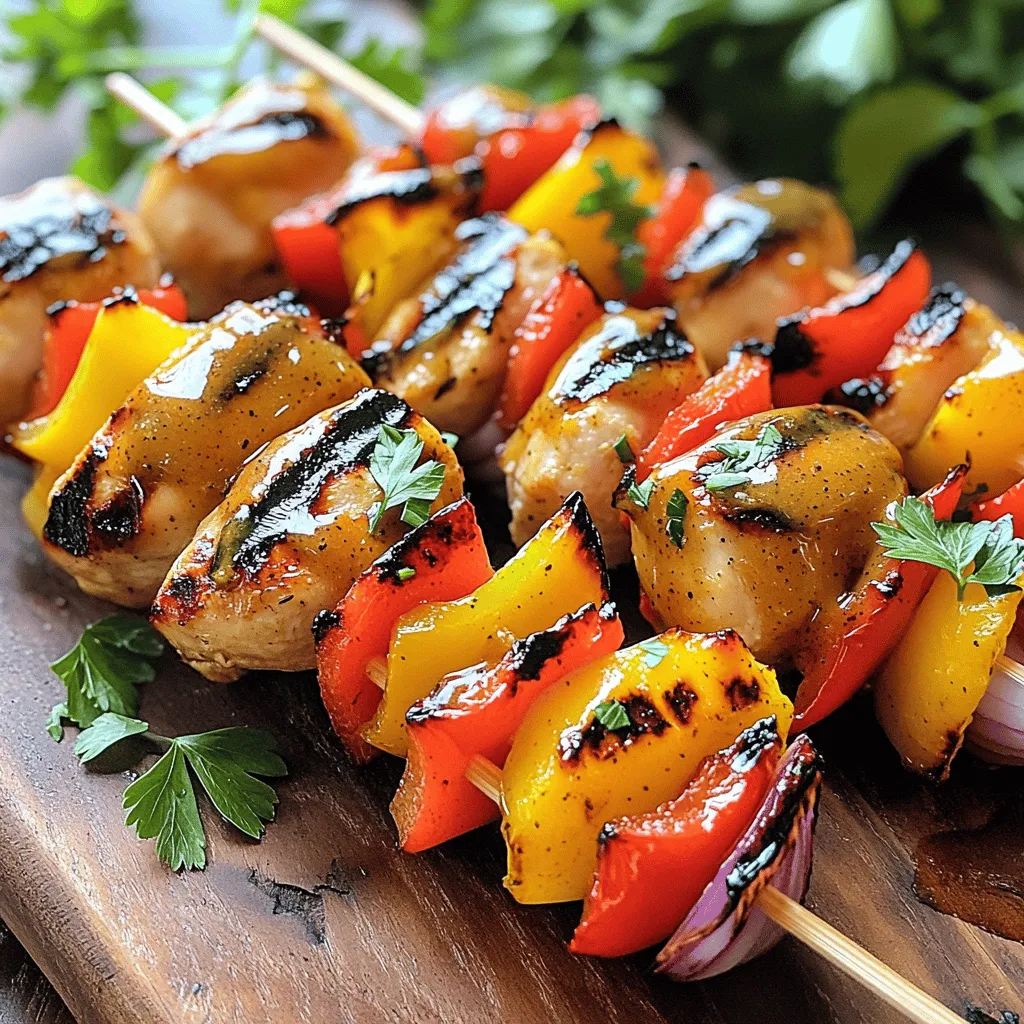
Are you ready to elevate your grill game? My Honey Mustard Chicken Skewers are a must-try! This simple recipe features

- 1 cup rolled oats - 1 ripe banana, mashed - 1 cup almond milk (or milk of choice) - 1/2 teaspoon cinnamon - 1 tablespoon maple syrup (or honey) - 1 tablespoon chia seeds - 1/4 cup walnuts, chopped - 1/4 cup raisins (optional) - Pinch of salt - Additional banana slices and sprinkle of cinnamon for topping Banana bread overnight oats combine flavors we all love. These ingredients create a fun and simple meal. The oats give you good fiber. The banana adds sweetness. You can use almond milk, but any milk works well. I use cinnamon to give it warmth. Maple syrup or honey adds extra sweetness. Chia seeds help thicken the mix and add nutrition. Walnuts add crunch, and raisins can be a sweet surprise. When you gather these items, the magic begins. You will mix the ingredients and let them sit. The oats soak up the flavors, and the chia seeds expand. This makes for a filling breakfast. You can find the full recipe for making banana bread overnight oats. Enjoy making this tasty dish! To make banana bread overnight oats, start by gathering your ingredients. In a medium bowl, combine: - 1 cup rolled oats - 1 ripe banana, mashed - 1 cup almond milk (or milk of choice) - 1/2 teaspoon cinnamon - 1 tablespoon maple syrup (or honey) - 1 tablespoon chia seeds - Pinch of salt Mix these ingredients well. Ensure everything is evenly incorporated. Next, fold in: - 1/4 cup walnuts, chopped - 1/4 cup raisins (optional) This step adds crunch and sweetness to your oats. Now, it’s time to store your mixture. Divide it into two jars or airtight containers. Seal them well after filling. Place the jars in the refrigerator overnight. This allows the oats to soak up the liquid and the chia seeds to thicken the mix. In the morning, take out your jars. Stir the oats well. If the mixture seems too thick, add a splash more almond milk for your desired consistency. For a tasty finish, top your oats with some banana slices and a sprinkle of cinnamon. This adds flavor and makes your dish look beautiful. Enjoy your healthy breakfast! To make your banana bread overnight oats truly shine, start with ripe bananas. They add natural sweetness and great flavor. If you want it sweeter, adjust the maple syrup. You can add more or less, based on your taste. Serve the oats in clear jars. This shows off the lovely layers. Garnish them with banana slices and walnuts for extra flair. A sprinkle of cinnamon on top makes it look even better. If your oats turn out too thick, simply add more milk. This will help reach your desired consistency. For a creamier texture, let the oats soak longer in the fridge. The longer they sit, the creamier they become. {{image_2}} You can easily change the taste of your banana bread overnight oats. One fun twist is to add cocoa powder. This gives your oats a rich chocolate flavor, making breakfast feel like dessert. Just mix in one tablespoon of cocoa powder with the other ingredients. Another great way is to incorporate nut butter. This makes your oats creamier and adds a nutty taste. Almond butter or peanut butter works well. Simply stir in a tablespoon of your favorite nut butter before refrigerating. If you need a vegan option, you can use dairy-free milk. Almond milk, oat milk, or coconut milk are all great choices. They keep the oats creamy and tasty. For those avoiding nuts, you can substitute walnuts with seeds. Sunflower seeds or pumpkin seeds add a nice crunch and are nut-free. Just swap the walnuts for the seeds in the same amount. You can also play with seasonal flavors. In fall, try adding pumpkin puree. This gives your oats a warm, cozy taste. Just mix in 1/4 cup of pumpkin puree with the other ingredients before chilling. In summer, include fresh berries. Blueberries, strawberries, or raspberries add a burst of flavor. Toss in a handful of your favorite berries just before serving for a refreshing touch. For the full recipe, check the section above! You can store banana bread overnight oats in the fridge for up to five days. This makes it a great meal prep choice. I recommend using airtight containers or jars. They help keep your oats fresh and tasty. Glass jars work best because they are easy to clean and look nice. Yes, you can freeze banana bread overnight oats! It’s a smart way to save time. To freeze, place the oats in a freezer-safe container. Leave some space at the top, as they will expand when frozen. When you’re ready to eat, thaw them in the fridge overnight. For quick thawing, you can use the microwave. Just heat in short bursts and stir. To tell if your oats have gone bad, check for smell and texture. If they smell sour or look moldy, throw them away. Always use clean hands or utensils when serving to keep them safe. If you see any signs of spoilage, it’s best to skip eating them. Enjoy your banana bread overnight oats fresh and safe! To make banana bread overnight oats, follow these steps: 1. In a medium bowl, combine the rolled oats, mashed banana, almond milk, cinnamon, maple syrup, chia seeds, and a pinch of salt. Mix well until everything is blended. 2. Fold in the chopped walnuts and raisins. This adds texture and flavor. 3. Divide the oat mixture into two jars or airtight containers. Seal them tightly after filling. 4. Refrigerate the jars overnight or for at least four hours. This lets the oats soak up the liquid. 5. In the morning, stir the oats. If the mixture feels too thick, add a little more almond milk until you like the texture. 6. Top with banana slices and a sprinkle of cinnamon before you enjoy. This recipe is easy and quick, taking just about ten minutes to prepare. You can find the full recipe above. Yes, you can prepare banana bread overnight oats in advance. The best way is to make them the night before. This gives the oats time to soak and thicken. You can store the jars in the fridge for up to three days. Just keep the toppings separate until you serve. This way, they stay fresh and look nice. Banana bread overnight oats are packed with nutrition. Here are some benefits: - Fiber: Oats and bananas provide a good source of fiber. This helps digestion and keeps you full. - Vitamins: Bananas are rich in vitamins like B6 and C. They also add natural sweetness. - Healthy Fats: Walnuts add healthy fats and protein. This supports heart health. - Calcium: Almond milk gives you calcium, which is good for bones. Overall, this dish is a balanced meal that fuels your day. If you do not have chia seeds, don't worry! You can use several options to thicken your oats: - Flaxseeds: Ground flaxseeds work well. They add fiber and omega-3s. - Greek Yogurt: This adds creaminess and protein. Just mix it in with the other ingredients. - Mashed Avocado: For a unique twist, try mashed avocado. It gives healthy fats and a smooth texture. These substitutes keep your oats thick and tasty! You can create delicious banana bread overnight oats with simple ingredients and steps. First, combine oats, banana, almond milk, and spices. Then, let them chill overnight. Enjoy your oats topped with fresh banana slices or other fun add-ins. Remember, you can adapt this recipe to your taste. Experiment with flavors and storage options. These oats are easy, healthy, and great for busy days. With just a bit of creativity, you make a satisfying breakfast every time. Happy preparing!

Banana Bread Overnight Oats Easy and Healthy Recipe

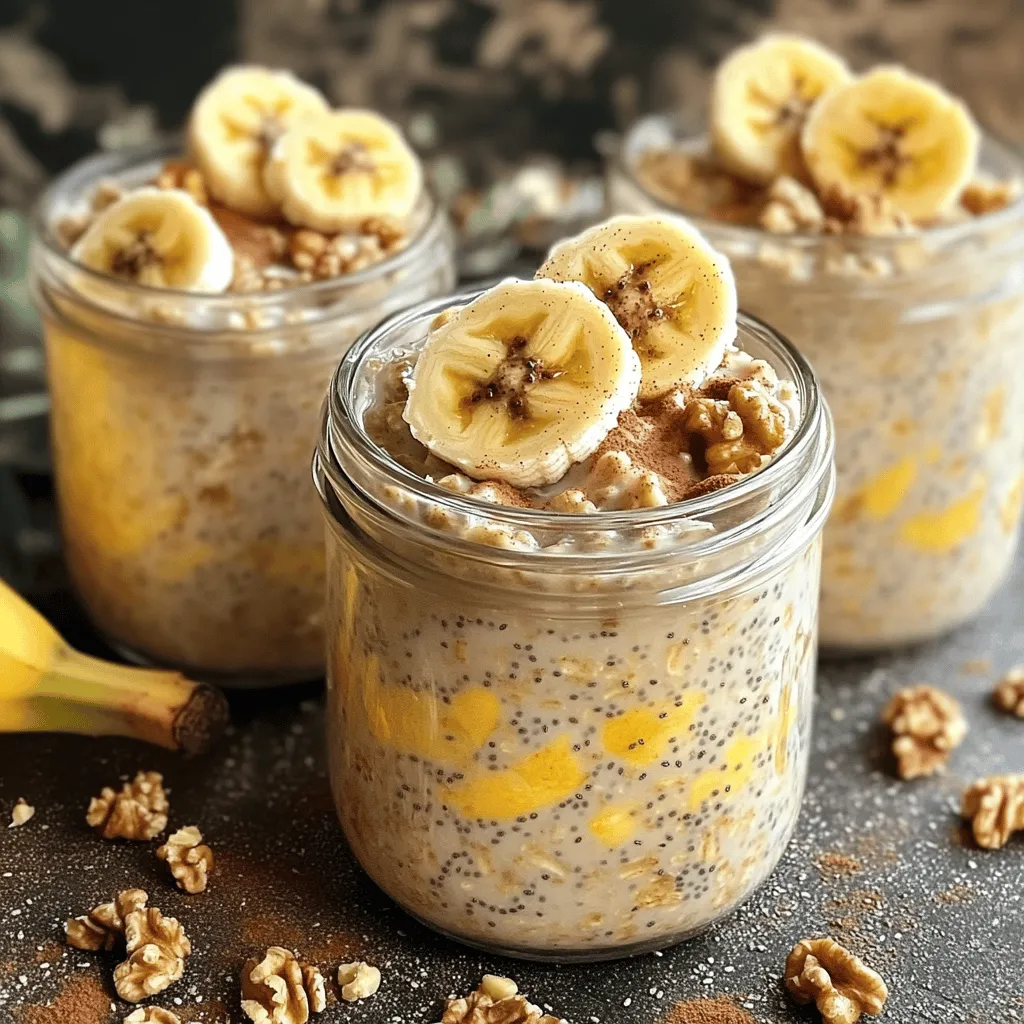
Are you ready to kickstart your mornings with a delicious twist? My Banana Bread Overnight Oats recipe combines the sweet

To make a tasty Cheesy Spinach Artichoke Dip, you need some key ingredients. Here’s what you should gather: - 1 cup frozen spinach, thawed and drained - 1 cup canned artichoke hearts, drained and chopped - 1 cup cream cheese, softened - 1 cup sour cream - 1 cup shredded mozzarella cheese - 1/2 cup grated Parmesan cheese - 2 cloves garlic, minced - 1 teaspoon onion powder - 1/4 teaspoon crushed red pepper flakes (optional) - Salt and pepper to taste - Tortilla chips or sliced baguette for serving These ingredients blend to create a creamy, flavorful dip. The spinach and artichokes add great texture, while the cheeses bring richness. To kick up the flavor, you can add some optional ingredients. Here are a few ideas: - Chopped fresh herbs like parsley or basil for freshness. - A squeeze of lemon juice for a zesty touch. - A dash of Worcestershire sauce for extra depth. - Sautéed onions or peppers for added sweetness. These options let you customize the dip to fit your taste. Feel free to get creative! This dip is naturally vegetarian since it does not include meat. If you're looking for gluten-free options, simply serve it with gluten-free tortilla chips or veggie sticks. You can also make it dairy-free by using vegan cream cheese and cheese alternatives. Just remember to check labels for hidden gluten or dairy ingredients. This ensures everyone can enjoy the dip at your party! For the full recipe, check out the earlier section. Start by gathering your ingredients. You need frozen spinach, canned artichoke hearts, cream cheese, sour cream, mozzarella cheese, Parmesan cheese, garlic, onion powder, and optional red pepper flakes. Frozen spinach should be thawed and drained well. This helps your dip stay creamy, not watery. Chop the artichokes into small pieces and mince the garlic. This adds more flavor. In a large bowl, mix the softened cream cheese and sour cream. Stir until it is smooth and creamy. This is the base for your dip. Next, add the chopped artichoke hearts, spinach, minced garlic, onion powder, and red pepper flakes if you want some heat. Season with salt and pepper. Mix well to combine everything evenly. Preheat your oven to 350°F (175°C). This step is key for a nice bake. Transfer your dip mixture into an oven-safe dish. Spread it out evenly. Now, sprinkle half of the mozzarella cheese and all of the grated Parmesan on top. These cheeses will melt beautifully. Finally, add the rest of the mozzarella cheese on top for that gooey finish. Bake the dip in the oven for 25-30 minutes. You want it bubbly and golden brown on top. The smell will make everyone eager to dig in. Once done, take it out and let it cool for a few minutes. When mixing, be gentle. Overmixing can make your dip tough. You want a nice, creamy texture. Use a spatula to fold in the cheeses carefully. This helps keep air in the mixture for a fluffy dip. If you want a twist, try adding some chopped herbs or spices to mix in. Always taste your dip before baking. This lets you adjust the salt and spice to your liking. For the best results, serve the dip warm. Pair it with tortilla chips or slices of baguette. It’s a crowd-pleaser! For the full recipe, check out the section above. Enjoy your tasty creation! To make your dip super creamy, use softened cream cheese. This helps it blend easily. Mix the cream cheese and sour cream first. Make sure there are no lumps. Also, try using full-fat cream cheese for the best texture. If you want more creaminess, add extra sour cream. Mixing in some heavy cream can also help! You can swap ingredients to fit your taste. If you don't have artichokes, use diced jalapeños. You can also replace mozzarella with cheddar for a sharper flavor. For a lighter dip, use Greek yogurt in place of sour cream. This keeps it creamy but adds protein. If you're dairy-free, try a vegan cream cheese alternative. To change the spice level, add or reduce crushed red pepper flakes. If you like it hot, add more! You can also mix in a dash of hot sauce. For a milder dip, skip the red pepper flakes altogether. Always taste as you go! This way, you can find the perfect balance for your palate. For the full details, check out the Full Recipe. {{image_2}} You can swap cheeses in this dip for fun flavors. Try using sharp cheddar for a zesty kick. Goat cheese can add a creamy tang. For a smoky note, use smoked Gouda. Mixing different cheeses makes each dip unique. You can blend mozzarella with fontina for extra meltiness. Each cheese choice adds its own charm to the dip. Want to make your dip heartier? Adding protein is a great idea. Shredded chicken works well and gives a nice texture. You can also use crab meat for a seafood twist. Both options blend well with the creamy base. Just fold in about a cup of cooked protein before baking. This makes the dip more filling and satisfying. If you want a vegan version, it’s easy to adapt. Use cashew cream instead of cream cheese for richness. Swap the sour cream for coconut yogurt or silken tofu. Nutritional yeast can add a cheesy flavor. For the cheeses, try vegan mozzarella and parmesan. These changes keep the dip creamy and delicious without dairy. You won’t miss the cheese at all! For the full recipe, refer to Cheesy Spinach Artichoke Delight. If you have leftover cheesy spinach artichoke dip, store it in an airtight container. Let it cool down first. Then, seal it tightly. Keep the dip in the fridge. It will stay fresh for up to three days. When you want to enjoy it again, just take it out when you are ready. To reheat your dip, place it in a safe oven dish. Preheat the oven to 350°F (175°C). Heat the dip for about 15 minutes. Check it often. You want it warm and bubbly. If you are in a hurry, use the microwave. Heat it in short bursts, stirring in between. This way, it warms evenly without getting too hot. You can freeze this dip for later use. Freeze it in a safe container. It can last up to three months this way. However, freezing can change the texture. When you thaw it, it might be a bit watery. To fix this, stir the dip well after thawing. You can also add a little cream cheese to help it. This dip tastes great fresh but can still be enjoyed after freezing. For the full recipe, check out the details above. You can store Cheesy Spinach Artichoke Dip for about three to four days in the fridge. Make sure to place it in an airtight container. This keeps it fresh and tasty. When you are ready to enjoy it again, just reheat it in the oven or microwave. Yes, you can make the dip ahead of time. Just prepare it and store it in the fridge before baking. This way, you save time on the day of your party. When you are ready, bake it as directed in the Full Recipe. Besides tortilla chips, you can serve the dip with sliced baguette. Fresh veggies like carrots and celery also work well. You can even use crackers or pretzels for a nice crunch. These options add variety and keep it fun! You learned how to make a great Cheesy Spinach Artichoke Dip. We covered the main and optional ingredients, along with dietary options. The step-by-step instructions guide you through preparation and baking. You also got tips for the creamiest dip and ways to mix flavors. Variations include new cheeses and protein options. Finally, we discussed storage and reheating for leftovers. This dip is fun and easy to make. Enjoy experimenting with different flavors to find your favorite.

Cheesy Spinach Artichoke Dip Irresistible Party Snack

If you’re searching for the perfect party snack, look no further! My Cheesy Spinach Artichoke Dip is creamy, tangy, and

- Rolled oats - Vegetable broth (or water) - Olive oil - Eggs - Avocado - Baby spinach - Seasonings (garlic powder, smoked paprika, salt, pepper) - Garnish options (chives or green onions) To create a rich, savory oatmeal, you need a few key ingredients. Rolled oats form the base of this dish. They cook up creamy and have a nice texture. Using vegetable broth instead of water adds a depth of flavor. Olive oil gives a lovely richness that ties everything together. For the protein, I recommend fresh eggs. They complement the oats perfectly, adding both flavor and texture. A sliced avocado brings creaminess and freshness, while baby spinach adds a pop of color and nutrients. Seasonings are crucial. Garlic powder and smoked paprika bring warmth and spice. Salt and pepper enhance the flavors, so don’t skip these. Finally, fresh chives or green onions make for a bright garnish, adding a nice touch of crunch. You can find all these ingredients in the Full Recipe. 1. First, bring the vegetable broth or water to a boil in a medium saucepan. 2. Once boiling, add 1 cup of rolled oats and a pinch of salt. 3. Reduce the heat to low. Let the oats simmer for about 5-7 minutes. Stir occasionally until they reach a creamy texture. If you want them thinner, just add a bit more broth or water. 1. While the oats cook, heat 1 tablespoon of olive oil in a skillet over medium heat. 2. Crack 2 large eggs into the skillet. Cook them sunny-side up or to your liking. 3. Season with salt, pepper, and a sprinkle of smoked paprika for added flavor. 1. When the oats are ready, stir in 1/2 teaspoon of garlic powder. Adjust the seasoning with more salt and pepper if needed. 2. Remove the skillet from heat. Set the fried eggs aside. 3. In serving bowls, spoon the savory oatmeal. Top each bowl with a fried egg, sliced avocado, and a handful of baby spinach. 4. For extra flavor, garnish with chopped chives or green onions. This method gives your savory oatmeal a quick flavor boost, making it both tasty and satisfying. If you're ready to dive deeper, check out the Full Recipe for more details! To get the best savory oatmeal, you can adjust the texture. If it’s too thick, add more broth or water. This makes it creamy and pleasing. For flavor, season with garlic powder and smoked paprika. They add warmth and depth, making each bite enjoyable. When you fry your eggs, you have choices. A sunny-side-up egg has a runny yolk, while an over-easy egg is flipped for a firmer yolk. Both are great, but sunny-side-up gives a lovely shine. Timing is key for the perfect yolk. Cook for about 3-4 minutes for sunny-side-up. For over-easy, flip and cook for only 1-2 minutes. To make your dish look as good as it tastes, use deep bowls. Spoon the oatmeal first, then place the fried egg on top. Slice the avocado and arrange it nicely next to the egg. For a gourmet touch, drizzle a bit of olive oil over the dish. Finish with chopped chives or green onions for color and a fresh taste. This makes your meal appealing and fun to eat! For more details, check the Full Recipe. {{image_2}} You can easily boost the flavor of your savory oatmeal. Adding cheese makes it creamy and rich. Try shredded cheddar or crumbled feta for a tangy twist. Cooked vegetables also add depth. Spinach, mushrooms, or bell peppers work well. Spices and herbs can transform your dish, too. A sprinkle of cumin or curry powder adds warmth. Fresh herbs like parsley or cilantro bring brightness. Experiment with your favorite flavors to find your perfect mix. Toppings can change the whole meal. If you like protein, bacon or smoked salmon are great choices. They add a salty crunch that pairs nicely with the egg. For a lighter option, try sliced turkey or grilled chicken. You can also switch up the veggies. Kale or roasted cherry tomatoes can add color and nutrients. These toppings not only taste great but also make your bowl look beautiful. If you need a gluten-free dish, use certified gluten-free oats. They work just as well in this recipe. For a vegan alternative, you can swap the eggs for tofu or chickpea scramble. These options give you the protein you need without using eggs. To create a vegan savory bowl, use vegetable broth and add extra veggies. Try avocado, nuts, or seeds for healthy fats. This way, you can still enjoy a tasty, nourishing meal. Check out the Full Recipe for more details on making this dish! After enjoying your savory oatmeal, store leftovers in an airtight container. Let the oatmeal cool before sealing. This method helps keep it fresh. You can refrigerate it for up to three days. When reheating, add a splash of broth or water. This helps restore its creamy texture. Making a large batch of savory oatmeal is a smart move. Cook a big pot and divide it into smaller containers. This saves time on busy mornings. Use glass or BPA-free plastic containers for easy storage. Label them with dates to keep track of freshness. To freeze savory oatmeal, let it cool completely. Then, transfer it to freezer-safe bags or containers. Remove as much air as possible to prevent freezer burn. Savory oatmeal can last up to three months in the freezer. When you're ready to eat, thaw it in the fridge overnight. Reheat in a pot or microwave, adding a little broth or water to revive the dish. Yes, you can use quick oats. However, they cook faster, usually in about 1-2 minutes. This means you will need to adjust your cooking time. Quick oats will also be softer in texture. If you like a chewier bite, stick with rolled oats. To add some heat, consider these options: - Stir in a pinch of red pepper flakes while cooking. - Drizzle hot sauce on top just before serving. - Mix in sriracha or harissa for a bold flavor. Savory oatmeal is packed with nutrients: - Oats provide fiber, which aids digestion. - Eggs add protein, supporting muscle health. - Spinach and avocado offer vitamins and healthy fats, enhancing your meal's nutritional value. This dish is quick to make. Here’s the breakdown: - Prep Time: 5 minutes - Cook Time: 10 minutes In just 15 minutes, you can enjoy a warm bowl of savory oatmeal. Yes, you can make this dish vegan. Replace the eggs with: - Scrambled tofu seasoned with turmeric. - A dollop of hummus for creaminess. - Avocado can still be used as a topping for added flavor and texture. Savory oatmeal is simple and delicious, offering endless flavors. From cooking techniques to storage tips, you've learned how to make a great dish. You can mix in your favorite toppings or spices to customize it just for you. Whether you want it vegan or with added protein, the options are plenty. Enjoy experimenting with this dish, and savor each bite knowing it's nutritious and tasty. Your journey into savory oatmeal has just begun, and I can’t wait for you to try it all.

Savory Oatmeal with Fried Egg Quick Flavor Boost

Are you ready to elevate your breakfast game? This Savory Oatmeal with Fried Egg will do just that! Packed with

To make your salsa verde, you need some fresh items. Here’s what to gather: - 6 medium tomatillos, husked and rinsed - 1 small onion, quartered - 2 cloves garlic, unpeeled - 1-2 jalapeño peppers, stems removed (adjust for spice preference) These fresh ingredients are the heart of your salsa. Tomatillos give it a tangy kick. Jalapeños can add heat, but you can adjust them to suit your taste. The onion and garlic bring out deep flavors. Next, let’s add some herbs and seasoning. You will need: - 1 cup fresh cilantro, chopped - Juice of 2 limes - Salt, to taste - 1 tablespoon olive oil Cilantro adds a fresh, bright taste. Lime juice gives it a zesty punch. Salt and olive oil help to balance the flavors and enhance the taste. Lastly, gather these kitchen tools to make the process easy: - Baking sheet - Blender or food processor - Measuring cups You will use the baking sheet to roast your veggies. A blender or food processor will mix everything well. Measuring cups help you get the right amounts for each ingredient. This simple list covers everything you need for a fresh and flavorful salsa verde. Check out the Full Recipe for more details! To start, you need to clean the tomatillos. Remove the husks and rinse them under cool water. This removes any sticky residue. After that, quarter the onion. This helps it roast evenly. For the jalapeños, simply remove the stems. You can keep the seeds for heat or take them out for less spice. Next, preheat your oven to 425°F (220°C). Spread the tomatillos, onion, and garlic cloves on a baking sheet. Add the jalapeños for roasting. Drizzle olive oil on top and sprinkle some salt. Roast everything in the oven for about 15 to 20 minutes. You want them to be tender and slightly charred. Watch closely to avoid burning. Once roasted, take the baking sheet out of the oven and let it cool for a few minutes. Now, transfer the roasted ingredients into a blender or food processor. Add the chopped cilantro and the juice of two limes. Blend until smooth, scraping down the sides as needed. Taste your salsa verde now. If it needs salt, add some. For a chunkier look, pulse the mixture a few times instead of blending completely. This method creates a fresh and flavorful salsa verde that enhances any dish. For the full recipe, refer back to the earlier section. When making salsa verde, the spice level is key. Jalapeños can vary in heat. To choose the right one, look at the skin color. Dark green usually means more heat. If you want a milder salsa, remove the seeds and ribs. You can also use poblano peppers for a sweet kick. These are much milder and still add great flavor. You can boost the flavor of your salsa verde with some extra ingredients. Consider adding a pinch of cumin for warmth. A dash of smoked paprika can give it a nice smoky touch. Fresh ingredients like lime juice and cilantro really lift the taste. Always use fresh herbs for the best flavor. They make a big difference in your dish. Salsa verde is versatile and fun to serve. Try it with grilled meats like chicken or pork. It also pairs well with fish tacos and quesadillas. For a fun twist, serve it with fresh veggies, like carrot sticks or cucumber slices. You can even drizzle it over a salad for a zesty kick. It’s a great way to brighten up any meal. Don't forget, serving it in a colorful bowl makes it even more appealing. For the full recipe, check out the details above. {{image_2}} You can easily switch up your salsa verde by adding unique ingredients. Adding fruit like mango or pineapple gives a sweet twist to your salsa. The fruit adds a nice balance to the tangy tomatillos. You can simply chop them and mix them in after blending. It creates a fun, fresh flavor that pairs well with many dishes. Another great idea is to incorporate roasted garlic. Roasting garlic makes it taste sweet and rich. Just put unpeeled cloves on the baking sheet with your tomatillos. The garlic becomes soft and tasty as it roasts. Blend it in for an extra layer of flavor that you will love. If you like heat, try using serrano peppers. They pack more spice than jalapeños. You can blend them in for a fiery kick. Start with one and taste as you go. You can always add more if you want it spicier. If you prefer a mild salsa, you can omit the jalapeños. The salsa will remain fresh and tasty without them. You can still enjoy all the vibrant flavors from tomatillos and other ingredients. Salsa verde is perfect for many diets. It is naturally vegan and gluten-free. The fresh ingredients make it healthy and delicious. You can serve it to anyone, and they will enjoy it. If you are watching your sodium intake, consider low-sodium options. Use less salt in your recipe. You can also use fresh lime juice for flavor without added salt. This way, everyone can enjoy your salsa verde without worry. For the full recipe, check out the Zesty Green Delight Salsa Verde. To keep your salsa verde fresh, use airtight containers. Glass jars or plastic containers work well. Always let the salsa cool before sealing it. This prevents condensation, which can spoil your salsa. Store it in the fridge right after preparation. The cold slows down spoilage and keeps flavors bright. You can freeze salsa verde if you want to save some for later. Pour it into freezer bags or containers. Leave some space for expansion as it freezes. When you’re ready to use it, take it out and thaw in the fridge overnight. For quicker thawing, run the bag under cold water. Avoid using a microwave, as it can change the texture. Salsa verde will last about a week in the fridge. Always check for signs of spoilage. If it smells off or shows mold, throw it away. Fresh salsa should have a vibrant green color. If it turns brown or dull, it's time to discard it. Enjoy your salsa verde within a week for the best taste! Yes, you can use canned tomatillos. They save time and add flavor. Just drain and rinse them before blending. Canned tomatillos may be softer, so adjust cooking times if needed. Fresh tomatillos give a brighter taste, but canned works well in a pinch. I often use them when fresh ones are not available. To spice up your salsa verde, add more jalapeño peppers. You can also use serrano peppers for extra heat. Remove the seeds and ribs for less spice. For a smoky flavor, try adding chipotle peppers in adobo sauce. Just blend them in with the other ingredients. Salsa verde is versatile and pairs well with many dishes. It works great with grilled meats like chicken or pork. You can drizzle it on tacos for added flavor. It complements roasted vegetables well, too. - Using with meats and vegetables Try it with grilled chicken, pork, or fish. It also brightens up roasted veggies like zucchini or bell peppers. - Dipping options for appetizers Serve salsa verde with tortilla chips. You can also use it as a dip for fresh veggies like carrots and cucumbers. It's perfect for adding zing to quesadillas or nachos. Homemade salsa verde lasts about 5-7 days in the fridge. Store it in an airtight container to keep it fresh. If you want to keep it longer, freeze it. Salsa verde can last up to 3 months in the freezer. Just thaw it overnight in the fridge before using. Salsa verde is a fresh and flavorful addition to many dishes. You learned how to select fresh ingredients and use kitchen tools effectively. I shared tips for adjusting spice levels and enhancing flavors. You can even try unique variations to make it your own. Proper storage ensures your salsa stays fresh and delicious longer. Remember these steps, and enjoy your salsa verde with tacos, grilled meats, or as a dip. It’s easy, fun, and worth making!

Homemade Salsa Verde Fresh and Flavorful Recipe

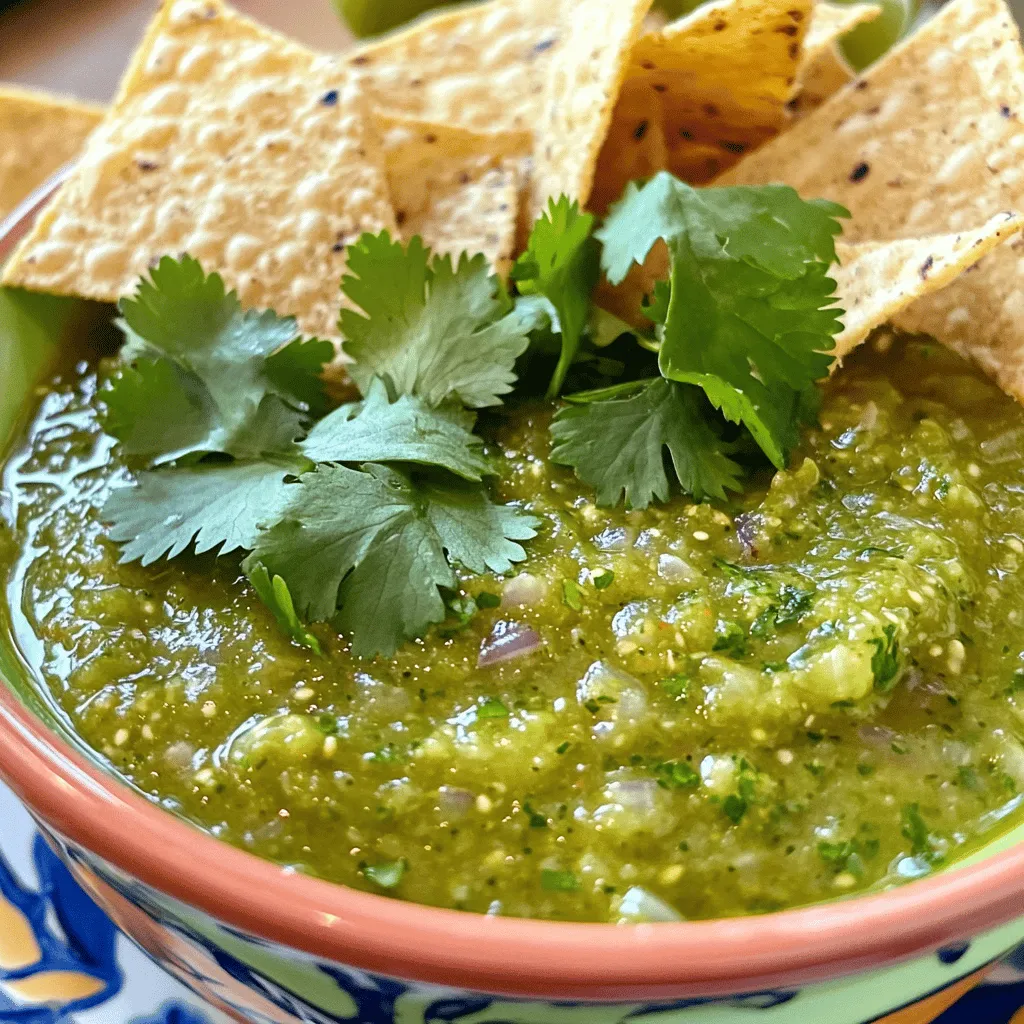
Ready to add a burst of flavor to your meals? Homemade Salsa Verde is fresh, vibrant, and easy to make!

Older posts
Newer posts
← Previous Page1 … Page55 Page56 Page57 … Page68 Next →

dsad

© 2025 Southern Dishes • Built with GeneratePress

Our Policies

  • Copyright Policy
  • Cookie Policy
  • GDPR Policy
  • Privacy Policy
  • Disclaimer
  • Terms Of Use

More Information

  • Home
  • About
  • Contact
  • Appetizers
  • Dessert
  • Dinner
  • Drinks
©2025, Southern Dishes About Back To Top