Skip to content
DisclaimerTerms Of UseGDPR PolicyCookie Policy

Southern Dishes

  • Home
  • Drinks
  • Appetizers
  • Dinner
  • Dessert
  • About
  • Contact
  • Privacy Policy
DisclaimerTerms Of UseGDPR PolicyCookie Policy

Isabella

- 1 medium zucchini, sliced - 1 medium yellow squash, sliced - 1 bell pepper (any color), diced - 1 cup cherry tomatoes, halved - 1 red onion, cut into wedges - 2 cloves garlic, minced - 3 tablespoons olive oil - 1 teaspoon dried oregano - 1 teaspoon dried thyme - Salt and pepper to taste - Fresh basil leaves for garnish The base of this dish is fresh vegetables. I love using zucchini and yellow squash because they cook well and stay tender. Bell peppers add color and a sweet bite. The cherry tomatoes burst with flavor, while red onions give a nice crunch. For seasoning, garlic is a must. It brings out the taste of the veggies. Olive oil coats everything and helps with roasting. Dried oregano and thyme add depth. Don’t forget salt and pepper to bring all the flavors together. Finally, fresh basil leaves make a beautiful garnish. They add a pop of color and a hint of freshness. You can find the full recipe to see how to put this all together. - Preheat your oven to 400°F (200°C). - In a large mixing bowl, combine the sliced zucchini, yellow squash, diced bell pepper, halved cherry tomatoes, and onion wedges. - Drizzle with olive oil and add minced garlic, oregano, thyme, salt, and pepper. - Toss to coat the veggies evenly. - Spread the seasoned vegetables on a baking sheet or oven-safe skillet. - Roast for 20-25 minutes, stirring halfway through. - Remove from the oven and let cool for a couple of minutes. - Garnish with fresh basil leaves before serving. This One Pan Summer Veggie Medley is colorful and packed with flavor. Enjoy it as a side or a light meal. For the full recipe, check the section above. - Use a large baking sheet for even cooking. - Do not overcrowd the pan. To keep your veggies crisp, choose a big baking sheet. This helps air flow around them. If you pile too many on, they will steam instead of roast. A single layer is key for crispiness. - Stir the veggies halfway through for uniform browning. - Monitor cooking time; aim for a slight char. Halfway through cooking, stir the veggies. This helps them brown evenly. Keep an eye on the time. You want a nice char, but not burnt. The perfect roast shows some color and tender texture. - Add a splash of balsamic vinegar for tang. - Experiment with different herbs and spices. For extra flavor, try adding balsamic vinegar. Just a little can brighten the dish. Don’t hesitate to play with herbs and spices. Rosemary or paprika can change the taste in fun ways. For the full recipe, feel free to check the details above. {{image_2}} You can easily change this dish by adding protein. - Include chickpeas for a hearty vegetarian option. - Add grilled chicken or shrimp for a protein boost. Chickpeas bring a nutty flavor and good fiber to your meal. They soak up the taste of the veggies and spices. Grilled chicken or shrimp add a nice touch and extra texture. You can season the protein just like the veggies for balance. Changing the veggies with the seasons keeps this dish fresh. - Swap in asparagus or green beans in spring. - Use butternut squash or sweet potatoes in the fall. Asparagus adds a crisp bite that goes well with the soft veggies. Green beans provide a nice crunch. In fall, butternut squash and sweet potatoes give a sweet, rich flavor. These swaps can change the dish's taste while keeping it healthy. Adding different spices can give your dish a whole new vibe. - Add curry powder for an Indian twist. - Incorporate Italian seasoning for a Mediterranean flair. Curry powder brings warmth and depth, making it feel cozy. It pairs well with the sweet tomatoes and onions. Italian seasoning adds herbs that brighten the dish. You can try out these flavors and see what you like best! For the full recipe, visit the earlier section. Keep leftovers in an airtight container in the fridge for up to 3 days. This helps maintain the fresh flavors and crispness of the veggies. Just make sure to let them cool before storing. You can freeze the One Pan Summer Veggie Medley for up to a month. Use freezer-safe bags for best results. When you're ready to enjoy, simply thaw them in the fridge overnight before reheating. Reheat in the oven or microwave until heated through. For the oven, set it to 350°F (175°C) and warm for around 10-15 minutes. This way, your veggies will stay tasty and not get mushy. Enjoy your meal! This recipe is already vegan; just ensure all added ingredients are plant-based. You can easily customize it with your favorite veggies. Yes, but adjust cooking time as needed for even roasting. Frozen veggies may need a bit more time. Stir them halfway for best results. Pair it with quinoa, rice, or as a side to your favorite protein. These options will complement the flavors well. For a complete meal, consider adding a protein source like grilled chicken or chickpeas. This blog post covers a simple yet tasty roasted vegetable medley recipe. You learned about fresh ingredients, step-by-step cooking instructions, and useful tips for perfect roasting. Adding your favorite proteins or herbs can make this dish even better. Store leftovers for quick meals or snacks. Enjoy this dish anytime, knowing it's healthy and easy to prepare. Embrace creativity in the kitchen and make it your own!

One Pan Summer Veggie Medley Fresh and Flavorful Dish

Looking for a quick, tasty dish that captures the essence of summer? My One Pan Summer Veggie Medley is your

To make Lemon Herb Roasted Okra, you will need: - 1 pound fresh okra, trimmed - 2 tablespoons olive oil - Zest of 1 lemon - Juice of 1 lemon - 2 cloves garlic, minced - 1 teaspoon dried thyme - 1 teaspoon dried oregano - ½ teaspoon smoked paprika - Salt and pepper to taste - Fresh parsley, chopped (for garnishing) Using fresh okra is key. Look for bright green pods. They should feel firm and smooth. Try to select okra that is less than four inches long. For the best taste, use fresh herbs. Fresh thyme and oregano can add more flavor than dried ones. When using lemon, make sure it is juicy and firm. If you can, zest it right before cooking. This keeps the oils fresh and flavorful. Keep all ingredients stored properly to maintain freshness. If you cannot find fresh okra, frozen okra can work. Just thaw it first. You can swap olive oil for avocado oil or canola oil if needed. For herbs, try using Italian seasoning instead of thyme and oregano. If you want more zest, add a bit of lemon pepper. You can also skip the smoked paprika if you prefer a milder flavor. Garnish with cilantro or chives instead of parsley for a twist. For the full recipe, check out Full Recipe. First, wash the okra well under cold water. Trim the ends to remove any tough parts. Dry the okra with a clean towel. You want to remove as much moisture as possible. This helps it roast better. In a large bowl, combine the okra with olive oil, lemon zest, and lemon juice. Add minced garlic, dried thyme, dried oregano, and smoked paprika. Sprinkle salt and pepper over the mix. Toss everything together. Make sure each piece of okra is coated well. This step is key for great flavor! Preheat your oven to 425°F (220°C). Spread the okra on a baking sheet in a single layer. Avoid crowding the pan; this helps the okra roast evenly. Roast for 15-20 minutes. Halfway through, shake the pan gently to turn the okra. You want it tender and slightly crispy. When done, let it cool for a few minutes. Garnish with fresh parsley before serving. Enjoy your Lemon Herb Roasted Okra! For a detailed guide, check the Full Recipe. To get that nice crunch, always use fresh okra. Fresh okra has a firmer texture. Cut the okra into equal pieces for even cooking. Spread them out on the baking sheet. Avoid overcrowding the pan; this helps them crisp up nicely. Shake the pan halfway through cooking. This action helps the okra cook evenly and get crispy all around. Lemon adds a bright taste to the okra. You can try different herbs like rosemary or basil for a twist. Adding a bit of cayenne pepper gives it a spicy kick. If you want a smoky flavor, increase the smoked paprika. For a creamy touch, serve with yogurt or tahini sauce. These additions can take your dish from good to great! You can serve Lemon Herb Roasted Okra as a side dish or snack. It pairs well with grilled chicken or fish. For a vegetarian meal, serve it over rice or quinoa. Garnish with fresh parsley for a pop of color. This dish is also great for parties. Guests will love the unique taste and crunch! For the full recipe, check out the [Full Recipe]. {{image_2}} You can change the flavors in Lemon Herb Roasted Okra by using different spices. Try adding cumin for a warm, earthy taste. For a kick, use chili powder or cayenne. If you love herbs, mix in basil or rosemary. Each choice brings a new twist, making the dish exciting every time. You can also add other veggies to your okra. Bell peppers, zucchini, or carrots roast well with okra. Cut them into similar sizes for even cooking. This mix not only adds color but also boosts nutrition. You get a tasty medley that is fun to eat. This recipe is naturally vegan and gluten-free. You don’t need to change much to keep it that way. Just use fresh ingredients and the right seasonings. If you want more protein, add chickpeas or lentils. They roast nicely and pair well with okra. This makes for a filling dish that everyone can enjoy. These variations keep your Lemon Herb Roasted Okra fresh and fun. You can explore new tastes while keeping the dish simple. Check out the Full Recipe for more details! You can store leftover Lemon Herb Roasted Okra in the fridge. Place it in an airtight container. It stays fresh for about three days. When you are ready to eat, check for any signs of spoilage. If it looks or smells off, throw it away. Always trust your senses when it comes to food safety. Freezing okra is a great option if you want to keep it longer. First, let the okra cool completely. Then, place it in a freezer-safe bag. Make sure to remove as much air as possible. Label the bag with the date. Frozen okra can last up to six months. When ready to use, thaw it in the fridge overnight. Reheating Lemon Herb Roasted Okra is simple. You can use the oven for the best results. Preheat your oven to 350°F (175°C). Spread the okra on a baking sheet. Heat for about 10 minutes or until warm. You can also use a microwave, but it may lose some crispiness. If using a microwave, cover it loosely with a paper towel. Enjoy your tasty leftovers! Yes, you can use frozen okra. However, fresh okra tastes better. Frozen okra may have more moisture. To use frozen, thaw it first. Pat it dry with a towel. This helps keep the okra crispy when roasted. To add heat, use a pinch of cayenne pepper. You can also add red pepper flakes. Mix them in with your seasonings. If you want more flavor, add hot sauce as a garnish. Adjust the amount based on your spice level. Lemon Herb Roasted Okra goes well with many dishes. It pairs nicely with grilled chicken or fish. You can serve it alongside rice or quinoa. It also works well in tacos or salads. For a fun twist, try it with a spicy dip. For the full recipe, refer to the Lemon Herb Roasted Okra section. This blog covered how to make Lemon Herb Roasted Okra, step by step. We explored the best ingredients, tips for freshness, and ways to substitute them. You learned how to prepare, season, and roast okra to get that perfect crispy texture. I also shared flavor tips, variations, and how to store leftovers properly. Embrace your cooking journey with this tasty dish. Enjoy exploring your own flavor twists!

Lemon Herb Roasted Okra Flavorful and Easy Recipe

Are you ready to turn a humble veggie into a showstopper? This Lemon Herb Roasted Okra recipe is both flavorful

- Fresh peaches: 4 cups, peeled and sliced - Lemon juice: 1 tablespoon - Rolled oats: 1 cup - All-purpose flour: ½ cup - Brown sugar: ½ cup - Cinnamon: ½ teaspoon - Nutmeg: ¼ teaspoon - Salt: ½ teaspoon - Unsalted butter: ⅓ cup, melted - Chopped pecans (optional): ¼ cup For this recipe, ripe peaches are key. They should be sweet and juicy. The lemon juice brightens the flavor and helps the peaches shine. The topping combines oats, flour, and spices for that perfect crunch. This recipe contains common allergens like gluten and dairy. If you need gluten-free options, use gluten-free oats and flour. For vegan substitutions, replace the butter with coconut oil or vegan butter. This makes the dish suitable for many diets. You can switch the sweetener if you like. Coconut sugar or maple syrup works well instead of brown sugar. For nut lovers, try walnuts or almonds as a tasty alternative to pecans. Each change can give the dish a unique twist. For the full recipe, check the [Full Recipe]. 1. Preheat your oven to 350°F (175°C). This step is key for a tasty crisp. 2. Grab a medium bowl and mix the sliced peaches with lemon juice. This keeps the peaches bright and adds flavor. Toss them well and set aside. 1. In a large bowl, combine rolled oats, flour, brown sugar, cinnamon, nutmeg, and salt. Mix these dry ingredients well. 2. Pour in the melted butter and stir until the mix becomes crumbly. This is crucial for that crunchy topping. 3. If you want some extra crunch, fold in chopped pecans. They add a nice texture and flavor. 1. Spread the peaches evenly in a greased 9x9 inch baking dish. Make sure they cover the bottom well. 2. Carefully top the peaches with the crumble mixture. Ensure even coverage for the best bake. 3. Bake for 30-35 minutes. Look for a golden brown top and bubbly peaches. This means it’s ready! You can find the detailed instructions in the Full Recipe. To find ripe peaches, look for a vibrant color. They should feel slightly soft when you press them gently. A sweet aroma is also a good sign. At the store, choose peaches that are free from bruises. Avoid any with dark spots or wrinkles. If they are hard, let them ripen at room temperature for a few days. For a golden crispy topping, use cold butter. Cut it into the dry mix until it resembles crumbs. This helps create that nice crunch. Baking times can vary. If your oven runs hot, check your peach crisp a bit earlier. If it runs cool, add a few extra minutes. Always look for a golden top and bubbling peaches. Serve your peach crisp warm. A scoop of vanilla ice cream adds creaminess. Whipped cream can also enhance the taste. For a fun twist, drizzle caramel sauce on top. This adds sweetness and makes it look fancy. You can serve it in a lovely dish to impress your guests. {{image_2}} You can enhance your peach crisp by adding spices. Try ginger for warmth or vanilla for sweetness. Almond extract also adds a nice touch. For a fun twist, mix in seasonal fruits with your peaches. Berries like blueberries or raspberries work well. You can also add sliced apples for a different flavor. To make your peach crisp healthier, reduce the sugar. Use less brown sugar or try a natural sweetener like honey or maple syrup. You can also swap all-purpose flour with whole-grain flour. This change boosts fiber and nutrients. Using whole-grain oats adds more health benefits too. For a fun serving style, make mini peach crisps. Use ramekins to create individual portions. This way, each person gets their own dessert. You can also bake the crisp in muffin tins. This method helps with portion control and makes for a cute presentation. For the full recipe details, check out the Full Recipe. After you enjoy your peach crisp, store leftovers in the fridge. Use an airtight container to keep it fresh. Peach crisp stays good for up to three days in the fridge. It’s best to cover it well to prevent it from drying out. If you want to save some for later, freezing peach crisp works great. First, let it cool completely. Then, wrap it tightly in plastic wrap or aluminum foil. Place it in a freezer-safe container. Frozen peach crisp lasts about three months. When you’re ready to eat it, thaw it in the fridge overnight. Reheat it in the oven at 350°F until warm, about 20 minutes. You might have leftover crumble topping after making your peach crisp. You can use it for other desserts like muffins or as a topping for yogurt. If you have extra peaches, slice them for smoothies or add them to salads. They can also be baked into other treats. This way, nothing goes to waste, and you can enjoy peach goodness in different meals! You can tell the peach crisp is done by looking for two signs. First, check the color of the top. It should be golden brown. Second, watch for bubbling around the edges. This means the peaches are soft and cooked through. If you see both signs, it’s time to take it out! Yes, you can use canned or frozen peaches in this recipe! If using canned peaches, drain them well to avoid excess liquid. For frozen peaches, thaw and drain them before use. Remember, both options may change the cooking time slightly. Keep an eye on your crisp as it bakes. To reheat peach crisp, you can use an oven or microwave. For the oven, preheat it to 350°F (175°C). Place the crisp in a baking dish and cover it with foil. Heat for about 15 minutes or until warm. If using a microwave, warm a single serving for about 30 seconds. Enjoy it warm! Yes, you can prepare the peach crisp ahead of time. Mix the peach filling and topping separately, then store them in the fridge. When you’re ready, layer the peaches and topping in a dish, then bake. This way, you save time and still enjoy fresh peach crisp! In this blog post, we explored how to make a delicious peach crisp. I shared easy steps, ingredient tips, and variations to try. You can use fresh peaches or substitute with canned, and even make it healthier. Remember, selecting ripe peaches enhances the flavor. You can serve it warm with ice cream or save leftovers by refrigerating or freezing. Enjoy this treat with friends and family. With these tips, your peach crisp will delight anyone who tries it. Happy baking!

Easy Peach Crisp Simple and Delicious Dessert Recipe

Looking for a quick and tasty dessert? This Easy Peach Crisp recipe is your answer! With fresh peaches, a crunchy

- Cauliflower: 1 medium head cut into florets - Olive Oil: 2 tablespoons - Spices: 1 teaspoon smoked paprika, 1 teaspoon cumin, 1 teaspoon garlic powder - Seasonings: Salt and pepper to taste - Tortillas: 8 small corn tortillas - Toppings: 1 avocado (sliced), ½ cup red cabbage (finely shredded), 1 cup fresh cilantro (chopped) - Serving Garnishes: Lime wedges, hot sauce To start, gather all your ingredients. This will make cooking easier and more fun. The cauliflower acts as the star of the show. It is light, healthy, and packed with flavor. I love using olive oil for roasting. It adds a nice richness to the dish. The spices like smoked paprika and cumin give the cauliflower a warm, smoky taste. The garlic powder is just the right touch to enhance the flavor. Don't forget to season with salt and pepper. This step is key to making sure the cauliflower shines. For the tortillas, I prefer small corn tortillas. They are soft and perfect for holding all the tasty filling. For toppings, I like avocado for its creaminess. Red cabbage adds a nice crunch and color. Fresh cilantro brings a burst of bright flavor. Lastly, lime wedges and hot sauce are perfect for serving. They add freshness and spice to your tacos. For the full recipe, you can check the detailed instructions to make these Roasted Cauliflower Tacos at home. - Preheat your oven to 425°F (220°C). Line a baking sheet with parchment paper. - In a large bowl, toss the cauliflower florets with 2 tablespoons of olive oil. Add 1 teaspoon each of smoked paprika, cumin, garlic powder, salt, and pepper. Mix until all the florets are coated well. - Spread the seasoned cauliflower evenly on the baking sheet. Make sure they are in a single layer for even cooking. - Roast the cauliflower for 25-30 minutes. Flip the florets halfway through to ensure they cook evenly. They should be golden brown and tender when done. - While the cauliflower roasts, warm the 8 small corn tortillas. You can do this on a skillet for about 30 seconds on each side or wrap them in foil and warm them in the oven. - Once the cauliflower is ready, take it out of the oven. Place a few pieces of roasted cauliflower on each tortilla. - Top the tacos with sliced avocado, shredded red cabbage, and chopped cilantro. Serve them right away with lime wedges and a drizzle of hot sauce for extra flavor. For the full recipe, check out the complete details above. Enjoy your meal! To get the best roasted cauliflower, aim for 25 to 30 minutes at 425°F (220°C). This heat gives the cauliflower a nice, golden color. Flip the florets halfway through. This tip helps them cook evenly and adds crispiness. The aim is to reach a tender inside and a crunchy outside. Try adding extra spices for more flavor. A pinch of chili powder or some cayenne can kick up the heat. You could also marinate the cauliflower in lime juice for a zesty twist. If you're into hot sauce, mix some sriracha with mayo for a creamy topping. This combo adds a spicy yet smooth touch. To make your tacos pop, use a colorful platter. Lay out the tacos neatly and add lime wedges for a bright touch. Fresh cilantro adds a nice green contrast. You can also sprinkle some extra red cabbage for crunch and color. These small details make your meal look as good as it tastes! {{image_2}} You can mix up your roasted cauliflower tacos in fun ways. Try using other veggies like bell peppers, zucchini, or sweet potatoes. You can roast these veggies along with the cauliflower. For a protein boost, add black beans or grilled chicken. These options keep the tacos filling and tasty. If you're looking for vegan options, this recipe is a winner. All the ingredients are plant-based. For gluten-free tacos, use corn tortillas, like in the recipe. These small changes ensure everyone can enjoy the meal without worry. Toppings can change the whole vibe of your tacos. Add fresh salsa for a bright kick or crumbled feta for creaminess. You can drizzle a chipotle sauce for a smoky touch. Each topping brings a new flavor, making your tacos even more special. Check out the Full Recipe for more ideas on how to create your perfect taco. Store your roasted cauliflower tacos in an airtight container. Keep them in the fridge for up to three days. To maintain taste and texture, separate the cauliflower from the tortillas and toppings. This method prevents sogginess. To reheat, use an oven or skillet. Preheat your oven to 350°F (175°C). Warm the cauliflower for about 10 minutes until heated through. If using a skillet, add a little oil and heat on medium. This method keeps the cauliflower crispy. You can freeze cooked cauliflower for later use. Allow it to cool completely, then place it in a freezer-safe bag. The cauliflower can stay frozen for up to three months. For the tortillas, wrap them in foil before freezing. Thaw everything in the fridge before reheating. Enjoy tasty tacos anytime! For the full recipe, check the main article. Roasting cauliflower takes about 25 to 30 minutes. Preheat your oven to 425°F (220°C). Spread the cauliflower on a baking sheet. Flip it halfway through for even cooking. You want it golden brown and tender. Yes, you can use frozen cauliflower. It saves time, but fresh gives a better texture. Thaw frozen cauliflower first. Pat it dry to remove excess moisture. This helps it roast well. Fresh cauliflower has a firmer bite and more flavor. I suggest serving black beans or a fresh salad. These add protein and greens to your meal. You can also try rice or quinoa for a filling side. Guacamole pairs well, adding creaminess to the tacos. Enjoy your meal with lime wedges for a zesty touch. In this post, we explored how to make tasty roasted cauliflower tacos. We covered essential ingredients, step-by-step instructions, and tips for perfecting your dish. Remember to use spices you love and experiment with toppings for fun. Whether you enjoy them today or save some for later, these tacos are a hit. Try different veggie fillings or sauces to keep your meals exciting. Enjoy making these delicious tacos as part of a healthy and satisfying meal.

Roasted Cauliflower Tacos Flavorful and Light Meal

Looking for a light and flavorful meal? Roasted Cauliflower Tacos deliver on both counts. Packed with tasty spices and fresh

- 2 ripe avocados, halved and pitted - 2 cloves garlic - 2 tablespoons fresh lemon juice - 1/4 cup fresh basil leaves - 1/4 cup extra virgin olive oil - Salt and black pepper to taste - 8 ounces spaghetti or your choice of pasta These fresh ingredients make the dish vibrant and tasty. Ripe avocados give a creamy texture. Fresh lemon juice adds a nice zing. Garlic and basil bring out rich flavors. - 1/4 cup grated Parmesan cheese (optional) - Cherry tomatoes, halved for garnish Adding Parmesan cheese gives a savory touch. Cherry tomatoes add color and sweetness. Feel free to skip these if you prefer a simpler dish. - Large pot for boiling pasta - Food processor for blending sauce - Mixing bowl for combining pasta and sauce - Measuring spoons and cups for accuracy - Tongs or pasta fork for tossing These tools help you prepare the dish with ease. A food processor makes blending quick. A large pot ensures you cook pasta evenly. With these items, you can create this creamy avocado pasta perfectly. For the full recipe, check out the detailed instructions! To start, bring a large pot of salted water to a boil. This adds flavor to your pasta. Add 8 ounces of spaghetti or your pasta choice. Cook according to package instructions until it is al dente, which means firm but not hard. This usually takes about 8 to 10 minutes. When it’s done, reserve 1/2 cup of the pasta water. Drain the pasta and set it aside. Next, we make the creamy avocado sauce. In a food processor, add the following: - 2 ripe avocados, halved and pitted - 2 cloves garlic - 2 tablespoons fresh lemon juice - 1/4 cup fresh basil leaves - 1/4 cup extra virgin olive oil - Salt and black pepper to taste Blend all these ingredients until smooth and creamy. If the sauce is too thick, add a little reserved pasta water. This will help you achieve the perfect consistency. Now, it’s time to mix everything together. In a large mixing bowl, combine your cooked pasta with the avocado sauce. Toss gently until the pasta is well coated. Taste your dish and adjust seasoning with more salt, pepper, or lemon juice if needed. Serve your creamy avocado pasta in bowls. You can add grated Parmesan cheese and halved cherry tomatoes on top for flavor and color. Enjoy this delightful meal! For the full recipe, please refer to the earlier section. To find ripe avocados, look for ones that feel slightly soft when you press them. If they feel too firm, they need more time to ripen. A dark green skin often signals ripeness. You can also check the stem; if it comes off easily and the skin underneath is green, the avocado is ready. Using pasta water helps make your sauce smooth and creamy. When you cook the pasta, save a cup of the water before draining. This water has starch that adds a nice texture. Mix it into the avocado sauce a little bit at a time. It helps the sauce cling to the pasta better. Make your creamy avocado pasta look great on the plate. Serve it in shallow bowls for a nice touch. Drizzle a bit of olive oil on top for shine. Add fresh basil leaves or halved cherry tomatoes for color. A wedge of lemon on the side adds a pop and lets everyone add more flavor. For the full recipe, follow the instructions above! {{image_2}} If you want a vegan version, skip the cheese. You can add nutritional yeast for a cheesy flavor. This keeps it creamy and yummy. You can also use plant-based pasta. It’s a great way to enjoy this dish without animal products. For a gluten-free meal, choose gluten-free pasta. There are many types available, like rice or chickpea pasta. These options taste great and mix well with the creamy sauce. Just cook them as you would regular pasta. Your dish will still be delicious! Add more fun to your pasta by including extras. Try mixing in spinach or arugula for greens. You can also add chopped nuts for crunch. A sprinkle of red pepper flakes brings heat. If you like sweet, add roasted cherry tomatoes. These small changes make the dish exciting. For the full recipe, check the section above. To store leftover creamy avocado pasta, place it in an airtight container. You want to keep it fresh. Add a little lemon juice on top to slow down browning. This will help keep the bright green color. Store it in the fridge and use it within two days for the best taste. When you reheat your creamy avocado pasta, do it slowly. Use a pan over low heat. Add a splash of water or olive oil to keep it creamy. Stir often to avoid burning. You can also microwave it on low power. This method helps keep the sauce smooth and tasty. Freezing creamy avocado pasta isn’t the best option. The texture may change after thawing. If you must freeze it, place the pasta in a freezer bag. Squeeze out the air and seal tightly. You can freeze it for up to a month. When ready to eat, thaw it in the fridge overnight before reheating. Yes, you can make creamy avocado pasta ahead of time. However, the avocado sauce may brown as it sits. To keep it fresh, store the sauce in an airtight container. Add a little lemon juice on top to slow down browning. You can cook the pasta and mix it just before serving. This keeps the dish fresh and tasty. Avocado pasta has many health benefits. Avocados are high in healthy fats, which help your heart. They also contain fiber, which is good for digestion. The garlic in the recipe can boost your immune system. Plus, fresh basil adds vitamins and minerals. This meal is not only delicious but also packed with nutrients. You can easily change the creamy avocado pasta recipe. For a vegan option, skip the Parmesan cheese or use a vegan substitute. If you need gluten-free pasta, choose a gluten-free option like rice or quinoa pasta. You can also add or swap veggies based on your needs. Cherry tomatoes, spinach, or peas add color and flavor. In this blog post, I covered how to make creamy avocado pasta. You learned about fresh ingredients and kitchen tools needed. I shared step-by-step instructions for cooking pasta and blending sauce. Tips helped you choose avocados and make the dish look great. We explored tasty variations and storage tips for leftovers. In closing, this dish is simple and healthy. You'll enjoy experimenting and making it your own. Get cooking and savor every bite!

Creamy Avocado Pasta Delightful and Simple Recipe

Looking for a quick and delicious meal? My Creamy Avocado Pasta Recipe is here to help! This dish uses fresh

- 4 cups fresh spinach, washed and dried - 1 ½ cups strawberries, hulled and sliced - ½ cup crumbled feta cheese - ¼ cup slivered almonds, toasted Fresh ingredients make this salad shine. Spinach adds a crisp base. Strawberries add sweetness and a bright color. Feta cheese gives a creamy, salty kick. Toasted almonds add a nice crunch. Together, these ingredients create a balanced dish. - 3 tablespoons olive oil - 2 tablespoons balsamic vinegar - 1 tablespoon honey - Salt and pepper to taste The dressing ties everything together. Olive oil brings richness. Balsamic vinegar adds a tangy note. Honey brings a hint of sweetness. Salt and pepper enhance all the flavors. This simple dressing is easy to whisk together. - Portion Size: This recipe serves 4. Each serving is a perfect side dish or light meal. - Garnishes for Presentation: Serve in individual bowls. Add a whole strawberry on the side for a pop of color. A sprig of mint can also brighten the dish. For the full recipe, check out the Strawberry Spinach Delight. Enjoy making this fresh and flavorful salad! Mixing the Ingredients Start by taking a small bowl. Add 3 tablespoons of olive oil, 2 tablespoons of balsamic vinegar, and 1 tablespoon of honey. Then, sprinkle in some salt and pepper. Use a whisk to mix everything together. This makes a smooth dressing that brings great flavor to your salad. Consistency Check After mixing, check if the dressing is smooth. It should coat a spoon easily. If it is too thick, add a tiny bit of water. If it’s too thin, mix in more olive oil. Combining the Spinach and Strawberries In a large bowl, add 4 cups of fresh spinach. Make sure it is washed and dried well. Then, add 1 ½ cups of sliced strawberries. You want the strawberries to be fresh and sweet. Gently toss the spinach and strawberries together. Incorporating the Dressing Now, take the dressing you made. Drizzle it over the spinach and strawberries. Use your hands or salad tongs to gently toss the salad. Be careful not to break the strawberries. You want everything to get coated with the dressing. Adding Feta Cheese Sprinkle ½ cup of crumbled feta cheese over the top of your salad. The feta adds a creamy texture and salty flavor. It pairs perfectly with the sweet strawberries. Toasting Almonds and Serving Take ¼ cup of slivered almonds and toast them in a pan over low heat. Stir them often until they're golden brown. This brings out their nutty flavor. Once toasted, sprinkle them over the salad. Serve the salad right away for the best taste and texture. Enjoy your Strawberry Spinach Salad Fresh and Flavorful Delight! For more details, check the Full Recipe. Choosing Quality Ingredients To make your strawberry spinach salad shine, select fresh ingredients. Look for bright, crisp spinach. Choose strawberries that are vibrant red and firm. Soft or dull berries may taste bland. For feta cheese, pick a creamy, crumbly type for better flavor. The almonds should be toasted for a crunchy bite. Fresh ingredients make a huge difference. Timing of Assembly Assemble your salad close to serving time. This keeps the spinach crisp and the strawberries juicy. If you mix the salad too early, it can get soggy. Dress the salad just before you eat. This way, it stays fresh and vibrant. Alternative Dressings While the honey balsamic dressing is great, you can try others. A lemon vinaigrette adds a zesty kick. A creamy yogurt dressing can give a smooth texture. Experimenting keeps each meal exciting and fresh. Adding Herbs or Spices Fresh herbs can boost flavor. Try adding mint or basil for a twist. A pinch of black pepper or red pepper flakes can add warmth. These small changes can make your salad pop with new flavors. Pairing with Proteins To make this salad a full meal, add protein. Grilled chicken or shrimp works well. Tofu is a great option for a vegetarian dish. These additions make the salad heartier and more satisfying. Suggestions for Side Dishes Serve your salad with crusty bread or a warm soup. A light pasta dish can also complement the salad nicely. These sides enhance your meal and create a lovely dining experience. For the full recipe, check out the details above! {{image_2}} Vegan Options To make this salad vegan, skip the feta cheese. You can use avocado instead. Avocado adds creaminess and a rich flavor. You can also try vegan cheese made from nuts. Gluten-Free Alternatives This recipe is naturally gluten-free. Just ensure that your dressing ingredients are gluten-free. Always check labels to be safe. Other Fruits to Use If strawberries are not in season, try using blueberries or peaches. Both fruits add a nice sweetness. You can also experiment with apples or pears for a crunch. Different Nuts and Cheeses Instead of slivered almonds, use walnuts or pecans. They add great texture and flavor. For cheese, goat cheese or a dairy-free option works well too. Holiday Variants For festive occasions, add pomegranate seeds for color. You can also toss in candied pecans for a sweet touch. This makes the salad more special for gatherings. Potluck-Friendly Enhancements At potlucks, add grilled chicken for protein. This makes it more filling and satisfying. You can also serve the salad in small cups for easy sharing. You can find the full recipe for this delightful salad above! To keep your Strawberry Spinach Salad fresh, store it in the fridge. Place it in an airtight container. This helps prevent wilting and sogginess. You should eat the salad within two days for the best flavor. If you have leftovers, don’t mix in the dressing. Store the salad and dressing separately. This keeps the greens crisp. Just dress the salad right before you eat it. For long-term storage, freezing is not ideal for salads. The lettuce and strawberries become mushy when thawed. Instead, consider freezing ingredients like nuts or cheese separately. These items freeze well and can enhance your salad later. If you do freeze any components, rehydrate them slowly. Let them sit in the fridge overnight. This helps them regain some of their original texture. Fresh ingredients have a short shelf life. Spinach should stay bright green and crisp. Strawberries should be red and firm. If they become dull or mushy, they are likely spoiled. Check for any signs of spoilage. If you see mold or a bad smell, it’s best to discard the ingredient. Keeping track of freshness ensures your salad remains a delightful treat. For the full recipe and details on preparing this salad, check the [Full Recipe]. You can prepare this salad a few hours before serving. Start by making the dressing. Store it in a small jar or bowl. You can mix the spinach and strawberries right before serving. Keep them separate to avoid wilting. For best taste, don't add the cheese and nuts until you are ready to serve. This way, your salad stays fresh and crunchy. If you want to switch up the nuts, try walnuts or pecans. Both add a nice crunch. Walnuts have a rich flavor, while pecans are sweeter. You can even mix different nuts for more texture. Just remember that the flavor of the nuts should balance with the sweetness of the strawberries. Yes, this salad is very healthy! It has fresh spinach, which is rich in vitamins. Strawberries provide antioxidants and fiber. Feta adds protein and calcium, while almonds are full of healthy fats. One serving has about 200 calories. This makes it a great option for a light lunch or a side dish. Enjoy the health benefits with every bite! This blog post shared how to make a delicious Strawberry Spinach Salad. We discussed fresh ingredients like spinach, strawberries, feta cheese, and almonds. I detailed how to prepare the dressing, assemble the salad, and made it look great. You learned tips for keeping your salad fresh and tasty. Plus, we explored variations for different diets and occasions. Remember to store it properly for the best taste. Enjoy this vibrant salad that’s both healthy and simple to make. It’s perfect for any meal!

Strawberry Spinach Salad Fresh and Flavorful Delight

If you’re looking for a quick, healthy dish that dazzles, I’ve got you covered. The Strawberry Spinach Salad is a

To make this Avocado Chickpea Salad, you need: - 1 ripe avocado, diced - 1 can (15 oz) chickpeas, rinsed and drained - 1 cup cherry tomatoes, halved - 1 cucumber, diced - 1 red bell pepper, diced - 1/4 red onion, finely chopped - 2 tablespoons fresh cilantro, chopped - 2 tablespoons olive oil - 1 tablespoon apple cider vinegar - 1 tablespoon lemon juice - Salt and pepper to taste - 1/2 teaspoon garlic powder - 1/4 teaspoon cumin (optional) This salad is not just tasty; it’s also healthy. - Avocado provides healthy fats and fiber. - Chickpeas are high in protein and fiber. - Tomatoes add vitamins and are low in calories. - Cucumbers keep you hydrated and fresh. - Bell peppers are rich in vitamins A and C. - Red onion offers antioxidants and adds flavor. Cilantro adds a burst of freshness, while olive oil gives healthy fats. This salad is a great choice for a balanced meal. You can swap ingredients to suit your taste: - Use black beans instead of chickpeas for a different flavor. - Try avocado oil if you want a milder taste. - Substitute zucchini for cucumbers for a crunchy twist. - Add spinach or kale for more greens. - Use lime juice instead of lemon for a zesty kick. These changes keep the dish exciting while still being nutritious. Check the Full Recipe for more details to create this colorful dish! To make this delicious salad, start with fresh ingredients. First, gather your items. You need: - 1 ripe avocado, diced - 1 can (15 oz) chickpeas, rinsed and drained - 1 cup cherry tomatoes, halved - 1 cucumber, diced - 1 red bell pepper, diced - 1/4 red onion, finely chopped - 2 tablespoons fresh cilantro, chopped Next, take a large mixing bowl and add the chickpeas, diced avocado, cherry tomatoes, cucumber, red bell pepper, and red onion. Gently mix these ingredients together. You want to keep the avocado pieces whole, so be careful. When you mix the ingredients, do it lightly. If you mash the avocado, the salad won't look nice. To avoid this, use a wide spatula. This helps keep the avocado chunky. Also, cut all your veggies to a similar size. This makes each bite balanced. For the dressing, grab a small bowl. Add 2 tablespoons of olive oil, 1 tablespoon of apple cider vinegar, and 1 tablespoon of lemon juice. You will also add 1/2 teaspoon of garlic powder, and if you like, 1/4 teaspoon of cumin. Season with salt and pepper to taste. Whisk these ingredients together until smooth. Once it's ready, pour the dressing over the salad mixture. Gently toss everything together. Make sure to coat the ingredients well. Finally, add the chopped cilantro and stir it in. Let the salad sit for about 10 minutes. This allows all the flavors to blend. For the full recipe, refer to the earlier section. When you pick avocados, look for ones that feel slightly soft. This means they are ripe and ready to eat. If they feel hard, they need more time to ripen. You can also check the color. Dark green avocados often taste sweeter. Store unripe avocados in a brown paper bag. This helps them ripen faster. If you have ripe avocados, keep them in the fridge to slow down the ripening process. To boost flavors in your avocado chickpea salad, try adding fresh herbs. Chopped cilantro gives a bright taste. You can also use parsley or basil for a different twist. A splash of lime juice can add a zesty kick. Experiment with spices like cumin or paprika for extra warmth. A pinch of chili flakes will bring heat if you like it spicy. Mixing different flavors makes the salad more exciting! One common mistake is cutting avocados too early. They brown quickly when exposed to air. To avoid this, add them last to the salad. Another mistake is not seasoning enough. Salt and pepper bring out the salad's best flavors. Always taste before serving. Lastly, don't overmix. Gently toss the salad to keep it fresh and intact. These simple tips will help you make a delicious avocado chickpea salad. For the complete recipe, check out the Full Recipe. {{image_2}} You can boost your avocado chickpea salad with more vegan goodies. Try adding diced tofu for protein. Sunflower seeds or pumpkin seeds add crunch. You can also toss in some chopped nuts for extra texture. If you love spice, add jalapeño or crushed red pepper. These changes keep your salad fresh and tasty! You can swap ingredients based on what’s in season. In winter, try roasted sweet potatoes instead of cucumber. In fall, add diced apples or pears for a sweet touch. Fresh herbs like basil or mint can brighten your salad in summer. These swaps give your dish a new twist while keeping it healthy. Mixing flavors makes your salad exciting! Try adding a dash of smoked paprika for depth. A sprinkle of feta cheese can add creaminess and tang. You can also use fresh lemon zest for a citrus kick. These flavor tricks will take your avocado chickpea salad to the next level. Check out the Full Recipe for more ideas! After enjoying your avocado chickpea salad, store any leftovers in an airtight container. This keeps the salad fresh. Place the container in the fridge. The salad will stay good for about two days. The avocado may brown a bit, but the taste will remain. If you want to keep it looking nice, add the dressing just before eating. To make meal prep easy, store salad ingredients separately. Keep the avocado and dressing in different containers. This way, the avocado stays fresh and the salad won’t get soggy. You can prepare everything a day ahead. On the day you plan to eat, mix it all together. This will give you a fresh and tasty meal. Each ingredient in the avocado chickpea salad has its own shelf life. Here’s a quick guide: - Chickpeas: Canned chickpeas last up to three years in the pantry. - Avocado: A ripe avocado lasts about 1-2 days. Check for softness. - Cherry tomatoes: They stay fresh in the fridge for about a week. - Cucumber: A cucumber lasts about a week in the fridge. - Red bell pepper: This can last up to a week too. - Red onion: Whole onions can last for weeks in a cool, dark place. - Fresh cilantro: Store it in the fridge, and it lasts about a week. - Olive oil: Keep it in a cool spot, and it lasts up to a year. - Apple cider vinegar: This lasts indefinitely in your pantry. For the best taste, use fresh ingredients. Check the Full Recipe for more tips on making this salad. To ripen avocados, place them in a brown paper bag. This traps the ethylene gas, which speeds up ripening. Keep them at room temperature for a few days. You can add an apple or banana to the bag for extra gas. Check daily to avoid overripening. Yes, you can make this salad in advance. Just prepare the ingredients and mix them without the dressing. Store the salad in an airtight container in the fridge. Add the dressing just before serving to keep it fresh. You can serve this salad on its own or as a side dish. It pairs well with grilled chicken or fish. You can also serve it in a wrap or on toast. For added crunch, top with pumpkin seeds or nuts. Absolutely! This recipe is great for meal prepping. You can make a big batch and store it in separate containers. It stays fresh for about three days in the fridge. Just remember to add the dressing later. To reduce water in the salad, drain the chickpeas well. You can also pat the diced cucumber with a paper towel. This absorbs excess moisture. Avoid overmixing the salad after adding the dressing. This helps keep it from becoming soggy. For the full recipe, check out Avocado Chickpea Delight. This blog post covered many key points about making a delicious and healthy salad. We looked at important ingredients and their benefits, along with simple steps to mix the perfect dressing. I shared best tips for choosing avocados and avoiding common errors. You can even explore variations for personal tastes. Remember, small changes can create tasty meals. Enjoy your salad journey and feel free to experiment!

Avocado Chickpea Salad Healthy and Flavorful Dish

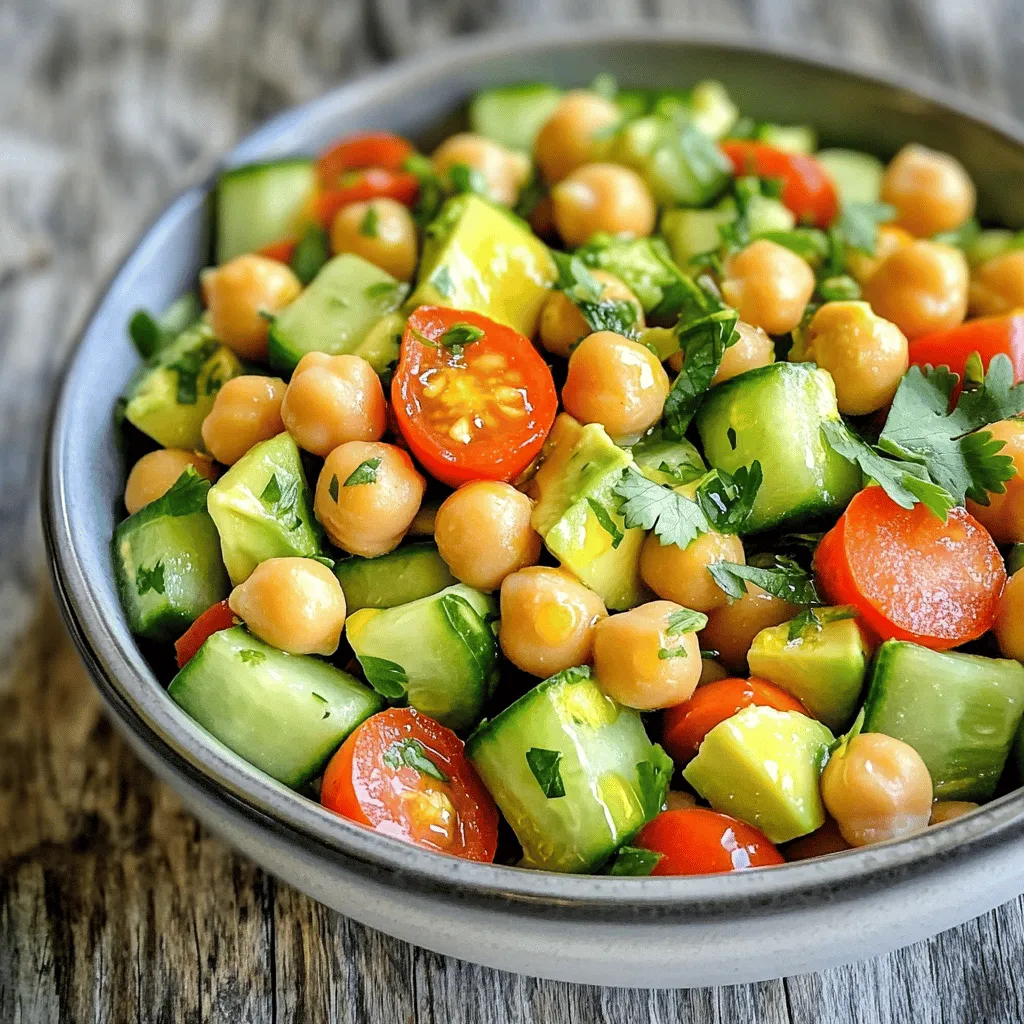
Looking for a tasty and healthy dish? You’ll love this Avocado Chickpea Salad! Packed with fresh flavors and great nutrients,

To make Crispy Parmesan Zucchini Chips, you need a few key items: - 2 medium zucchinis - 1 cup panko breadcrumbs - 1/2 cup grated Parmesan cheese - 1 teaspoon garlic powder - 1 teaspoon Italian seasoning - 1/2 teaspoon paprika - Salt and pepper to taste - 1 large egg - 2 tablespoons olive oil These ingredients come together to create a crunchy and cheesy snack. The combination of panko and Parmesan gives each chip a delightful flavor. You can mix things up with these fun additions: - Chili powder for some heat - Fresh herbs like thyme or oregano - Lemon zest for a bright taste - A sprinkle of cayenne pepper for extra kick Feel free to experiment! These options can give your chips a unique twist. Gather these tools to make the process smooth: - Baking sheet - Parchment paper - Shallow bowls for mixing - Knife and cutting board for slicing - Paper towels for drying the zucchini Having the right tools makes cooking easier. You'll be ready to whip up these chips in no time! For the full recipe, check the details above. Prepping zucchini is key for the best chips. Start with two medium zucchinis. Wash them well to remove dirt. Slice the zucchinis into thin rounds, about 1/8 inch thick. Thin slices help them get crispy. After slicing, pat each piece dry with a paper towel. This step removes extra moisture. Less moisture means more crunch. Now it's time to coat our zucchini chips! In a shallow bowl, mix the panko breadcrumbs, grated Parmesan cheese, garlic powder, Italian seasoning, paprika, salt, and pepper. This mix gives the chips great flavor. In another bowl, beat one large egg and add two tablespoons of olive oil. Dip each zucchini slice into the egg mixture. Let any extra egg drip off. Then, coat it in the breadcrumb mix. Press gently to help it stick. Repeat this for all the slices. To bake the chips, preheat your oven to 425°F (220°C). Line a baking sheet with parchment paper. This makes cleanup easy. Place the breaded zucchini slices in a single layer on the sheet. Bake for 20-25 minutes. Flip them halfway through for even cooking. Look for a golden brown color; that means they are crispy. Once baked, let them cool for a few minutes. This helps them crisp up even more. For the full recipe, refer to the earlier section. To make Crispy Parmesan Zucchini Chips, you must dry the zucchinis well. Zucchini has a lot of water. If you skip this step, your chips will be soggy. After slicing them, pat each round with a paper towel. These chips taste great with dips. Try marinara sauce or ranch dressing for dipping. You can also pair them with guacamole for a fun twist. They are a hit at parties as a snack or appetizer. You can prepare the zucchini chips in advance. Just bake them, then let them cool. Store them in a sealed container at room temperature. If you want to reheat them, place them in the oven at 350°F (175°C) for about 10 minutes. This makes them crispy again, just like fresh! For the full recipe, check the section above. {{image_2}} You can make your crispy zucchini chips even more fun. To add a kick, try a spicy version. Mix in some cayenne pepper or chili powder with the breading. You can also add fresh herbs like rosemary or thyme for an herbed flavor. These small changes can change the taste a lot. If you want a gluten-free option, use almond flour or crushed cornflakes instead of panko. Both work great and still give a nice crunch. You can also use crushed rice crackers for a unique twist. These alternatives keep the flavor while meeting your dietary needs. For a quicker method, use an air fryer. Preheat it to 400°F (200°C). Place the breaded zucchini slices in a single layer in the basket. Cook for about 10-12 minutes, shaking the basket halfway through. This gives you a crispy outside with less oil. It’s a great way to enjoy your chips without the oven. Try these variations to keep your snack fresh and exciting. Check out the Full Recipe for more details. To keep your leftover crispy parmesan zucchini chips fresh, store them in an airtight container. This helps prevent moisture from ruining their crunch. Make sure the chips are completely cool before sealing. If you place hot chips into the container, steam will form inside and make them soggy. When stored properly, these chips last about 2 to 3 days. For the best taste and texture, enjoy them within the first day. After that, they may lose their crunch. To maintain freshness, avoid stacking them. Instead, use layers of parchment paper between chips if you need to stack. You can freeze zucchini chips to enjoy later. Just place them in a single layer on a baking sheet and freeze until solid. Once frozen, transfer them to a freezer bag. They can last up to 2 months in the freezer. When ready to eat, bake them straight from the freezer. This method helps keep them crispy. For the best results, bake them for a few extra minutes. For the full recipe, check out the earlier section! You can dip Crispy Parmesan Zucchini Chips in many tasty sauces. I love marinara sauce for a classic touch. Ranch dressing adds a nice creamy flavor. Hummus is another great option if you want something healthy. You can even try a spicy aioli for a kick. Experiment with your favorite dips! Yes, you can use regular breadcrumbs instead of panko. Regular breadcrumbs will work, but they won’t be as crispy. Panko is lighter and creates a better crunch. If you don’t have panko, try crushing some crackers for a similar texture. Just remember, the goal is to get that perfect crispiness! You can make zucchini chips without baking by using an air fryer. Slice the zucchini thinly and season them as you would for baking. Then, place them in the air fryer basket in a single layer. Cook at 375°F (190°C) for about 10-15 minutes, shaking the basket halfway through. This gives you a quick, crispy snack without using an oven. Zucchini chips are tasty and fun to make. We covered essential ingredients and tools, plus tips for crispiness. You learned how to prepare, coat, and bake them for the best results. We also shared ways to add flavor, different cooking methods, and smart storage tips. In the end, these chips are great snacks. With practice, you can make them your own. Enjoy your cooking and experiment with different styles!

Crispy Parmesan Zucchini Chips Flavorful and Easy Snack

If you’re looking for a tasty snack that’s both crispy and healthy, you’ve come to the right place! These Crispy

- 2 cups all-purpose flour - 1/4 cup granulated sugar - 1 tablespoon baking powder - 1/2 teaspoon salt The base of these scones is the dry mix. I use all-purpose flour for its balance. Granulated sugar adds the right sweetness. Baking powder helps the scones rise. A pinch of salt brings out all the flavors. - 1/2 cup unsalted butter, chilled and cubed - 1/2 cup heavy cream - 1 large egg - 1 teaspoon vanilla extract - 1 tablespoon lemon juice Next, we have the wet ingredients. I use unsalted butter for a rich flavor. Chilling it keeps the scones flaky. Heavy cream adds moisture. The egg binds all the ingredients together. Vanilla extract gives a lovely aroma, while lemon juice brightens the taste. - 1/2 cup fresh blueberries - Zest of 1 lemon The best part is the flavor. Fresh blueberries add bursts of sweetness. They also give a nice color. Lemon zest enhances the lemon flavor. It makes the scones refreshing and lively. To check the complete recipe, refer to the [Full Recipe]. 1. First, preheat your oven to 400°F (200°C). This step is key for baking. 2. Next, line a baking sheet with parchment paper. This helps prevent sticking. 3. In a large bowl, mix together 2 cups of all-purpose flour, 1/4 cup of granulated sugar, 1 tablespoon of baking powder, and 1/2 teaspoon of salt. Whisk until well combined. 4. Now, add 1/2 cup of chilled, cubed unsalted butter to the dry mix. Use a pastry cutter or your fingers. Mix until it looks like coarse crumbs. Keep some butter chunks for a flaky texture. 5. Gently fold in 1/2 cup of fresh blueberries and the zest of 1 lemon. Be careful not to crush the blueberries as you fold. 6. In another bowl, whisk together 1/2 cup of heavy cream, 1 large egg, 1 teaspoon of vanilla extract, and 1 tablespoon of lemon juice until smooth. 7. Pour this wet mixture into the dry ingredients. Stir just until combined. The dough should feel slightly sticky. 8. Turn the dough onto a lightly floured surface. Shape it into a disc about 1-inch thick. Cut the disc into 8 wedges. 9. Place the wedges on the prepared baking sheet. Bake for 15 to 18 minutes. They should turn golden brown. A toothpick inserted should come out clean. 10. Let the scones cool on a wire rack for a few minutes before serving. For the full recipe, check out the details above. Enjoy your fresh and tasty scones! To get the best texture in your lemon blueberry scones, use cold butter. Cold butter helps create a flaky scone. When you mix it into the flour, you want small pieces. This gives the scones a nice rise. Next, do not overmix the dough. Overmixing can lead to tough scones. Mix just until everything comes together. The dough should feel a bit sticky but not wet. For a burst of flavor, add more lemon zest. The zest brightens the scones and gives them a fresh taste. You can also try using other fruits. Raspberries or blackberries work well, too. You might like a sweet glaze on top. Mix powdered sugar with lemon juice. Drizzle it over warm scones for a tasty finish. Dust your scones with powdered sugar before serving. This adds a nice touch and makes them look pretty. Pair your scones with a cup of tea or coffee. They also go great with fresh fruit. Serve them warm for the best flavor. If you want the full recipe, check out the Full Recipe section. {{image_2}} You can easily change the flavor of your lemon blueberry scones. Adding nuts like walnuts or pecans gives a nice crunch. Chop them coarsely and fold them in with the blueberries. This adds a rich, nutty taste. You can also swap out blueberries for other berries. Raspberries and strawberries work great too. Each berry brings its own taste and can change the whole vibe of the scone. Mix and match to find your favorite! If you need gluten-free scones, you can use alternative flours. Almond flour or a gluten-free blend works well. Just make sure to adjust the liquid as needed. These swaps can make the scones just as light and fluffy. For dairy-free options, substitute unsalted butter with coconut oil or dairy-free butter. You can also use non-dairy milk in place of heavy cream. These changes will keep your scones soft and tasty without dairy ingredients. Want to get creative? Try adding other citrus fruits. Oranges or limes can add unique flavors to your scones. Just replace some lemon juice with the juice of your choice. You can also use spices like cinnamon or nutmeg. A pinch of these spices can enhance the flavor profile. It’s a great way to adapt your scones to the season or your mood. For more details about making these delicious scones, check out the Full Recipe. To keep your Lemon Blueberry Scones fresh, store them at room temperature. Place them in an airtight container or wrap them in plastic wrap. Avoid refrigeration, as it can make them dry and tough. Enjoy them within two days for the best taste. For longer storage, freezing is a great option. Wrap each scone tightly in plastic wrap and place them in a freezer bag. They can last up to three months in the freezer. When ready to eat, reheat them in the oven. Set the oven to 350°F (175°C) for about 10-15 minutes. This restores their soft texture and warms the flavors. Lemon Blueberry Scones last about two days at room temperature. If stored properly in the freezer, they can be enjoyed for three months. Always check for any signs of spoilage, like mold or a strange smell. Enjoy these treats fresh for the best experience! For the full recipe, check the main section. To keep scones moist, use cold butter. Cold butter helps create flaky layers. Be sure to mix the dough gently. Overmixing can make them tough. Also, check your ingredient ratios. Use enough heavy cream for moisture. The right balance makes a difference. If the dough feels dry, add a splash more cream. This keeps your scones tender and fluffy. Yes, you can make these scones ahead of time! Prepare the dough and shape it into a disc. Wrap it tightly in plastic wrap. You can freeze it for up to a month. When you're ready, bake them directly from the freezer. Just add a few extra minutes to the baking time. You can also bake them and store in an airtight container for a few days. Serve Lemon Blueberry Scones warm for the best taste. Dust them with powdered sugar for a pretty look. Pair them with a cup of tea or coffee. They also go well with lemon curd or jam. Adding a slice of lemon on the side makes it fancy. For a fun twist, serve them with whipped cream! Your guests will love the flavors. For the complete recipe, please refer to the Full Recipe above. In this post, we covered how to make delicious Lemon Blueberry Scones. I shared key ingredients, step-by-step instructions, and tips for the perfect bake. We also explored fun variations and how to store your scones for later. Remember, using cold butter and not overmixing are key for that flaky texture. Enjoy experimenting with flavors and serving ideas. These scones can brighten any breakfast or snack time! Now, get baking and treat yourself to something special.

Lemon Blueberry Scones Fresh and Flavorful Treat

Looking for a bright, tasty treat? Lemon Blueberry Scones are just what you need. With zesty lemon and juicy blueberries,

- 1 lb carrots, peeled and sliced into thin strips - 2 tablespoons honey - 1 tablespoon olive oil - Salt and pepper to taste - 4 cups mixed greens (arugula, spinach, or lettuce) The main ingredients create the base of your salad. The carrots bring natural sweetness, enhanced by honey. The olive oil adds richness, while the mixed greens provide a fresh crunch. Salt and pepper balance flavors. - 1/4 cup feta cheese, crumbled - 1/4 cup walnuts, toasted and chopped - 2 tablespoons apple cider vinegar - Fresh parsley, chopped for garnish These toppings elevate the dish. Feta cheese adds a creamy, tangy element. Walnuts introduce a nice crunch and nutty flavor. Apple cider vinegar brings zesty brightness, while parsley adds a pop of color and freshness. - Other vegetables (e.g., bell peppers, red onion) - Seeds (e.g., pumpkin or sunflower seeds) - Different cheese types (e.g., goat cheese or parmesan) Feel free to customize your salad. You can add more vegetables for extra flavor and texture. Seeds boost crunch and nutrition. Changing cheese types can create a whole new taste experience. For the full recipe, check out the complete instructions. - Preheat your oven to 400°F (200°C). - In a large bowl, combine sliced carrots, honey, olive oil, salt, and pepper. Toss until the carrots are well coated. - Spread the carrots on a baking sheet. - Roast for 20-25 minutes, stirring halfway through. This helps them cook evenly and get that nice caramel color. - In another bowl, toss mixed greens with apple cider vinegar and a pinch of salt. - Once the carrots cool slightly, add them to the greens. - Top with crumbled feta cheese and toasted walnuts. - Gently toss everything together to combine. Adjust seasoning if needed. - Garnish with chopped fresh parsley before you serve. For the full recipe, check out the detailed instructions. Enjoy this vibrant salad packed with flavor! How do you achieve caramelization without burning? Start by cutting the carrots into even strips. This helps them cook at the same rate. Toss them well with honey and olive oil. Spread them out on the baking sheet. Make sure they are not too crowded. This allows heat to circulate, giving you a nice caramelization. For even cooking, stir the carrots halfway through roasting. Keep an eye on them after 20 minutes. You want them tender and golden, not charred. If they start to brown too fast, lower the oven temperature slightly. How do you wash and dry greens properly? Rinse the greens under cold water. Gently shake off excess water. A salad spinner works great for this. It removes moisture without bruising the leaves. Dry greens help the dressing stick better. To store leftover salad, keep the greens and toppings separate. Place the greens in a sealed container. Use a paper towel to absorb moisture. This keeps them fresh longer. Keep the toppings in a separate container to maintain their crunch. What spices or herbs work well with this salad? Try adding fresh dill or thyme. They pair nicely with honey and carrots. A sprinkle of smoked paprika adds a warm twist. For homemade dressings, consider a simple mix of olive oil and lemon juice. This keeps things light and bright. You can also mix yogurt with herbs for a creamy dressing. For the full recipe, check out the details above! {{image_2}} You can change this salad to fit many styles. For a Mediterranean twist, add olives and fresh herbs like oregano. This mix brings a bright taste that pairs well with the sweet carrots. You can also try an Asian-inspired version. Use toasted sesame oil and top it with sliced scallions. The nutty flavor and crunch add a fun crunch to the salad. The great thing about this salad is its flexibility with the seasons. In the fall, you might add diced apples or tart cranberries. These fruits bring a sweet and tangy taste that works well with the honey-roasted carrots. In summer, consider adding fresh tomatoes. Their juicy texture adds a refreshing bite and brightens the dish. If you need vegan options, skip the feta cheese. Instead, use avocado for creaminess or a sprinkle of nutritional yeast for a cheesy taste. For those with nut allergies, you can swap walnuts for seeds like pumpkin or sunflower. These seeds add crunch without the worry of nuts. Feel free to explore these variations to make your honey roasted carrot salad truly yours! For the full recipe, refer to the Honey Roasted Carrot Salad section. To keep your honey roasted carrot salad fresh, store it in a sealed container. This helps prevent air from making the greens wilt. Place the salad in the fridge and use it within three days for the best taste. If you leave it longer, the greens may get soggy, and the flavors can fade. You can freeze honey roasted carrots, but it is best to freeze them separately. To do this, let the carrots cool completely, then place them in a single layer on a baking sheet. Freeze until solid, then transfer to a freezer bag. When you are ready to enjoy, thaw them in the fridge overnight. Reheat in the oven at 350°F (175°C) for about 10 minutes. Preparing ingredients in advance can save time. You can slice the carrots and store them in the fridge for up to two days. The mixed greens can also be washed and dried ahead of time. For best results, keep the salad components separate until you are ready to serve. This keeps everything fresh and crunchy. Yes, you can use pre-packaged carrots. They save time and cut down prep work. Just make sure they are fresh. If they are already cut, you can skip the slicing step. This makes your cooking easier. However, fresh carrots often taste better. To serve more people, simply double or triple the ingredients. Increase the amount of carrots, honey, and greens. Use a big baking sheet for roasting. Make sure you have enough space for the carrots to roast evenly. You can also mix the salad in a large bowl. This salad pairs well with grilled chicken or fish. You can also serve it with quinoa or couscous. Another great option is crusty bread. All these sides enhance the meal and add variety. Yes, this salad is gluten-free. It contains no gluten ingredients. You can enjoy it on many diets. If you need it vegan, just leave out the feta cheese. This salad is very flexible for different dietary needs. To make the salad vegan, skip the feta cheese. You can add extra nuts or seeds for protein. Try using avocado for creaminess. This keeps the salad tasty and satisfying while being plant-based. For the full recipe, check the details above. This blog post explained how to make a honey roasted carrot salad. You learned the key ingredients, roasting steps, and tips for great flavor. I shared ideas for variations and storage too. Try this easy salad recipe for a fresh taste. It fits many diets and can be changed to suit your likes. Enjoy your cooking and make it your own!

Honey Roasted Carrot Salad Packed with Flavorful Greens

Looking for a salad that bursts with flavor? My Honey Roasted Carrot Salad is a must-try! With sweet, tender carrots

Older posts
Newer posts
← Previous Page1 … Page4 Page5 Page6 … Page67 Next →

dsad

© 2025 Southern Dishes • Built with GeneratePress

Our Policies

  • Copyright Policy
  • Cookie Policy
  • GDPR Policy
  • Privacy Policy
  • Disclaimer
  • Terms Of Use

More Information

  • Home
  • About
  • Contact
  • Appetizers
  • Dessert
  • Dinner
  • Drinks
©2025, Southern Dishes About Back To Top