Skip to content
DisclaimerTerms Of UseGDPR PolicyCookie Policy

Southern Dishes

  • Home
  • Drinks
  • Appetizers
  • Dinner
  • Dessert
  • About
  • Contact
  • Privacy Policy
DisclaimerTerms Of UseGDPR PolicyCookie Policy

Isabella

- 1 lb (450g) boneless skinless chicken breasts, thinly sliced - 2 tablespoons honey - 3 cloves garlic, minced - 1 tablespoon ginger, minced For a great Honey Garlic Chicken Stir Fry, start with the chicken. Use boneless, skinless chicken breasts for a tender bite. Slice them thinly to cook quickly and evenly. Honey adds a sweet touch that balances the savory. Garlic and ginger bring a robust flavor. These three ingredients form a tasty base for your dish. - 1 bell pepper (red or yellow), sliced - 1 cup broccoli florets - 1 cup snap peas Next, choose colorful vegetables. A bell pepper, either red or yellow, adds crunch and sweetness. Broccoli florets provide a nice bite and a bright green color. Snap peas add a crisp texture and fresh flavor. Together, these vegetables make your stir fry vibrant and healthy. - 2 tablespoons soy sauce - 1 tablespoon sesame oil - 1 tablespoon cornstarch mixed with 2 tablespoons water (slurry) For flavor, soy sauce is key. It adds saltiness to the dish. Sesame oil gives a nutty aroma and taste. Finally, cornstarch mixed with water thickens the sauce. This makes it cling to the chicken and veggies. These pantry staples complete your Honey Garlic Chicken Stir Fry. For the full recipe, check out the section above. - Marinate the chicken: In a large bowl, mix the sliced chicken, honey, minced garlic, ginger, soy sauce, and a pinch of salt and pepper. Allow this to marinate for at least 15 minutes. This step helps the chicken absorb all the flavors. - Gather all ingredients: Make sure you have everything ready. You will need bell pepper, broccoli, snap peas, and green onions for garnish. Having everything in place makes cooking smooth and fun. - Stir-fry the chicken: Heat sesame oil in a large skillet or wok over medium-high heat. Once hot, add the marinated chicken. Stir-fry for about 5-7 minutes until cooked through and slightly caramelized. The nice sizzle tells you it’s time to add the veggies. - Add vegetables: Toss in the sliced bell pepper, broccoli florets, and snap peas. Stir-fry for another 3-4 minutes. You want the veggies to stay crisp and colorful. They add great texture and nutrition to the dish. - Thicken the sauce: Pour in the cornstarch slurry while stirring continuously. This will thicken the sauce and coat the chicken and vegetables nicely. The sauce should be shiny and sticky, making each bite delicious. - Garnish with green onions: Turn off the heat and sprinkle chopped green onions over the stir-fry. This adds a fresh flavor and a pop of color. - Serve options: Serve the Honey Garlic Chicken Stir Fry hot over cooked jasmine rice or noodles. This meal is both simple and flavorful, perfect for any night. Check out the Full Recipe for more details! Marinate the chicken for at least 15 minutes. This helps the chicken absorb all the flavors. You can enhance the flavor by adding a splash of lime juice or a sprinkle of red pepper flakes. These small changes make a big difference. For perfect stir-frying, make sure your skillet or wok is hot. This allows the chicken to sear well, locking in juices. Stir the chicken often to ensure even cooking. Avoid overcooking by checking the chicken's color; it should look golden brown. Pair your Honey Garlic Chicken Stir Fry with jasmine rice or your favorite noodles. Both create a great base for the savory sauce. Garnish with chopped green onions or sesame seeds for added crunch and flavor. This simple touch makes each bite even better. For more details, check the Full Recipe. {{image_2}} You can switch chicken for beef or shrimp. Beef gives a rich flavor. Use thin strips for quick cooking. Shrimp cooks fast and adds a nice texture. For a vegetarian option, try tofu or tempeh. Both soak up flavors well. Press tofu before cooking to remove extra water. This helps it crisp up nicely. Feel free to mix in seasonal vegetables. Carrots, zucchini, or mushrooms work great. These add color and flavor to the dish. You can customize your stir fry with your favorites. Just chop them into even pieces. This way, they cook at the same speed. Want some heat? Add red pepper flakes or sriracha. This gives your stir fry a spicy kick. If you need a low-sodium option, use low-sodium soy sauce. It keeps the flavor while cutting salt. You can also mix in fresh lime juice for extra zing. For the full recipe, check out the complete guide. To store leftovers, let the Honey Garlic Chicken Stir Fry cool first. Place it in an airtight container. This keeps the dish fresh for you. I recommend using glass or BPA-free plastic containers. These containers seal tightly and help prevent spills. For reheating, the best method is the stovetop. Heat a pan over medium heat. Add a splash of water or broth to keep it moist. Stir often to ensure even heating. If you use a microwave, cover it to lock in steam. This helps keep the chicken juicy and the veggies crisp. Yes, you can freeze Honey Garlic Chicken Stir Fry! Just store it in freezer-safe containers. Make sure to leave some space for expansion. For thawing, place the container in the fridge overnight. If you’re in a hurry, you can use the microwave. Just be careful not to cook it too long. You can serve Honey Garlic Chicken Stir Fry with several tasty options. Some great choices include: - Cooked jasmine rice - Noodles (like udon or rice noodles) - Quinoa for a healthy twist - A fresh salad on the side These sides help balance the sweet and savory flavors of the stir fry. Yes, you can make this recipe ahead of time. Marinate the chicken and chop veggies a day before. Store them in the fridge. When you’re ready, just stir-fry everything together. This saves time during busy days. Leftovers from Honey Garlic Chicken Stir Fry last about 3 to 4 days in the refrigerator. Be sure to store them in an airtight container. - Tips to maintain freshness: - Cool the dish before placing it in the fridge. - Avoid leaving it out at room temperature for long. - Label the container with the date to track freshness. If you need a soy sauce substitute, try these options: - Tamari for a gluten-free option - Coconut aminos for a soy-free flavor - Liquid aminos for a similar taste These substitutes still give you that rich umami flavor in your dish. For the full recipe, check out the notes above. This Honey Garlic Chicken Stir Fry recipe offers a quick, tasty meal. We started with key ingredients such as chicken, honey, garlic, and fresh veggies. The step-by-step instructions help you stir-fry like a pro. Our tips ensure your dish is full of flavor and not overcooked. You can even mix it up with different proteins or veggies. Make sure to store leftovers properly and enjoy them later. Remember, cooking should be fun, so explore your options and make this dish your own!

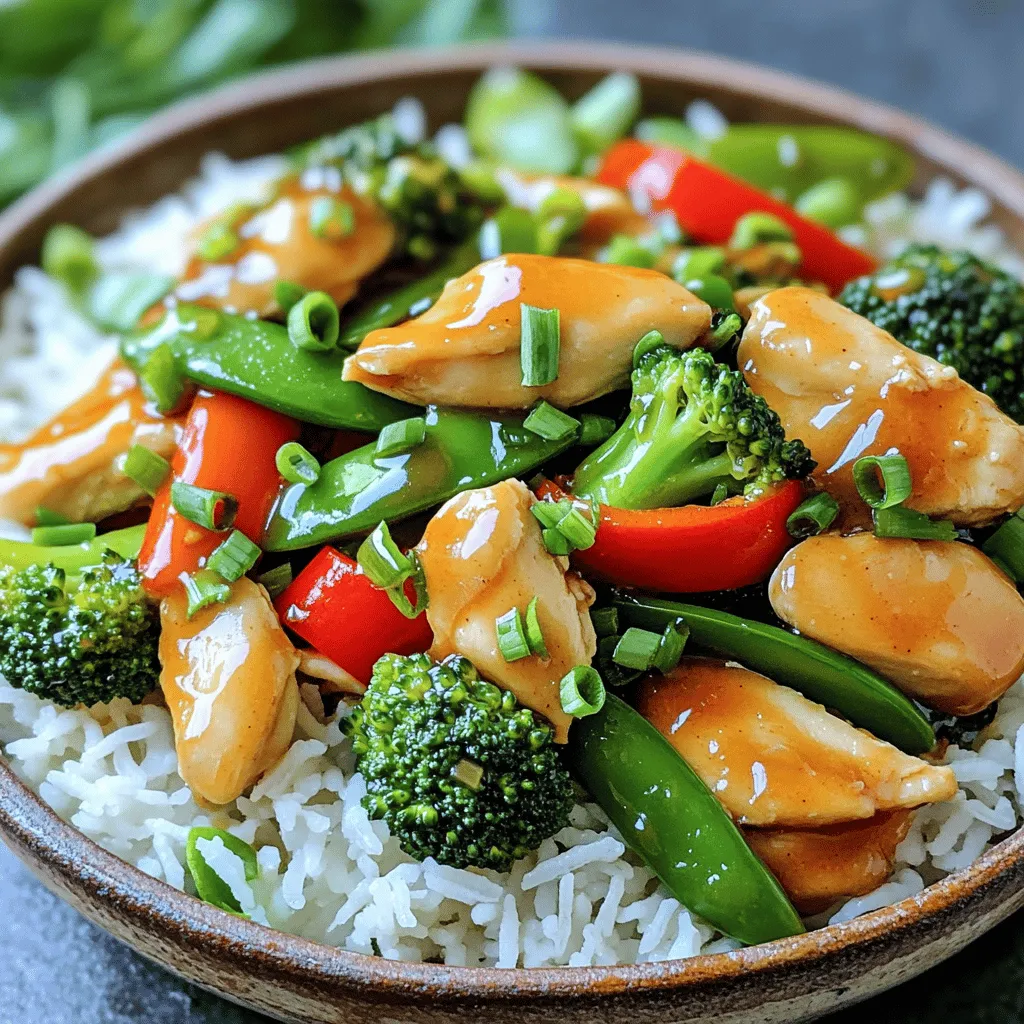
Honey Garlic Chicken Stir Fry Simple and Flavorful Meal

If you love quick and tasty meals, you’ll adore this Honey Garlic Chicken Stir Fry! With just a few simple

- 1 medium head cauliflower - 1/2 cup all-purpose flour - 1 cup buffalo sauce Buffalo cauliflower bites start with a fresh head of cauliflower. It gives the best texture. You cut it into bite-sized florets, which are perfect for dipping. The all-purpose flour helps the batter stick. Most importantly, the buffalo sauce adds that fiery flavor. - 1 teaspoon garlic powder - 1 teaspoon onion powder - 1/2 teaspoon smoked paprika The spices make this snack pop! Garlic powder adds depth, while onion powder gives a nice sweetness. Smoked paprika brings a subtle smokiness, enhancing the buffalo flavor. - Olive oil - Fresh parsley for garnish Olive oil helps with cooking and adds a bit of richness. Fresh parsley makes a colorful garnish and adds a fresh taste. It’s a simple touch, but it transforms the dish! For the complete guide on making these tasty bites, check the Full Recipe. 1. Preheat the oven and line a baking sheet. Start by setting your oven to 450°F (230°C). This high heat helps to make the bites crispy. While the oven heats, take a baking sheet and line it with parchment paper. This will prevent sticking and make cleanup easier. 2. Prepare the batter. In a large bowl, mix 1/2 cup of all-purpose flour with 1/2 cup of water. Add in 1 teaspoon of garlic powder, 1 teaspoon of onion powder, and 1/2 teaspoon of smoked paprika. Season with salt and pepper to taste. Whisk until your batter is smooth and free of lumps. 1. Dip each floret into the batter. Take a cauliflower floret and dip it into the batter. Make sure it gets fully coated. This adds a nice layer that will crisp up during baking. 2. Arrange on the baking sheet. Place the coated florets on the lined baking sheet. Spread them out so they have space. This helps them cook evenly and get crispy. 1. Bake cauliflower until golden. Put your baking sheet in the preheated oven. Bake the cauliflower for about 25 minutes. Halfway through, flip the florets to ensure they cook evenly. Look for a nice golden color and a crisp texture. 2. Toss in buffalo sauce and bake again. While the cauliflower is baking, mix 1 cup of buffalo sauce with 1 tablespoon of olive oil in a bowl. Once the cauliflower is done, toss the hot bites in the buffalo sauce. Make sure they are well-coated. Return them to the baking sheet and bake for another 10-15 minutes. This second bake makes them even crispier. This step-by-step guide will lead you to delicious Buffalo Cauliflower Bites. For the full recipe, check the earlier section. Enjoy! To make sure your buffalo cauliflower bites stay crispy, follow these steps: - Baking at the correct temperature: Set your oven to 450°F (230°C). This high heat helps the batter crisp up nicely. - Flipping halfway through cooking: When you bake the cauliflower, flip them at the halfway mark. This ensures even cooking and browning on all sides. You can easily add more flavor to your buffalo bites: - Ways to spice up the batter: Try adding cayenne pepper or a dash of hot sauce to the batter. It gives an extra kick! - Alternate sauces for tossing: Instead of just buffalo sauce, you can use ranch dressing, BBQ sauce, or a garlic aioli. Each sauce brings a unique taste to the bites. Dips and sides can make your buffalo bites even better: - Best dips to serve with buffalo bites: Classic blue cheese dressing or ranch dip pairs well. They cool down the heat from the buffalo sauce. - Pairing with side dishes: Serve the bites with celery sticks or a fresh salad. They add crunch and freshness to your meal. For a complete guide on making buffalo cauliflower bites, check out the Full Recipe. {{image_2}} You can make buffalo cauliflower bites vegan easily. Instead of using all-purpose flour, try chickpea flour or a gluten-free mix. These substitutes work well and add great taste. For the buffalo sauce, check labels to ensure there are no animal products. You can also make your own sauce using hot sauce and vegan butter. For a gluten-free version, use almond flour or coconut flour. Both options give a nice texture. Make sure the buffalo sauce is gluten-free too. This way, everyone can enjoy the snack without worry. While buffalo sauce is a classic, don’t stop there! You can try sweet chili sauce for a milder bite. Other spicy sauces like sriracha or harissa can add a fun twist. Mix and match to find your favorite flavor. Each sauce brings a unique taste to these bites, making them even more exciting. For the full recipe, check out the details above for step-by-step guidance! After you enjoy your buffalo cauliflower bites, store any leftovers in the fridge. Place them in an airtight container. This helps keep them fresh. You can keep them for up to three days. If you want to reheat them, it is best to use the oven or air fryer for a crispy texture. For long-term storage, you can freeze buffalo cauliflower bites. Let them cool completely first. Arrange them in a single layer on a baking sheet and freeze for about an hour. Once frozen, transfer them to a freezer-safe bag or container. They can stay fresh for up to three months. Just make sure to label the bag with the date. To reheat, preheat your oven to 400°F (204°C). Place the frozen bites on a baking sheet. Bake them for about 15-20 minutes. This method keeps them crispy. You can also use an air fryer for about 10 minutes at 375°F (190°C). Both methods work great! Yes, you can use frozen cauliflower! It is convenient and saves time. However, you need to adjust a few steps. First, thaw the cauliflower completely. Pat it dry with paper towels to remove excess moisture. This helps the batter stick better. Keep in mind that frozen cauliflower may take a little longer to bake. Watch for that golden color. Buffalo cauliflower bites can be as spicy as you like. The spice level comes from the buffalo sauce. If you prefer less heat, try a milder sauce. You can also mix your sauce with a little butter or cream to tone it down. For more heat, use hot sauce with a higher Scoville rating. Taste and adjust until you find your perfect balance. Absolutely! Air frying buffalo cauliflower bites is a great idea. Preheat your air fryer to 400°F (200°C). Prepare the cauliflower as you would for baking. Place the coated florets in a single layer in the air fryer basket. Cook for 12-15 minutes, shaking the basket halfway through. This method gives you crispy bites without extra oil. Buffalo cauliflower bites pair well with many tasty options. Here are some ideas: - Dips: Serve with ranch or blue cheese dressing for cooling flavor. - Veggies: Fresh carrot and celery sticks add a nice crunch. - Appetizers: Pair with chips or pretzels for a fun snack spread. - Salads: A crisp salad balances the heat and adds freshness. For the full recipe, check the link above! This blog post shared a simple recipe for buffalo cauliflower bites. You learned about the key ingredients, step-by-step instructions, and helpful tips. We also explored variations and storage information. These bites are tasty, easy to make, and perfect for sharing. Whether you stick with classic buffalo sauce or try something new, they promise to please. Enjoy experimenting with flavors and serving suggestions. You'll impress your friends and family with your cooking skills!

Buffalo Cauliflower Bites Flavorful and Crispy Snack

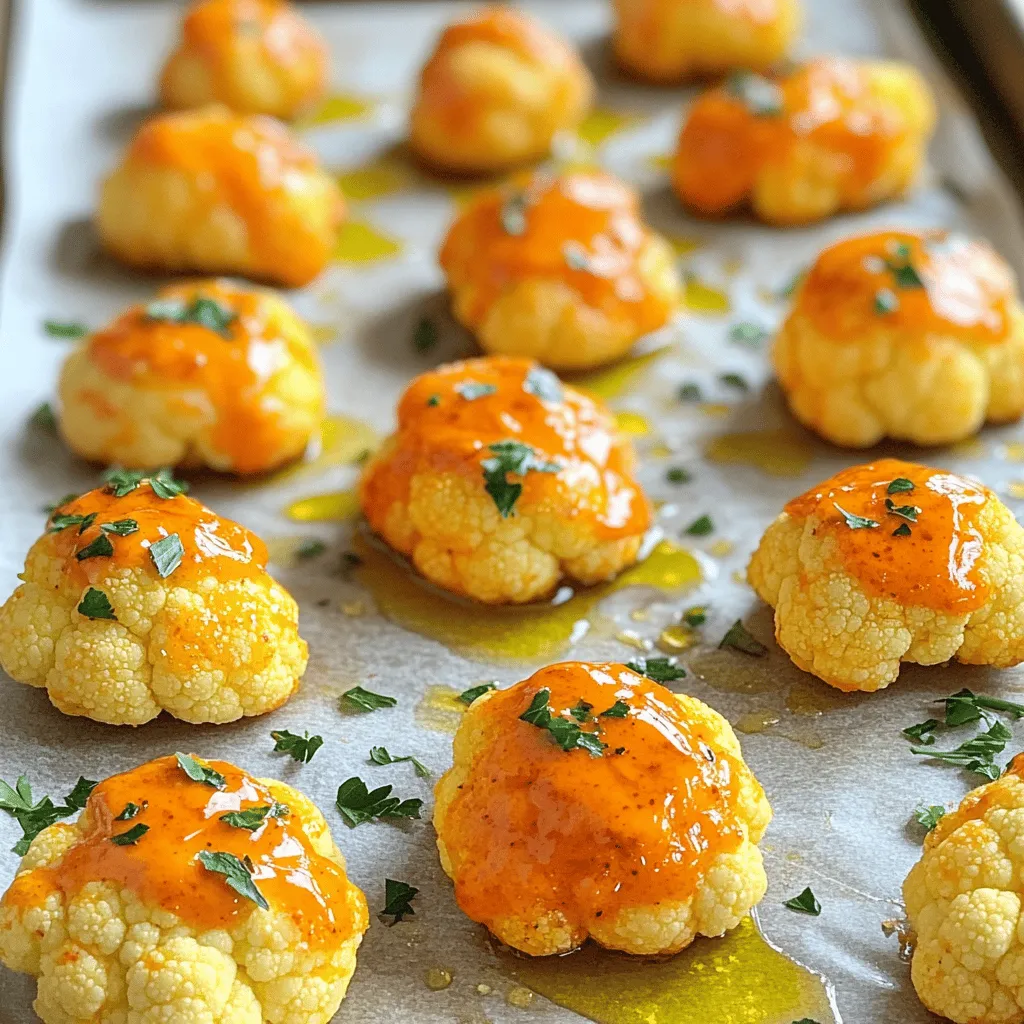
Are you craving a tasty snack that’s both crispy and packed with flavor? Buffalo cauliflower bites offer the perfect solution!

- Zucchini and Preparation - 2 medium zucchinis, thinly sliced. Use a sharp knife for even cuts. This helps each chip cook the same. - Seasonings and Spices - 1 cup grated Parmesan cheese. This cheese adds a rich flavor. - 1 teaspoon garlic powder. This gives a strong garlic taste. - 1 teaspoon onion powder. It adds a nice depth. - 1 teaspoon smoked paprika. This gives a warm, smoky flavor. - Salt and pepper, to taste. Adjust to your liking. - Additional Ingredients (optional) - 2 tablespoons olive oil. This helps the spices stick and adds healthy fat. - Fresh parsley, chopped (for garnish). It adds color and freshness. Gather these ingredients to get started on the crispy garlic Parmesan zucchini chips. For a complete guide, check the Full Recipe. The blend of spices and the cheese makes these chips flavorful and addictive. Preheating the Oven First, preheat your oven to 225°F (110°C). This low temperature helps the zucchini dry out and get crispy. Mixing the Coating In a bowl, mix 1 cup of grated Parmesan cheese, 1 teaspoon of garlic powder, 1 teaspoon of onion powder, and 1 teaspoon of smoked paprika. Add salt and pepper to taste. This blend gives the chips a rich flavor. Coating the Zucchini Slice 2 medium zucchinis thinly. In the same bowl, drizzle 2 tablespoons of olive oil over the zucchini. Toss them gently in the spice mix until they are well-coated. Then, sprinkle the cheese mixture on top, pressing it down lightly to stick. Arranging Zucchini for Baking Line a baking sheet with parchment paper. Place the zucchini slices in a single layer. Make sure none overlap. This helps them bake evenly, leading to perfect crispiness. Timing and Temperature Bake the zucchini in your preheated oven for about 2 hours. Keep an eye on them. Check halfway through and rotate the baking sheet if needed. You want them crispy and golden. Cooling and Garnishing Once the zucchini chips are done, take them out of the oven. Let them cool for a few minutes. For the final touch, garnish with freshly chopped parsley. It adds a nice color and fresh taste. Enjoy your crispy snack! Thickness of Zucchini Slices Slice your zucchini about 1/8 inch thick. This thickness gives you the best crunch. If the slices are too thick, they will not crisp well. You can use a mandoline for even slices. Baking Techniques Baking at a low temperature is key. Set your oven to 225°F (110°C). This slow cook allows moisture to escape. Place zucchini slices in a single layer on the baking sheet. Avoid overlapping to ensure even cooking. Halfway through, check and rotate the baking sheet. This promotes uniform crispiness. Additional Seasonings While garlic and Parmesan shine, you can add more flavor. Try a pinch of cayenne for heat. A sprinkle of Italian herbs adds depth. For a twist, use lemon zest for brightness. Pairing Suggestions Zucchini chips taste great alone. For added fun, serve with dips. Marinara sauce makes a classic pairing. You can also try ranch or a spicy aioli. These sides boost flavor and make your chips even more enjoyable. For the full recipe and more details, check the [Full Recipe]. {{image_2}} You can switch up the cheese in these chips. Cheddar gives a sharp taste. Mozzarella adds a nice stretch and creaminess. If you're vegan, try a plant-based cheese. It melts well and tastes great too. Each cheese option creates a new flavor that enhances your snack. Want to kick it up a notch? Add red pepper flakes for heat. Just a pinch can make a big change. You can also drizzle hot sauce over the zucchini before baking. This adds a tasty zing and makes each bite exciting. Adjust the spice level to match your taste. Baking is the classic way to make these chips. But, air frying is a great option too. Air frying gives you a crispy texture with less oil. It may cut down on calories while still tasting delicious. Try both methods to see which you like best. You might find a new favorite way to enjoy these chips. To keep your Garlic Parmesan Zucchini Chips fresh, choose the right container. I recommend using an airtight container. Glass or plastic containers work great. Make sure the chips are completely cool before storing them. This step helps prevent moisture build-up. For short-term storage, you can keep them in the fridge. If you want to save them for longer, freezing is a good option. Just layer them between parchment paper to avoid sticking. How long do they last? When stored properly in the fridge, they stay fresh for about 3-4 days. If you choose to freeze them, they can last up to 2 months. However, keep in mind that freezing may change the texture. They might not be as crispy after thawing. For the best taste and texture, enjoy them within a few days. For the full recipe, check out the earlier sections of this article. To make Garlic Parmesan Zucchini Chips, follow these key steps: 1. Preheat the oven to 225°F (110°C) and line a baking sheet with parchment paper. 2. Mix seasonings: In a bowl, combine Parmesan cheese, garlic powder, onion powder, smoked paprika, salt, and pepper. 3. Prepare zucchini: Slice the zucchinis thinly. Then, drizzle olive oil over the slices and toss to coat. 4. Coat zucchini: Sprinkle the cheese mixture over the zucchini. Press down to help it stick. 5. Arrange on the baking sheet: Lay the zucchini slices in a single layer, avoiding overlaps. 6. Bake: Cook in the oven for about 2 hours or until crispy and golden. 7. Cool and garnish: Let the chips cool a bit and sprinkle chopped parsley before serving. This process creates a crunchy, cheesy snack, perfect for any occasion. If you want the full recipe, check the earlier section. Yes, you can use other vegetables! Here are some great alternatives: - Eggplant: Slices of eggplant can mimic the crispiness of zucchini. - Sweet Potatoes: Thinly sliced sweet potatoes offer a sweet twist. - Carrots: They add a nice crunch and sweetness to the mix. - Kale: For a healthier option, try kale leaves. They turn crispy and flavorful. Feel free to experiment with different veggies to find your favorite! Zucchini Chips pair well with various dips and snacks. Here are some tasty suggestions: - Marinara Sauce: A classic choice that adds a rich flavor. - Ranch Dressing: Creamy and cool, it complements the chips perfectly. - Hummus: A healthy, savory option that adds great texture. - Guacamole: This adds a creamy, tangy flavor that works well. These dips will take your snacking experience to the next level! This blog post covered how to make delicious zucchini chips. We explored the right ingredients, like zucchini, spices, and optional add-ins. I shared step-by-step instructions to prepare, bake, and garnish your chips. We discussed tips for perfect crispiness and offered fun variations, from cheese choices to spicy twists. Lastly, we looked at storage tips to keep your chips fresh. Now, you can enjoy tasty, homemade zucchini chips anytime. It’s a fun way to eat veggies!

Garlic Parmesan Zucchini Chips Crispy and Flavorful Snack

Craving a delicious, crunchy snack? Let’s make Garlic Parmesan Zucchini Chips! These chips pack bold flavor and are easy to

- 1 cup unsalted butter, melted - 1 cup granulated sugar - 1 cup brown sugar, packed - 4 large eggs - 1 teaspoon vanilla extract - 1 cup all-purpose flour - 1/2 cup unsweetened cocoa powder - 1/4 teaspoon salt - 1 cup chocolate chips - 2 cups mini pretzels - 1/2 cup caramel sauce (for drizzling) - Sea salt for sprinkling To make delicious brownies with a pretzel crown, you need a mix of sweet and salty ingredients. The unsalted butter gives a rich base, while the granulated and brown sugars add sweetness. Eggs are key to binding everything together, and they bring a nice lift to the brownies. Vanilla extract adds a warm flavor that enhances the cocoa powder. The all-purpose flour and cocoa powder bring that classic brownie texture and taste. Don't forget the salt! It balances the sweet and helps the chocolate shine. Chocolate chips add even more chocolatey goodness. The mini pretzels are fun! They give a crunchy crown on top. Drizzling with caramel sauce gives a sweet finish that pairs perfectly with the salty pretzels. A sprinkle of sea salt on top boosts all the flavors. I love how these ingredients come together to create a treat that is both delightful and unique. Each bite offers a mix of flavors and textures that keeps you coming back for more. For the full recipe, check out the steps to make this indulgent dessert. First, you need to preheat your oven to 350°F (175°C). This step warms the oven for even baking. Greasing your baking pan or lining it with parchment paper is key. This makes it easy to lift out the brownies later. If the pan is not greased, the brownies may stick. In a large bowl, add the melted butter, granulated sugar, and brown sugar. Whisk these together until smooth and creamy. This blend gives the brownies their rich flavor and texture. Make sure to mix well so all sugars dissolve. Now, add the eggs one at a time. Mix well after each egg. This helps the batter hold air, making it fluffy. After adding all the eggs, stir in the vanilla extract for added flavor. This step is simple but very important for taste. In a separate bowl, sift together the flour, cocoa powder, and salt. Sifting breaks up clumps and helps mix the dry ingredients well. Gradually add this mix to the wet ingredients. Fold gently to combine. Be cautious not to overmix; this keeps the brownies soft. Once mixed, fold in the chocolate chips. This adds pockets of melted chocolate in each bite. Pour the batter into the prepared pan, spreading it evenly. Make sure to use a spatula for smooth edges. Take your mini pretzels and press them lightly into the top of the brownie batter. This creates a fun pretzel crown. Leave a small space around the edges. This space allows the brownies to rise while baking. Place the pan in the oven and bake for 25-30 minutes. To check for doneness, insert a toothpick into the center. It should come out with moist crumbs, not wet batter. After baking, let the brownies cool in the pan for about 15 minutes. This cooling time helps set the brownies. While they cool, drizzle caramel sauce on top and sprinkle with sea salt. This adds a sweet and salty kick that pairs perfectly with the pretzels. Once cooled, cut into squares and enjoy your delicious brownies crowned with pretzels! For the complete recipe, check the Full Recipe section. To get the best brownie texture, mixing is key. You want to mix just enough. Overmixing can lead to tough brownies. When you combine your dry and wet ingredients, fold them gently. Use a spatula to bring them together. This way, you keep the brownies soft and chewy. Pretzels add a nice crunch and saltiness. You can also try other toppings. Some great options are: - Chopped nuts like walnuts or pecans - Mini marshmallows for a gooey touch - Crushed candy bars for extra sweetness - Sprinkles for a fun look Mix and match these toppings to make your brownies unique. Cutting brownies can be tricky if you want clean edges. Here are some tips: - Use a sharp knife for clean cuts. - Wipe the knife with a damp cloth between cuts. - Let the brownies cool completely before cutting. - For a neater presentation, cut into squares or rectangles. These steps help you serve the brownies beautifully, making them even more tempting! {{image_2}} If you want gluten-free brownies, simple swaps work well. You can use almond flour or coconut flour. Both add a unique taste. Just remember that coconut flour absorbs more moisture. So, you may need to adjust the liquid in your recipe. Want to change things up? Try adding peanut butter, mint, or espresso. Peanut butter gives a creamy, nutty taste. Mint adds a fresh twist, perfect for mint lovers. Espresso boosts the chocolate flavor, making it richer. A little goes a long way, so start with one tablespoon. You can also mix up your toppings. Instead of mini pretzels, try different nuts like walnuts or pecans. You can add candies like M&Ms or chocolate chunks for more color and sweetness. These options make your brownies unique and fun. To keep your brownies fresh, store them in an airtight container. This helps to maintain their texture and flavor. You can place parchment paper between layers. This prevents sticking and keeps them neat. Avoid leaving brownies uncovered, as they can dry out quickly. Freezing brownies is easy and helps you save some for later. First, let them cool completely. Then, cut them into squares. Wrap each square in plastic wrap tightly. Place the wrapped brownies in a freezer-safe bag. Label the bag with the date. To thaw, simply take out a square and leave it at room temperature for a few hours. Brownies can stay fresh at room temperature for about 3 to 4 days. Keep them in a cool, dry place. If you want them to last longer, you can refrigerate them. In the fridge, they can last up to a week. But remember, they may become a bit firmer. If you like them soft, let them sit at room temperature for a bit before enjoying. For the full recipe, check the [Full Recipe]. Yes, you can use dark chocolate. Just melt it first. Use about 4 ounces of dark chocolate for 1/2 cup of cocoa powder. This change adds a rich taste to the brownies. Remember to adjust the sugar since dark chocolate can be sweeter. If you need an egg substitute, use applesauce. Replace each egg with 1/4 cup of unsweetened applesauce. You can also use mashed bananas or yogurt. These options keep your brownies moist and delicious. Check the brownies at 25 minutes. Insert a toothpick into the center. If it comes out with moist crumbs, they are done. If it has wet batter, bake for a few more minutes. Do not overbake, as they will continue to cook while cooling. Yes, you can make these brownies ahead of time. Bake them and let them cool completely. Store them in an airtight container. They stay fresh for up to three days at room temperature. You can also freeze them for longer storage. To reheat brownies, use your oven. Preheat it to 350°F (175°C). Place brownies on a baking sheet. Heat for about 10 minutes. This method keeps them warm and soft. You can also use a microwave for a quick warm-up. Just heat for 10-15 seconds. You learned how to make brownies with a pretzel crown from scratch. We covered the ingredients, step-by-step instructions, and helpful tips for perfect results. Customizing these brownies with different flavors or toppings makes them even more special. Store them right to keep them fresh for longer. Enjoy your baking adventure! Try sharing your creations with friends and family. They will love the sweet and salty combo. Happy baking!

Brownies with Pretzel Crown Delightful and Sweet Treat

Looking for a sweet treat that’s packed with flavor? Try my Brownies with Pretzel Crown! This recipe combines soft, chewy

To create the No Bake Basil Lime Cheesecake Cups, gather these simple ingredients: - 1 cup graham cracker crumbs - 4 tablespoons unsalted butter, melted - 2 cups cream cheese, softened - 1 cup powdered sugar - 1/2 cup fresh lime juice (about 4 limes) - Zest of 2 limes - 1/2 cup heavy whipping cream - 1/4 cup fresh basil leaves, finely chopped - Pinch of salt - Lime slices and basil leaves for garnish Each ingredient plays a key role in the flavor and texture of these cups. The graham cracker crumbs provide a crunchy base. The melted butter helps bind the crumbs together. Cream cheese gives a rich, creamy texture. Powdered sugar adds the perfect sweetness. Fresh lime juice and zest brighten the flavor with a refreshing tang. Basil adds a unique twist and a hint of herbal freshness. Heavy whipping cream makes the filling light and fluffy. The pinch of salt enhances all the flavors. Finally, lime slices and basil leaves serve as a lovely garnish. Using fresh ingredients makes a noticeable difference. Fresh lime juice offers a vibrant taste that bottled juice cannot match. Similarly, fresh basil adds depth that dried herbs lack. For a full recipe, check out the details shared earlier in this article. Enjoy making these delightful cheesecake cups! First, grab a medium bowl. In it, combine 1 cup of graham cracker crumbs with 4 tablespoons of melted unsalted butter. Mix well until the crumbs soak up the butter. This helps them stick together. Next, take your serving cups. Divide the crumb mixture evenly among them. Press the mixture down firmly to form a solid crust at the bottom of each cup. This crust gives a nice crunch to your cheesecake. Now, move to a large mixing bowl. Add 2 cups of softened cream cheese. Use an electric mixer to beat it until smooth and creamy. Gradually add in 1 cup of powdered sugar. Mix well until it blends in fully. Then, add 1/2 cup of fresh lime juice, the zest of 2 limes, 1/4 cup of finely chopped basil leaves, and a pinch of salt. Stir until everything combines into a creamy filling. In a separate bowl, pour in 1/2 cup of heavy whipping cream. Beat it until soft peaks form. This step adds lightness to your cheesecake. Now, gently fold the whipped cream into the cream cheese mixture. Be careful not to deflate the whipped cream. You want a light and airy texture for your cheesecake. Spoon the cheesecake filling over the crust in each cup. Smooth the tops with a spatula for a nice finish. Cover the cups with plastic wrap. Place them in the refrigerator for at least 4 hours, or until set. The chilling time helps the flavors meld together. For the full recipe, check out the complete guide above. Enjoy your delightful treat! To make your no bake basil lime cheesecake cups shine, focus on how you serve them. Use a rustic wooden board or a bright tray for a fun look. Place small mint or basil leaves around the cups. Add lime slices for bright color. This will make your dessert pop! If you don’t have graham crackers, use crushed cookies or oats. You can also try crushed almonds for a gluten-free base. For dairy-free options, look for vegan cream cheese and coconut whipped cream. These swaps allow everyone to enjoy this treat. Sometimes, cheesecake can be tricky. If your mixture seems too runny, try adding more cream cheese. This thickens it up nicely. If it is too sweet, add a bit of lime juice. This helps balance the flavors. Pay attention to your mixing; overmixing can cause the cream to lose its lightness. {{image_2}} You can change the flavor of your cheesecake cups. Try adding herbs like mint or rosemary. Mint brings a fresh taste, while rosemary adds a warm, earthy note. Both herbs pair well with the lime. You can also mix in berries or other fruits. Fresh strawberries, blueberries, or raspberries add sweetness and color. Just mash them slightly before folding them into the cheesecake mix. This will give a lovely fruity layer. Serving style can elevate your dessert. Use different cups or jars for a unique look. Small glass jars or colorful plastic cups work well. These options can make your dish fun and appealing. Layering techniques can also add style. Alternate layers of crust and cheesecake for a visual treat. You can top the cups with whipped cream or extra fruit to make them even more tempting. If you have dietary needs, you can still enjoy these cheesecake cups. For gluten-free options, use gluten-free graham crackers. This small change keeps the base tasty and safe for everyone. For vegan adaptations, replace cream cheese with plant-based cream cheese. Use coconut cream instead of heavy cream. These swaps keep the flavor and texture while being plant-friendly. You can enjoy these cups without any dairy. For the full recipe, check the link above. To keep your No Bake Basil Lime Cheesecake Cups fresh, follow these tips: - Use airtight containers to keep out air. - Place parchment paper between layers if stacking. - Always cover the cups with plastic wrap before sealing. These steps help maintain the taste and texture of your cheesecake cups. In the refrigerator, these cheesecake cups last for about 3 to 5 days. They are best enjoyed fresh, but you can still savor them later. If you want to freeze the cups, they can stay good for up to a month. Just remember to wrap them well in plastic wrap and then foil. When you’re ready to eat, let them thaw in the fridge overnight. This method keeps the flavor intact. You can make these cheesecake cups up to two days in advance. Prepare the crust and filling as directed. After assembling, cover them with plastic wrap. Store them in the fridge until you are ready to serve. This makes for a stress-free dessert on special occasions. You can use bottled lime juice, but fresh is best. Fresh limes offer a bright, zingy flavor that bottled juice lacks. If you must use bottled juice, choose a brand with no added sugar or preservatives. This will help keep the taste as close to fresh as possible. If your cheesecake mixture is runny, you have options. First, try adding more cream cheese to thicken it. Another option is to fold in more whipped cream. This will help create a firmer texture. If it’s still too thin, chill it longer in the fridge before serving. This cheesecake cup recipe blends fresh lime and basil for a refreshing treat. I walked you through each step, from making the crust to the creamy filling and assembly. You also learned about presentation tips, ingredient swaps, and different flavor options. Use these insights to make your own delicious cups. Don’t forget to store extras properly for later enjoyment. With these tips, you’ll impress friends and family with your skills. Happy baking!

No Bake Basil Lime Cheesecake Cups Delightful Treat

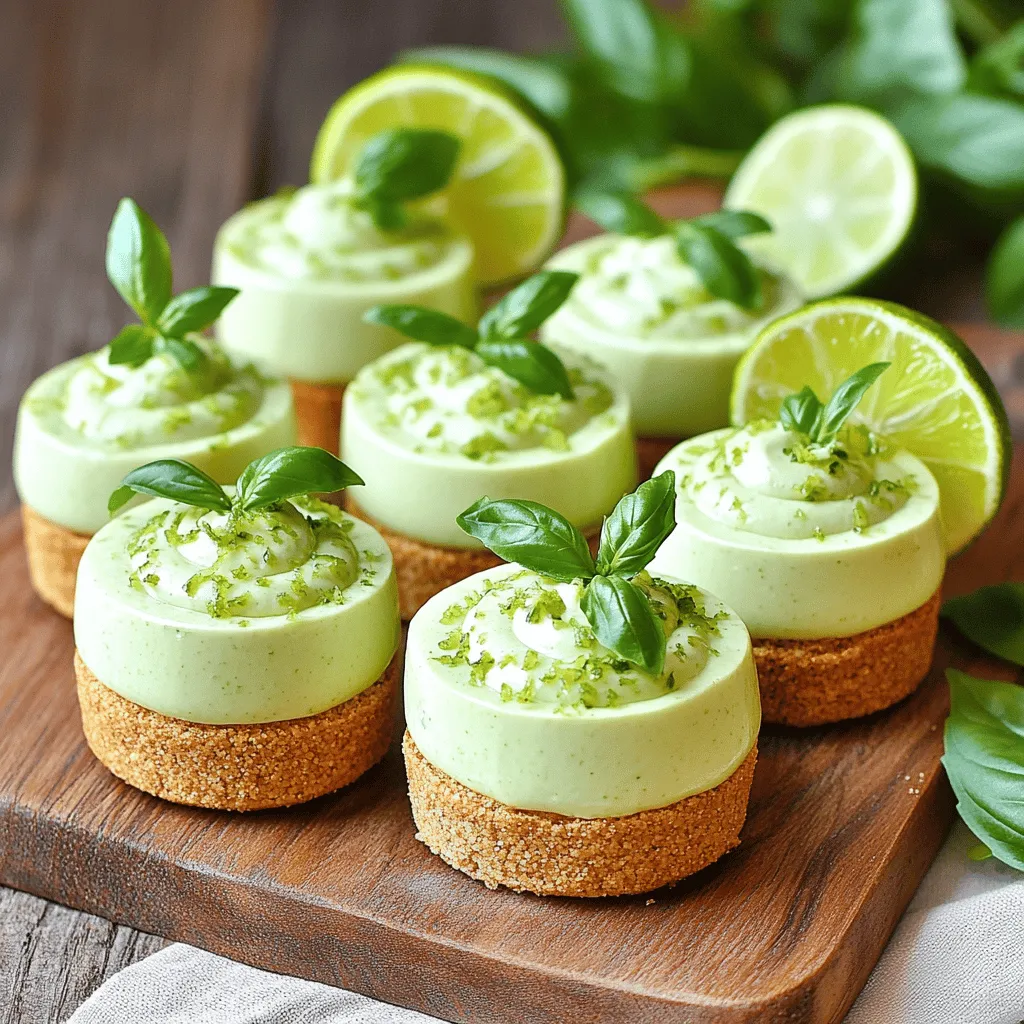
Are you ready to treat yourself to something unique and delicious? These No Bake Basil Lime Cheesecake Cups are here

For this fun snack, you need simple ingredients. Here’s what to gather: - 1/2 cup popcorn kernels - 1/4 cup pickle juice - 2 tablespoons granulated sugar - 1 teaspoon smoked paprika - 1/2 teaspoon cayenne pepper (adjust to taste) - 1/4 cup melted butter - Salt to taste - 1/4 cup finely chopped dill pickles (for garnish) These ingredients create the bold flavor in Sweet Heat Pickle Popcorn. The combination of sugar and spices makes it sweet and spicy. You can easily swap some ingredients to fit your taste. If you want a sweeter taste, use more sugar. For less heat, cut the cayenne pepper. You can also try different pickles. Sweet pickles can give a different flavor. For a vegan option, substitute butter with oil or a dairy-free butter. Each serving of Sweet Heat Pickle Popcorn is about 1.5 cups. Here’s what you get in one serving: - Calories: 200 - Total Fat: 10g - Saturated Fat: 5g - Sodium: 300mg - Carbohydrates: 27g - Sugars: 5g - Protein: 3g This snack is tasty but should be eaten in moderation. You can enjoy the bright flavors without too much guilt! For the full recipe, check out the instructions above. To start, you need to pop the corn. Take a large pot and heat 2 tablespoons of melted butter over medium heat. Next, add 1/2 cup of popcorn kernels. Cover the pot with a lid, but don’t forget to shake it a bit. This helps the kernels pop evenly. Listen for the popping sounds; when they slow to 2-3 seconds apart, it’s time to remove the pot from heat. Now, let’s make the pickle-flavored butter. In a bowl, combine the remaining melted butter, 1/4 cup of pickle juice, 2 tablespoons of granulated sugar, 1 teaspoon of smoked paprika, and 1/2 teaspoon of cayenne pepper. If you like it spicy, feel free to add more cayenne. Add a pinch of salt, then whisk it all together until it’s well mixed. Once the corn is popped, transfer it to a large mixing bowl. Drizzle your pickle-flavored butter mixture over the popcorn. Toss the popcorn gently to coat it evenly with the butter. It should look shiny and delicious. Finally, gently fold in 1/4 cup of finely chopped dill pickles. This adds extra flavor and texture. You can now serve your Sweet Heat Pickle Popcorn! Enjoy the bold flavors as a fun snack. To get the best popcorn texture, start with fresh kernels. Old kernels may not pop well. Use a heavy pot to heat the oil evenly. This helps the popcorn pop fully. Shake the pot gently as it heats. This keeps the kernels moving and prevents burning. When popping slows down, remove the pot from heat. Let it sit for a minute to let any last pops finish. You can tweak the sweetness and heat to your liking. If you want it sweeter, add more sugar. Start with small amounts and taste as you go. For more heat, add extra cayenne pepper. Just remember, a little goes a long way. You can also try mixing in other spices like garlic powder or onion powder for a twist. Serving this popcorn is easy and fun. Transfer it to a big bowl for sharing. For a nice touch, sprinkle extra dill pickles on top. This makes it look pretty and adds crunch. Pair it with a cold drink to balance the heat. You can also serve it in small bags for a party. Enjoy it while watching your favorite movie or at a fun gathering. Check out the Full Recipe for more details! {{image_2}} You can play with seasonings to find your perfect taste. Try adding garlic powder for a savory kick. Cheese powder gives a rich, creamy flavor. For a zesty twist, squeeze a bit of lime juice over the popcorn. You can also use ranch seasoning for a tangy surprise. Mix and match to create your unique blend. Want to enhance your Sweet Heat Pickle Popcorn? Consider adding nuts or seeds, like sunflower seeds or chopped pecans. They add crunch and flavor. You can also try mixing in some crispy bacon bits for a savory touch. Diced jalapeños bring extra heat and flavor. These additions make your snack even more exciting. You can make this recipe vegan by swapping butter for coconut oil. Use a plant-based butter for a similar taste. For gluten-free options, check your seasonings and ensure they are gluten-free. Most spices are safe, but it's always best to double-check. Enjoy your Sweet Heat Pickle Popcorn without worries about dietary restrictions. For the full recipe, check the section above. To keep your Sweet Heat Pickle Popcorn tasty, store it right. Place leftover popcorn in an airtight container. This keeps out air and moisture. If you don’t have one, use a zip-top bag. Squeeze out the air before sealing it. Store it in a cool, dry place. Avoid heat and sunlight to keep it fresh longer. To maintain that perfect crunch, avoid adding more toppings. If you do, the popcorn can get soggy. You can also layer it with paper towels in your container. The towels will absorb any extra moisture. Remember, popcorn is best eaten within a few days. For the best taste, enjoy it fresh! If you need to reheat your popcorn, use the oven. Preheat it to 250°F (120°C). Spread the popcorn on a baking sheet. Heat for about 5-7 minutes. This will bring back some crunch. You can also microwave it. Use a microwave-safe bowl and cover it with a lid. Heat in short bursts, checking often. This will help avoid a chewy snack. For the full recipe, check out the details above. Enjoy your unique snack! Sweet Heat Pickle Popcorn is a fun snack that mixes popcorn with bold flavors. It combines the crunch of popcorn with the tangy taste of pickles. The sweet and spicy blend comes from pickle juice, sugar, and spices. This unique treat is perfect for movie nights or parties. You get a mix of sweet and heat in every bite! You can make Sweet Heat Pickle Popcorn ahead, but it’s best fresh. Popcorn can lose its crunch over time. If you must make it early, store it in an airtight container. This helps keep it from getting stale. Just remember, it tastes best when served right after making it! You can find ingredients for Sweet Heat Pickle Popcorn at most grocery stores. Look for popcorn kernels in the snack aisle. Pickle juice is often near pickles or condiments. Sugar, smoked paprika, and cayenne pepper are in the spice section. Dill pickles are easy to find in the canned vegetable aisle. All these ingredients let you create this tasty snack from the [Full Recipe]. Sweet Heat Pickle Popcorn blends unique flavors to create a tasty snack. We discussed key ingredients, substitutions, and nutritional info to help you choose wisely. Step-by-step, I showed you how to pop corn, make pickle-flavored butter, and combine them. I shared tips for texture and serving, plus fun variations to try. Store your leftovers right to keep them fresh. This fun snack is easy to make and enjoy. Try it out and discover your new favorite treat!

Sweet Heat Pickle Popcorn Bold Flavor for Snack Time

Are you ready to spice up your snack game? Sweet Heat Pickle Popcorn is a bold, tasty twist on a

Creating a Peach Burrata Prosciutto Flatbread is simple and fun. Here’s what you need to make it: - Flatbread or pita bread - Ripe peaches - Burrata cheese - Prosciutto - Honey - Balsamic reduction - Fresh basil - Olive oil - Salt and pepper Each ingredient plays a key role. The flatbread serves as the base, crisp and warm. Juicy peaches add sweetness and color. Burrata cheese brings creaminess and richness. Prosciutto adds a salty bite that balances the flavors. Honey provides a touch of sweetness, while the balsamic reduction adds tang. Fresh basil gives a pop of freshness, and olive oil enhances the taste. Salt and pepper are essential for seasoning. Grab these ingredients, and you are ready to create a dish that impresses! For the full recipe, check the details provided. 1. Preheat the oven. Set it to 400°F (200°C). This step warms the oven for baking. 2. Prepare the flatbread. Place the flatbread on a baking sheet lined with parchment paper. This keeps it from sticking. 3. Arrange the toppings. Drizzle olive oil over the flatbread. Spread the sliced peaches evenly. Tear the burrata cheese and scatter it on top. Lay the prosciutto slices across the flatbread. Finish with salt and pepper to taste. 1. Bake the flatbread. Put the flatbread in the preheated oven. Bake for about 10-12 minutes. Look for crispy edges and slightly melted cheese. 2. Add garnishes. Once out of the oven, drizzle honey and balsamic reduction on top. This adds sweetness and tang. 1. Cut and serve. Use a sharp knife to slice the flatbread. Serve it warm for the best taste. Enjoy this Peach Burrata Prosciutto Flatbread with friends or family. For the complete recipe, check the Full Recipe section. Choosing the right flatbread is key. I prefer using large flatbreads for a sturdy base. You can also use pita bread if you want smaller pieces. Both options work well but ensure they are fresh and soft. When it comes to peaches, slicing them perfectly makes a big difference. Use a sharp knife and cut thin slices. This helps them lay nicely on the flatbread. Aim for even thickness so they cook well in the oven. Using flavored olive oil adds depth to your flatbread. Look for oils infused with herbs or citrus. Drizzle it over the flatbread before adding toppings. This little step makes a big impact on flavor. Choosing high-quality prosciutto is also essential. The best prosciutto has a rich taste and melts in your mouth. Look for thinly sliced options at your local deli. This will elevate your dish. Arranging the food nicely makes the dish more appealing. Start by laying the peaches in a fan shape. Then, place the burrata pieces evenly. Add prosciutto last so it stands out. Aim for a mix of colors for a vibrant look. Garnishing effectively adds the finishing touch. Use fresh basil leaves to bring freshness. Drizzle honey and balsamic reduction in a zigzag pattern. This not only tastes good but also looks beautiful on the table. {{image_2}} You can change up the fruits easily. Try using ripe figs or sweet pears instead of peaches. Both add a nice touch to your flatbread. You can also use apples for a crunchy bite. For cheese, if you want a twist, substitute burrata with goat cheese or creamy ricotta. Both cheeses will give a different flavor and texture. They can still melt nicely, adding creaminess to every bite. If you need gluten-free options, use gluten-free flatbreads or corn tortillas. They will hold the toppings well. Ensure that the other ingredients are also gluten-free. For vegan alternatives, skip the prosciutto and burrata. Use plant-based cheese or hummus instead. You can also add avocado slices for creaminess and flavor. This keeps your meal fresh and plant-based. Want more crunch? Add nuts like walnuts or pistachios. They add texture and flavor that pairs well with the fruit. Seeds like sunflower or pumpkin seeds also work great. You can switch up the meats too. Try adding smoked salmon for a unique taste. Or, use turkey or chicken for a lighter option. These small changes can make your flatbread feel new each time. For the full recipe, check out the details provided earlier. Enjoy making your Peach Burrata Prosciutto Flatbread just the way you like it! To store leftover Peach Burrata Prosciutto Flatbread, wrap it tightly in plastic wrap. You can also place it in an airtight container. Make sure it cools to room temperature first. This will help keep the flatbread soft. Store it in the fridge for up to three days. If you want to keep it longer, consider freezing it. When you're ready to enjoy leftovers, reheating is key. The best method is to use an oven. Preheat the oven to 350°F (175°C). Place the flatbread on a baking sheet. Heat for about 10 minutes. This will make the flatbread warm and crispy again. You can also use a skillet over medium heat. Just heat it for a few minutes on each side. Can you freeze the flatbread? Yes, you can! However, it’s best to freeze it before you add toppings. Wrap the plain flatbread in plastic wrap and then in foil. Store it in the freezer for up to three months. When you’re ready to eat, thaw it in the fridge overnight. Then, add your toppings and bake as per the Full Recipe. Enjoy your tasty flatbread at any time! Yes, you can make this flatbread ahead of time. Prepare the flatbread with toppings, but do not bake it. Cover it tightly with plastic wrap and store it in the fridge. When you're ready to enjoy it, just pop it in the oven. This keeps the flatbread fresh and ready for baking. You can pair this flatbread with many things. A light salad with arugula and lemon vinaigrette works well. A glass of crisp white wine can also enhance the flavors. For a sweet touch, serve it with a fresh fruit salad. These pairings balance the creamy burrata and salty prosciutto. The flatbread is done when the edges are crispy and golden. The burrata should be slightly melting but still hold its shape. Check for a light browning on the cheese and the flatbread's base. This usually takes about 10-12 minutes at 400°F (200°C). The best prosciutto is one that is high in quality. Look for prosciutto di Parma or prosciutto di San Daniele. These types have a sweet and rich flavor, which pairs beautifully with the peaches and burrata. Always choose thinly sliced prosciutto for the best texture and taste. For the full recipe, check out the recipe section. This Peach Burrata Prosciutto Flatbread is a tasty treat. You will need a few simple ingredients. Here’s what you will need: - 1 large flatbread or pita bread - 2 ripe peaches, thinly sliced - 1 cup burrata cheese, torn into pieces - 4 slices prosciutto - 2 tablespoons honey - 1 tablespoon balsamic reduction - Fresh basil leaves for garnish - Olive oil for drizzling - Salt and pepper to taste To make it, first preheat your oven to 400°F (200°C). Then, place the flatbread on a baking sheet. Drizzle some olive oil on top to coat it well. Next, put the sliced peaches on the flatbread. Leave some space between each slice. Now, tear the burrata cheese and spread it over the peaches. Lay the prosciutto on top in a nice pattern. Sprinkle a pinch of salt and pepper to add flavor. Bake this flatbread for 10 to 12 minutes. The edges should be crispy and the cheese slightly melted. After baking, drizzle honey and balsamic reduction over it. Finally, add fresh basil leaves for a pop of color and taste. Cut the flatbread into slices and serve warm. This Peach Burrata Prosciutto Flatbread is sure to impress! For the full recipe, check out the detailed instructions above. This blog post guides you through making Peach Burrata Prosciutto Flatbread. We covered the key ingredients, step-by-step instructions, and helpful tips for a delightful dish. You learned about flavor enhancements and presentation tricks to impress your guests. Don't forget the variations and storage tips. This flatbread is fun to make and customize. I hope you feel ready to create a tasty masterpiece. Enjoy your cooking journey!

Peach Burrata Prosciutto Flatbread Irresistible Delight

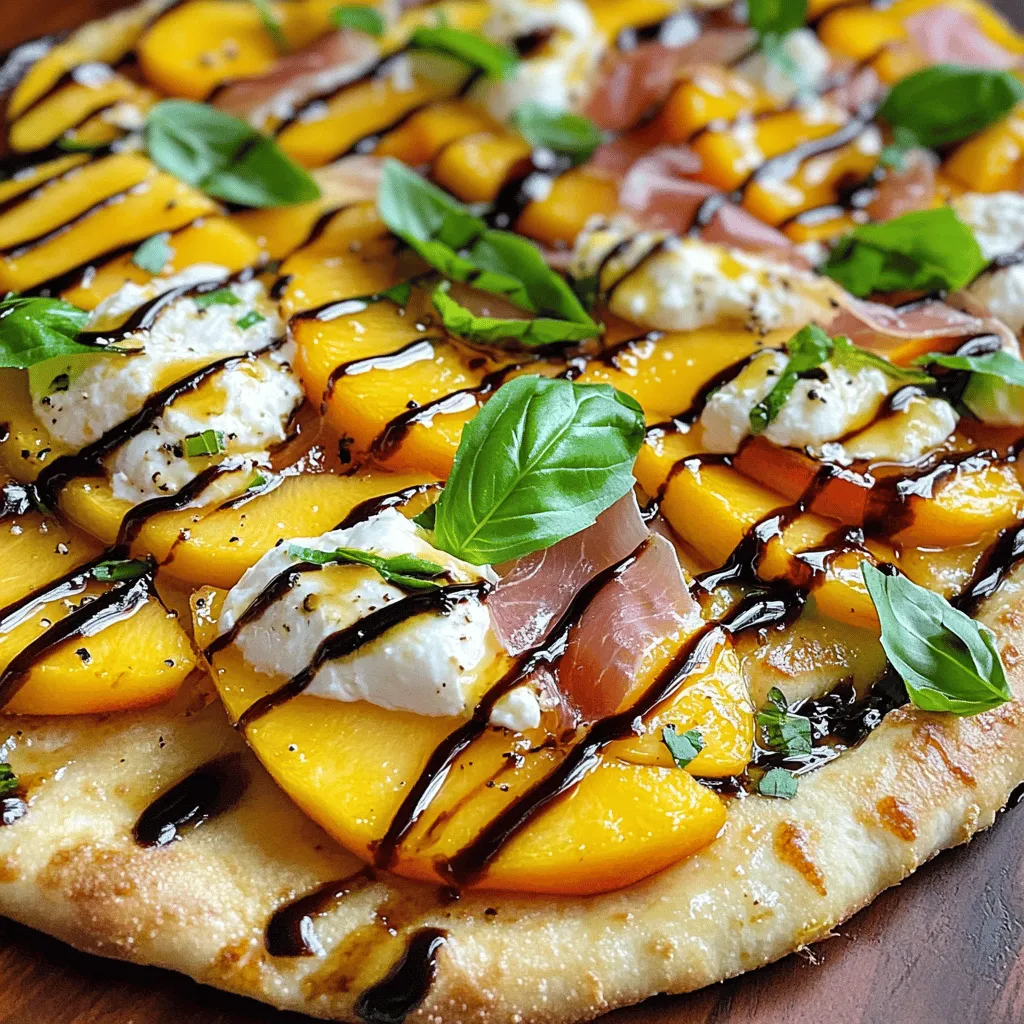
Are you ready to wow your taste buds? The Peach Burrata Prosciutto Flatbread is a delightful mix of sweet and

To make easy chicken enchiladas, you need these main ingredients: - 2 cups cooked chicken, shredded - 1 cup corn (frozen or canned) - 1 can (10 oz) enchilada sauce - 1 cup black beans, drained and rinsed - 1 cup sliced bell peppers (any color) - 1 cup shredded cheese (cheddar or Monterey Jack) - 8 medium flour tortillas - 1 teaspoon cumin - 1 teaspoon garlic powder - 1 tablespoon olive oil - Salt and pepper to taste These ingredients create a tasty filling and a flavorful sauce. You can add these optional garnishes for extra flavor: - Fresh cilantro - Sour cream - Sliced jalapeños - Avocado slices These garnishes not only enhance the taste but also add a nice look. If you have some different ingredients, here are some substitutions: - Use rotisserie chicken for quicker prep. - Swap black beans for pinto beans or chickpeas. - Try corn tortillas if you prefer a gluten-free option. - Use different cheese types like pepper jack for a spicy kick. These swaps still keep the recipe delicious while fitting your needs. For the full recipe, check out the Easy Chicken Enchiladas section. Start by cooking the bell peppers. Heat the olive oil in a skillet over medium heat. Add the sliced bell peppers and sauté for about 3-4 minutes. You want them slightly soft, not mushy. Next, mix your filling in a bowl. Combine the shredded chicken, corn, black beans, cumin, garlic powder, half of the cheese, and some salt and pepper. Stir until everything blends well. This filling gives your enchiladas a tasty punch. Now, it's time to fill the tortillas. Take a tortilla and place a generous scoop of your chicken mixture in the center. Roll it tightly and place it seam-side down in a greased 9x13 inch baking dish. Repeat this step until you fill all eight tortillas. Make sure they fit snugly in the dish. After all the enchiladas are in, pour the remaining enchilada sauce over the top. Cover every tortilla for maximum flavor. Finally, sprinkle the rest of the cheese on top. Preheat your oven to 375°F (190°C). Once the oven is ready, place the baking dish inside. Bake for about 20-25 minutes. You want the cheese to melt and bubble nicely. When they are done, take them out and let them cool for a few minutes. This cooling time helps set the flavors. If you like, garnish with fresh cilantro before serving. Enjoy your easy chicken enchiladas! For the full recipe, check the main article. To make your enchiladas great, follow these simple tips: - Use warm tortillas. This helps them roll better. - Don’t overfill the tortillas. A generous scoop will do. - Bake them until the cheese is bubbly. This adds flavor. - Let them cool a bit before serving. This helps with cutting. You can easily change this recipe to fit your taste. Here are some ideas: - Swap the chicken for beef or turkey. - Add more veggies like zucchini or spinach. - Use different cheeses, like pepper jack for some spice. - Try different sauces, like green enchilada sauce. Serve your enchiladas with tasty sides for a full meal: - Pair them with rice and beans for balance. - Add a fresh salad with lime dressing. - Offer sour cream and guacamole for dipping. - Top with fresh cilantro for a burst of flavor. For the full recipe, check out the section above! {{image_2}} You can easily make vegetarian enchiladas. Replace the chicken with more veggies. Try using mushrooms, zucchini, or spinach. You can also add extra beans for protein. Just make sure to season them well with spices. You will still get a tasty meal! Want to turn up the heat? Add jalapeños or chili powder to your chicken mix. You could also use spicy enchilada sauce. This will bring a nice kick to your dish. Adjust the spice level based on your taste. It’s a fun way to change the flavor! If you prefer a different protein, that works too! Ground beef, turkey, or pork can replace chicken. Just cook the meat before mixing it with the other ingredients. You can still follow the full recipe for the rest. The flavors will still shine through! After enjoying your easy chicken enchiladas, you'll likely have some leftovers. Store them in an airtight container. Keep the enchiladas in the fridge for up to three days. If you have a lot left, consider separating the sauce from the enchiladas. This can help keep them fresh longer. To reheat, preheat your oven to 350°F (175°C). Place the enchiladas in a baking dish. If they seem dry, add a splash of enchilada sauce or water. Cover with foil to keep moisture in. Bake for about 15-20 minutes, or until they're hot. You can also reheat them in the microwave. Heat for one to two minutes, checking often. If you want to save enchiladas for later, freezing is a great option. Assemble the enchiladas as you normally would. Instead of baking them, cover the dish tightly with foil or plastic wrap. Label the container with the date. Freeze for up to three months. When you're ready to eat, thaw them in the fridge overnight. Then bake as instructed in the Full Recipe. Enjoy your meal whenever you like! The best way to shred chicken is to use two forks. Hold one fork steady and use the other to pull apart the meat. If you have a stand mixer, you can also use it. Just place the cooked chicken in the bowl and mix on low speed for a few seconds. This method makes shredding fast and easy. Yes, you can use corn tortillas. They add a nice flavor and texture. Keep in mind that corn tortillas are smaller and may break easier. To prevent this, warm the tortillas before filling them. This helps them stay intact during rolling and baking. To make gluten-free enchiladas, simply use corn tortillas. Check the enchilada sauce label to ensure it is gluten-free. Many brands are naturally gluten-free. You can also make your own sauce at home by blending tomatoes, spices, and broth. Absolutely! You can assemble the enchiladas and store them in the fridge. Cover them tightly with plastic wrap or foil. They can stay fresh for up to two days. When you're ready to bake, just remove the cover and add extra enchilada sauce if needed. Enchiladas pair well with many sides. You can serve them with rice, beans, or a fresh salad. Guacamole and sour cream are great toppings, too. Fresh salsa adds a zesty touch. Feel free to get creative with your sides! To store leftover enchiladas, place them in an airtight container. They will stay fresh in the fridge for about 3 to 4 days. Make sure they cool down before sealing the container. You can also freeze them for up to three months. Just wrap them tightly in plastic wrap and foil. Yes, you can add many ingredients to your enchiladas. Try adding cooked veggies like zucchini or mushrooms. You can also mix in different cheeses for extra flavor. Just keep the balance of ingredients in mind to ensure they roll easily. Cheddar and Monterey Jack are both great choices for enchiladas. They melt well and add a nice flavor. You can also mix different cheeses for a unique taste. Just make sure to use cheese that you enjoy! For the full recipe, check out the Easy Chicken Enchiladas section above. Making easy chicken enchiladas can be simple and fun. We covered the main ingredients, step-by-step instructions, and helpful tips. You can even customize the recipe for your tastes. Try adding spicy or vegetarian options. Remember, leftovers can be stored well for later. Enjoy making these tasty enchiladas with your favorite ingredients. You’ll impress your family and friends in no time. Get cooking and savor every bite!

Easy Chicken Enchiladas Quick and Tasty Recipe

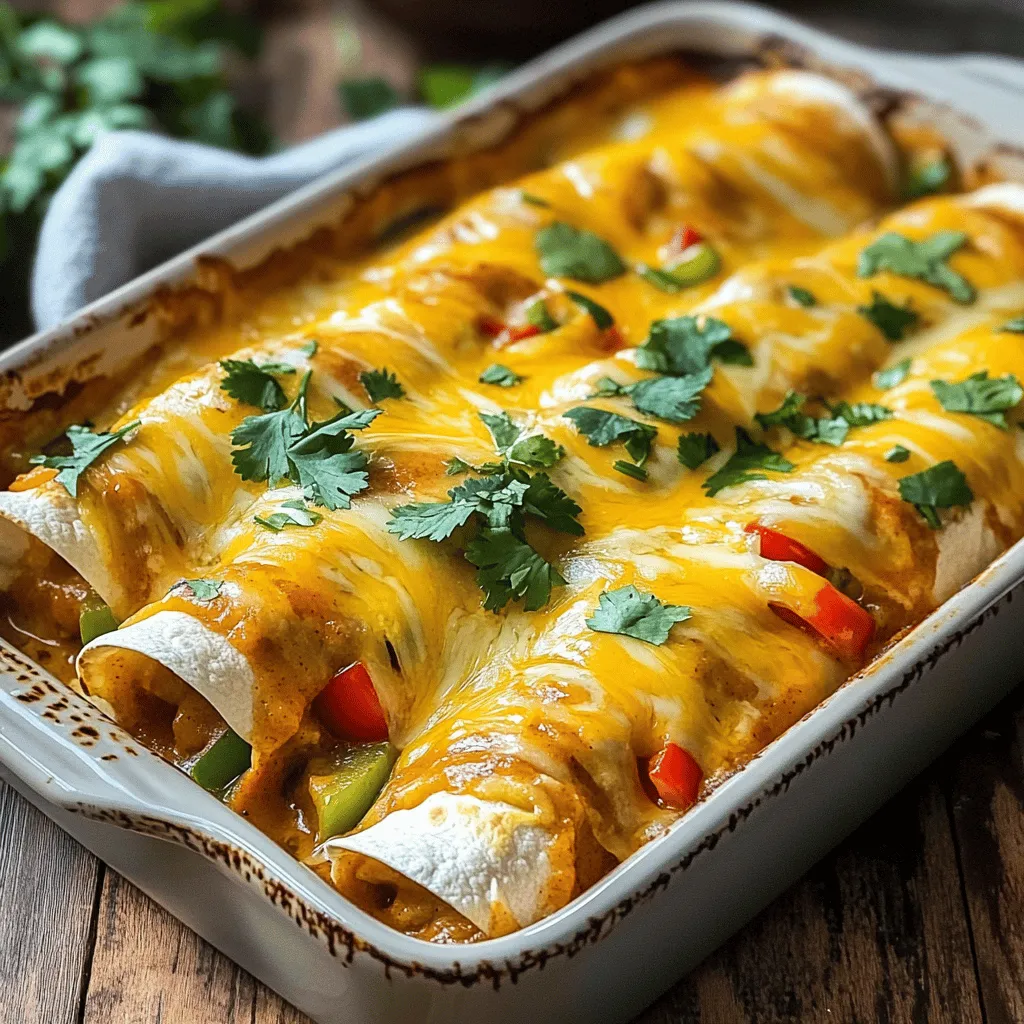
Welcome to your new go-to recipe for Easy Chicken Enchiladas! If you love quick, tasty meals that everyone can enjoy,

- 1 lb ground turkey or beef - 1 medium onion, diced - 2 cloves garlic, minced - 1 can (15 oz) black beans, rinsed and drained - 1 can (15 oz) kidney beans, rinsed and drained - 1 can (15 oz) corn, drained - 1 can (28 oz) diced tomatoes (with juices) - 1 packet taco seasoning (or homemade) - 4 cups chicken or vegetable broth - 1 jalapeño, diced (optional for heat) - 1 cup bell pepper, diced (any color) - 1 tablespoon olive oil - Salt and pepper to taste - Optional toppings: sour cream, avocado, shredded cheese, cilantro, tortilla chips One-Pot Taco Soup needs simple ingredients. You can find most in your pantry. Ground turkey or beef forms the base of your soup. I love using turkey for a lighter taste. Then, diced onion and minced garlic bring great flavor. Beans add protein and fiber. Black beans and kidney beans are fantastic choices. Corn brings sweetness and fun texture. Diced tomatoes make the soup hearty. Don’t forget the taco seasoning, which gives it that classic taste! For broth, use chicken or vegetable. It's your choice! If you want heat, add diced jalapeño. Bell peppers add color and crunch. Olive oil helps sauté the onions and garlic. This soup is not just tasty; it is also packed with nutrition. Each serving has about 300 calories. You get around 20 grams of protein, 10 grams of fat, and 40 grams of carbohydrates. These are rough estimates, but they show how filling this meal is. To make this soup, you need a few tools. Grab a large pot or Dutch oven for cooking. A wooden spoon helps mix everything well. Use measuring cups and spoons for accuracy. Lastly, a knife and chopping board are needed to prepare the ingredients. Remember, using the right tools helps make cooking easier and more fun! For the complete list of ingredients and directions, check the Full Recipe. - Sauté onions and garlic Heat 1 tablespoon of olive oil in a large pot over medium heat. Add 1 medium diced onion and 2 minced garlic cloves. Cook for about 3-4 minutes until the onion looks clear. - Brown the ground turkey or beef Next, add 1 pound of ground turkey or beef. Use a wooden spoon to break it apart. Cook it until it turns brown and is fully cooked, about 5-7 minutes. - Adding ingredients to the pot Stir in 1 packet of taco seasoning. Mix well to coat the meat. Let it cook for about 1-2 minutes to bring out the flavors. Then, add 1 can of black beans, 1 can of kidney beans, 1 can of corn, and 1 can of diced tomatoes (with their juices). If you like heat, add 1 diced jalapeño. Toss in 1 cup of diced bell pepper and pour in 4 cups of chicken or vegetable broth. - Simmering the soup Season with salt and pepper to taste. Stir everything together. Bring the soup to a boil and then lower the heat. Let it simmer for about 20-25 minutes. Stir occasionally to stop it from sticking. - Tips for presenting the soup Serve the soup in large bowls. Top it with dollops of sour cream, slices of avocado, and a sprinkle of shredded cheese. Add fresh cilantro and crispy tortilla chips on the side for a nice crunch. - Recommended serving size and accompaniments This recipe makes about 6 servings. It's perfect for a family meal or a cozy gathering. Pair it with a side salad or some crusty bread for a complete dinner. For the full recipe, check out the details above. To enhance the flavors of your One-Pot Taco Soup, use fresh ingredients. Fresh herbs, like cilantro, and ripe tomatoes can really boost taste. When you cook the onion and garlic, let them soften first. This step adds a nice base flavor. If you want more heat, add more jalapeños or a pinch of cayenne. Common mistakes can ruin your soup. One mistake is not rinsing canned beans well. This can lead to a gritty texture. Another mistake is overcooking the soup. Keep an eye on it while it simmers. Stir often to prevent sticking. Not a fan of beans? You can swap them for lentils or chickpeas. These options still add protein and fiber. If you want a meatless soup, use tofu or tempeh instead of ground meat. They soak up the flavors well. For a vegan version, replace chicken broth with vegetable broth. Many plant-based options are available. You can also skip the meat and add extra beans or veggies for a hearty meal. What to serve alongside your taco soup? A simple side salad can balance the flavors. You might also enjoy tortilla chips for crunch. They add a fun texture to the dish. Perfect side dishes include cornbread or guacamole. Both pair well with the soup's flavors. You can even set up a topping bar. Let everyone choose their favorite toppings, like sour cream, cheese, or avocado. This makes the meal even more fun! For the full recipe, see the section above. {{image_2}} To make spicy taco soup, you can add more heat. Use extra jalapeños or hot sauce. You can also add diced green chilies for layers of flavor. These small changes can make a big difference. Adjust the spice level to fit your taste buds. For creamy taco soup, mix in cream cheese or sour cream. This makes the soup rich and smooth. You may need to add more broth to adjust the consistency. Stir well to combine the cream with the other ingredients. This variation is perfect for those who love a creamy texture. You can adapt this recipe for a slow cooker. Just brown the meat first and then add the other ingredients. Set it to low for 6-8 hours or high for 3-4 hours. This method allows the flavors to blend nicely. It’s great for busy days when you want a warm meal ready when you get home. You can keep your taco soup in the fridge for about 3 to 4 days. Make sure to store it in a sealed container. Glass containers work great for holding heat and keeping flavors fresh. You can also use plastic containers, but ensure they are BPA-free. To freeze the soup, let it cool first. Then, pour it into freezer-safe bags or containers. Leave some space at the top for expansion. It stays good in the freezer for up to 3 months. When ready to eat, thaw it in the fridge overnight. Reheat it on the stove until hot, stirring often. Leftover taco soup can be a fun base for many meals. You can turn it into a taco salad by adding greens, cheese, and chips. Try serving it over rice for a hearty meal. You can even use it as a filling for burritos or quesadillas. For a twist, mix it with pasta for a taco-inspired casserole. Check the Full Recipe for more ideas! You can add heat easily. Here are some tips: - Use more jalapeños. - Add diced green chilies. - Mix in hot sauce. - Sprinkle crushed red pepper flakes. - Try spicy taco seasoning. These options let you control the spice level. Start with a little. You can always add more! Yes, you can! Here are best practices for meal prep: - Cook the soup and cool it down. - Store it in an airtight container. - Keep it in the fridge for up to three days. - You can also freeze it for later. When you reheat, add a splash of broth if needed. This keeps it tasty and fresh. You can get creative with toppings! Here are some options: - Sour cream for creaminess. - Avocado slices for richness. - Shredded cheese for extra flavor. - Fresh cilantro for a burst of freshness. - Crispy tortilla chips for crunch. Mix and match your toppings for fun flavors. Enjoy customizing your soup! For the complete recipe, check the Full Recipe section. This blog post shows you how to make a tasty One-Pot Taco Soup. You learned about the best ingredients and cooking tools to use. I shared step-by-step instructions so you can easily follow along. Plus, I offered tips for making it spicier or creamy. You now know how to store leftovers and use them in new dishes. Enjoy your cooking! Making this soup is quick and fun. You can customize it to fit your taste. Enjoy every spoonful!

One-Pot Taco Soup Hearty and Simple Recipe

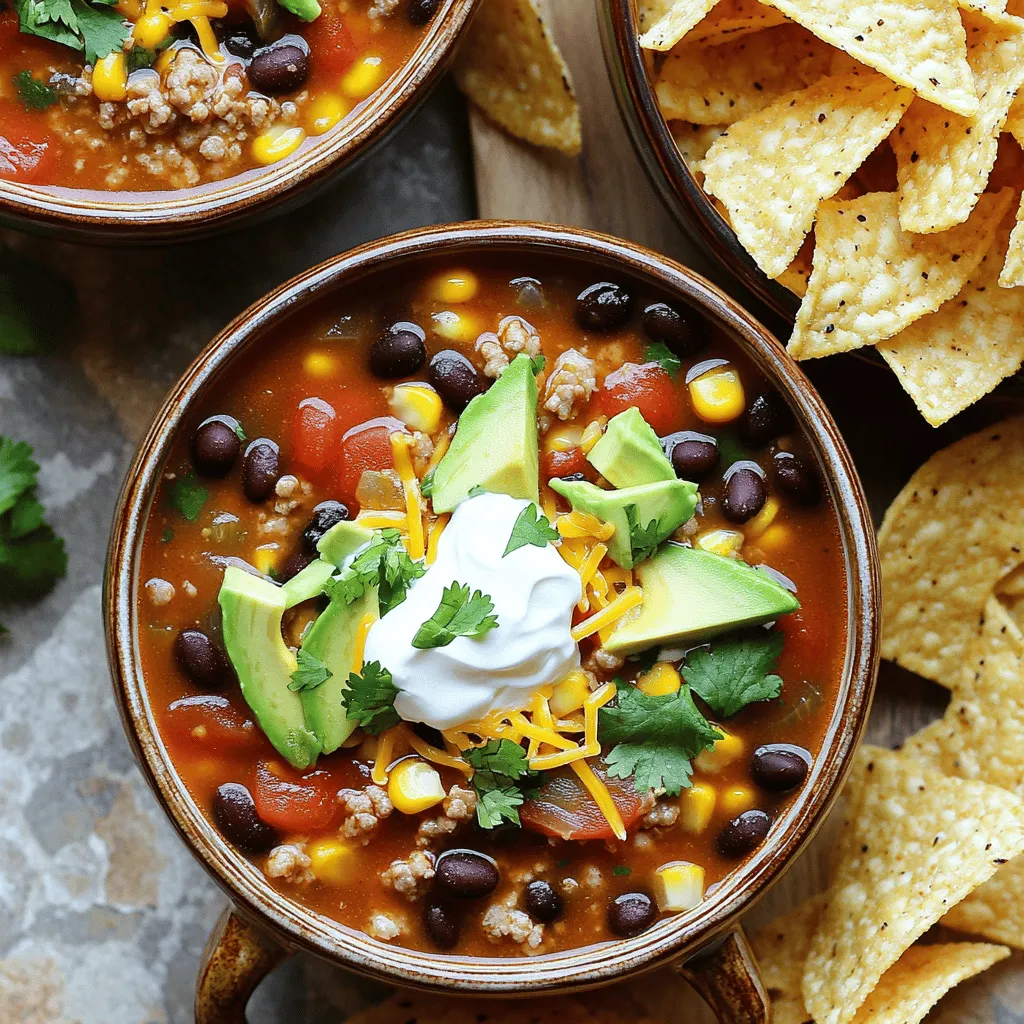
Craving a bold and hearty meal? This One-Pot Taco Soup is your answer! Packed with flavors and simple to make,

To make this easy treat, you need just a few key ingredients: - 24 Oreo cookies (plus extra for topping) - 1/4 cup unsalted butter, melted - 16 oz cream cheese, softened - 1/2 cup granulated sugar - 1 teaspoon vanilla extract - 1 cup heavy whipping cream - 1/2 cup powdered sugar These ingredients work together to create a rich and creamy cheesecake. The Oreos add a delightful crunch and flavor. You can play with the recipe by adding some optional ingredients: - Mint extract for a fresh twist - Cocoa powder for a deeper chocolate flavor - Crushed nuts for added texture These additions can change the flavor and keep things fun. Feel free to experiment! To make your cheesecake, you will need the following tools: - Food processor for crushing Oreos - Mixing bowls for combining ingredients - Electric mixer to whip the cream - 9-inch springform pan for easy removal Having these tools handy will make the process smooth and enjoyable. With the right setup, you will create a stunning no-bake cheesecake. To start, gather your 24 Oreo cookies. Place them in a food processor. Pulse the cookies until they turn into fine crumbs. Next, scoop the crumbs into a mixing bowl. Add 1/4 cup of melted butter and stir well. The crumbs should be well coated. Now, grab a 9-inch springform pan. Press the mixture firmly into the bottom of the pan. Use the back of a measuring cup or your fingers to pack it tightly. This crust needs to be sturdy. Once done, place the pan in the fridge. Let it chill while you make the filling. In a large mixing bowl, add 16 oz of softened cream cheese. Using an electric mixer, beat the cream cheese until smooth. It should be creamy and free of lumps. Then, mix in 1/2 cup of granulated sugar and 1 teaspoon of vanilla extract. Blend until well combined. In another bowl, pour 1 cup of heavy whipping cream and add 1/2 cup of powdered sugar. Beat this mixture until stiff peaks form. Now, gently fold the whipped cream into the cream cheese mixture. Be careful not to deflate the whipped cream. For added texture, fold in 10 crushed Oreos. This adds fun bits of chocolate. Now, it’s time to assemble your cheesecake. Pour the cream cheese filling over the prepared crust in the springform pan. Use a spatula to smooth the top. Once it looks good, cover the cheesecake with plastic wrap. Place it in the fridge for at least 4 hours, or better yet, overnight. This waiting time lets the cheesecake set perfectly. When you're ready to serve, run a knife around the edge of the pan. This makes it easier to release the cheesecake. Top it with crushed Oreos for a nice finish. Enjoy your delicious no-bake Oreo cheesecake! When making your no-bake Oreo cheesecake, avoid overmixing your filling. This can cause a runny texture. Make sure to fold the whipped cream gently. Also, don't skip chilling time. If you do, the cheesecake may not set properly. Lastly, use room temperature cream cheese. Cold cream cheese can lead to lumps. To get great whipped cream, start with cold tools. Chill your mixing bowl and beaters before you begin. Use heavy whipping cream for the best results. Beat the cream until stiff peaks form. This means the cream holds its shape well. Don't overbeat, or you'll make butter! Fold the whipped cream into your filling softly to keep it airy. To serve your cheesecake beautifully, remove it from the springform pan carefully. Use a hot knife to slice clean edges. You can decorate the top with crushed Oreos or even chocolate shavings. Adding a dollop of whipped cream can elevate the look. A sprinkle of cocoa powder can also add a nice touch. For an extra treat, serve with fresh berries on the side. {{image_2}} You can easily change the flavor of your cheesecake. For a mint version, add 1 teaspoon of mint extract to the filling. Mix in crushed mint Oreos for extra fun. If you love pumpkin, replace some cream cheese with pumpkin puree. Add 1 teaspoon of pumpkin spice for a cozy taste. These flavors give your cheesecake a new twist. Adding fruit can make your cheesecake even better. Fresh berries, like strawberries or raspberries, work great. Fold in 1 cup of chopped fruit into the cream cheese mix. You can also add crushed cookies or candy bars for more crunch. Try mixing in mini chocolate chips for a sweet surprise. These add-ins create fun textures and tastes. If you need gluten-free options, use gluten-free Oreos for the crust. For a dairy-free version, swap cream cheese with vegan cream cheese. Coconut cream makes a great substitute for heavy cream. Just whip it like you would with dairy cream. These changes let anyone enjoy this tasty treat without worry. Check out the Full Recipe for more details on making this delightful dessert. To keep your No-Bake Oreo Cheesecake fresh, cover it well. Use plastic wrap or a lid to seal it tightly. This prevents air from getting in and keeps moisture out. I recommend storing it in the refrigerator. It helps maintain the creamy texture and flavor. Your cheesecake will stay good in the fridge for about 3 to 5 days. This is if it remains properly stored. After that, it may lose its freshness and taste a bit off. Trust me; you want to enjoy every bite of this treat while it's still at its best. If you want to save your cheesecake for later, you can freeze it! First, cut it into slices. Wrap each slice in plastic wrap, then place them in an airtight container. This protects the cheesecake from freezer burn. It can last up to 2 months in the freezer. When you're ready to eat, let it thaw in the fridge overnight before serving. Enjoy this sweet treat again, even after some time! Don't forget to check the Full Recipe for more details. Yes, you can use different cookies! For a unique twist, try using graham crackers or chocolate cookies. Each type gives a different flavor and texture. Just crush them the same way you do with Oreos. It’s fun to play with flavors. Experiment and find what you like best! You’ll know the cheesecake is set when it feels firm to the touch. It should not jiggle much in the center. Chill it for at least four hours. For best results, let it sit overnight. This helps the cheesecake to fully firm up and develop flavor. Absolutely! This cheesecake is perfect for making ahead of time. Prepare it a day or two before your event. Just store it in the fridge. This way, you save time on the day you serve it. Plus, the flavors will be even better after chilling! For the full recipe, check out the earlier sections. You learned how to make a no-bake Oreo cheesecake. We discussed all the key ingredients, tools, and steps. I shared tips to avoid mistakes and make it look great. You can even try fun flavor twists and learn how to store leftovers. Now, I hope you feel ready to create this delicious treat. With these steps, you can't go wrong. Enjoy making and sharing your cheesecake with friends and family!

No-Bake Oreo Cheesecake Easy Dessert Treat Idea

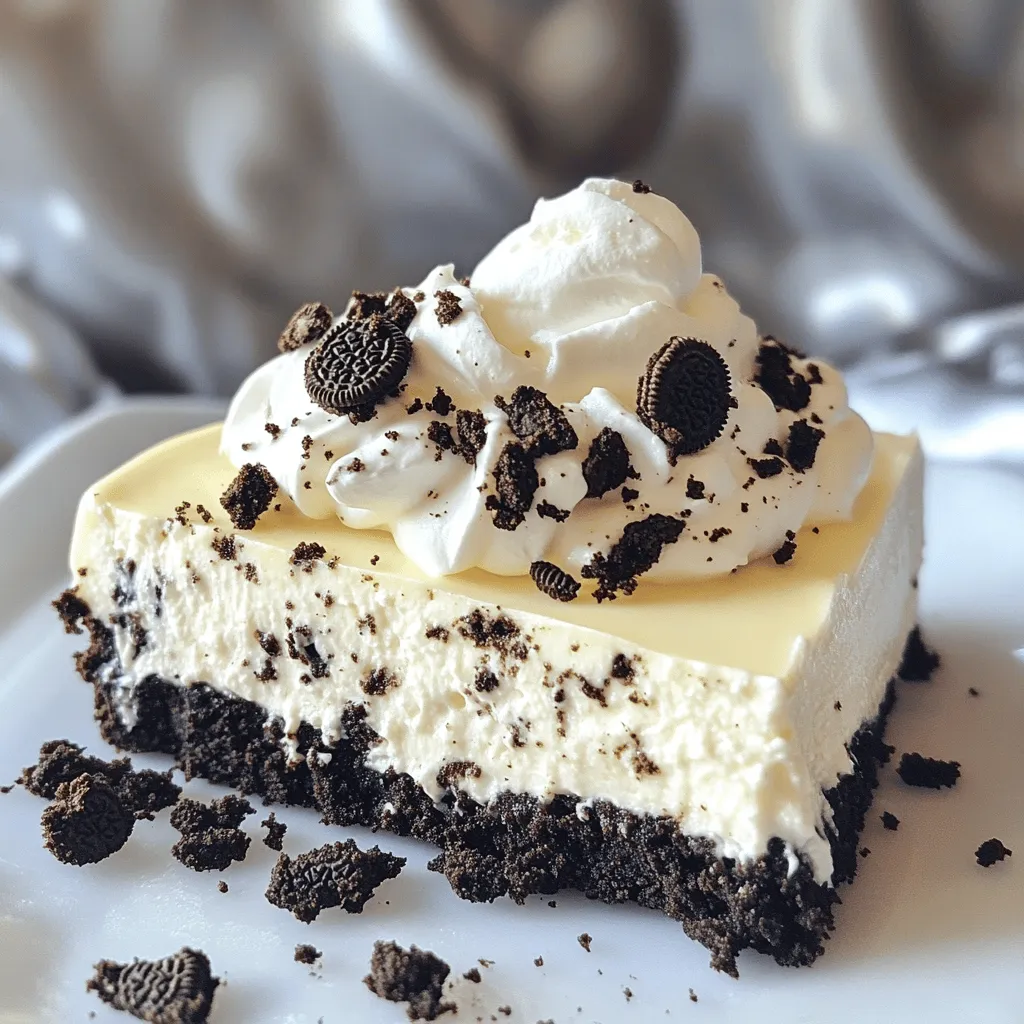
Are you craving a sweet treat that requires no oven? I’ve got just the recipe for you: No-Bake Oreo Cheesecake!

Older posts
Newer posts
← Previous Page1 Page2 Page3 … Page67 Next →

dsad

© 2025 Southern Dishes • Built with GeneratePress

Our Policies

  • Copyright Policy
  • Cookie Policy
  • GDPR Policy
  • Privacy Policy
  • Disclaimer
  • Terms Of Use

More Information

  • Home
  • About
  • Contact
  • Appetizers
  • Dessert
  • Dinner
  • Drinks
©2025, Southern Dishes About Back To Top